Deploy Cisco AMP Private Cloud on Cisco HyperFlex Systems
Available Languages
Bias-Free Language
The documentation set for this product strives to use bias-free language. For the purposes of this documentation set, bias-free is defined as language that does not imply discrimination based on age, disability, gender, racial identity, ethnic identity, sexual orientation, socioeconomic status, and intersectionality. Exceptions may be present in the documentation due to language that is hardcoded in the user interfaces of the product software, language used based on RFP documentation, or language that is used by a referenced third-party product. Learn more about how Cisco is using Inclusive Language.
Today the IT industry is going through a tremendous revolution. While evolving technologies such as IoT, image processing, AI/ML, autonomously driven vehicles, and intelligent manufacturing are growing rapidly, not only are customers transitioning their software and applications, they are also transforming the hardware layer for the underlying distributed infrastructure. Hyperconverged infrastructures are fast-to-deploy, simple-to-manage, and increasingly agile, thereby reducing the operational costs of daily IT operations, and are becoming a standardized choice for the enterprise and edge data centers.
Cisco HyperFlex™ and Cisco HyperFlex Edge systems are proven industry-leading hyperconverged solutions, optimized choices for many applications in a virtualized environment. Cisco HyperFlex systems combine converged computing and networking capabilities provided by the Cisco Unified Computing System™ (Cisco UCS®) with next-generation Cisco HyperFlex data platform storage software to deliver an innovative hyperconverged platform with all the computing resources, network connectivity, storage, and a hypervisor platform needed to run an entire virtual environment, all managed as a single, uniform system. The Cisco HyperFlex system delivers a cost-effective solution with simplified deployment, ease of day-to-day management, and many enterprise-class features. A HyperFlex™ powered data center can host many applications, services, and workloads, including virtual desktops that you can access from across the enterprise, in campus, WAN, and other remote locations. The large number of connected devices in enterprises today, accessing applications in the data center and exchanging content and data, also makes the workloads hosted in the data center more vulnerable to cyberattacks and other security threats. A robust security strategy to protect endpoints and data from advanced threats, therefore, becomes a critical factor in any IT architecture, including hyperconverged data center infrastructure.
The Cisco SecureX™ solution is an integrated and open security platform that integrates the Cisco® security portfolio with your IT infrastructure. It provides greater simplicity and visibility and maximizes operational efficiency with automated workflows. In addition, it unifies your entire security ecosystem in one location, including endpoint security to further enrich threat detection, investigation, and response. A core part of the Cisco SecureX platform, Cisco Advanced Malware Protection (AMP) for Endpoints, is deployed as a preventative and investigative tool supporting detection and/or response functions for Windows, MacOS, Linux, Android, and iOS devices. With the AMP Unity feature, you can make these functions available on other AMP-enabled devices such as firewalls, web gateways, and email proxies. The connectors installed in these end devices use metadata that it then sends to the Cisco AMP cloud for further analysis. For organizations with rigorous privacy requirements, a private cloud option is available for monitoring and protecting the AMP-enabled devices.
This document presents a validated solution for deploying a Cisco AMP Private Cloud virtual appliance (AMPv) on a Cisco HyperFlex system. It also provides guidance about the hardware and software requirements, procedures for installation and configuration of a Cisco HyperFlex Storage cluster, and instructions about how to deploy AMPv on Cisco HyperFlex hyperconverged infrastructure.
Security is an integrated part of the Cisco HyperFlex architecture. It comes from following the Cisco Security Development Lifecycle (Cisco SDL), which is a structured methodology for security development. It uses the Cisco security infrastructure to conduct regular security audits and to track exposure from common components and provide regular fixes. Cisco HyperFlex systems are built on highly secured Cisco UCS hardware, which has many security features such as Secure Boot, Hardware Root of Trust, Firmware Authenticity, and Secure Unique Device Identifier (SUDI) for anti-counterfeit, etc. It also has a set of features that address the key requirements for certain security-conscious industries. For example, you can use data-at-rest encryption to achieve compliance for industry regulations, and Cisco HyperFlex uses a policy-based approach to ensure uniform and secure key management and deployment across the whole cluster. Refer to this document to learn more about the security advantages on Cisco HyperFlex systems.
In addition, by using the products from the Cisco industry-leading security portfolio, Cisco HyperFlex continues to deliver proven solutions for protecting the data and applications running in data centers. A core part of the Cisco security-integrated platform, Cisco AMP is a cloud-managed endpoint security solution that provides the visibility and control to prevent cyberattacks. It rapidly detects, contains, and remediates advanced threats before damage can be done, and without affecting operational efficiency. It allows you to investigate and identify multiple files with context from integrations across security products. It provides detailed information about affected endpoints and devices. Additionally, it allows you to block files at endpoints and AMP-capable edge devices and immediately quarantine affected endpoints with the AMP Host Isolation response feature. Cisco AMP cloud, hosted in the public cloud, usually provides all of these protection capabilities . However, if you require an on-premises solution, the Cisco AMP Private Cloud appliance provides an enterprise private cloud solution with the proximate features. The appliance addresses privacy requirements without compromising the ability to take advantage of the power of collective security intelligence and provides network and endpoint protection across edge and enterprises data centers. It delivers threat protection using file reputation, malware analysis, continuous monitoring of all file activity, and security intelligence stored locally.
You can deploy Cisco AMP Private Cloud on both the virtual and physical appliances. The virtual appliance deployment option lets you choose the underlying hardware. This choice is important because the efficiency of the infrastructure affects the efficiency of the application and the speed of data collection and processing, storage performance, and resource management. Cisco HyperFlex systems are an optimized choice for a Cisco AMP Private Cloud virtual deployment in a VMware ESXi virtual environment.
This document describes how to build a Cisco AMP Private Cloud on a Cisco HyperFlex cluster. It provides guidance about the requirements and instructions about how to deploy the Cisco AMP virtual appliance on Cisco HyperFlex hyperconverged infrastructure.
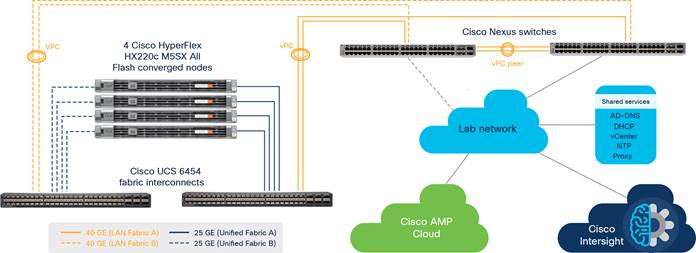
Figure 1 provides an overview of the solution.
High-level solution overview
Cisco HyperFlex and HyperFlex Edge systems
Cisco HyperFlex systems are built on the Cisco UCS platform. You can deploy these highly flexible and efficient systems quickly, reducing your risk. A main goal of the systems is simplicity of deployment and operation. They provide a hyperconverged platform that allows you to start small and grow in increments in the future and enable the support for any application of any scale. Many enterprise data centers have deployed these systems and adapted them for the small edge environments.
The Cisco HyperFlex system delivers a new generation of flexible, scalable, enterprise-class hyperconverged solutions with many enterprise-class features, such as:
● A fully distributed log-structured file system that supports thin provisioning
● High performance and low latency from the flash-friendly architecture
● Inline data optimization with deduplication and compression
● Fast and space-efficient clones through metadata operations
● The flexibility to scale out computing and storage resources separately
● Data-at-rest encryption using hardware-based self-encrypting disks (SEDs)
● Non-volatile memory express (NVMe)–based solid-state disk (SSD) support
● Native replication of virtual machine snapshots
● Cloud-based smart management
combines software-defined computing in the form of Cisco HyperFlex HX-Series nodes, software-defined storage with the powerful Cisco HX Data Platform, and software-defined networking with the Cisco UCS fabric that integrates seamlessly with Cisco Application Centric Infrastructure (Cisco ACI®). These technologies together offer a single point of connectivity and management and deliver a validated and adaptable cluster with a unified pool of resources that you can quickly deploy, scale, and manage to efficiently power your applications and your business. The system provides the following benefits:
● Simplicity: The solution is designed to be deployed and managed easily and quickly through familiar tools and methods. No separate management console is required for the Cisco HyperFlex solution.
● Centralized hardware management: The cluster hardware is managed consistently by service profiles in Cisco UCS Manager, which also provides a single console for solution management, including firmware management. A plug-in to VMware vCenter manages Cisco HyperFlex HX Data Platform clusters.
● High availability: Component redundancy is built into most levels at the node. Cluster-level tolerance of node, network, and fabric interconnect failures is implemented as well.
● Enterprise-class storage features: Complementing the other management efficiencies are features such as thin provisioning, data deduplication, compression, cloning, and snapshots to address concerns related to overprovisioning of storage.
● Flexibility with a “pay-as-you-grow” model: You can purchase the exact amount of computing and storage you need and expand one node at a time up to the supported cluster node limit.
● Agility to support different workloads: Support for both hybrid and all-flash models allows you to choose the right platform configuration for capacity-sensitive applications or performance-sensitive applications according to budget requirements.
A standard Cisco HyperFlex system is composed of the following components:
● One pair of Cisco UCS fabric interconnects
● Cisco HyperFlex HX-Series HX220c or HX240c rack-mount servers
● Cisco HyperFlex HX Data Platform software
● VMware vSphere ESXi hypervisor
● VMware vCenter Server (supplied by the end user)
A standard Cisco HyperFlex cluster requires a minimum of three HX-Series nodes. Data is replicated across at least two of these nodes, and a third node is required for continuous operation in case of a single-node failure. The HX-Series nodes combine the CPU and RAM resources for hosting guest virtual machines with a shared pool of the physical storage resources used by the HX Data Platform software. HX-Series hybrid nodes use a combination of SSDs for caching and hard-disk drives (HDDs) for the capacity layer. HX-Series all-flash nodes use SSD or NVMe storage for the caching layer and SSDs for the capacity layer.
The Cisco HyperFlex Edge system is a new type of Cisco HyperFlex system that is optimized for remote sites, branch offices, and edge environments. As a smaller form factor of the Cisco hyperconverged solution, the Cisco HyperFlex Edge system offers the same power as the Cisco HyperFlex system without the need for connecting to Cisco UCS fabric interconnects. It supports a configuration of two, three, or four HyperFlex converged nodes (Edge does not support compute-only nodes) and allows you to scale up capacity by hot-adding additional capacity drives to the nodes.
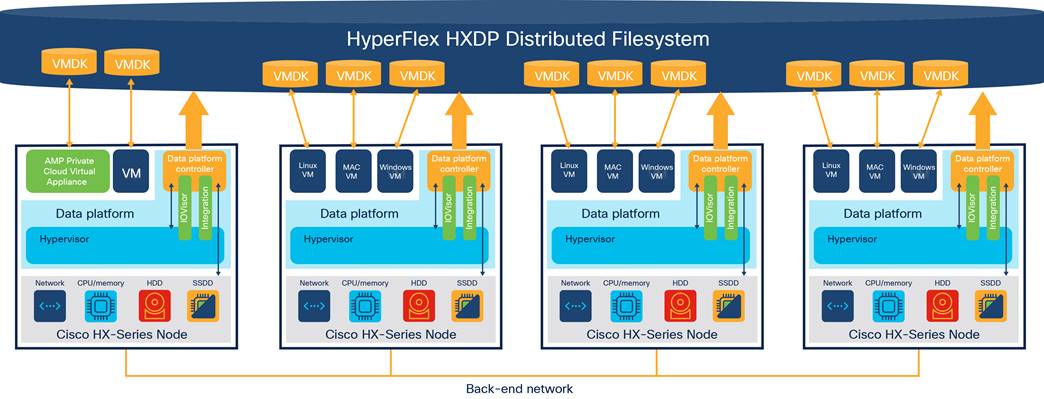
The Cisco HyperFlex HX Data platform is a high-performance, distributed file system with a wide range of enterprise-class data management services. Its innovations redefine distributed storage technology, exceeding the boundaries of first-generation hyperconverged infrastructures. The data platform simplifies operations and helps ensure data availability with many enterprise-class storage features.
An HX Data platform controller resides on each node and implements the Cisco HyperFlex HX Distributed File system. The storage controller runs in user space within a virtual machine, intercepting and handling all input/output (I/O) requests from guest virtual machines. The storage controller virtual machine uses the VMDirectPath I/O feature to provide Peripheral Component Interconnect (PCI) pass-through control of the serial-attached SCSI (SAS) disk controller of the physical server. This approach gives the controller virtual machine full control of the physical disk resources. The controller integrates the data platform into VMware software through three preinstalled VMware ESXi vSphere Installation Bundles (VIBs): the VMware API for Array Integration (VAAI), a customized IOvisor agent that acts as a stateless Network File System (NFS) proxy, and a customized stHypervisorSvc agent for Cisco HyperFlex data protection and virtual machine replication.
The HX Data platform controllers handle all read and write requests from the guest virtual machines to the virtual machine disks (VMDKs) stored in the distributed data stores in the cluster. The data platform distributes the data across multiple nodes of the cluster and across multiple capacity disks in each node according to the replication-level policy selected during cluster setup. The replication-level policy is defined by the Replication Factor (RF) parameter. When RF = 3, a total of three copies of the blocks are written and distributed to separate locations for every I/O write committed to the storage layer; when RF = 2, a total of two copies of the blocks are written and distributed.
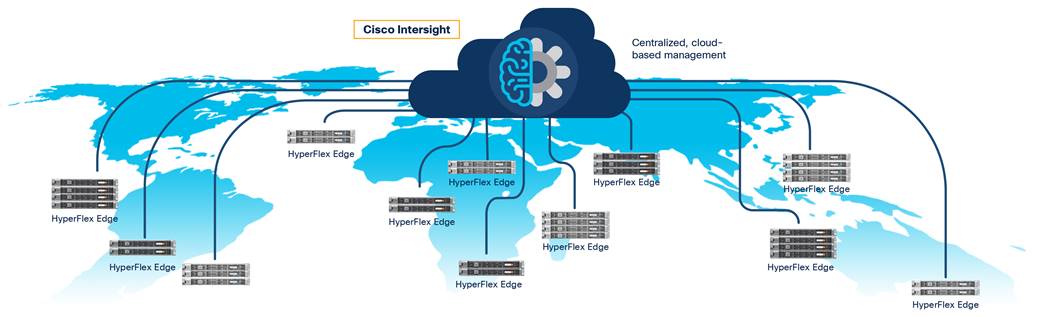
You can administer the HX Data platform through a VMware vSphere web client plug-in or through the HTML5-based native Cisco HyperFlex Connect management tool. In addition, you can manage Cisco HyperFlex systems remotely with the Cisco Intersight™ cloud-based management platform. You can deploy and manage the Cisco Intersight platform from the cloud, providing a low-cost, easy-to-deploy, remote-management feature set for Cisco HyperFlex systems for your IT environments without requiring experienced technicians at the deployment site.
You can install a Cisco HyperFlex system or Cisco HyperFlex Edge system using one of the following:
● The on-premises Cisco HyperFlex Installer appliance
● Cisco Intersight from the cloud
The on-premises Cisco HyperFlex Installer appliance is available as an OVA file that you can download from the Cisco website. After the HX Installer virtual machine is installed in your existing ESXi environment, you can access it through a web browser on the local computer by navigating to the IP address of the HX Installer virtual machine. It guides you through the process of setting up your cluster. Some specific workflows to support the installation for Standard clusters, Edge clusters, or Stretched clusters are available. The HyperFlex Installer assigns IP addresses to the HX-Series servers that come from the factory with ESXi hypervisor software preinstalled. The installer deploys the HyperFlex Controller virtual machine and software on the nodes, add the nodes to the vCenter cluster, and then finally creates the HyperFlex cluster and distributed filesystem. You can complete all of these processes with a single workflow from the HyperFlex Installer webpage.
You also can deploy HyperFlex clusters rapidly with the Cisco Intersight solution, where the HyperFlex installer sits in the cloud. It constructs a preconfiguration definition of your cluster, called a HyperFlex Cluster Profile. This definition is a logical representation of the HX nodes in your HyperFlex cluster. Each HyperFlex node provisioned in Cisco Intersight is specified in a HyperFlex Cluster Profile.
Cisco Intersight Cloud Management platform
Cloud-based management platforms provide unified access to applications and infrastructure monitoring, configuration, and orchestration, thereby reducing the complexity of IT management by simplifying and unifying the deployment and management of many devices. Cisco Intersight is Cisco’s new system management platform for Cisco UCS servers and Cisco HyperFlex systems that delivers intuitive computing through cloud-powered intelligence. This cloud-based platform offers a centralized management that enables your IT organization to analyze, simplify, and automate your environment in ways that were not possible with traditional tools. It is designed to help your IT management and operations achieve a higher level of automation, simplicity, and operational efficiency, empowering your organization to achieve significant savings in Total Cost of Ownership (TCO) and to deliver applications faster, so they can support new business initiatives.
You can access the Cisco Intersight platform at https://intersight.com/. This cloud management platform simplifies the installation, monitoring, troubleshooting, upgrade, and support for your infrastructure with the following benefits:
● Cloud-based management: The ability to manage the Cisco UCS and HyperFlex platforms from the cloud offers you the speed, simplicity, and ease of scaling your company’s infrastructure whether in the data centers or remote and branch-office locations.
● Automation: The unified application programming interface (API) in Cisco UCS and Cisco HyperFlex systems enables policy-driven configuration and management of the infrastructure, and it makes Cisco Intersight itself and the devices connected to it fully programmable and DevOps-friendly.
● Analytics and telemetry: Cisco Intersight monitors the health and relationships of all the physical and virtual infrastructure components. It also collects telemetry and configuration information for developing the intelligence of the platform in accordance with Cisco information security requirements.
● Connected Cisco Technical Assistance Center (TAC): Solid integration with Cisco TAC enables more efficient and proactive technical support. The Cisco Intersight platform expedites sending files to speed troubleshooting, thereby providing enhanced operations automation.
● Recommendation engine: Driven by analytics and machine learning, the Cisco Intersight Recommendation Engine provides actionable intelligence for IT operations management from the daily increasing knowledge base and practical insights learned in the entire system.
● Management as a service: Cisco Intersight provides management as a service and is designed to scale infinitely and implement easily. It relieves you of the burden of maintaining systems management software and hardware.
The Cisco Intersight solution supports monitoring and managing Cisco HyperFlex clusters. With the Cisco HX-Series rack-mount servers connected through the network, the platform provides comprehensive lifecycle management for the HyperFlex systems, including remote cloud-based installation through retirement. You can upgrade the Cisco Intersight website and framework with new and enhanced feature sets independently of the products that are managed, meaning that many new features and capabilities can come with no downtime or upgrades you have to perform. This innovative combination of embedded and online technologies will result in a complete cloud-based management solution that can care for the Cisco HyperFlex platform (Figure 2).
Cisco Intersight Managed HyperFlex systems
The Cisco Intersight virtual appliance delivers the management features of the Cisco Intersight SaaS platform for Cisco UCS and HyperFlex in an on-premises IT environment with high security restrictions. The virtual appliance form factor satisfies additional data locality, security, or compliance requirements that are not completely met by connecting directly to intersight.com in the cloud. Deployment of the Cisco Intersight virtual appliance has two modes. Cisco Intersight Connected Virtual Appliance deployment requires a connection back to Cisco and Intersight services to get updates and access required services for all functions of intersight.com. You can redirect communication back to Cisco through a proxy server if direct connectivity is not available or allowed by policy. Cisco Intersight Private Virtual Appliance deployment is intended for an environment where you operate data centers in a disconnected (air gap) mode. You can deploy Cisco Intersight Virtual Appliance from a VMware OVA that you can download from Cisco.com. Then you can deploy the solution as a virtual machine in your existing environment. It uses a subscription-based license delivered through Cisco Smart Licensing.
Cisco Advanced Malware Protection Private Cloud
Cyber security threats are growing significantly in frequency and complexity in today’s new world. With more and more devices connected and more sophisticated applications deployed, this growth also introduces new exploitable weaknesses. The security solutions to protect your IT environment become more and more difficult to address, and the impact on the business might be very costly. The Cisco Security portfolio consists of a broad set of technologies that help ensure security across the network, cloud, email, applications, and endpoints. For example, Cisco Meraki™ integration safeguards your network with centrally cloud-managed security and Software-Defined WAN (SD-WAN), Cisco Tetration Analytics™ sensors provide advanced workload protection with application visibility and micro-segmentation, Cisco Duo verifies the identity of users and inspects the devices trying to access your applications, the Cisco Umbrella® security solution shields you from unsafe Internet destinations whether they are on or off the network, and more. All products function as a team under a single platform: Cisco SecureX, which provides seamless interoperability with your security infrastructure, including third-party technologies. The Cisco SecureX platform connects the breadth of the Cisco integrated security portfolio and your infrastructure for a consistent experience that unifies visibility, enables automation, and strengthens your security across your whole IT infrastructure. By connecting technologies in an integrated platform, the Cisco SecureX platform delivers measurable insights, desirable outcomes, and exceptional cross-team collaboration.
As a key integration in the Cisco SecureX platform, Cisco AMP consolidates prevention, detection, and response capabilities in a single solution, taking advantage of the power of cloud-based analytics. Cisco AMP for Endpoints can protect your Windows, Mac, Linux, Android, and iOS devices. With the AMP Unity feature, you can offer these functions on your other AMP-enabled devices such as firewalls, web gateways, and email proxies. AMP prevents attacks by providing the latest global threat intelligence to strengthen defenses, a built-in antivirus engine to detect and block attacks at the point of entry, built-in sandboxing technology (ThreatGRID® technology) to analyze unknown files, and proactive protection capabilities that close attack pathways and minimize vulnerabilities. But if malware evades these prevention measures and gets inside, AMP continuously monitors and records all file activity to quickly detect malicious behavior, retrospectively alert security teams, and then provide deep visibility and a detailed recorded history of the malware behavior over time—where it came from, where it’s been, and what it’s doing. It can then automatically contain and remediate the threat.
Cisco AMP is normally integrated with Cisco ThreatGRID technology to provide intelligent threat prevention. ThreatGRID technology is a unified malware analysis and threat intelligence platform (Figure 3). It performs automated static and dynamic analysis, producing human-readable behavioral indicators for each file submitted. The ThreatGRID global scalability promotes context-rich information that you can be use directly or through content-rich threat intelligence feeds. The integration of the ThreatGRID sandboxing technology and advanced malware analysis capabilities into AMP provides more than 700 unique behavioral indicators analyzing the actions of a file, easy-to-understand threat scores, and billions of malware artifacts at your disposal for unmatched scale and coverage from global threats. You can deploy ThreatGRID technology as a cloud software as a service (SaaS) platform or on-premises physical appliance. The ThreatGRID appliance is equipped with a large amount of hardware and software resources and cannot be deployed as a virtual appliance. The integration option for Cisco AMP Private Cloud with Cisco ThreatGRID appliance is supported; you can achieve malicious marking for Cisco AMP Private Cloud only by integrating with the ThreatGRID appliance. The steps for deploying Cisco ThreatGRID appliance and integrating it on AMP are out of the scope and not described in this document. You can find more information at Cisco On-Premises Threat Grid.
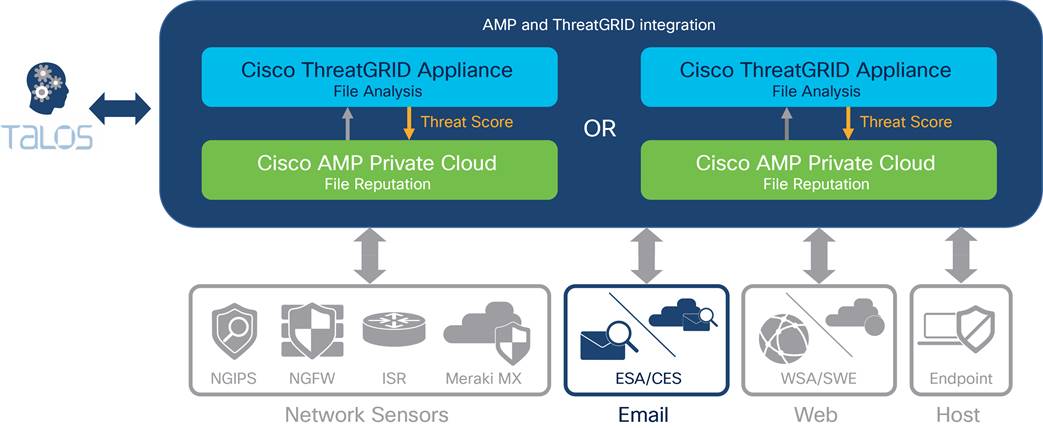
Cisco AMP and ThreatGRID architecture
Cisco AMP provides many benefits, including:
● More effective, efficient, and pervasive protection that goes beyond prevention: It analyzes files and traffic continuously. This capability helps enable retrospective security. You can look back in time and trace processes, file activities, and communications to understand the full extent of an infection, establish root causes, and perform remediation.
● Monitoring that enables unmatched visibility: It introduces a new level of intelligence, linking and correlating various forms of retrospection into a lineage of activity available for analysis in real time. It can then look for patterns of malicious behavior from an individual endpoint or across the environment of endpoints.
● Advanced analysis that looks at behaviors over time: It provides automation through advanced behavioral detection capabilities that deliver a prioritized and collated view of top areas of compromise and risk.
● Investigation that turns the hunted into the hunter: It shifts activity from looking for facts and clues as part of an investigation to a focused hunt for breaches based on actual events such as malware detections and behavioral indications of compromise (IoCs).
● Containment that is truly simple: It provides visibility into the chain of events and context that complements its dashboards and trajectory views. AMP lets you target specific applications, files, malware, and other root causes. Breaking the attack chain is not only quick but also easy.
● Dashboards that are actionable and contextual: Reports are not limited to event enumeration and aggregation. Its actionable dashboards allow for streamlined management and faster response.
● Integrated platforms that work better together: You can fully integrate Cisco AMP for Endpoints, Cisco AMP for Networks, and other AMP deployments together.
Three options currently are available for deployment of Cisco AMP platform:
● Cisco AMP Public Cloud
● Cisco AMP Private Cloud physical appliance
● Cisco AMP Private Cloud virtual appliance (AMPv)
The AMP Private Cloud physical appliance supports both cloud proxy deployment mode and air-gap deployment mode, whereas the AMP Private Cloud virtual appliance supports only cloud proxy deployment mode. In the cloud proxy mode, all traffic from endpoint connectors goes to the private cloud, but an Internet connection is needed to complete disposition lookups. Also, you can retrieve content and software updates automatically from the AMP Public Cloud directly to the AMP Private Cloud virtual appliance. The communication between Cisco AMPv and the public cloud is conducted using a propriety protocol tunneled over Secure Sockets Layer (SSL), and only SHA-256 hashes are sent to the AMP Public Cloud. All the endpoint connectors use metadata for analysis. Before the deployment, consult with your IT administrator to determine which firewall ports need to be opened to allow the connectivity.
The deployment of Cisco AMP Private Cloud virtual appliance requires two network interfaces, one for the administration network and the other for the production network. You can align them with the network design in the HyperFlex system. The Cisco HyperFlex system has communication pathways that fall into four defined network zones:
● Management zone
● Storage zone
● VMotion zone
● Virtual Machine zone
For the network configuration for Cisco AMP Private Cloud virtual appliance, the production network sits in the virtual machine zone. You can place the administration network in the management zone.
Figure 4 provides a logical view of the network design of the solution.
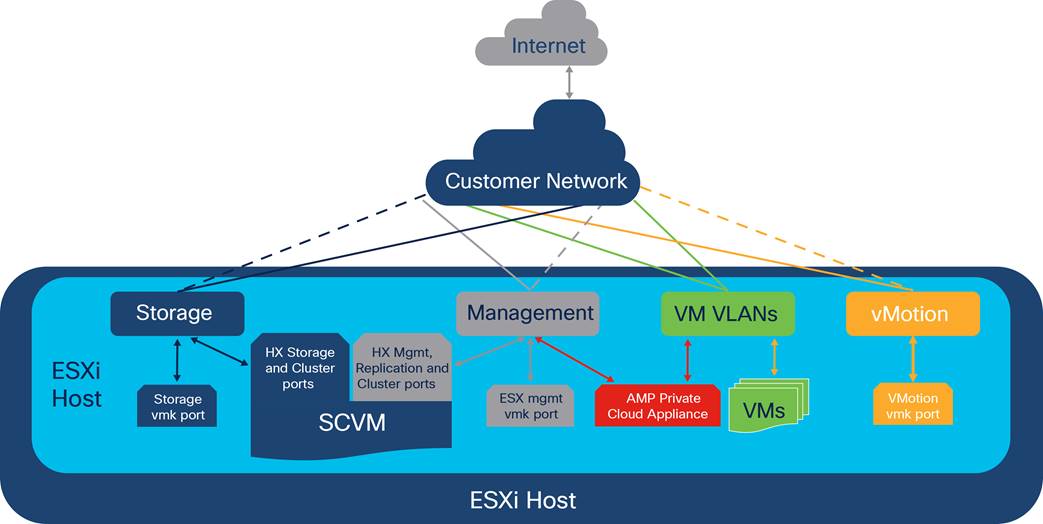
Solution network design
Table 1 shows the mapping applied for this document between the AMP Private Cloud virtual appliance network and the Cisco HyperFlex network.
Table 1. Mapping between Cisco AMPv and Cisco HyperFlex networks
| AMPV network |
Cisco HyperFlex VLAN |
Notes |
| Production |
Cisco AMP private VLAN on the guest virtual machine network |
Cisco HyperFlex guest virtual machine port group is created in the HyperFlex configuration. |
| Administration |
Cisco HyperFlex Storage Controller management VLAN |
The network can be the same as the Cisco HyperFlex management network, or it can be different, depending on the local environment. It must have access to the internet. |
The AMP virtual appliance model provides the option to run the Cisco AMP solution in on-premises VMware ESXi virtualized environments. It allows you to deploy the Cisco AMP platform on your premises using the hardware of your choice. The AMPv version with VMware ESXi is well-suited for the environments that host fewer than 10,000 connectors (endpoint devices).
Table 2 lists the requirements for deploying the Cisco AMP Private Cloud virtual appliance in an ESXi environment.
Table 2. Prerequisites for running the Cisco AMP Private Cloud virtual appliance
| Components |
Prerequisites |
|
| Software |
● VMware vSphere ESXi 5 or later
● Capability to access the VMware vSphere Flash Player GUI
● Cisco AMP Private Cloud software-only appliance .ova file
|
|
| Hardware |
CPU |
Minimum 8 CPUs |
| RAM |
Minimum 64 GB |
|
| Storage |
● Minimum 1 TB disk capacity on the VMware datastore
● SSD type of drive required
● Minimum Data Store Random Reads (4K): 60K IOPS
● Minimum Data Store Random Writes (4K): 30K IOPS
|
|
| Network |
Two virtual networks are required for deployment:
● Production network: This network is user-dedicated to the guest virtual machines and endpoints.
● Administration network: This network is the public network that you connect to for the configuration, setup, and installation of the appliance. It must be reachable from the user who is performing the deployment, and must have access to the internet. This network is used for Cisco AMPv administration portal access.
|
|
Setup and topology for validation testing
This section introduces the devices used in validating the solution described in this document (Figure 5):
● Cisco HyperFlex cluster (x 1) composed of:
◦ Cisco HyperFlex HX220c M5SX All Flash converged node (x 4)
◦ Cisco UCS 6454 Fabric Interconnect (x 2)
● Cisco Nexus® 93180YC-EX Switch (x 2)
Physical devices
Figure 6 provides a diagram of the virtual machines used in the testing environment.

Testing setup
Table 3 lists the converged node specifications.
Table 3. Cisco HyperFlex HX220c M5SX All Flash Node specifications
| Components |
Specifications |
Notes |
| CPU |
2 x second-generation Intel Xeon Gold 6248 CPUs |
2 x 20 cores |
| Memory |
12 x 32-GB DDR4 2933-MHz RDIMMs |
384 GB |
| Disk controller |
1 x Cisco 12-Gbps modular SAS HBA |
|
| SSD |
1 x 240-GB 2.5-inch enterprise value 6-GB SATA SSD |
Housekeeping |
|
|
1 x 1.6-TB 2.5-inch NVMe high-performance high-endurance SSD |
Configured as cache |
|
|
6 x 960-GB 2.5-inch enterprise value 6-GB SATA SSDs |
Capacity disks for each node |
| Network |
1x Cisco UCS VIC1457 modular LAN on motherboard (mLOM) |
25 Gigabit Ethernet |
| Boot device |
1 x 240-GB M.2 6-GB SATA SSD |
Local boot |
Table 4 lists the software versions used in the test environment described in this document.
Table 4. Test environment software versions
| Layer |
Device |
Version |
| Computing |
Cisco UCS 6454 Fabric Interconnect pair |
Release 4.0(4h) |
|
|
Cisco HyperFlex HX220c M5SX All Flash Node firmware |
Release 4.0(4h) |
| Network |
Cisco Nexus 93180YC-EX Switch pair |
Release 7.0(3)I4(2) |
| Software |
Cisco UCS Manager |
Release 4.0(4h) |
|
|
Cisco HyperFlex HX Data Platform software |
Release 4.0(2b) |
|
|
Cisco AMP Private Cloud (software-only virtual appliance) |
Version 3.1.2_202005291954 (System) |
|
|
Cisco AMP for Endpoints connector (Windows) |
Version 7.1.5.11523 |
|
|
Cisco AMP for Endpoints connector (Linux) |
Version 1.12.4.702 |
|
|
VMware vSphere ESXi |
Release 6.5.0, 15256549 |
|
|
VMware vSphere vCenter |
Release 6.5.0.32300 |
|
|
Windows Server 2016 Standard (Desktop Experience) |
Version 1607 (OS Build 14393.1884) |
|
|
Red Hat Enterprise Linux 7.5 |
Release 7.5-8.el7 |
Cisco AMP Private Cloud deployment in HyperFlex
Use the following procedures to configure the Cisco HyperFlex system to run the Cisco AMP Private Cloud virtual appliance software (AMPv) to provide a solid malware protection solution for the endpoints in a virtualized environment. The procedures describe how to deploy and run a HyperFlex Data Platform configuration with an existing vCenter appliance. Although embedded VMware vSphere vCenter is supported, use of an existing vCenter appliance on an external ESXi host or cluster is recommended.
Installing Cisco HyperFlex systems
You can deploy a Cisco HyperFlex system by using an on-premises Cisco HyperFlex Installer appliance, or by using the Cisco Intersight platform from the cloud. In this solution, a Cisco HyperFlex cluster is created using the Cisco Intersight platform.
Prior to the installation, the managed devices must be claimed into the Cisco Intersight platform.
1. Enable the device connector on the Cisco UCS fabric interconnects.
2. In the Cisco Intersight platform https://intersight.com , claim the Cisco UCS fabric interconnects for cloud management.
3. In the Fabric Interconnects window of the Cisco Intersight platform, verify that both Cisco UCS FI-A and FI-B are connected.
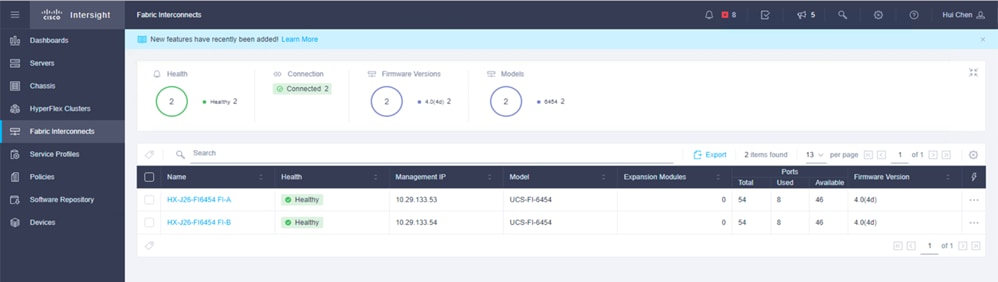
4. In the Servers window of the Cisco Intersight platform, verify that four Cisco HyperFlex nodes are shown as connected devices.

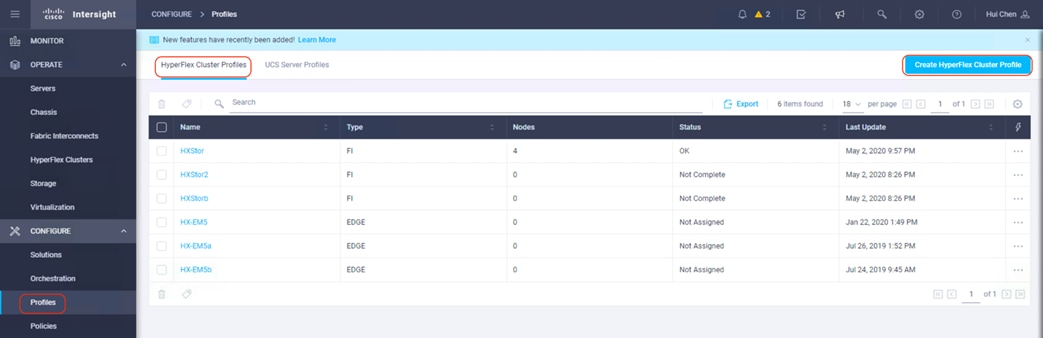
Now we can install and configure a Cisco HyperFlex cluster with the Cisco Intersight platform. Cisco Intersight provides an installation wizard to install, configure, and deploy Cisco HyperFlex clusters. The wizard constructs a preconfiguration definition of the cluster called a HyperFlex Cluster Profile. HyperFlex Cluster Profiles are built on policies in which administrators define sets of rules and operating characteristics, such as the node identity, interfaces, and network connectivity. Every active node in the HyperFlex cluster must be associated with a HyperFlex Cluster Profile. After gathering the node configuration settings to build the HyperFlex cluster profile, the installation wizard will validate and deploy this profile to your Cisco HX-Series nodes, thereby creating a Cisco HyperFlex cluster. HyperFlex Policies in Cisco Intersight provide different configurations, including auto support, security, network configuration, and more. You can assign a configured policy to any number of servers to provide a configuration baseline.
1. Log into the Cisco Intersight platform; in the left navigation pane choose Profiles. On the Profiles page, click the HyperFlex Cluster Profiles tab and then click Create HyperFlex Cluster Profile at the top right corner.
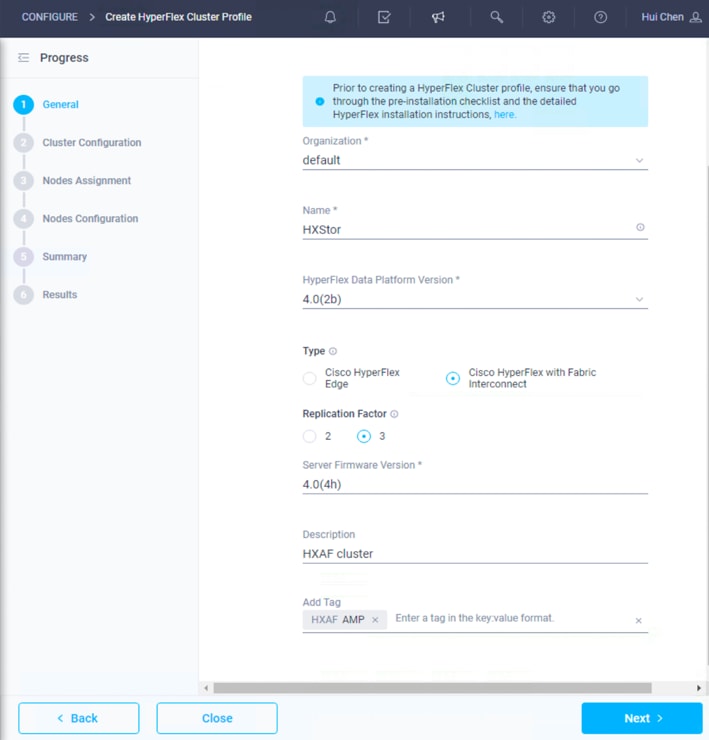
2. The Cisco HyperFlex Cluster Profile installation wizard is displayed. On the General page, enter a cluster name under Name. This cluster name must be unique; it will be used as the Cisco HyperFlex cluster name, VMware vCenter cluster name, and Cisco Intersight cluster name. Select the appropriate HX Data Platform version. Under Type, select Cisco HyperFlex with Fabric Interconnect. Choose 3 for Replication Factor. Select the appropriate Cisco UCS Server Firmware Version. Add a description and tags for this cluster for reference.
3. Click Next to move to the Cluster Configuration page.
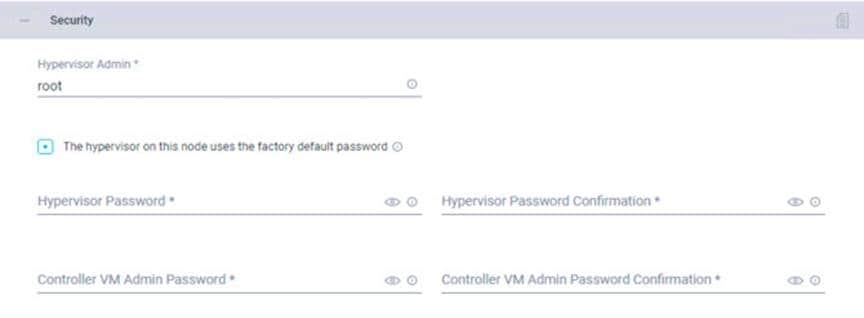
4. Click + to expand the Security configuration. Enter root as the hypervisor administrative user. Click the checkbox if the hypervisor on this node uses the factory default password. Enter a user-supplied new password for the hypervisor and a user-supplied password for the Cisco HyperFlex Controller virtual machine. Confirm that password in the second text field. The settings are saved automatically to a policy that you can reuse when you create a new Cisco HyperFlex cluster profile.
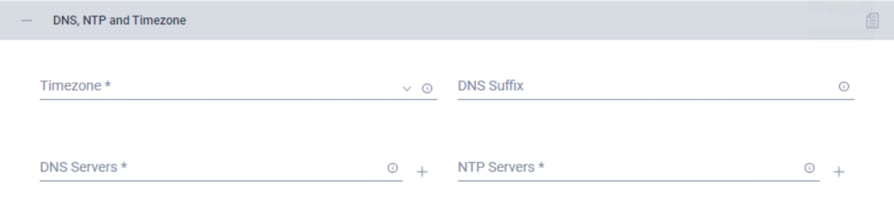
5. Click + to expand the DNS, NTP, and Timezone configuration. Choose a time zone from the drop-down list and enter the Domain Name System (DNS) server and Network Time Protocol (NTP) server information. Click + to enter secondary DNS or NTP servers if necessary.
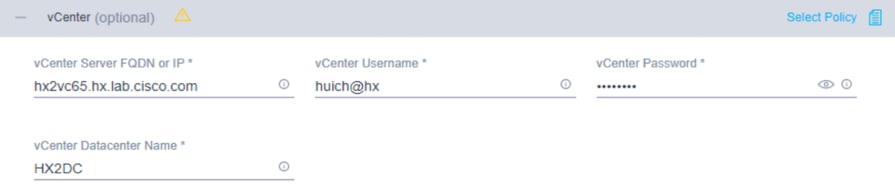
6. Click + to expand the vCenter configuration. Enter the vCenter server fully qualified domain name (FQDN) or IP address, the administrative username, and the password. Enter the name of the vCenter data center that is hosting the Cisco HyperFlex cluster.
7. Click + to expand the Storage Configuration. Select Clean Up Disk Partitions if you are performing a reinstallation on top of an existing deployment. If you are deploying a Virtual Desktop Infrastructure (VDI) environment on a hybrid Cisco HyperFlex cluster, check the box to enable file system optimizations.

8. Click + to expand the Auto-Support configuration. Check the box to enable Auto-Support. Enter your email address for service ticket notification.

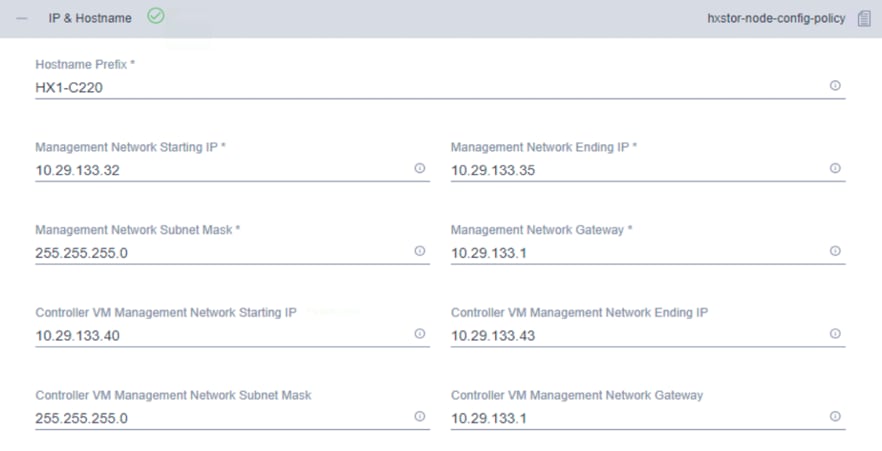
9. Click + to expand the IP & Hostname configuration. Enter a host name prefix. In a later step, you will assign host names sequentially to hosts using this prefix. Enter a starting IP address, an ending IP address, and the subnet mask and gateway for the management IP address pool. IP addresses from this range are automatically assigned to hosts during the node configuration step. If you enter only the management network IP addresses, the same range will be used for both VMware ESXi management and Cisco HyperFlex Controller virtual machine management IP addresses. If you want to use a second, noncontiguous range of IP addresses for the Cisco HyperFlex Controller virtual machines, you can optionally enter starting and ending IP addresses and the subnet mask and gateway for the Cisco HyperFlex Controller virtual machine management IP address pool. Note that these two IP address ranges must fall within the same IP subnet and VLAN.
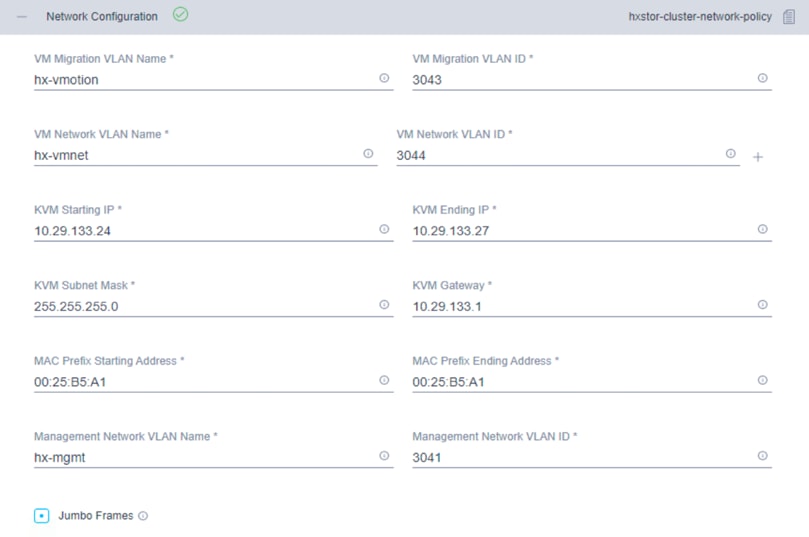
10. Click + to expand the Network Configuration. Enter the VMotion VLAN name and VLAN ID. Enter the guest virtual machine network VLAN name and VLAN ID. Click + at the right to add input for multiple guest virtual machine networks if necessary. Enter a starting IP address, an ending IP address, and the subnet mask and gateway for the Kernel-based Virtual Machine (KVM) management IP address pool. IP addresses from this range are automatically assigned to hosts during the node configuration step. Enter MAC prefix starting and ending addresses. Enter the VLAN ID for the management network. Click the Jumbo Frames checkbox unless you want to do otherwise.
11. Leave the optional External FC Storage configuration blank.
12. Leave the optional External iSCSI Storage configuration blank.
13. Leave the optional Proxy Setting blank.
14. Click + to expand the HyperFlex Storage Network configuration. Enter the VLAN name and ID for the data storage network.

15. Now that all the policies are configured, the saved policies will be listed on this page.

16. Click Next to proceed to the Nodes Assignment page.
17. Select the available Cisco HyperFlex nodes.
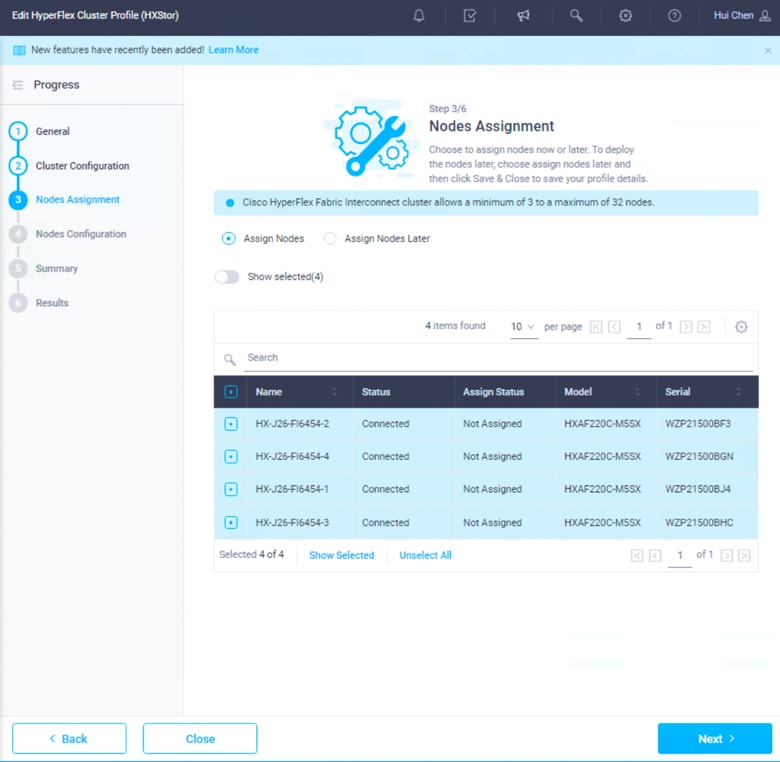
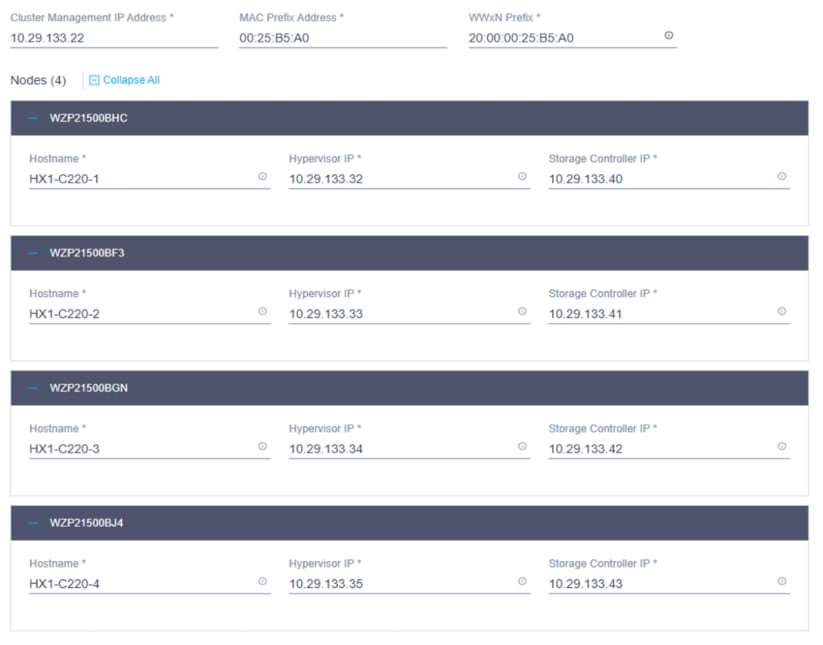
18. Click Next to navigate to the Nodes Configuration page. Check the node configuration for all the Cisco HyperFlex nodes. You can freely modify the host names and automatic IP address assignments if desired. Enter the cluster management IP address in the same IP management subnet.
19. Click Next to move to the Summary page. Review the Cluster Configuration and Nodes Configuration pages. Look for any errors.
20. Click Validate & Deploy to complete the validation and deployment processes together.
21. After deployment has completed successfully, click OK.
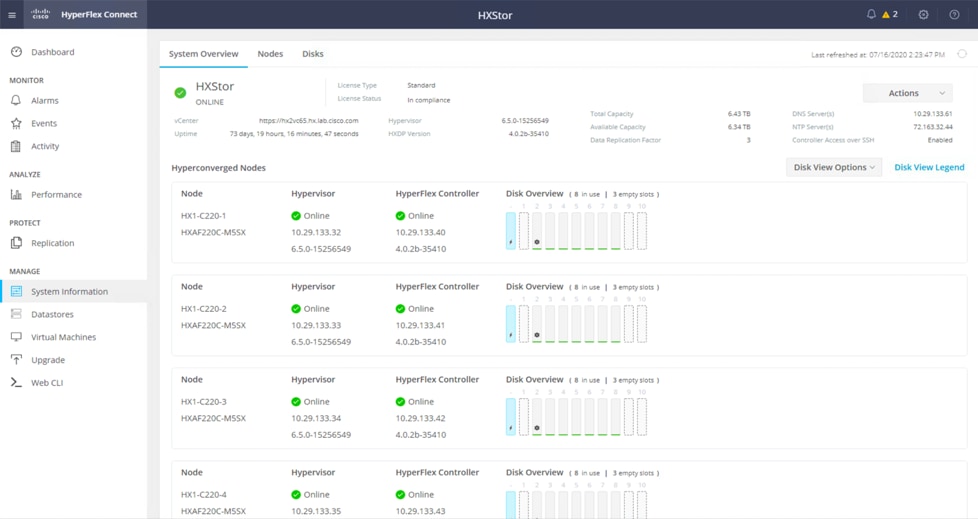
22. You can review more detailed status information for the new Cisco HyperFlex cluster in the Cisco HyperFlex Connect management GUI. You can launch Cisco HyperFlex Connect from the Cisco Intersight platform, or you can launch it directly with https://<HX-Cluster-Management-IP-Address>. At the Cisco HyperFlex Connect management console, click System Information and verify the status of the Cisco HyperFlex cluster and nodes.
For more details of the procedure to create a Cisco HyperFlex or Cisco HyperFlex Edge cluster, refer to these two documents:
● Cisco Validated Design: Cisco HyperFlex Edge 4.0 with Cisco Intersight
● Cisco Validated Design: Cisco HyperFlex 4.0 for Virtual Server Infrastructure with VMware ESXi
Before you put a new Cisco HyperFlex cluster into production, complete the necessary post-installation tasks as follows.
Performing Cisco HyperFlex post-installation configuration
Prior to putting a new HyperFlex cluster into production, you must complete a few post-install tasks. A post_install script is provided on the HyperFlex Controller virtual machines to automate the post-installation procedures and verify the HyperFlex cluster configuration. Use the following steps to run the post_install script to configure additional settings on the Cisco HyperFlex Storage cluster:
1. Execute Secure Shell Protocol (SSH) on the cluster management IP address and log in using <root> username and the controller virtual machine password provided during installation.
2. Run the following command in the shell and press Enter:
/usr/share/springpath/storfs-misc/hx-scripts/post_install.py
3. Select the first post_install workflow type – New/Existing Cluster.
4. Enter the HX Storage Controller virtual machine root password for the HX cluster (use the one entered during the HX Cluster installation).
5. Enter the vCenter username and password.
6. Enter the ESXi host root password (use the one entered during the HX Cluster installation).
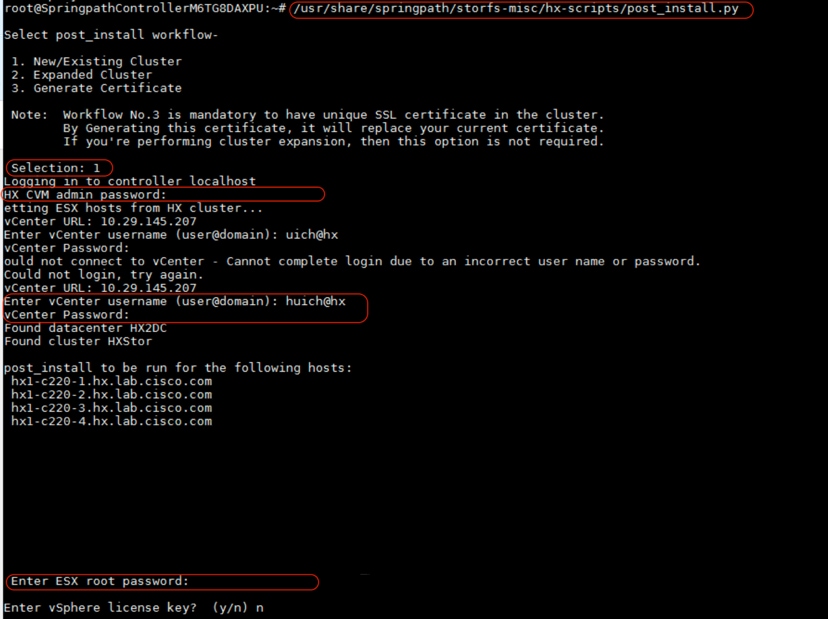
7. You must license the vSphere hosts through the script or complete this task in vCenter before continuing. Failure to apply a license will result in an error when enabling high availability (HA) or the Disaster Recovery System (DRS) in subsequent steps. Enter “n” if you have already registered the license information in vCenter.
![]()
8. Enter “y” to enable HA/DRS.
![]()
9. Enter “y” to disable the SSH warning of the ESXi hosts.
![]()
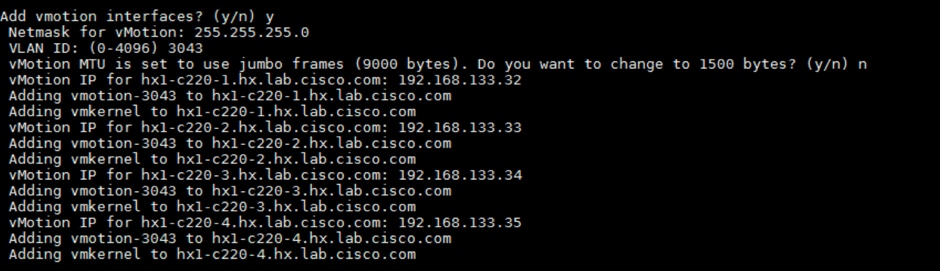
10. Add the vMotion VMkernel interfaces to each node by entering “y”. Input the netmask, the vMotion VLAN ID, and the vMotion IP addresses for each of the hosts as prompted.
11. Add virtual machine network portgroups for guest virtual machine traffic. This step adds identical network configuration to all nodes in the cluster. Enter “n” to skip this step if you don't need additional virtual machine networks.
![]()
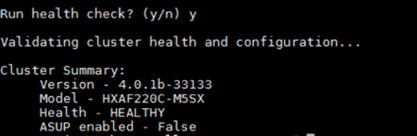
12. Enter “y” to run the health check on the cluster.
13. A summary of the cluster will be displayed upon completion of the script. Make sure the cluster is healthy.
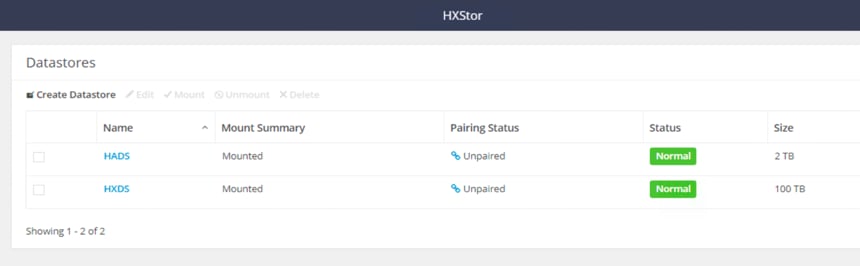
You have two options to configure the data stores for the Cisco HyperFlex Storage cluster. Use the following steps to configure it with the Cisco HyperFlex Connect management console:
1. Use a web browser to open the HX Connect webpage at the management IP address of the cluster; for example: https://10.29.133.22/.
2. Enter a local credential or a vCenter Role-Based Access Control (RBAC) credential for the username and the corresponding password.
3. Click Login.
4. Click Datastores from the left navigation pane, and then click Create Datastore.
5. In the popup screen, enter Datastore Name (for example, HXDS), Size, and Block Size, then click Create Datastore.
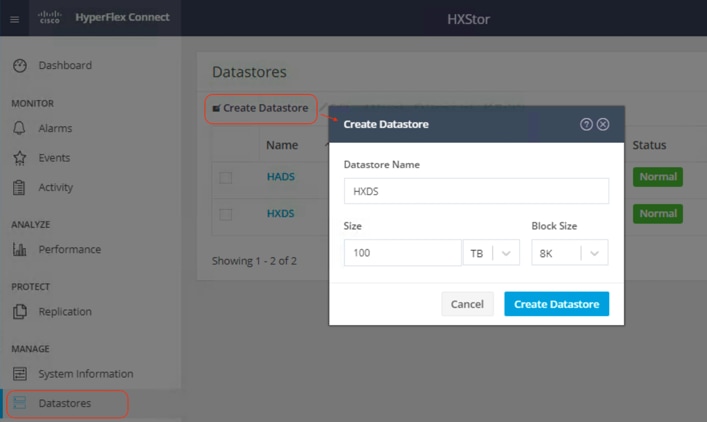
6. After you have successfully created the data store, check the Datastore status. Make sure that the data store shows as Normal and Mounted.
Installing Cisco AMP Private Cloud Virtual Appliance
Follow these steps to install the Cisco AMP Private Cloud Virtual Appliance. Before you start, make sure you obtain the appropriate license for the installation of the appliance.
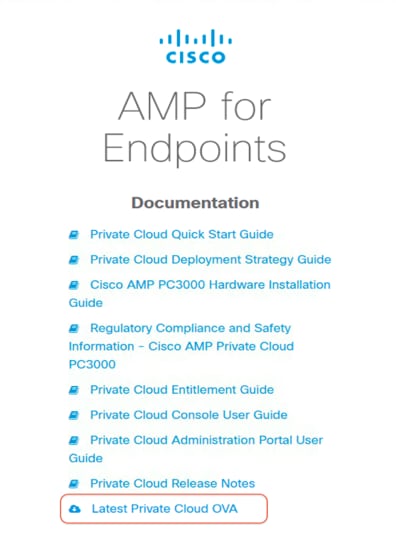
1. Go to the Cisco AMP Private Cloud document website: https://console.amp.cisco.com/docs/private_cloud. Click Latest Private Cloud OVA at the bottom to download the latest software-only virtual appliance OVA file for deploying AMP Private Cloud in a VMware ESXi environment; for example, PrivateCloud-Latest.ova.
2. Log in to the vSphere vCenter web interface for the HyperFlex cluster.
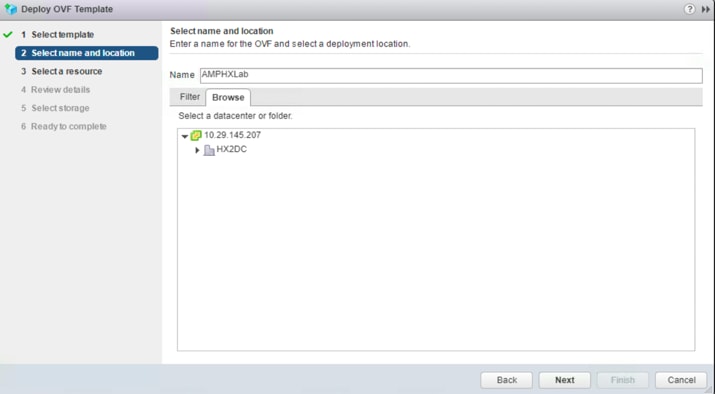
3. Right-click the Cisco HyperFlex cluster and choose Deploy OVF Template.
4. Enter the location of the downloaded OVF template file. Click Next.
5. Enter the name for the AMP Private Cloud virtual machine and choose the data center in which the virtual machine is deployed. Click Next.
6. Choose the Cisco HyperFlex cluster that is the intended target. Click Next.
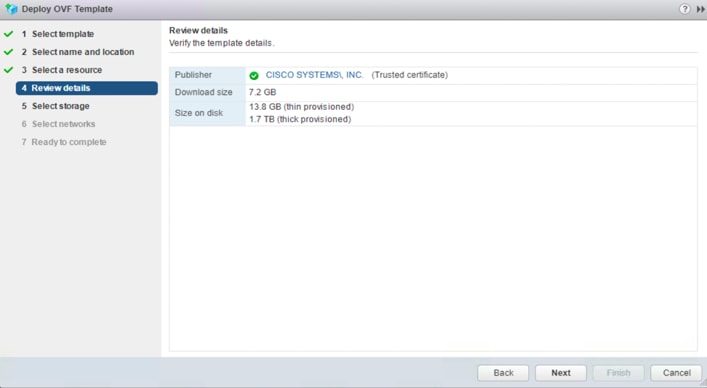
7. Review the required resources. Click Next.
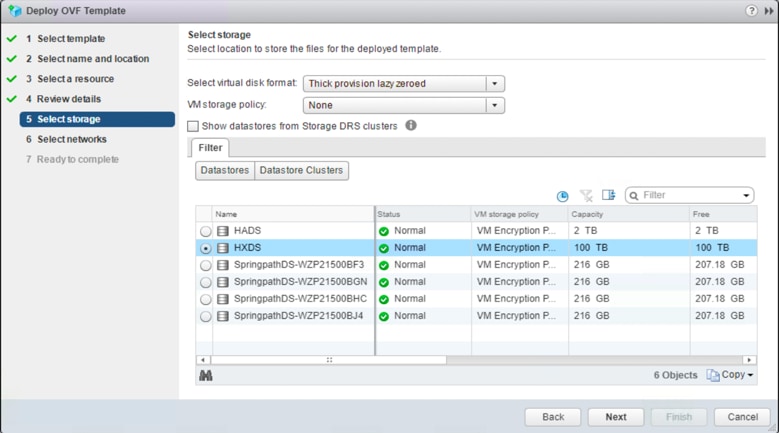
8. Choose the Cisco HyperFlex data store that you should use for the deployment. Leave other options at the default settings. Click Next.
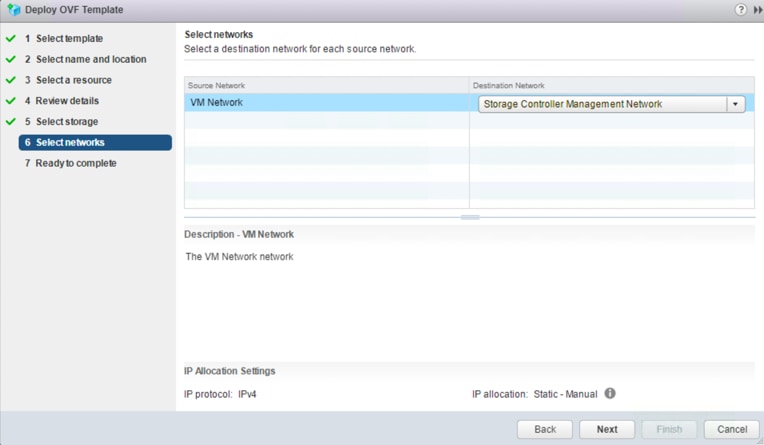
9. Choose the appropriate network settings on the Cisco HyperFlex cluster for AMP administrative network. Click Next.
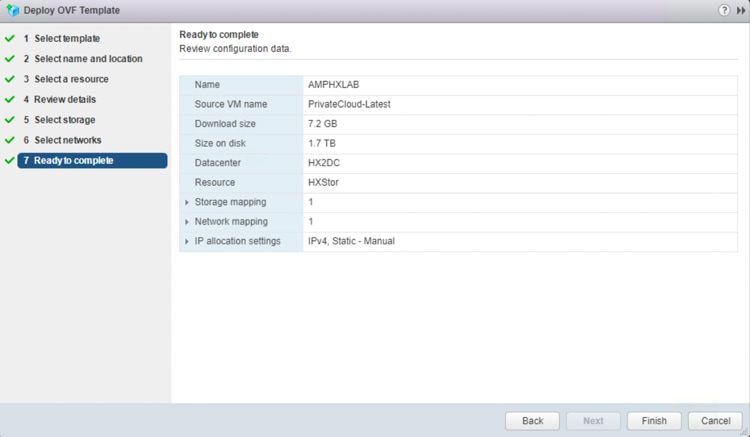
10. Review and confirm all your configuration parameters. Click Finish.
11. Wait a few minutes for the OVF deployment to be completed.
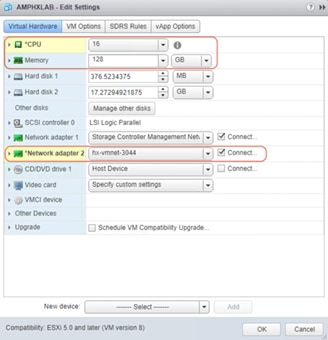
12. Go back to the vSphere web client, and edit the settings of the newly created virtual machine.
13. Increase the vCPU number and the memory capacity to meet the minimum requirements.
14. Add a second network adapter for the Cisco AMP Private Cloud. Place it in the appropriate production virtual machine network on the Cisco HyperFlex cluster.
15. Power on the AMP Private Cloud virtual machine.
16. Then power on the AMP Private Cloud virtual machine. The initial startup process of the AMPv will start.
17. After the startup is completed, the Main Menu window appears on the console. The URL shows [UNCONFIGURED] if the administration interface did not receive an IP address from the DHCP server.
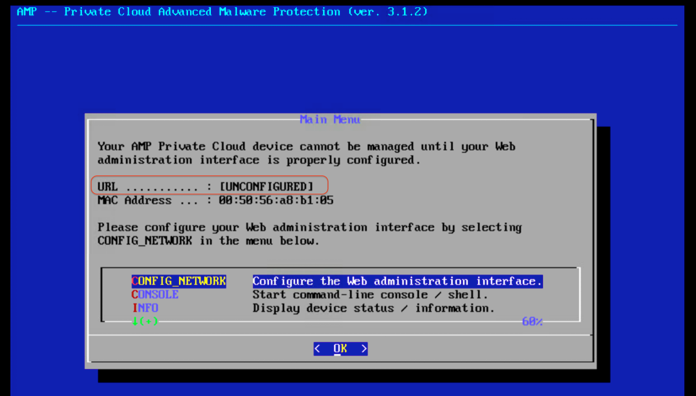
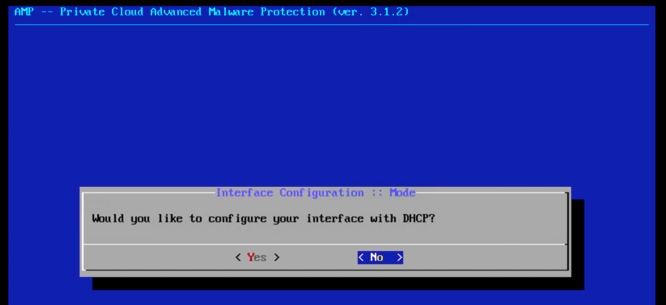
18. Navigate to CONFIG_NETWORK and click OK to begin the configuration of the administration IP address for the AMP Private Cloud. You can choose to use Dynamic Host Configuration Protocol (DHCP) or not. If you do not want to use DHCP, select No and click Enter.
19. Enter the IP address, Network Mask, and Default Gateway. Navigate to OK and Click Enter.
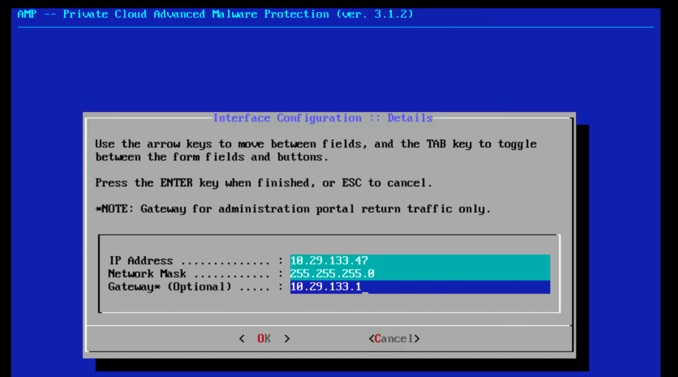
20. Choose Yes to continue with a static configuration for the administration interface.
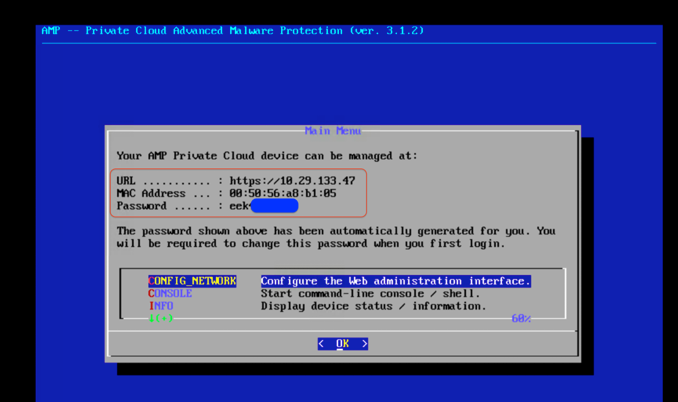
21. Wait until the main console menu appears again. This time you will see an IP address on the URL line. Write down the password that is displayed on the screen. This is a one-time password that is used on the web-based setup.
Configuring and deploying Cisco AMP Private Cloud
Now the system is ready to deploy the full set of Cisco AMP Private Cloud configurations.
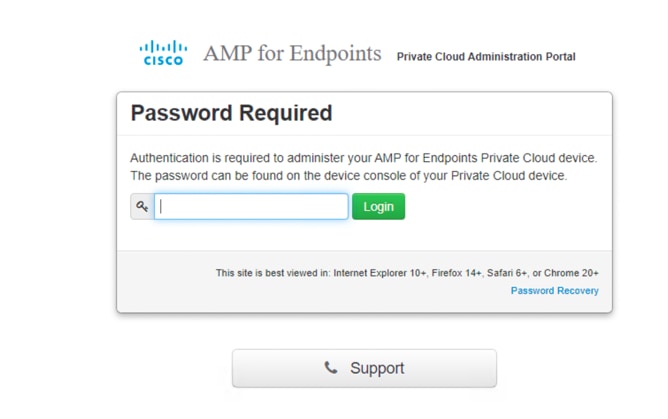
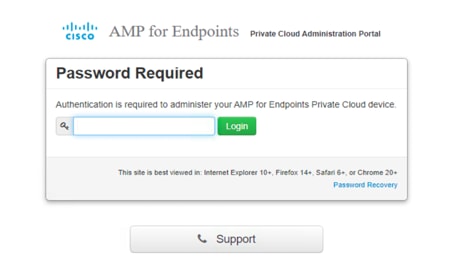
1. Open a web browser and navigate to the administration IP address of the AMPv appliance. Let the browser trust the self-signed Secure HTTP (HTTPS) certificate of the AMP Private Cloud.
2. Enter the password (use the initial password from the console recorded previously). Click Login.
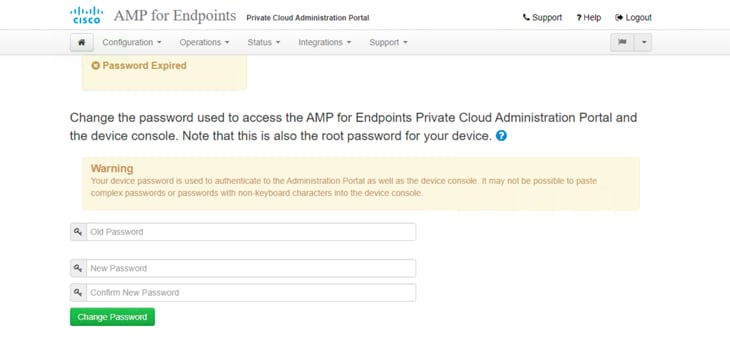
3. After you log in to the administration portal, change the password.
4. On the next page, scroll down to the bottom of the license agreement, click I HAVE READ AND AGREE to accept the agreement.
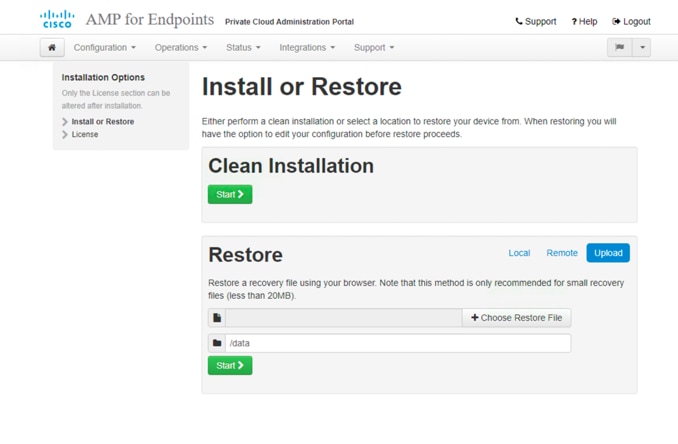
5. Continue to the installation page, as shown in the image. You have the options to do a Clean Installation or Restore the configuration from a backup file. In this document, the guidance is for the clean installation. Click Start.
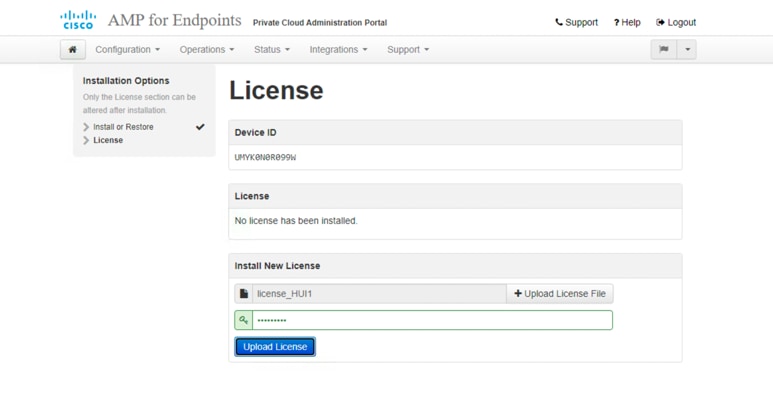
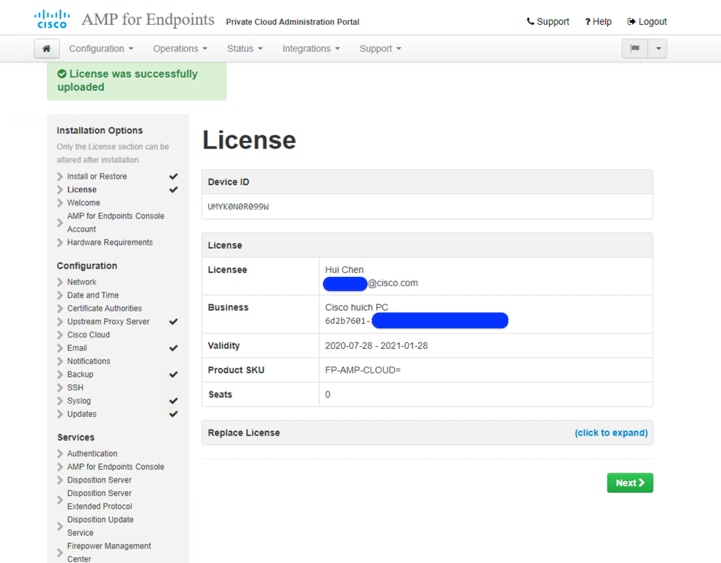
6. On the License page, Click +Upload License File. Choose the license file and enter the passphrase. Click Upload License. You should have received a license file and passphrase when you purchased the product.
7. When the upload is successful, a screen with valid license information is displayed. Click Next to continue.
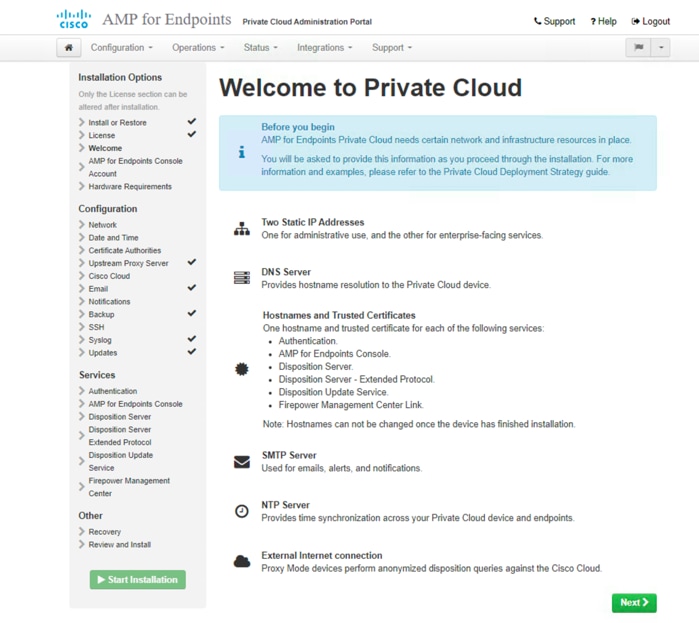
8. Now the Welcome to Private Cloud page displays. This page shows you the information you must have before beginning the configuration of the AMP Private Cloud. Read the requirements carefully and collect all the required information.
9. Click Next to start the pre-installation configuration.
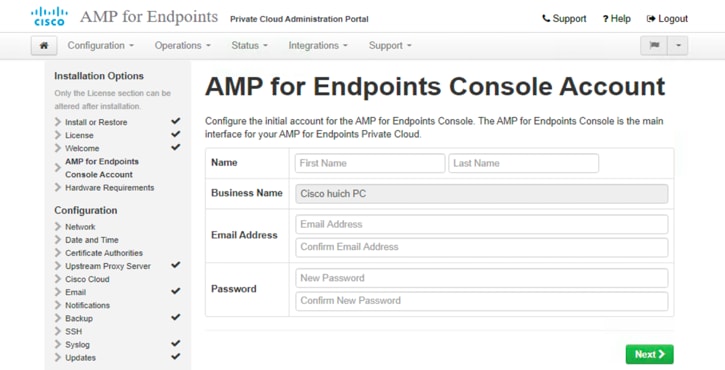
10. On the AMP Console Account page, enter Name, Email Address, and Password for the administrative Console user account. Click Next.
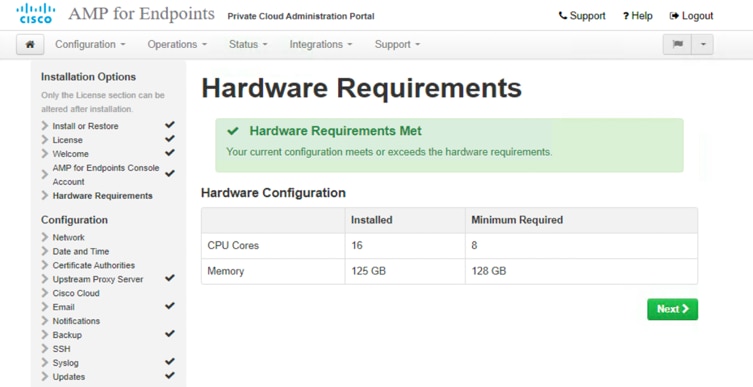
11. The Hardware Requirements page shows if the CPU and memory settings of your AMPv virtual machine meet the minimum requirements for the hardware. If your hardware does not meet the requirements, you receive a warning. Then it is recommended that you shut down the virtual machine and reconfigure the virtual machine settings to meet the requirements.
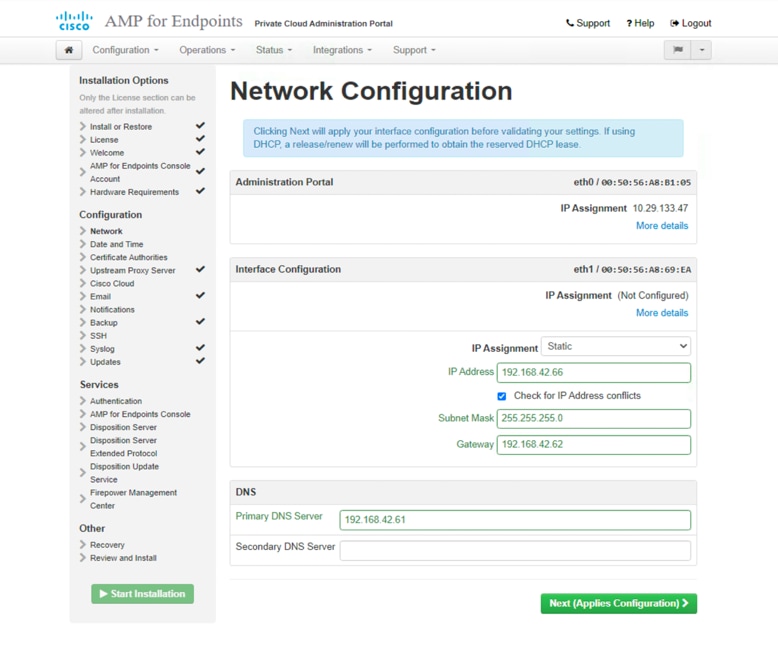
12. On the Network Configuration page, perform the network configuration for the Production interface, which connects to your endpoints in your HyperFlex systems. You have two options for the IP address assignment: DHCP or Static. For the Static configuration, enter the IP address, subnet mask, gateway, and DNS servers in the appropriate fields. Click Next (applies configuration).
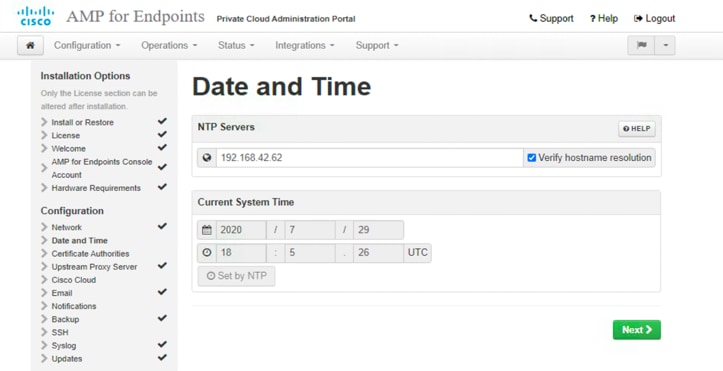
13. On the Date and Time page, enter the addresses of one or more NTP servers you want to use for Date and Time synchronization. You can specify more than one through a comma or space delimited list. Click Next.
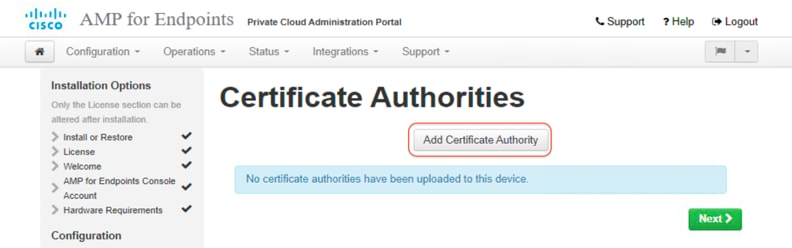
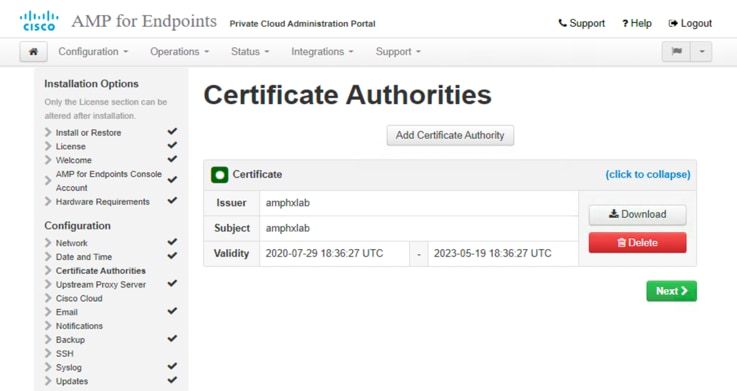
14. On the Certificate Authorities page, click Add Certificate Authority to add your root certificate.
Note: Refer to the Cisco Technote How to Generate and Add Certificates that are Required for Installation of AMP VPC 3.x Onwards for instructions on Root Certificate generation.
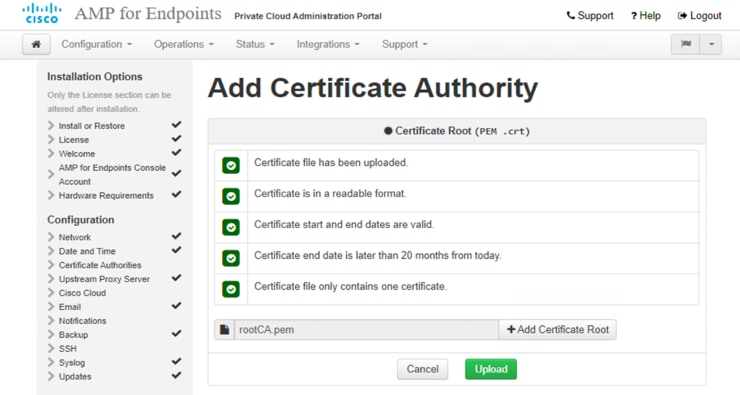
15. On the Add Certificate Authority page, click +Add Certificate Root and select your root certificate file; then Click Upload to continue.
16. On the Certificate Authorities page, click Next after the certificate authority file is uploaded successfully.
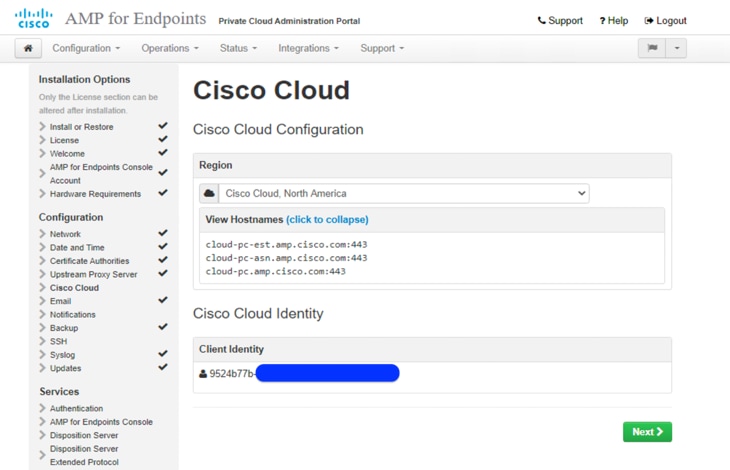
17. On the Cisco Cloud page, select the appropriate Cisco Cloud Region. Expand View Hostnames if your lab administrators need to create firewall exceptions for your AMP Private Cloud device to communicate with the Cisco Cloud for file lookups and device updates. Click Next.
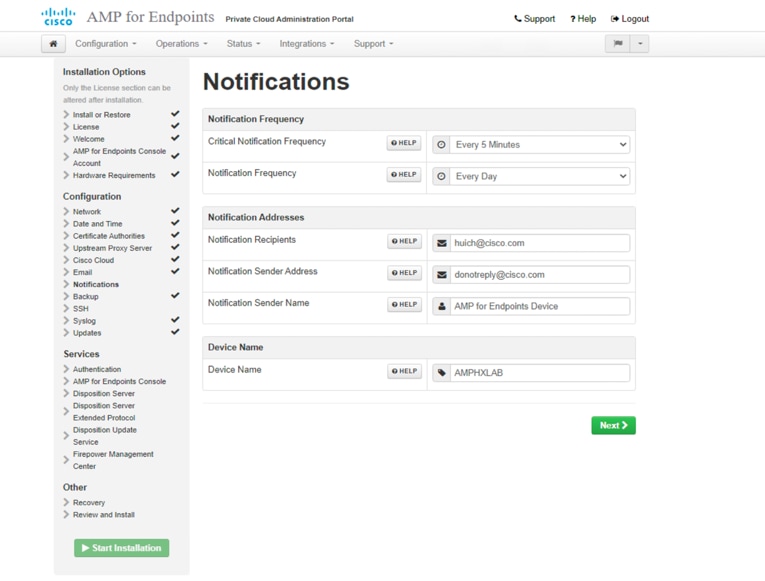
18. On the Notifications page, select the frequency for critical and regular Notifications. Enter the email addresses you want to receive alert notifications for the AMP device. You can use email aliases or specify multiple addresses through a comma-separated list. You can specify the sender name and email address the device uses. You can also specify a unique Device Name if you have multiple AMP Private Cloud devices. Click Next.
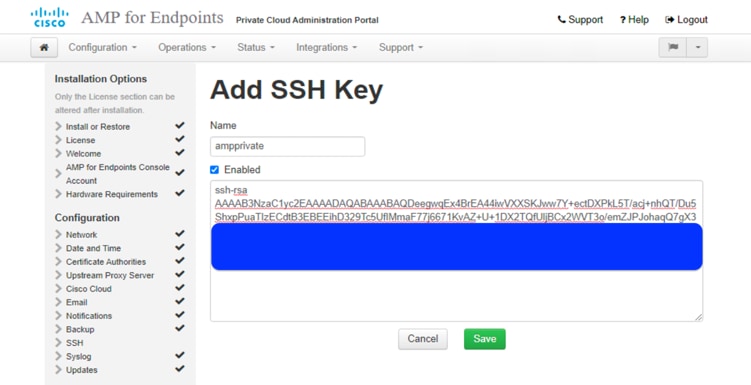
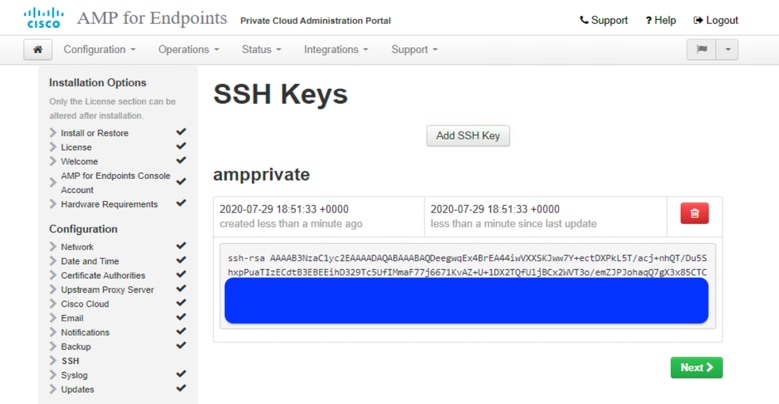
19. On the SSH Keys page, click Add SSH Key to enter the public keys you want to add (you can generate the key by using the ssh-keygen command). SSH keys allow you to access the device through a remote shell with root privileges. The Private Cloud appliance requires an OpenSSH-formatted RSA key. Click Save to save the key on the device.
20. The SSH Keys page reappears when the key is added successfully. Click Next.
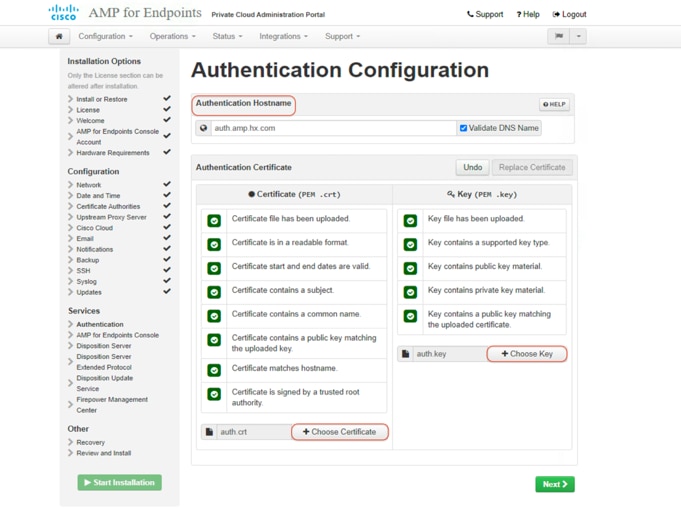
21. Now you can configure the Services section. For each service, you need to assign a hostname and upload the appropriate certificate and key pairs on the Cisco AMP Private Cloud:
◦ Authentication
◦ AMP Console
◦ Disposition Server
◦ Disposition Server - Extended Protocol
◦ Disposition Update Service
◦ Firepower Management Center
Note: You need to create six unique DNS A records for the AMP Private Cloud. Each record points to the same IP Address but represents the different host name for each of the services listed. The host names must be resolved by both the AMP Private Cloud and the AMP endpoints. You cannot change the host names after the device has finished the installation. Here is an example:

Note: Refer to the Cisco Technote How to Generate and Add Certificates that are Required for Installation of AMP VPC 3.x Onwards for the instruction on the Certificate generation for each service.
22. On the page for each service, enter the FQDN of the host; then click Replace Certificate to upload the certificate files.
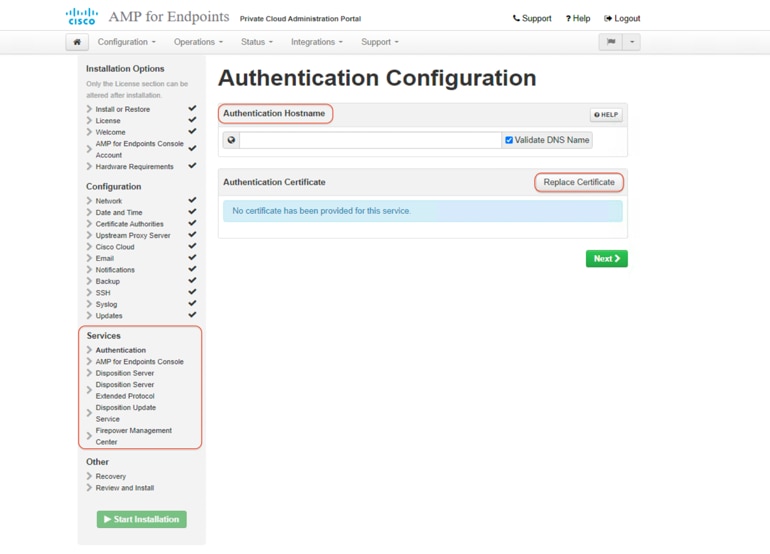
23. For example, on the Authentication Configuration page, enter the FQDN for the authentication service. Click Replace Certificate. Then click +Choose Certificate and +Choose Key to upload your matching certificate and key pair. Make sure the check marks for all the listed items become green. Click Next to continue.
24. Repeat step 23 to complete AMP for Endpoints Console Configuration.
25. Repeat step 23 to complete Disposition Server Configuration.
26. Repeat step 23 to complete Disposition Server – Extended Protocol Configuration.
27. Repeat step 23 to complete Disposition Update Service Configuration.
28. Repeat step 23 to complete Firepower Management Center Configuration.
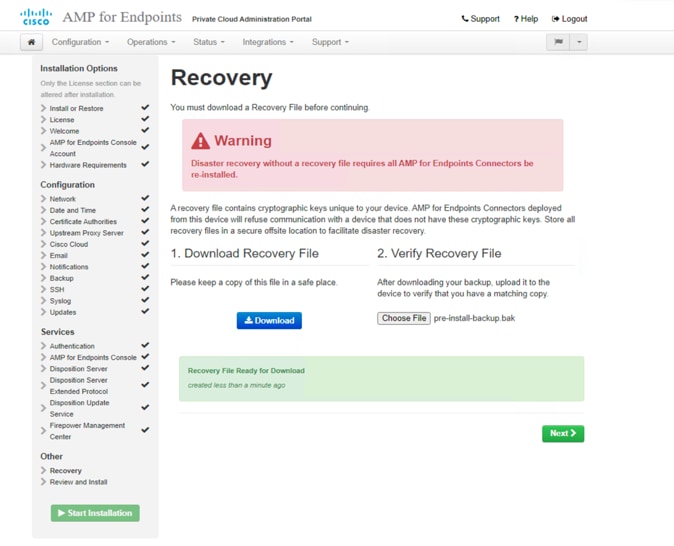
29. On the Recovery page, download and verify a recovery file of your configuration before the installation starts. The recovery file contains all of the configuration as well as the server keys. Click Download to save the backup to your local computer. After the file is downloaded, click Choose File to upload the backup file and verify that it is not corrupt. Click Next to proceed.
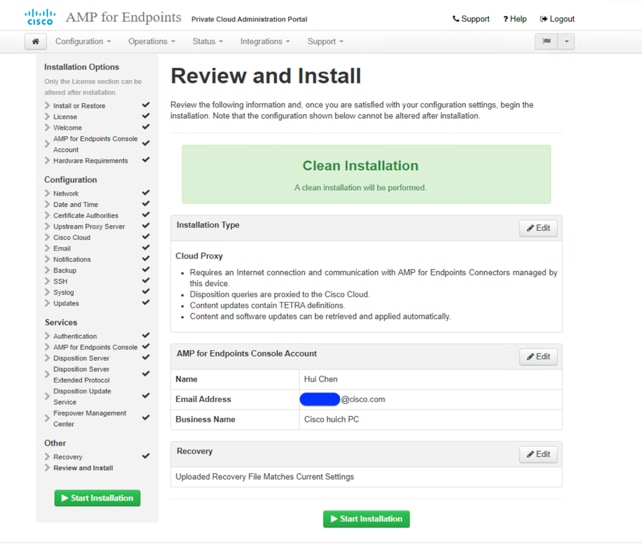
30. On the Review and Install page, review your AMP settings. You can go back to previous steps to change settings through the navigation bar on the left. If you edit any settings, you have to download a new recovery file with the new settings and verify it. When you are satisfied with your configuration settings, click Start Installation.
31. During the installation process, you can see an output of the commands that have been performed. This process may take some time. You can download the output log or error log if you need to contact support about an installation problem. To do so, click Download Output.
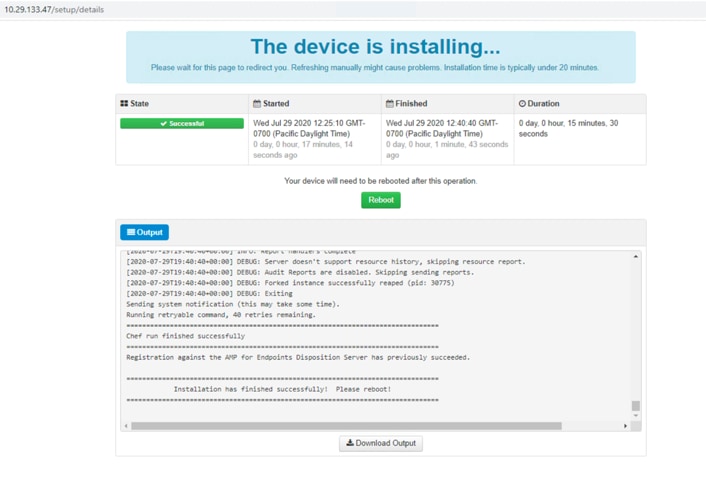
32. When the installation is completed, click Reboot to reboot the AMP virtual appliance. When the device has rebooted, you will arrive at the AMP Administration Portal landing page.
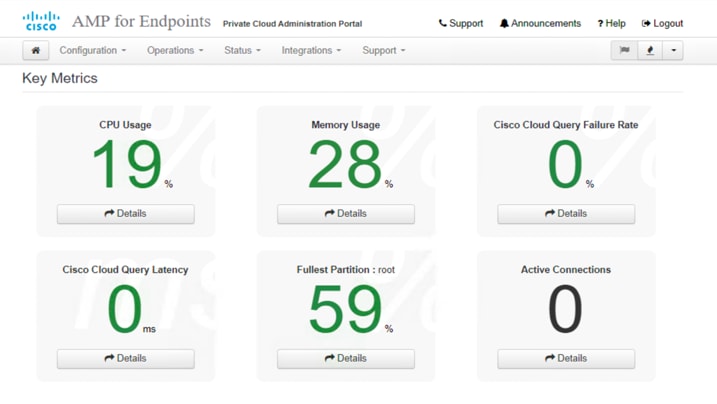
33. Log in to the administration portal, where you can change configuration settings, update the device, integrate other Cisco devices and services, or launch support sessions, as well as monitor performance of the AMP Private Cloud.
Now validate the installation. You can use all of the features of your AMP Private Cloud. You can visit the production IP address or FQDN of the AMP Private Cloud virtual appliance through a web browser to access the AMPv Console for policy, connector, and detection management.
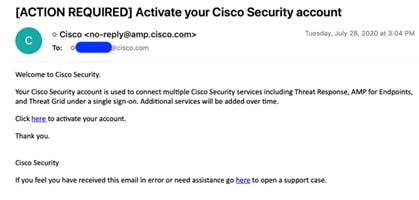
1. When the installation is completed, you will receive an email to activate the initial account you created. Click the link in the email to activate the account.
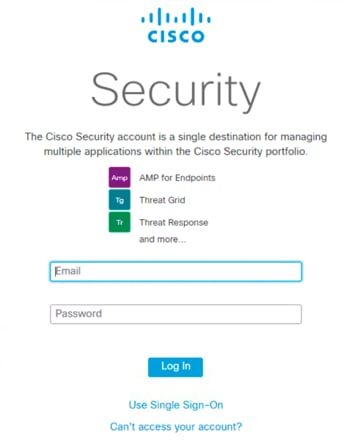
2. Open a web browser and navigate to the AMP Console FQDN; for example, console.amp.hx.com. Enter the email address and password for your activated account. Click Log In.
3. On the fresh Dashboard page are links to some Getting Started documents, wizards to deploy connectors, and a description and option to enable Demo Data.
4. (Optional) Demo Data allows you to see how Cisco AMP for Endpoints works by populating your console with replayed data from actual malware infections. To enable Demo Data, click Enable Demo Data on the Dashboard page. Or from the menu bar at the top, click Accounts à Demo Data à Enable Demo Data. Enabling Demo Data will add computers and events to your Cisco AMP for Endpoints console so you can see how the Dashboard, File Trajectory, Device Trajectory, Threat Root Cause, and Detections and Events displays behave when malware is detected. You can disable this option later. To disable Demo Data, from the menu bar at the top, click Accounts à Demo Data à Disable Demo Data.
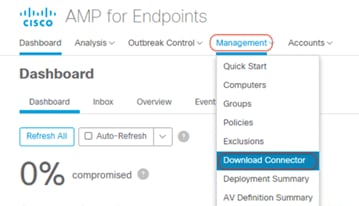
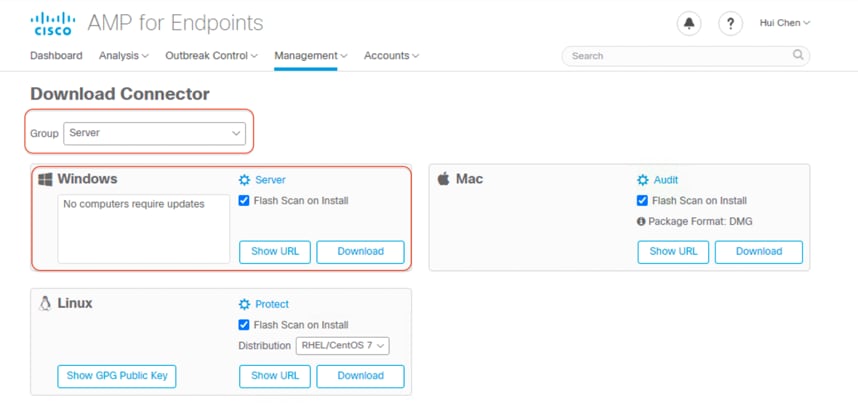
5. From the menu bar at the top, click Management à Download Connector.
6. On the Download Connector page, select Server Group. Click Download under the Windows category to save the amp_Server.exe file to your local machine. Then transfer this file to your Windows client virtual machines.
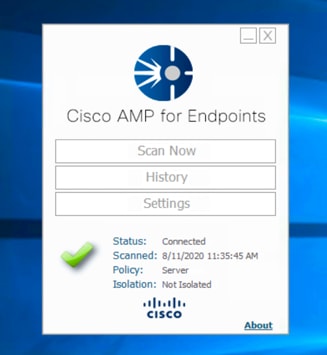
7. Go to one of your Windows clients, and open amp_Server.exe to install the AMP for Endpoints connector. A green Pass sign with Connected status indicates a successful installation, and the client is under the protection. You can click Scan Now for an immediate scanning of the viruses on this virtual machine if needed.
8. Repeat step 7 to install the connector for all the Windows client virtual machines.
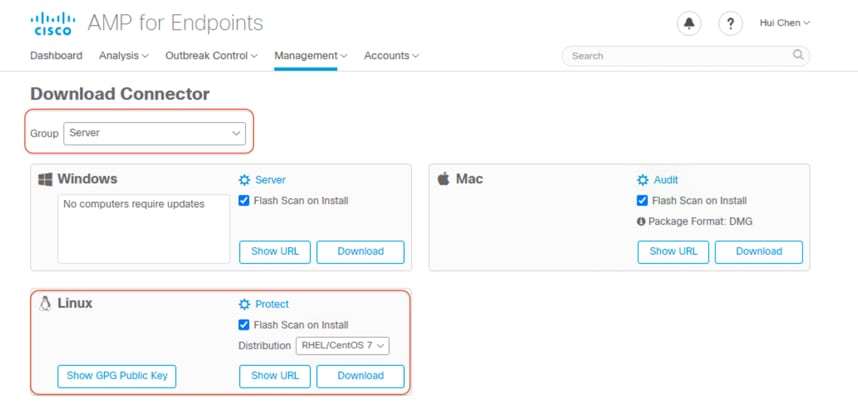
9. Go to the console of the AMP Private Cloud; on the Download Connector page, select Server Group. Under the Linux category, select REHL/CentOS 7 Distribution, and click Download to save the amp_Server_rhel-centos-7.rpm file to your local machine. Then transfer this file to your Linux client virtual machines.
10. Log in to one of your Linux clients, and install the AMP for Endpoints connector using the command:
Sudo yum localinstall amp_Server_rhel-centos-7.rpm –y.
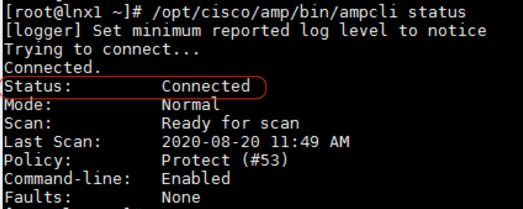
11. To check the connector status, run the following command:
/opt/cisco/amp/bin/ampcli status.
12. You can start scanning for viruses on this virtual machine if needed with the following command:
/opt/cisco/amp/bin/ampcli scan [options].
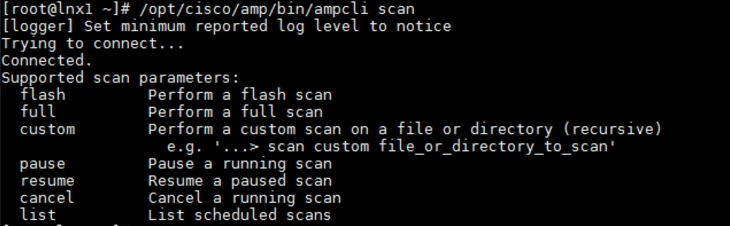
13. Repeat steps 10–12 to install the connector for all the Linux client virtual machines.
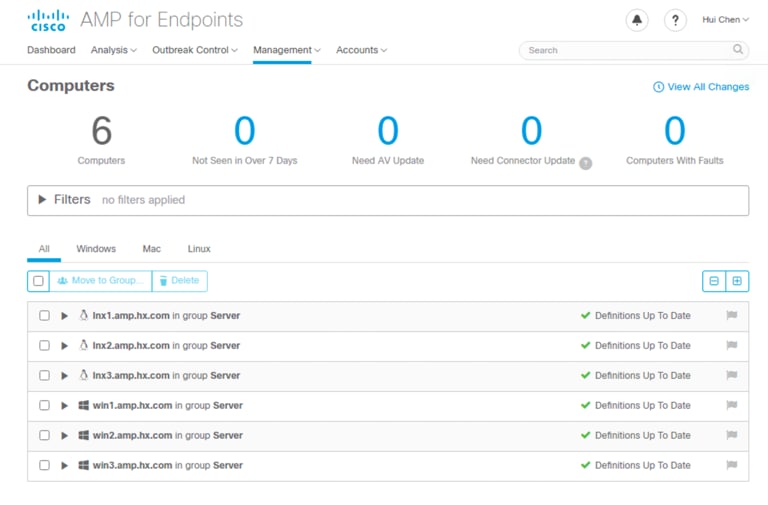
14. Go to the console of the AMP Private Cloud; from the menu bar at the top, click Management à Computers to check the protected servers.
Note: The client computers must trust the Root Certificate Authority for the AMP Private Cloud to be connected.
Cisco AMP provides next-generation endpoint protection, scanning files using a variety of anti-malware technologies including the Cisco antivirus engine. The Cisco AMP Private Cloud virtual appliance offers you the benefits of advanced malware protection in a VMware ESXi-based virtualized environment. Cisco HyperFlex systems provide optimized hyperconverged infrastructure for any workload at any scale. This solution simplifies the AMPv deployment process and provides an excellent choice of hardware and storage for the high-performing virtual infrastructure required for a Cisco AMPv deployment. Meanwhile the embedded AMP Private Cloud establishes a solid solution to protect the endpoints in the HyperFlex cluster from the malware attacks.
For additional information, refer to the following:
● Cisco HyperFlex products, services, and solutions: https://www.cisco.com/go/hyperflex
● Cisco SecureX platform: https://www.cisco.com/site/us/en/products/security/securex-platform/index.html
● Cisco AMP products and resources:
https://www.cisco.com/site/us/en/learn/topics/security/what-is-advanced-malware-protection-amp.html