Migrating Workloads from Cisco HyperFlex to Cisco Compute Hyperconverged with Nutanix White Paper
Available Languages
Bias-Free Language
The documentation set for this product strives to use bias-free language. For the purposes of this documentation set, bias-free is defined as language that does not imply discrimination based on age, disability, gender, racial identity, ethnic identity, sexual orientation, socioeconomic status, and intersectionality. Exceptions may be present in the documentation due to language that is hardcoded in the user interfaces of the product software, language used based on RFP documentation, or language that is used by a referenced third-party product. Learn more about how Cisco is using Inclusive Language.
Cisco has announced Cisco Compute Hyperconverged with Nutanix. As an industry leader in Hyperconverged Infrastructure (HCI), this represents an exciting new option for customers who wish to adopt HCI in their datacenters, who also wish to utilize Cisco Unified Computing System™ (Cisco UCS) hardware, and all the additional benefits of the UCS ecosystem, such as Cisco Intersight®. The number of modern applications that organizations use to serve their customers is growing at an unprecedented pace. Modern applications are the foundation for digital transformation of traditional businesses and business models. For most businesses in the digital era, apps are the key interface between them and their customers, their technology partners, their supply chain, and their employees. These new applications are becoming more hyper-diverse and hyper-distributed in nature and provisioned inside virtual machines, containers, or even bare-metal hardware. As these applications become more distributed and portable, they will be located in the data center, at the edge, and in the cloud, and modern infrastructure and operations will be required to meet the needs of this new application landscape.
Cisco and Nutanix have partnered to bring together our combined excellence in unifying management, infrastructure, and platforms to help simplify operations and establish an agile foundation to support any application, regardless of where it resides. We’re delivering enhanced flexibility that enables customers choice in best-in-class UCS servers and the freedom to connect to multiple clouds, creating a platform that can respond to dynamic changes in application and business requirements. Finally, we’re helping our customers innovate with confidence knowing that our augmented support and proactive, automated resiliency capabilities prevent and fix issues faster resulting in cost savings and superior business outcomes.
In the past, Nutanix has been available on Cisco UCS rackmount M5 generation servers via a self-certification process that was completed by Nutanix. Now, Nutanix is being made available on current M6 generation Cisco UCS rackmount servers with full lifecycle support from Cisco sales to Cisco Technical Assistance Center (TAC) for technical assistance and will be available in additional configurations and future generations of servers as well. For some customers, deploying Cisco Compute Hyperconverged with Nutanix may be the first installation of an HCI system in their datacenters. For many others, the adoption of HCI has already happened in some capacity, and many customers who have invested in Cisco UCS hardware have also adopted Cisco HyperFlex® as their chosen HCI platform. Looking forward, there will be several scenarios where virtual machine workloads need to be migrated from their existing platform over to a new Nutanix system running on Cisco UCS hardware. In some cases, the migration will be moving VMs from a traditional legacy virtual environment or a larger Cisco Converged Infrastructure (CI) system. In others, customers may wish to migrate from an existing Cisco HyperFlex system, particularly systems using older M4 or M5 generation servers, by purchasing new Cisco servers and installing Nutanix.
Cisco HyperFlex deployments most often utilize the VMware ESXi hypervisor, which is also an option for the deployment of Nutanix. In general, the simplest migration strategy is to use “shared nothing” vMotion between the two ESXi clusters, where the two clusters share no storage resources, they only require network connectivity between them to move the entire VM. In addition, Nutanix has developed a free migration tool known as Move, which can schedule migrations and adds further advanced options compared to simple vMotion migrations. This brief white paper covers the initial migration scenarios from a Cisco HyperFlex system to a new Nutanix system on Cisco UCS hardware for both vMotion migrations and use of the Nutanix Move tool, plus additional third-party solutions from Cohesity and Veeam. These techniques may also be applied to other migrations to Cisco Compute Hyperconverged with Nutanix from other compute and storage systems. The scenarios outlined cover the processes required and our best practice recommendations at the initial product offering of Cisco Compute Hyperconverged with Nutanix. As such, future deployment methods and features cannot be accounted for in this paper, and future migration guides should be consulted when they are available to get the most current information.
This section is organized into the following subsections:
● Audience
The intended audience for this document includes sales engineers, field consultants, professional services, IT managers, partner engineering staff, and customers deploying Cisco Compute Hyperconverged Solution with Nutanix hardware, who wish to migrate virtual machine workloads from an existing Cisco HyperFlex system. External references are provided wherever applicable, but readers are expected to be familiar with VMware technologies, Cisco HyperFlex, Nutanix, plus infrastructure concepts, network switching and connectivity, and the security policies of the customer installation.
This document describes the best practices, strategies, and recommendations for migrating virtual machine workloads from Cisco HyperFlex to Cisco Compute Hyperconverged Solution with Nutanix systems on Cisco UCS using the VMware ESXi hypervisor. The document is based on all known best practices using the software, hardware, and firmware revisions specified in the document at the time of publication. Therefore, recommendations and best practices may be amended for later versions. This limited-scope document does not fully detail the installation of Cisco Compute Hyperconverged with Nutanix, nor does it describe every possible migration strategy or technique possible for moving virtual machines between Cisco HyperFlex and Cisco Compute Hyperconverged with Nutanix clusters. Although readers of this document are expected to have sufficient knowledge to install and configure the products used, configuration details that are important to the deployment of this solution are provided in this document.
Migrations of virtual machines between clusters of VMware ESXi servers is most easily accomplished via “shared nothing” vMotion, where the virtual machines have their running state and all their virtual disks moved to a new set of hosts and a new storage location without service interruptions. The strategy is known as “shared nothing” because the two clusters do not need to have simultaneous shared access to a common storage array, which was an earlier migration strategy. This newer method only requires network connectivity and communication between the source and destination clusters to move the VMs and their disks. This approach is much simpler and more flexible and involves lower risk because no changes to the existing storage of the VMs is necessary. The changes made to the environment can be limited to only the new Cisco Compute Hyperconverged with Nutanix system or the upstream network to enable communication between the two clusters. The two primary methods of “shared nothing” vMotion are as follows:
● Adding the default vMotion VLAN of the existing Cisco HyperFlex cluster to the Cisco UCS manager configuration of the new Cisco Compute Hyperconverged with Nutanix cluster, enabling communication on a common VLAN.
● Enabling routed traffic between the default vMotion VLAN and subnet of the existing Cisco HyperFlex cluster, and the default management VLAN and subnet of the new Cisco Compute Hyperconverged with Nutanix cluster.
In addition, Nutanix offers a free software tool called Move, which acts as an intermediary agent and coordinator to move VMs between two systems. Move is deployed as a virtual machine on the new Cisco Compute Hyperconverged with Nutanix cluster and establishes connections to the vCenter server managing the existing Cisco HyperFlex cluster, and the new Cisco Compute Hyperconverged with Nutanix cluster, facilitating the ability to create migration plans, synchronize data, and cut over VMs.
Lastly, third-party software tools from Cisco partners such as Veeam and Cohesity can copy, synchronize, and move VMs between different clusters. While detailed instructions for the use of these third-party software packages are beyond the scope of this paper, a general overview of their use and abilities is presented here to give our customers and partners a full view of the options at their disposal.
Additional technical solutions for reconfiguring the new Cisco Compute Hyperconverged with Nutanix clusters are possible to enable “shared nothing” migrations, for example, adding more virtual Network Interface Cards (vNICs) to the service profiles. However, these involve more significant changes to the system in Cisco UCS Manager, including rolling reboots, full cluster shutdowns, and service interruptions. Due to this, those solutions will not be presented here as the primary options at this time. Future Cisco Compute Hyperconverged with Nutanix hardware and software configurations may differ from those in this initial product offering therefore it is important to refer to the latest documentation for any future migration papers and best practices recommendations prior to beginning any migration project.
This section is organized into the following subsections:
● Migration Scenarios
● Feature Availability and Support
● Migration Strategy Overview
Migration Scenarios
Migration from an existing Cisco HyperFlex system to a new Cisco Compute Hyperconverged with Nutanix system can involve numerous scenarios, depending on the type of systems being migrated to and from. Cisco HyperFlex is available in several deployments; traditional Datacenter clusters with up to 32 nodes connected to a pair of Cisco UCS Fabric Interconnects, stretched clusters across two sites with nodes connected to two pairs of Fabric Interconnects, smaller Datacenter clusters with up to 16 nodes which do not utilize Fabric Interconnects, known as “DC-no-FI” clusters, and Edge clusters which use only 2‒4 nodes and are not connected to Fabric Interconnects. The initial product release of Cisco Compute Hyperconverged with Nutanix will enable deployments using Cisco Compute Hyperconverged M6 All Flash and All NVMe nodes connected to a pair of Cisco UCS Fabric Interconnects for connectivity and management, or alternatively two clusters configured for metro availability across two sites. In truth, any virtual machine could be migrated from an existing system to a new Cisco Compute Hyperconverged with Nutanix cluster if they have proper network connectivity between them using the “shared nothing” vMotion approach. However, it is most likely that existing clusters of Cisco HyperFlex would be replaced like-for-like with new systems of the same basic design, i.e., an Edge system replaced with a new Edge system, or stretch clusters replaced with new stretch clusters. The following table outlines the current recommendations for migrations of virtual machines between existing and new clusters of the same types.
Table 1. Migration Scenarios and Recommendations
| Source System |
Target System |
Recommendations |
| Cisco HyperFlex Datacenter |
Cisco Compute Hyperconverged with Nutanix (UCS Manager Managed) |
Migration is possible using the techniques and recommendations in this document, or via third-party tools. |
| Cisco HyperFlex stretch cluster |
Cisco Compute Hyperconverged with Nutanix with metro availability |
Migration is possible using the techniques and recommendations in this document, or via third-party tools. Cisco highly recommends engaging with professional services to ensure the proper configuration of the new cluster with metro availability before beginning migrations. |
| Cisco HyperFlex Edge |
Cisco Compute Hyperconverged with Nutanix (Intersight Managed) |
Currently, non-FI based deployments are not available for Cisco Compute Hyperconverged with Nutanix. Migration is possible to a Cisco Compute Hyperconverged with Nutanix system managed by Fabric Interconnects. |
| Cisco HyperFlex DC-no-FI |
Cisco Compute Hyperconverged with Nutanix (Intersight Managed) |
Currently, non-FI based deployments are not available for Cisco Compute Hyperconverged with Nutanix. Migration is possible to a Cisco Compute Hyperconverged with Nutanix system managed by Fabric Interconnects. |
Feature Availability and Support
In addition to the migration of the virtual machines from an existing Cisco HyperFlex cluster to a new Cisco Compute Hyperconverged with Nutanix cluster managed by Fabric Interconnects, there are standard and optional features available in the two systems which must also be considered in a migration scenario. It is important to view the features in use in the source system and ensure that the same features are available, activated, and configured in the destination system before beginning any migrations. In the following table, the features available in Cisco HyperFlex datacenter clusters are compared to their corresponding features in Nutanix, along with details of their availability, implementation, and activation.
Table 2. Feature Availability and Support
| Feature |
Cisco HyperFlex |
Cisco Compute Hyperconverged with Nutanix |
| Data Compression |
Available in all editions, enabled system-wide and cannot be disabled |
Available in all editions, enabled or disabled per storage container |
| Deduplication |
Available in all editions, enabled system-wide and cannot be disabled |
Available in all editions, enabled or disabled per storage container |
| Data-at-rest encryption |
Available with Premier licensing, enabled system-wide |
Available with Ultimate licensing, or with Pro licensing plus an add-on license, enabled or disabled per storage container |
| Self-Encrypting Disks (SEDs) |
Available in all editions with supported SED drive models |
Available with Ultimate licensing, or with Pro licensing plus an add-on license with supported SED drive models |
| Accelerator Card |
Available with Premier licensing |
Not available for use with Nutanix |
| Erasure Coding |
Not available |
Available with Pro licensing or above, enabled or disabled per storage container |
| Data Replication |
Available in all editions, N:1 available with Premier licensing |
Available with Ultimate licensing, or with Pro licensing plus an add-on license |
| Metro clusters |
Available with Premier licensing |
Available with Ultimate licensing, or with Pro licensing plus an add-on license |
| Native Snapshots |
Available in all editions |
Available in all editions |
| Availability Zones |
Available in all editions |
Available in all editions |
| iSCSI |
Available with Premier licensing |
Available with Pro licensing or above for external client access |
| Connectivity to external storage arrays (FC/NFS etc.) |
Supported |
Not supported |
| Compute only nodes |
Available up to a 2:1 ratio of compute only to converged with Premier licensing, or 1:1 with all other licensed editions |
Available up to a 1:2 ratio of compute only nodes to converged nodes, only for clusters running AHV on the converged nodes. Please see the additional notes below. |
| Storage only nodes |
Not available |
Available, running the AHV hypervisor on the storage only nodes |
Note: Alternative hypervisors are available for both Cisco HyperFlex and Cisco Compute Hyperconverged with Nutanix. Cisco HyperFlex is available with Microsoft Hyper-V, and Nutanix is available with their native Acropolis Hypervisor (AHV). For the purposes of this document migrations from Cisco HyperFlex on Hyper-V are not discussed. For customers interested in running AHV for Nutanix, the recommendation from Cisco is to migrate to Nutanix running the ESXi hypervisor, and then convert the system from ESXi to AHV afterwards. Conversion between clusters running ESXi have more options available, including all the techniques presented in this document. Please consult the Nutanix documentation for the procedure to convert from ESXi to AHV.
Note: There are significant differences in the configuration and use cases for compute-only nodes between a Cisco HyperFlex system and a Cisco Compute Hyperconverged with Nutanix system. First, Nutanix compute-only nodes must be certified as HCI appliances, meaning that at launch, only the same M6 generation rackmount servers available for the converged nodes can be used as compute nodes, just simply without storage capacity disks. This contrasts with Cisco HyperFlex which could use a wide variety of Cisco UCS rack mount and blade servers as compute only nodes. Second, use cases for compute nodes are limited to specific cluster configurations, namely requiring an AHV storage cluster, and not available when using ESXi on the converged nodes. Compute-only nodes are often recommended by Nutanix when running databases on the cluster licensed by core, where the compute-only nodes would use lower core count CPUs just to run those database VMs, as opposed to general purpose VMs. Finally, all compute-only nodes require a license in a Nutanix cluster. Refer to Nutanix documentation for further details and limitations on the use of compute only nodes in a cluster.
Migration Considerations
Many aspects of the source and destination systems must be considered before attempting to perform large-scale migrations between two systems. Most of these considerations are not unique to migrations between a source Cisco HyperFlex cluster and a destination Cisco Compute Hyperconverged with Nutanix cluster. However, due to some of the feature availability and limitations listed above, some configurations will present significant challenges to their migrations. The following table presents a list of topics, tasks, and configurations which should be answered and considered as part of developing a full migration strategy. Please use the table as a step-by-step guide, answering and evaluating each item in turn, to assist you with determining the specific migration steps which must be undertaken, along with configuration specific items which must be given extra attention and consideration before putting any migration plans into motion.
Table 3. Migration considerations
| Task |
Value |
Notes |
| Determine the total number of VMs to be migrated |
|
The larger the number of VMs to migrate will directly impact the number of vMotion tasks to be created, as their configuration must be carefully managed to achieve the maximum performance. Also has impact to snapshot-based tools such as Nutanix Move, Cohesity and Veeam. |
| Determine the maximum bandwidth available between the two clusters, and consider the latency of the link if it is over a long distance |
|
Each vMotion based migration can consume roughly 1.5-2.0 Gigabit per second of bandwidth, which could quickly saturate links between the clusters. Long-distance migrations may be taking place over slower links with high latency, which may be unsuitable for vMotion and better suited to snapshot-based solutions. Saturating WAN links during peak business hours with migration traffic may not be allowed and may require a solution which can schedule data transfers. |
| Determine the total amount of guest VM data to be migrated |
|
Understanding the total amount of data to migrate is critical to making any estimate of the total time needed for the data transfers to take place, plus the overhead of creating and managing the migration tasks themselves, plus any additional manual tasks pre- and post-migration. |
| Consider the source and target system hypervisors |
|
Although Cisco recommends migrations between Cisco HyperFlex and Cisco Compute Hyperconverged with Nutanix clusters using the ESXi hypervisor, it is possible to build the new Cisco Compute Hyperconverged with Nutanix system using the AHV hypervisor. Migrations between ESXi and AHV cannot use vMotion and must instead use Nutanix Move, or a third-party tool. |
| Consider the source and target cluster configurations |
|
If the source Cisco HyperFlex system uses compute-only nodes, and the intention is to use compute-only nodes in the new Cisco Compute Hyperconverged with Nutanix system, compute-only nodes can only be used along with the AHV hypervisor on the converged nodes. The new system would need to be built with AHV, or converted to AHV before any compute-only nodes could be added. |
| Consider the tolerance for downtime of the applications being migrated |
|
Migrations using vMotion will involve no appreciable downtime of the VM or its applications, often losing only 1‒2 pings during a migration. Other solutions will involve cutover jobs and processes which could involve up to several minutes of downtime. In some scenarios, migration using vMotion of powered on VMs is not possible. |
| Determine if any VMs use shared disks |
|
Migrations via vMotion of powered on VMs are not possible when the VMs use shared disks. The VMs must be migrated in a powered off state. For more details refer to this page: |
| Determine if any VMs use connectivity to an external storage array |
|
Nutanix does not offer official support for connectivity of the nodes to an external storage array. For example, if the Cisco HyperFlex nodes connect to a Fibre Channel (FC) storage network, and mount Logical Unit Numbers (LUNs) for use as Virtual Machine File System (VMFS) datastores, this ability would not be supported in the new environment. Likewise, if the Cisco HyperFlex system mounts Network File System (NFS) volumes from an external array and stores guest VM virtual disks there, this is also not supported. |
| Determine if any VMs use raw device mappings (RDMs) |
|
Because Nutanix does not support connectivity to external storage, guest VMs using RDMs in physical mode from an external array cannot be directly migrated to a new Cisco Compute Hyperconverged with Nutanix system. Physical mode RDMs would need to be converted to virtual mode RDMs, then they could be moved via a storage migration, which would convert the LUNs into virtual disk Virtual Machine Disk (VMDK) files in the new cluster. An alternative would be to migrate the source system away from RDMs and instead use Small Computer Systems Interface over IP (iSCSI) volumes. For more details refer to this page: https://kb.vmware.com/s/article/1005241 |
| Determine if any guest VMs are mounting iSCSI volumes from the Cisco HyperFlex filesystem |
|
Nutanix volumes allows for guest VMs to mount iSCSI volumes presented from the Nutanix storage pool. To migrate a VM configured in this way, the source iSCSI volume would need to be cloned to a new volume on the new cluster. The most likely method for this cloning would be to mount the source and target iSCSI volumes from both systems to the VM and clone it using an OS level tool. After migration, the software iSCSI initiator could be configured to connect only to the new cloned iSCSI volume in the new cluster. |
| Determine if any external hosts are mounting iSCSI volumes from the Cisco HyperFlex filesystem |
|
Nutanix volumes only supports external Windows and Linux systems mounting iSCSI volumes. If any other types of systems are mounting volumes externally via iSCSI from the Cisco HyperFlex system, they will not be supported in the new Cisco Compute Hyperconverged with Nutanix system. Like the use case with guest VMs, the iSCSI volumes would need to be cloned as part of the migration. |
| Determine if any guest VMs will need their IP addresses changed, or any other changes to their network configurations such as DNS servers, hostnames, Network Time Protocol (NTP) servers, proxy servers, etc. |
|
Some of the third-party tools can help automate changes of the IP addresses of the guest VMs as part of their migration cutover jobs. |
| Ensure that guest VM ports groups, virtual switches, or distributed virtual switch configurations have been completed to support the incoming guest VMs |
|
Newly deployed clusters have generic networking configurations. All network configurations needed to support the connectivity of the incoming guest VMs being migrated must be completed manually or via scripting as post-installation tasks before the migrations of the guest VMs can begin. |
| Ensure successful backups of the source VMs exist and test recovery in case of the need for failback. |
|
Backups of the VMs being migrated is a critical safeguard to the overall process. Simply having native snapshots of the guest VMs in the source Cisco HyperFlex system is insufficient as a backup strategy, as vMotion or Nutanix Move would delete all snapshots as part of the migration task. For maximum safety, a VM backup solution that takes snapshots of the VMs and replicates the snapshots to a central or offsite location is preferred. It is also important that this backup strategy is fully tested to ensure recovery in case the live source VMs are completely lost or corrupted. |
| Test small scale or example workload migrations |
|
A smart strategy for migrations is to create testing or example virtual servers and applications matching the configurations of your critical systems, but not used for actual live production, then test migrating them between the two environments before attempting to migrate the live critical systems. Nutanix Move and other third-party tools may be used to create functional copies of running VMs connected to isolated test networks as part of a migration testing strategy. |
| Migrate critical systems in smaller batches and verify their function before continuing |
|
Do not attempt to move extremely large numbers of VMs simultaneously, and limit migrations of critical systems to small batches, allowing time to verify functionality and connectivity before continuing with additional migrations. |
| Establish backups, replication, and protection of the newly migrated VMs |
|
You must ensure that protection of critical VMs does not lapse as part of the migration plan. That includes establishing replication in the new cluster where applicable, and backups of the guest VMs so that the newly migrated VMs do not run for any significant period in the new cluster without being adequately protected. |
Migration Strategy overview
This paper presents three strategies for migrating VMs between an existing Cisco HyperFlex cluster and a newly built Cisco Compute Hyperconverged with Nutanix cluster; vMotion of VMs and storage using a “shared nothing” solution, use of a first-party tool such as Nutanix Move, and use of a third-party tool such as Veeam or Cohesity. Each solution has specific benefits and limitations and would be the best choice depending on the overall migration being attempted. The following table lists each solution to give an overview of their capabilities and suitability for various migration scenarios.
Table 4. Migration Tool Features and Abilities
| Feature |
vMotion |
Nutanix Move |
Cohesity |
Veeam |
| VM migration with no downtime |
Yes |
No |
No |
No |
| Suitable for migrations across WAN links (<10GbE) |
Limited |
Yes |
Yes |
Yes |
| Original VM is left intact |
No |
Yes |
Yes |
Yes |
| Migration is performed using snapshots |
No, data is directly transferred |
Yes, all existing snapshots will be deleted |
Yes |
Yes |
| Simplified networking requirements |
No, vMotion networking must be configured on all nodes |
Yes |
Yes |
Yes |
| Scheduled data seeding |
No, seeding and cutover happen in a single task |
Yes |
Yes |
Yes |
| Controlled cutover |
No, seeding and cutover happen in a single task |
Yes |
Yes |
Yes |
| VM name changes |
No |
No |
Yes |
Yes |
| VM network connection changes |
Yes |
Yes |
Yes |
Yes |
| In guest IP address changes |
No |
No |
No |
Yes |
This section of the document covers the following topics:
● Cisco HyperFlex and Cisco Compute Hyperconverged with Nutanix Networking
● VMotion Migrations with Native Snapshots
● VMotion Migration Limits and Performance
The primary method for migrating virtual machines and their virtual disks between the two dissimilar and disconnected clusters is to use the vMotion feature in a “shared nothing” configuration. In a “shared nothing” vMotion, the two clusters do not need simultaneous shared storage access, and the VMs and their underlying storage can be migrated between clusters with dissimilar or disconnected storage, with the transfer of the underlying storage happening across a standard Ethernet network. This is a much simplified and more flexible approach, as establishing standard Ethernet network connectivity between two clusters is far easier and simpler than building shared storage access in most cases.
Migrations via vMotion require that a VMkernel port configured for vMotion services on the source and destination clusters have network connectivity between them. The two methods outlined in this document to establish connectivity are:
● Configure the destination Cisco Compute Hyperconverged with Nutanix system and the source Cisco HyperFlex cluster to communicate on the same VLAN for vMotion. This can be done in two ways; the first method requires changing the vMotion VMkernel port configuration of the source Cisco HyperFlex system to use the same VLAN as the new Cisco Compute Hyperconverged with Nutanix system already does for vMotion. This is the simplest method available to enable vMotion between the systems and requires no Cisco UCS Manager changes. The second method involves changes to the Cisco Compute Hyperconverged with Nutanix system to create a different vMotion VMkernel port in the same VLAN already used for vMotion by the source Cisco HyperFlex cluster. This requires changes to the Cisco UCS Manager configuration of the Cisco Compute Hyperconverged with Nutanix service profiles, adding the vMotion VLAN as a tagged VLAN to the vNIC settings of all the nodes. Afterwards, a new port group and VMkernel port can be added to the default vSwitch0 of all the Nutanix nodes via vCenter, configured to use the same VLAN ID as the source Cisco HyperFlex system. Because this method creates a dedicated VMkernel port for vMotion, it is possible to configure jumbo frame support alongside other configuration changes in Cisco UCS Manager. As with the routable subnet method described below, it is possible that the Maximum Transmission Unit (MTU) setting of the source system will need to be turned down from 9000 to 1500, unless jumbo frame support was enabled at all levels of the network.
● Configure the upstream network to allow traffic to be routable between the vMotion VLAN used by the source Cisco HyperFlex cluster, and the default management VLAN used by the destination Cisco Compute Hyperconverged with Nutanix cluster, which also functions as the vMotion VMkernel port. This requires changes to the upstream network in some cases to make the Cisco HyperFlex VLAN routable, as many locations will not have vMotion VLANs configured to be routable. In addition, the VMkernel ports of the Cisco HyperFlex nodes would need to be modified to use their own unique gateway IP address for the traffic to reach the new Cisco Compute Hyperconverged with Nutanix cluster’s management VLAN. Lastly, most Cisco HyperFlex clusters are configured to use jumbo frames for vMotion traffic. This could lead to failures for many reasons, including the upstream switches not being configured to pass jumbo frames, and the destination Cisco Compute Hyperconverged with Nutanix cluster not being set to use jumbo frames by default. The easiest solution is to reconfigure for standard MTU setting (e.g. 1500 bytes) on the source Cisco HyperFlex system so that vMotion traffic will work properly.
Note: Wherever possible, Cisco recommends using jumbo frames to maximize performance of vMotion traffic in our solutions and validated designs. Cisco Compute Hyperconverged with Nutanix is deployed with a default configuration on the Cisco UCS Manager (UCSM) vNICs set with an MTU of 9000; however the default QoS system classes of the Cisco Fabric Interconnects are not modified for jumbo frame support, and no QoS policies are used to map traffic to those classes. Therefore, jumbo frame traffic will not properly traverse the network in this default setup. In the instructions below, both options are given for the configuration of the vMotion VMkernel ports to use standard or jumbo frames. Please ensure that all instructions are read through carefully to understand the options available, so that vMotion will function properly when attempting to configure the clusters to migrate VMs.
Cisco HyperFlex and Cisco Compute Hyperconverged with Nutanix Networking
Cisco HyperFlex and Cisco Compute Hyperconverged with Nutanix systems are both built with predefined network configurations that are applied to the nodes as part of the Cisco UCS Manager configuration, and the settings in the ESXi hypervisors. The two configurations are significantly different from each other, therefore it is important to have an understanding of the default network configurations in order to understand the migration paths between the two systems.
Cisco HyperFlex
Cisco HyperFlex clusters are designed with multiple virtual NICs (vNICs) defined in the Cisco UCS Manager configuration, with each pair of vNICs configured to carry a specific type of network traffic, designated failover orders, and all traffic tagged with the VLAN IDs. The net result is that a Cisco HyperFlex cluster will by default have a vMotion VMkernel port, which is connected to a dedicated pair of vNICs, pinned to the A side of the UCS fabric, and carrying its own dedicated VLAN ID tags. Other traffic types, such as management or node-to-node storage traffic are separated on their own vNICs, split across the A and B side fabrics, and carry their own unique VLAN ID tags.
Cisco HyperFlex Networking
Note: Virtual machine network interface card (VMnic) numbers on Cisco HyperFlex systems can be different from what is shown based on the configuration of the cluster; however the general networking configuration is the same on all Cisco HyperFlex systems as shown.
Cisco Compute Hyperconverged with Nutanix
Cisco Compute Hyperconverged with Nutanix systems are deployed with a simplified flat network structure using only one pair of vNICs for all traffic on a single subnet, and do not tag any traffic with VLAN ID tags.
Cisco Compute Hyperconverged with Nutanix Networking
VMotion Migrations with Native Snapshots
Cisco HyperFlex includes a feature to take native storage-based snapshots of VMs within the HX Data Platform (HXDP) filesystem, versus standard VMware snapshots which use redo log files. Currently, VMware cannot perform a vMotion of a VM including relocating the storage if there are any native storage backed snapshots on those VMs, regardless of the make and model of the storage system used. Consequently, before beginning any migration of a VM from a Cisco HyperFlex system to Nutanix, all existing Cisco HyperFlex native snapshots must be deleted. Native snapshots may exist from manual snaps, scheduled snapshots, or from HyperFlex native replication. Manual snapshots can simply be deleted. Scheduled snapshots must have their schedules disabled via HyperFlex Connect to prevent new snapshots from being created before manually removing the existing snapshots. Replicated VMs must have their individual protection disabled, or they must be removed from their protection group via HyperFlex Connect to prevent new snapshots from being created before manually removing the existing snapshots. In some cases, replicated VMs must be moved from a replicated HyperFlex datastore to a standard, i.e., non-replicated HyperFlex datastore to stop the creation of new snapshots. This process would simply involve a vMotion of the VM including its storage from one HX datastore to another.
The following sections outline the steps necessary to configure a source Cisco HyperFlex cluster and a new Cisco Compute Hyperconverged with Nutanix cluster so that they can migrate VMs between them using “shared nothing” vMotion. In many cases, migrations will be performed between the two clusters where both are managed by the same vCenter server. Additionally, it is possible to perform a Cross vCenter vMotion when the two clusters are managed by separate vCenter servers. This migration is possible by configuring the two vCenter servers in Enhanced Link Mode, where the two vCenter servers participate in the same Single-Sign-On (SSO) domain. The configuration of Enhanced Link Mode is not described in this document. Lastly, it is possible to migrate VMs between two vCenter servers which are not linked using a method known as Advanced Cross vCenter vMotion, as long as both vCenter servers are running version 7.0 Update 1C or later and can communicate with each other via the network.
VMotion using a common migration subnet
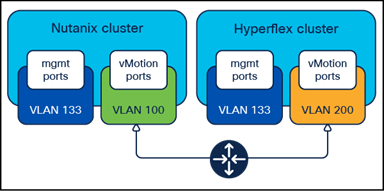
The simplest solutions involve using shared Layer 2 subnets between the two clusters and are our recommended methods for configuring the clusters in order to move the VMs. The new Cisco Compute Hyperconverged with Nutanix cluster can be configured after the installation to carry the tagged VLAN already used by the Cisco HyperFlex cluster for vMotion. This change is made in Cisco UCS Manager for the Fabric Interconnects managing the Cisco Compute Hyperconverged with Nutanix cluster nodes. Afterward, a new vMotion VMkernel port is created on each Cisco Compute Hyperconverged with Nutanix cluster node, effectively putting the Nutanix and HyperFlex clusters’ vMotion VMkernel ports in the same Layer 2 subnet. This simplified configuration is the easiest and fastest to deploy and is recommended for all environments which allow dissimilar hardware and vSphere clusters to occupy the same VLAN for vMotion. This is also the recommended solution for situations where you cannot or do not wish to significantly modify the networking configuration of the existing Cisco HyperFlex cluster.
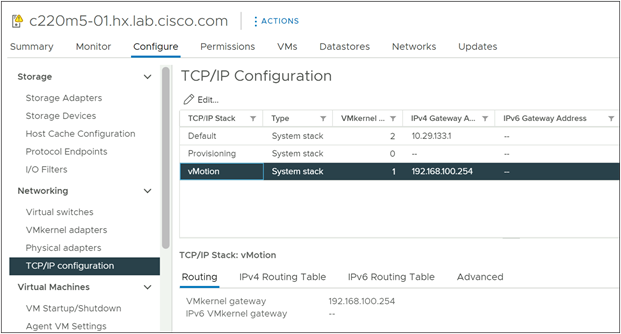
Common vMotion VLANs
Note: Prior to beginning the configuration process below, the existing vMotion VLAN used by the Cisco HyperFlex cluster must be trunked to the Cisco UCS domain via the uplinks to the Cisco Fabric Interconnects. For example, in the diagram above, the Cisco UCS domain operating the Cisco Compute Hyperconverged with Nutanix cluster must have VLAN 200 trunked to the Fabric Interconnects.
To configure the new VMkernel ports on the Nutanix nodes, complete the following steps:
Procedure 1. Configure new VMkernel ports for vMotion on Cisco Compute Hyperconverged with Nutanix cluster
Step 1. Hyperconverged with Nutanix cluster.
Step 2. In the left-hand navigation menu, click LAN, then in the navigation tree, under LAN > LAN cloud, click VLANs.
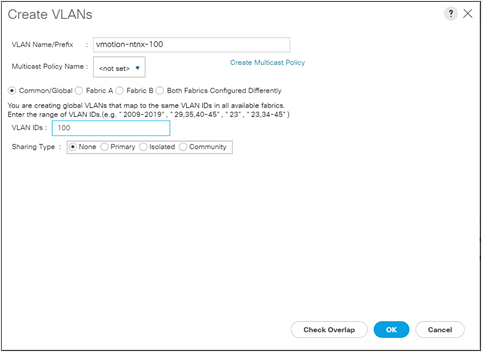
Step 3. Click the Add button to add the new VLAN which is already used by the Cisco HyperFlex cluster for vMotion traffic if it does not already exist.
Step 4. Enter the VLAN name and VLAN ID for the new VLAN, then click OK.
Step 5. In the left-hand navigation menu, click Servers, then in the navigation tree, under Servers > Service Profiles > root, locate the first service profile for the first Nutanix node and click on it.
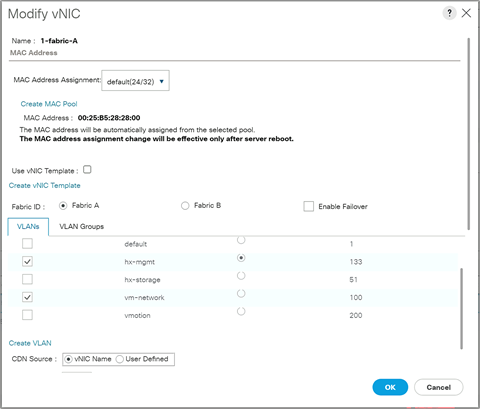
Step 6. Click on the Network tab at the top, scroll to the bottom of the main screen and click on the first vNIC named “1-fabric-A,” then click the Modify button.
Step 7. Click the checkbox next to the desired VLAN and ensure that the Native VLAN radio button is not selected, then click OK.
Step 8. Repeat steps 6 and 7 for the second vNIC named “1-fabric-B.”
Step 9. Click the Save Changes button.
Step 10. Repeat steps 5 through 9 for all the remaining service profiles associated with the Nutanix servers, adding the needed VLAN to both vNICs in each service profile.
Step 11. Log in to the vCenter server managing the Cisco Compute Hyperconverged with Nutanix cluster using an account with administrative rights.
Step 12. From the inventory screen, locate the Datacenter and Cluster running Nutanix, then click on the first ESXi node of the cluster.
Step 13. Click the Configure tab, then under Networking click Virtual Switches.
Step 14. Click the ellipses (…) next to the default vmk0 VMkernel port, then click Edit Settings.
Step 15. Uncheck vMotion as an enabled service, then click OK.
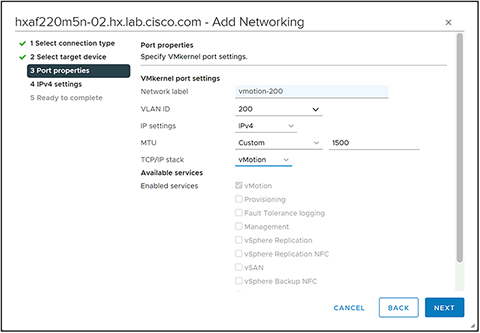
Step 16. Click the Add Networking Button.
Step 17. Select the option for VMkernel Network Adapter, then click Next.
Step 18. Select the option for Select an existing standard switch, then click Browse. Select “vSwitch0” from the list and click OK. Then click Next.
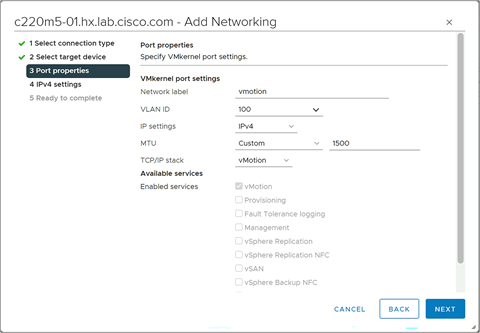
Step 19. Enter a name for the new port group, enter the VLAN ID for the vMotion traffic, select a custom MTU and enter 1500 for the value, and select Default for the TCP/IP stack, check the box for vMotion as an enabled service, then click Next.
Step 20. Select the option for Use static IP address, enter the IP address and the subnet mask, but do not enter a custom gateway, then click Next.
Step 21. Click Finish.
Step 22. Repeat steps 12 through 21 for each remaining ESXi host in the Cisco Compute Hyperconverged with Nutanix cluster, adding a new vMotion VMkernel port to each node in the existing Cisco HyperFlex vMotion VLAN, and disabling vMotion on the default VMkernel port.
After the previous steps are completed, the new Nutanix nodes will each have a new vMotion-enabled VMkernel port using the default TCP/IP stack, allowing direct Layer 2 vMotion traffic to reach the vMotion VMkernel ports of the Cisco HyperFlex cluster nodes. In most cases Cisco HyperFlex clusters are built with jumbo frames enabled on their vMotion VMkernel ports. This leads to a mismatched configuration between the existing Cisco HyperFlex cluster and the new Cisco Compute Hyperconverged with Nutanix cluster, which will cause vMotion failures. If all the upstream network switches and interfaces have all been configured to support jumbo frames, then the configuration steps to enable jumbo frames for vMotion can be followed in the section of the document following this one. If jumbo frames cannot be used, then the vMotion VMkernel ports of the existing Cisco HyperFlex cluster need to be verified or modified to only transmit standard MTU packets.
To modify the existing Cisco HyperFlex vMotion VMkernel ports for standard MTU transmission, complete the following steps:
Procedure 2. Verify or Modify the Cisco HyperFlex vMotion VMkernel Ports MTU Settings
Step 1. Log in to the vCenter server managing the HyperFlex cluster using an account with administrative rights.
Step 2. From the inventory screen, locate the Datacenter and Cluster running HyperFlex, then click on the first ESXi node of the cluster.
Step 3. Click the Configure tab, then under Networking click Virtual Switches.
Step 4. Locate the standard virtual switch named “vmotion” and expand the view to see the configured adapters and port groups.
Step 5. Click on the ellipses (…) next to the existing vMotion VMkernel port named vmk2, then click Edit Settings.
Step 6. Modify the MTU setting to 1500, then click OK.
Procedure 3. Test vMotion Networking and vMotion Migrations
Step 1. SSH into one of the Cisco Compute Hyperconverged with Nutanix ESXi hosts via command line or by using a utility such as Putty or MobaXTerm, connecting to the management IP address of the ESXi host and logging in as root.
Step 2. From the command line, ping the Cisco HyperFlex hosts’ vMotion IP addresses one by one to test that the vMotion networking is functioning properly. The vmkping utility has specific switches that can be used to test vMotion communication; see the example below:
Step 3. vmkping -4 192.168.200.61
Step 4. SSH into one of the Cisco HyperFlex ESXi hosts via command line or by using a utility such as Putty or MobaXTerm, connecting to the management IP address of the ESXi host and logging in as root.
Step 5. From the command line, ping the Cisco Compute Hyperconverged with Nutanix hosts’ vMotion IP addresses one by one to test that the vMotion networking is functioning properly. The vmkping utility has specific switches that can be used to test vMotion communication, see the example below:
Step 6. vmkping -4 192.168.200.81
Step 7. From vCenter, identify a VM to use for a test migration in the source Cisco HyperFlex cluster, or build a new VM for testing purposes.
Step 8. Perform a migration via vCenter of the virtual machine. When the two clusters are managed by the same vCenter server, or the two vCenter servers operating in Enhanced Link Mode, select the option “Change both compute resource and storage.” If performing an Advanced Cross vCenter vMotion, select the option “Cross vCenter Server export” and enter the second vCenter details in the next screen.
Step 9. Select the new Cisco Compute Hyperconverged with Nutanix cluster as the destination, and a datastore hosted by the Cisco Compute Hyperconverged with Nutanix cluster as the new storage location.
Step 10. Observe the migration until it completes successfully.
VMotion using a common management subnet
This alternative solution uses the management VLAN of the two clusters, assuming they are both deployed using the same VLAN and subnet. The Cisco HyperFlex cluster can be reconfigured with vMotion VMkernel ports in the management virtual switch after removing the existing VMkernel ports. This simplified configuration is possible for situations where you can make the network configuration changes to the existing Cisco HyperFlex cluster, and you do not wish to significantly modify the networking configuration of the new Cisco Compute Hyperconverged with Nutanix cluster.
Common management and vMotion VLANs
To reconfigure the VMkernel ports on the Cisco HyperFlex nodes, complete the following steps:
Procedure 1. Reconfigure the VMkernel ports for vMotion on Cisco HyperFlex
Step 1. Log in to the vCenter server managing the Cisco HyperFlex cluster using an account with administrative rights.
Step 2. From the inventory screen, locate the Datacenter and Cluster running Cisco HyperFlex, then click on the first ESXi node of the cluster.
Step 3. Click the Configure tab, then under Networking click Virtual Switches.
Step 4. Click the ellipses (…) next to the vmk2 VMkernel port in the virtual switch named “vmotion,” then click Remove.
Step 5. Click Remove in the pop-up window.
Step 6. Click the ellipses (…) next to the default vmk0 VMkernel port in the virtual switch named “vswitch-hx-inband-mgmt,” then click Edit Settings.
Step 7. Check the box for vMotion, then click OK.
Step 8. Repeat steps 2 through 7 for each remaining ESXi host in the Cisco HyperFlex cluster, removing the existing vMotion VMkernel port on each node, and enabling the existing management VMkernel port for vMotion services.
After the previous steps are completed, the new Nutanix nodes and the existing Cisco HyperFlex nodes will each have vMotion- enabled VMkernel ports using the default TCP/IP stack in their management VLAN, allowing direct layer 2 vMotion traffic.
Procedure 2. Test vMotion Networking and vMotion Migrations
Step 1. SSH into one of the Cisco Compute Hyperconverged with Nutanix ESXi hosts via command line or by using a utility such as Putty or MobaXTerm, connecting to the management IP address of the ESXi host and logging in as root.
Step 2. From the command line ping the Cisco HyperFlex hosts’ vMotion IP addresses one by one to test that the vMotion networking is functioning properly. The vmkping utility has specific switches that can be used to test vMotion communication, see the example below:
vmkping -4 192.168.200.61
Step 3. SSH into one of the Cisco HyperFlex ESXi hosts via command line or by using a utility such as Putty or MobaXTerm, connecting to the management IP address of the ESXi host and logging is as root.
Step 4. From the command line ping the Cisco Compute Hyperconverged with Nutanix hosts’ vMotion IP addresses one by one to test that the vMotion networking is functioning properly. The vmkping utility has specific switches that can be used to test vMotion communication, see the example below:
vmkping -4 192.168.200.81
Step 5. From vCenter, identify a VM to use for a test migration in the source Cisco HyperFlex cluster, or build a new VM for testing purposes.
Step 6. Perform a migration via vCenter of the virtual machine. When the two clusters are managed by the same vCenter server, or the two vCenter servers operating in Enhanced Link Mode, select the option “Change both compute resource and storage.” If performing an Advanced Cross vCenter vMotion, select the option “Cross vCenter Server export” and enter the second vCenter details in the next screen.
Step 7. Select the new Cisco Compute Hyperconverged with Nutanix cluster as the destination, and a datastore hosted by the Cisco Compute Hyperconverged with Nutanix cluster as the new storage location.
Step 8. Observe the migration until it completes successfully.
VMotion between routed subnets
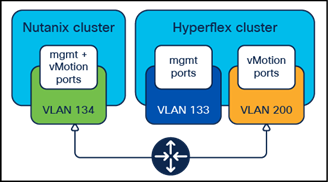
Configuring two clusters to migrate virtual machines between them using fully routed subnets requires reconfiguration work in the upstream network if the two VLANs are not already configured to be routable. Instructions for configuring these subnets and VLANs to be made routable are not addressed in this document. There are two distinct scenarios that are possible when attempting to configure a new Cisco Compute Hyperconverged with Nutanix cluster to migrate data from an existing Cisco HyperFlex cluster; the first is if the new Cisco Compute Hyperconverged with Nutanix cluster and the existing HyperFlex cluster use the same management subnet and VLAN, and the second when their management networks are on separate subnets. The process for configuring routed vMotion between the clusters is different based upon which scenario the two systems fall under.
Routed vMotion with Common Management Subnets
In a default configuration, Cisco Compute Hyperconverged with Nutanix system uses a single VMkernel port for management and vMotion, whereas Cisco HyperFlex splits them into two different VMkernel ports across two VLANs. If the new Nutanix system and the existing Cisco HyperFlex system are built using the same VLAN for management, this creates a routing problem when attempting to use routed vMotion traffic between them.
Common Management VLANs
Specifically, some packets from the Cisco HyperFlex system may not respond via the correct interface, causing vMotion failures and failures during testing using vmkping. This is a common issue with many operating systems when they have multiple interfaces which can reach the same destination. Although some solutions exist involving custom routing tables and rules, the simplest approach is to create a new vMotion VMkernel port on the new Nutanix nodes operating in a distinct subnet and VLAN, as shown below. In addition, the default vMotion VMkernel ports of the Cisco HyperFlex nodes will need to be modified or recreated so that they also properly route traffic.
Distinct vMotion VLANs
Note: Prior to beginning the configuration process below, the VLANs must be defined in the upstream network, they must be routable to each other with gateways configured, and the VLANs must be trunked to the Cisco UCS domains via the uplinks to both Cisco Fabric Interconnects. For example, in the diagram above, the Cisco UCS domain operating the Cisco HyperFlex cluster must have VLAN 200 trunked to the Fabric Interconnects, and the Cisco UCS domain operating the Cisco Compute Hyperconverged with Nutanix cluster must have VLAN 100 trunked to the Fabric Interconnects.
To configure the new routed VMkernel ports on the Nutanix nodes, complete the following steps:
Procedure 1. Configure new routed VMkernel ports for vMotion on Cisco Compute Hyperconverged with Nutanix cluster
Step 1. Log in to Cisco UCS Manager for the Fabric Interconnects that are managing the new Cisco Compute Hyperconverged with Nutanix cluster.
Step 2. In the left-hand navigation menu, click LAN, then in the navigation tree, under LAN > LAN cloud, click VLANs.
Step 3. Click the Add button to add the new VLAN, which will be used by the Cisco Compute Hyperconverged with Nutanix cluster for routed vMotion traffic if it does not already exist.
Step 4. Enter the VLAN name and VLAN ID for the new VLAN, then click OK.
Step 5. In the left-hand navigation menu, click Servers, then in the navigation tree, under Servers > Service Profiles > root, locate the first service profile for the first Nutanix node and click on it.
Step 6. Click on the Network tab at the top, scroll to the bottom of the main screen and click on the first vNIC named “1-fabric-A,” then click the Modify button.
Step 7. Click the checkbox next to the desired VLAN and ensure that the Native VLAN radio button is not selected, then click OK.
Step 8. Repeat steps 6 and 7 for the second vNIC named “1-fabric-B.”
Step 9. Click the Save Changes button.
Step 10. Repeat steps 5 through 9 for all the remaining service profiles associated with the Nutanix servers, adding the needed VLAN to both vNICs in each service profile.
Step 11. Log in to the vCenter server managing the Cisco Compute Hyperconverged with Nutanix cluster using an account with administrative rights.
Step 12. From the inventory screen, locate the Datacenter and Cluster running Nutanix, then click on the first ESXi node of the cluster.
Step 13. Click the Configure tab, then under Networking click Virtual Switches.
Step 14. Click the Add Networking Button.
Step 15. Select the option for VMkernel Network Adapter, then click Next.
Step 16. Select the option for Select an existing standard switch, then click Browse. Select "vSwitch0" from the list and click OK. Then click Next.
Step 17. Enter a name for the new port group, enter the VLAN ID for the vMotion traffic, select a custom MTU and enter 1500 for the value, and select vMotion for the TCP/IP stack, then click Next.
Step 18. A warning will appear saying that the existing vMotion VMkernel port will no longer be used and be disabled. Click OK.
Step 19. Select the option for Use static IP address, enter the IP address and the subnet mask, but do not enter a custom gateway, then click Next.
Step 20. Click Finish.
Step 21. Click the Configure tab, then under Networking click TCP/IP Configuration.
Step 22. Select the vMotion TCP/IP stack then click Edit.
Step 23. Enter the gateway IP address for the vMotion subnet, then click OK.
Step 24. Repeat steps 12 through 23 for each remaining ESXi host in the Cisco Compute Hyperconverged with Nutanix cluster, adding a new vMotion VMkernel port to each node, and configuring their vMotion TCP/IP stack gateways.
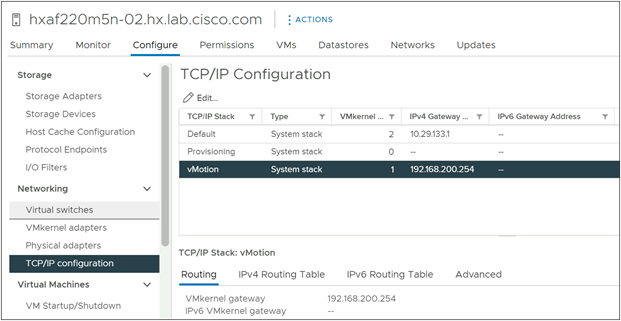
After the previous steps are completed, the new Nutanix nodes will each have a new vMotion-enabled VMkernel port using the vMotion TCP/IP stack, which uses its own unique gateway, allowing vMotion traffic to be routed across the network. The next step is to reconfigure the existing vMotion VMkernel ports on the Cisco HyperFlex nodes as they are configured to use the default TCP/IP network stack during installation. This configuration would not allow for routable vMotion traffic, therefore the supported method to enable routable vMotion traffic is to recreate the vMotion VMkernel port and port group using the vMotion TCP/IP stack.
To reconfigure the existing VMkernel ports on the existing Cisco HyperFlex nodes, complete the following steps:
Procedure 2. Reconfigure existing VMkernel ports for vMotion on HyperFlex
Step 1. Log in to the vCenter server managing the HyperFlex cluster using an account with administrative rights.
Step 2. From the inventory screen, locate the Datacenter and Cluster running HyperFlex, then click on the first ESXi node of the cluster.
Step 3. Click the Configure tab, then under Networking click Virtual Switches.
Step 4. Locate the standard virtual switch named “vmotion” and expand the view to see the configured adapters and port groups.
Step 5. Examine the configuration of the vMotion port group and VMkernel port, noting the VLAN ID used, and the IP address assigned.
Step 6. Click on the ellipses (…) next to the name of the vMotion port group and click Remove. Click Yes to confirm the removal.
Step 7. Click the Add Networking Button.
Step 8. Select the option for VMkernel Network Adapter, then click Next.
Step 9. Select the option for Select an existing standard switch, then click Browse. Select “vmotion” from the list and click OK. Then click Next.
Step 10. Enter a name for the new port group, enter the VLAN ID for the vMotion traffic, select a custom MTU and enter 1500 for the value, and select vMotion for the TCP/IP stack, then click Next.
Step 11. Select the option for Use static IP address, enter the IP address and the subnet mask, but do not enter a custom gateway, then click Next.
Step 12. Click Finish.
Step 13. Click the Configure tab, then under Networking click TCP/IP Configuration.
Step 14. Select the vMotion TCP/IP stack then click Edit.
Step 15. Enter the gateway IP address for the vMotion subnet, then click OK.

Step 16. Repeat steps 2 through 15 for each remaining ESXi host in the HyperFlex cluster, removing the existing vMotion VMkernel port and adding a new vMotion VMkernel port to each node, and configuring their vMotion TCP/IP stack gateways.
After the previous steps are completed, both the Nutanix and HyperFlex clusters will have the correct configuration for routable vMotion traffic. In the following steps, communication between the clusters is tested and initial test vMotion migrations can be attempted.
To test the new vMotion configuration and test migrating virtual machines, complete the following steps:
Procedure 3. Test vMotion Networking and vMotion Migrations
Step 1. SSH into one of the Cisco Compute Hyperconverged with Nutanix ESXi hosts via command line or by using a utility such as Putty or MobaXTerm, connecting to the management IP address of the ESXi host and logging in as root.
Step 2. From the command line ping the Cisco HyperFlex hosts’ vMotion IP addresses one by one to test that the vMotion networking is functioning properly. The vmkping utility has specific switches that can be used to test vMotion communication, see the example below:
vmkping -4 -S vmotion 192.168.200.61
Step 3. SSH into one of the Cisco HyperFlex ESXi hosts via command line or by using a utility such as Putty or MobaXTerm, connecting to the management IP address of the ESXi host and logging is as root.
Step 4. From the command line ping the Cisco Compute Hyperconverged with Nutanix hosts’ vMotion IP addresses one by one to test that the vMotion networking is functioning properly. The vmkping utility has specific switches that can be used to test vMotion communication, see the example below:
vmkping -4 -S vmotion 192.168.100.61
Step 5. From vCenter, identify a VM to use for a test migration in the source Cisco HyperFlex cluster, or build a new VM for testing purposes.
Step 6. Perform a migration via vCenter of the virtual machine. When the two clusters are managed by the same vCenter server, or the two vCenter servers operating in Enhanced Link Mode, select the option “Change both compute resource and storage.” If performing an Advanced Cross vCenter vMotion, select the option “Cross vCenter Server export” and enter the second vCenter details in the next screen.
Step 7. Select the new Cisco Compute Hyperconverged with Nutanix cluster as the destination, and a datastore hosted by the Cisco Compute Hyperconverged with Nutanix cluster as the new storage location.
Step 8. Observe the migration until it completes successfully.
Routed vMotion with Separate Management Subnets
A new deployment of a Cisco Compute Hyperconverged with Nutanix cluster using a separate management subnet and VLAN allows for migrations using routable vMotion traffic, but with less reconfiguration work than if the two clusters used a common management subnet and VLAN. Assuming the management VLAN and subnet of the new Cisco Compute Hyperconverged with Nutanix cluster is already routable and can reach the subnet and VLAN used by the existing Cisco HyperFlex cluster, then no configuration work is necessary in Cisco UCS Manager for the new Cisco Compute Hyperconverged with Nutanix cluster. All that is required is to remove the existing vMotion VMkernel ports on the Cisco HyperFlex cluster and recreate them using the vMotion TCP/IP stack with their own appropriate gateway IP address.
Separate Management VLANs
To reconfigure the existing VMkernel ports on the existing Cisco HyperFlex nodes, complete the following steps:
Procedure 1. Reconfigure existing VMkernel ports for vMotion on HyperFlex
Step 1. Log in to the vCenter server managing the HyperFlex cluster using an account with administrative rights.
Step 2. From the inventory screen, locate the Datacenter and Cluster running HyperFlex, then click on the first ESXi node of the cluster.
Step 3. Click the Configure tab, then under Networking click Virtual Switches.
Step 4. Locate the standard virtual switch named “vmotion” and expand the view to see the configured adapters and port groups.
Step 5. Examine the configuration of the vMotion port group and VMkernel port, noting the VLAN ID used, and the IP address assigned.
Step 6. Click on the ellipses (…) next to the name of the vMotion port group and click Remove. Click Yes to confirm the removal.
Step 7. Click the Add Networking Button.
Step 8. Select the option for VMkernel Network Adapter, then click Next.
Step 9. Select the option for Select an existing standard switch, then click Browse. Select “vmotion” from the list and click OK. Then click Next.
Step 10. Enter a name for the new port group, enter the VLAN ID for the vMotion traffic, select a custom MTU and enter 1500 for the value, and select vMotion for the TCP/IP stack, then click Next.

Step 11. Select the option for Use static IP address, enter the IP address and the subnet mask, but do not enter a custom gateway, then click Next.
Step 12. Click Finish.
Step 13. Click the Configure tab, then under Networking click TCP/IP Configuration.
Step 14. Select the vMotion TCP/IP stack then click Edit.
Step 15. Enter the gateway IP address for the vMotion subnet, then click OK.
Step 16. Repeat steps 2 through 15 for each remaining ESXi host in the HyperFlex cluster, removing the existing vMotion VMkernel port and adding a new vMotion VMkernel port to each node, and configuring their vMotion TCP/IP stack gateways.
After the previous steps are completed, the Nutanix and HyperFlex clusters will have the correct configuration for routable vMotion traffic. In the following steps, communication between the clusters is tested and initial test vMotion migrations can be attempted.
To test the new vMotion configuration and test migrating virtual machines, complete the following steps:
Procedure 2. Test vMotion Networking and vMotion Migrations
Step 1. SSH into one of the Cisco Compute Hyperconverged with Nutanix ESXi hosts via command line or by using a utility such as Putty or MobaXTerm, connecting to the management IP address of the ESXi host and logging in as root.
Step 2. From the command line, ping the Cisco HyperFlex hosts’ vMotion IP addresses one by one to test that the vMotion networking is functioning properly. The vmkping utility has specific switches that can be used to test vMotion communication, see the example below:
vmkping -4 -I vmk0 192.168.200.61
Step 3. SSH into one of the Cisco HyperFlex ESXi hosts via command line or by using a utility such as Putty or MobaXTerm, connecting to the management IP address of the ESXi host and logging is as root.
Step 4. From the command line, ping the Cisco Compute Hyperconverged with Nutanix hosts’ vMotion IP addresses one by one to test that the vMotion networking is functioning properly. The vmkping utility has specific switches that can be used to test vMotion communication, see the example below:
vmkping -4 -S vmotion 10.29.133.231
Step 5. From vCenter, identify a VM to use for a test migration in the source Cisco HyperFlex cluster, or build a new VM for testing purposes.
Step 6. Perform a migration via vCenter of the virtual machine. When the two clusters are managed by the same vCenter server, or the two vCenter servers operating in Enhanced Link Mode, select the option “Change both compute resource and storage.” If performing an Advanced Cross vCenter vMotion, select the option “Cross vCenter Server export” and enter the second vCenter details in the next screen.
Step 7. Select the new Cisco Compute Hyperconverged with Nutanix cluster as the destination, and a datastore hosted by the Cisco Compute Hyperconverged with Nutanix cluster as the new storage location.
Step 8. Observe the migration until it completes successfully.
In many network environments, not all interfaces or port-channels of the network switches will be configured to support jumbo frames, or IP frames with a larger than standard 1500 byte maximum payload. Enabling jumbo frames can at times help with large network transfers by sending larger payloads per frame and reducing TCP overhead due to the lesser number of packets being transferred. VMotion migrations are an example where such improvements are often can be seen in reduced VM migration time. The default configuration of a new Cisco Compute Hyperconverged with Nutanix cluster is not set to utilize jumbo frames, meanwhile many Cisco HyperFlex clusters are. If jumbo frames are supported by the upstream network switches and interfaces, then jumbo frames can optionally be enabled for the vMotion VMkernel ports on the Cisco Compute Hyperconverged with Nutanix cluster in some configurations. Changes must also be made to the Cisco UCS Manager configuration for the Fabric Interconnects that are managing the new Cisco Compute Hyperconverged with Nutanix cluster before they will pass jumbo frames, assuming the UCS domain is a new installation with no existing configuration.
Note: Enabling jumbo frames is not possible with the default configuration of a Cisco Compute Hyperconverged with Nutanix cluster, as there is only a single VMkernel port enabled for both management traffic and vMotion services. Enabling jumbo frames for the management VMkernel port will lead to connectivity failures and must be avoided. Enabling jumbo frames is only possible when separate vMotion enabled VMkernel ports are configured, as outlined in the steps above. For “shared nothing” storage vMotions migrating VMs across clusters, our testing has not shown significant reductions in migration times, as other internal architectural bottlenecks exist within the ESXi hypervisor. Therefore, configuring jumbo frames should only be attempted when you are completely comfortable and familiar with the processes, and require slightly decreased migration times.
To enable jumbo frames where possible for vMotion traffic, complete the following steps:
Procedure 1. Enable jumbo frames for vMotion traffic
Step 1. Log in to Cisco UCS Manager for the Fabric Interconnects that are managing the new Cisco Compute Hyperconverged with Nutanix cluster.
Step 2. In the left-hand navigation menu, click LAN, then in the navigation tree, under LAN > LAN cloud, click QoS System Class.
Step 3. Modify the MTU field for Best Effort class to 9216, then click Save Changes.
Step 4. Log in to the vCenter server managing the Cisco Compute Hyperconverged with Nutanix cluster using an account with administrative rights.
Step 5. From the inventory screen, locate the Datacenter and Cluster running Nutanix, then click on the first ESXi node of the cluster.
Step 6. Click the Configure tab, then under Networking click Virtual Switches.
Step 7. Expand the section for standard switch “vSwitch0,” then click Edit.
Step 8. Modify the MTU setting to 9000, then click OK.
Step 9. Click on the ellipses (…) next to the existing vMotion VMkernel port named vmk2, then click Edit Settings. Do not modify this setting if the default management port named vmk0 is also the enabled vMotion port.
Step 10. Modify the MTU setting to 9000, then click OK.
Step 11. Repeat steps 5 through 10 for each remaining ESXi host in the Cisco Compute Hyperconverged with Nutanix cluster.
Step 12. From the inventory screen, locate the Datacenter and Cluster running HyperFlex, then click on the first ESXi node of the cluster.
Step 13. Click the Configure tab, then under Networking click Virtual Switches.
Step 14. Expand the section for standard switch “vmotion,” then click Edit.
Step 15. Modify or verify the MTU setting to 9000, then click OK.
Step 16. Click on the ellipses (…) next to the existing vMotion VMkernel port named vmk2, then click Edit Settings.
Step 17. Modify or verify the MTU setting to 9000, then click OK.
Step 18. Repeat steps 12 through 17 for each remaining ESXi host in the Cisco HyperFlex cluster.
Procedure 2. Test vMotion Networking and vMotion Migrations
Step 1. SSH into one of the Cisco Compute Hyperconverged with Nutanix ESXi hosts via command line or by using a utility such as Putty or MobaXTerm, connecting to the management IP address of the ESXi host and logging in as root.
Step 2. From the command line, ping the Cisco HyperFlex hosts’ vMotion IP addresses one by one to test that the vMotion networking is functioning properly. The vmkping utility has specific switches that can be used to test vMotion communication with jumbo frames and not allowing packets to be fragmented, as shown in the example below:
vmkping -4 -S vmotion -d -s 8972 192.168.200.61
Step 3. SSH into one of the Cisco HyperFlex ESXi hosts via command line or by using a utility such as Putty or MobaXTerm, connecting to the management IP address of the ESXi host and logging is as root.
Step 4. From the command line, ping the Cisco Compute Hyperconverged with Nutanix hosts’ vMotion IP addresses one by one to test that the vMotion networking is functioning properly. The vmkping utility has specific switches that can be used to test vMotion communication with jumbo frames and not allowing packets to be fragmented, as shown in the example below:
vmkping -4 -S vmotion -d -s 8972 192.168.100.61
Step 5. From vCenter, identify a VM to use for a test migration in the source Cisco HyperFlex cluster, or build a new VM for testing purposes.
Step 6. Perform a migration via vCenter of the virtual machine. When the two clusters are managed by the same vCenter server, or the two vCenter servers operating in Enhanced Link Mode, select the option “Change both compute resource and storage.” If performing an Advanced Cross vCenter vMotion, select the option “Cross vCenter Server export” and enter the second vCenter details in the next screen.
Step 7. Select the new Cisco Compute Hyperconverged with Nutanix cluster as the destination, and a datastore hosted by the Cisco Compute Hyperconverged with Nutanix cluster as the new storage location.
Step 8. Observe the migration until it completes successfully.
Note: In Cisco’s testing of VM migrations between Cisco HyperFlex and Cisco Compute Hyperconverged with Nutanix clusters, VMs move at a rate of roughly 10‒12 GB/min per VM migration even with jumbo frames enabled. This suggests that the speed limitation on vMotion based migrations is not related to network bandwidth. As such, enabling jumbo frames between clusters is not required or recommended as it does not significantly improve cross-cluster migration speeds. On the other hand, the general recommendation is to enable jumbo frames between the nodes in a single cluster whenever possible because it does have a positive impact on vMotion speeds within that cluster while performing live migrations from node to node.
VMotion Migration Limits and Performance
Migrating virtual machines via vMotion has hard set limitations on the scale and number of simultaneous migrations set by VMware. VMotion with non-shared storage, as is the case with the “shared nothing” configuration, is limited to two simultaneous migrations per host. This limitation applies to the source hosts and the receiving hosts. For example, a source Cisco HyperFlex cluster with four nodes will only be able to simultaneously migrate eight VMs to a new cluster, assuming the new Cisco Compute Hyperconverged with Nutanix cluster also has four or more nodes. Inversely, a source Cisco HyperFlex cluster with eight nodes would only be able to simultaneously migrate eight VMs if the new Cisco Compute Hyperconverged with Nutanix cluster only had four nodes. Exceeding this limitation pauses all additional migration tasks until other migration tasks have completed.
Because of this limitation, performing large scale simultaneous migrations between clusters can only be accomplished via careful selection of the VMs being moved when creating the migration tasks, and targeting specific hosts within the destination cluster for each task. For example, if a task were created to move eight VMs between two clusters of four nodes each, this would in theory not violate the maximum simultaneous limits for the vMotion migrations. However, if the eight VMs being moved were chosen randomly, some of the source hosts may be tasked to move three or more VMs at once, while others would only move one VM or none. In this situation, the hosts migrating three or more VMs would pause all the migrations beyond the first two until one of the first two migrations completed, then it would resume the next migration. In a similar vein, if the eight VMs had been carefully chosen to migrate two from each of the four hosts, but the migration was attempted as a single task, targeting the destination cluster, and allowing DRS to determine the VM placement, then only two VM migrations will begin with the additional migrations pausing until earlier ones complete. The only way to achieve migrating eight VMs simultaneously in this scenario is to create four migration tasks, each one selecting two VMs from a single source host while targeting a single destination host.
During migration testing, virtual machines move at roughly 200 MB/sec per VM being migrated, or approximately 10-12 GB/min. At that pace, a 10-Gb ethernet network between the two clusters would be saturated beyond 6 simultaneous migrations, a 25- Gb ethernet network would be saturated beyond 15 simultaneous migrations, and 40-Gb Ethernet would be saturated beyond 24 simultaneous migrations. Based upon the per node limits for simultaneous migrations, to migrate 24 VMs at the same time would require source and destination clusters of at least 12 nodes each. Cisco has not been able to test mass migrations at this scale to establish what, if any, additional bottlenecks may slow down the speed of migrations beyond this basic observation of per VM migration speed. For additional information about the observed and expected speeds of cross-cluster “shared nothing” vMotions, refer to the following knowledge base article:
https://portal.nutanix.com/page/documents/kbs/details?targetId=kA032000000TT12CAG
Nutanix Move is a free tool for migrating virtual machines between clusters running several different software and hardware platforms. Nutanix Move can be used for the total migration strategy between an existing Cisco HyperFlex cluster and a new Cisco Compute Hyperconverged with Nutanix cluster, perhaps because technical issues prevent a migration strategy using vMotion, long-distance migrations with low bandwidth or unreliable connections, or for other specific situations where the features of Nutanix Move prove to be beneficial. Nutanix Move migrates VMs between systems in a two-step process; first by creating a migration plan, which when executed performs an initial data seeding, or synchronization of the source and destination systems via VM snapshots, and second as a cutover job that shuts down the original VM and creates the new VM in the new system using the seeded data. In contrast to a vMotion migration, this process does require downtime of the VM being moved, so use of the Move tool would not be the optimal choice for systems that must maintain 100% uptime as would normally be achieved using vMotion. In general, the downtime required is roughly equal to that of a reboot of the VMs in question.
Note: Because Move also uses a snapshot mechanism for data seeding and periodic synchronization, Move will remove all existing VMware or Cisco HyperFlex native snapshots when a migration plan is started.
Nutanix Move is deployed as a virtual machine from a Virtual Server Template (OVA) image file and is deployed to the new destination Cisco Compute Hyperconverged with Nutanix cluster according to the recommendations from Nutanix. The Move VM then establishes connections to the vCenter server managing the source Cisco HyperFlex cluster, and the Prism Element manager of the destination Cisco Compute Hyperconverged with Nutanix cluster. As such, the Move VM must be deployed with its virtual network adapter connected to a port group where it can reach both environments simultaneously via the network. Details of the installation and use of Nutanix Move are not provided in this document, the publicly available documentation for installing and using Nutanix Move is available here:
https://portal.nutanix.com/page/documents/details?targetId=Nutanix-Move-v4_9:Nutanix-Move-v4_9
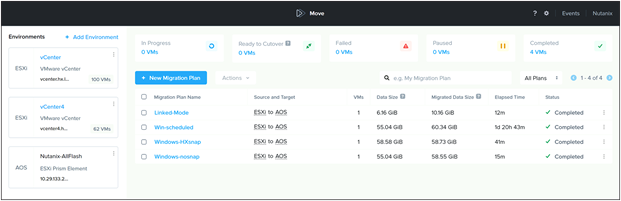
Nutanix Move tool
The following provides a list of considerations and observations when using Nutanix Move, plus recommendations for conducting migrations between Cisco Hyperflex and Cisco Compute Hyperconverged with Nutanix:
● By default, the Nutanix Move VM uses Dynamic Host Configuration Protocol (DHCP) for automatic IP addressing. If a static IP address is required, consult the official documentation via the link above to set an address manually after the VM deployment.
● Nutanix Move can be controlled via its embedded API. Please refer to the API documentation link from the Move Dashboard.
● Although both the source Cisco HyperFlex cluster and the destination Cisco Compute Hyperconverged with Nutanix cluster are using the ESXi hypervisor, the environment connections made in the Move dashboard are to the vCenter server managing the source Cisco HyperFlex cluster, and to the Prism Element manager webpage running on the destination Cisco Compute Hyperconverged with Nutanix cluster. The Move tool does not connect to the destination Cisco Compute Hyperconverged with Nutanix cluster via its managing vCenter server.
● The source Cisco HyperFlex cluster and destination Cisco Compute Hyperconverged with Nutanix cluster can be managed by the same vCenter server, separate vCenter servers, or separate vCenter servers in Linked Mode.
● When migrating VMs from multiple clusters managed by multiple vCenter servers, each vCenter server must be added as a unique environment, even if they are configured to operate in Linked Mode.
● As of Nutanix Move 4.9, up to 100 VMs can be included in a single migration plan.
● Migration plans are created to target individual VMs or groups of VMs to be migrated using common settings, such as which source and destination environment are specified, which datastore to place the migrated VMs into. For example, there may be multiple source clusters being migrated from, or there may be multiple datastores in the new destination cluster. For each of those scenarios a different migration plan would need to be created.
● All the VMs in a migration plan will be connected to the same destination virtual network; therefore if VMs need to be distributed across different virtual port groups, they must be migrated in separate migration plans.
● VMs being migrated can have their static addresses reset back to DHCP; however Move does not automate the process of changing from an existing static IP address to a new static IP address.
● VMs being migrated can be configured to retain their existing MAC addresses if desired.
● During the creation of the migration plan, the initial data seeding can be scheduled to begin later, avoiding periods of heavy utilization or backup windows.
● At the beginning of the data seeding process all existing snapshots of any type are deleted, and new snapshots are taken by the Move tool to perform the data synchronization.
● After the initial data seeding is completed, the cutover job must be manually started and cannot be scheduled in the graphical user interface.
● When the source Cisco HyperFlex cluster and the destination Cisco Compute Hyperconverged with Nutanix cluster are managed by the same vCenter server, the newly migrated VM in the new cluster must be configured with a new name in the vCenter inventory. This name change can be done in the settings of the cutover job before it begins. In this scenario, if the VM is not given a new name in the inventory, the cutover job will fail.
● When the source Cisco HyperFlex cluster and the destination Cisco Compute Hyperconverged with Nutanix cluster are managed by different vCenter servers, even vCenter servers in Linked Mode, the new VM on the destination cluster does not need to be renamed.
● As part of the cutover job, the virtual CPU and virtual RAM configurations of the VMs can be changed if desired.
● The original VMs in the source cluster are left in the inventory, but powered off and with their virtual network adapters disconnected in case they are accidentally turned back on. To fail back, the original VM must have its virtual network adapter reconnected in the VM settings before turning the VM back on.
● The new VMs migrated by Move will have no snapshots after the cutover job completes, and all snapshots taken by Move during the data seeding and synchronization on the source VMs will also be deleted during the cutover job.
Nutanix Move Migrations
Migrations of VMs using the free Move tool start with the deployment of the Move tool from an OVA file to the new Cisco Compute Hyperconverged with Nutanix cluster. After configuring the Move tool with an IP address and changing the default password, configuration and migrations can begin.
Procedure 1. Connect Nutanix Move to the source and destination environments.
Step 1. From the Move homepage, click Add Environment.
Step 2. Choose the environment type and enter the remaining information, such as the vCenter address or Prism address, username and password, then click Add.
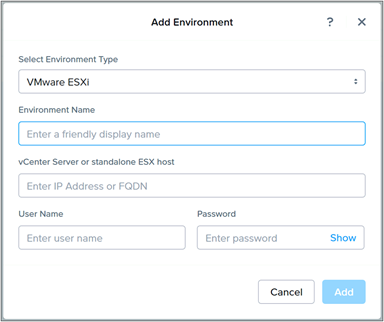
Step 3. Repeat these steps for each environment needed as a source or destination for the migrations.
Procedure 2. Create a migration plan.
Step 1. Ensure the environments have refreshed their inventories. From the Move homepage, click the ellipses (…) next to each environment and click Refresh.
Step 2. From the Move homepage, click New Migration Plan.
Step 3. Give the new migration plan a descriptive name and click Proceed.
Step 4. Select the source and destination environments and choose the target storage container for the VMs being moved, then click Next.
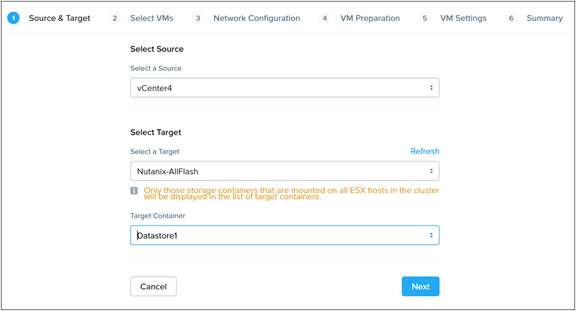
Step 5. Select the VMs to move by clicking on the + symbol next to them, then click Next.
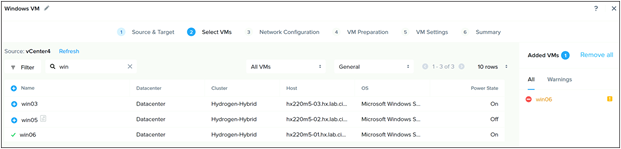
Step 6. Select the target networking port group to connect the VM to, then click Next.
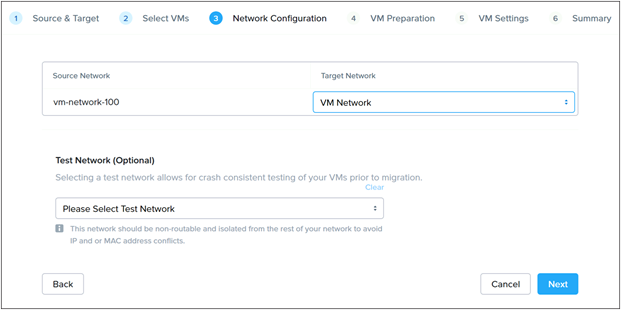
Step 7. Select the desired preparation mode and options, such as retaining the existing static IP address, then click Next.

Step 8. Select the VM settings needed, including the option to schedule the initial data sync if desired, then click Next.
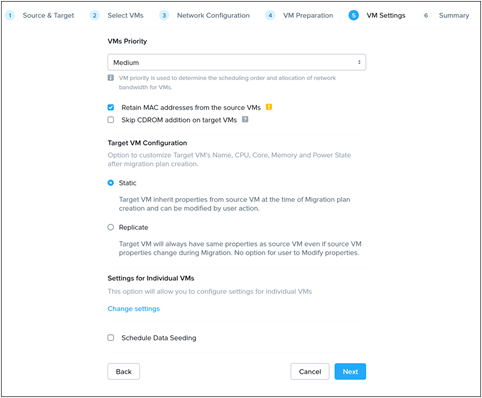
Step 9. Click Save to save the Migration plan to manually start the data sync later or start it according to its schedule or Save and Start to begin the initial data sync right away.
Procedure 3. Monitor the initial data synchronization.
Step 1. In the Move homepage, monitor the Migration Plan(s) until the Status box at the top indicates VMs have a status of Ready to Cutover.
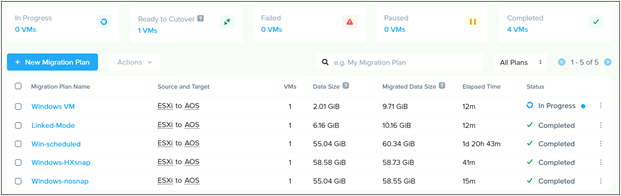
Procedure 4. Perform the cutover.
Step 1. Click on the Status box at the top labeled Ready to Cutover to see the VMs which have finished their initial data sync.
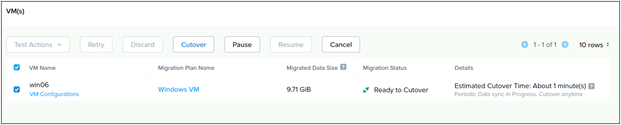
Step 2. If needed, click on the VM configurations link underneath the VM’s name to change the name of the new VM being created from the snapshots. Click on the pencil icon and change the name of the new VM, then click Close.
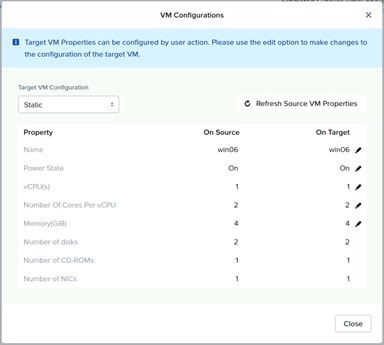
Step 3. Check the box next to the VM(s) which are ready to cutover, then click the Cutover button.
Step 4. Click the X in the upper right-hand corner to return to the homepage to monitor the progress of the cutover jobs until they are completed.
The third-party solution recommendations presented are intended for users that already have Cohesity or Veeam deployed in a production capacity and understand the administration of these solutions. Data protection and disaster recovery solutions provided by Cisco partners provide backup and restore functionality, which may accommodate migration project requirements. In addition to backup and recovery, the solutions also include functionality to conduct “planned migration” operations. The planned migration operation falls into a suite of disaster recovery tools that typically includes the “failover” and “test failover” operations. Users with Cohesity or Veeam deployments are encouraged to understand the capabilities of these products. Note that the solutions presented are specific to migrating from a source HyperFlex cluster running VMware ESXi to a target Cisco Compute Hyperconverged with Nutanix cluster running VMware ESXi.
Cohesity Data Protect
There are two use cases that generally apply to the use of Cohesity for the purpose of data migration. Use case one should be considered when the source HyperFlex cluster and target Cisco Compute Hyperconverged with Nutanix cluster are co-located within close network proximity of each other and connected by means of a LAN (Local Area Network). At a high level this migration strategy consists of a backup of the source HyperFlex VM workload followed by recovery onto the target Cisco Compute Hyperconverged with Nutanix cluster. This migration strategy requires a workload outage that should be understood. From an operational standpoint, a final incremental backup of powered-off VMs occurs on the source HyperFlex cluster prior to recovery onto the target Cisco Compute Hyperconverged with Nutanix cluster. Any required networking or IP address changes may incur additional workload downtime. The recovery method utilized may also impact the total duration of the workload outage.
Use case two should be considered when the source HyperFlex cluster and target Cisco Compute Hyperconverged with Nutanix cluster reside in different locations and are connected by means of a WAN (Wide Area Network). Replication of protected data occurs between different Cohesity clusters. Replicated data consists of snapshots, which represent recovery points for use in planned migration, failover, or failover testing (cloning). Network requirements consist of connectivity between connected Cohesity clusters. Replication traffic can share bandwidth on the primary network. Optionally, a secondary network can be configured such that backup and replication traffic can be segregated. The overall design is largely a customer choice based on business requirements. Bandwidth requirements of the replication network should be understood based on protected workloads and data change rates. At a high level this migration strategy consists of replicating VM backups of the source HyperFlex cluster to the location of the target Cisco Compute Hyperconverged with Nutanix cluster. The net result is that the source HyperFlex VM workload effectively goes through a planned migration process and is recovered on the target Cisco Compute Hyperconverged with Nutanix cluster.
Cohesity Data Protect – scenario one
In this use case the source HyperFlex cluster and target Cisco Compute Hyperconverged with Nutanix cluster are co-located within close network proximity of each other and connected by means of a LAN (Local Area Network). The migration strategy consists of a final incremental backup of powered off VMs on the source HyperFlex cluster followed by recovery onto the target Cisco Compute Hyperconverged with Nutanix cluster. Note that the powering off of VMs is a manual operation.
Sources
In this migration scenario, the existing HyperFlex cluster and vCenter are already registered as sources within the Cohesity Data Protect product. If the target Cisco Compute Hyperconverged with Nutanix cluster is configured to use the same vCenter as the existing HyperFlex cluster, an additional source does not need to be registered. If the target Cisco Compute Hyperconverged with Nutanix cluster is configured to use a new or different vCenter it should be registered as a source within the Cohesity Data Protect product.
Protection groups
A protection group consists of VMs to be protected based on a registered source vCenter. A protection group is associated with a policy. A basic policy includes the frequency or cadence at which backups are performed, as well as a retention period. VM recovery can be performed such that an entire protection group can be recovered simultaneously. When architecting a migration strategy, users may want to consider the use of protection groups as a method to migrate a subset of the total VM workload that needs to be migrated. For example, the use of multiple smaller protection groups that contain fewer VMs will facilitate performing VM migration in smaller batches which may reduce VM outage time when compared to migrating a larger number of VMs in a single large protection group.
Recover to a new location
Backups performed on the source HyperFlex cluster will be recovered to a new location and selecting the “New Location” radio button within the recovery workflow facilitates this requirement. The selected registered source should be the vCenter server associated with the target Cisco Compute Hyperconverged with Nutanix cluster. The resource pool, datastore, and VM folder are also selected at this stage of the recovery workflow. In the event where a given resource pool, datastore, or VM folder do not appear in the pull-down menus yet are known to have been created, refreshing the registered source will update the user interface. To refresh a registered source select “Data Protection > Sources” and the click the ellipses symbol followed by “Refresh.”
Instant recovery or copy recovery
This is important consideration because the selection made at this stage of the recovery workflow will affect recovery time and the total outage time experienced by VMs being migrated. Instant recovery mounts a Cohesity datastore onto one or more of the ESXi hosts in the target Cisco Compute Hyperconverged with Nutanix cluster. The datastore contains the recovered VMs. It is important to understand that the performance of VMs recovered in this manner depend on the I/O performance of the Cohesity datastore. For this reason, the total number of VMs recovered simultaneously should be limited based on available and required IOPs (Input/Output Operations per second) provided by the Cohesity datastore. At the point where instant recovery has completed, the recovered VMs are automatically migrated using storage vMotion from the Cohesity datastore to the previously selected target Cisco Compute Hyperconverged with Nutanix cluster datastore.
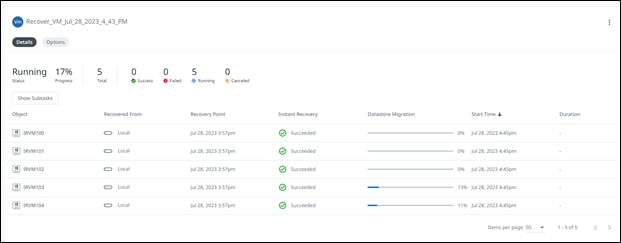
Cohesity instant recovery and datastore migration
The copy recovery method performs a full VM recovery into the previously selected Cisco Compute Hyperconverged with Nutanix cluster datastore. Recovered VMs become usable at the point where all the data has been copied over from the Cohesity cluster to the target Nutanix datastore.
Recovery options
Network options include attaching a named network to the recovered VMs. There are additional options to start the VM with the network connected, and to preserve the MAC address.
Renaming options include the ability to add a VM name prefix and/or suffix. Note that when a single vCenter server is being used as the registered source for both the source HyperFlex cluster and target Cisco Compute Hyperconverged with Nutanix cluster, the names of recovered VMs must either be unique or recovered to a different VM folder. The power state of recovered VMs can be set to “on” or “off.”
Monitoring Recovery
Instant recovery operations will post status for both the instant recovery portion and datastore migration parts of the job. Copy recovery operations will post status that includes a percentage of completion until the point where recovery has completed with a final status of “Succeeded.” While the recovery operation is in progress, the VMs being recovered will appear in vCenter with a name that includes an appended “COHESITY_DO_NOT_USE” suffix. When the recovery operation has completed, the VMs are visible within the Nutanix Prism user interface.
Recovery step-by-step
● Assure that protection group backup and replication jobs have successfully completed prior to commencing recovery. Successful execution of backup and replication effectively seeds the target Cohesity cluster such that the final incremental backup and replication jobs will complete in less time when compared to a full backup and replication operation. Note that the backup of HyperFlex CVMs (Controller VMs) is not necessary or supported.
● Make sure that the vCenter server associated with the target Cisco Compute Hyperconverged with Nutanix cluster is registered as a source within the Cohesity Data Protect product.
● Power off VMs on the source HyperFlex cluster that are to be migrated to the target Cisco Compute Hyperconverged with Nutanix cluster.
● Perform a backup of the source HyperFlex cluster VMs that are to be migrated.
● From the Cohesity user interface select “Data Protection > Recoveries.”
● Click the “Recover” button and select “Virtual Machines > VMs.” Search criteria for VMs to be recovered may consist of the wildcard character (*), partial VM name or the protection group name. Select the protection group or VMs to recover.
● The “Recover To” section is next, and defaults to “Original Location.” Select “New Location” and select the registered vCenter source associated with the target Cisco Compute Hyperconverged with Nutanix cluster.
● Continue by selecting the resource pool, datastore, and VM folder for the recovered VMs on the target Cisco Compute Hyperconverged with Nutanix cluster.
● The “Recovery Method” section is next. By “Default, “Instant Recovery” is selected. If a “Copy Recovery” should be performed, select the “Copy Recovery” radio button.
● The “Recovery Options” section is next. By default, the network option is set to “Unattached.” Optionally a new network on the target Cisco Compute Hyperconverged with Nutanix cluster can be selected along with the “Start Connected” property and “Preserve MAC Address” property. Note that there is no automatic ability to perform DHCP, IP address, subnet mask, gateway, or DNS parameter changes.
● The “Rename” recovery option defaults to use a prefix value of “copy.” The default prefix can be altered or deleted. A suffix can also be applied if desired. Note that this will not change the VM name from the perspective of the VM operating system.
● The “Power State” recovery option defaults to “On,” and this can be disabled if desired.
● Click the “Recover” button to continue.
● Monitor the recovery task to be sure all VM recoveries end with “Succeeded” status.
● Use Nutanix Prism to check the status of the migrated VMs.
● Also use vCenter to check VM status, and to perform any required tasks. Tasks may include any required VM IP address configuration changes, power on sequencing, etc.
● Pause future execution of the original HyperFlex backup protection group.
● Create a new protection group to protect the migrated VMs on the target Cisco Compute Hyperconverged with Nutanix cluster.
Cohesity Data Protect – scenario two
In this use case the source HyperFlex cluster and target Cisco Compute Hyperconverged with Nutanix cluster are not co-located within close network proximity of each other and are typically connected by means of a WAN (Wide Area Network). The migration strategy consists of a final incremental backup of powered-off VMs on the source HyperFlex cluster prior to replication of VM backups to a remote Cohesity cluster and failover onto the target Cisco Compute Hyperconverged with Nutanix cluster. Note that the powering off of VMs is a manual operation.
Cohesity replication
Replication occurs between different Cohesity clusters. There should be one Cohesity cluster co-located near the source HyperFlex cluster, and a second Cohesity cluster co-located near the target Cisco Compute Hyperconverged with Nutanix cluster. On each Cohesity cluster, the other Cohesity cluster should be added as a remote cluster. When adding the remote cluster, the replication property should be enabled. Optionally, the remote access property can also be enabled. Each Cohesity cluster should have a unique storage domain name. Storage domain pairings are typically created during the “Add Cluster” workflow. The use of descriptive storage domain names is encouraged. Example storage domain names are “HyperFlexStorageDomain” and “NutanixStorageDomain.”
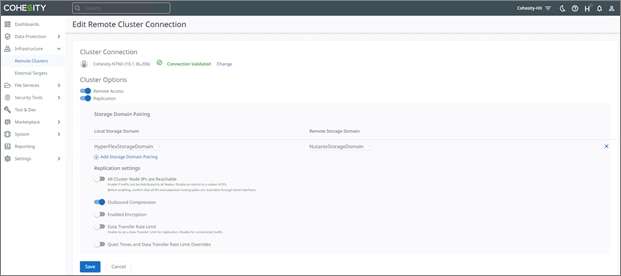
Cohesity remote cluster connection with replication enabled with local and remote storage domain pairing
After adding the remote cluster and pairing storage domains, the next step is to add replication to a policy. If there are existing policies that backup the HyperFlex workload VMs they can be modified to add replication. The “Replicate to” parameter should be set to “Remote Cluster.” Alternately, new protection groups that include a policy with replication can be created. The replication target should be set to the name of the Cohesity cluster co-located with the target Cisco Compute Hyperconverged with Nutanix cluster. Replication frequency or cadence and the retention period for replicated VM backups is also specified at this time.
Failover options
The failover operation is initiated on the Cohesity cluster associated with the target Cisco Compute Hyperconverged with Nutanix cluster. The failover operation is executed at a protection group level of granularity.
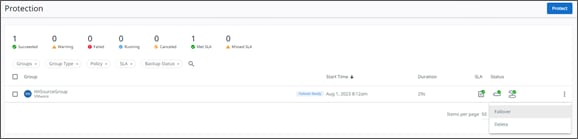
Cohesity initiating a failover operation
The failover workflow begins with specifying a source to failover to, which is the vCenter server associated with the target Cisco Compute Hyperconverged with Nutanix cluster. At this stage a policy is also specified to protect the VMs that will be failed over to the target Cisco Compute Hyperconverged with Nutanix cluster. The next step of the workflow requires selection of a destination resource pool, datastore, and VM folder. The options available in the workflow include with the recovery method, which can be set to either the instant or copy recovery methods. Network options include attaching a named network to the recovered VMs. There are additional options to start the VM with the network connected, and to preserve the MAC address. Renaming options include the ability to add a VM name prefix and/or suffix. Note that if a single vCenter server is being used as the registered source for both the source HyperFlex cluster and target Cisco Compute Hyperconverged with Nutanix cluster, the names of recovered VMs must either be unique or recovered to a different VM folder. The power state of recovered VMs can be set to “on” or “off.”
Monitoring failover
Status of the failover operation can be viewed at the protection group level, or at the object (VM) level. When the failover operation has completed, the VMs are visible within the Nutanix Prism user interface.
Failover step-by-step
● Power-off VMs on the source HyperFlex cluster that are to be migrated to the target Cisco Compute Hyperconverged with Nutanix cluster.
● Perform a backup of the source HyperFlex cluster VMs that are to be migrated. The policy associated with the protection group should also replicate the VM backups to the Cohesity cluster co-located with the target Cisco Compute Hyperconverged with Nutanix cluster.
● From the Cohesity cluster associated with the target Cisco Compute Hyperconverged with Nutanix cluster access the user interface and select “Data Protection > Protection.”
● Locate the protection group to failover. Click the ellipsis and then select “Failover” from the pop-up menu. A “Failover Protection Group” dialog window will appear. Select the registered source vCenter used by the target Cisco Compute Hyperconverged with Nutanix cluster. Also select a policy to be applied to the failed over protection group. Click the “Failover Protection Group and Continue to Recovery” button.
● In the “Recover To” section of the workflow select a resource pool, datastore, and VM folder for the failed over VMs on the target Cisco Compute Hyperconverged with Nutanix cluster.
● The “Recovery Method” section is next. By default, “Instant Recovery” is selected. If a “Copy Recovery” should be performed, select the “Copy Recovery” radio button.
● The “Recovery Options” section is next. By default, the network option is set to “Unattached.” Optionally a new network on the target Cisco Compute Hyperconverged with Nutanix cluster can be selected along with the “Start Connected” property and “Preserve MAC Address” property. Note that there is no automatic ability to perform DHCP, IP address, subnet mask, gateway, or DNS parameter changes.
● The “Rename” recovery option defaults to use a prefix value of “copy-”. The default prefix can be altered or deleted. A suffix can also be applied if desired. Note that this will not change the VM name from the perspective of the VM operating system.
● The “Power State” recovery option defaults to “On,” and this can be disabled if desired.
● Click the “Recover” button to continue.
● Monitor the recovery task to be sure all VM recoveries end with “Succeeded” status.
● Use Nutanix Prism to check the status of the migrated VMs.
● Also use vCenter to check VM status, and to perform any required tasks. Tasks may include any required VM IP address configuration changes, power on sequencing, etc.
● Pause future execution of the original HyperFlex backup protection group.
● Create a new protection group to protect the migrated VMs on the target Cisco Compute Hyperconverged with Nutanix cluster.
Veeam Backup and Replication
Veeam provides different methods that can be utilized to migrate VMs from a source HyperFlex cluster to a target Cisco Compute Hyperconverged with Nutanix cluster. Multi-site environments that rely on WAN connectivity are accommodated by adding a second backup proxy such that each site has a local proxy. Users are encouraged to understand the capabilities of each migration method.
Method: Replication
Veeam replication creates an exact copy of source VMs in native VMware vSphere format directly on a Nutanix datastore. Replica VMs reside in a production datastore, are registered within vCenter, and are in a ready-to-start state. The user-initiated planned failover operation triggers an initial incremental replication job, automatically shuts down the source VM, performs a second incremental replication job, and updates the replica VM. At the point where the replica VM is fully synchronized with the source VM, the replica VM is powered on. This automated solution is optimized to perform planned migration of VMs using a one-by-one methodology that minimizes the outage window for each VM being migrated. This methodology is preferred when compared to a traditional backup followed by restoring to a new destination as it is easier to administer and results in a reduced VM migration outage window.
Additional information about Veeam replication is available at: https://helpcenter.veeam.com/docs/backup/vsphere/replication.html?ver=120.
Backup infrastructure
The required infrastructure components consist of a single Veeam Backup and Replication deployment. The vCenter server associated with the source HyperFlex cluster and target Cisco Compute Hyperconverged with Nutanix cluster should be configured as a managed server. A single backup proxy and backup repository are also required. The backup proxy must have access to the backup server, source host, target host, and backup repository that stores replica metadata. In cases where the source HyperFlex cluster and target Cisco Compute Hyperconverged with Nutanix cluster are located at different sites and are connected by a WAN or slow network, the use of two proxies is recommended. One proxy should be located at each site. The use of two backup proxies also enables the optional use of Veeam built-in WAN accelerators. Additional information about Veeam WAN Acceleration is available at:
https://helpcenter.veeam.com/docs/backup/vsphere/wan_acceleration.html?ver=120
Replication jobs
A replication job includes the source HyperFlex cluster VMs to replicate, the target Cisco Compute Hyperconverged with Nutanix cluster, resource pool, VM folder, and datastore.
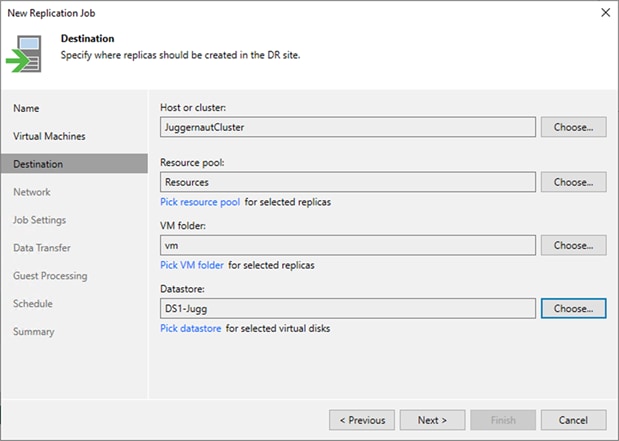
Veeam replica destination
Network mapping between the source HyperFlex cluster and destination Cisco Compute Hyperconverged with Nutanix cluster is supported. IP address change rules that include the IP address, subnet mask, default gateway, and DNS servers are also supported. Job settings include the ability to specify a replica name suffix and the number of restore points that should be retained. Replication jobs can be scheduled to execute automatically, which allows the user to have this solution implemented and ready for planned failover prior to cutover.
Additional information about Veeam Replication jobs is available here:
https://helpcenter.veeam.com/docs/backup/vsphere/replica_job.html?ver=120
Planned failover
One or more replica VMs can be selected for the planned failover operation. It is important to note that when planned failover is initiated for multiple VMs that are replicated within one replication job, that the VMs will be processed one-by-one, not in parallel. The net effect of this methodology minimizes the outage window for each VM being migrated.
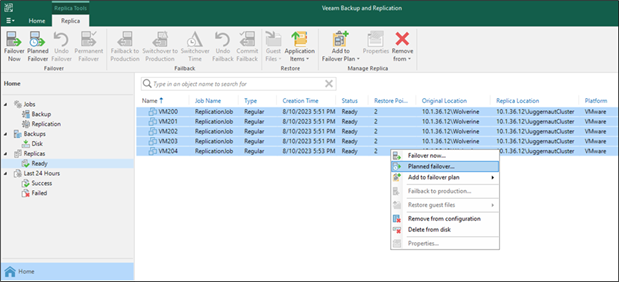
Veeam planned failover of replica VMs
Additional information about Veeam Planned Failover is available here:
https://helpcenter.veeam.com/docs/backup/vsphere/planned_failover.html?ver=120
Monitoring
Replication jobs can be monitored in the jobs pane of the Veeam Backup & Replication user interface, the same as any Veeam job. When planned failover is performed a restore session is created that can be viewed from the running jobs pane. A log of messages and progress is available to provide detailed information. In additional, the planned failover operation will execute two incremental replication jobs that are also available for monitoring from the running jobs pane. At the point where failover has finished, the active replica pane will display VMs with failover status. An additional level of detail is available that will provide the original location of each VM with failover status.
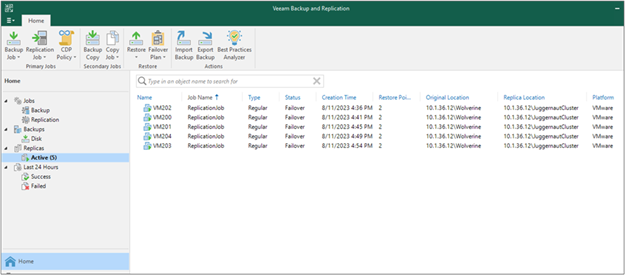
Veeam active replica VMs in failover state
Planned migration step-by-step
● Select one or more VM replicas on which to conduct a planned failover. Note that planned failover occurs sequentially such that VM replicas are processed on-by-one.
● Confirm that the list of VMs is correct and add or remove VMs as required. Also note that an earlier restore point can be selected if the number of configured restore points is two or more. Planned failover will typically use the most recent restore point, which is selected by default.
● Optionally, enter a planned failover reason, such as “Planned migration from HyperFlex to Nutanix.”
● On the summary portion of the workflow click the “Finish” button.
● Display the running jobs and monitor the progress of the planned failover operation. Each VM will undergo an incremental replication job, be powered off, and then undergo another incremental replication job. This will occur sequentially for each VM. The session type will be “Planned Failover.” The status column will be “Working.”
● As each VM replica completes the planned failover operation, it will appear as an active replica. Status will indicate “Failover.”
● At the point where the selected VM or VMs have a status of “Failover,” the planned failover operation can be finalized. Finalization options are to make the failover permanent, undo the failover, or failback to production. The “Permanent failover” option should be selected to complete the planned failover operation. Note that the undo failover operation is typically used to test failover for disaster recovery readiness. Also note that the failback to production operation is typically used as part of a disaster recovery process, where the originating site has been recovered and is ready to receive inbound replica VMs.
● The replication job can be disabled at the point where the planned failover operation has completed.
Method: Backup, Backup Copy, Replication
Existing Veeam deployments that already protect HyperFlex can be augmented to add replication. When a replication job is created, the VM source can be backup files. Selecting an existing backup repository effectively removes any requirement to use production VM storage as the source for a replication job. Replication job scheduling can also be set to occur immediately following a backup job. This is referred to as job chaining.
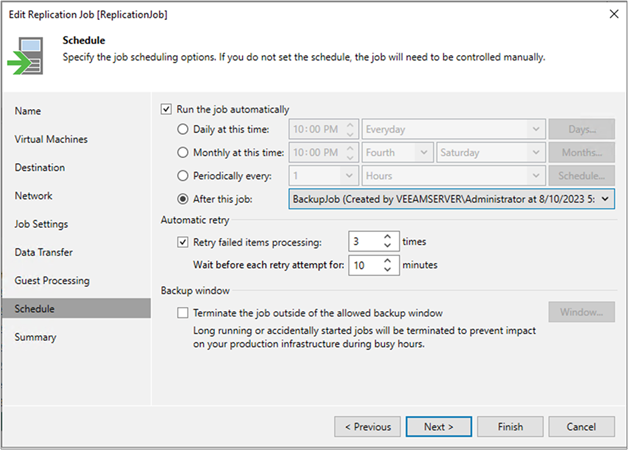
Veeam job chaining
This variation provides an ability to continue performing any existing HyperFlex backups, while at the same time preparing for a planned failover operation to the target Cisco Compute Hyperconverged with Nutanix cluster.
Method: Quick Migration
The Quick Migration method stands out as a method that does not provide the advanced functionality of Veeam replication. Users considering the use of this migration method should understand that it does not include functionality that may be required in many use cases:
● Quick Migration is a workflow-driven process that cannot be saved as a job or scheduled to occur at some future point in time.
● Quick migration does not have an ability to pre-populate or seed a target datastore.
● Quick migration does not support network remapping.
● Quick migration does not support changing VM IP address parameters.
● Quick migration does not support the use Veeam built-in WAN accelerators.
Additional information about Veeam Quick Migration is available at:
https://helpcenter.veeam.com/docs/backup/vsphere/quick_migration.html?ver=120.
Cisco UCS M6 220/240 node conversion
Introduction and purpose
There may be requests to determine if an existing HyperFlex M6 cluster deployment can be converted to a Nutanix cluster. Similarly, there may be requests to determine if existing Cisco UCS 220/240 nodes can be converted to form a Nutanix cluster. The content presented here assists in determining if the repurposing of existing M6 hardware is possible based on a compatible Nutanix bill of materials. In addition to hardware compatibility, the conversion process will include Nutanix licensing and required services. Implementing the conversion will involve workload migration off the existing HyperFlex deployment, which may include a number of variables depending on the chosen methodology.
Eligible HyperFlex M6 hardware
Cisco Compute Hyperconverged with Nutanix spec sheets include supplemental material detailing the retrofit of existing UCS servers. Confirm that all installed components match all required sections of the spec sheet. Care should be taken to ensure the compatibility of boot media, drives, storage controllers, and networking adapters.
Please reference the appropriate UCS M6 server spec sheet, and navigate to the “Supplemental material” section, and then proceed to the “Retrofit of existing UCS servers” subsection.
HCIAF220C M6 All-NVMe/All-Flash Server:
HCIAF240C M6 All-Flash Server:
M6 node hardware preparation
Each HyperFlex M6 node requires removal of the caching drive and the housekeeping/logging drive. Please note that this requirement is specific to M6 nodes with a HyperFlex PID and is not applicable to M6 nodes with a UCS PID.
On C220 M6 nodes, drive slots vacated by the removal of the caching and housekeeping/logging drives can be populated with a supported drive type/model. On C240 M6 nodes, only front drive slots vacated by the removal of the caching and housekeeping/logging drives can be populated with a supported drive type/model.
All C240 M6 nodes must use only the front-drive slots; the rear-drive slots must not be populated or contain any drives.
Fabric Interconnects (FIs)
The Cisco UCS Manager service-profile hierarchy makes possible the simultaneous use of Cisco Compute Hyperconverged with Nutanix clusters and HyperFlex clusters within the same UCS domain. Nutanix clusters will have UCS Manager service profiles that are created at the “root” level. HyperFlex clusters have UCS Manager service profiles that have been created at the “sub-organization” level. There is no requirement to separate Nutanix and HyperFlex clusters such that they are members of different UCS domains or utilize a different pair of fabric interconnects.
Licensing and required services
At the point where the UCS M6 server hardware is confirmed to be compatible with the correct spec sheet, the conversion will require the purchase of the appropriate Nutanix software licenses, Cisco Intersight licenses, and professional services, as required.
Also note that existing UCS M6 server hardware support is still valid with the converted Nutanix cluster. There are no credits for the remaining term of any unused HXDP licensing.
Workload migration considerations
Existing workloads will need to be moved from existing HX M6 clusters prior to conversion to Nutanix. A noncomprehensive suite of possible solutions includes:
Migrate workloads to an existing production environment
The user may have unused capacity on alternate data-center resources suitable for hosting existing HyperFlex M6 cluster workloads. In this use case, the existing workloads are migrated to the alternate resources, at which time the HyperFlex M6 cluster can be converted to a Nutanix M6 cluster. After the conversion is complete, the user can optionally migrate workloads back onto the converted cluster.
Migrate workloads to a temporary production environment prior to cluster conversion, and then migrate workloads back onto the converted Nutanix cluster
This solution requires the use of a temporary data-center resource commonly referred to as “swing gear” that can be used for the duration of the conversion project. In this context, the swing gear will consist of a borrowed HyperFlex cluster that is deployed to host-migrated workloads. After the HyperFlex M6 cluster conversion to a Nutanix M6 cluster is completed, the workloads are then migrated from the swing gear back to the original converted cluster. At this time, the swing gear is decommissioned and removed from the data center.
Back up workloads and recover them after cluster conversion
This solution requires the use of a third-party data-protection solution and requires a production workload outage. The duration of the outage is proportional to the cluster conversion process timeline, with additional time required to perform both backup and recovery operations. Users considering this solution should have licensed access to a third-party data-protection product and be proficient in the use of the product.
To find complete information and details regarding Cisco’s Hyperconverged Infrastructure product portfolio, visit: https://www.cisco.com/c/en/us/products/hyperconverged-infrastructure/index.html
Feedback
For comments and suggestions about this guide and related guides, join the discussion on Cisco Community at https://cs.co/en-cvds.
Cisco Validated Design program
All designs, specifications, statements, information, and recommendations (collectively, "designs") in this manual are presented "as is," with all faults. Cisco and its suppliers disclaim all war-ranties, including, without limitation, the warranty of merchantability, fitness for a particular purpose and noninfringement or arising from a course of dealing, usage, or trade practice. In no event shall cisco or its suppliers be liable for any indirect, special, consequential, or incidental damages, including, without limitation, lost profits or loss or damage to data arising out of the use or inability to use the designs, even if cisco or its suppliers have been advised of the possibility of such damages.
The designs are subject to change without notice. Users are solely responsible for their application of the designs. The designs do not constitute the technical or other professional advice of cisco, its suppliers or partners. Users should consult their own technical advisors before implementing the designs. Results may vary depending on factors not tested by cisco.
CCDE, CCENT, Cisco Eos, Cisco Lumin, Cisco Nexus, Cisco StadiumVision, Cisco TelePresence, Cisco WebEx, the Cisco logo, DCE, and Welcome to the Human Network are trademarks; Changing the Way We Work, Live, Play, and Learn and Cisco Store are service marks; and Access Registrar, Aironet, AsyncOS, Bringing the Meeting To You, Catalyst, CCDA, CCDP, CCIE, CCIP, CCNA, CCNP, CCSP, CCVP, Cisco, the Cisco Certified Internetwork Expert logo, Cisco IOS, Cisco Press, Cisco Systems, Cisco Systems Capital, the Cisco Systems logo, Cisco Unified Computing System (Cisco UCS), Cisco UCS B-Series Blade Servers, Cisco UCS C-Series Rack Servers, Cisco UCS S-Series Storage Servers, Cisco UCS Manager, Cisco UCS Management Software, Cisco Unified Fabric, Cisco Application Centric Infrastructure, Cisco Nexus 9000 Series, Cisco Nexus 7000 Series. Cisco Prime Data Center Network Manager, Cisco NX-OS Software, Cis-co MDS Series, Cisco Unity, Collaboration Without Limitation, EtherFast, EtherSwitch, Event Center, Fast Step, Follow Me Browsing, FormShare, GigaDrive, HomeLink, Internet Quotient, IOS, iPhone, iQuick Study, LightStream, Linksys, MediaTone, MeetingPlace, MeetingPlace Chime Sound, MGX, Networkers, Networking Academy, Network Registrar, PCNow, PIX, PowerPanels, ProConnect, ScriptShare, SenderBase, SMARTnet, Spectrum Expert, StackWise, The Fastest Way to Increase Your Internet Quotient, TransPath, Webex, and the WebEx logo are registered trade-marks of Cisco Systems, Inc. and/or its affiliates in the United States and certain other countries. (LDW_1)
All other trademarks mentioned in this document or website are the property of their respective owners. The use of the word partner does not imply a partnership relationship between Cisco and any other company. (0809R)