Cisco Intersight Kubernetes Service (IKS) with Azure Arc-enabled Data Services
Available Languages
Bias-Free Language
The documentation set for this product strives to use bias-free language. For the purposes of this documentation set, bias-free is defined as language that does not imply discrimination based on age, disability, gender, racial identity, ethnic identity, sexual orientation, socioeconomic status, and intersectionality. Exceptions may be present in the documentation due to language that is hardcoded in the user interfaces of the product software, language used based on RFP documentation, or language that is used by a referenced third-party product. Learn more about how Cisco is using Inclusive Language.
This document describes the steps to deploy Azure Arc-enabled data services on Cisco Intersights Kubernetes Services (IKS) running on premises or at the edge.
Customers can confidently deploy this solution because it has been successfully validated by Microsoft’s Azure Arc-enabled Kubernetes and Data Services Validation Program. The solution has been validated with Cisco IKS deployed on top of VMware ESXi hypervisors and Cisco Intersight Workload Engine (IWE).
The benefits of this validated solution to customers include a database-as-a-service offering, elastic scale, built-in capabilities such as high availability, and unified management for data workloads running on Cisco IKS enabled for Azure Arc data services. Cisco IKS integrates the Kubernetes lifecycle management capabilities into the Intersight hybrid-cloud platform to offer Kubernetes as a service. It enables customers to deploy quickly and easily and manage the lifecycle of Kubernetes clusters across the globe using a single cloud portal – Cisco Intersight.
The intended audience of this document includes but is not limited to cloud and database administrators, IT architects and managers, sales engineers, partner engineering, and customers who want to deploy Azure Arc hybrid offerings and services on Cisco IKS.
Cisco Intersight is an API-driven, cloud-based, Software-as-a-Service (SaaS) hybrid-cloud operations platform. It delivers intelligent automation, observability, and optimization for traditional and cloud-native applications and infrastructure.
Cisco Intersight Kubernetes Service (IKS) introduces lifecycle management capabilities allowing customers to quickly provision, deploy, and easily manage multicluster Kubernetes across multiple clouds globally using Cisco Intersight. IKS also has a full stack of observability, monitoring, and logging for Kubernetes management.
Azure Arc is an offering of Azure service that simplifies the governance and management of complex and distributed environments across on-premises, edge, and multicloud sites. It provides a single pane of glass by projecting your non-Azure, on-premises, and other cloud resources (such as AWS, Google Cloud Platform, etc.) into Azure Resource Manager.
With Azure Arc you can:
● Easily organize, govern, and secure servers (Windows and Linux), SQL Servers, and Kubernetes clusters across data centers, the edge, and multicloud environments and use Azure tools such as Azure Policy and Azure Resource Graph with both traditional and cloud workloads.
● Ensure consistent deployments and configuration – deploy and manage Kubernetes applications with GitHub and Azure Policy. Ensure that applications and clusters are consistently deployed and configured at scale from source control.
● Automate and enforce policies to meet data governance and security requirements, and manage costs efficiently. Get the latest cloud innovation and automation, elastic scale, and unified management for data workloads that are running across hybrid infrastructure.
Using Azure Arc, organizations can connect Kubernetes clusters located anywhere to Azure. You can manage clusters in a consistent way. Azure Arc-enabled Kubernetes lets you control the cluster configuration and workloads at scale, using git repositories for the clusters. It also lets organizations use management capabilities in Azure for cluster management needs such as inventory, monitoring, policy compliance, security, user access, and more.
Azure Arc-enabled data services
Azure Arc–enabled data services make it possible to run Azure data services such as Azure Arc-enabled-SQL Managed Instance and Azure Arc-enabled PostgreSQL Hyperscale. You can run these systems on premises, at the edge, in Azure, and in other public clouds. Using Kubernetes allows you to use the infrastructure of your choice. You get an always-current, elastically scaled, self-provisioning deployment. You also get a unified command-line and graphical management and monitoring system. Azure Arc–enabled data services have both direct and indirect connected modes. Azure Arc-enabled data services also provide deep security and compliance monitoring.
Azure Arc-enabled Kubernetes and data services validation program
Azure Arc-enabled Kubernetes works with any Cloud Native Computing Foundation (CNCF)–certified Kubernetes clusters. The Azure Arc team has worked with Cisco and other industry partners to validate conformance of their Kubernetes distributions with Azure Arc–enabled Kubernetes
Cisco successfully validated and passed the conformance tests of Azure Arc-enabled Kubernetes for the two standard IKS deployments: (1) IKS with VMware ESXi, and (2) IKS with Cisco Intersight Workload Engine (IWE). For more information on Azure Arc service and technology partners and the validated distributions, refer to the following links:
Azure Arc service and technology partners
Azure Arc-enabled Kubernetes validation program
Azure Arc-enabled data services validation program
Azure Arc-enabled data services validation program
The Azure Arc-enabled data services team has also worked with industry partners to validate specific distributions and solutions to host Azure Arc-enabled data services. This validation extends the Azure Arc-enabled Kubernetes validation for the data services. The below link provides information on partner solutions, versions, Kubernetes versions, SQL engine versions, and PostgreSQL Hyperscale versions that have been verified to support the data services.
The conformance tests run as part of the Azure Arc-enabled data services validation. A prerequisite to running these tests is to pass on the Azure Arc-enabled Kubernetes tests for the Kubernetes distribution in use. These tests verify that the product is compliant with the requirements of running and operating data services. This process helps assess if the product is enterprise ready for deployments.
The validation tests for data services on Cisco IKS covered the following in indirectly connected mode
● Deploy data controller in indirect mode
● Deploy Azure Arc-enabled SQL Managed Instance
Plan an Azure Arc-enabled data services deployment
Careful planning and preparing the infrastructure to support the database workloads based on your business requirements is required to deploy Azure Arc-enabled data services. For more information on planning to deploy Azure Arc-enabled data services, refer to this link.
This document covers the steps to deploy Azure Arc-enabled data services on Cisco IKS in the following way:
● Connect an existing Cisco Intersight Kubernetes Service (IKS) cluster to Azure Arc
● Deploy the Azure Arc-enabled data controller (in direct connectivity mode)
● Deploy an Azure Arc-enabled SQL managed instance
Connect an existing Cisco Intersight Kubernetes Service (IKS) cluster to Azure Arc
To deploy Cisco IKS and connect the cluster to Azure using Azure Arc-enabled Kubernetes, refer to the white paper “Azure Arc-enabled Kubernetes with Cisco IKS”.
Deploy the Azure Arc-enabled data controller (direct connectivity mode)
This section describes how to prepare and deploy a data controller for Azure Arc-enabled data services in direct-connect mode from the Azure portal. Deploying an Azure Arc data controller requires additional understanding and concepts as described in Plan to deploy Azure Arc-enabled data services.
Install tools
● On your administration workstation:
● Install client tools for creating and managing Azure Arc-enabled data services
● Install arcdata extension (Azure CLI)
● Download and install Azure Data studio.
Prerequisites
The prerequisites for creating Azure Arc data controller in direct connectivity mode include:
Access to your Kubernetes cluster
Run the following command to make sure you have access and are connected to your Kubernetes cluster on which you want to deploy Azure Arc-enabled data services:
> kubectl cluster-info
> kubectl config view
Login and set Azure subscription
Run the commands below on your administration workstation to log in to Azure and set the subscription.
> az login
> az account set --subscription xxxxxxxx-xxxx-xxxx-xxxx-xxxxxxxxxxxx
Connect the Kubernetes cluster to Azure using Azure Arc-enabled Kubernetes
To deploy Cisco IKS and connect to Azure Arc, refer to the section above: “Connect an existing Cisco Intersight Kubernetes Service (IKS) cluster to Azure Arc”.
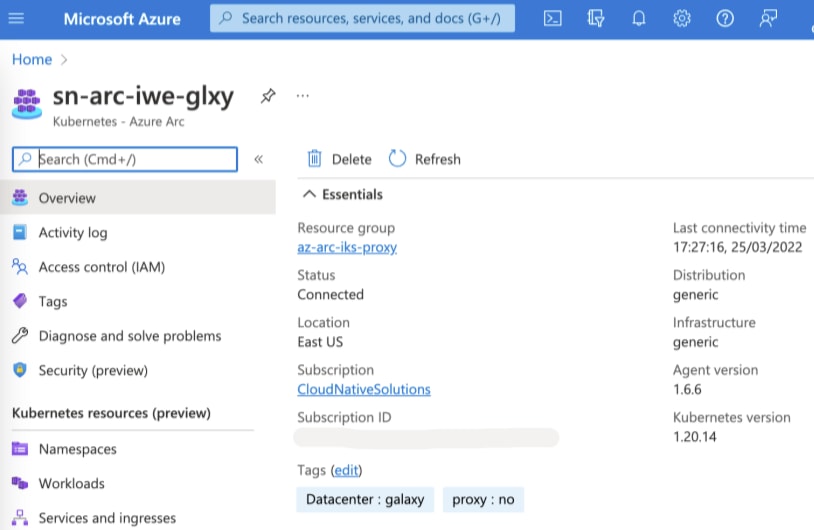
For this documentation purpose, we are using the Cisco IKS cluster named “sn-arc-iwe-glxy” as shown in the figure below for deploying the Azure Arc data controller.
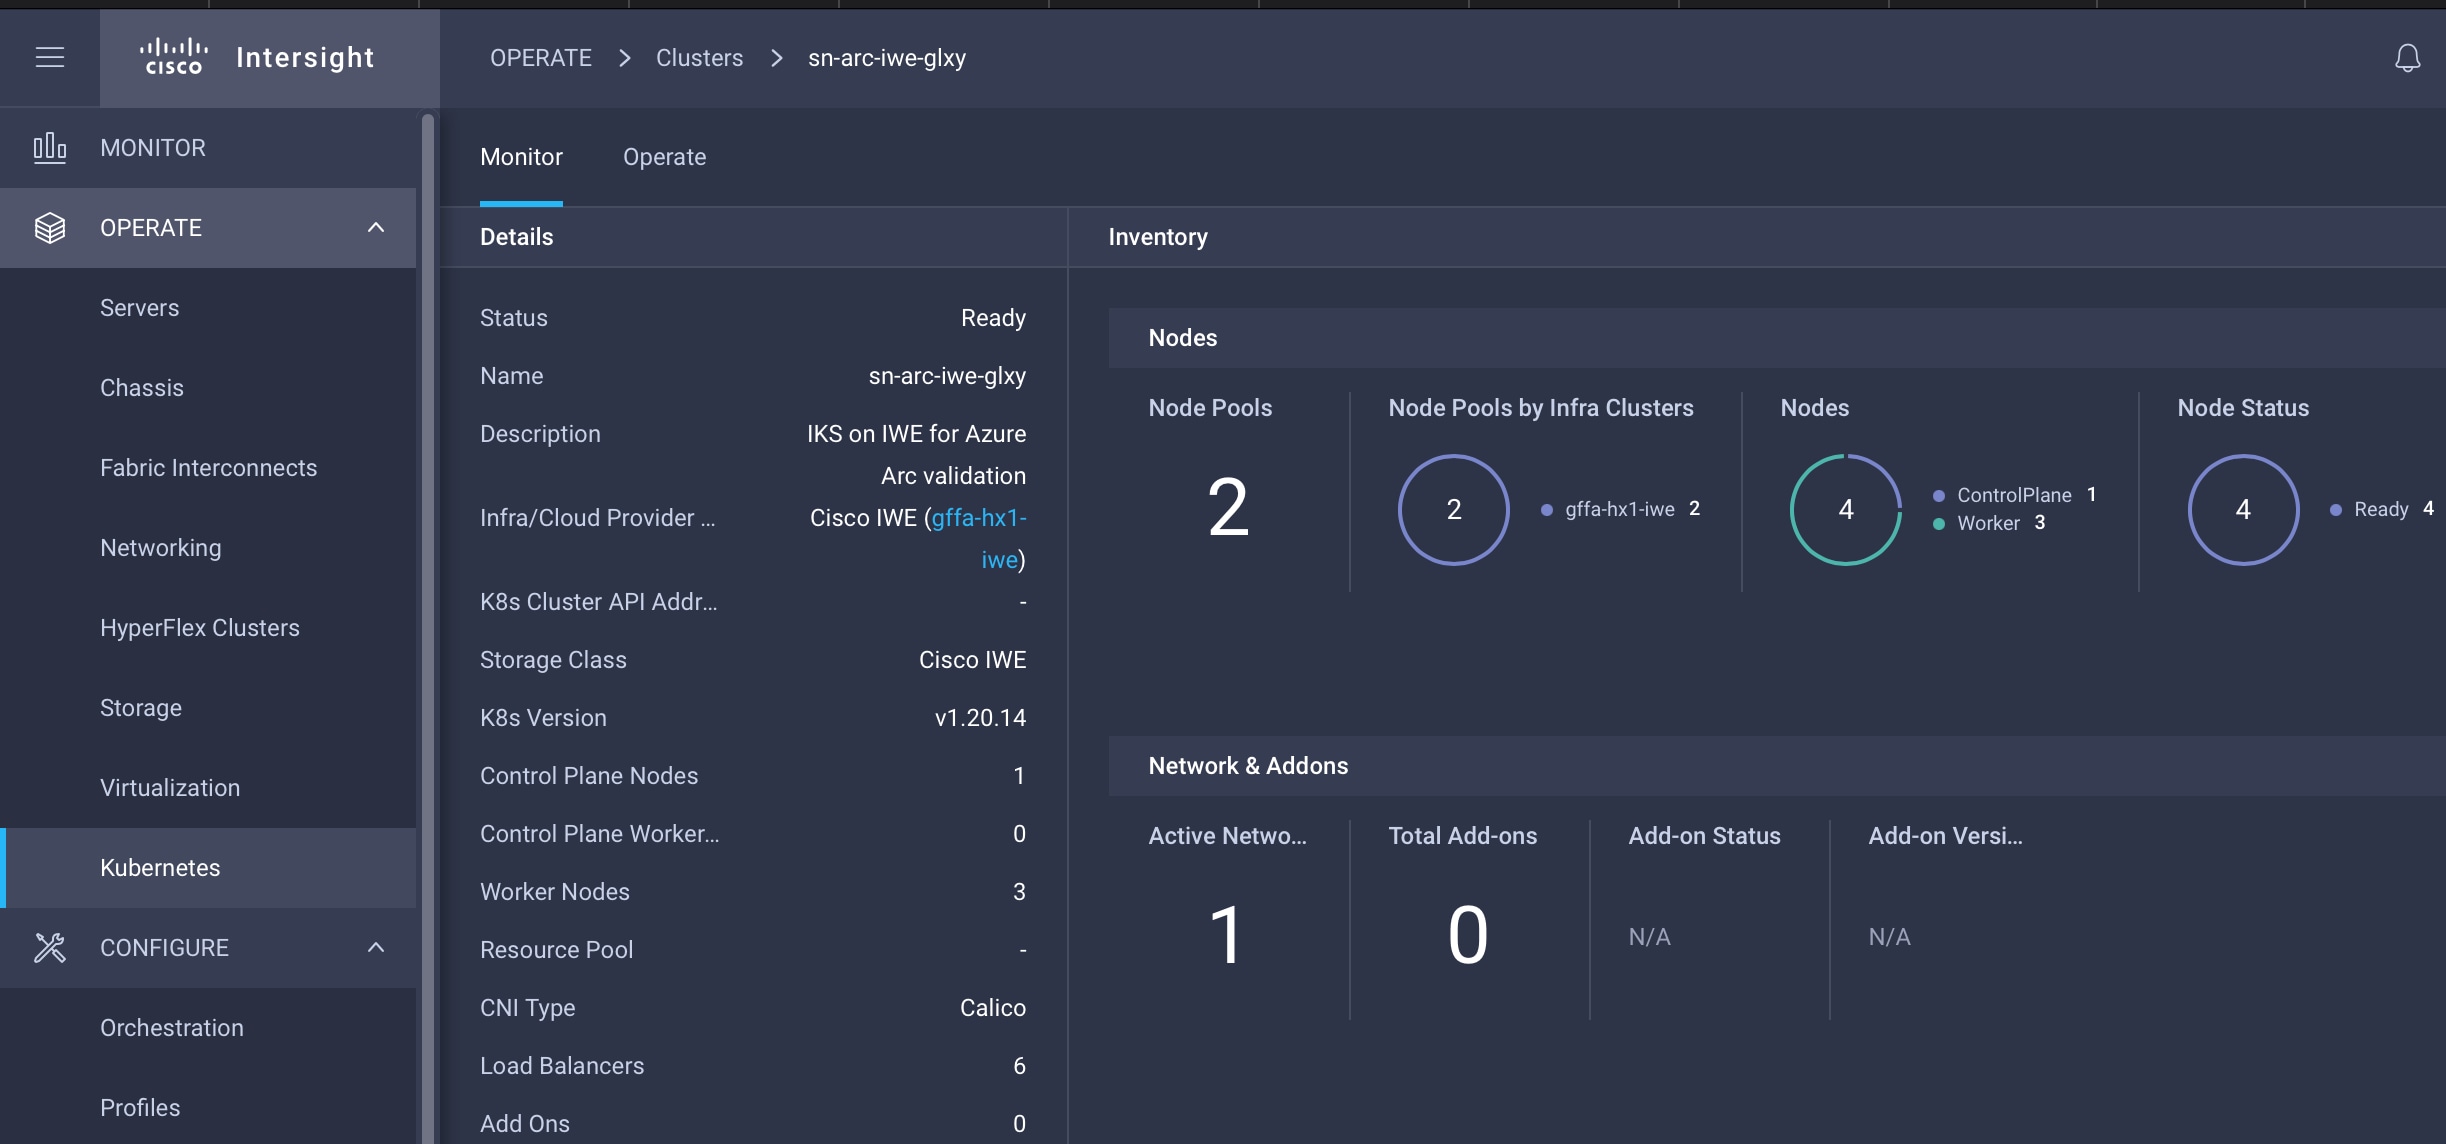
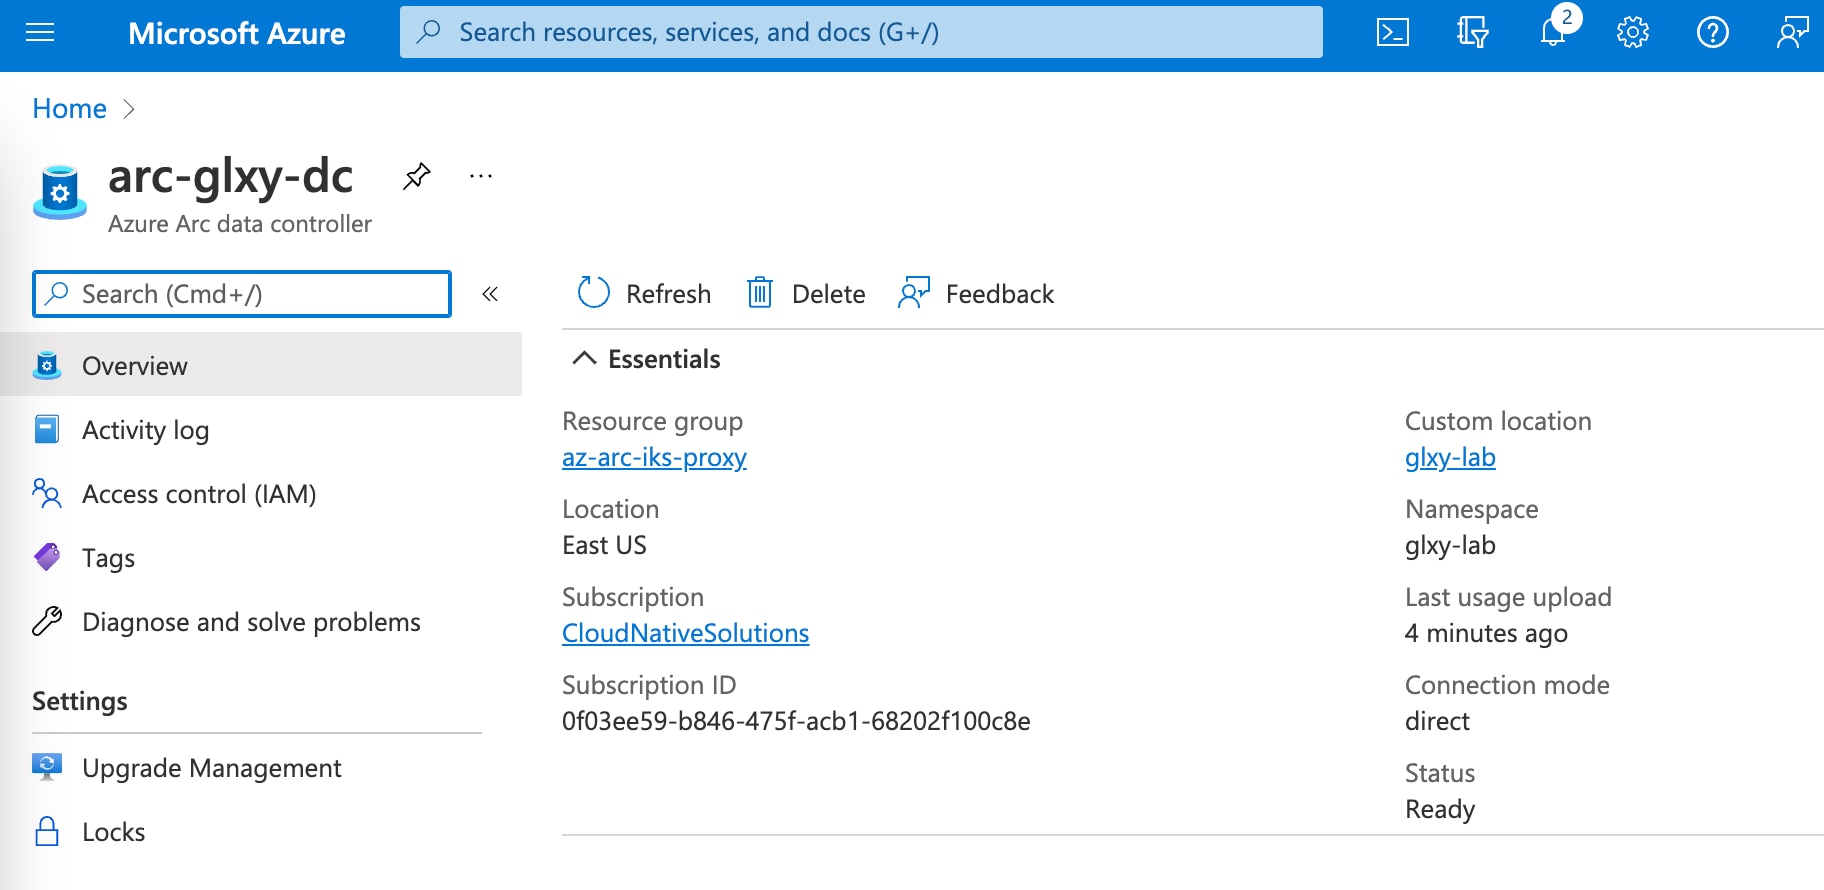
This Cisco IKS cluster is already connected to Azure using Azure Arc-enabled Kubernetes, as shown in the figure below. The Azure Arc-enabled Kubernetes cluster “sn-arc-iwe-glxy” is placed in the “az-arc-iks-proxy” resource group, and the status of the projected cluster is “Connected.”
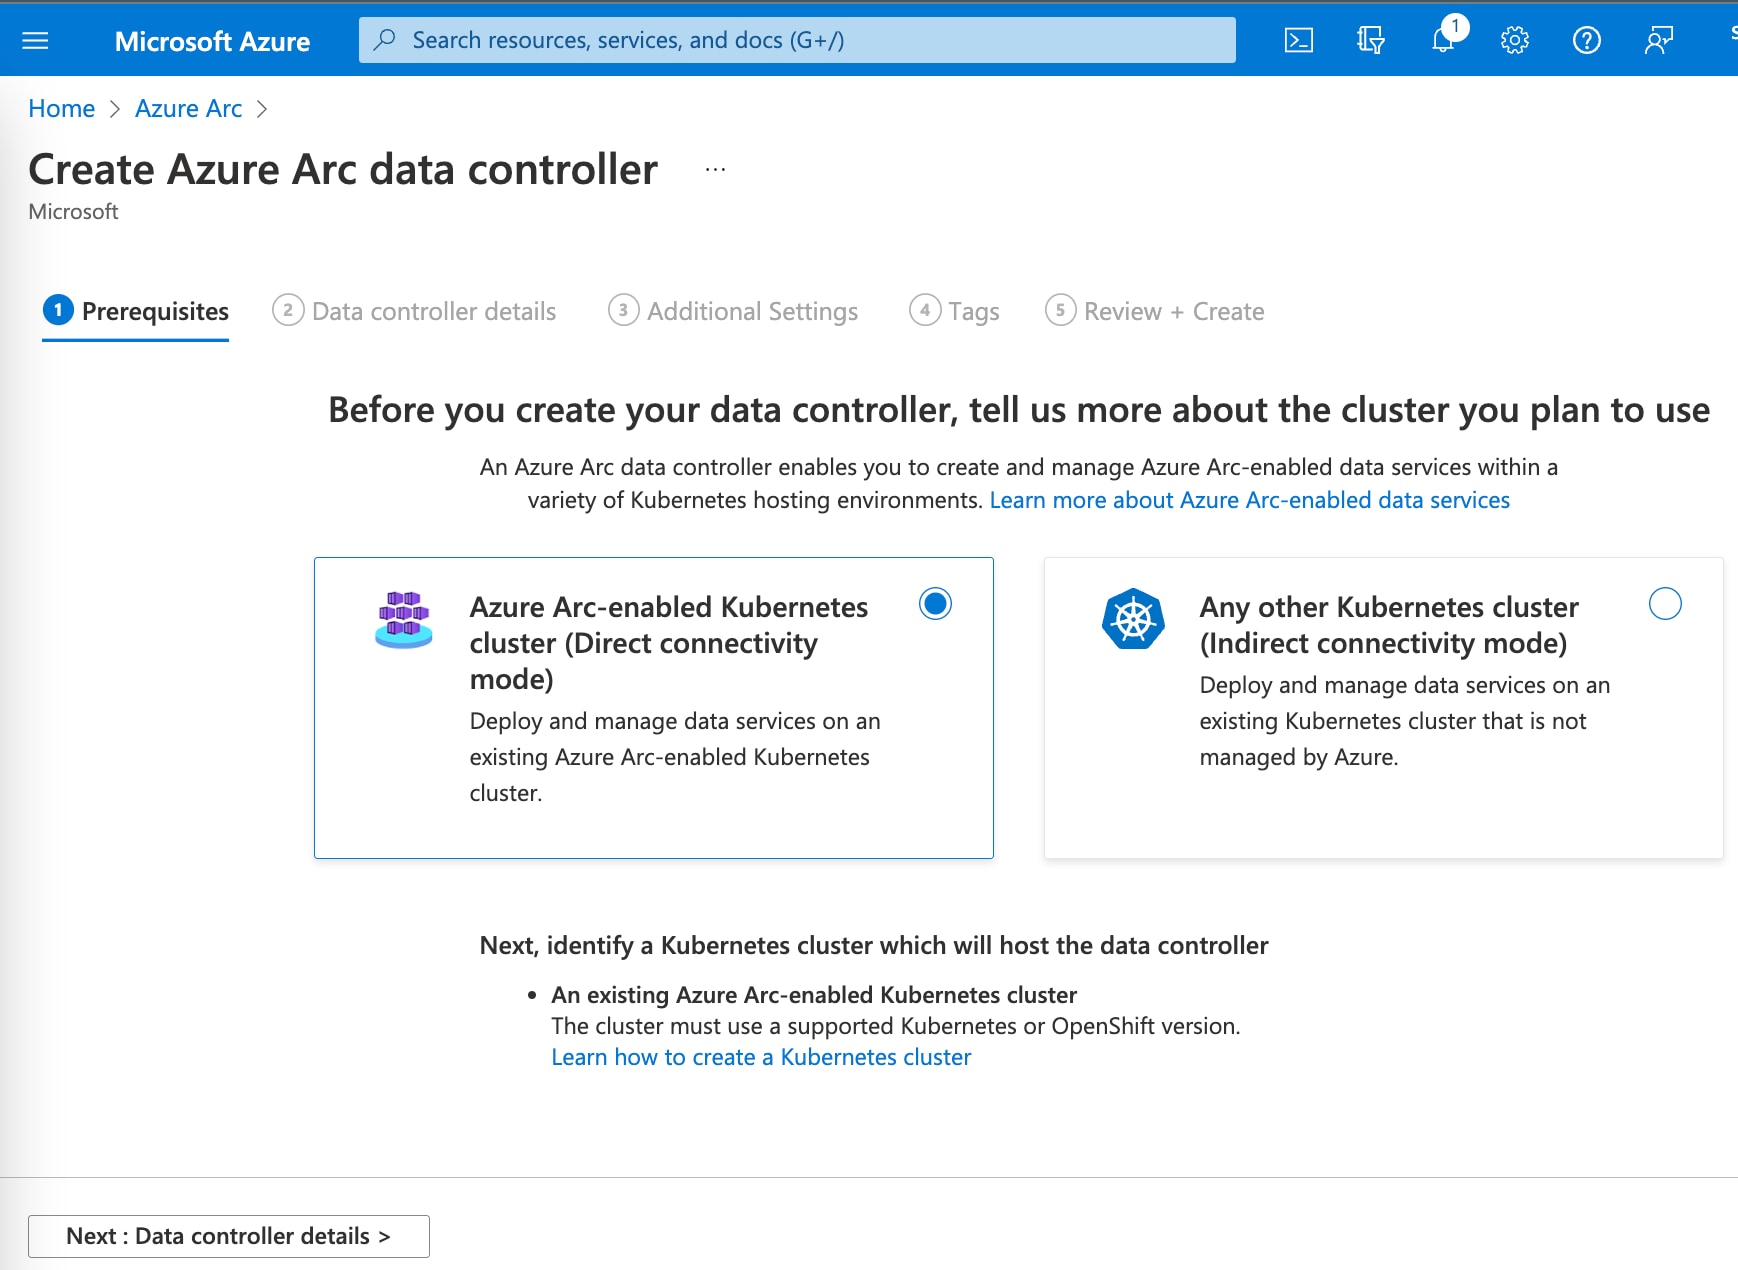
Create Azure Arc data controller in direct connectivity mode from Azure portal
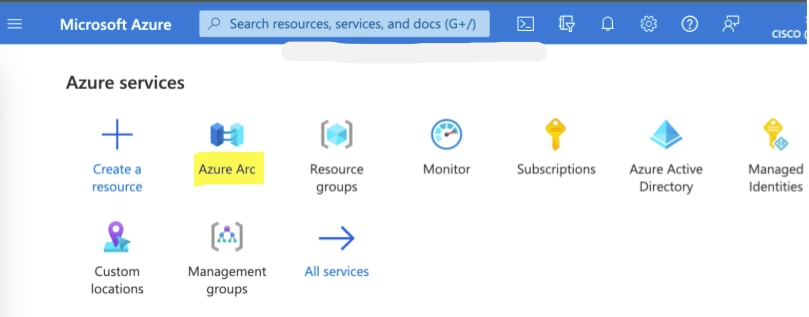
1. Log in to the Azure portal. Locate and open “Azure Arc” from Azure services.
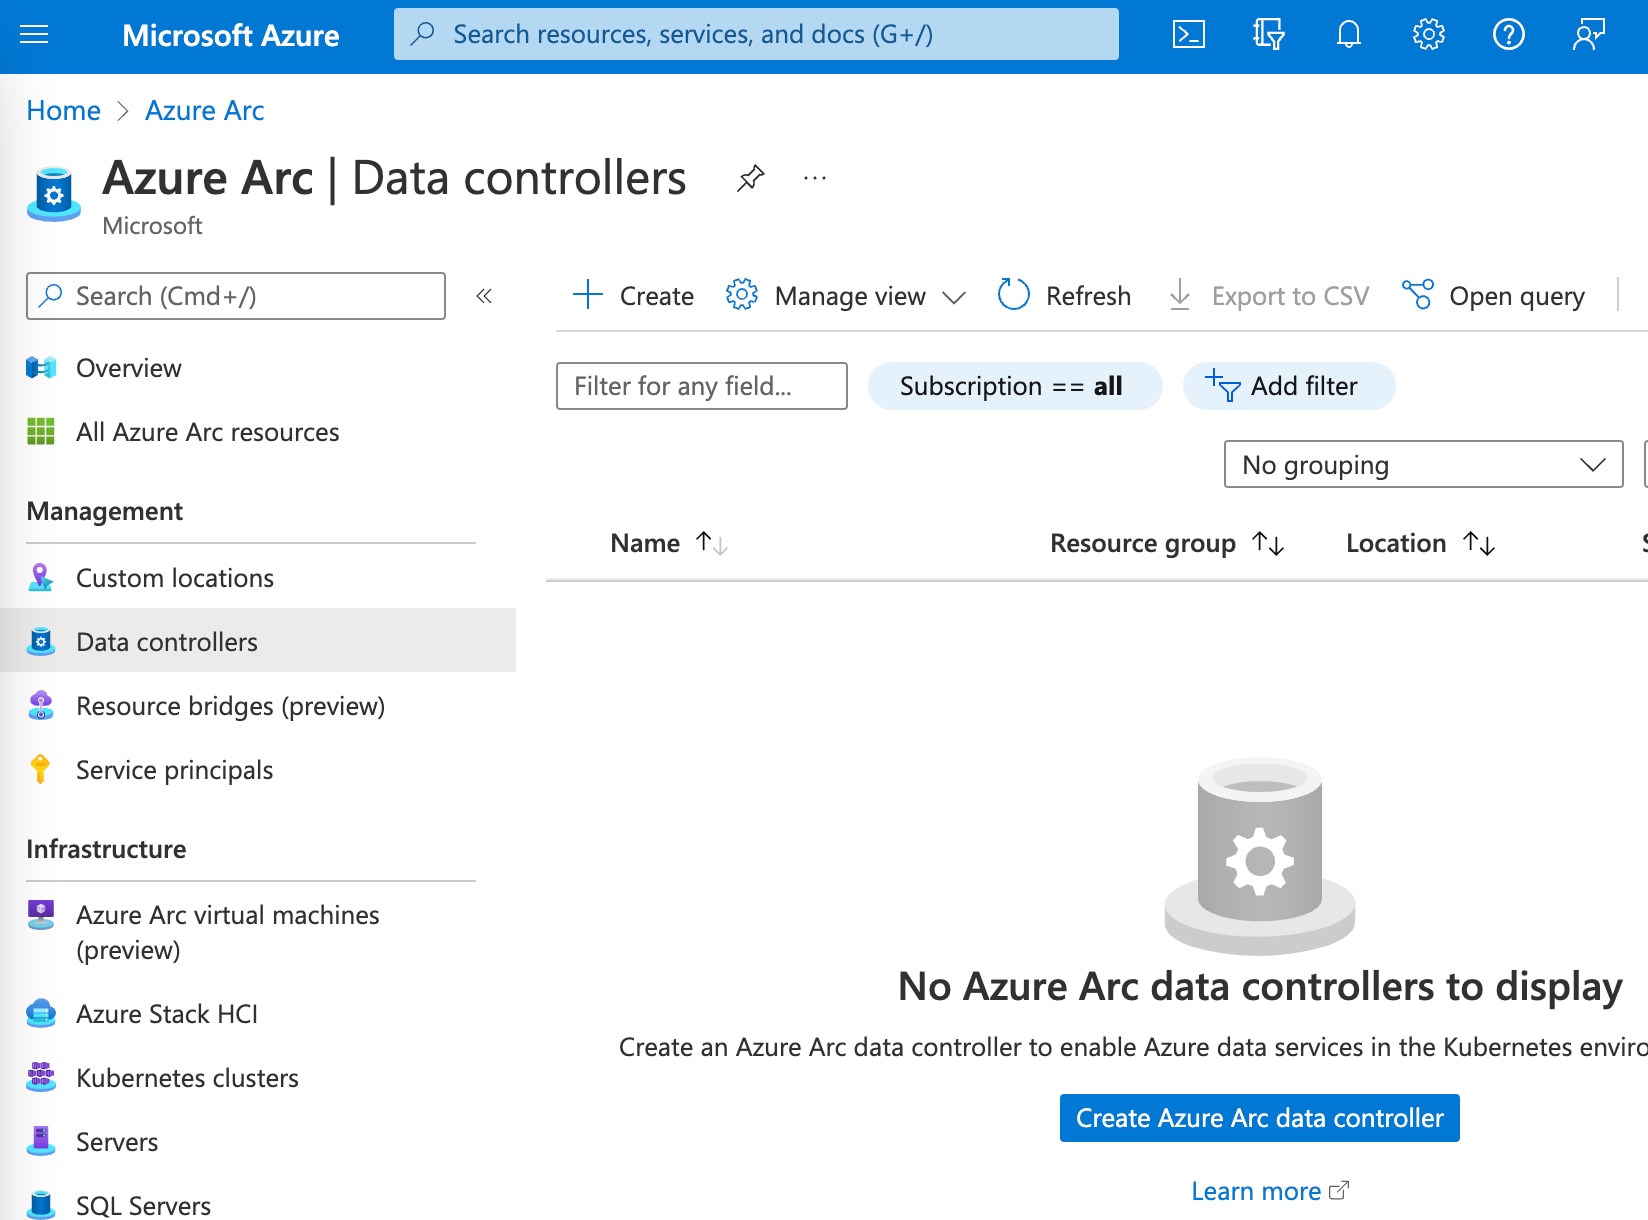
2. Select Management > Data Controllers and click on “Create Azure Arc data controller” button.
3. Select “Azure Arc-enabled Kubernetes cluster (Direct connectivity mode)” and click Next.
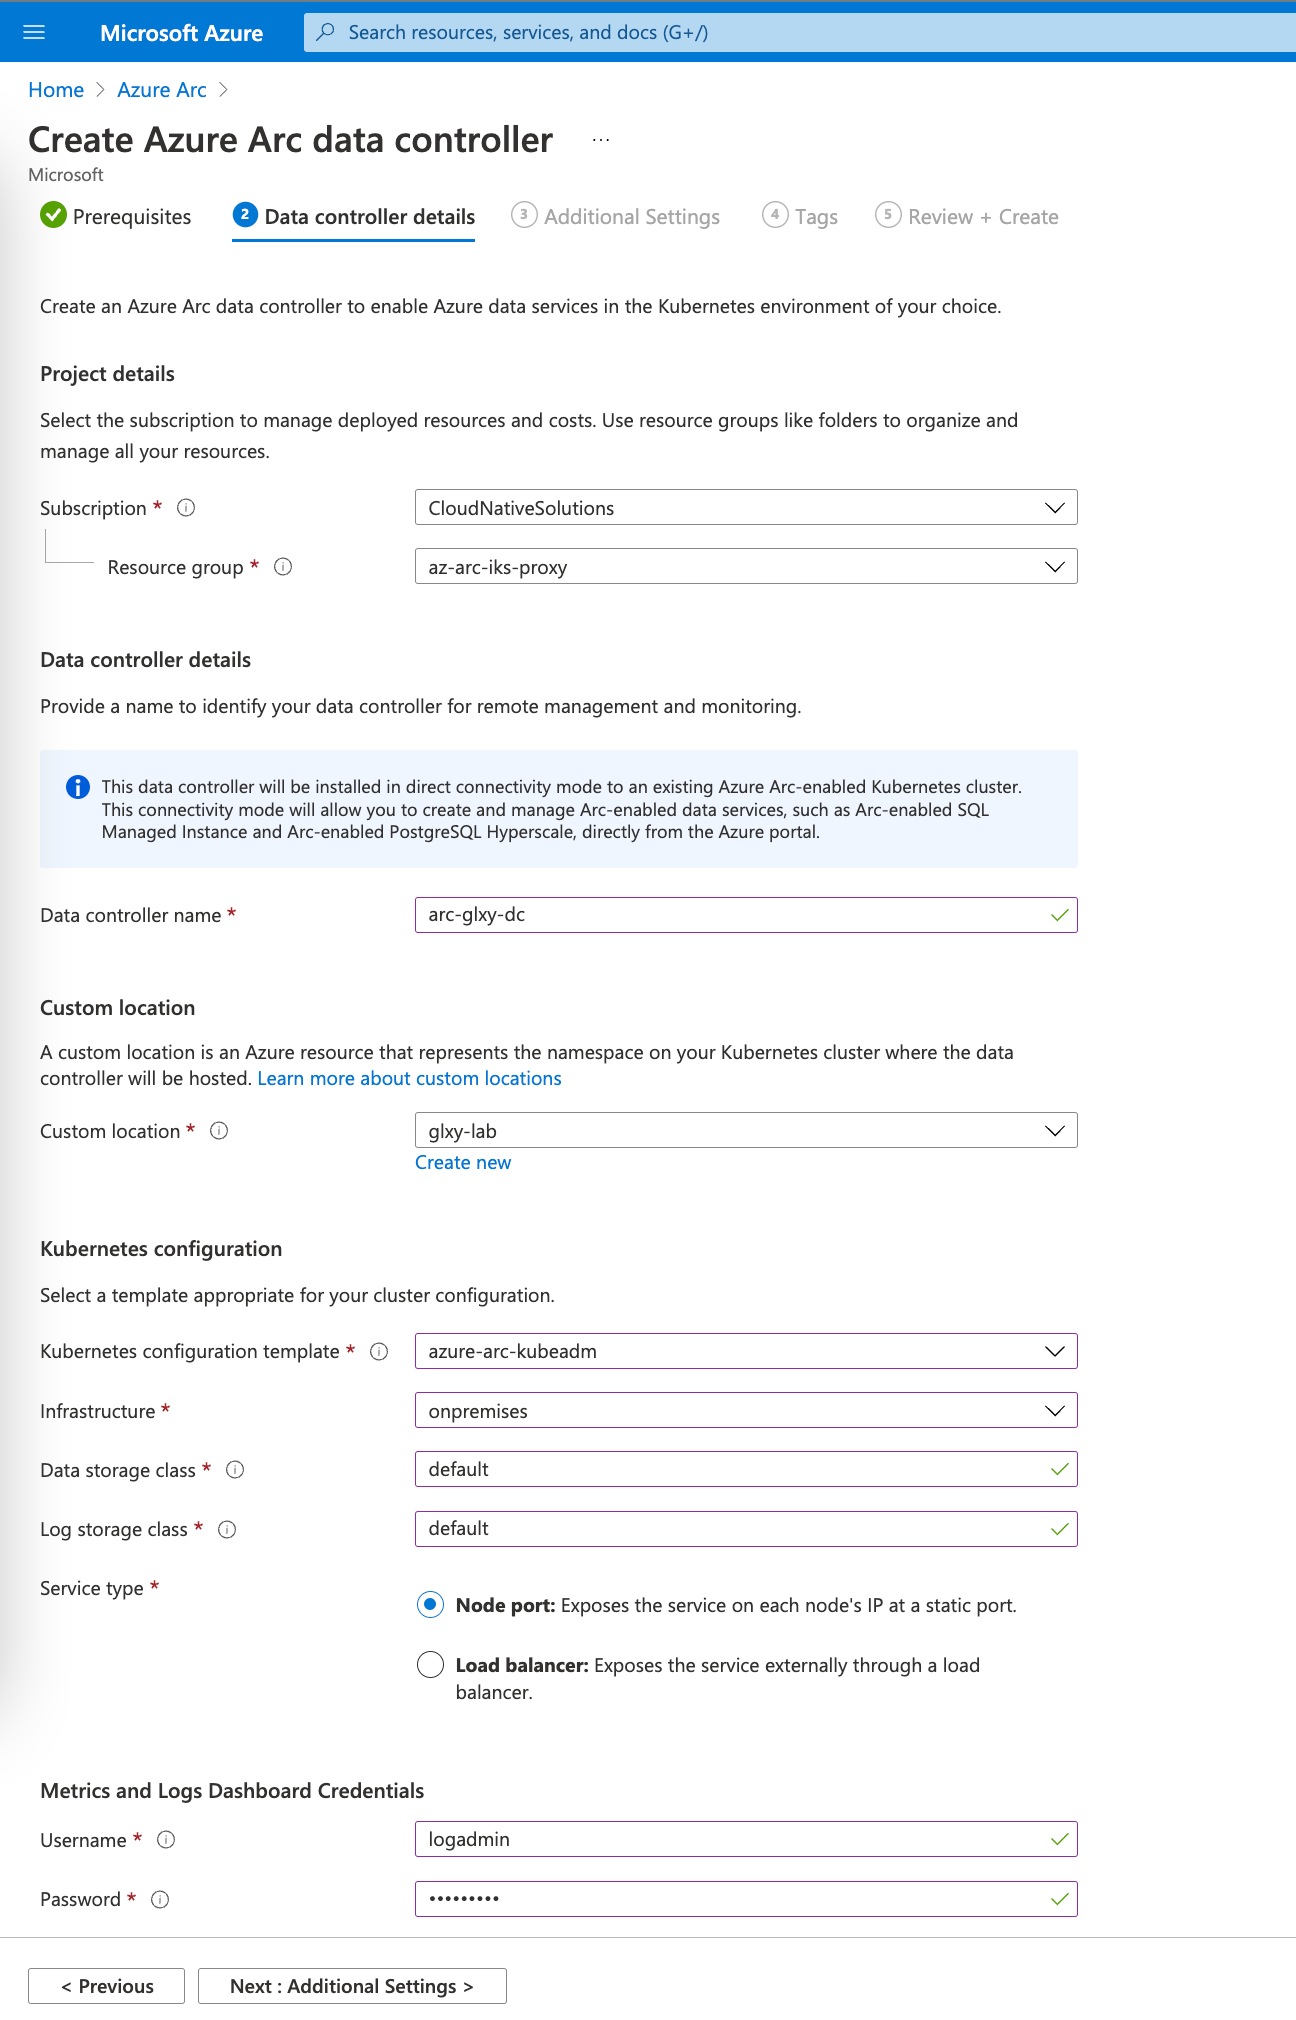
4. In the Data controller details section, specify the details below by replacing the values as per your environment and click Next to provide additional details:
● Select the subscription and resource group where the Azure Arc-enabled Cisco IKS is deployed from the drop-down button
● Specify a name for the data controller
● Specify a custom location (namespace). If not available, create a new one.
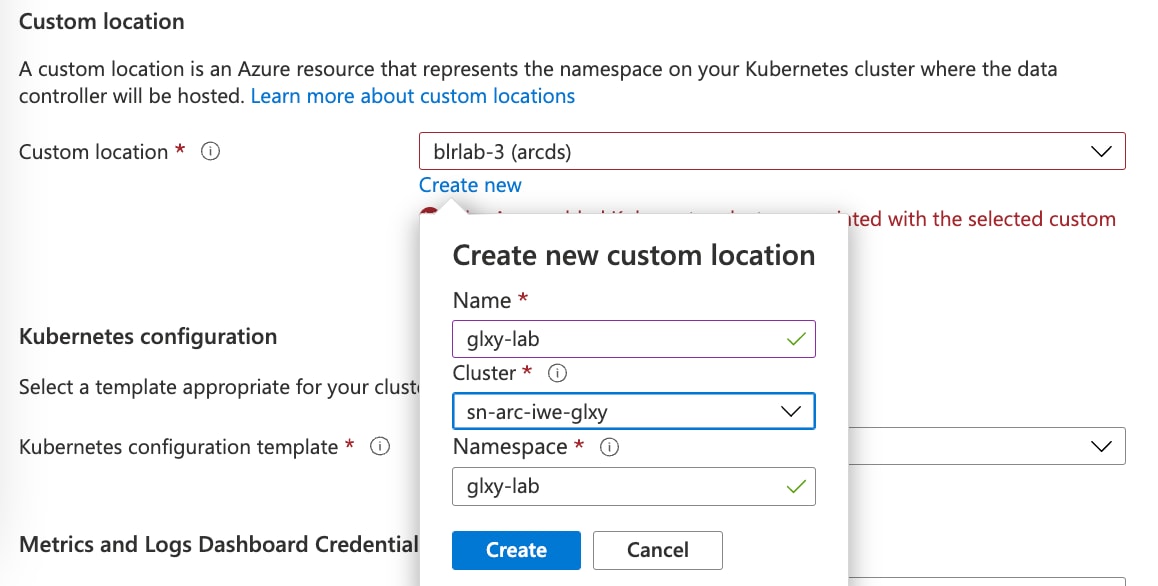
● In the Kubernetes configuration, select “azure-arc kubeadm” as the template, “onpremises” for infrastructure, and “default” storage class for both data and log. To find out the storage classes available in your cluster, run the command below:
> kubectl get sc
![]()
● Select a Service type and enter Metrics and Logs dashboard credentials and click Next.
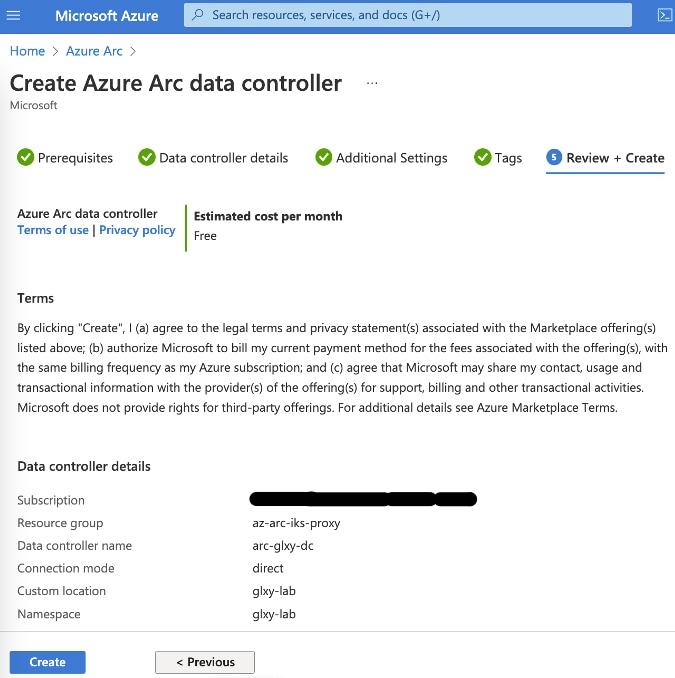
5. In Additional settings, provide the Log Analytics workspace, ID, and primary key and click Next.

6. Add tags, if any, to categorize resources and click Next.
7. In the Review + Create section, review the details and click Create.
8. The deployment of the data controller begins; it takes a few minutes to complete. Click on “Go to resource group” when it is done.
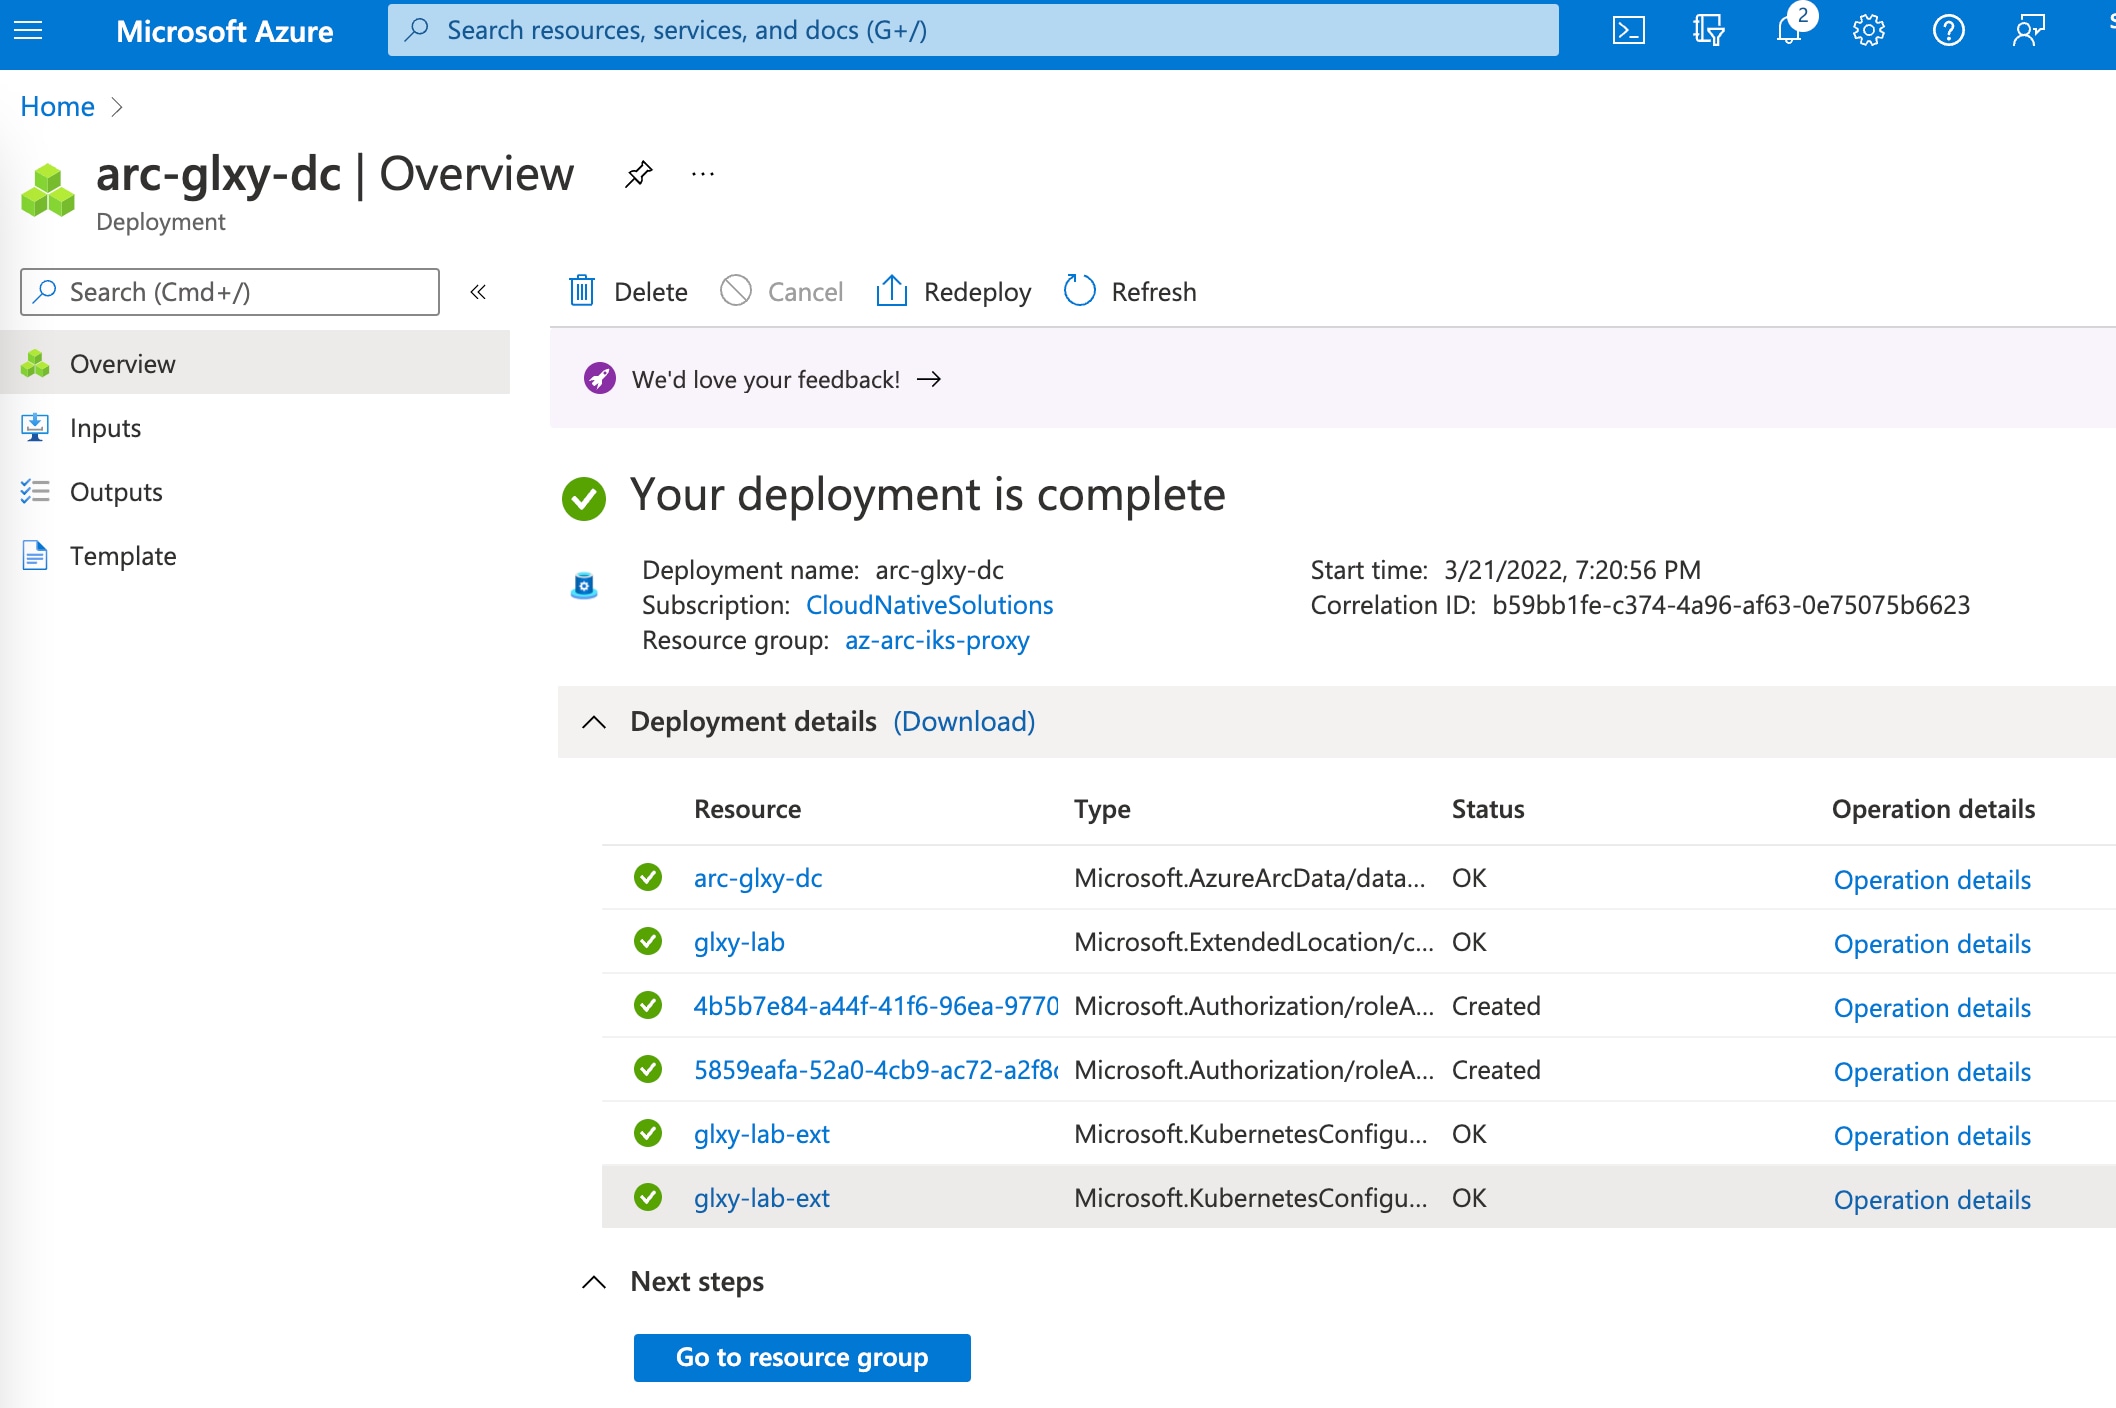
9. In the resource group, click on the newly deployed data controller resource to view the details. The data controller status should be in “Ready” state.
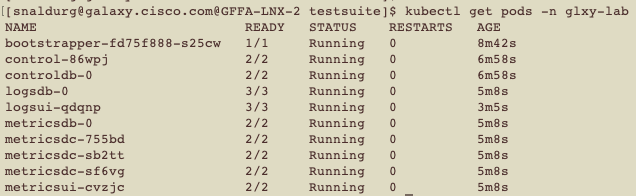
10. Check the status using the kubectl CLI by running the following commands to see if the namespace mentioned above is created and that the data controller and all pods in that namespace are in ready and running states, respectively, as shown below
> kubectl get ns

> kubectl -n glxy-lab get datacontrollers
![]()
> kubectl get pods -n glxy-lab
Create an Azure SQL-managed instance on Azure Arc
Prerequisites
1. Install tools – Azure CLI, Azure Data Studio, and the required extensions. Follow this link to install client tools.
2. An Azure Arc data controller is already installed.
Create an Azure SQL-managed instance from Azure portal
This section provides steps to create an Azure SQL-managed instance on Azure Arc using an Azure portal.
1. In Azure portal, open Azure Arc services as shown in the figure below, and click on Create SQL managed instance – Azure Arc.

2. In the Basics section of the Create Azure SQL Managed Instance – Azure Arc page, do the following:
● Select the subscription and resource group from the dropdown list where the data controller is deployed. Use the same values that were set in the previous section.
● Set a name for the SQL-managed instance, and select a custom location from the dropdown list associated with Azure Arc-enabled Kubernetes and also where the data controller is deployed.
● Set the Node Port as Kubernetes service type.
● Edit the Compute + Storage information as per your requirements, or leave it to the defaults.
● Provide credentials for the managed instance administrator account.

3. Click Next.
4. Enter any tag-related information in the “Tags” section, and click on Next. This step is optional.
5. In the “Review + create” section, verify the details, and click on the “Create” button.
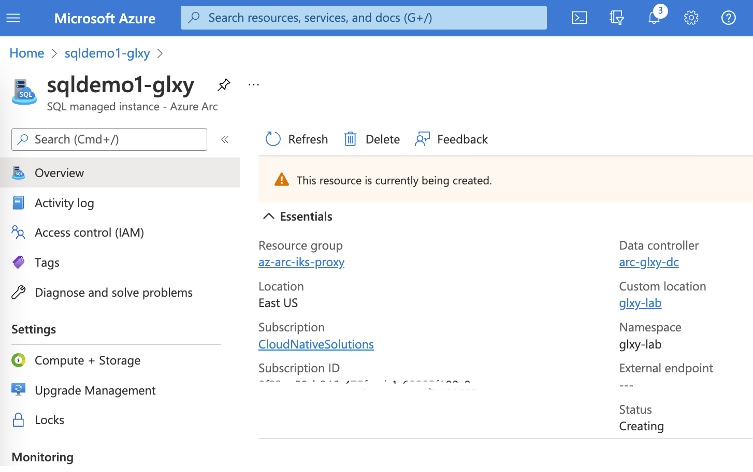
6. Wait for the completion of the creation of a SQL-managed instance, as shown in the figure below.
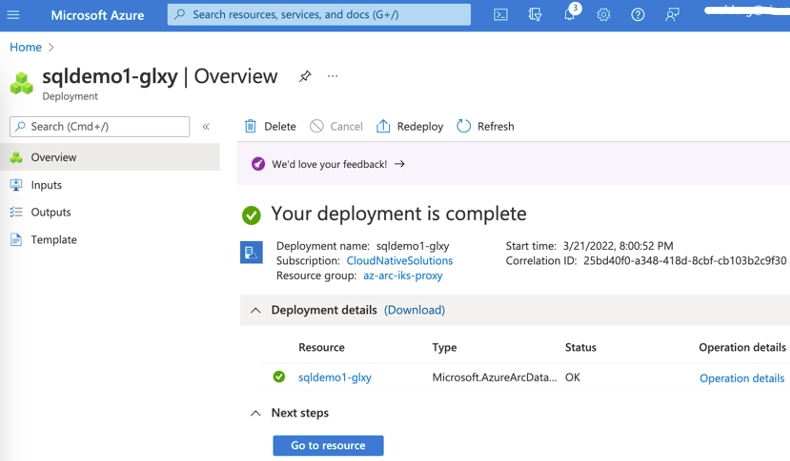
7. Once the deployment is complete, click on the “Go to resource” button to see the details of the installed instance. Note down the “External endpoint” details required to connect using a SQL client such as Azure Data Studio.
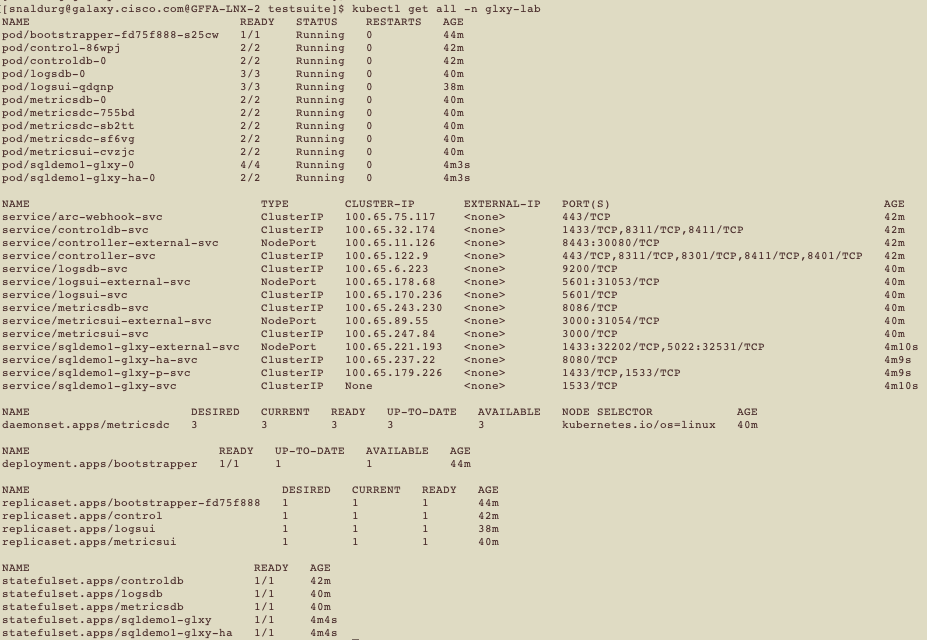
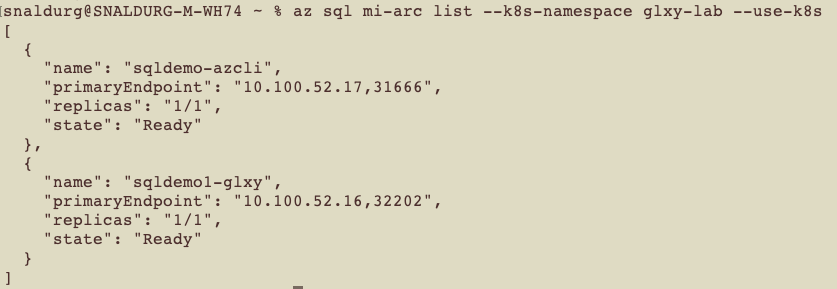
8. To verify the instance has been created, and also to check the pod deployment of SQL, enter the following commands:
> kubectl get sqlmi -n glxy-lab

> kubectl get all -n glxy-lab
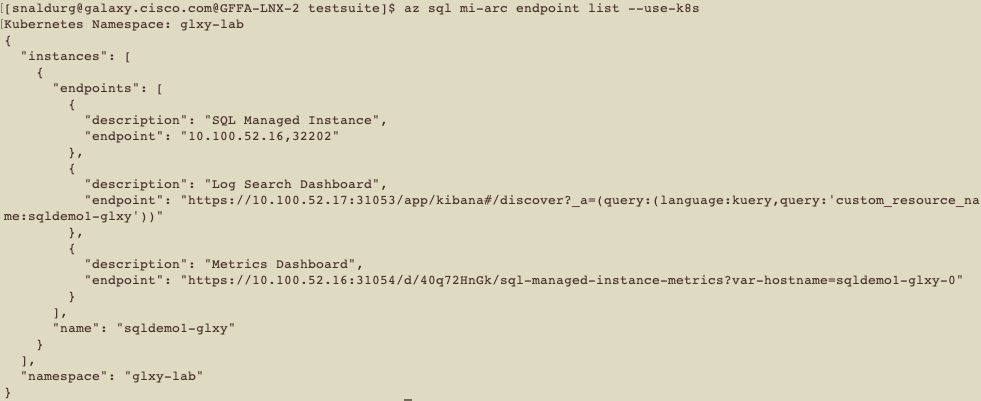
> az sql mi-arc list --k8s-namespace glxy-lab --use-k8s

> az sql mi-arc endpoint list --use-k8s
Monitor and manage Azure Arc resources using Azure Data Studio
Azure Data Studio is a client tool used to connect to and view information about your Azure Arc resources from your local environment. This section provides steps to connect to an existing Azure data controller and SQL-managed instances using Azure Data Studio.
1. Launch Azure Data Studio on your administration workstation.
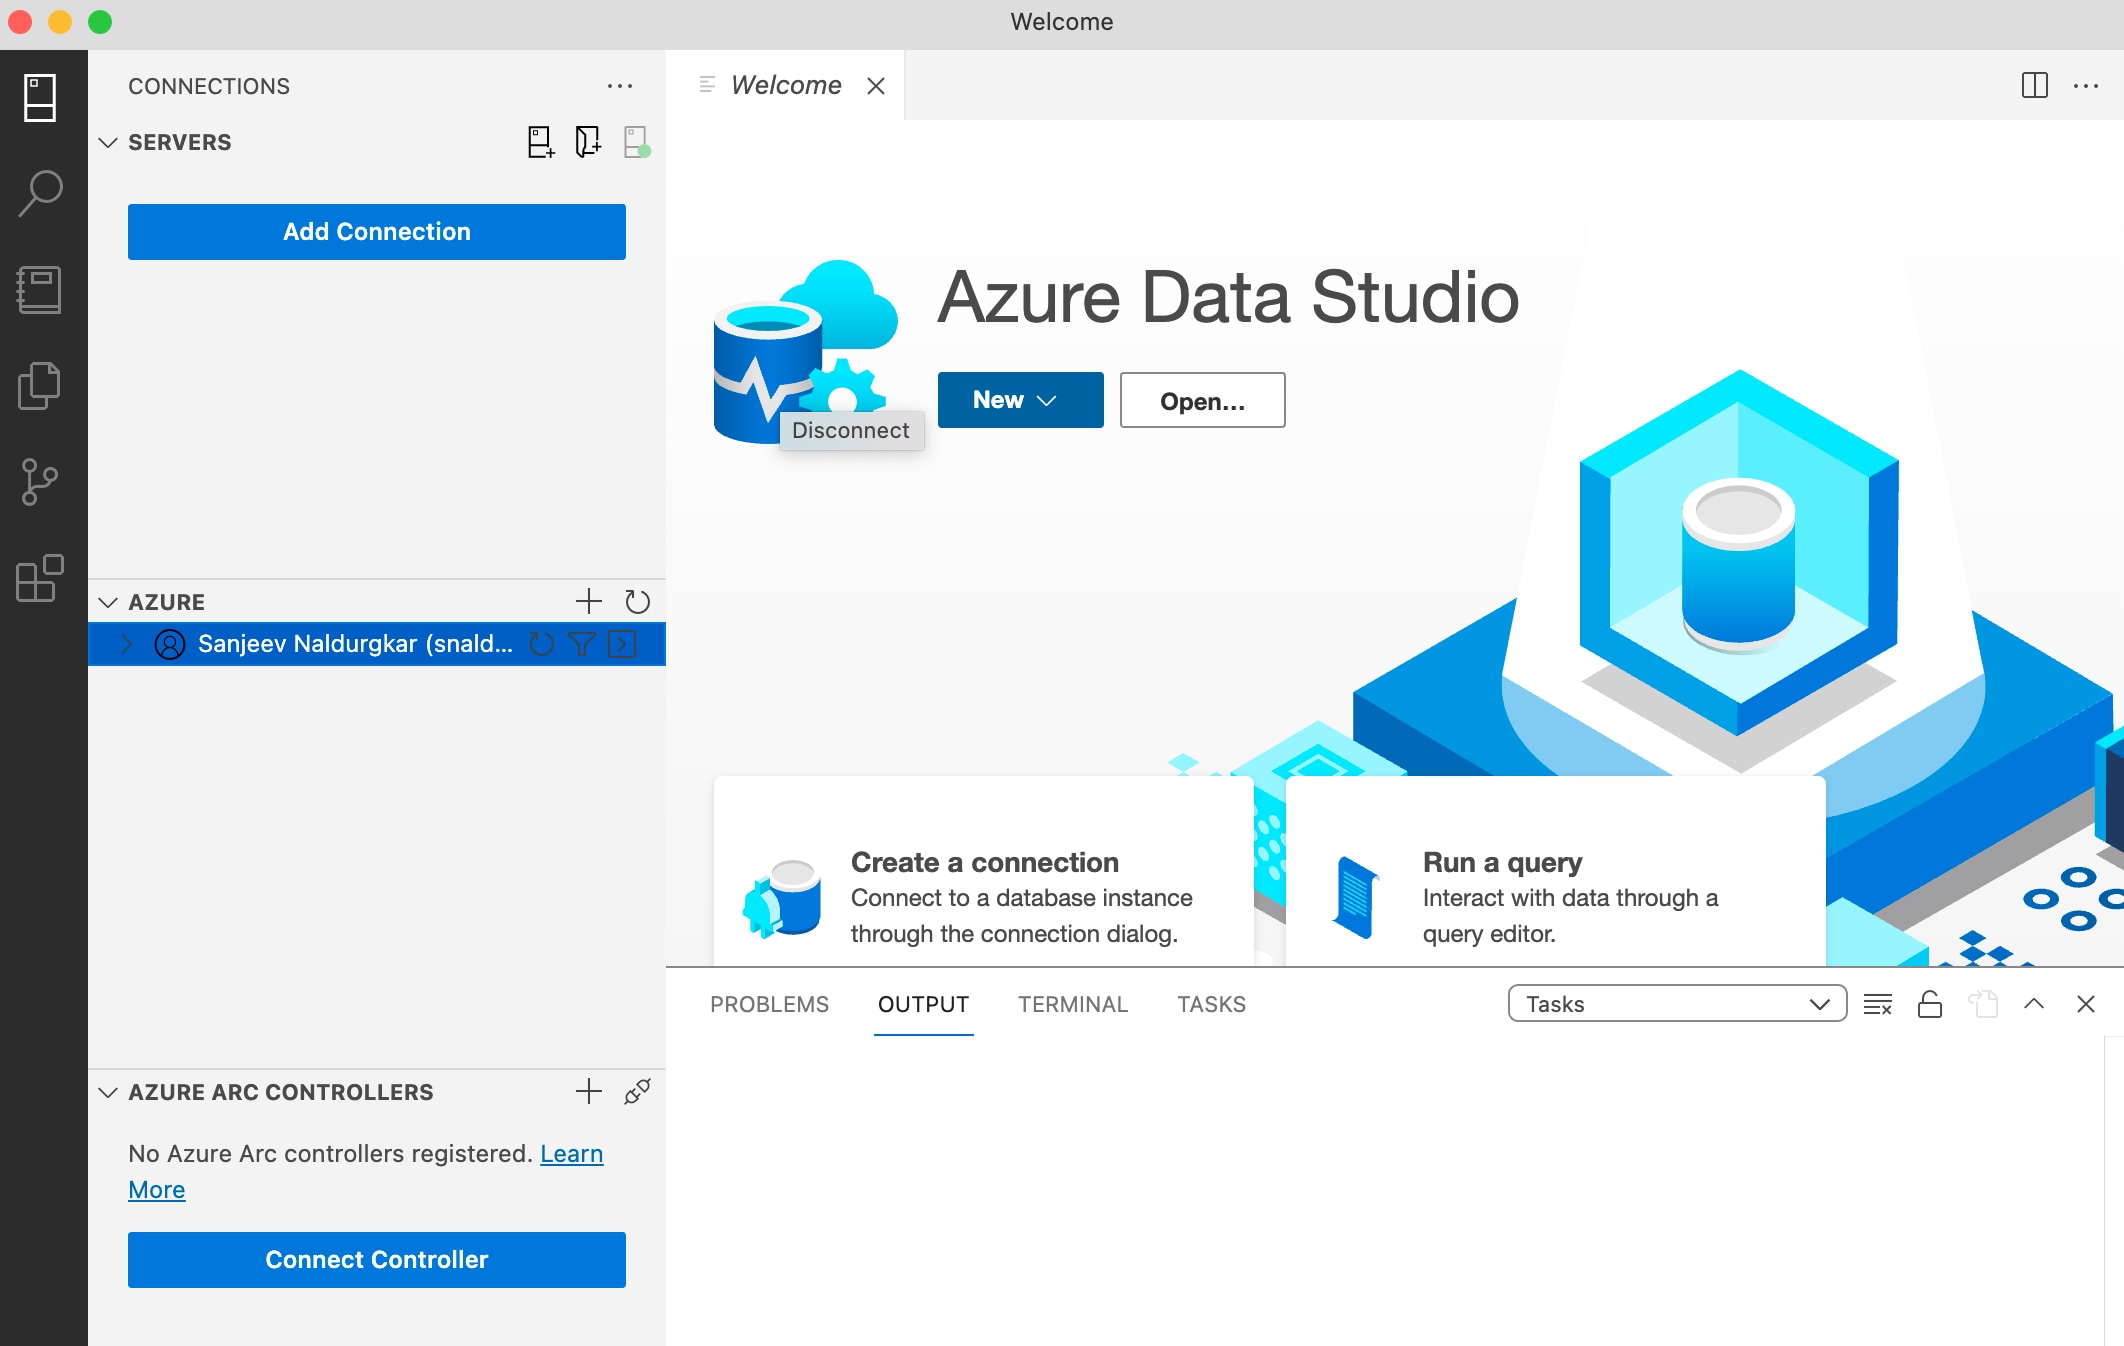
2. Select the Connections tab on the left navigation pane and expand the Azure panel. Click on the “+” button next to the Azure panel to sign in to your Azure subscription where the Azure data controller and SQL-managed instance are deployed.
3. Next, select the Connections tab on the left navigation pane, and expand the Azure Arc Controllers panel. Click on the “+” next to Azure Arc Controllers panel to connect to an existing Azure Arc controller.
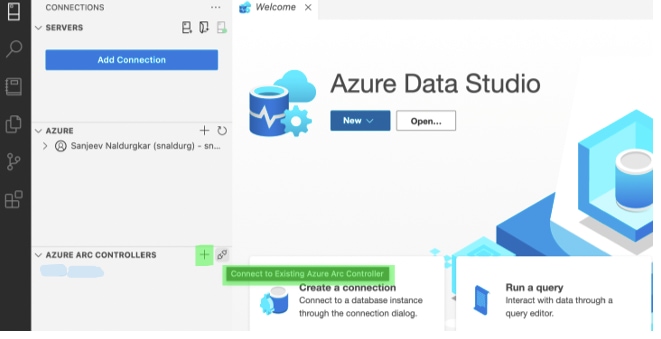
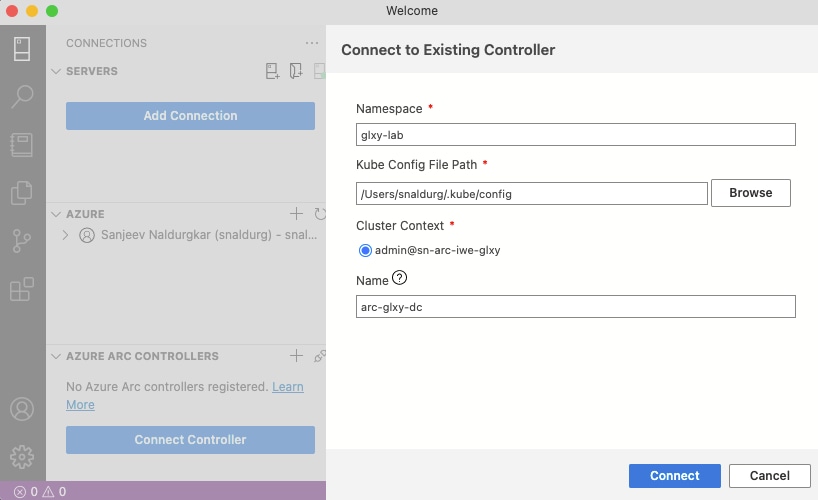
4. In the Connect to Existing Controller wizard on the right-side pane, enter the following details and click on the Connect button:
● Namespace – where the data controller and SQL-managed instance are deployed
● Kube Config File Path – path to the kubeconfig file of the cluster
● Cluster Context – Select the correct cluster context from multiple cluster contexts configured in the above kubeconfig file
● Name – enter the name of the existing Azure data controller
5. On successful connection, the Azure Arc data controller is now seen under the Azure Arc Controllers panel in the Connections tab in the left navigation pane. Expand the data controller under the Azure Arc Controllers panel to view all the SQL managed instances deployed under it.
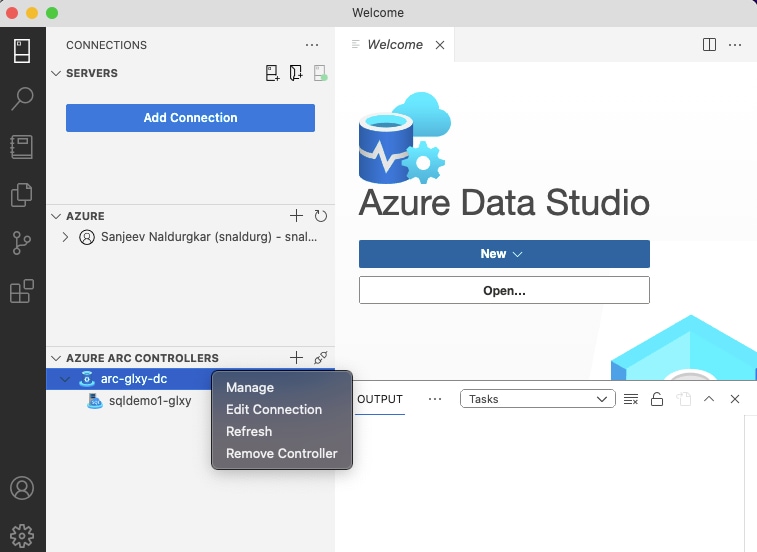
6. Right-click on the data controller as shown in the figure below, and click on Manage to open the Azure Arc Data Controller Dashboard on the right side of the navigation page.
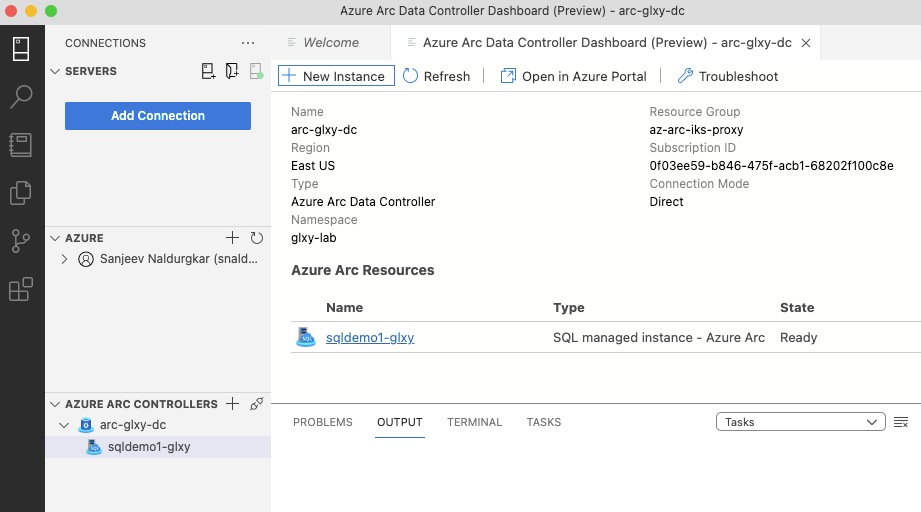
7. Similarly, you can right-click on the SQL-managed instance, and click on Manage, to open the SQL-managed instance – Azure Arc Dashboard. On the overview tab, you can view details about the SQL-managed instance, as shown in the figure below.
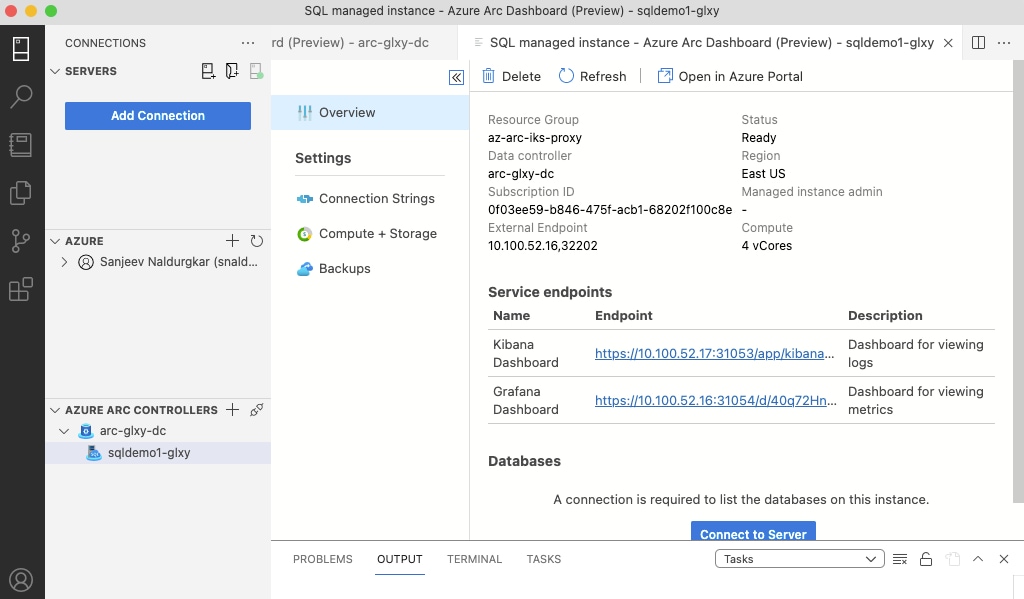
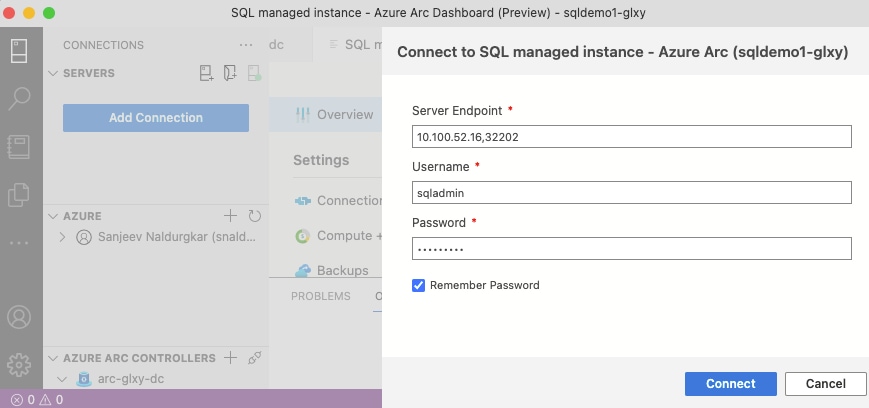
8. Next, click on “Connect to Server” under Databases on the right navigation pane, and enter the details for the server endpoint, username, and password, and click on Connect. The details for the server endpoint can be noted down from the figure for step 7, above.
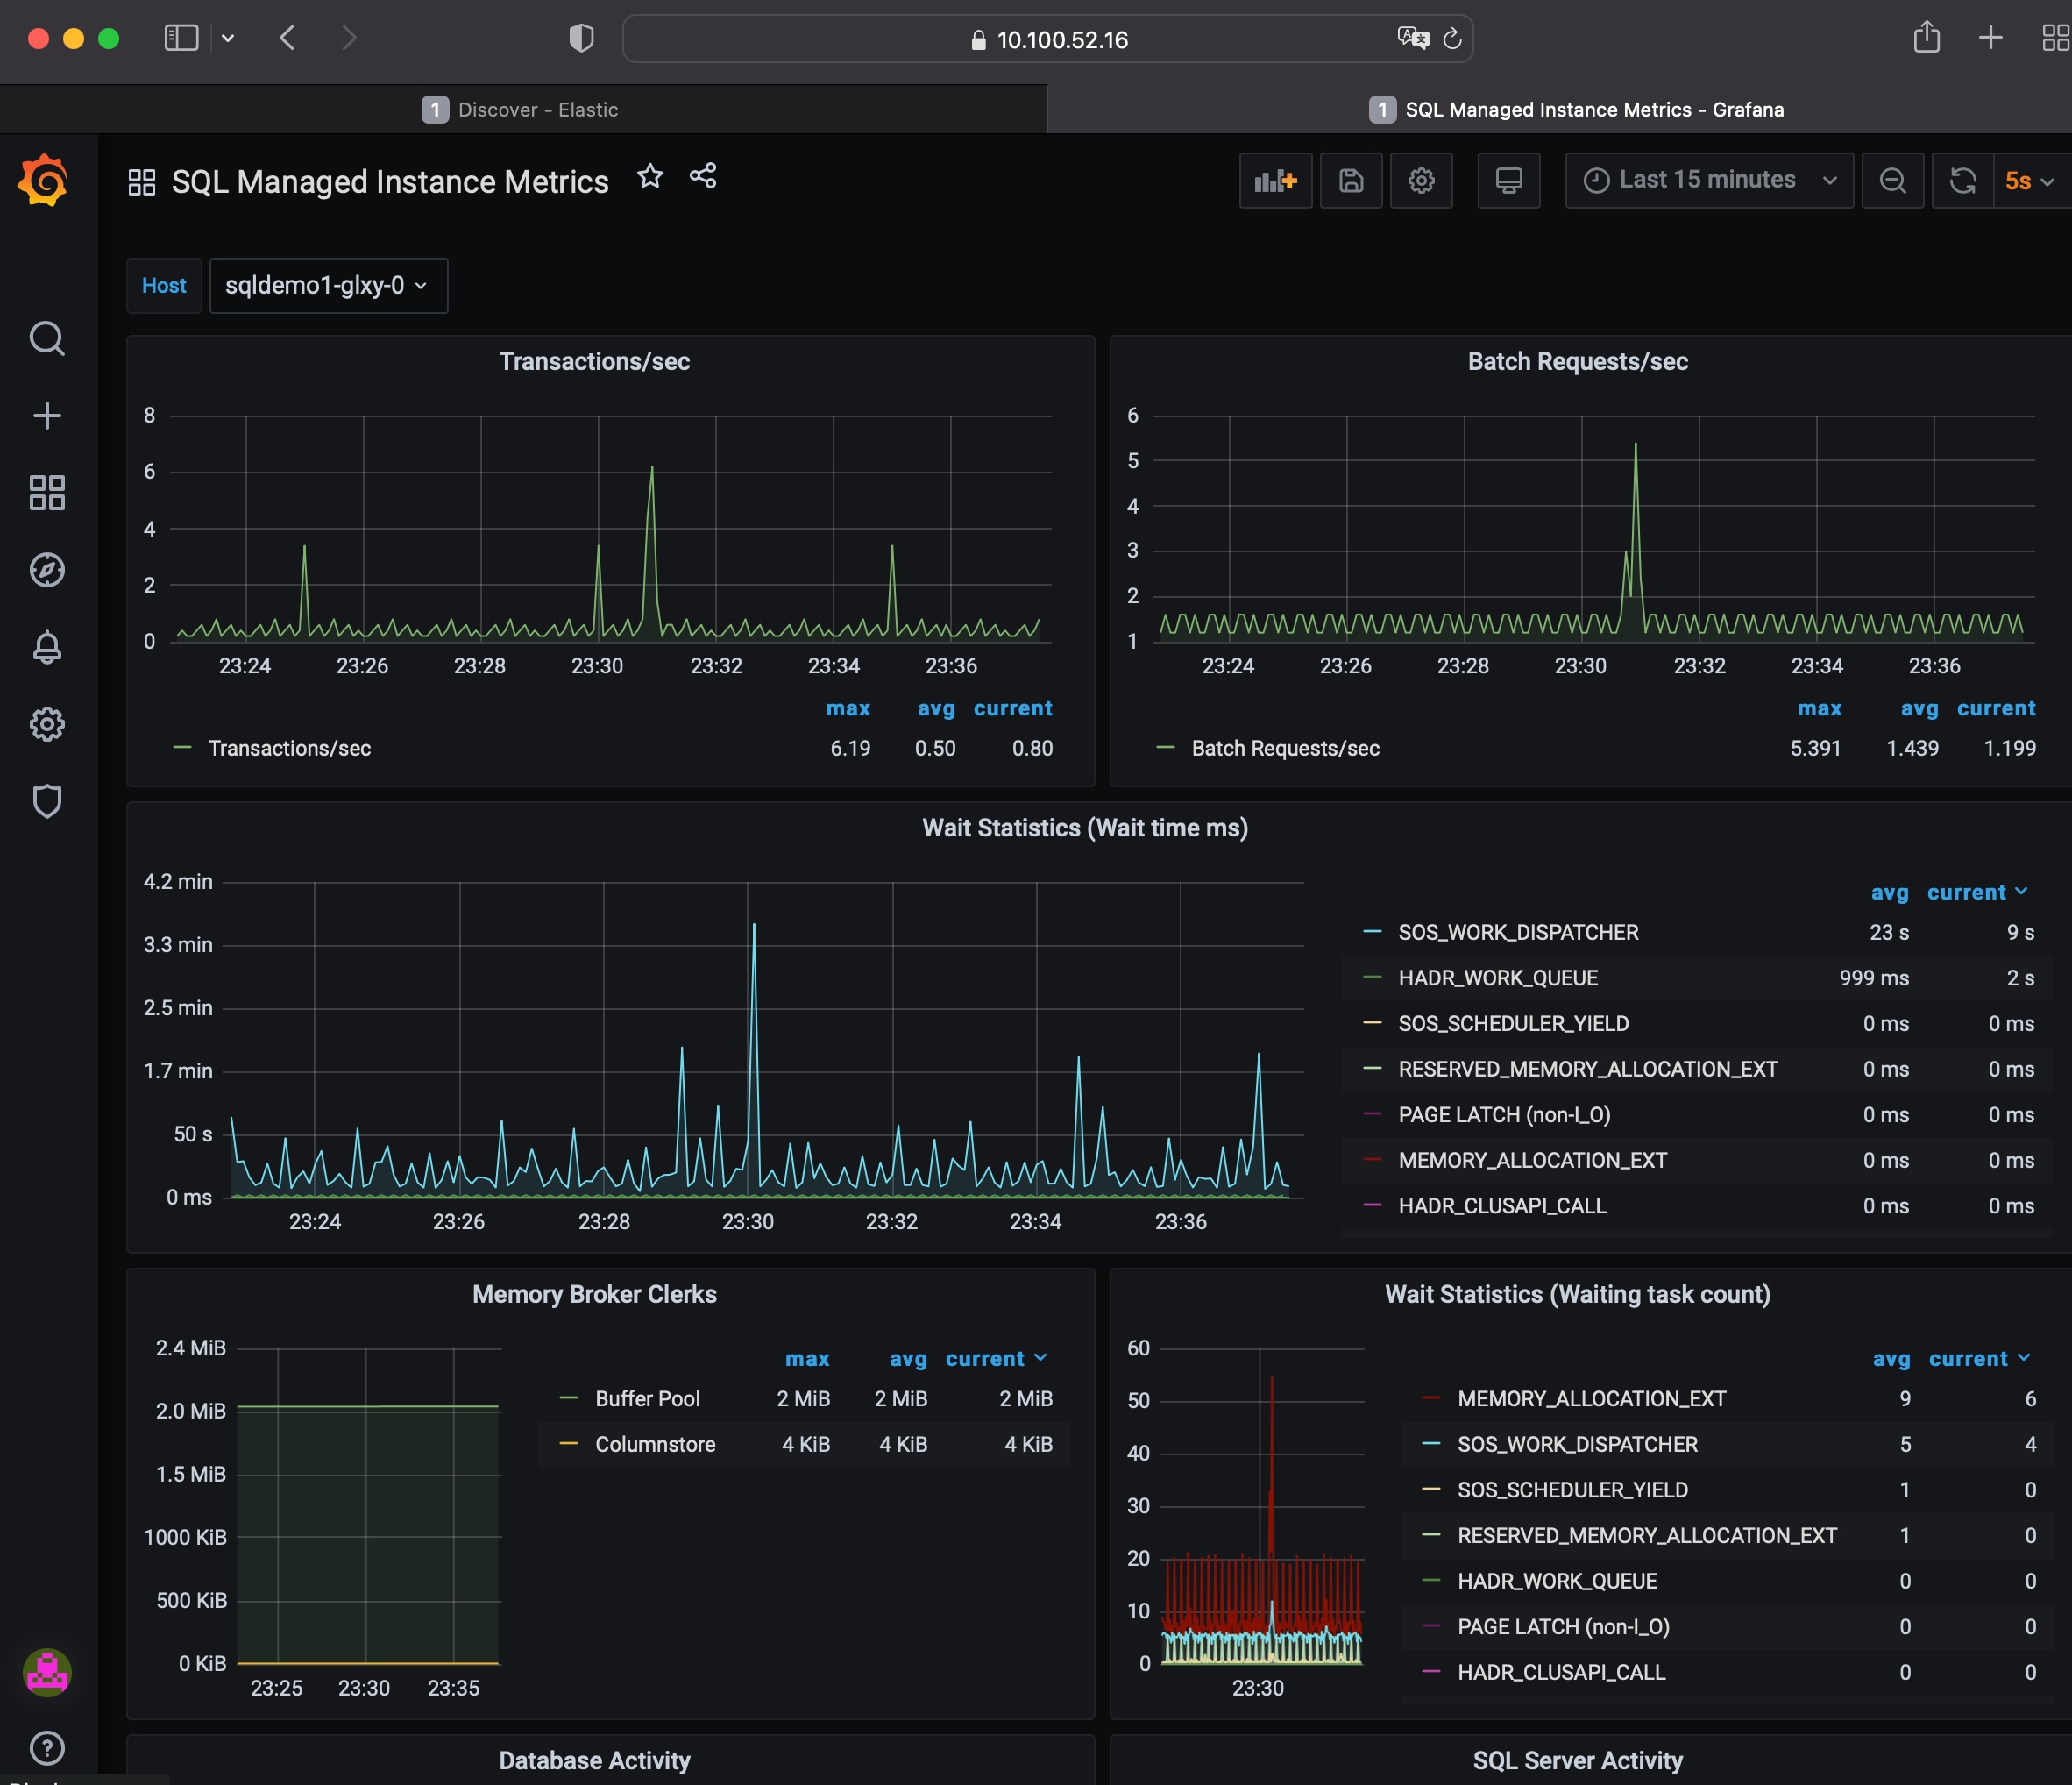
9. On the SQL-managed instance – Azure Arc Dashboard on the right navigation pane, click on the link next to Grafana Dashboard under Service endpoints to view the SQL-managed instance metrics for that context. At the login prompt, key in the credentials provided during the creation of the SQL-managed instance.
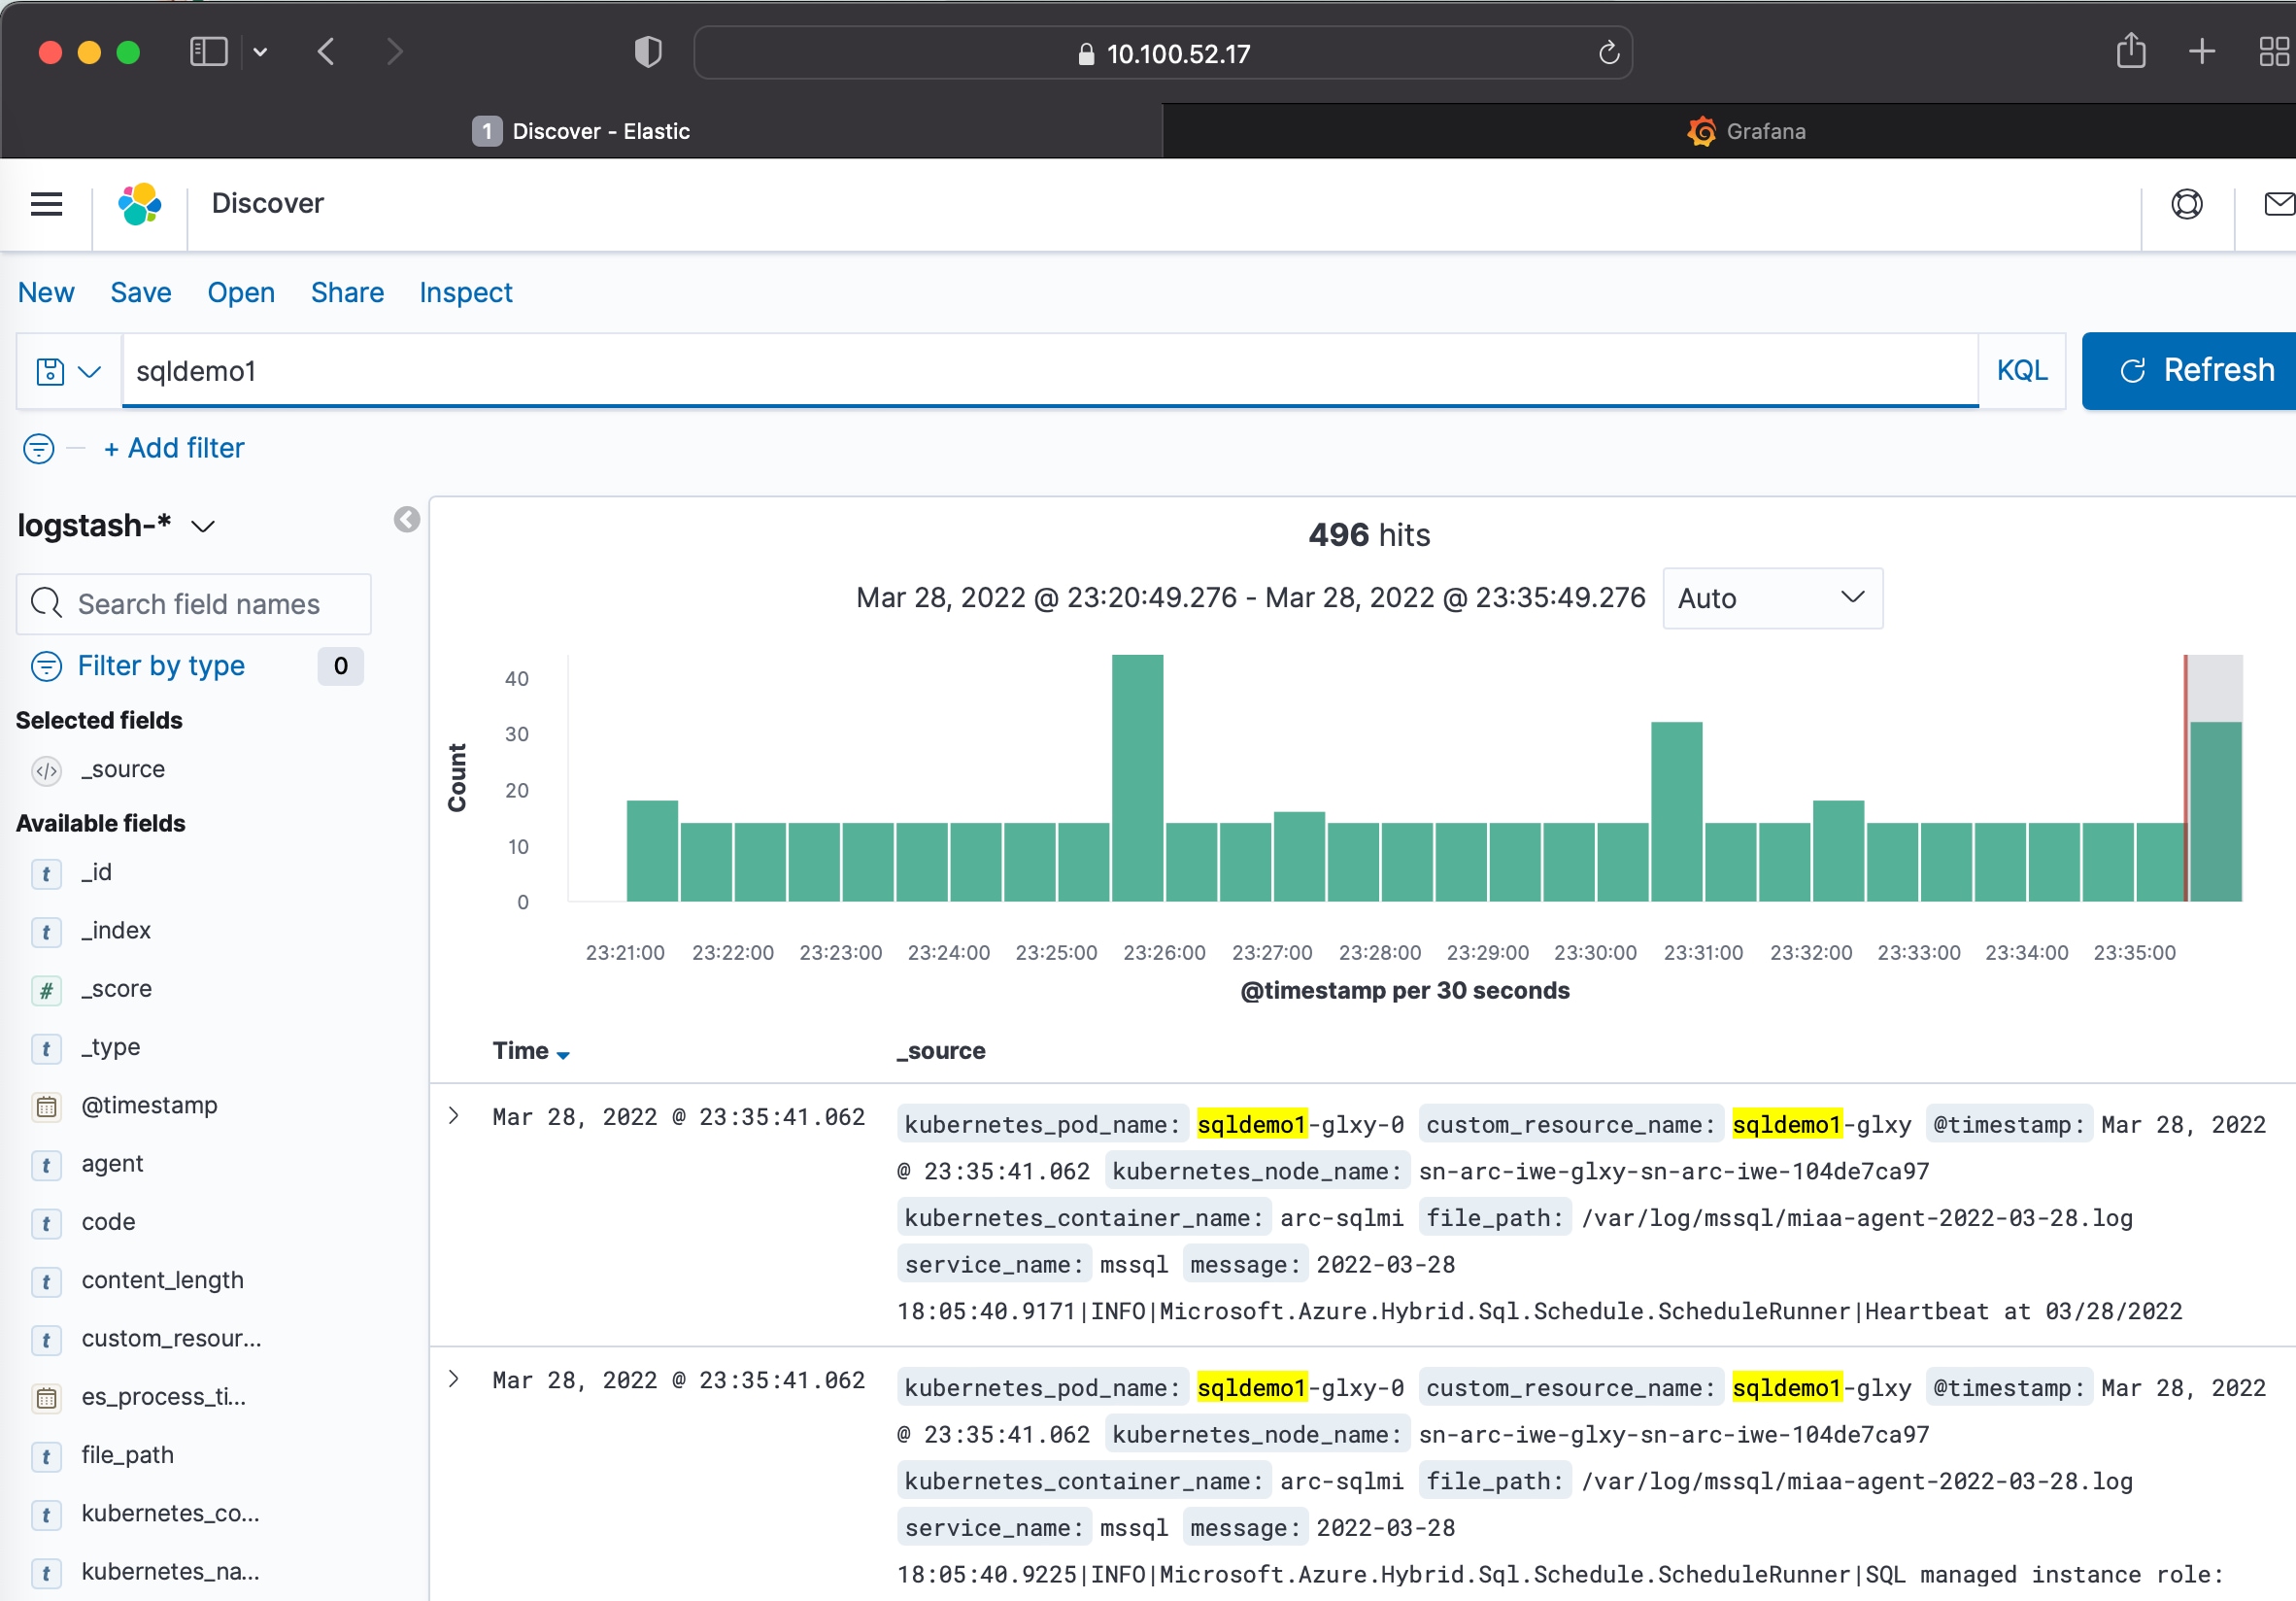
10. On the SQL-managed instance – Azure Arc Dashboard on the right navigation pane, click on the link next to Kibana Dashboard under Service endpoints to view the SQL- managed instance logs for that context. At the login prompt, key in the credentials provided during the creation of the SQL-managed instance.
11. To connect to and query Azure Arc SQL server-managed instances using Azure Data Studio, expand the Servers panel in the Connections tab on the left navigation pane, and click on the Add Connections button. Enter the details for your SQL-managed instance as shown in the figure below, and click Connect.
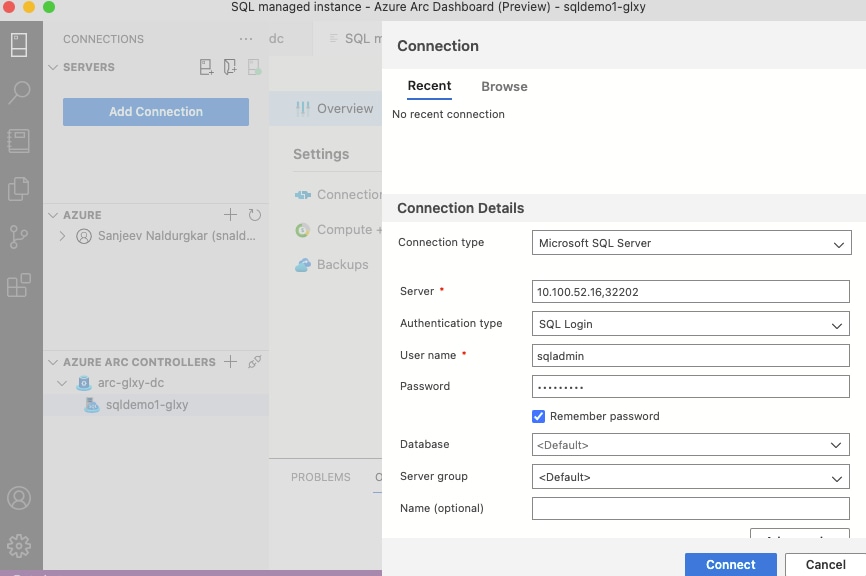
12. Right-clicking on the server as shown below allows you to perform a variety of operations.

Create an Azure SQL-managed instance using Azure CLI
Refer this link to create an Azure SQL-managed instance on Azure Arc using Azure CLI.
The example below can be used to create a SQL-managed instance for direct connectivity modes:
> az sql mi-arc create --name sqldemo-azcli --resource-group az-arc-iks-proxy --location eastus --subscription xxxxxxxx-xxxx-xxxx-xxxx-xxxxxxxxxxxx --custom-location glxy-lab

To view the created instance, use the following command:
> az sql mi-arc list --k8s-namespace glxy-lab --use-k8s
For additional information, see the following resources:
● https://intersight.com/help/saas/resources/intersight_kubernetes_service_user_guide#overview
● https://docs.microsoft.com/en-us/azure/azure-arc/kubernetes/overview
● https://docs.microsoft.com/en-us/azure/azure-arc/data/
● https://docs.microsoft.com/en-us/azure/azure-arc/data/managed-instance-overview
● https://docs.microsoft.com/en-us/sql/azure-data-studio/?view=sql-server-ver15