Verfahren zur Neuerstellung von Cisco Nexus Dashboard-Knoten mithilfe eines HTTP-Servers
Download-Optionen
-
ePub (634.2 KB)
In verschiedenen Apps auf iPhone, iPad, Android, Sony Reader oder Windows Phone anzeigen
Inklusive Sprache
In dem Dokumentationssatz für dieses Produkt wird die Verwendung inklusiver Sprache angestrebt. Für die Zwecke dieses Dokumentationssatzes wird Sprache als „inklusiv“ verstanden, wenn sie keine Diskriminierung aufgrund von Alter, körperlicher und/oder geistiger Behinderung, Geschlechtszugehörigkeit und -identität, ethnischer Identität, sexueller Orientierung, sozioökonomischem Status und Intersektionalität impliziert. Dennoch können in der Dokumentation stilistische Abweichungen von diesem Bemühen auftreten, wenn Text verwendet wird, der in Benutzeroberflächen der Produktsoftware fest codiert ist, auf RFP-Dokumentation basiert oder von einem genannten Drittanbieterprodukt verwendet wird. Hier erfahren Sie mehr darüber, wie Cisco inklusive Sprache verwendet.
Informationen zu dieser Übersetzung
Cisco hat dieses Dokument maschinell übersetzen und von einem menschlichen Übersetzer editieren und korrigieren lassen, um unseren Benutzern auf der ganzen Welt Support-Inhalte in ihrer eigenen Sprache zu bieten. Bitte beachten Sie, dass selbst die beste maschinelle Übersetzung nicht so genau ist wie eine von einem professionellen Übersetzer angefertigte. Cisco Systems, Inc. übernimmt keine Haftung für die Richtigkeit dieser Übersetzungen und empfiehlt, immer das englische Originaldokument (siehe bereitgestellter Link) heranzuziehen.
Einleitung
Dieses Dokument beschreibt das Verfahren zum erneuten Imaging von Cisco Nexus Dashboard-Knoten mithilfe eines HTTP-Servers und bietet eine klare, schrittweise Anleitung, um ein standardisiertes und effizientes Node-Re-Imaging über eine HTTP-gehostete Remote-Image-Bereitstellung sicherzustellen.
Voraussetzungen
- Der Cisco Integrated Management Controller (CIMC) muss mit einer OOB-IP-Adresse konfiguriert werden.
- Überprüfen Sie die Versionshinweise für das Nexus Dashboard, und stellen Sie sicher, für welches Nexus Dashboard-Software-Image ein neues Image erstellt werden muss.
- Laden Sie das Software-Image von software.cisco.com herunter.
- Bestätigen Sie, dass die MD5-Prüfsumme des Abbilds mit der unter Cisco.com veröffentlichten übereinstimmt.
- Laden Sie das Nexus Dashboard-Image auf den HTTP-Server hoch.
- Der HTTP-Server muss über die CIMC-Management-Schnittstelle erreichbar sein. Diese Erreichbarkeit kann entweder über die CIMC-GUI oder die CLI überprüft werden.
Verwendete Komponenten
Dieses Dokument ist nicht auf bestimmte Software- und Hardware-Versionen beschränkt.
Die Informationen in diesem Dokument beziehen sich auf Geräte in einer speziell eingerichteten Testumgebung. Alle Geräte, die in diesem Dokument benutzt wurden, begannen mit einer gelöschten (Nichterfüllungs) Konfiguration. Wenn Ihr Netzwerk in Betrieb ist, stellen Sie sicher, dass Sie die möglichen Auswirkungen aller Befehle kennen.
Hintergrundinformationen
Wenn ein Cisco Nexus Dashboard-Knoten ausfällt - aufgrund von Systemfehlern, nicht unterstützten Updates oder nicht zugänglicher Benutzeroberfläche - können Administratoren ein neues Image des Knotens mithilfe eines ISO-Images erstellen, das auf einem HTTP-Server gehostet wird. Der Prozess umfasst das Herunterladen der ISO für das Nexus Dashboard, das Hosten der ISO-Datei auf einem Webserver und die Verwendung von CIMC (Cisco Integrated Management Controller) zum Zuordnen und Booten der ISO-Datei über HTTP. Dies ermöglicht eine effiziente Wiederherstellung oder Neuinstallation eines Remote-Knotens im Rahmen der Cluster-Wiederherstellung.
Lösung
Um ND-Re-Imaging über einen HTTP-Server durchzuführen, müssen folgende Schritte ausgeführt werden:
Schritt 1:Laden Sie die Firmware von der Cisco Website herunter.
Öffnen Sie software.cisco.com/download.
Schritt 2: Rufen Sie die Nexus Dashboard-Oberfläche auf, und wählen Sie aus den verfügbaren Versionoptionen die entsprechende Softwareversion aus (z. B. 3.2(2m)).
Beispiele:
Schritt 3: Kopieren Sie das ISO-Image der Nexus Dashboard-Software auf den HTTP-Server.
Beispiel: http://x.x.x.x/iso/
Schritt 4: Verbindung von SSH/Konsole mit dem Cisco Integrated Management Controller
- Melden Sie sich von einem Terminalfenster aus bei der CIMC-Konsole an.
# ssh admin@cimc_ip
wobei "cimc_ip" die CIMC-IP-Adresse ist.
Beispiele:
# ssh admin@x.x.x.x
admin@x.x.x.x's password:
system#
- Ändern Sie den Bereich in Virtual Media:
system# scope vmedia
system /vmedia #
-
Ordnen Sie das ISO-Image dem HTTP-Server zu.
system /vmedia # map-www volume_name http://http_server_ip_and_path iso_file_name
Dabei gilt:
-
volume_name ist der Name des Volumes.
-
http_server_ip_and_path ist die IP-Adresse des HTTP-Servers und der Pfad zur ISO-Datei.
-
iso_filename ist der Name der ISO-Datei.
Beispiele:
Anmerkung: Zwischen http_server_ip_and_path und iso_filename ist ein Leerzeichen.
system /vmedia # map-www apic http://x.x.x.x/iso/ nd-dk9.3.2.2m.iso
Server username: admin
Server password:
Confirm password:
Anmerkung: Geben Sie die Anmeldeinformationen ein, und drücken Sie die Eingabetaste.
-
Überprüfen Sie den Zuordnungsstatus:
 system /vmedia # show mappings detail

The Map-Status must be shown as OK.

For Example:

system /vmedia # show mappings detail
Volume apic:
    Map-Status: OK
    Drive-Type: CD
    Remote-Share: http://x.x.x.x/iso/

    Remote-File:nd-dk9.3.2.2m.iso
    Mount-Type: www
    Mount-Options: noauto,username=admin,password=********3
    system /vmedia #
Wenn die Zuordnung fehlschlägt oder während der Zuordnung ein Fehler auftritt, können Sie die vorhandene Zuordnung mit dem Befehl unmap entfernen und dann erneut versuchen.
Server # scope vmedia
Server /vmedia # show mappings
Volume  Map-status   Drive-type     remote-share        remote-file                mount-type
------  ----------  ------------  ------------------- -------------------        -----------
Huu     OK           removable    http://x.x.x.x/ rhel-server-6.1-x86_6.iso      www
Server /vmedia # unmap Huu
Server /vmedia # show mappings
Volume  Map-status   Drive-type     remote-share        remote-file                mount-type
------  ----------  ------------  ------------------- -------------------        -----------
-
Stellen Sie eine Verbindung mit SOL her, um den Installationsprozess zu überwachen:
system /vmedia # connect host
CISCO Serial Over LAN:
Press Ctrl+x to Exit the session
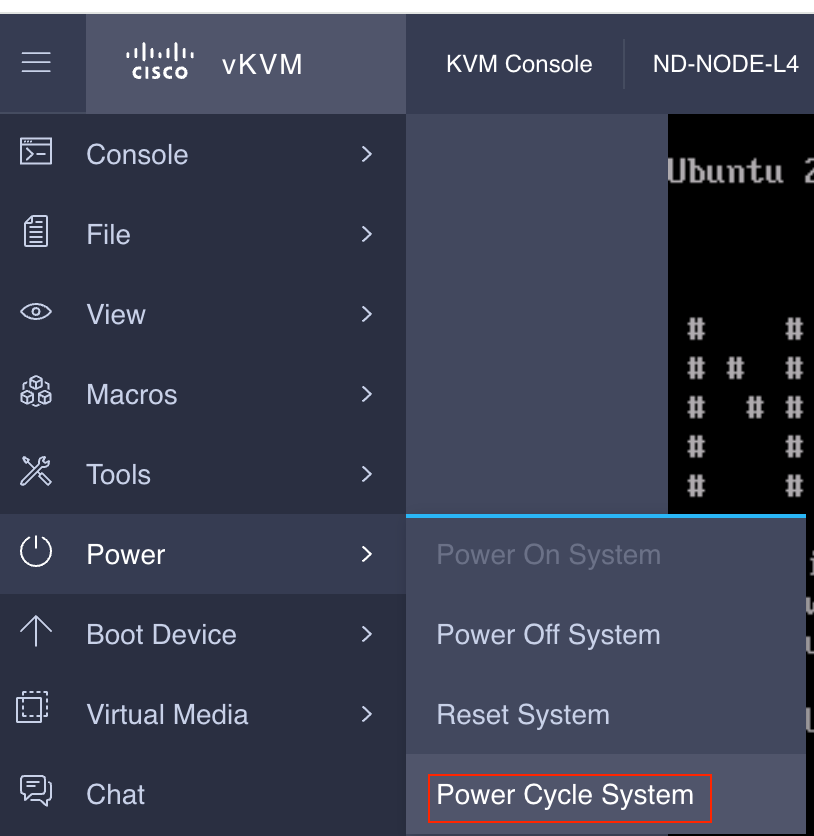
Schritt 5: Aus- und wieder Einschalten der KVM-Konsole der CIMC-Benutzeroberfläche.
Choose Power > Power Cycle System (cold boot) to power cycle the controller.
Von der SOL-Konsole aus: Beobachten Sie den Bildschirm während des Bootvorgangs, und bereiten Sie sich darauf vor, zu gegebener Zeit F6 zu drücken, um in das Boot-Auswahlmenü zu wechseln.
Beispiele:
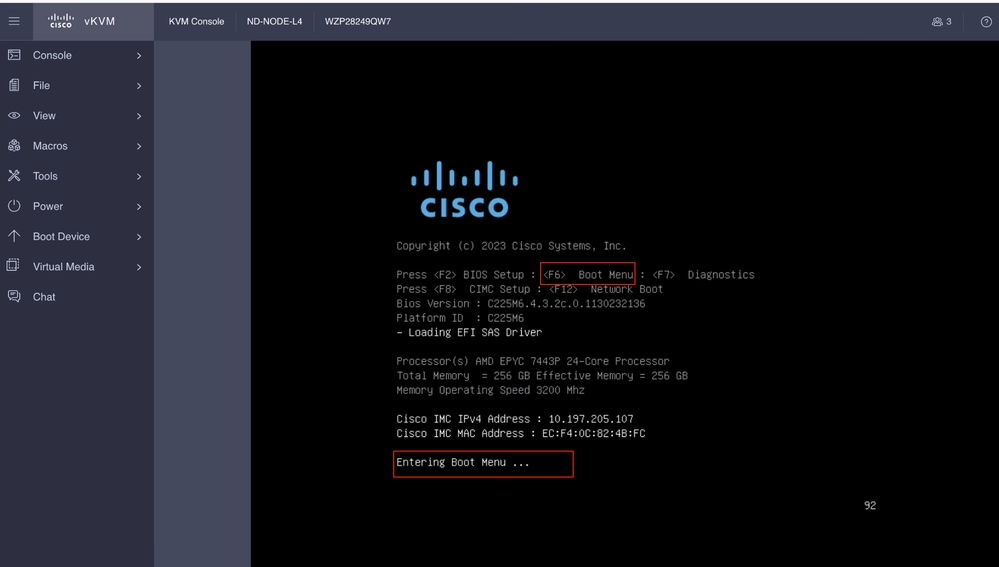
Sie können auch das BIOS-Kennwort eingeben. Das Standardkennwort lautet password.
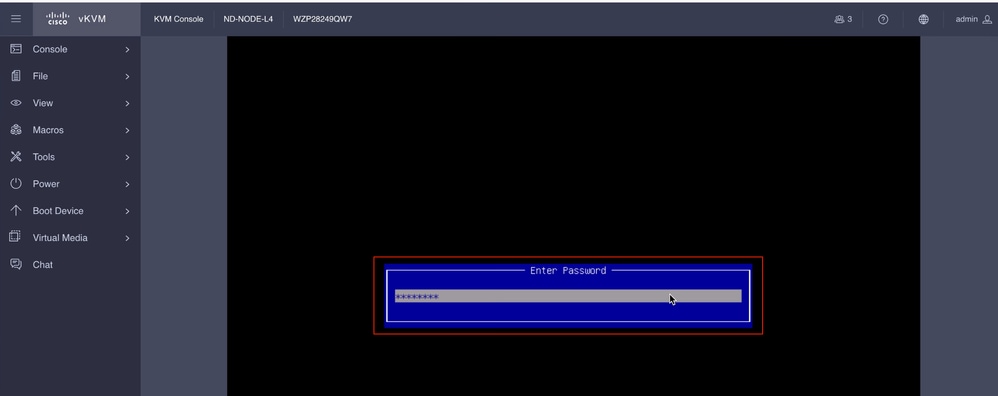
Wählen Sie im Startauswahlmenü die Option Cisco CIMC-Mapped vDVD2.00 als einmaliges Startgerät aus.
Schritt 6: Zurück zur CIMC-CLI und Überwachen der Ausgabe des Connect-Hosts
Überwachen Sie die CIMC-CLI, wenn Sie die Meldung zur Beschleunigung der Installation erhalten, geben Sie in den nächsten zehn Minuten iso url ein, und geben Sie dann die HTTP-Server-URL mit dem Nexus Dashboard-Image ein.
Boot000A* UEFI: Cisco CIMC-Mapped vDVD2.00 PciRoot(0x1)/Pci(0x8,0x1)/Pci(0x0,0x3)/USB(1,0)/USB(2,0)/Unit(3)/CDROM(1,0x35,0x5597ed)..BO'
+ return 1
+ '[' -n '' ']'
++ mount
++ grep /run/install/repo
++ cut -f 1 -d ' '
++ tr -d '[:digit:]'
++ true
+ usbdevice=
+ mkdir /mnt/usbdata
+ '[' -n '' ']'
+ '[' true = true ']'
+ read_iso_url
+ dmesg --console-off
+ true
+ echo 'To speed up the install, enter iso url. Type '\''skip'\'' to use local media:'
To speed up the install, enter iso url. Type 'skip' to use local media:
+ echo ' Either http://server/path/to/file or nfs:server:/path/to/file are supported'
Either http://server/path/to/file or nfs:server:/path/to/file are supported
+ read -r -p '? ' url

 http://x.x.x.x197.204.4/iso/DCApps/ND/nd-dk9.3.2.1i.iso << Enter the http server details  >>
+ '[' http://x.x.x.x197.204.4/iso/DCApps/ND/nd-dk9.3.2.1i.iso = skip ']'
+ '[' http://x.x.x.x197.204.4/iso/DCApps/ND/nd-dk9.3.2.1i.iso = '' ']'
+ '[' http = nfs: ']'
+ echo http://x.x.x.x197.204.4/iso/DCApps/ND/nd-dk9.3.2.1i.iso
+ grep -q '\[.*\]'
++ awk -F '/|:' '{print $4}'
+ urlip=x.x.x.x197.204.4
+ '[' -z x.x.x.x197.204.4 ']'
+ break
+ dmesg --console-on
+ '[' -n http://x.x.x.x197.204.4/iso/DCApps/ND/nd-dk9.3.2.1i.iso ']'
+ '[' http://x.x.x.x197.204.4/iso/DCApps/ND/nd-dk9.3.2.1i.iso '!=' skip ']'
+ dmesg --console-of
Schritt 7. Nach Eingabe der HTTP-URL wird der Bootvorgang fortgesetzt.
Anmerkung: Wählen Sie die statische Option aus. Sie werden aufgefordert, den Schnittstellennamen, die Management-IP-Adresse und das Gateway einzugeben.
+ set +e
+ configured=0
+ interface=none
+ addr=none
+ gw=none
+ '[' 0 -eq 0 ']'
+ echo 'Configuring network interface'
Configuring network interface
+ echo 'type static, dhcp, bash for a shell to configure networking, or url to re-enter the url: '
type static, dhcp, bash for a shell to configure networking, or url to re-enter the url:
+ read -p '? ' ntype
? static << Enter the static  to configure the networking >>
+ case $ntype in
+ configure_static
+ '[' none '!=' none ']'
Anmerkung: Wenn Sie die falsche Schnittstelle ausgewählt haben, ist der Paketverlust 100 %. Nach drei fehlgeschlagenen Ping-Versuchen wird erneut gefragt, die richtige Schnittstelle auszuwählen, bis der Paketverlust 0 ist, wenn Sie nicht wissen, dass die Schnittstelle eine nach der anderen ausgewählt hat.
Beispiele
+ echo 'Available interfaces'
Available interfaces
+ ls -l /sys/class/net
total 0
lrwxrwxrwx 1 root root 0 Aug 12 03:53 eno5 -> ../../devices/pci0000:40/0000:40:03.1/0000:46:00.0/0000:47:01.0/0000:49:00.0/0000:4a:00.0/0000:4b:00.0/net/eno5
lrwxrwxrwx 1 root root 0 Aug 12 03:53 eno6 -> ../../devices/pci0000:40/0000:40:03.1/0000:46:00.0/0000:47:01.0/0000:49:00.0/0000:4a:00.0/0000:4b:00.1/net/eno6
lrwxrwxrwx 1 root root 0 Aug 12 03:53 enp1s0f0 -> ../../devices/pci0000:00/0000:00:01.1/0000:01:00.0/net/enp1s0f0
lrwxrwxrwx 1 root root 0 Aug 12 03:53 enp1s0f1 -> ../../devices/pci0000:00/0000:00:01.1/0000:01:00.1/net/enp1s0f1
lrwxrwxrwx 1 root root 0 Aug 12 03:51 lo -> ../../devices/virtual/net/lo
+ read -p 'Interface to configure: ' interface
Interface to configure: enp1s0f0        <<  select the correct interface   >>
+ read -p 'address: ' addr
Anmerkung: ND-NODE-L4 erfordert Schnittstellennamen im Format enp1s0fX, wobei X eine numerische Kennung ist. SE-NODE-G2 erfordert das Format enoX, wobei X eine Zahl ist.
Schritt 8: Korrekte Schnittstellenüberprüfung.
Nachdem die Schnittstelle eingegeben wurde, wird versucht, einen Ping an den HTTP-Server zu senden. Wenn die ausgewählte Schnittstelle korrekt ist, muss der Paketverlust 0 % betragen, und das Image wird vom HTTP-Server abgerufen.
Beispiele: Nach Eingabe der richtigen Schnittstelle mit 0 % Paketverlust.
Interface to configure: enp1s0f0
+ read -p 'address: ' addr
address: x.x.x.x/24
+ read -p 'gateway: ' gw
gateway:x.x.x.x
+ ip addr add x.x.x.x/24 dev enp1s0f0
+ ip link set enp1s0f0 up
+ ip route add default via x.x.x.x
++ seq 1 6
+ for count in $(seq 1 6)
+ ping -c 1 x.x.x.x
PING x.x.x.x (x.x.x.x): 56 data bytes

---x.x.x.x ping statistics ---
1 packets transmitted, 0 packets received, 100% packet loss
+ sleep 20
+ for count in $(seq 1 6)
+ ping -c x.x.x.x
PING x.x.x.x (x.x.x.x): 56 data bytes
64 bytes from x.x.x.x : seq=0 ttl=63 time=0.512 ms

---x.x.x.x ping statistics ---
1 packets transmitted, 1 packets received, 0% packet loss
round-trip min/avg/max = 0.512/0.512/0.512 ms
+ configured=1
+ break
+ '[' 1 -eq 0 ']'
+ set -e
+ tmpiso=/tmp/cdrom.iso
+ echo 'Fetching http://x.x.x.x/iso/DCApps/ND/nd-dk9.3.2.2f.iso to /tmp/cdrom.iso'
Fetching http://x.x.x.x/iso/DCApps/ND/nd-dk9.3.2.2f.iso to /tmp/cdrom.iso >> started fetching the apic image from HTTP server
+ '[' http = nfs: ']'
+ download http://x.x.x.x/iso/DCApps/ND/nd-dk9.3.2.2f.iso /tmp/cdrom.iso
+ local url=http://x.x.x.x/iso/DCApps/ND/nd-dk9.3.2.2f.iso dest=/tmp/cdrom.iso tries=5
+ wget --server-response --no-check-certificate --tries=5 --progress=dot:mega --read-timeout=60 --output-document=/tmp/cdrom.iso.tmp http://x.x.x.x197.204.4/iso/DCApps/ND/nd-dk9.3.2.2f.iso
--2025-08-12 09:39:08-- http://x.x.x.x197.204.4/iso/DCApps/ND/nd-dk9.3.2.2f.iso
Connecting to x.x.x.x:80... connected.
HTTP request sent, awaiting response...
HTTP/1.1 200 OK
Date: Tue, 12 Aug 2025 09:39:09 GMT
Server: Apache/2.4.6 (CentOS) OpenSSL/1.0.2k-fips mod_wsgi/3.4 Python/2.7.5
Last-Modified: Tue, 10 Jun 2025 06:51:41 GMT
ETag: "2c66bd000-6373220f3b940"
Accept-Ranges: bytes
Content-Length: 11918888960
Keep-Alive: timeout=5, max=100
Connection: Keep-Alive
Content-Type: application/octet-stream
Length: 11918888960 (11G) [application/octet-stream]
Saving to: '/tmp/cdrom.iso.tmp'
Wenn Sie die falsche Schnittstelle ausgewählt haben, beträgt der Paketverlust 100 %. Nach drei fehlgeschlagenen Ping-Versuchen wird erneut die richtige Schnittstelle ausgewählt.
Beispiele: Nach der Eingabe der falschen Schnittstelle mit 100% Paketverlust.
+ read -p 'Interface to configure: ' interface
Interface to configure: enp11s0
+ read -p 'address: ' addr
address: x.x.x.x/24
+ read -p 'gateway: ' gw
gateway: x.x.x.x
+ ip addr add x.x.x.x/24 dev enp11s0
+ ip link set enp11s0 up
+ ip route add default via x.x.x.x
++ seq 1 2
+ for count in '$(seq 1 2)'
+ ping -c 1 x.x.x.x
PING x.x.x.x (x.x.x.x) 56(84) bytes of data.
From x.x.x.x icmp_seq=1 Destination Host Unreachable

--- x.x.x.x ping statistics ---
1 packets transmitted, 0 received, +1 errors, 100% packet loss, time 0ms

+ sleep 20
+ for count in '$(seq 1 2)'
+ ping -c 1 x.x.x.x
PING x.x.x.x (x.x.x.x) 56(84) bytes of data.
From x.x.x.x icmp_seq=1 Destination Host Unreachable

--- x.x.x.x ping statistics ---
1 packets transmitted, 0 received, +1 errors, 100% packet loss, time 0ms

+ sleep 20
+ '[' 0 -eq 0 ']'
+ echo 'Configuring network interface'
Configuring network interface
+ echo 'type static, dhcp, bash for a shell to configure networking, or url to re-enter the url: ' <>
type static, dhcp, bash for a shell to configure networking, or url to re-enter the url:
+ read -p '? ' ntype
?
Überwachen Sie die CIMC-CLI, und warten Sie ca. 40-50 Minuten. Die folgende Ausgabe wird für die CLI ausgegeben.
+ log 'Shutting down Atomix Installer'
+ echo 'Shutting down Atomix Installer'
Shutting down Atomix Installer
+ log 'reboot: Power down'
+ echo 'reboot: Power down'
reboot: Power down
+ sleep 5
+ poweroff
+ ec[  533.195532] sysrq: Emergency Sync
ho s
[  533.195563] sysrq: Emergency Sync
[  533.212106] sysrq: Emergency Sync
[  533.212117] sysrq: Emergency Remount R/O
[  533.212189] sysrq: Power Off
[  533.212226] kvm: exiting hardware virtualization
[  533.213874] EXT4-fs (sdf1): re-mounted. Opts: (null). Quota mode: none.
[  533.215431] sd 1:0:0:0: [sdf] Synchronizing SCSI cache
[  533.215749] EXT4-fs (dm-3): re-mounted. Opts: (null). Quota mode: none.
[  533.216395] EXT4-fs (dm-1): re-mounted. Opts: (null). Quota mode: none.
[  533.217221] EXT4-fs (sdf6): re-mounted. Opts: (null). Quota mode: none.
[  533.217689] EXT4-fs (sdf4): re-mounted. Opts: (null). Quota mode: none.
[  533.218965] Emergency Remount complete
[  533.218997] Emergency Sync complete
[  533.218997] Emergency Sync complete
[  533.219002] Emergency Sync complete
[  533.359024] sd 1:0:0:0: [sdf] Stopping disk
+ echo s
+ echo s
+ echo u
+ echo o
+ log 'Nap time'
+ echo 'Nap time'
Nap time
+ true
+ sleep 60
[  535.571545] megaraid_sas 0000:41:00.0: megasas_disable_intr_fusion is called outbound_intr_mask:0x40000009
[  535.692202] ACPI: PM: Preparing to enter system sleep state S5
[  535.706849] reboot: Power down
Schritt 9: SOL nach dem Ausschalten beenden
Warten Sie, bis die Meldung poweroff in der SOL-Konsole angezeigt wird, verlassen Sie die SOL-Konsole, indem Sie Strg und x (Strg+x) drücken, melden Sie sich erneut beim CIMC an, und ändern Sie den Bereich erneut.
(i) Change the scope to virtual media again:
system# scope vmedia
system /vmedia #
(ii) Unmap the .iso image that you mapped in 2.c:
 system /vmedia # unmap volume_name
 At the Save mapping prompt, enter yes if you want to save the mapping or no if you do not want to save the mapping. For example:
 system /vmedia # unmap apic
 Save mapping? Enther 'yes' or 'no' to confirm (CTRL-C to cancel) → yes
 system /vmedia #
(iii) Connect back to SOL again:
 system /vmedia #  connect host
Nachdem das System heruntergefahren wurde, müssen Sie es mithilfe des KVM wieder hochfahren und dann mit den nächsten Schritten fortfahren.
Schritt x.x.x.x First-Boot-Setup
[  274.210045] nd_bootstrap.sh[2628]:   INFO[0174] bootDisk: found disk=/dev/sdf bootPart=/dev/sdf4 espPart=/dev/sdf3
[  274.224041] nd_bootstrap.sh[2628]:   INFO[0174] boot devices/filesystems have been mounted
[  274.236038] nd_bootstrap.sh[2628]:   INFO[0174] |12231-start| ["expand-stub.bash" "/boot/efi/EFI/atx-current/kernel.efi"]
[  274.251228] nd_bootstrap.sh[2628]:   INFO[0174] |12231-out  | 21870+1 records in
[  274.262061] nd_bootstrap.sh[2628]:   INFO[0174] |12231-out  | 21870+1 records out
[  274.272065] nd_bootstrap.sh[2628]:   INFO[0174] |12231-out  | 11197856 bytes (11 MB, 11 MiB) copied, 0.0716082 s, 156 MB/s
[  274.287060] nd_bootstrap.sh[2628]:   INFO[0174] |12231-out  | 0+1 records in
[  274.297060] nd_bootstrap.sh[2628]:   INFO[0174] |12231-out  | 0+1 records out
[  274.307049] nd_bootstrap.sh[2628]:   INFO[0174] |12231-out  | 187 bytes copied, 7.2325e-05 s, 2.6 MB/s
[  274.566030] nd_bootstrap.sh[2628]:   INFO[0175] |12231-out  | 102375+1 records in
[  274.576055] nd_bootstrap.sh[2628]:   INFO[0175] |12231-out  | 102375+1 records out
[  274.588059] nd_bootstrap.sh[2628]:   INFO[0175] |12231-out  | 52416297 bytes (52 MB, 50 MiB) copied, 0.329377 s, 159 MB/s
[  274.604075] nd_bootstrap.sh[2628]:   INFO[0175] |12231-out  | 0+1 records in
[  OK  ] Finished atomix-boot-setup.
[  274.615055] nd_bootstrap.sh[2628]:   INFO[0175] |12231-out  | 0+1 records out
Starting Initial cloud-init job (pre-networking)...
[  274.634046] nd_bootstrap.sh[2628]:   INFO[0175] |12231-out  | 82 bytes copied, 9.4287e-05 s, 870 kB/s
[  274.656064] nd_bootstrap.sh[2628]:   INFO[0175] |12231-exit | rc=0
[  274.666047] nd_bootstrap.sh[2628]:   INFO[0175] Boot()                    duration=175321
[  274.837851] cloud-init[12253]: Cloud-init v. 24.1.3-0ubuntu1~22.04.5 running 'init-local' at Tue, 12 Aug 2025 09:53:39 +0000. Up 274.82 seconds.
Press any key to run first-boot setup on this console...
Starting Nexus Dashboard setup utility
Welcome to Nexus Dashboard 3.2.2f
Press Enter to manually bootstrap your first master node..
Schritt 11: Konfigurieren des Admin-Kennworts und des Management-Netzwerks der Nexus Dashboard-Management-Schnittstelle
Starting Nexus Dashboard setup utility
Welcome to Nexus Dashboard 3.2.2f
Press Enter to manually bootstrap your first master node...

Admin Password:
Reenter Admin Password:
Management Network:
  IP Address/Mask: x.x.x.x/24
  Gateway: x.x.x.x
Konfiguration erneut eingeben?(J/N): N
System configured successfully
Initializing System on first boot. Please wait..
[  OK  ] Listening on Network Service Netlink Socket.
[  OK  ] Finished Initial cloud-init job (pre-networking).
[  OK  ] Reached target Preparation for Network.
         Starting Network Configuration...
[  OK  ] Started Network Configuration.
[  OK  ] Reached target Network.
Starting Wait for Network to be Configured...
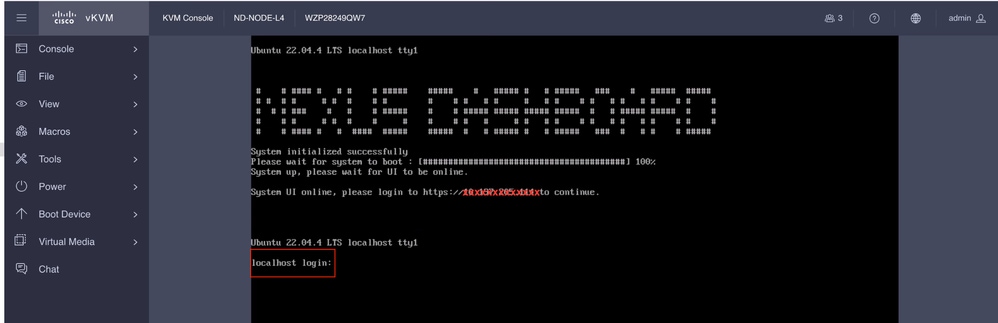
Schritt 12: Der Nexus Dashboard-Knoten ist bereit für die Anmeldung. Sie können sich mit der IP-Adresse der Management-Schnittstelle für den Rest der Konfiguration bei der ND-GUI anmelden.
Von Konsole:
Ubuntu 22.04.4 LTS localhost ttyS0

#    # #### #   # #    # #####    #####    #   ##### #   # #####   ###    #   #####  #####

# #  # #     # #  #    # #        #    # #   # #     #   # #    # #   # #   # #    # #    #

#  # # ###    #   #    # #####    #    # ##### ##### ##### #####  #   # ##### #####  #    #

#    # #     # #  #    #     #    #    # #   #     # #   # #    # #   # #   # #    # #    #

#    # #### #   #  ####  #####    #####  #   # ##### #   # #####   ###  #   # #    # #####
System initialized successfully
[  564.309561] cloud-init[12560]: Cloud-init v. 24.1.3-0ubuntu1~22.04.5 running 'modules:final' at Tue, 12 Aug 2025 09:58:28 +0000. Up 564.27 seconds.
ci-info: no authorized SSH keys fingerprints found for user ubuntu.
<14>Aug 12 09:58:29 cloud-init: #############################################################
<14>Aug 12 09:58:29 cloud-init: -----BEGIN SSH HOST KEY FINGERPRINTS-----
<14>Aug 12 09:58:29 cloud-init: 256 SHA256:vKu7Zj3MAP+vFOXaeW14HClEhAwrSpA9AqcUC4SZVlU root@localhost (ECDSA)
<14>Aug 12 09:58:29 cloud-init: 256 SHA256:I7eiUnQq6pZsoFPy+UxIUQ66jQOgHyG4zGuF6cAtSl0 root@localhost (ED25519)
<14>Aug 12 09:58:29 cloud-init: 3072 SHA256:SvodRIEgWzEAaQQdH2rlw0qLziBbv0e88VAGkt/ox14 root@localhost (RSA)
<14>Aug 12 09:58:29 cloud-init: -----END SSH HOST KEY FINGERPRINTS-----
<14>Aug 12 09:58:29 cloud-init: #############################################################

-----BEGIN SSH HOST KEY KEYS-----
ecdsa-sha2-nistp256 AAAAE2VjZHNhLXNoYTItbmlzdHAyNTYAAAAIbmlzdHAyNTYAAABBBBf9S1BXcR48cWcIKhvfjLGYufJgycGIf1Yx8OpRsk4e1I+y80J/x5dfX90h+3cwt9kjH8IubMpleK66mlW+xd0= root@localhost
ssh-ed25519 AAAAC3NzaC1lZDI1NTE5AAAAIGWTN7hoB2/dYSVA0gpV88FWh2iRD2hwJ2LMryhhhQHg root@localhost
ssh-rsa AAAAB3NzaC1yc2EAAAADAQABAAABgQCeM+In/dciDwCKEPLV/97oIA5pHHRBRf0Lij5NcUwzYAf9q/m/lUsdzv2zVYc4WAJd8uX9ZxDAGa9D358Tvxh/lKzBKqNQpQdAjyby6IGGui+UK9Mq1RVxoUkFtIIJ97IzaBoR9ScnucMXpu5mp5OAjws+VrUhKk1XNFAui1QgW507I0Xk+2AaR/W0rwJCQRsHx3orDxCwJkDQDiQQAf/SrvSnuAe/8pSuCuvscqPjZeIF7LnJ6dAms0XXrhbxRQ8c4q/Ud6RL2sKjinlZPfqsbVFSpjbJ9m4jtXvuGE5llyJbS1FcU8DsFbkY6HH9JQru49iXcd5mKt7fyPg0ypp7Hl+2g07mEcYlEMBXxNZw+HqNW27xp0ZkRfWO+Zl2t0s6DjM0LHWqV0wZLYqqBTlQIkhf2irM6mr7s2bVAcvEsuZzG9d7uY8aC/CR5GwkgKW8s4oI7m56ccdRPHV0qQFXnBybBToUInmIK+1fxtaUXYbQbQ83wxNOvG7O55gDsws= root@localhost
-----END SSH HOST KEY KEYS-----
[  564.364630] cloud-init[12560]: Cloud-init v. 24.1.3-0ubuntu1~22.04.5 finished at Tue, 12 Aug 2025 09:58:29 +0000. Datasource DataSourceAtomix [sources=/var/lib/cloud/seed/atomix][dsmode=net].  Up 564.36 seconds
Please wait for system to boot : [########################################] 100%
System up, please wait for UI to be online.
System UI online, please login to https://x.x.x.x to continue. << Access the Nexus Dashboard GUI via this URL >>
Ubuntu 22.04.4 LTS localhost ttyS0
localhost login:
Von KVM:
Revisionsverlauf
| Überarbeitung | Veröffentlichungsdatum | Kommentare |
|---|---|---|
1.0 |
29-Aug-2025
|
Erstveröffentlichung |
Beiträge von Cisco Ingenieuren
- Shivam TripathiTAC
 Feedback
Cisco kontaktieren
- Eine Supportanfrage öffnen

- (Erfordert einen Cisco Servicevertrag)