Configuring Smart Licensing
Prerequisites for Configuring Smart Licensing
You must have the following in CSSM:
-
Cisco Smart Account
-
One or more Virtual Account
-
User role with proper access rights
-
You should have accepted the Smart Software Licensing Agreement on CSSM to register devices.
Introduction to Smart Licensing
Cisco Smart Licensing is a flexible licensing model that provides you with an easier, faster, and more consistent way to purchase and manage software across the Cisco portfolio and across your organization. And it’s secure – you control what users can access. With Smart Licensing you get:
-
Easy Activation: Smart Licensing establishes a pool of software licenses that can be used across the entire organization—no more PAKs (Product Activation Keys).
-
Unified Management: Cisco License Central provides a complete view into all of your Cisco products and services in an easy-to-use portal, so you always know what you have and what you are using.
-
License Flexibility: Your software is not node-locked to your hardware, so you can easily use and transfer licenses as needed.
To use Smart Licensing, you must first set up a Smart Account on Cisco Software Central (software.cisco.com).
For a more detailed overview on Cisco Licensing, go to cisco.com/go/licensingguide.
 Note |
Licenses are managed as Smart licenses from Cisco IOS XE Fuji 16.9.1 and later. Right-to-Use licenses are deprecated from Cisco IOS XE Fuji 16.9.1. |
Overview of CSSM
CSSM enables you to manage all your Cisco smart software licenses from one centralized portal. With CSSM, you can organize and view your licenses in groups called virtual accounts (collections of licenses and product instances).
You can access the CSSM on https://software.cisco.com/#, by clicking the Smart Software Licensing link under the License tab.
Note |
Use a Chrome 32.0, Firefox 25.0, or Safari 6.0.5 web browser to access CSSM. Also, ensure that Javascript 1.5 or a later version is enabled in your browser. |
Use the CSSM to do the following tasks:
-
Create, manage, or view virtual accounts.
-
Create and manage Product Instance Registration Tokens.
-
Transfer licenses between virtual accounts or view licenses.
-
Transfer, remove, or view product instances.
-
Run reports against your virtual accounts.
-
Modify your email notification settings.
-
View overall account information.
CSSM Help describes the procedures for carrying out these tasks.
Connecting to CSSM
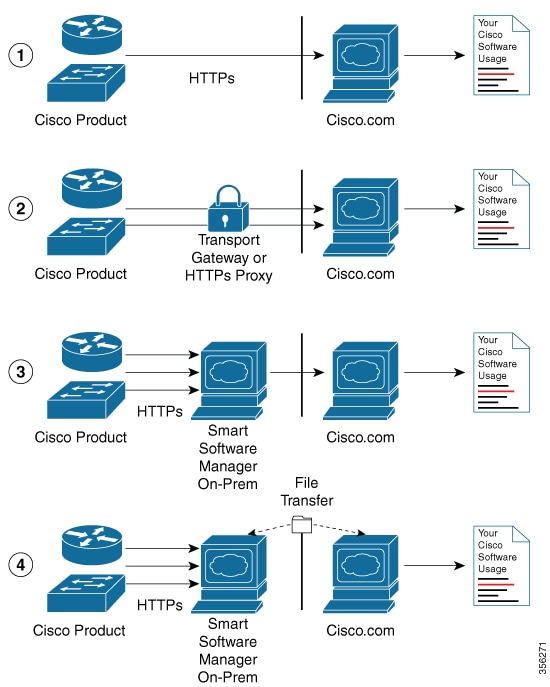
The following illustration shows the various options available to connect to CSSM:
-
Direct cloud access: In this method, Cisco products send usage information directly over the internet to Cisco.com; no additional components are needed for the connection.
-
Direct cloud access through an HTTPs proxy: In this method, Cisco products send usage information over the internet through a proxy server - either a Call Home Transport Gateway or an off-the-shelf proxy (such as Apache) to Cisco.com.
-
Mediated access through a connected on-premises collector: In this method, Cisco products send usage information to a locally-connected collector, which acts as a local license authority. Periodically, this information is exchanged to keep the databases synchronized.
-
Mediated access through a disconnected on-premises collector: In this method, Cisco products send usage information to a local disconnected collector, which acts as a local license authority. Exchange of human-readable information takes place occasionally (maybe once a month) to keep the databases synchronized.
Options 1 and 2 provide an easy connection option, and options 3 and 4 provide a secure environment connection option. Cisco Smart Software Manager On-Prem (formerly known as Cisco Smart Software Manager satellite) provides support for options 3 and 4.
Linking Existing Licenses to CSSM
The following section is required for those licenses that were purchased without a Cisco Smart Account. These licenses will not be available in CSSM after you have upgraded to Cisco IOS XE Fuji 16.9.1. You are requested to contact the Cisco Global Licensing Operations (GLO) team with the following email template. Fill the template with the appropriate information to request linking of your existing licenses to your Cisco Smart Account in CSSM.
Email Template:
To: licensing@cisco.com
Subject: Request for Linking Existing Licenses to Cisco Smart Account
Email Text:
Cisco.com ID: #####
Smart virtual account name: #####
Smart account domain ID (domain in the form of "xyz.com"): #####
List of UDIs:
List of licenses with count:
Proof of purchase (Please attach your proof of purchase along with this mail)
Configuring a Connection to CSSM and Setting Up the License Level
The following sections provide information about how to set up a connection to CSSM and set up the license level.
Setting Up a Connection to CSSM
The following steps show how to set up a Layer 3 connection to CSSM to verify network reachability. Skip this section if you already have Layer 3 connectivity to CSSM.
SUMMARY STEPS
- enable
- configure terminal
- {ip | ipv6} name-server server-address 1 [server-address 2] [server-address 3] [server-address 4] [server-address 5] [server-address 6]
- ip name-server vrf Mgmt-vrf server-address 1 [server-address 2] [server-address 3] [server-address 4] [server-address 5] [server-address 6]
- ip domain lookup source-interface interface-type interface-number
- ip domain name example.com
- ip host tools.cisco.com ip-address
- interface vlan_id
- ntp server ip-address [version number] [key key-id] [prefer]
- switchport access vlan vlan_id
- ip route ip-address ip-mask subnet mask
- license smart transport callhome
- ip http client source-interface interface-type interface-number
- exit
- copy running-config startup-config
DETAILED STEPS
| Command or Action | Purpose | |||
|---|---|---|---|---|
|
Step 1 |
enable Example: |
Enables privileged EXEC mode. Enter your password, if prompted. |
||
|
Step 2 |
configure terminal Example: |
Enters global configuration mode. |
||
|
Step 3 |
{ip | ipv6} name-server server-address 1 [server-address 2] [server-address 3] [server-address 4] [server-address 5] [server-address 6] Example: |
Configures Domain Name System (DNS). |
||
|
Step 4 |
ip name-server vrf Mgmt-vrf server-address 1 [server-address 2] [server-address 3] [server-address 4] [server-address 5] [server-address 6] Example: |
(Optional) Configures DNS on the VRF interface.
|
||
|
Step 5 |
ip domain lookup source-interface interface-type interface-number Example: |
(Optional) Configures the source interface for the DNS domain lookup. |
||
|
Step 6 |
ip domain name example.com Example: |
Configures the domain name. |
||
|
Step 7 |
ip host tools.cisco.com ip-address Example: |
(Optional) Configures static hostname-to-address mappings in the DNS hostname cache if automatic DNS mapping is not available. |
||
|
Step 8 |
interface vlan_id Example: |
Configures a Layer 3 interface. |
||
|
Step 9 |
ntp server ip-address [version number] [key key-id] [prefer] Example: |
Forms a server association with the specified system.
|
||
|
Step 10 |
switchport access vlan vlan_id Example: |
(Optional) Enables the VLAN for which this access port carries traffic and sets the interface as a nontrunking nontagged single-VLAN Ethernet interface.
|
||
|
Step 11 |
ip route ip-address ip-mask subnet mask Example: |
Configures a route on the device.
|
||
|
Step 12 |
license smart transport callhome Example: |
Enables the transport mode as Call Home.
|
||
|
Step 13 |
ip http client source-interface interface-type interface-number Example: |
Configures a source interface for the HTTP client.
|
||
|
Step 14 |
exit Example: |
(Optional) Exits global configuration mode and returns to privileged EXEC mode. |
||
|
Step 15 |
copy running-config startup-config Example: |
(Optional) Saves your entries in the configuration file. |
Configuring the Call Home Service for Direct Cloud Access
Note |
By default, the CiscoTAC-1 profile is already set up on the device. Use the show call-home profile all command to check the profile status. |
The Call Home service provides email-based and web-based notification of critical system events to CSSM.
To configure and enable the Call Home service, perform this procedure:
SUMMARY STEPS
- enable
- configure terminal
- call-home
- no http secure server-identity-check
- contact-email-address email-address
- profile CiscoTAC-1
- destination transport-method http
- destination address http url
- active
- no destination transport-method email
- exit
- exit
- service call-home
- exit
- copy running-config startup-config
DETAILED STEPS
| Command or Action | Purpose | |
|---|---|---|
|
Step 1 |
enable Example: |
Enables privileged EXEC mode. Enter your password, if prompted. |
|
Step 2 |
configure terminal Example: |
Enters global configuration mode. |
|
Step 3 |
call-home Example: |
Enters Call Home configuration mode. |
|
Step 4 |
no http secure server-identity-check Example: |
Disables server identity check when HTTP connection is established. |
|
Step 5 |
contact-email-address email-address Example: |
Assigns customer's email address. You can enter up to 200 characters in email address format with no spaces. |
|
Step 6 |
profile CiscoTAC-1 Example: |
By default, the CiscoTAC-1 profile is inactive. To use this profile with the Call Home service, you must enable the profile. |
|
Step 7 |
destination transport-method http Example: |
Enables the Call Home service via HTTP. |
|
Step 8 |
destination address http url Example: |
Connects to CSSM. |
|
Step 9 |
active Example: |
Enables the destination profile. |
|
Step 10 |
no destination transport-method email Example: |
Disables the Call Home service via email. |
|
Step 11 |
exit Example: |
Exits Call Home destination profile configuration mode and returns to Call Home configuration mode. |
|
Step 12 |
exit Example: |
Exits Call Home configuration mode and returns to global configuration mode. |
|
Step 13 |
service call-home Example: |
Enables the Call Home feature. |
|
Step 14 |
exit Example: |
Exits global configuration mode and returns to privileged EXEC mode. |
|
Step 15 |
copy running-config startup-config Example: |
(Optional) Saves your entries in the configuration file. |
Configuring the Call Home Service for Direct Cloud Access through an HTTPs Proxy Server
The Call Home service can be configured through an HTTPs proxy server. This configuration requires no user authentication to connect to CSSM.
Note |
Authenticated HTTPs proxy configurations are not supported. |
To configure and enable the Call Home service through an HTTPs proxy, perform this procedure:
SUMMARY STEPS
- enable
- configure terminal
- call-home
- contact-email-address email-address
- http-proxy proxy-address proxy-port port-number
- profile CiscoTAC-1
- destination transport-method http
- no destination transport-method email
- profile name
- reporting smart-licensing-data
- destination transport-method http
- destination address http url
- active
- exit
- exit
- service call-home
- ip http client proxy-server proxy-address proxy-port port-number
- exit
- copy running-config startup-config
DETAILED STEPS
| Command or Action | Purpose | |
|---|---|---|
|
Step 1 |
enable Example: |
Enables privileged EXEC mode. Enter your password, if prompted. |
|
Step 2 |
configure terminal Example: |
Enters global configuration mode. |
|
Step 3 |
call-home Example: |
Enters Call Home configuration mode. |
|
Step 4 |
contact-email-address email-address Example: |
Configures the default email address as sch-smart-licensing@cisco.com. |
|
Step 5 |
http-proxy proxy-address proxy-port port-number Example: |
Configures the proxy server information to the Call Home service. |
|
Step 6 |
profile CiscoTAC-1 Example: |
By default, the CiscoTAC-1 profile is inactive. To use this profile with the Call Home service, you must enable the profile. |
|
Step 7 |
destination transport-method http Example: |
Enables the Call Home service via HTTP. |
|
Step 8 |
no destination transport-method email Example: |
Disables the Call Home service via email. |
|
Step 9 |
profile name Example: |
Enters Call Home destination profile configuration mode for the specified destination profile name. If the specified destination profile does not exist, it is created. |
|
Step 10 |
reporting smart-licensing-data Example: |
Enables data sharing with the Call Home service via HTTP. |
|
Step 11 |
destination transport-method http Example: |
Enables the HTTP message transport method. |
|
Step 12 |
destination address http url Example: |
Connects to CSSM. |
|
Step 13 |
active Example: |
Enables the destination profile. |
|
Step 14 |
exit Example: |
Exits Call Home destination profile configuration mode and returns to Call Home configuration mode. |
|
Step 15 |
exit Example: |
Exits Call Home configuration mode and returns to global configuration mode. |
|
Step 16 |
service call-home Example: |
Enables the Call Home feature. |
|
Step 17 |
ip http client proxy-server proxy-address proxy-port port-number Example: |
Enables the Call Home feature. |
|
Step 18 |
exit Example: |
Exits global configuration mode and returns to privileged EXEC mode. |
|
Step 19 |
copy running-config startup-config Example: |
(Optional) Saves your entries in the configuration file. |
Configuring the Call Home Service for Cisco Smart Software Manager On-Prem
For information about Cisco Smart Software Manager On-Prem (formerly known as Cisco Smart Software Manager satellite), see https://www.cisco.com/c/en/us/buy/smart-accounts/software-manager-satellite.html.
To configure the Call Home service for the Cisco Smart Software Manager On-Prem (formerly known as Cisco Smart Software Manager satellite), perform this procedure:
SUMMARY STEPS
- enable
- configure terminal
- call-home
- no http secure server-identity-check
- profile name
- reporting smart-licensing-data
- destination transport-method http
- destination address http url
- destination preferred-msg-format {long-text | short-text | xml}
- active
- exit
- exit
- ip http client source-interface interface-type interface-number
- crypto pki trustpoint name
- revocation-check none
- end
- copy running-config startup-config
DETAILED STEPS
| Command or Action | Purpose | |||
|---|---|---|---|---|
|
Step 1 |
enable Example: |
Enables privileged EXEC mode. Enter your password if prompted. |
||
|
Step 2 |
configure terminal Example: |
Enters global configuration mode. |
||
|
Step 3 |
call-home Example: |
Enters Call Home configuration mode. |
||
|
Step 4 |
no http secure server-identity-check Example: |
Disables server identity check when HTTP connection is established. |
||
|
Step 5 |
profile name Example: |
Enters Call Home destination profile configuration mode for the specified destination profile name. If the specified destination profile does not exist, it is created. |
||
|
Step 6 |
reporting smart-licensing-data Example: |
Enables data sharing with the Call Home service via HTTP. |
||
|
Step 7 |
destination transport-method http Example: |
Enables the HTTP message transport method. |
||
|
Step 8 |
destination address http url Example:or |
Configures the destination URL (CSSM) to which Call Home messages are sent. Note Ensure the IP address or the fully qualified domain name (FQDN) in the destination URL matches the IP address or the FQDN as configured for the Satellite Name on the Cisco Smart Software Manager On-Prem. |
||
|
Step 9 |
destination preferred-msg-format {long-text | short-text | xml} Example: |
(Optional) Configures a preferred message format. The default is XML. |
||
|
Step 10 |
active Example: |
Enables the destination profile. By default, a profile is enabled when it is created. |
||
|
Step 11 |
exit Example: |
Exits Call Home destination profile configuration mode and returns to Call Home configuration mode. |
||
|
Step 12 |
exit Example: |
Exits Call Home configuration mode and returns to global configuration mode. |
||
|
Step 13 |
ip http client source-interface interface-type interface-number Example: |
Configures a source interface for the HTTP client.
|
||
|
Step 14 |
crypto pki trustpoint name Example: |
(Optional) Declares the trustpoint and a given name and enters ca-trustpoint configuration mode. |
||
|
Step 15 |
revocation-check none Example: |
(Optional) Specifies that certificate checking is ignored. |
||
|
Step 16 |
end Example: |
(Optional) Exits ca-trustpoint configuration mode and returns to privileged EXEC mode. |
||
|
Step 17 |
copy running-config startup-config Example: |
(Optional) Saves your entries in the configuration file. |
Configuring the License Level
-
Downgrade or upgrade licenses.
-
Enable or disable an evaluation or extension license
-
Clear an upgrade license
The required license level(s) needs to be configured on the device before registering. The following are the license levels available for Cisco Catalyst 9000 Series Switches:
Base licenses
-
Network Essentials
-
Network Advantage (includes Network Essentials)
Add-on licenses—These can be subscribed for a fixed term of three, five, or seven years.
-
Digital Networking Architecture (DNA) Essentials
-
DNA Advantage (includes DNA Essentials)
To configure the license levels, follow this procedure:
SUMMARY STEPS
- enable
- configure terminal
- license boot level license_level
- exit
- write memory
- show version
- reload
DETAILED STEPS
| Command or Action | Purpose | |
|---|---|---|
|
Step 1 |
enable Example: |
Enables privileged EXEC mode. Enter your password, if prompted. |
|
Step 2 |
configure terminal Example: |
Enters global configuration mode. |
|
Step 3 |
license boot level license_level Example: |
Activates the licenses on the switch. |
|
Step 4 |
exit Example: |
Returns to the privileged EXEC mode. |
|
Step 5 |
write memory Example: |
Saves the license information on the switch. |
|
Step 6 |
show version Example: |
Shows license-level information. |
|
Step 7 |
reload Example: |
Reloads the device. |
Registering a Device on CSSM
To register a device on CSSM, you must do the following tasks:
-
Generate a unique token from the CSSM.
-
Register the device with the generated token.
On successful registration, the device will receive an identity certificate. This certificate is saved on your device and automatically used for all future communications with Cisco. CSSM will attempt to renew the registration information every 30 days..
Additionally, license usage data is collected and a report is sent to you every month. If required, you can configure your Call Home settings to filter out sensitive information (like hostname, username and password) from the usage report.
Note |
Downgrading a device from Cisco IOS XE Fuji 16.9.1 to any prior release will migrate the smart license to traditional license. All smart license information on the device will be removed. In case the device needs to be upgraded back to Cisco IOS XE Fuji 16.9.1, the license status will remain in evaluation mode until the device is registered again in CSSM. |
Generating a New Token from CSSM
Procedure
|
Step 1 |
Log in to CSSM from https://software.cisco.com/#. You must log in to the portal using the username and password provided by Cisco. |
|
Step 2 |
Click the Inventory tab. |
|
Step 3 |
From the Virtual Account drop-down list, choose the required virtual account. |
|
Step 4 |
Click the General tab. |
|
Step 5 |
Click New Token. 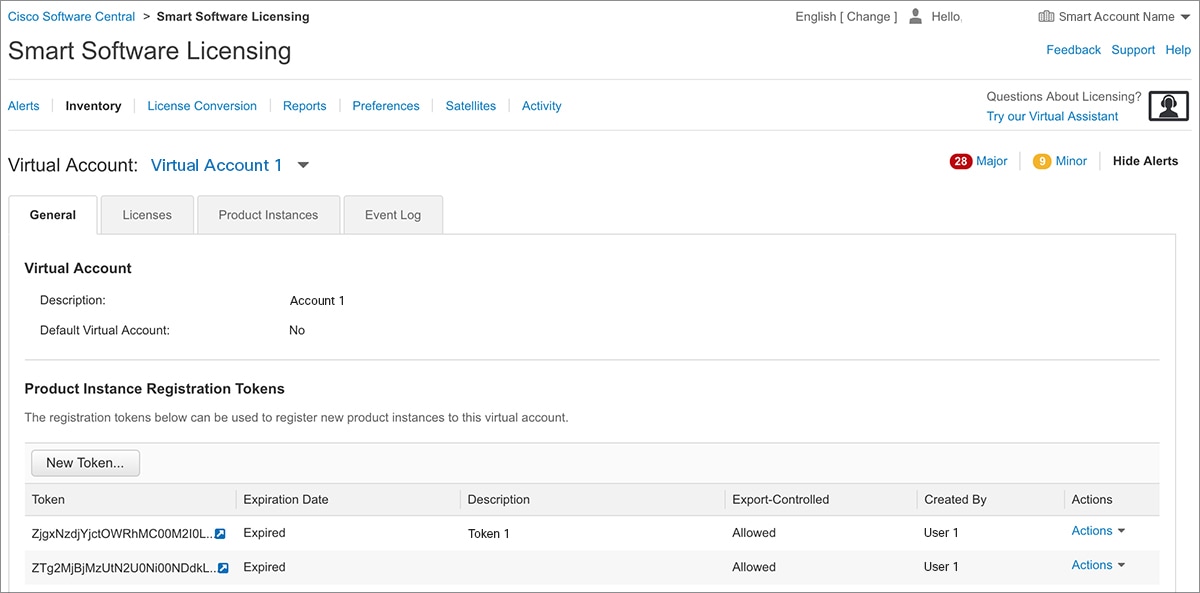 The Create Registration Token window is displayed.
|
|
Step 6 |
In the Description field, enter the token description. |
|
Step 7 |
In the Expire After field, enter the number of days the token must be active. |
|
Step 8 |
(Optional) In the Max. Number of Uses field, enter the maximum number of uses allowed after which the token expires.  |
|
Step 9 |
Check the Allow export-controlled functionality on the products registered with this token checkbox. Enabling this checkbox ensures Cisco compliance with US and country-specific export policies and guidelines. For more information, see https://www.cisco.com/c/en/us/about/legal/global-export-trade.html. |
|
Step 10 |
Click Create Token to create a token. |
|
Step 11 |
After the token is created, click Copy to copy the newly created token. 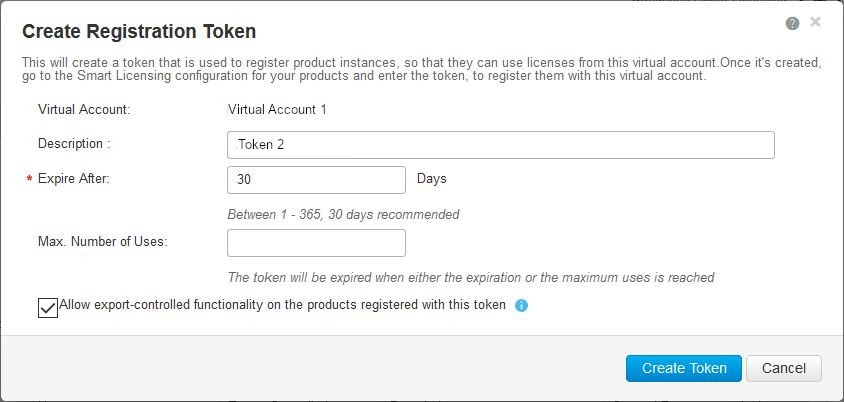 |
Registering a Device with the New Token
To register a device with the new token, perform this procedure:
SUMMARY STEPS
- enable
- license smart register idtoken token_ID
- write memory
DETAILED STEPS
| Command or Action | Purpose | |
|---|---|---|
|
Step 1 |
enable Example: |
Enables privileged EXEC mode. Enter your password, if prompted. |
|
Step 2 |
license smart register idtoken token_ID Example: |
Registers the device with the back-end server using the token generated from CSSM. |
|
Step 3 |
write memory Example: |
Saves the license information on the device. |
Verifying the License Status After Registration
To verify the status of a license after registration, use the show license all command.
Device> enable
Device# show license all
Smart Licensing Status
======================

Smart Licensing is ENABLED

Registration:
  Status: REGISTERED
  Smart Account: Smart Account Name
  Virtual Account: Virtual Account 1
  Export-Controlled Functionality: Allowed
  Initial Registration: SUCCEEDED on Jul 16 09:44:50 2018 IST
  Last Renewal Attempt: None
  Next Renewal Attempt: Jan 12 09:44:49 2019 IST
  Registration Expires: Jul 16 09:39:05 2019 IST

License Authorization:
  Status: AUTHORIZED on Jul 31 17:30:02 2018 IST
  Last Communication Attempt: SUCCEEDED on Jul 31 17:30:02 2018 IST
  Next Communication Attempt: Aug 30 17:30:01 2018 IST
  Communication Deadline: Oct 29 17:24:12 2018 IST

Export Authorization Key:
  Features Authorized:
    <none>

Utility:
  Status: DISABLED

Data Privacy:
  Sending Hostname: yes
    Callhome hostname privacy: DISABLED
    Smart Licensing hostname privacy: DISABLED
  Version privacy: DISABLED

Transport:
  Type: Callhome

License Usage
==============

C9500 48Y4C DNA Advantage (C9500-DNA-48Y4C-A):
  Description: C9500 48Y4C DNA Advantage
  Count: 1
  Version: 1.0
  Status: AUTHORIZED
  Export status: NOT RESTRICTED

C9500 48Y4C NW Advantage (C9500-48Y4C-A):
  Description: C9500 48Y4C NW Advantage
  Count: 1
  Version: 1.0
  Status: AUTHORIZED
  Export status: NOT RESTRICTED

Product Information
===================
UDI: PID:C9500-48Y4C,SN:CAT2150L5HK

Agent Version
=============
Smart Agent for Licensing: 4.5.2_rel/32
Component Versions: SA:(1_3_dev)1.0.15, SI:(dev22)1.2.1, CH:(rel5)1.0.3, PK:(dev18)1.0.3

Reservation Info
================
License reservation: DISABLED
Canceling a Device's Registration in CSSM
When your device is taken off the inventory, shipped elsewhere for redeployment, or returned to Cisco for replacement using the return merchandise authorization (RMA) process, you can use the deregister command to cancel the registration of your device.
To cancel device registration, follow this procedure:
Before you begin
Layer 3 connection to CSSM must be available to successfully deregister the device.
SUMMARY STEPS
- enable
- license smart deregister
DETAILED STEPS
| Command or Action | Purpose | |
|---|---|---|
|
Step 1 |
enable Example: |
Enables privileged EXEC mode. Enter your password, if prompted. |
|
Step 2 |
license smart deregister Example: |
Cancels the device's registration, and sends the device into evaluation mode. All smart licensing entitlements and certificates on the corresponding platform are removed. The device product instance stored on CSSM is also removed. |
Monitoring Smart Licensing Configuration
Use the following commands in privileged EXEC mode to monitor smart licensing configuration.
|
Command |
Purpose |
|---|---|
|
show license status |
Displays the compliance status of smart licensing. The following is the list of possible statuses:
|
|
show license all |
Displays all the entitlements in use. Additionally, it shows the associated licensing certificates, compliance status, UDI, and other details. |
|
show tech-support license |
Displays the detailed debug output. |
|
show license usage |
Displays the license usage information. |
|
show license summary |
Displays the summary of all the active licenses. |
Configuration Examples for Smart Licensing
The following sections provide various Smart Licensing configuration examples.
Example: Viewing the Call Home Profile
Example
To display the Call Home profile, use the show call-home profile all command:
Device> enable
Device# show call-home profile all
Profile Name: CiscoTAC-1
    Profile status: ACTIVE
    Profile mode: Full Reporting
    Reporting Data: Smart Call Home, Smart Licensing
    Preferred Message Format: xml
    Message Size Limit: 3145728 Bytes
    Transport Method: http
    HTTP  address(es): https://tools.cisco.com/its/service/oddce/services/DDCEService
    Other address(es): default

    Periodic configuration info message is scheduled every 1 day of the month at 09:15

    Periodic inventory info message is scheduled every 1 day of the month at 09:00

    Alert-group               Severity
    ------------------------  ------------
    crash                     debug
    diagnostic                minor
    environment               warning
    inventory                 normal

    Syslog-Pattern            Severity
    ------------------------  ------------
    APF-.-WLC_.*              warning
    .*                        major
Example: Viewing the License Information Before Registering
Example
To display the license entitlements, use the show license all command:
Device> enable
Device# show license all

Smart Licensing Status
======================

Smart Licensing is ENABLED

Registration:
  Status: UNREGISTERED
  Export-Controlled Functionality: Not Allowed

License Authorization:
  Status: EVAL MODE
  Evaluation Period Remaining: 68 days, 0 hours, 30 minutes, 5 seconds

Utility:
  Status: DISABLED

Data Privacy:
  Sending Hostname: yes
    Callhome hostname privacy: DISABLED
    Smart Licensing hostname privacy: DISABLED
  Version privacy: DISABLED

Transport:
  Type: Callhome

License Usage
==============

C9500 48Y4C DNA Advantage (C9500-DNA-48Y4C-A):
  Description: C9500 48Y4C DNA Advantage
  Count: 1
  Version: 1.0
  Status: EVAL MODE

C9500 48Y4C NW Advantage (C9500-48Y4C-A):
  Description: C9500 48Y4C NW Advantage
  Count: 1
  Version: 1.0
  Status: EVAL MODE

Product Information
===================
UDI: PID:C9500-48Y4C,SN:CAT2150L5HK

Agent Version
=============
Smart Agent for Licensing: 4.5.2_rel/32
Component Versions: SA:(1_3_dev)1.0.15, SI:(dev22)1.2.1, CH:(rel5)1.0.3, PK:(dev18)1.0.3

Reservation Info
================
License reservation: DISABLED
Example
To display the license usage information, use the show license usage command:
Device> enable
Device# show license usage

License Authorization:
  Status: EVAL MODE
  Evaluation Period Remaining: 68 days, 0 hours, 29 minutes, 38 seconds

C9500 48Y4C DNA Advantage (C9500-DNA-48Y4C-A):
  Description: C9500 48Y4C DNA Advantage
  Count: 1
  Version: 1.0
  Status: EVAL MODE

C9500 48Y4C NW Advantage (C9500-48Y4C-A):
  Description: C9500 48Y4C NW Advantage
  Count: 1
  Version: 1.0
  Status: EVAL MODE
Example
To display all the license summaries, use the show license summary command:
Device> enable
Device# show license summary

Smart Licensing is ENABLED

Registration:
  Status: UNREGISTERED
  Export-Controlled Functionality: Not Allowed

License Authorization:
  Status: EVAL MODE
  Evaluation Period Remaining: 68 days, 0 hours, 29 minutes, 33 seconds

License Usage:
  License                 Entitlement tag               Count Status
  -----------------------------------------------------------------------------
                          (C9500-DNA-48Y4C-A)               1 EVAL MODE
                          (C9500-48Y4C-A)                   1 EVAL MODE
Example
To display the license status information, use the show license status command:
Device> enable
Device# show license status

Smart Licensing is ENABLED

Utility:
  Status: DISABLED

Data Privacy:
  Sending Hostname: yes
    Callhome hostname privacy: DISABLED
    Smart Licensing hostname privacy: DISABLED
  Version privacy: DISABLED

Transport:
  Type: Callhome

Registration:
  Status: UNREGISTERED
  Export-Controlled Functionality: Not Allowed

License Authorization:
  Status: EVAL MODE
  Evaluation Period Remaining: 68 days, 0 hours, 29 minutes, 35 seconds
Example: Registering a Device
Example
To register a device, use the license smart register idtoken command:
Device> enable
Device# license smart register idtoken Tl4UytrNXBzbEs1ck8veUtWaG5abnZJOFdDa1FwbVRa%0AblRMbz0%3D%0A
Device# write memory
Example: Viewing the License Status After Registering
Example
To display the license entitlements, use the show license all command:
Device> enable
Device# show license all

Smart Licensing Status
======================

Smart Licensing is ENABLED

Registration:
  Status: REGISTERED
  Smart Account: Smart Account Name
  Virtual Account: Virtual Account 1
  Export-Controlled Functionality: Allowed
  Initial Registration: SUCCEEDED on Jul 16 09:44:50 2018 IST
  Last Renewal Attempt: None
  Next Renewal Attempt: Jan 12 09:44:49 2019 IST
  Registration Expires: Jul 16 09:39:05 2019 IST

License Authorization:
  Status: AUTHORIZED on Jul 31 17:30:02 2018 IST
  Last Communication Attempt: SUCCEEDED on Jul 31 17:30:02 2018 IST
  Next Communication Attempt: Aug 30 17:30:01 2018 IST
  Communication Deadline: Oct 29 17:24:12 2018 IST

Export Authorization Key:
  Features Authorized:
    <none>

Utility:
  Status: DISABLED

Data Privacy:
  Sending Hostname: yes
    Callhome hostname privacy: DISABLED
    Smart Licensing hostname privacy: DISABLED
  Version privacy: DISABLED

Transport:
  Type: Callhome

License Usage
==============

C9500 48Y4C DNA Advantage (C9500-DNA-48Y4C-A):
  Description: C9500 48Y4C DNA Advantage
  Count: 1
  Version: 1.0
  Status: AUTHORIZED
  Export status: NOT RESTRICTED

C9500 48Y4C NW Advantage (C9500-48Y4C-A):
  Description: C9500 48Y4C NW Advantage
  Count: 1
  Version: 1.0
  Status: AUTHORIZED
  Export status: NOT RESTRICTED

Product Information
===================
UDI: PID:C9500-48Y4C,SN:CAT2150L5HK

Agent Version
=============
Smart Agent for Licensing: 4.5.2_rel/32
Component Versions: SA:(1_3_dev)1.0.15, SI:(dev22)1.2.1, CH:(rel5)1.0.3, PK:(dev18)1.0.3

Reservation Info
================
License reservation: DISABLED
Example
To display license usage information, use the show license usage command:
Device> enable
Device# show license usage
License Authorization:
  Status: AUTHORIZED on Jul 31 17:30:02 2018 IST

C9500 48Y4C DNA Advantage (C9500-DNA-48Y4C-A):
  Description: C9500 48Y4C DNA Advantage
  Count: 1
  Version: 1.0
  Status: AUTHORIZED
  Export status: NOT RESTRICTED

C9500 48Y4C NW Advantage (C9500-48Y4C-A):
  Description: C9500 48Y4C NW Advantage
  Count: 1
  Version: 1.0
  Status: AUTHORIZED
  Export status: NOT RESTRICTED
Example
To display all the license summaries, use the show license summary command:
Device> enable
Device# show license summary
Smart Licensing is ENABLED

Registration:
  Status: REGISTERED
  Smart Account: Smart Account Name
  Virtual Account: Virtual Account 1
  Export-Controlled Functionality: Allowed
  Last Renewal Attempt: None
  Next Renewal Attempt: Jan 12 09:44:49 2019 IST

License Authorization:
  Status: AUTHORIZED
  Last Communication Attempt: SUCCEEDED
  Next Communication Attempt: Aug 30 17:30:02 2018 IST

License Usage:
  License                 Entitlement tag               Count Status
  -----------------------------------------------------------------------------
  C9500 48Y4C DNA Adva... (C9500-DNA-48Y4C-A)               1 AUTHORIZED
  C9500 48Y4C NW Advan... (C9500-48Y4C-A)                   1 AUTHORIZED
Example
To display the license status information, use the show license status command:
Device> enable
Device# show license status
Smart Licensing is ENABLED

Utility:
  Status: DISABLED

Data Privacy:
  Sending Hostname: yes
    Callhome hostname privacy: DISABLED
    Smart Licensing hostname privacy: DISABLED
  Version privacy: DISABLED

Transport:
  Type: Callhome

Registration:
  Status: REGISTERED
  Smart Account: Smart Account Name
  Virtual Account: Virtual Account 1
  Export-Controlled Functionality: Allowed
  Initial Registration: SUCCEEDED on Jul 16 09:44:50 2018 IST
  Last Renewal Attempt: None
  Next Renewal Attempt: Jan 12 09:44:49 2019 IST
  Registration Expires: Jul 16 09:39:05 2019 IST

License Authorization:
  Status: AUTHORIZED on Jul 31 17:30:02 2018 IST
  Last Communication Attempt: SUCCEEDED on Jul 31 17:30:02 2018 IST
  Next Communication Attempt: Aug 30 17:30:01 2018 IST
  Communication Deadline: Oct 29 17:24:12 2018 IST
Additional References
Related Documents
| Related Topic | Document Title |
|---|---|
|
Cisco Smart Software Manager Help |
|
|
Cisco Smart Software Manager On-Prem |
Technical Assistance
| Description | Link |
|---|---|
|
The Cisco Support website provides extensive online resources, including documentation and tools for troubleshooting and resolving technical issues with Cisco products and technologies. To receive security and technical information about your products, you can subscribe to various services, such as the Product Alert Tool (accessed from Field Notices), the Cisco Technical Services Newsletter, and Really Simple Syndication (RSS) Feeds. Access to most tools on the Cisco Support website requires a Cisco.com user ID and password. |
Feature Information for Smart Licensing
The following table provides release information about the feature or features described in this module. This table lists only the software release that introduced support for a given feature in a given software release train. Unless noted otherwise, subsequent releases of that software release train also support that feature.
Use Cisco Feature Navigator to find information about platform support and Cisco software image support. To access Cisco Feature Navigator, go to https://cfnng.cisco.com/. An account on Cisco.com is not required.|
Feature Name |
Releases |
Feature Information |
|---|---|---|
|
Smart Licensing |
Cisco IOS XE Fuji 16.9.1 |
Smart Licensing is a cloud-based, software license management solution that allows you to manage and track the status of your license, hardware and software usage trends. |