Feedback
Table Of Contents
Overview: Internet Subscribers
Setting Up Internet Subscriber Accounts
Creating Internet Subscriber Accounts
Before Creating Internet Subscriber Accounts
Using the Cisco Unity Bulk Import Wizard to Create Multiple Internet Subscriber Accounts
Using the Cisco Unity Administrator to Create Internet Subscriber Accounts
After Creating Internet Subscriber Accounts
Internet Subscriber Concepts and Definitions
Subscriber Experience with Internet Subscribers
Internet Subscribers Are Not Identified
Call Transfer Settings and Internet Subscribers
Internet Subscribers
Overview: Internet Subscribers
By creating Internet subscriber accounts, you enable Cisco Unity subscribers to send voice messages to recipients whose computers are connected to the Internet. Messages are sent over the Internet or any TCP/IP network via the Simple Mail Transfer Protocol (SMTP). The recipient receives a voice message as an e-mail with a WAV attachment.
In this chapter, you will find procedures for creating Internet subscriber accounts, followed by detailed discussions of the concepts and terminology you need to understand. See the following sections:
•
Setting Up Internet Subscriber Accounts—This section explains how to create Internet subscriber accounts, and the issues you need to consider before and after creating them.
•
Setting Up Internet Subscriber Accounts
Prerequisites
Before creating the Internet subscriber accounts, verify that the following prerequisites have been met.
•
•
In installations with multiple Cisco Unity servers networked together via Digital Networking, Internet subscriber accounts can be created on any Cisco Unity server. After the Cisco Unity servers have been set up for Digital Networking as described in the "Digital Networking" chapter, verify the following settings:
•
•
–
–
Creating Internet Subscriber Accounts
You can create Internet subscriber accounts by using the Cisco Unity Bulk Import wizard or the Cisco Unity Administrator. See the following sections:
•
•
•
•
Before Creating Internet Subscriber Accounts
This section lists—in order—the issues that you must consider before creating Internet Subscriber accounts.
1.
If you are unsure whether the account that you are using has sufficient rights and permissions to create Internet Subscribers, or whether Cisco Unity is properly configured to work with your message store, use the following procedure to run the SysCheck diagnostic tool.
To Check Cisco Unity Setup and Permissions by Using the Cisco Unity SysCheck Tool
Step 1
Step 2
Step 3
Step 4
Step 5
Step 6
Step 7
a.
b.
c.
Step 8
2.
A class of service (COS) defines limits and permissions for subscribers who use Cisco Unity. For example, a COS dictates the maximum length of subscriber messages and greetings. Although most COS settings are not applicable to Internet Subscribers, they still must be members of a COS. In the Cisco Unity Administrator, a COS is specified in each subscriber template; thus, a subscriber is assigned to the COS that is specified in the template upon which the Internet Subscriber account is based. Cisco Unity includes predefined classes of service, which you can modify. You can also create new classes of service. For details, see the "Class of Service Settings" chapter in the Cisco Unity System Administration Guide.
3.
Each COS specifies a restriction table for call transfers, one for message notification, and one for fax deliveries. Cisco Unity applies the restriction table associated with the COS of a subscriber, and displays an error message if the phone number is not allowed. Cisco Unity comes with predefined restriction tables, which you can modify.
Although most restriction table settings do not apply to Internet Subscribers because they cannot log on to Cisco Unity or use the Cisco Personal Communications Assistant (PCA), administrators can enter call transfer numbers for Internet Subscribers. For security purposes, you should modify the restriction table used for transfers in the COS to which Internet Subscribers belong, as necessary. For details, see the "Restriction Tables" chapter in the Cisco Unity System Administration Guide.
4.
Public distribution lists are used to send voice messages to multiple subscribers at the same time. Cisco Unity assigns new subscribers to the public distribution lists that are specified in the template on which the Internet Subscriber account is based. For details, see the "Public Distribution List Settings" chapter in the Cisco Unity System Administration Guide.
5.
In the Cisco Unity Administrator, you can specify settings for a group of Internet Subscribers by using a subscriber template. Subscriber templates contain settings that are applicable for subscribers of a particular type, such as a department. The settings from the template you choose are applied to Internet Subscriber accounts as they are created. Cisco Unity comes with a default subscriber template, which you can modify, and you can create an unlimited number of additional templates. For more details, see the "Subscriber Template Settings" chapter in the Cisco Unity System Administration Guide.
6.
If you use the Cisco Unity Administrator to create a Internet Subscriber account, confirm that the address book(s) listed on the System > Configuration > Subscriber Address Books page in the Cisco Unity Administrator contain the user data that you want to import when you create the Internet Subscriber account. If necessary, you can add one secondary address book to the System > Configuration > Subscriber Address Books page. For details, see the "System Settings" chapter in the Cisco Unity System Administration Guide.
Note
Using the Cisco Unity Bulk Import Wizard to Create Multiple Internet Subscriber Accounts
The Cisco Unity Bulk Import wizard allows you to create multiple Internet Subscriber accounts at once by importing user data contained in a comma-separated value (CSV) file. CSV is a common text file format for moving data from one data store to another. As long as the user data contained in the CSV file is formatted correctly, you can use it to create Internet Subscribers with existing Domino Person Documents.
In Cisco Unity 4.0(3) and later, the Cisco Unity Bulk Import wizard also allows you to create multiple Internet Subscriber accounts at once by importing user data directly from the Domino directory. To do so, see the procedure "To Create Internet Subscriber Accounts by Using the Cisco Unity Bulk Import Wizard." Otherwise, use the following procedure to prepare your CSV file. Refer to the Cisco Unity Bulk Import wizard Help to find additional information about using the wizard to create Internet Subscriber accounts, or about the required and optional column headers for your CSV file.
To Prepare a CSV File for Creating Internet Subscriber Accounts
Step 1
As a best practice, do not include more than 7,500 records in a single CSV file, as you may encounter unexpected results when the Cisco Unity Bulk Import wizard imports the data.
Step 2
Step 3
•
•
Step 4
For example, the columns of data in this sample are sorted so that the short name of the user is followed by the remote address:
aabade,SMTP:aabade@cisco.com
kbader,SMTP:kbader@cisco.com
tcampbell,SMTP:tcampbell@cisco.com
lcho,SMTP:lcho@cisco.comStep 5
SHORT_NAME,REMOTE_ADDRESS
Step 6
•
•
Step 7
Step 8
Step 9
Step 10
Note
To Create Internet Subscriber Accounts by Using the Cisco Unity Bulk Import Wizard
Step 1
Step 2
To learn more about the options presented in the dialog boxes that appear as the wizard proceeds, click Help.
Step 3
Step 4
•
•
Step 5
Step 6
If you had no import errors, or if all errors have now been corrected, see the "After Creating Internet Subscriber Accounts" section.
Correcting Import Errors
The error log file contains data that the Cisco Unity Bulk Import wizard could not import. The Cisco Unity Bulk Import wizard reports the first error it detects in any user mailbox or row in a CSV file. Once you correct that error, the wizard may detect additional errors in the same mailbox or row when the data is imported again. Thus, you may need to repeat the correction process—running the Cisco Unity Bulk Import wizard and correcting an error—several times to find and correct all errors.
The output log file contains all the records that were not imported. You can save it as a CSV file, and use it when you run the Cisco Unity Bulk Import wizard again. Note that each time you run the Cisco Unity Bulk Import wizard, the error and output log files are overwritten (unless you specify new names for the files).
To correct import errors, use one of the following procedures: "To Correct Errors That Occurred When Importing Data from a CSV File," or "To Correct Errors That Occurred When Importing Data from the Message Store."
To Correct Errors That Occurred When Importing Data from a CSV File
Step 1
Step 2
Step 3
Step 4
Step 5
Step 6
Step 7
Step 8
To Correct Errors That Occurred When Importing Data from the Message Store
Step 1
Step 2
Step 3
Step 4
Step 5
Step 6
Step 7
Step 8
Using the Cisco Unity Administrator to Create Internet Subscriber Accounts
By using the Cisco Unity Administrator, you can create an Internet Subscriber account by importing existing user data from Domino. Use the following procedure to create an Internet Subscriber account.
To Create an Internet Subscriber Account by Importing Existing User Data
Step 1
Step 2
Step 3
Step 4
If the address book that you want to use is not listed, go to the System > Configuration > Subscriber Address Books page and add a different address book (you can add one secondary address book in addition to the address book configured during the installation of Cisco Unity).
Step 5
Step 6
Step 7
Step 8
Step 9
Step 10
Step 11
After Creating Internet Subscriber Accounts
After creating Internet Subscriber accounts, consider the following:
•
•
When you want to modify settings for multiple subscribers at once, you can (re)run the Cisco Unity Bulk Import wizard. To learn more, see the Cisco Unity Bulk Import wizard Help.
•
Internet Subscriber Concepts and Definitions
Internet subscribers are a representation in Cisco Unity of users who do not have mailboxes on the Domino network. Instead, messages for Internet subscribers are sent to an e-mail address that you specify when you create the Internet subscriber account. The recipient receives voice messages as e-mails with attached WAV files.
In Domino, Internet subscribers are represented as Person documents without a mailbox. You create and manage Internet subscriber accounts in much the same way that you do regular subscriber accounts. For example, a subscriber template is used when the Internet subscriber accounts are created, and you can adjust the call transfer settings for Internet subscriber accounts as needed.
Extensions are optional for Internet subscribers whereas they are mandatory for regular subscribers. If an Internet subscriber has not been assigned an extension, subscribers can address messages to that Internet subscriber only in spelled-name mode (if the Internet subscriber has a voice name) or by using the DUC-enabled Notes client.
If you have specified extensions for the Internet subscribers, you can configure the call transfer settings for the Internet subscribers so that they can be reached by outside callers.
Other than receiving messages (and possibly calls), Internet subscribers do not have access to other Cisco Unity features, and some sections of the Cisco Unity Administrator are disabled for Internet subscribers. Internet subscribers:
•
•
•
•
•
Subscriber Experience with Internet Subscribers
Provided that Internet subscribers have extensions, are listed in the phone directory, and have had voice names and greetings recorded for them:
•
•
•
•
•
Extensions are optional for Internet subscribers whereas they are mandatory for regular subscribers. If an Internet subscriber has not been assigned an extension:
•
•
•
Deleting Internet Subscribers
Each Internet subscriber is associated with a Domino Person document without a mailbox. After deleting the Internet subscribers in the Cisco Unity Administrator, you will need to delete the associated Person document in the Domino Administrator.
Notable Behavior
This section contains information about notable behavior related to Internet subscribers.
Internet Subscribers Are Not Identified
When a person who has a corresponding Internet subscriber account calls a Cisco Unity subscriber and leaves a message, Cisco Unity does not identify the message as being from the Internet subscriber. In this case, when the phone system forwards the call to Cisco Unity, the message is handled as though it came from an unidentified caller. This means that:
•
•
•
Call Transfer Settings and Internet Subscribers
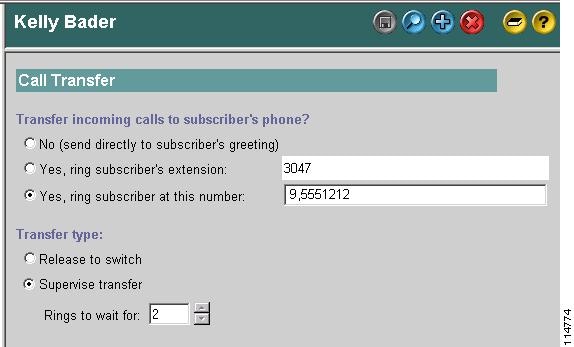
In installations with multiple Cisco Unity servers networked via Digital Networking, the number that Cisco Unity uses for call transfers to a subscriber is the only number replicated among the Cisco Unity servers; none of the other settings on the Subscriber > Call Transfer page in the Cisco Unity Administrator are replicated. For example, in Figure 4-1, call transfers are set to ring the subscriber at the number 9,5551212. The only call transfer setting that is replicated to other Cisco Unity servers is the call transfer number 9,5551212. If the setting was "Yes, ring subscriber's extension" instead, the number 3047 would be replicated.
Figure 4-1 Only the Call Transfer Number Is Replicated
When the call transfer setting is set to "No (send directly to subscriber's greeting)," the call transfer number is automatically set to the subscriber extension (3047 in the example above), which is replicated to the other networked Cisco Unity servers.
Call transfers to Internet subscribers created on other Cisco Unity servers are always handled by the phone system (release to switch)—rather than by Cisco Unity (supervised transfer)—even if the subscribers are set up for supervised transfers (as in the above example). The release to switch call transfers happen when:
•
•
On a release to switch transfer, Cisco Unity dials the call transfer number configured for the Internet subscriber and hangs up, leaving the phone system to handle the call. Note the following limitations with release to switch transfers:
•
•