Feedback Feedback
|
Table Of Contents
Cisco CallManager 3.0 Integration Guide for Cisco Unity 3.1
Integration Steps When Integrating with Cisco CallManager for the First Time
Integration Steps When Updating to a More Recent Version of Cisco CallManager
Planning How the Voice Messaging Ports Will Be Used by Cisco Unity
Programming the Cisco CallManager Phone System
Setting Up the Gateways Servicing Cisco Unity
Installing, Configuring, and Testing the TSP
Configuring Cisco Unity for the Integration
Integrating a Secondary Server for Cisco Unity Failover
Setting Up the Secondary Server for Failover
Switching Call Processing from a Cisco CallManager Failover Server to the Primary Server
Changing the Number of uOne Ports
Removing Dialogic Voice Card Software
Troubleshooting the Cisco CallManager Integration
The Default Ear Piece and Speaker Volume on Cisco 7960 Phones Is Too Loud
Cisco Unity Does Not Answer When the Extension for Cisco Unity Is Dialed
Dual Phone System Integration Overview
Integration Steps When No Phone Systems Are Installed
Integration Steps When a Circuit-Switched Phone System Is Already Installed
Integration Steps When Cisco CallManager Is Already Installed
Changing Cisco Unity Administrator Settings
Changing the Number of Installed Ports
Appendix: Remapping Extension NumbersSetting Up Cisco Unity to Remap Extension Numbers
Appendix: Assigning Dialogic Ports for a Dual Phone System Integration
Appendix: Documentation and Technical AssistanceObtaining Technical Assistance
Obtaining Additional Publications and Information
Cisco CallManager 3.0 Integration Guide for Cisco Unity 3.1
Revised May 2 2003
This document provides instructions for integrating the phone system with Cisco Unity.
Integration Overview
Before doing the following integration steps, confirm that the Cisco Unity server is ready for the integration by completing the applicable tasks in the Cisco Unity Installation Guide.
Integration Steps When Integrating with Cisco CallManager for the First Time
To set up a new integration with only Cisco CallManager, follow these steps.
1.
Review the system and equipment requirements to confirm that all Cisco CallManager and Cisco Unity system requirements have been met. See the "Requirements" section.
2.
3.
4.
5.
6.
7.
8.
Integration Steps When Updating to a More Recent Version of Cisco CallManager
To set up an integration with an updated version of Cisco CallManager, follow these steps.
1.
The Cisco Unity system key does not need to be upgraded when you update Cisco CallManager. If you are changing the number of ports, the system key must be upgraded.
2.
3.
4.
5.
6.
Integration Steps When Converting from a Dual Phone System Integration to a Cisco CallManager-Only Integration
To convert from a dual phone system integration to a Cisco CallManager-only integration, follow these steps.
1.
2.
3.
4.
5.
6.
7.
8.
9.
Integration Steps When Converting from an Integration with a Traditional, Circuit-Switched Phone System to an Integration with Cisco CallManager
To convert an existing integration of Cisco Unity and a traditional, circuit-switched phone system to an integration of Cisco Unity and Cisco CallManager, do the following steps.
1.
2.
3.
4.
5.
6.
Requirements
The Cisco CallManager integration supports configurations of the following components:
Phone System
•
•
•
•
Cisco Unity Server
•
•
•
Integration Description
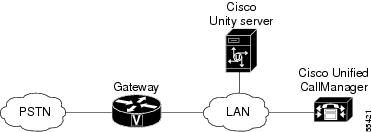
The Cisco CallManager integration uses the LAN to connect Cisco Unity and the phone system. The gateway provides connections to the PSTN. Figure 1 shows the connections.
Figure 1 Connections Between the Phone System and Cisco Unity
Some countries require a phone system between the public phone network and the gateway.
The following steps give an overview of the path an external call takes through the Cisco AVVID network.
1.
2.
3.
4.
5.
6.
Integration Features
The Cisco CallManager integration with Cisco Unity provides the following features.
Planning How the Voice Messaging Ports Will Be Used by Cisco Unity
Before programming the phone system, you need to plan how the voice messaging ports will be used by Cisco Unity. The following considerations will affect the programming for the phone system (for example, setting up the hunt group or call forwarding for the voice messaging ports):
•
•
•
•
The Number of Voice Messaging Ports to Install
The number of voice messaging ports to install depends on a number of factors including:
•
•
•
•
•
•
•
•
The Number of Voice Messaging Ports That Will Answer Calls
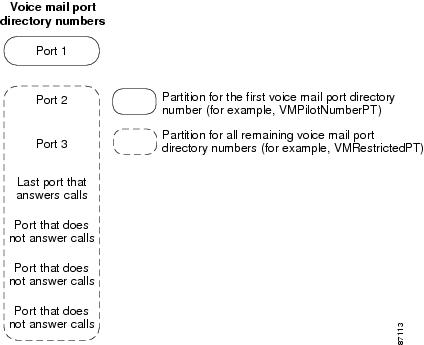
The calls that the voice messaging ports answer can be incoming calls from unidentified callers or from subscribers. Typically, these voice messaging ports are the busiest. They also have the lowest port numbers for the phone system. As a general guideline, assign approximately 75% of the voice messaging ports to answer calls.
You can set voice messaging ports to both answer calls and to dial out (for example, to set MWIs).
The Number of Voice Messaging Ports That Will Only Dial Out and Not Answer Calls
Ports that will only dial out and will not answer calls can do one or more of the following actions:
•
•
•
•
Typically, these voice messaging ports are the least busy ports. They also have the highest port numbers for the phone system. As a general guideline, assign approximately 25% of the voice messaging ports to dial out.
Caution
The Number of Voice Messaging Ports That Will Be Dedicated to Activate MWIs on Other Cisco CallManager Clusters
If Cisco Unity services multiple clusters of Cisco CallManager, there must be at least one voice messaging port per cluster dedicated for turning MWIs on and off for each cluster. For example, if the system has four clusters, at least four ports on Cisco Unity must be dedicated to activate MWIs, one port for each cluster.
Preparing for Programming the Phone System
Record your decisions about the voice messaging ports to guide you in programming the phone system.
Programming the Cisco CallManager Phone System
After Cisco CallManager software is installed, do the procedures in this section to program Cisco CallManager to work with Cisco Unity:
•
•
To Add Partitions and a Calling Search Space to Contain the uOne Ports
Step 1
Step 2
Step 3
Step 4
Step 5
Step 6
Step 7
Step 8
Step 9
Step 10
The name of the partition appears in the Selected Partitions field.
Step 11
Step 12
Step 13
Caution
Step 14
Step 15
Figure 2 Partitions for Voice Mail Port Directory Numbers
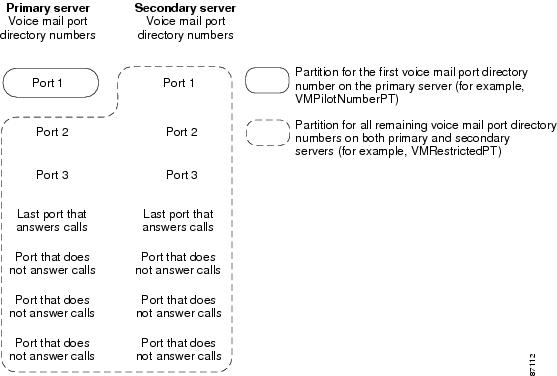
Figure 3 Partitions for Voice Mail Port Directory Numbers with Cisco Unity Failover
To Add uOne Ports to Cisco CallManager
Add a uOne port to Cisco CallManager for each port that you are connecting to Cisco Unity.
Step 1
Step 2
Step 3
Step 4
The default name (even if you do not use it) becomes part of the name for ports as follows:
<the uOne port name>-VIFor example, the default uOne port name is CiscoUM1, and the device name prefix for ports is CiscoUM1-VI. The device name prefix is used by the Cisco Unity-CM service provider. For details, see Table 4.
Caution
Step 5
Step 6
Step 7
Table 2 Settings for the uOne Directory Numbers
Pilot Number
Enter the pilot number for the uOne ports.
The pilot number is the extension number of the first uOne port and is the number subscribers enter to listen to their voice messages.
If Cisco Unity is configured for failover and you are adding uOne ports for the secondary server, the pilot number is the extension number of the first uOne port on the secondary server, but it is not the number subscribers enter to listen to their voice messages.
Route Partition
Click the name of the partition that you set up for all uOne port directory numbers except the first uOne port. For example, click VMRestrictedPT.
Calling Search Space
Click the name of a calling search space that you set up to contain the partition with all uOne port directory numbers except the first uOne port, as set in Step 8 of the "To Add Partitions and a Calling Search Space to Contain the uOne Ports" section. For example, click VMRestrictedCSS.
This calling search space does not include partitions containing subscriber phones, so subscribers can dial the uOne pilot number but not any other uOne ports.
Display
Accept the default of Voicemail.
This text appears on the phone when the pilot number is dialed.
Step 8
Step 9
Step 10
Note
To Set the Partition and Calling Search Space for the First uOne Port
Step 1
Step 2
Step 3
To Specify MWI and Voice Mail Directory Numbers
Step 1
Step 2
Step 3
Step 4
Step 5
Step 6
Step 7
Step 8
Step 9
Step 10
Step 11
Step 12
If the plan for ports in Cisco Unity (see the "Planning How the Voice Messaging Ports Will Be Used by Cisco Unity" section) includes ports that do not answer calls (for example, ports that only dial out to set MWIs), do the following procedure so that incoming calls are not forwarded to these ports.
To Set Up uOne Ports So Incoming Calls Are Forwarded Only to Answering Ports
Step 1
Step 2
Step 3
Step 4
Step 5
Step 6
Step 7
Step 8
If the Cisco Unity server services multiple clusters of Cisco CallManager, do the following procedure to enable MWIs to be activated on extensions in each cluster.
To Set Up MWI Ports for Multiple Clusters of Cisco CallManager
Step 1
Step 2
Step 3
Step 4
Step 5
Step 6
Step 7
Step 8
Step 9
If you want to remap extension numbers (for example, when multiple subscribers use a single phone, or when multiple extension numbers on a single phone should go to a single subscriber greeting), see the "Appendix: Remapping Extension Numbers" section.
Setting Up the Gateways Servicing Cisco Unity
In certain situations, DTMF digits are not recognized when processed through VoIP dial-peer gateways. To avoid this problem, certain gateways must be configured to enable DTMF relay. The DTMF relay feature is available in Cisco IOS software version 12.0(5) and later.
Cisco IOS software-based gateways that use H.245 out-of-band signaling must be configured to enable DTMF relay.
Enable dtmf-relay h245-alphanumeric on this dial-peer.
The Catalyst 6000 T1/PRI and FXS gateways enable DTMF relay by default and do not need additional configuration to enable this feature.
To Enable DTMF Relay
Step 1
dtmf-relay h245-alphanumericStep 2
Step 3
Installing, Configuring, and Testing the TSP
Do the following procedures in the order given.
If you are converting an integration with a circuit-switched phone system to an integration with Cisco CallManager, see the "Integration Steps When Converting from a Dual Phone System Integration to a Cisco CallManager-Only Integration" section for additional instructions.
While the Cisco Unity compact disc has the most recent version of the TSP at the time of publication, new versions are released periodically. The most recent version of the TSP is available through Cisco Connection Online (CCO) at http://www.cisco.com/univercd/cc/td/doc/product/voice/c_unity/tsp/index.htm.
To Remove the Existing TSP
If the most recent version of the TSP is already installed on the Cisco Unity server, or if the TSP is not installed, skip to the procedure "To Install the TSP and Wave Driver."
In all other cases (for example, when upgrading Cisco Unity from an earlier version), do this procedure.
Step 1
Step 2
Step 3
Note
Step 4
Step 5
Step 6
Step 7
To Install the TSP and Wave Driver
Cisco Unity 3.1(1) or later must be installed before you install the TSP and wave driver.
Step 1
Step 2
Step 3
Step 4
Step 5
Step 6
Step 7
To Configure the TSP
Step 1
The Cisco Unity-CM Service Provider dialog box appears automatically only the first time you log on after installing the TSP and wave driver. To change settings later, see the "Changing TSP Settings" section.
Step 2
Step 3
Step 4
Table 4 Settings for the Cisco Unity-CM Service Provider Settings Dialog Box
Primary CallManager IP Address
The IP address of the Cisco CallManager server that Cisco Unity will usually receive calls from.
Primary CallManager IP Port
The IP port that Cisco CallManager uses. The default is 2000.
Number of Voice Ports
The number of Cisco CallManager uOne ports that are connected to Cisco Unity.
Device Name Prefix
Enter the following characters without any spaces:
•
•
For example, if the uOne port name is CiscoUM1, the device name prefix is CiscoUM1-VI.
Make sure you enter this prefix exactly as it appears in the Cisco CallManager Administration. Otherwise, the integration will not work.
The uOne port name is set in the "To Add uOne Ports to Cisco CallManager" section.
MessageWaitingOnDN
The extension that you specified, in the Cisco CallManager Administration, for turning MWIs on. See the "To Specify MWI and Voice Mail Directory Numbers" section.
MessageWaitingOffDN
The extension that you specified, in the Cisco CallManager Administration, for turning MWIs off. See the "To Specify MWI and Voice Mail Directory Numbers" section.
CallManager Failover IP Addresses
The IP addresses of backup Cisco CallManager servers, if any. Backup Cisco CallManager servers must be in the same cluster as the primary Cisco CallManager server.
CallManager Device List
A display-only list of the names of the uOne ports that Cisco Unity looks for on the current Cisco CallManager server. This list is constructed by appending numbers starting with 1 to the setting of device name prefix.
The names in this list must exactly match the names of the uOne ports in the Cisco CallManager Administration. Otherwise, calls will not be correctly transferred to Cisco Unity.
Automatically Reconnect to the Primary CCM on Failover
A check box that enables Cisco Unity to reconnect to the primary Cisco CallManager server after a failover is corrected.
If there is no secondary Cisco CallManager server for failover, uncheck this box.
Step 5
Step 6
Step 7
To Test the TSP
Step 1
Step 2
Step 3
Step 4
Step 5
Step 6
Step 7
If the test succeeds, a message box displays the message "The test completed successfully." If the test fails, one of the error messages shown in the following table appears. Troubleshoot the problem as described in the "Comments" column, and repeat this step until the test succeeds. Then continue with Step 8.
Table 5 Error Messages from the Integration Test
Pinging CallManager server (<IP address>) failed. Make sure the IP address is valid, the server is running, and the network connection is working.
No computers on the network have the IP address that you specified in Primary CallManager IP Address. Confirm that this address is valid. If the value is correct, or if the problem persists after you change the value, troubleshoot the problem as you would a network connectivity problem.
The voice device named <device name> does not respond to registration requests. Ensure that the device has been created in the CallManager database and that the device name prefix is correct.
Confirm that the values in CallManager Device List (see Step 4 of the "To Configure the TSP" section) match the names of the uOne ports that you created (see the "To Add uOne Ports to Cisco CallManager" section). If not, change the setting for Device Name Prefix or the names of the uOne ports, as necessary.
Could not connect to the CallManager. Confirm that all Cisco services are started on the CallManager server.
The IP address that you specified in Primary CallManager IP Address is a valid address, but Cisco CallManager services are not running on that computer, possibly because Cisco CallManager is not installed on the server with that IP address. Confirm that this address is correct and that the Cisco CallManager services are running.
No wave devices were found on the system. The wave driver is either not installed correctly or the computer needs to be rebooted to update its configuration.
Exit the Cisco Unity software, then restart the server.
Step 8
This computer needs to be rebooted to update the wave driver.Step 9
Step 10
Step 11
Step 12
Configuring Cisco Unity for the Integration
After ensuring that the Cisco Unity server is ready for the integration by completing the appropriate tasks in the Cisco Unity Installation Guide, do the following procedures to confirm that the integration is enabled and to enter the port settings.
To Confirm That the Integration Is Enabled
Step 1
•
•
Step 2
Step 3
Step 4
Step 5
Table 6 Switch Settings
Manufacturer
Cisco
Model
CallManager
Switch PBX Software Version
3.01 or later
Integration
TAPI
Step 6
Step 7
Step 8
To Enter Port Settings
Step 1
Step 2
Step 3
For the voice messaging ports assigned to a given Cisco CallManager cluster, use the first voice messaging ports for incoming calls and the last ports to dial out. This helps minimize the possibility of a collision, in which an incoming call arrives on a port at the same time that Cisco Unity takes the port off-hook to dial out. Set the ports assigned to each Cisco CallManager cluster in this manner.
Caution
If the Cisco Unity server is connected to multiple clusters of Cisco CallManager, dedicate one voice messaging port to each cluster and set the port to Dialout MWI. Do not include these dedicated MWI voice messaging ports in the Cisco Call Manager hunt group for incoming calls but include the ports in a hunt group for sending MWIs to all clusters. For example, if the system has four clusters, dedicate four ports to send only MWIs, and assign one to port to each cluster. For details, see the "To Set Up MWI Ports for Multiple Clusters of Cisco CallManager" section.
Step 4
Step 5
Step 6
Testing the Integration
To test whether Cisco Unity and the phone system are integrated correctly, do the procedures in the order listed.
If any of the steps indicates a failure, refer to the following documentation as appropriate:
•
•
•
To Set Up the Test Configuration
Step 1
Step 2
Step 3
If Example Subscriber is not displayed, click the Find icon (the magnifying glass) in the title bar, then click Find, and select Example Subscriber in the list that appears.
Step 4
Step 5
Step 6
For more information on transfer settings, refer to the "Subscriber Template Call Transfer Settings" section in the online Help for the Cisco Unity Administrator.
Step 7
Step 8
Step 9
Step 10
Step 11
Step 12
Step 13
Step 14
•
•
•
To Test an External Call with Release Transfer
Step 1
Step 2
Step 3
Step 4
Step 5
Step 6
Step 7
Step 8
Step 9
Step 10
To Test an Internal Call with Release Transfer
Step 1
Step 2
Step 3
Step 4
Step 5
Step 6
Step 7
Step 8
To Set Up Supervised Transfer on Cisco Unity
Step 1
If Example Subscriber is not displayed, click the Find icon (the magnifying glass) in the title bar, then click Find, and select Example Subscriber in the list that appears.
For more information on transfer settings, refer to the "Subscriber Template Call Transfer Settings" section in the online Help for the Cisco Unity Administrator.
Step 2
Step 3
Step 4
To Test Supervised Transfer
Step 1
Step 2
Step 3
Step 4
Step 5
Step 6
Step 7
Step 8
To Return Example Subscriber to the Default Settings
Step 1
If Example Subscriber is not displayed, click the Find icon (the magnifying glass) in the title bar, then click Find, and select Example Subscriber in the list that appears.
Step 2
Step 3
Step 4
Step 5
Step 6
Step 7
Step 8
Integrating a Secondary Server for Cisco Unity Failover
A Cisco Unity failover server is a secondary (or backup) server that provides voice messaging services if the primary Cisco Unity server becomes inactive. For information on installing a secondary server, refer to the Cisco Unity Installation Guide, available on Cisco.com at http://www.cisco.com/en/US/products/sw/voicesw/ps2237/products_installation_and_configuration_guide_books_list.html.
For information on failover, refer to the Cisco Unity Failover Guide, available on Cisco.com at http://www.cisco.com/en/US/products/sw/voicesw/ps2237/products_installation_and_configuration_guide_books_list.html.
Note
Requirements
The following components are required to integrate a secondary Cisco Unity server:
•
•
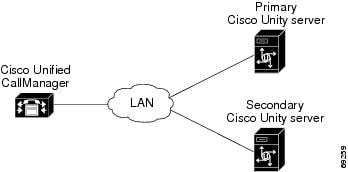
Integration Description
The phone system communicates with both the primary and secondary servers through the LAN. Figure 4 shows the required connections.
Figure 4 Connections Between Cisco CallManager and the Cisco Unity Servers
The primary and secondary servers act in the following manner:
•
•
•
Setting Up the Secondary Server for Failover
Before proceeding, confirm that Cisco CallManager is configured as described in the "Programming the Cisco CallManager Phone System" section earlier in this integration guide, including the following:
•
•
Do the following two procedures to integrate the secondary server.
To Configure Cisco CallManager
Step 1
Step 2
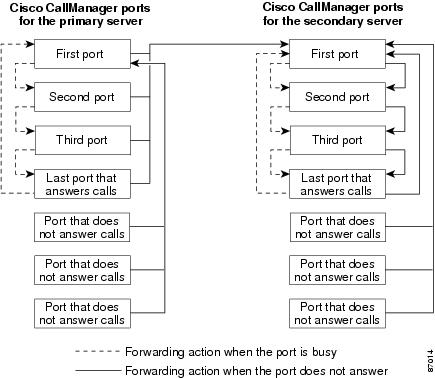
If there are uOne ports on the primary server that do not answer calls (for example, ports set only to Dialout MWI), leave the Forward Busy field blank.
Caution
For a diagram of the port settings, see Figure 5.
Step 3
If there are uOne ports on the primary server that do not answer calls (for example, ports set only to Dialout MWI), set the Forward No Answer field to the first uOne port on the primary server.
Caution
For a diagram of the port settings, see Figure 5.
Step 4
If there are uOne ports on the secondary server that do not answer calls (for example, voice mail ports set only to Dialout MWI), leave the Forward Busy field blank and set the Forward No Answer field to the first uOne port on the secondary server.
Caution
For a diagram of the port settings, see Figure 5.
Figure 5 Cisco CallManager uOne Port Configuration for Cisco Unity Failover
To Set Up the Secondary Server for Failover
Step 1
Step 2
Step 3
Step 4
Step 5
Switching Call Processing from a Cisco CallManager Failover Server to the Primary Server
If the primary Cisco CallManager server fails and a failover server starts processing calls, Cisco Unity automatically starts sending calls to the failover server. When the problem with the primary Cisco CallManager server has been resolved, Cisco Unity automatically resumes sending calls to that server.
If the primary Cisco CallManager server is not set up for automatic reconnect, and you are ready for that server to start processing calls again, do the following procedure.
To Switch Call Processing from a Failover Cisco CallManager Server to the Primary Cisco CallManager Server
Caution
Step 1
Step 2
Step 3
Step 4
Step 5
Step 6
WARNING: This operation will reset the TSP and reconnect to the primary Cisco CallManager.
Any current calls will be dropped. Proceed with the reset?
Step 7
Step 8
Step 9
Step 10
Changing TSP Settings
If you want to change or review the values that you specified when you installed and configured the Cisco Unity-CM TSP, do the following procedure.
Note
To Change and Test TSP Settings
Step 1
Step 2
Step 3
Step 4
Step 5
Step 6
If the Select CallManager list does not contain the IP address you want, click Add, enter the IP address, and then click OK.
Step 7
Table 7 Settings for the Cisco Unity-CM Service Provider Settings Dialog Box
Primary CallManager IP Address
The IP address of the Cisco CallManager server that Cisco Unity will usually receive calls from.
Primary CallManager IP Port
The IP port that Cisco CallManager uses. The default is 2000.
Number of Voice Ports
The number of Cisco CallManager uOne ports that are connected to Cisco Unity.
Device Name Prefix
Enter the following characters without any spaces:
•
•
For example, if the uOne port name is CiscoUM1, the device name prefix is CiscoUM1-VI.
Make sure you enter this prefix exactly as it appears in the Cisco CallManager Administrator. Otherwise, the integration will not work.
MessageWaitingOnDN
The extension that you specified, in the Cisco CallManager Administration, for turning MWIs on. See the "To Specify MWI and Voice Mail Directory Numbers" section.
MessageWaitingOffDN
The extension that you specified, in the Cisco CallManager Administration, for turning MWIs off. See the "To Specify MWI and Voice Mail Directory Numbers" section.
CallManager Failover IP Addresses
The IP addresses of backup Cisco CallManager servers, if any. Backup Cisco CallManager servers must be in the same cluster as the primary Cisco CallManager server.
CallManager Device List
A display-only list of the names of the uOne ports that Cisco Unity looks for on the current Cisco CallManager server. This list is constructed by appending numbers starting with 1 to the setting of device name prefix.
The names in this list must exactly match the names of the uOne ports in the Cisco CallManager Administration. Otherwise, calls will not be correctly transferred to Cisco Unity.
Step 8
Step 9
If the test succeeds, a message box displays the message, "The test completed successfully." If the test fails, one of the error messages shown in the following table appears. Troubleshoot the problem as described in the "Comments" column, and repeat this step until the test succeeds. Then continue with Step 10.
Table 8 Error Messages from the Cisco Unity-CM Service Provider Test
Pinging CallManager server (<IP address>) failed. Make sure the IP address is valid, the server is running, and the network connection is working.
No computers on the network have the IP address that you specified in Primary CallManager IP Address. Confirm that this address is valid. If the value is correct, or if the problem persists after you change the value, troubleshoot the problem as you would a network connectivity problem.
The voice device named <device name> does not respond to registration requests. Ensure that the device has been created in the CallManager database and that the device name prefix is correct.
Confirm that the values in CallManager Device List match the names of the voice mail ports that you created in Cisco CallManager Administrator (see the "To Add uOne Ports to Cisco CallManager" section). If not, change the setting in Device Name Prefix or the names of the voice mail ports, as necessary.
Could not connect to the CallManager. Verify that all Cisco services are started on the CallManager server.
The IP address that you specified in Primary CallManager IP Address is a valid address, but Cisco CallManager services are not running on that computer, possibly because Cisco CallManager is not installed on the server with that IP address. Confirm that this address is correct and that the Cisco CallManager services are running.
No wave devices were found on the system. The wave driver is either not installed correctly or the computer needs to be rebooted to update its configuration.
Exit the Cisco Unity software, then restart the server.
Step 10
This computer needs to be rebooted to update the wave driver.
Step 11
Step 12
Step 13
Step 14
Changing the Number of uOne Ports
To change the number of uOne ports after you have finished installing and setting up Cisco CallManager, do the following procedures.
To Change the Number of uOne Ports in the Cisco CallManager Administration
Step 1
For information on adding uOne ports, see the "To Add uOne Ports to Cisco CallManager" section. For information on removing uOne ports, see the online Help in the Cisco CallManager Administrator.
Step 2
To Update the Cisco Unity System Key for Additional uOne Ports
Step 1
Step 2
Step 3
If you increase the number of voice messaging ports from 32 or fewer to more than 32, you must also install SQL Server 2000 as described in the Cisco Unity Installation Guide. Otherwise, continue on to the procedure "To Change the Number of uOne Ports Specified for the TSP."
To Change the Number of uOne Ports Specified for the TSP
Step 1
Step 2
Step 3
Step 4
Step 5
Step 6
Step 7
Step 8
Step 9
Step 10
Step 11
Step 12
Step 13
Removing Dialogic Voice Card Software
If you are converting an integration with a circuit-switched phone system to an integration with Cisco CallManager, see the "Integration Steps When Converting from a Dual Phone System Integration to a Cisco CallManager-Only Integration" section and do the following two procedures.
To Remove Dialogic Voice Card Software
Step 1
Step 2
Dialogic Configuration Manager may display an error message about not detecting devices. This error is harmless. Click OK.
Step 3
Step 4
Step 5
Step 6
Step 7
Step 8
Step 9
Step 10
Step 11
Step 12
Step 13
Step 14
Step 15
Step 16
Step 17
Step 18
Step 19
Step 20
Step 21
Step 22
Caution
Step 23
Step 24
Step 25
Step 26
Step 27
Step 28
Step 29
Step 30
Step 31
Step 32
To Remove the Cisco Unity Dependence on the Dialogic Service
Step 1
Step 2
Caution
Step 3
Step 4
Step 5
Step 6
Step 7
Step 8
Step 9
Troubleshooting the Cisco CallManager Integration
This section provides information about common integration problems.
The Default Ear Piece and Speaker Volume on Cisco 7960 Phones Is Too Loud
To Change the Volume on Cisco 7960 Phones
Step 1
Step 2
Step 3
Step 4
Cisco Unity Does Not Answer When the Extension for Cisco Unity Is Dialed
If you hear a fast busy or number unobtainable signal when you dial Cisco Unity, do the following procedure.
To Confirm That the Phone System Programming Is Complete
Step 1
•
•
•
Step 2
Dual Phone System Integration
Cisco Unity can be integrated with one each of the following phone systems at the same time:
•
•
All extensions for subscribers and call handlers must be unique regardless of which phone system a subscriber (or call handler) uses. To transfer calls from one phone system to the other, Cisco Unity must dial the same access codes that a subscriber dials when calling someone on the other phone system.
Dual Phone System Integration Overview
Before doing the following integration steps, confirm that the Cisco Unity server is ready for the integration by completing the appropriate tasks in the Cisco Unity Installation Guide.
Integration Steps When No Phone Systems Are Installed
Follow these steps to set up the dual phone system integration when no phone systems are installed.
1.
2.
3.
4.
5.
Integration Steps When a Circuit-Switched Phone System Is Already Installed
Follow these steps to set up the dual phone system integration when the circuit-switched phone system is already installed and Cisco CallManager is being newly installed.
1.
2.
3.
Integration Steps When Cisco CallManager Is Already Installed
Follow these steps to set up the dual phone system integration when Cisco CallManager is already installed and a circuit-switched phone system is being newly installed.
1.
2.
3.
4.
5.
Requirements
The dual phone system integration supports configurations of the following components:
•
•
•
•
Changing Cisco Unity Administrator Settings
After Cisco Unity is installed and the phone systems have been separately integrated, you need to adjust settings on pages in the Cisco Unity Administrator so that Cisco Unity can work with both phone systems.
Follow these steps to set up the dual phone system integration.
1.
Caution
2.
3.
4.
5.
Caution
To Specify Switch Settings for the Circuit-Switched Phone System
Step 1
Step 2
The access code is the same number that subscribers on the circuit-switched phone system dial to reach someone on the Cisco CallManager system.
Step 3
Step 4
To Specify Switch Settings for Cisco CallManager
Step 1
Step 2
Table 9 Switch Settings
Manufacturer
Cisco
Model
CallManager
Switch PBX software version
3.01 or later
Integration
TAPI
Step 3
Step 4
The access code is the same number that subscribers on Cisco CallManager dial to reach someone on the circuit-switched phone system.
Step 5
To Modify Voice Port Settings
Step 1
Step 2
Caution
Step 3
Step 4
Step 5
Step 6
Caution
To Select Which Phone System Subscribers and Call Handlers Use
For existing subscriber templates, subscriber accounts, and call handlers, Cisco Unity uses the circuit-switched phone system as its default. Therefore, during the initial setup of the dual phone integration, you will modify only those pages that will be using Cisco CallManager. Note that changes made to subscriber templates do not affect existing subscriber accounts.
Step 1
•
•
•
Step 2
Step 3
Caution
To Select Which Phone System Cisco Unity Uses for Message Notification
If subscribers use message notification, you can select which phone system Cisco Unity dials out on when notifying subscribers of new messages. Note that changes made to subscriber templates do not affect existing subscribers.
Step 1
•
•
Step 2
Cisco Unity uses the phone system specified on the subscriber template's Profile page as the default.
Step 3
Caution
Changing the Number of Installed Ports
After the dual phone system integration is set up, if you need to add or remove voice cards or uninstall voice card software, follow these steps:
1.
2.
3.
4.
If you completely remove the circuit-switched phone system, you must adjust the port assignments for Cisco CallManager on the System > Ports page, after the voice cards and voice card software used in the integration with the circuit-switched phone system have been removed.
To Remove the Existing TSP
Step 1
Step 2
Step 3
Step 4
Note
Step 5
Step 6
Step 7
To Reinstall the TSP
Step 1
Step 2
Step 3
Step 4
Step 5
Step 6
Step 7
Step 8
Step 9
Step 10
Appendix: Remapping Extension Numbers
The Remapping Feature
The extension remapping feature lets you convert the calling numbers and forwarding numbers of calls that Cisco Unity handles to the extensions of your choice. This feature is useful, for example, when the phone system cannot map multiple extension numbers on a subscriber's phone to a single Inbox.
Remapping can change one or both of the following extension numbers in a call:
•
•
Setting Up Cisco Unity to Remap Extension Numbers
This section includes a procedure for enabling the remapping feature. There are also examples of extension remapping syntax.
By doing the procedure, you can create multiple files in either or both of two directories:
•
•
Creating remapping instructions in an .exm file in a directory remaps only the type of extension number that the directory is named for. For example, if you want to remap only the extensions that Cisco Unity provides with calls it forwards, you must enter the instructions in an .exm file in the Forwarding directory; the Calling directory needs no file in this case.
In each directory, you can have several .exm files with different file names but the same .exm extension to help organize the remapping information (for example, Ports_1-12.exm and Ports_13-24.exm). Cisco Unity reads all files that have the .exm extension in these directories.
To Remap Extension Numbers
Step 1
Step 2
Step 3
For a sample file, see the file Sample.txt in the \CommServer\IntLib\ExtensionMapping directory. To create a section for indicating which voice messaging ports will be monitored for remapping calls, enter [Range] and press Return.
An .exm file can have only one [Range] section.
Step 4
For example, you might enter:
ports=1,2,5-34,10Step 5
An .exm file can have only one [Number Mappings] section.
Step 6
<original number>, <new number>
The rules cannot include spaces between digits. However, the numbers must be separated by a comma and a single space. Wildcard characters cannot appear at the beginning of a number.
Step 7
Step 8
Step 9
Step 10
Step 11
Syntax and Examples
Table 10 lists the wildcard characters you can use in the .exm files.
Table 10 Wildcard Characters
*
Matches zero or more digits.
?
Matches exactly one digit. Use ? as a placeholder for a single digit.
Table 11 gives examples for the syntax and results of rules in the .exm files.
Cisco Unity executes rules in the order they appear in the .exm file. For example, the .exm file might contain the following rules:
1234, 11893189, 11894189, 1189123?, 8891The extension 1234 would be remapped to 1189 while extensions 1233 and 1235 would be remapped to 8891, because the rule mapping 1234 appears earlier.
An .exm file might contain the following:
[Range]ports=1,2,5-34,10[Number Mappings]2189, 11893189, 11894189, 11898???, 9???
Appendix: Assigning Dialogic Ports for a Dual Phone System Integration
In a dual phone system integration, Cisco Unity assigns a voice messaging port to the traditional, circuit-switched phone system for every port available on the installed voice cards before assigning voice messaging ports to Cisco CallManager. The result is that Cisco Unity may not have enough voice messaging ports remaining to assign to Cisco CallManager.
The maximum number of voice messaging ports are assigned to the circuit-switched phone system in spite of the settings on the Ports page in the System Administrator.
For example, a dual phone system integration might have the following configuration:
•
•
•
•
Even so, Ports 1 through 4 (the total voice card ports) will be assigned to the circuit-switched phone system, and Ports 5 through 6 will be assigned to Cisco CallManager.
If you want to assign fewer than the total voice card ports to the circuit-switched phone system, you must first set the Port assignments on the Ports page of the System Administrator, then do the following procedure.
To Set the Port Assignments in the Registry
Step 1
Step 2
Caution
Step 3
Step 4
You will find several subkeys with this name.
Step 5
Step 6
Step 7
Step 8
Step 9
Step 10
Step 11
Step 12
Step 13
Step 14
Step 15
Appendix: Documentation and Technical Assistance
Conventions
The Cisco CallManager 3.0 Integration Guide for Cisco Unity 3.1 uses the following conventions.
The Cisco CallManager 3.0 Integration Guide for Cisco Unity 3.1 also uses the following convention:
Note
Caution
Cisco Unity Documentation
For descriptions and URLs of Cisco Unity documentation on Cisco.com, refer to About Cisco Unity Documentation. The document is shipped with Cisco Unity and is available on Cisco.com at http://www.cisco.com/en/US/products/sw/voicesw/ps2237/prod_pre_installation_guides_list.html.
Obtaining Documentation
Cisco provides several ways to obtain documentation, technical assistance, and other technical resources. These sections explain how to obtain technical information from Cisco Systems.
Cisco.com
You can access the most current Cisco documentation on the World Wide Web at this URL:
http://www.cisco.com/univercd/home/home.htm
You can access the Cisco website at this URL:
International Cisco websites can be accessed from this URL:
http://www.cisco.com/public/countries_languages.shtml
Documentation CD-ROM
Cisco documentation and additional literature are available in a Cisco Documentation CD-ROM package, which may have shipped with your product. The Documentation CD-ROM is updated regularly and may be more current than printed documentation. The CD-ROM package is available as a single unit or through an annual or quarterly subscription.
Registered Cisco.com users can order a single Documentation CD-ROM (product number DOC-CONDOCCD=) through the Cisco Ordering tool:
http://www.cisco.com/en/US/partner/ordering/ordering_place_order_ordering_tool_launch.html
All users can order monthly or quarterly subscriptions through the online Subscription Store:
http://www.cisco.com/go/subscription
Ordering Documentation
You can find instructions for ordering documentation at this URL:
http://www.cisco.com/univercd/cc/td/doc/es_inpck/pdi.htm
You can order Cisco documentation in these ways:
•
http://www.cisco.com/en/US/partner/ordering/index.shtml
•
Documentation Feedback
You can submit comments electronically on Cisco.com. On the Cisco Documentation home page, click Feedback at the top of the page.
You can e-mail your comments to bug-doc@cisco.com.
You can submit comments by using the response card (if present) behind the front cover of your document or by writing to the following address:
Cisco Systems
Attn: Customer Document Ordering
170 West Tasman Drive
San Jose, CA 95134-9883We appreciate your comments.
Obtaining Technical Assistance
Cisco provides Cisco.com, which includes the Cisco Technical Assistance Center (TAC) website, as a starting point for all technical assistance. Customers and partners can obtain online documentation, troubleshooting tips, and sample configurations from the Cisco TAC website. Cisco.com registered users have complete access to the technical support resources on the Cisco TAC website, including TAC tools and utilities.
Cisco.com
Cisco.com offers a suite of interactive, networked services that let you access Cisco information, networking solutions, services, programs, and resources at any time, from anywhere in the world.
Cisco.com provides a broad range of features and services to help you with these tasks:
•
•
•
•
•
To obtain customized information and service, you can self-register on Cisco.com at this URL:
http://tools.cisco.com/RPF/register/register.do
Technical Assistance Center
The Cisco TAC is available to all customers who need technical assistance with a Cisco product, technology, or solution. Two types of support are available: the Cisco TAC website and the Cisco TAC Escalation Center. The type of support that you choose depends on the priority of the problem and the conditions stated in service contracts, when applicable.
We categorize Cisco TAC inquiries according to urgency:
•
•
•
•
Cisco TAC Website
The Cisco TAC website provides online documents and tools to help troubleshoot and resolve technical issues with Cisco products and technologies. To access the Cisco TAC website, go to this URL:
All customers, partners, and resellers who have a valid Cisco service contract have complete access to the technical support resources on the Cisco TAC website. Some services on the Cisco TAC website require a Cisco.com login ID and password. If you have a valid service contract but do not have a login ID or password, go to this URL to register:
http://tools.cisco.com/RPF/register/register.do
If you are a Cisco.com registered user, and you cannot resolve your technical issues by using the Cisco TAC website, you can open a case online at this URL:
http://www.cisco.com/tac/caseopen
If you have Internet access, we recommend that you open P3 and P4 cases online so that you can fully describe the situation and attach any necessary files.
Cisco TAC Escalation Center
The Cisco TAC Escalation Center addresses priority level 1 or priority level 2 issues. These classifications are assigned when severe network degradation significantly impacts business operations. When you contact the TAC Escalation Center with a P1 or P2 problem, a Cisco TAC engineer automatically opens a case.
To obtain a directory of toll-free Cisco TAC telephone numbers for your country, go to this URL:
http://www.cisco.com/warp/public/687/Directory/DirTAC.shtml
Before calling, please check with your network operations center to determine the Cisco support services to which your company is entitled: for example, SMARTnet, SMARTnet Onsite, or Network Supported Accounts (NSA). When you call the center, please have available your service agreement number and your product serial number.
Obtaining Additional Publications and Information
Information about Cisco products, technologies, and network solutions is available from various online and printed sources.
•
http://www.cisco.com/en/US/products/products_catalog_links_launch.html
•
•
http://www.cisco.com/go/packet
•
http://www.cisco.com/go/iqmagazine
•
http://www.cisco.com/en/US/about/ac123/ac147/about_cisco_the_internet_protocol_journal.html
•
http://www.cisco.com/en/US/learning/le31/learning_recommended_training_list.html
Copyright © 2003 Cisco Systems, Inc. All rights reserved.