Cisco Unity System Administration Guide, Release 3.0(1)
Chapter 24 - Network Settings

Table Of Contents

Network Settings

Overview: Network Settings

Location Profile Settings

Location Dial IDs

Customizing the Default Location

Creating a Dialing Domain

Creating Locations for Use in Blind Addressing

Location Addressing Option Settings

AMIS Profile Settings

AMIS Schedule Settings


Network Settings


Overview: Network Settings

You use network settings to set up and administer Cisco Unity for use with Digital Networking and the AMIS analog protocol, both of which allow subscribers to address voice messages—by using the phone—to subscribers at other locations. With Digital Networking, the locations can be other Cisco Unity servers or computers that do not use Exchange, including other voice messaging systems that have SMTP gateways. With AMIS, the locations are other voice messaging systems that support the AMIS protocol.

The network location settings provide a general, consistent interface for setting up Cisco Unity to use different message transport mechanisms. No matter which protocol Cisco Unity uses to send and receive messages, you must customize the default location for your Cisco Unity server. If you will be using blind addressing to another Cisco Unity server or another voice messaging system, you also need to create locations on your local Cisco Unity server that correspond to the remote locations.

Refer to the following sections in this chapter for more information about network settings:

Location Profile Settings—This section provides information about customizing the default location and about creating additional locations for use with Digital Networking and AMIS blind addressing.

Location Addressing Option Settings—This section provides information about the settings that allow you to select the scope of the search performed when a subscriber uses the phone to address a message by name or extension.

AMIS Profile Settings—This section provides information about the settings that control AMIS message transmissions.

AMIS Schedule Settings—This section describes how to set up a schedule to control when AMIS messages are transmitted.

Related sections

Chapter 10, "Digital Networking"

Chapter 11, "AMIS"

Location Profile Settings

Locations are Cisco Unity entities that contain the addressing information that Cisco Unity needs to send and receive messages between locations, no matter what transport mechanism is used. With Digital Networking, locations contain the domain name portion of the e-mail addresses used by subscribers at the location. With AMIS, locations contain the Delivery Number and the AMIS Node ID required by the AMIS protocol.

Each Cisco Unity server is associated with one location (referred to as the default or primary location), which is created during installation and which cannot be deleted. You create additional locations when setting up blind addressing with either Digital Networking or AMIS.

Location Dial IDs

You assign a Dial ID to the default location and to all locations that you create for blind addressing. When addressing a message to another location by using blind addressing, subscribers dial a number that is made up of the Dial ID and the extension of the recipient.

You need to carefully plan the numbers that you choose as Dial IDs, particularly if your organization has more than one Cisco Unity server networked together with access to a single, corporate-wide directory. Without careful planning, it is possible to assign Dial IDs that prevent Cisco Unity from finding a message recipient at another location. The following guidelines take into account how Cisco Unity searches for a matching extension or Dial ID when a subscriber addresses a message. For more information about the search process, see the "Location Addressing Option Settings" section.

Guidelines for assigning Dial IDs and extensions

The policies set for assigning Dial IDs and extensions can affect how easily Cisco Unity can match the number that a subscriber enters when addressing a message. The following policies are recommended:

Establish a fixed length for Dial IDs and if possible, a fixed length for extensions.

Assign unique Dial IDs. A Dial ID must not be the same as any other Dial ID or any extension assigned to subscribers, call handlers, interview handlers, or public distribution lists. If possible, assign a numbering range to Dial IDs that extensions do not use.

If you use variable-length Dial IDs and extensions, the Dial IDs should be in a different numbering range than the range for extensions. For example, if there is a local extension 750123, do not assign a location the Dial ID of 750 if there is a possibility that this location will have the extension 123.

If you use variable-length Dial IDs, the first digits of each ID should be unique with respect to other Dial IDs. For example, if you have a location with an ID of 750, do not assign another location the ID of 7503.

You may need to consult with the administrators of the other Cisco Unity servers in your organization about the numbers that you can use for your default location and for any other locations that you create. This is particularly important if your organization has more than one Cisco Unity server networked together with access to a single, corporate-wide directory. In this case, verify that the location Dial ID does not conflict with extensions used on other Cisco Unity servers.

If you do not follow these guidelines, subscribers may encounter the following problems when addressing a message:

A delay while Cisco Unity searches for a match

Multiple matches for the number

Failure to find the recipient at another location

Customizing the Default Location

With both Digital Networking and AMIS, you need to customize the default location.

To customize the default location


Step 1 Go to Network > Locations > Profile. The {Default} location is displayed.

Step 2 Enter a meaningful name for the location.

Step 3 Enter a Dial ID.

Step 4 Record a voice name for the location.

Step 5 Enter the domain name associated with the Cisco Unity server. The domain name in this context is the right half of the e-mail address of the subscribers associated with this location, after (but not including) the @ symbol.

Step 6 If the location is part of a dialing domain, enter the dialing domain ID. Otherwise, click None.

Step 7 If your Cisco Unity installation will be using AMIS, enter the numbers for the Node ID, which is transmitted on all outgoing AMIS calls.


Creating a Dialing Domain

Multiple Cisco Unity servers can be grouped together into a dialing domain. A dialing domain provides a means to group subscribers when multiple Cisco Unity servers are connected to a single, corporate-wide directory, and Cisco Unity is integrated with a networked phone system. In this configuration, callers who reach the opening greeting of your organization can dial the extension of any subscriber or look up any subscriber in directory assistance; the call is transferred regardless of which Cisco Unity server in the dialing domain the subscriber is associated with. (See the "Call Transfer Settings Unavailable" section on page 10-24 for information about limitations with call transfers from the automated attendant and directory assistance.)

Additionally, a dialing domain provides a means to set the scope for searches that Cisco Unity performs when a subscriber addresses a message, and when members are being added to a public or private distribution list.

To create a dialing domain


Step 1 Consult with the administrators of the other Cisco Unity servers to decide on a name or ID for the dialing domain.

Step 2 Go to the Network > Locations > Profile page of the default location, and enter the dialing domain name.

Step 3 The administrators for the other Cisco Unity server(s) enter the same dialing domain name on the Network > Locations > Profile page of the default location for their servers.

Step 4 If desired, adjust settings on the Network > Locations > Addressing Options and the Call Management > Directory Handler > Search Options pages to include the dialing domain.


Creating Locations for Use in Blind Addressing

With both Digital Networking and AMIS blind addressing, you need to create a location on your local Cisco Unity server for each remote location to which subscribers will be sending messages. Additionally, when using AMIS subscribers, you need to create a location that corresponds to the remote voice messaging system that the AMIS subscribers use.

To create a new location


Step 1 Go to Network > Locations > Profile.

Step 2 Click the Add icon.

Step 3 Enter a meaningful name for the location.

Step 4 Enter the Dial ID that subscribers dial to reach the location. When creating a new location for Digital Networking blind addressing, the location Dial ID that you specify must match the location Dial ID of the default location on the corresponding Cisco Unity server.

Step 5 Indicate if this is a new location or if this location should use the settings from an existing location. If appropriate, select the location to base it on.

Step 6 Click Add.

Step 7 Record a voice name for the location.

Step 8 Select the Destination Type for the location. The Destination Type determines which other fields are displayed on the Profile page.

Step 9 If this is not an AMIS location, enter the domain name. The domain name in this context is the right half of the e-mail address of the subscribers associated with this location, after (but not including) the @ symbol.

Step 10 If this is an AMIS location, enter the Delivery Phone Number. This is the number that Cisco Unity dials for outgoing AMIS messages.

Step 11 If this is an AMIS location, enter the numbers for the Node ID of the location. This Node ID must match the Node ID that is transmitted during incoming calls from the corresponding remote AMIS node.


Use the following table to learn more about location profile settings.

Table 24-1 Network > Locations > Profile Page

Field
Considerations
Name

This displays the name of the location. To change the name of the location, enter a new name here, and then click the Save icon.

Dial ID

Enter the ID associated with the location. When addressing a message to another location by using blind addressing, subscribers dial a number that is made up of the Dial ID and the extension (or the remote mailbox number) of the recipient. The minimum length for a Dial ID is one digit.

When setting up blind addressing for Digital Networking, the ID that you enter here must match the Dial ID of the default location at the corresponding remote Cisco Unity server.

The following policies are recommended:

Establish a fixed length for Dial IDs and if possible, a fixed length for extensions.

Assign unique Dial IDs.

If you use variable-length Dial IDs and extensions, the Dial IDs should be in a different numbering range than extensions.

If you use variable-length Dial IDs, the first digits of each ID should be unique with respect to other Dial IDs.

Recorded Name

Record a name for the location. Cisco Unity plays this recorded name for subscribers addressing a message to another location and for recipients of messages from another location.

To record the name here, use the Media Master control bar. (Note that the Media Master is not available across a firewall.) Use the Options menu in the Media Master control bar to set recording and playback devices, if applicable, and to use other sound files.

Destination Type

Select one of the following:

Cisco Unity—Indicates that the location is a Cisco Unity server.

SMTP—Indicates that the location can send and receive messages over the Internet by using a standard SMTP gateway.

AMIS—Indicates that the location can send and receive messages by using the AMIS analog protocol.

If you will be using a combination of Digital Networking and AMIS, set the Destination Type to AMIS.

Domain Name

(for SMTP and Cisco Unity locations only)

Enter the Internet domain name. This is the right half of the e-mail address after the @ used by subscribers associated with the Cisco Unity server that corresponds to this location. Do not enter the @ symbol; Cisco Unity automatically inserts it. The domain name is used in Digital Networking blind addressing to construct e-mail addresses for subscribers associated with the location.

Delivery Phone Number

(for AMIS locations only)

Enter the phone number, including trunk access code, that Cisco Unity dials for outgoing AMIS calls to the remote voice messaging system that corresponds to this location.

Dialing Domain

(available on the default location only)

Enter the name of the dialing domain. A dialing domain provides a means to scope message address and directory handler searches. Although the creation of a dialing domain is optional, the Cisco Unity servers integrated with the networked phone system cannot take advantage of the networked features unless they are grouped within a dialing domain.

Node ID:
Country Code, Area Code, Phone Number

(for AMIS locations only)

On the default location, enter the numbers that identify Cisco Unity to other voice messaging systems on all outgoing AMIS calls.

On other locations created for AMIS blind addressing or for AMIS subscribers, enter the numbers used to identify the remote voice messaging system that corresponds to this location. This Node ID must match the Node ID that is transmitted during incoming calls from the remote voice messaging system that corresponds to this location. Cisco Unity accepts messages only from known AMIS nodes.

Disable Outbound Message Delivery to This AMIS Location

(for AMIS locations only)

Check this box if you want to prevent subscribers associated with your Cisco Unity server from sending messages to the remote voice messaging system that corresponds to this location.

When an outbound AMIS call to the delivery phone number for this location is answered by a person instead of a voice messaging system, Cisco Unity plays a prompt that instructs the person to prevent further AMIS calls by pressing a touchtone. If the person chooses to disable further calls, Cisco Unity checks this box and disables outbound calls to this location. Any messages that could not be delivered to this location remain in the Inbox of the UAmis account until you uncheck the box. Any messages remaining in the UAmis Inbox longer than 24 hours are returned to sender with a Non-Delivery Report (NDR).


Location Addressing Option Settings

The location addressing options allow you to control the search that Cisco Unity performs when a subscriber addresses a message by using the phone. These settings are also applied when members are added to public or private distribution lists by using the Cisco Unity Administrator, and when subscribers add members to private lists by using the phone or the ActiveAssistant.

Note that these settings are applied to the default location only.

Cisco Unity search scope

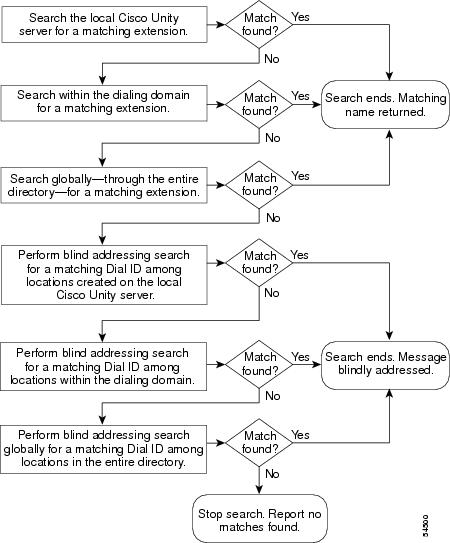
The addressing options settings allow you to control the scope of the search that Cisco Unity performs when it searches for a matching subscriber extension. You can set the scope to the local Cisco Unity server, to the dialing domain that the local Cisco Unity server is a member of, or to the entire directory (the Global Address List). The addressing options also allow you to enable blind addressing searches for a matching location Dial ID. You can set the blind addressing scope to those locations created on the local Cisco Unity server, to locations within the dialing domain, or to the entire directory.

Figure 24-1 illustrates the search that Cisco Unity performs when both the subscriber and blind addressing searches are set to the Global Address List.

Figure 24-1 Cisco Unity Search Scope

How Cisco Unity searches the local Cisco Unity server

When searching for a matching subscriber extension, Cisco Unity does not expand the search scope to the dialing domain until after it first searches:

Private list IDs (when a message is being addressed by a subscriber)

All subscriber extensions on the local Cisco Unity server

Call handlers, interview handlers, and the directory handler (if they have extensions)

Public distribution lists (if they have extensions)

How Cisco Unity searchers for a matching Dial ID

When subscribers address a message to another location by using blind addressing, they dial a number that is made up of the Dial ID and the extension of the recipient. Before starting a blind addressing search for a matching location Dial ID, Cisco Unity first searches for a matching extension, as described above.

If an extension match is not found, and if blind addressing searches are allowed, Cisco Unity begins searching for a matching location Dial ID. The scope of the blind addressing search is determined by the "Blind Addressing: Allowed Locations" setting on the Network > Locations > Addressing Options page. At each scope level, Cisco Unity first searches for a Dial ID that matches the first digit entered by the subscriber. If a match is not found, and the number of remaining digits in the dialed number is more than three (which is the minimum extension length), Cisco Unity continues the search by looking for a location with an ID that matches the first two digits entered by the subscriber. The search for a matching location continues in this manner and stops either when a matching location is found or when the number of the remaining digits is three.

For example, a subscriber presses 333506 on the phone to address a message. Table 24-2 shows the possible matches:

Table 24-2 Possible Matches for the Number 333506

Number
Possible Match

333506

Extension 333506

333506

Location 3, extension 33506

333506

Location 33, extension 3506

333506

Location 333, extension 506


When Cisco Unity finds a match, it stops searching. This is why you need to carefully plan the numbers that you choose as Dial IDs, particularly if your organization has more than one Cisco Unity server networked together with access to a single, corporate-wide directory. See the "Guidelines for assigning Dial IDs and extensions" section for more information.

Use the following table to learn more about location addressing option settings.

Table 24-3 Network > Locations > Addressing Options Page

Field
Considerations
Subscriber Searches: Limit Searches To

Select the scope of the search that Cisco Unity performs when a subscriber addresses a message by using the phone, or when members are being added to a public or private distribution list:

This Server—Limits the search to those subscribers associated with the local Cisco Unity server.

This Server's Dialing Domain—After searching the local Cisco Unity server, if a match is not found, the search expands to include those subscribers associated with the dialing domain that the Cisco Unity server is a member of.

The Global Address List—After searching the local Cisco Unity server and then the dialing domain (if there is one), the search expands to include every subscriber in the directory.

Play Location to Subscriber as Part of Search Results

(for blind addressing between Cisco Unity servers only)

Check this box to allow subscribers to first dial the Dial ID or name for a particular location and then dial the extension for a subscriber at that location. When this box is unchecked, subscribers dial one number which is made up of both the Dial ID and the extension of the recipient. This setting applies only for blind addressing between Cisco Unity servers. When subscribers address messages to AMIS locations, they must always dial the Dial ID and recipient extension as one number.

When checked, this setting allows subscribers to address a message in two steps. First subscribers select a particular location (by name or by Dial ID). If Cisco Unity finds a matching location, subscribers are prompted to dial the extension for the recipient at that location.

This option is useful when the numbers for extensions at different locations are of different lengths or are not unique.

Blind Addressing: Allowed Locations

Select the scope of the blind addressing search for a matching location that Cisco Unity performs when a subscriber addresses a message by using the phone. Select one of the following:

None—Do not allow blind addressing searches.

Locations on this Cisco Unity Server—Limits the search to locations that were created on your Cisco Unity server.

Locations in this Cisco Unity Server's Dialing Domain—After searching the local Cisco Unity server, if a match is not found, the blind addressing search expands to include those locations included in the dialing domain that the Cisco Unity server is a member of.

Locations in the Global Address List—After searching the local Cisco Unity server and then the dialing domain (if there is one), the search expands to include every location in the Exchange directory.


AMIS Profile Settings

The AMIS profile settings control attributes of outgoing AMIS calls. You specify settings such as how many rings Cisco Unity waits when it encounters a busy signal, and whether urgent messages override the AMIS schedule. A restriction table that you specify is used to control which delivery numbers are allowed and processed immediately. See the "Overview: Restriction Tables" section on page 22-1 for basic information about restriction tables.

Use the following table to learn more about AMIS profile settings.

Table 24-4 Network > AMIS > Profile Page

Field
Considerations
Urgent Messages Override the Schedule

Check this box to allow messages marked as urgent to be delivered immediately. When the box is unchecked, urgent messages are treated the same as non-urgent messages—they are queued until the AMIS schedule becomes active. Queued messages are placed in the Inbox for the UAmis account.

Local Dial Restriction Table

Select a restriction table to determine which delivery numbers are allowed and which can be processed immediately. If an AMIS delivery number is allowed by the restriction table, the AMIS message can be delivered immediately. If the delivery number is not allowed by the restriction table, the message is queued until the AMIS schedule becomes active. Queued messages are placed in the Inbox for the UAmis account.

By default, the Local Dial Restriction Table field is set to the predefined Default AMIS restriction table. You can modify the Default AMIS restriction table or select another restriction table. You may want to modify this restriction table to disallow long distance delivery numbers and adjust the AMIS schedule to become active when the long distance phone rates are lower.

Wait for How Many Rings Before Hanging Up

Specify the number of rings that Cisco Unity waits for the remote node to answer when making an AMIS call. After the specified number of rings, Cisco Unity considers the call a "No Answer." The default value is 4.

Set the Number of Retries on a Busy Signal

Specify the number of times that Cisco Unity attempts to make an AMIS call when the initial attempt resulted in a busy signal. The default value is 4. When the schedule that allows AMIS deliveries becomes inactive, the count that Cisco Unity maintains for this setting is reset to 0.

How Many Minutes Between Retries

Specify the number of minutes that Cisco Unity waits after receiving a busy signal before attempting the AMIS call again. The default value is 5 minutes.

Set the Number of Retries on a No Answer

Specify the number of times that Cisco Unity attempts to make an AMIS call when the remote node did not answer the initial attempt. The default value is 4. When the schedule that allows AMIS deliveries becomes inactive, the count that Cisco Unity maintains for this setting is reset to 0.

How Many Minutes Between Retries

Specify the number of minutes that Cisco Unity waits after an AMIS call is not answered before attempting the call again. The default value is 15 minutes.


AMIS Schedule Settings

The AMIS schedule and the AMIS restriction table together determine when outgoing AMIS calls are made. If a delivery number for an outgoing AMIS message is allowed by the AMIS restriction table, then the message is sent immediately—the schedule settings do not apply. If the delivery number is not allowed by the AMIS restriction table, then the schedule determines when the message is sent. In other words, the schedule determines when messages are sent for delivery numbers that are disallowed by the AMIS restriction table.

Cisco Unity batches messages to an AMIS location or AMIS subscriber, with a maximum of nine messages per batch. If an AMIS transmission is in progress when the schedule becomes inactive, the transmission of the current message as well as the rest of the messages in the batch is completed. At that time, any other messages remaining in the queue are queued until the next active time in the schedule. Queued messages are placed in the Inbox for the UAmis account.

Because the transmission of AMIS messages may tie up voice ports for long periods of time, you may want to schedule outgoing AMIS calls during closed hours or at times when Cisco Unity is not processing many calls. Additionally, if most or all of your AMIS delivery numbers are long distance, you may want to schedule the AMIS calls when the long distance phone rates are lower.

Use the following table to learn more about AMIS schedule settings.

Table 24-5 Network > AMIS > Schedule Page

Field
Considerations
Click Individual Blocks to Set Hours

Click the blocks in the grid to change from inactive to active hours. Click the block again to undo your change. AMIS outgoing calls are allowed only during the active hours on the schedule. Note that you can set active and inactive hours for one day, then use the Copy Day's Schedule box to copy the settings to other days.

Copy Day's Schedule

To avoid clicking the same blocks for more than one day, use the Copy Day's Schedule and >> functions. Select a day to copy, then select which days to copy the schedule setting to.