 Feedback Feedback
|
Table Of Contents
Using the Cisco Media Convergence Server Network Teaming Driver
Related Cisco Unified CallManager and Operating System Documentation
HP Network Teaming Driver Configuration
Configuring the HP Network Teaming Driver
Dissolving the HP Network Teaming Driver
Uninstalling the HP Network Teaming Driver
IBM Network Teaming Driver Configuration
Configuring the IBM Network Teaming Driver
Dissolving the IBM Network Teaming Driver
Uninstalling the IBM Network Teaming Driver
Troubleshooting the Network Teaming Driver
Cisco Product Security Overview
Using the Cisco Media Convergence Server Network Teaming Driver
Supports Operating System Versions 2000.4.4, (or later) and 2003.1.1 (or later)
The Cisco Media Convergence Server (MCS) Network Teaming Driver enables the functionality for the failover fault-tolerant network adapters. This driver works with Cisco Media Convergence Servers that have dual network interface cards (NIC) installed. With this functionality, the standby NIC can handle all IP traffic if the primary NIC fails.
Operating system version 2000.4.4 (or later) automatically installs the Network Teaming Driver as part of the installation process. You must perform configuration tasks, as described in this document, to set up and use the Network Teaming Driver.
Use this document with operating system version 2000.4.4 (or later). For information about installing and configuring the Network Teaming Driver with earlier versions of the operating system, refer to previous versions of this document, which are available at the following URL:
http://www.cisco.com/en/US/products/hw/voiceapp/ps378/prod_installation_guides_list.html
Contents
This document contains the following topics:
•
Related Cisco Unified CallManager and Operating System Documentation
•
Troubleshooting the Network Teaming Driver
•
Cisco Product Security Overview
Related Cisco Unified CallManager and Operating System Documentation
Table 1 provides a list of Cisco Unified CallManager and operating system documentation. You can navigate to the appropriate documentation by clicking the URLs that are shown in the table.
Table 1 Quick Reference for Documentation and Software URLs
Operating system documentation and Virtual Network Computing (VNC) documentation
(not readme documentation)
http://www.cisco.com/en/US/products/hw/voiceapp/ps378/prod_installation_guides_list.html
Cisco MCS data sheets
http://www.cisco.com/en/US/products/hw/voiceapp/ps378/index.html
Software-only servers (IBM, HP, Compaq, Aquarius)
http://www.cisco.com/en/US/products/hw/voiceapp/ps378/prod_brochure_list.html
Cisco Unified CallManager Compatibility Matrix
http://www.cisco.com/en/US/docs/voice_ip_comm/cucm/compat/ccmcompmatr1.pdf
Cisco Unified CallManager documentation, including installation and upgrade documentation
http://www.cisco.com/en/US/products/sw/voicesw/ps556/tsd_products_support_series_home.html
Backup and Restore documentation
http://www.cisco.com/en/US/products/sw/voicesw/ps556/prod_maintenance_guides_list.html
Support patches and readme documentation
http://www.cisco.com/public/sw-center/sw-voice.shtml
Note
The operating system and SQL Server 2000 support patches post on the voice products operating system cryptographic software page. You can navigate to the site from the Cisco Unified CallManager software page.
Server Requirements
The following servers support the HP Network Teaming Driver:
•
Cisco MCS-7816-H3
•
Cisco MCS-7825H-2266
•
Cisco MCS-7825H-3000
•
Cisco MCS-7825H1
•
Cisco MCS-7825-H2
•
Cisco MCS-7825-H3
•
Cisco MCS-7835H-1266
•
Cisco MCS-7835H-2400
•
Cisco MCS-7835H-3000
•
Cisco MCS-7835H1
•
Cisco MCS-7835-H2
•
Cisco MCS-7845H-1400
•
Cisco MCS-7845H-2400
•
Cisco MCS-7845H-3000
•
Cisco MCS-7845-H1
•
Cisco MCS-7845-H2
•
Cisco-approved, customer-provided HP DL320 G2 server
•
Cisco-approved, customer-provided HP DL320 G3 server
•
Cisco-approved, customer-provided HP DL320 G4 server
•
Cisco-approved, customer-provided HP DL320 G5 server
•
Cisco-approved, customer-provided HP DL380 G2 server, including single and dual processors
•
Cisco-approved, customer-provided HP DL380 G3 server, including single and dual processors
•
Cisco-approved, customer-provided HP DL380 G4 server, including single and dual processors
•
Cisco-approved customer-provided HP DL380 G5 server, including single and dual processors
The following servers support the IBM Network Teaming driver
•
Cisco MCS-7816-I3
•
Cisco MCS-7825-I3
•
Cisco MCS-7835-I1
•
Cisco MCS-7835-I2
•
Cisco MCS-7845-I1
•
Cisco MCS-7845-I2
•
Cisco-approved customer-provided IBM xSeries x346 server, including single and dual processors
•
Cisco-approved customer-provided IBM xSeries x3250 server, including single and dual processors
•
Cisco-approved customer-provided IBM xSeries x3650 server, including single and dual processors
Before You Begin
Before you configure the Network Teaming Driver, review the following information:
•
Cisco requires that your system runs Cisco-provided operating system version 2000.4.4 (or later).
•
Cisco requires that your system runs Cisco Unified CallManager 4.2(1) or later before you run this install package.
•
You must reboot the server after you perform the driver configuration tasks.
•
If you want to uninstall the network teaming driver, you must reboot the server for the changes to take effect.
•
Perform all configuration tasks on every server in the cluster where the driver is supported.
•
You must enable network teaming from the console. You cannot perform this procedure remotely through Terminal Services or Virtual Network Computing (VNC).
Note
Before you install or upgrade Cisco Unified CallManager, Cisco strongly recommends that you configure the Network Teaming Driver.
If you do not perform the tasks in the recommended order and decide to configure the driver after the application upgrade, you might encounter a Service Control Manager message, as described in the "Troubleshooting the Network Teaming Driver" section.
Before you configure the driver, perform the following procedure:
Procedure
Step 1
After you install Cisco-provided operating system 2000.4.4 on every server in the cluster, right-click My Network Places.
Step 2
Right-click Local Area Connection; choose Properties.
Step 3
Choose the Internet Protocol (TCP/IP) component and click the Properties button.
Step 4
In Table 2, enter the IP information, including the IP address, subnet mask, the default gateway, and the DNS/WINS settings.
Tip
To obtain the WINS setting, click the Advanced button for WINS settings.
Step 5
After you record the information, click Cancel.
Step 6
In the Local Area Connection window, click the Configure button.
Step 7
Click the Advanced tab.
Step 8
In the Property pane, locate the speed and duplex settings.
One or two different settings may exist, depending on the server type.
Step 9
In Table 2, enter the speed and duplex setting values for the primary network card.
Step 10
Right-click the second network card connection, Local Area Connection 2.
Step 11
Choose Enable.
Note
The installation of Cisco-provided operating system version 2000.4.4 (or later) automatically disables the second network card. You must enable it now.
In addition, make sure that the second network card is connected to the network. When only one network card is connected, the network team does not get created correctly. If the network team is not created correctly, verify the connection of the second network card and rerun the Network Teaming Driver configuration procedures.
Configuration Tasks
The configuration tasks vary based on the server type. See the appropriate section for your server:
•
HP Network Teaming Driver Configuration
•
IBM Network Teaming Driver Configuration
HP Network Teaming Driver Configuration
This section includes information on the following topics:
•
Configuring the HP Network Teaming Driver
•
Dissolving the HP Network Teaming Driver
•
Uninstalling the HP Network Teaming Driver (includes verification steps)
Configuring the HP Network Teaming Driver
To configure the HP Network Teaming Driver, perform the following procedure:
Procedure
Step 1
Locate the HP Network Configuration Utility icon in the Windows 2000 system tray or by choosing Start > Settings > Control Panel > HP Network.
Figure 1 shows this icon.
Figure 1 HP Network Configuration Utility Icon
Step 2
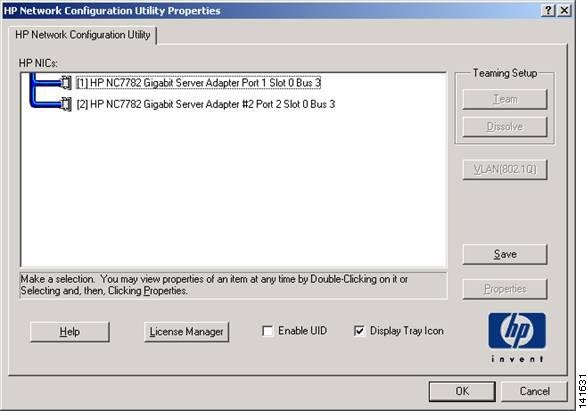
Double-click the icon to launch the HP Network Configuration Utility.
The HP Network Configuration Utility Properties window displays, as shown in Figure 2.
Figure 2 HP Network Configuration Utility Properties Window
Step 3
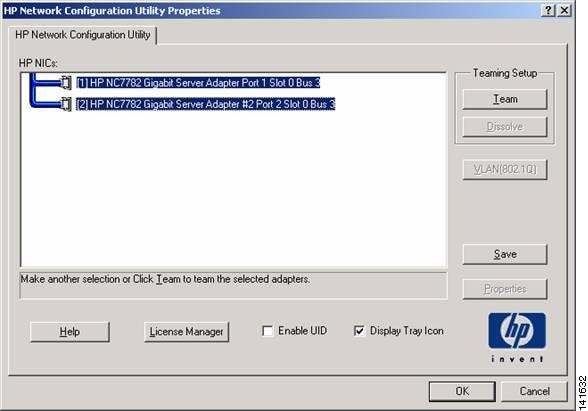
Click each HP NIC that is listed to select both entries, as shown in Figure 3.
Figure 3 Selected HP NICs
Step 4
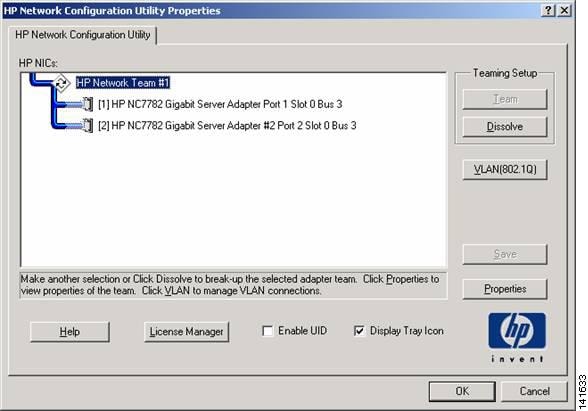
In the Teaming Setup area, click Team to team the selected HP NICs.
The system creates the NIC team, as shown in Figure 4:
Figure 4 Team Created
Step 5
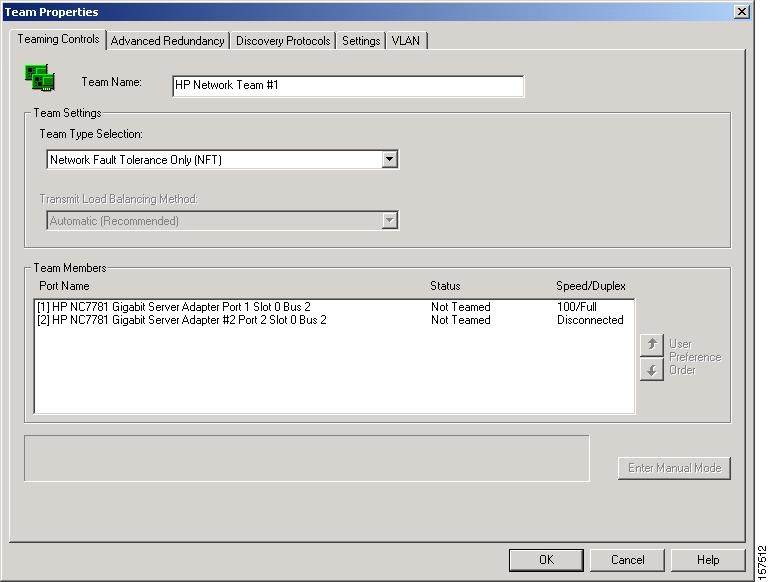
Click Properties.
The Team Properties window displays, as shown in Figure 5. In this figure, HP Network Team #1 represents the default name for the team.
Figure 5 Team Properties Window
Note
In the Team Properties window, Cisco strongly recommends that you choose the specified setting in Step 6.
Step 6
Under the Teaming Controls tab in the Team Properties window, choose Network Fault Tolerance Only (NFT) from the Team Type Selection drop-down list box.
After you choose this setting, the options in the Transmit Load Balancing Method drop-down list box appear disabled.
Step 7
In the Team Properties window, click OK.
You have created the HP Network Team.
Step 8
In the HP Network Configuration Utility Properties window, click OK.
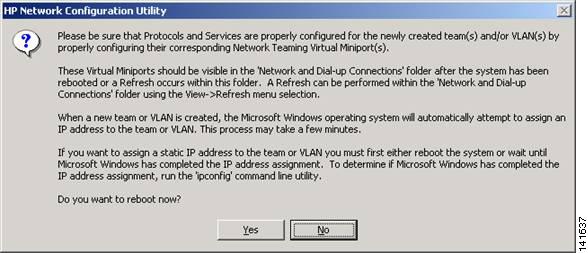
A confirmation window displays, as shown in Figure 6.
Figure 6 Confirmation
Tip
You can change the team properties, if you want to do so, by clicking Properties in the HP Network Configuration Utility Team Properties window. For example, you can use Properties to change the name of the HP Network Team. After you change the properties, click OK.
Step 9
To confirm your changes and continue, click Yes.
Step 10
Wait while the adapters are being configured; then, click Yes when prompted to reboot the server, as shown in Figure 7.
Figure 7 Successful Configuration Changes
Step 11
Launch the HP Network Configuration Utility, as described in Step 2.
Step 12
To choose the NIC, click NIC Port #1 (or a variation of that name); then, click Properties.
Step 13
Click the Settings tab.
Step 14
Choose Speed/Duplex Setting and enter the setting that you recorded in Table 2.
Step 15
Click OK.
Step 16
To deselect the NIC, click NIC Port #1 (or a variation of that name).
Step 17
Repeat Step 12 through Step 15 for NIC Port #2 (or a variation of that name).
Step 18
Click OK.
Step 19
Right-click My Network Places; choose Properties for the Local Area Connection.
An additional network card, Local Area Connection 3, displays in the window.
Step 20
Right-click the teamed connection; choose Properties.
Step 21
Choose the Internet Protocol (TCP/IP) option and click the Properties button.
Step 22
From Table 2, enter the information, including the IP address, the subnet mask, the default gateway, and the DNS/WINS settings.
Tip
To enter the WINS setting, click the Advanced button for WINS settings. After you enter the information, make sure that you click OK.
Step 23
After you enter the information, click OK.
Step 24
Click OK.
Step 25
Close the Network and Dial-up Connections window.
You do not need to reboot the server.
Step 26
Perform all teaming procedures on every server in the cluster where the teaming driver is supported.
Step 27
Perform Cisco Unified CallManager installation tasks. See Table 1 for reference to Cisco Unified CallManager documentation.
Dissolving the HP Network Teaming Driver
When you dissolve the driver, you disassociate the two NICs and the virtual NIC that is used for the driver. The teaming drivers remain installed, but they no longer are configured or used.
In this case, the server uses NIC #1 only for IP telephony.
To dissolve the HP Network Teaming Driver, perform the following procedure:
Procedure
Step 1
Double-click the HP Network Configuration Utility icon that displays in the Windows 2000 system tray.
Step 2
Click HP Network Team #1.
Step 3
Click Dissolve.
Step 4
Click OK.
Step 5
To apply changes, click Yes.
Step 6
After all configuration changes are successful, click OK.
CautionFailing to disable the second NIC may result in two IP addresses being assigned to the server. Assigning two IP addresses to the Cisco Unified CallManager server may cause a loss of service.
Uninstalling the HP Network Teaming Driver
When you uninstall the HP Network Teaming Driver, you delete the drivers from the server. The server uses only NIC #1 for IP telephony.
To uninstall the HP Network Teaming Driver, perform the following procedure:
Procedure
Step 1
Right-click My Network Places and choose Properties.
Step 2
Right-click any active network card connection and click Properties.
Step 3
Choose HP Network Configuration Utility and click Uninstall.
Step 4
To uninstall the driver, click Yes.
Step 5
For the changes to take effect, click Yes to reboot the server.
Step 6
After the server reboots, disable the second NIC.
Note
If you need to reinstall the Network Teaming Driver, you must run HPConfigUtil.exe. To do so, navigate to C:\Utils\DualNIC\HPConfigUtil.exe and follow the procedure for configuring the driver (see Step 11 in the "Configuring the HP Network Teaming Driver" section).
CautionFailing to disable the second NIC may result in two IP addresses being assigned to the server. Assigning two IP addresses to the Cisco Unified CallManager server may cause a loss of service.
Step 7
To verify that you uninstalled the driver, perform the following procedure:
a.
Right-click My Network Properties and choose Properties.
A list, which should not include the network team, displays.
b.
Right-click the primary network card connection, which is, by default, Local Area Connection, and choose Properties.
c.
Choose Internet Protocol (TCP/IP) option and click Properties.
d.
Verify that the settings from Step 4 in the "Before you configure the Network Teaming Driver, review the following information:" section display.
IBM Network Teaming Driver Configuration
This section includes information on the following topics:
•
Configuring the IBM Network Teaming Driver
•
Dissolving the IBM Network Teaming Driver
•
Uninstalling the IBM Network Teaming Driver
Configuring the IBM Network Teaming Driver
To configure the IBM Network Teaming Driver, perform the following procedure.
Before You Begin
Consider the following information:
•
Cisco uses IBM Broadcom Advanced Server Program (BASP) software to configure and modify a teaming network. BASP runs within the Broadcom Advanced Control Suite 2(BACS2).
•
No network service exists during the teaming configuration. Cisco recommends, that you configure the teaming driver during off-peak hours.
•
Cisco only supports the load balancing with failover option with two network cards, one acting as the primary and other acting as a backup. This option provides fault tolerance without load balancing. As described in the following procedure, the IBM applet only allows load balancing with failover to work with fault tolerance and does not provide a fault tolerance only option. Cisco does not support load balancing alone due to known problems with voice applications.
•
After you create a teaming virtual network card, the IP configuration for the physical network adapters gets disabled, and the TCP/IP from teaming takes over.
•
The teaming virtual network card uses the MAC address of the first physical NIC card that is up and included in the teaming members.
•
You must complete the IP address configuration for the teaming virtual network card, including the gateway information, DNS, and WINS server, that are described in the Configuring the IBM Network Teaming Driver section.
Procedure
Step 1
To start the Broadcom Advanced Control Suite 2 utility, choose Start > Programs > Broadcom > Broadcom Advanced Control Suite 2.
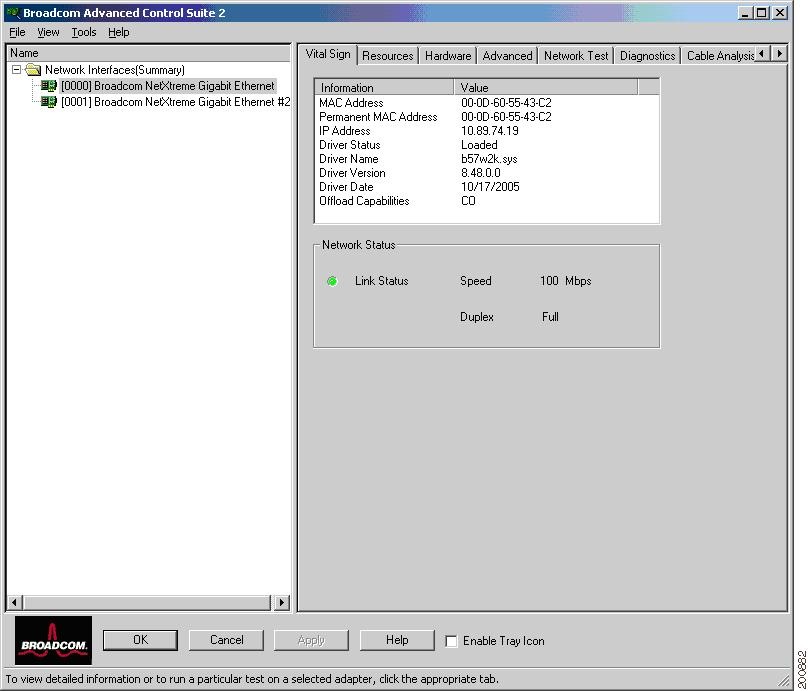
A window with the available Network Interface Cards (NIC) displays. Figure 8 shows the Broadcom Advanced Control Suite 2 with two physical network cards: Ethernet and Ethernet #2.
Figure 8 Broadcom Advanced Control Suite 2 Utility
Step 2
Right-click either Ethernet card in the list and choose Create a Team.
Step 3
On the Welcome to the Broadcom Teaming Wizard window, click Next.
Step 4
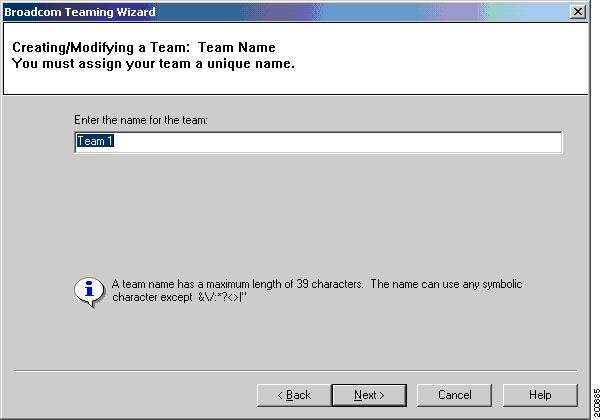
On the Creating/Modifying a Team window, enter a teaming adapter name in the Enter the name for the team field, or leave the default name "Team 1," as shown in Figure 9. Then, click Next.
Figure 9 Entering a Team Name
Step 5
Choose the Smart Load Balancing and Failover radio button and click Next.
Step 6
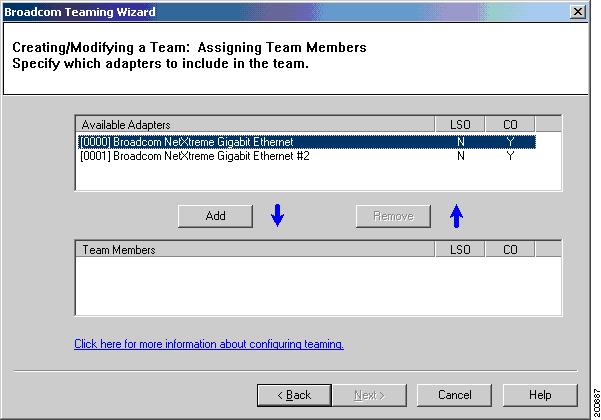
The Assigning Team Members window displays the available network cards. Choose Gigabit Ethernet and click Add, as shown in Figure 10.
Figure 10 Assigning Team Members
Step 7
When the warning message show in Figure 11 displays, click Yes.
Figure 11 Warning Message
Step 8
To add the second Ethernet to the list of teaming members, repeat Step 6 and Step 7.
Step 9
To continue creating the team, click Next on the Assigning Team Members window.
Step 10
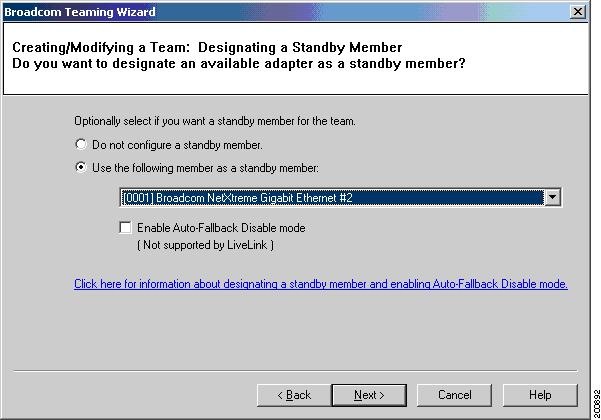
On the Designating a Standy Member window, choose the Use the following member as standby member radio button and choose the second Ethernet controller from the drop-down list box, as shown in Figure 12.
Figure 12 Designating a Standby Member
Step 11
Click Next.
Step 12
On the Configuring Live Link window, keep the default setting of No, and click Next.
Step 13
On the Configure VLAN Support window, choose the No radio button and click Next.
Step 14
On the Congratulations window, choose the Commit changes and return to Broadcom Advanced Control Suite 2 radio button and click Finish.
Step 15
When the message regarding temporary service interruption displays, as shown in Figure 13, click Yes.
Figure 13 Temporary Service Interruption
Step 16
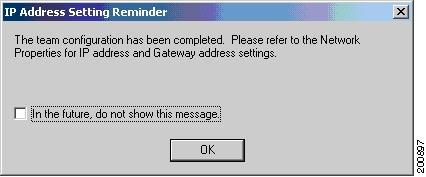
The IP Address Setting Reminder message displays, as shown in Figure 14. Click OK and continue with the IP address and gateway configuration for the virtual teaming adapter.
Figure 14 IP Address Setting Reminder
Step 17
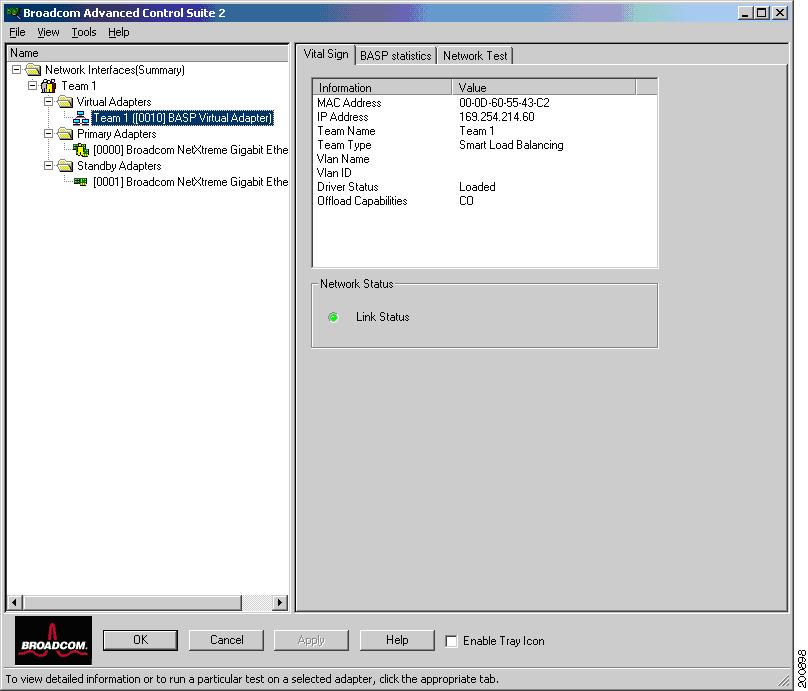
The Broadcom Advanced Control Suite 2 utility displays the teaming adapter that you configured, as shown in Figure 15. To save and exit the utility, click OK.
Figure 15 Configured Teaming Adapter
Step 18
To display the list of network adapters, including the teaming NIC virtual adapter that you configured, right-click My Network Places on desktop and choose Properties .
Step 19
On the Network and Dial-up Connections window, choose Team 1 (or the name that you gave to the teaming adapter), right-click, and choose Properties.
Step 20
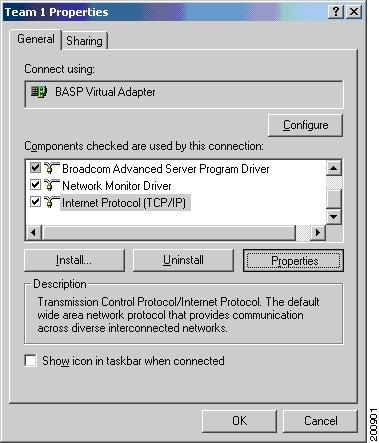
Choose the Internet protocol (TCP/IP) option and click Properties as shown in Figure 16.
Figure 16 Properties Window
Step 21
Choose the Use the following IP address radio button and enter the IP configuration information, including the gateway information, DNS, and WINS server, as you do for the physical network adapters on a Windows server. To configure the WINS server and other configuration, click the Advanced button.
Step 22
To save your settings and exit the utility, click OK on the Advanced TCP/IP Settings window and other following windows.
Dissolving the IBM Network Teaming Driver
When you dissolve the driver, you disassociate the two NICs and the virtual NIC that is used for the driver. The teaming drivers remain installed, but they no longer are configured or used.
In this case, the server uses NIC #1 only for IP telephony.
To dissolve the HP Network Teaming Driver, perform the following procedure:
Procedure
Step 1
Start the Broadcom Advanced Control Suite Utility by choosing Start > Programs >Broadcom > Broadcom Advanced Control Suite 2.
Step 2
Right-click the name of the team that you configured, such as Team #1.
Step 3
Click Delete Team.
Step 4
Click OK.
Step 5
Click Yes to the message regarding network disruption.

Uninstalling the IBM Network Teaming Driver
When you uninstall the IBM Network Teaming Driver, you delete the drivers from the server. The server uses only NIC #1 for IP telephony.
To uninstall the IBM Network Teaming Driver, perform the following procedure:
Procedure
Step 1
Right-click My Network Places and choose Properties.
Step 2
Right-click any active network card connection and click Properties.
Step 3
Choose IBM Broadcom Advanced Server Program Driver and click Uninstall.
Step 4
To uninstall the driver, click Yes.
Step 5
For the changes to take effect, click Yes to reboot the server.
Step 6
After the server reboots, disable the second NIC.
CautionFailing to disable the second NIC may result in two IP addresses being assigned to the server. Assigning two IP addresses to the Cisco Unified CallManager server may cause a loss of service.
Troubleshooting the Network Teaming Driver
After you configure the Network Teaming Driver and install Cisco Unified CallManager, you might encounter a Service Control Manager message, such as "At least one service or driver failed during system startup. Use Event Viewer to examine the event log for details." To resolve this problem, perform the following procedure:
Procedure
Step 1
Open the Event Viewer by choosing Start > Programs > Administrative Tools > Event Viewer.
Step 2
Select System Log.
Step 3
To find an occurrence of the following entry around the time of the error, browse the System Log:
•
Source entry—Service Control Manager
•
Event ID—7000
Step 4
To open the Event Properties window, double-click Service Control Manager.
The following description displays:
The HP Network Configuration Utility service failed to start due to the following error:
The service cannot be started, either because it is disabled or because it has enabled
devices associated with it.
Step 5
Navigate to the C:\Utils\DualNIC folder and double-click Teaming-CDP.cmd.
The utility runs for a few seconds. The fix takes effect without rebooting the server.
After the next reboot of the server, this message no longer displays.
Obtaining Documentation
For information on obtaining documentation, submitting a service request, and gathering additional information, see the monthly What's New in Cisco Product Documentation, which also lists all new and revised Cisco technical documentation, at:
http://www.cisco.com/en/US/docs/general/whatsnew/whatsnew.html
Subscribe to the What's New in Cisco Product Documentation as a Really Simple Syndication (RSS) feed and set content to be delivered directly to your desktop using a reader application. The RSS feeds are a free service and Cisco currently supports RSS version 2.0.
Cisco Product Security Overview
This product contains cryptographic features and is subject to United States and local country laws governing import, export, transfer and use. Delivery of Cisco cryptographic products does not imply third-party authority to import, export, distribute or use encryption. Importers, exporters, distributors and users are responsible for compliance with U.S. and local country laws. By using this product you agree to comply with applicable laws and regulations. If you are unable to comply with U.S. and local laws, return this product immediately.
Further information regarding U.S. export regulations may be found at http://www.access.gpo.gov/bis/ear/ear_data.html.
CCVP, the Cisco logo, and Welcome to the Human Network are trademarks of Cisco Systems, Inc.; Changing the Way We Work, Live, Play, and Learn is a service mark of Cisco Systems, Inc.; and Access Registrar, Aironet, Catalyst, CCDA, CCDP, CCIE, CCIP, CCNA, CCNP, CCSP, Cisco, the Cisco Certified Internetwork Expert logo, Cisco IOS, Cisco Press, Cisco Systems, Cisco Systems Capital, the Cisco Systems logo, Cisco Unity, Enterprise/Solver, EtherChannel, EtherFast, EtherSwitch, Fast Step, Follow Me Browsing, FormShare, GigaDrive, HomeLink, Internet Quotient, IOS, iPhone, IP/TV, iQ Expertise, the iQ logo, iQ Net Readiness Scorecard, iQuick Study, LightStream, Linksys, MeetingPlace, MGX, Networkers, Networking Academy, Network Registrar, PIX, ProConnect, ScriptShare, SMARTnet, StackWise, The Fastest Way to Increase Your Internet Quotient, and TransPath are registered trademarks of Cisco Systems, Inc. and/or its affiliates in the United States and certain other countries.
All other trademarks mentioned in this document or Website are the property of their respective owners. The use of the word partner does not imply a partnership relationship between Cisco and any other company. (0711R)
Copyright © 2008. Cisco Systems, Inc.
All rights reserved.


