Feedback Feedback
|
Table Of Contents
Upgrading Cisco CallManager Release 3.1(4b)
Locating Related Cisco CallManager Documentation
Frequently Asked Questions about the Cisco CallManager Upgrade
From which versions of Cisco CallManager can I upgrade to Cisco CallManager Release 3.1(4b)?
How long does it take to upgrade a cluster?
Which server in the cluster do I upgrade first?
Will I experience call-processing interruptions and a loss of services during the upgrade?
May I use Terminal Services to remotely upgrade the cluster?
What tasks should I perform before I upgrade the cluster?
What additional information should I know before I upgrade?
What tasks should I perform after the upgrade?
Obtaining Device Default Load Information for Cisco CallManager Release 3.0
Backing Up Cisco CallManager Data and Preserving the Hard Drives
Performing the Cisco CallManager Release 3.1 Upgrade
Upgrading the BIOS and Operating System via CD-ROM
Upgrading the BIOS and Operating System via the Web
Upgrading Cisco CallManager via CD-ROM or the Web
Changing the Password for the SQLSvc Account
Verifying Services, Patches, and Hotfixes
Viewing the Component Versions Installed on the Server
Drive Mirroring for the MCS-7830, MCS-7835, IBM xSeries 340 or 342 Server
Configuring Cisco MOH Audio Translator and Cisco TFTP
Using the Cisco CallManager Attendant Console
Upgrading TAPI, JTAPI, and Cisco Unity-CM Telephony Service Provider (TSP)
Upgrading the Cisco TAPI/TSP for Cisco SoftPhone
Upgrading the Cisco WebAttendant Client
Using the Cisco CallManager Music On Hold Download
Reverting to the Previous Configuration after an Upgrade Attempt
Reverting a 3.1 Cisco Device Load to a 3.0 Cisco Device Load
Reconfiguring the MCS-7830, MCS-7835, IBM xSeries 340 or 342 Server After an Upgrade Attempt
Reverting the Hard Drive After Driving Mirroring Completes
Reverting Upgraded Cisco IP Telephony Applications After You Revert Cisco CallManager
Obtaining Technical Assistance
Upgrading Cisco CallManager Release 3.1(4b)
This document provides reference and procedural information for upgrading the Cisco CallManager cluster. For more information on Cisco CallManager or for information on Cisco IP telephony applications, see the "Locating Related Cisco CallManager Documentation" section.
Contents
This document contains the following topics:
Pre-Upgrade Tasks
•
Locating Related Cisco CallManager Documentation
•
–
–
–
–
–
–
–
–
•
•
Upgrade Tasks
•
•
•
Post-Upgrade Tasks
•
•
•
•
•
•
•
•
•
•
Reversion Tasks
•
•
•
•
Obtaining Assistance
•
Conventions
Consider the following documentation conventions as you review this upgrade document:
Note
Caution
Locating Related Cisco CallManager Documentation
Cisco strongly recommends that you review the following documents before you upgrade:
•
Cisco provides versions of this document that match the version of the upgrade document.
•
To ensure continued functionality with interfacing Cisco IP telephony applications after the Cisco CallManager upgrade, refer to the Cisco CallManager Compatibility Matrix, which provides release information and workarounds for applications that are integrated with Cisco CallManager.
Affected applications may include Cisco Conference Connection, Cisco SoftPhone, Cisco uOne, Cisco 186 Analog Telephony Adapter, Cisco WebAttendant, Cisco Personal Assistant, Cisco Customer Response Applications (CRA), Telephony Application Programming Interface and Java Telephony Application Programming Interface (TAPI/JTAPI) applications, including Cisco- provided and third-party applications, and Cisco Telephony Service Provider (TSP).
This document provides specific information, including compatibility and upgrading guidelines, for Cisco IP Contact Center (IPCC) systems. If you use Cisco CallManager and related Cisco IP telephony applications in a call-center environment, review this document before you begin any upgrade procedures.
•
This document describes how to back up Cisco CallManager data and restore the Cisco IP Telephony Applications Server and Cisco CallManager data.
•
Locate the release notes, installation/upgrade, and configuration guides for the applications that you have integrated with Cisco CallManager.
You can navigate to the appropriate Cisco CallManager documentation by clicking the following URL:
http://www.cisco.com/univercd/cc/td/doc/product/voice/c_callmg/index.htm
Frequently Asked Questions about the Cisco CallManager Upgrade
Review the following questions and corresponding responses before you upgrade.
From which versions of Cisco CallManager can I upgrade to Cisco CallManager Release 3.1(4b)?
Cisco supports upgrading to Cisco CallManager Release 3.1(4b), a full version of Cisco CallManager, from Cisco CallManager Releases 3.0(12) or any version of Cisco CallManager Release 3.1. To verify whether other versions of Cisco CallManager are compatible for upgrade, click the following URL to refer to the Cisco CallManager Compatibility Matrix, which provides compatibility information and workarounds for applications integrated with Cisco CallManager:
http://www.cisco.com/univercd/cc/td/doc/product/voice/c_callmg/index.htm
If your server runs Cisco CallManager Release 2.4, you must upgrade to the latest version of Cisco CallManager Release 3.0 before you can upgrade to a version of Cisco CallManager Release 3.1.
How long does it take to upgrade a cluster?
Cisco strongly recommends that you perform all upgrade procedures for the Cisco CallManager and Cisco IP telephony applications within a consecutive time period (within one maintenance window) and that you allot adequate time to perform the upgrade. Cisco strongly recommends that you perform the entire upgrade during off-peak hours.
Before you perform an upgrade, consider the time that it takes to perform pre-/post-upgrade tasks and Cisco IP telephony application upgrades.
Many factors, such as the size of the Cisco CallManager or call detail records (CDR) database or the number of Cisco IP telephony applications integrated with Cisco CallManager, affect the time that it takes to upgrade the cluster.
Upgrade Consideration: Allotting Time to Upgrade Cisco CallManager
If you have three servers with 900 devices and no CDRs, the upgrade process takes approximately 3 hours to upgrade Cisco CallManager (excluding Cisco IP telephony application upgrades). The size of your Cisco CallManager or CDR database may increase the time that it takes to complete the upgrade process.
Which server in the cluster do I upgrade first?
Caution
You must upgrade all the servers in the cluster. See Table 1, which describes the upgrade order for the following cluster configurations:
•
•
Table 1 Cluster Upgrade Order
Step 1
Upgrade the publisher database server. The "Performing the Cisco CallManager Release 3.1 Upgrade" section provides the upgrade procedure for all servers.
When you perform an upgrade, the Cisco CallManager service automatically stops, and the devices homed to the publisher fail over to the subscriber.
Upgrade the publisher database server. The "Performing the Cisco CallManager Release 3.1 Upgrade" section provides the upgrade procedure for all servers.
Step 2
Upgrade the subscriber.
Upgrade the Cisco TFTP server, if it exists separately from the publisher database server.
Step 3
You completed the Cisco CallManager upgrade. Perform post-upgrade tasks.
Upgrade servers that have only Cisco CallManager-related applications (Music on Hold, Cisco IP Media Streaming Application, Cisco Customer Response Applications, etc.) running on them.
Make sure that the Cisco CallManager service does not run on these servers.
Upgrade Consideration: Simultaneously Upgrading Backup Servers and Application Servers in the Cluster
If you choose to do so, you can upgrade the backup server(s) and Cisco CallManager-related application servers at the same time. Before you attempt to perform the upgrades, consider the number of people that are needed to complete the tasks.
Step 4
Not applicable
Upgrade the backup servers.
Upgrade Consideration: Oversubscribing the Backup Servers
If you choose to oversubscribe the backup server(s) during the upgrade, Cisco strongly recommends that you have no more than 5,000 devices registered to the backup server during the upgrade and that you oversubscribe the backup server(s) for no more than a few hours. Cisco strongly recommends that you perform the upgrade during off-peak hours when low call volume occurs (less than 1,000 busy hour call attempts).
Upgrade Consideration: Registering All Devices to the Same Version of Cisco CallManager
If you configured your Cisco CallManager cluster using approved Cisco configuration standards, which include configuring four primary servers and two backup servers in the cluster, you can minimize call-processing interruptions if you register all devices to servers that are running the same version of Cisco CallManager during the entire upgrade process; i.e., you register all devices to the backup Cisco CallManager servers or the primary Cisco CallManager servers, but not to both types of servers.
Step 5
Not applicable
Upgrade the primary servers that have the Cisco CallManager service running on them.
Caution
How does the upgrade work?
Using this document, you can upgrade the operating system, BIOS, and Cisco CallManager via CD-ROM or the web. To upgrade via CD-ROM, locate the Cisco IP Telephony Server Operating System OS/BIOS Upgrade CD-ROM (CD #2) and the appropriate version of the Cisco CallManager 3.1 Installation and Recovery CD-ROM.
When you upgrade the operating system via the Cisco IP Telephony Server Operating System OS/BIOS Upgrade CD-ROM (CD #2) or the web, the upgrade automatically accomplishes the following tasks:
Installations
•
–
–
–
–
–
–
–
•
–
–
–
•
–
–
•
–
–
•
Caution
•
•
For a current list of Window 2000 hotfixes, refer to the Cisco IP Telephony BIOS and Operating System Version Roadmap by clicking the following URL:
http://www.cisco.com/univercd/cc/td/doc/product/voice/c_callmg/osbios.htm
•
Windows 2000 Service Pack 2 detects the previous installation, changes the system to 128-bit encryption, and includes hotfixes for virtual memory management. It will not install if it detects a previous installation of Windows 2000 Service Pack 2.
•
It will not install if it detects a previous installation.
Updates
•
•
•
•
•
•
•
•
•
•
•
Deletions
•
•
•
•
•
After you upgrade the operating system, you upgrade Cisco CallManager. Table 2 describes the components that you can activate if the CallManager Components window displays.
Cisco CallManager places services in a stopped state until the upgrade completes. After the upgrade completes, the services activate and start after the server reboots. For information on starting and stopping services, refer to the Cisco CallManager Serviceability Administration Guide or to online help in the Cisco CallManager application.
Will I experience call-processing interruptions and a loss of services during the upgrade?
When you upgrade a cluster, you have two separate versions of Cisco CallManager running in the cluster at the same time. Be aware that the different Cisco CallManager versions running in the cluster will not interact, causing call-processing interruptions to occur.
If you configured your Cisco CallManager cluster by using approved Cisco configuration standards, which include configuring four primary servers and two backup servers in the cluster, you can minimize call-processing interruptions if you register all devices to servers that are running the same version of Cisco CallManager during the entire upgrade process; i.e., you register all devices to the backup Cisco CallManager servers or the primary Cisco CallManager servers, but not to both types of servers.
Cisco CallManager places services in a stopped state until the upgrade completes. After the upgrade completes, the services activate and start after the server reboots. For information on starting and stopping services, refer to the Cisco CallManager Serviceability Administration Guide or to online help in the Cisco CallManager application.
May I use Terminal Services to remotely upgrade the cluster?
Cisco installs Terminal Services, so Cisco Technical Assistance Center (TAC) can perform remote administration and troubleshooting tasks. Cisco does not support upgrades through Terminal Services.
What tasks should I perform before I upgrade the cluster?
Before you begin the upgrade, complete the following tasks that are described in Table 3:
Table 3 Pre-Upgrade Tasks
Verify that you can upgrade from the Cisco CallManager version that you currently run in the cluster.
For the latest information on compatible versions of Cisco CallManager, review the Cisco CallManager Compatibility Matrix by clicking the following URL:
http://www.cisco.com/univercd/cc/td/doc/product/voice/c_callmg/index.htm
Because some versions of Cisco IP telephony applications are not compatible with Cisco CallManager, ensure that you maintain compatibility with other Cisco applications after the Cisco CallManager upgrade.
If compatibility does not exist when Cisco CallManager 3.1(4b) releases, Cisco recommends that you wait to upgrade until compatibility exists.
Refer to the following documentation:
•
•
•
If you have not previously upgraded your Cisco CallManager 3.0 system to a 3.1 release, write down the default load information for all devices that are associated with your current Cisco CallManager 3.0 system.
See the "Obtaining Device Default Load Information for Cisco CallManager Release 3.0" section.
See the "Reverting a 3.1 Cisco Device Load to a 3.0 Cisco Device Load" section.
Purge any unused call detail records (CDRs) to prevent timeout of the upgrade and to reduce upgrade time. Cisco recommends storing no more than1.5 million CDRs in the database.
Refer to the Cisco CallManager Serviceability Administration Guide.
Back up your Cisco CallManager data, and, if applicable, preserve the hard drives.
See the "Backing Up Cisco CallManager Data and Preserving the Hard Drives" section.
Make note of your system configuration. Consider the number and type of devices, Cisco IP telephony applications, and various services that are running on the servers.
For more information on devices and services, refer to the latest version of the Cisco CallManager System Guide and the Cisco CallManager Administration Guide.
Refer to the documentation that accompanies your Cisco IP telephony applications.
Download hotfixes and service packs that affect the upgrade.
For more information, review the Cisco IP Telephony BIOS and Operating System Roadmap. To obtain the document, click the following URL:
http://www.cisco.com/univercd/cc/td/doc/product/voice/c_callmg/osbios.htm
After you review the document, perform the following procedure: Click http://www.cisco.com/public/sw-center/sw-voice.shtml. Choose Cisco CallManager Version 3.1 > Download...CallManager Cryptographic Software... > Download Cisco 3DES Cryptographic Software under export licensing controls; download the latest Microsoft patches and hotfixes.
Through the Control Panel, set all Cisco-approved McAfee antivirus services to Disabled. You can enable all antivirus services after you complete the upgrade.
To disable and enable the services, see the following sections:
•
•
If you have Cisco IDS Host Sensor installed on the server, you must stop the following services before the operating system upgrade:
•
•
•
•
For information on Cisco IDS Host Sensor, click the following URL:
http://www.cisco.com/warp/public/788/AVVID/ids_host_sensor_cm.htmlClose all programs before you start the upgrade.
To begin the upgrade, see "Performing the Cisco CallManager Release 3.1 Upgrade" section.
What additional information should I know before I upgrade?
Caution
Cisco strongly recommends that you do not run a web browser on the Cisco CallManager server (the server that is running the Cisco CallManager service). Running a web browser on the server causes CPU usage to surge.
Be aware that Cisco does not support third-party software that is installed on any Cisco Media Convergence Server (MCS) or customer-provided server that meet approved Cisco configuration standards.
This document assumes that all servers in your cluster are currently in an operational state.
If you have CDR Analysis and Reporting (CAR), formerly known as the Administrative Reporting Tool (ART), running on your system before the upgrade, the upgrade process automatically upgrades CAR. For more information about CAR, refer to the Cisco CallManager Serviceability Administration Guide.
If you changed the default value of a service parameter while you were running Cisco CallManager, the default value does not change during the Cisco CallManager 3.1 upgrade process. If you never changed the default value while a previous version of Cisco CallManager was running, Cisco CallManager updates the parameter value during the Cisco CallManager 3.1 upgrade to match the suggested value seen in Cisco CallManager Administration.
Unless otherwise specified in this document, all further references to the MCS-7835 apply to the MCS-7835, which contains a 733-MHz processor, the MCS-7835-1000, which contains a 1-GHz processor, the MCS-7835-1266, which contains a 1.26-GHz processor, and the customer-provided DL380. All further references to the MCS-7825 apply to the MCS-7825, which contains an 800-MHz processor, and the MCS-7825-1133, which contains a 1.13-GHz processor.
What tasks should I perform after the upgrade?
To ensure that your Cisco CallManager system and Cisco IP telephony applications function properly, Cisco strongly recommends that you review the "Performing Post-Upgrade Tasks" section.
Obtaining Device Default Load Information for Cisco CallManager Release 3.0
Caution
To obtain the device default load information that is associated with your Cisco CallManager 3.0 system, perform the following procedure:
Procedure
Step 1
Step 2
Step 3
Step 4
Note
Use Table 4 in conjunction with the "Obtaining Device Default Load Information for Cisco CallManager Release 3.0" section. Fill in the device default load information for Cisco CallManager Release 3.0. The first four digits of an eight-digit load have been inserted for you. Make sure to file this information after you complete the table.
Backing Up Cisco CallManager Data and Preserving the Hard Drives
After you write down the device default load information, you perform the backup. Cisco CallManager comes with the Cisco IP Telephony Applications Backup Utility. This utility provides a reliable and convenient way to perform regularly scheduled, automatic backups of Cisco CallManager data.
Note
Perform the following steps to back up Cisco CallManager data and preserve the hard drives:
Procedure
Step 1
For instructions on backing up Cisco CallManager data, refer to latest version of Backing Up and Restoring Cisco CallManager Release 3.1 or the Cisco CallManager installation guide that matches your Cisco CallManager installation CD-ROM.
Step 2
Step 3
Step 4
Step 5
Step 6
Step 7
Step 8
Step 9
a.
b.
Note
For the customer-provided IBM xSeries 340 or 342 server, choose Start > Programs > ServeRaid Manager> ServeRaid Manager.
c.
Step 10
Step 11
Performing the Cisco CallManager Release 3.1 Upgrade
Note
After you finish the Cisco IP Telephony Applications backup, you choose to upgrade via the web or CD-ROM. The following sections apply to the upgrade:
•
•
•
•
Upgrading the BIOS and Operating System via CD-ROM
Using the Cisco IP Telephony Server Operating System OS/BIOS Upgrade CD-ROM (CD #2), upgrade the BIOS and the operating system by completing the following steps:
Procedure
Step 1
Step 2
Step 3
Step 4
Step 5
a.
b.
c.
d.
e.
f.
Step 6
•
•
•
•
Step 7
Step 8
Step 9
Step 10
To continue the upgrade, see the "Upgrading Cisco CallManager via CD-ROM or the Web" section.
Upgrading the BIOS and Operating System via the Web
Before you upgrade the BIOS and operating system on your Cisco CallManager server, click http://www.cisco.com/univercd/cc/td/doc/product/voice/c_callmg/osbios.htm to review the latest Cisco-supported BIOS and operating system files that are available for web download.
Via the web, upgrade the BIOS and the operating system by completing the following steps:
Procedure
Step 1
a.
b.
c.
d.
e.
f.
Step 2
•
•
•
•
Step 3
http://www.cisco.com/warp/public/779/largeent/avvid/products/infrastructure.html; then, go to Step 5.
Step 4
a.
b.
c.
http://www.cisco.com/univercd/cc/td/doc/product/voice/c_callmg/osbios.htm
d.
e.
f.
g.
h.
Note
i.
j.
Step 5
a.
b.
http://www.cisco.com/univercd/cc/td/doc/product/voice/c_callmg/osbios.htm
c.
d.
e.
f.
g.
Step 6
Step 7
Caution
To continue the upgrade, see the "Upgrading Cisco CallManager via CD-ROM or the Web" section.
Installing SQL Service Pack 4
Perform the following procedure on all servers in the cluster; make sure that you close all programs before performing the procedure.
Procedure
Step 1
Step 2
Step 3
Step 4
Step 5
Step 6
Step 7
Step 8
Step 9
Step 10
Upgrading Cisco CallManager via CD-ROM or the Web
Via CD-ROM or the web, perform the upgrade by completing the following steps:
Procedure
Step 1
a.
b.
c.
d.
e.
f.
Step 2
•
•
•
•
Step 3
a.
b.
c.
d.
e.
Step 4
Step 5
Step 6
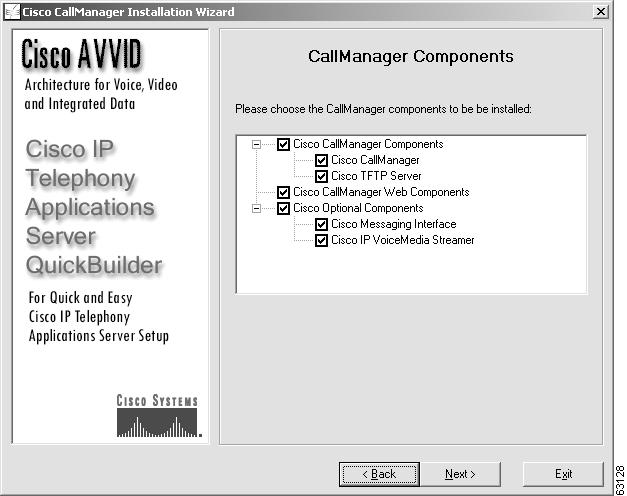
Figure 1 shows an example of the CallManager Components window.
Figure 1 CallManager Components Window
Choose the services that you want to activate; then, click Next.
To add or remove services after you complete the upgrade, refer to the "Activating Cisco CallManager Services" section in the latest version of Installing Cisco CallManager Release 3.1.
Note
Note
Step 7
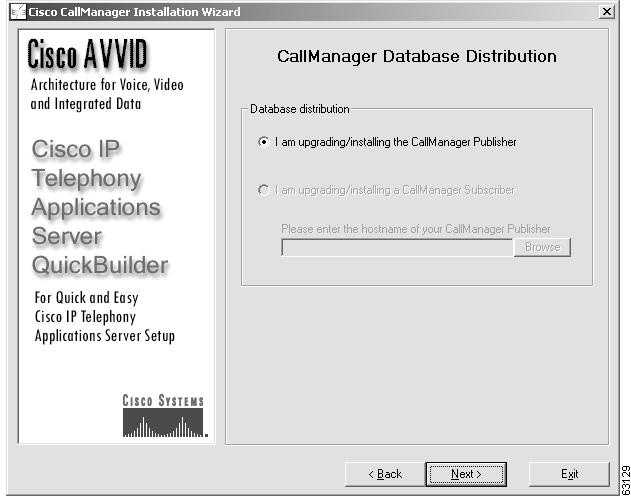
Figure 2 demonstrates Cisco CallManager autodetection of the publisher.
Figure 2 Cisco CallManager Publisher Autodetection
If a publisher database already exists and you are configuring a subscriber database server, Cisco CallManager automatically chooses I am upgrading/installing the CallManager Subscriber. By default, the publisher database server that is associated with the subscriber displays in the hostname publisher field. You may choose another publisher by clicking Browse. After you choose the appropriate publisher, click Next and go to Step 8.
Step 8
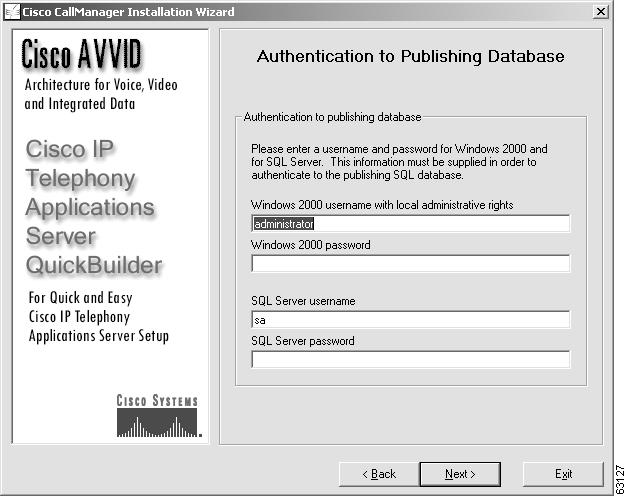
Figure 3 shows an example of the authentication window.
Figure 3 Authentication to Publishing Database Window
Step 9
Note
Step 10
Step 11
Step 12
Step 13
a.
b.
c.
d.
e.
f.
g.
Step 14
•
•
•
•
Step 15
Step 16
Performing Post-Upgrade Tasks
After you complete the upgrade, perform the appropriate tasks as described in Table 5:
Table 5 Post-Upgrade Tasks
If you choose to do so, change the SQLSvc password on all servers in the cluster.
See the "Changing the Password for the SQLSvc Account" section.
If you need to do so, upgrade the Cisco IP telephony applications that are integrated with your Cisco CallManager system.
Refer to the Cisco CallManager Compatibility Matrix by clicking the following URL:
http://www.cisco.com/univercd/cc/td/doc/product/voice/c_callmg/index.htm
Refer to the appropriate Cisco IP telephony application documentation.
Verify that all services started. Verify that you can place and receive a call across gateways. Verify that all Cisco IP telephony applications that are integrated with Cisco CallManager run properly.
Make note of the number of devices that you support in the Cisco CallManager cluster.
See the "Verifying Services, Patches, and Hotfixes" section.
See the "Viewing the Component Versions Installed on the Server" section.
Refer to the Cisco CallManager Compatibility Matrix, which provides compatibility information and workarounds for applications that are integrated with Cisco CallManager.
Download hotfixes and service packs that are available on the web.
Refer to the Cisco CallManager Compatibility Matrix.
After you review the document, click http://www.cisco.com/public/sw-center/sw-voice.shtml. Choose Cisco CallManager Version 3.1 > Download...CallManager Cryptographic Software... > Download Cisco 3DES Cryptographic Software under export licensing controls; download Microsoft patches and hotfixes.
If you run Cisco TFTP service and the Cisco MOH Audio Translator service on two separate servers in the cluster, you must ensure that the server with the Cisco MOH Audio Translator service can access and has write privileges to the server where the Cisco TFTP service runs.
See the "Configuring Cisco MOH Audio Translator and Cisco TFTP" section.
Cisco strongly recommends that you download and use the Cisco CallManager Attendant Console.
For more information on this product, see the "Using the Cisco CallManager Attendant Console" section.
If you need to do so, upgrade Cisco TAPI, Cisco JTAPI, Cisco TSP (for the voice-mail system), the Cisco TSP for Cisco SoftPhone, and the plugin for the Cisco WebAttendant client.
See the following sections for more information:
•
•
•
Refer to Cisco CallManager Compatibility Matrix.
If you have not already done so, set all Cisco-approved McAfee antivirus services to Enable through the Control Panel.
See Step 13 of the "Upgrading Cisco CallManager via CD-ROM or the Web" section.
If you have Cisco IDS Host Sensor installed on the server, you must start the following services after the upgrade:
•
•
•
•
For information on Cisco IDS Host Sensor, click the following URL:
http://www.cisco.com/warp/public/788/AVVID/ids_host_sensor_cm.htmlInstall an additional set of Music on Hold selections.
See the "Using the Cisco CallManager Music On Hold Download" section.
Back up your Cisco CallManager data; if applicable, preserve the hard drives.
See the "Backing Up Cisco CallManager Data and Preserving the Hard Drives" section.
Refer to Backing Up and Restoring Cisco CallManager 3.1.
Changing the Password for the SQLSvc Account
The Cisco CallManager installation creates the SQLSvc account. At installation, the account receives a unique and encrypted default password that is unique to the cluster. This identical password applies on all servers in the cluster because the servers use the SQLSvc account as the core account for server-to-server interaction in the Cisco CallManager system. If you decide to change the password, make sure that the password for the SQLSvc account is identical on all servers in the cluster.
Caution
Changing the password for the SQLSvc account includes performing the following tasks:
•
•
•
•
Procedure
Step 1
Step 2
Step 3
Step 4
Step 5
Step 6
Step 7
Step 8
Step 9
Step 10
Step 11
Step 12
Step 13
Step 14
Step 15
Step 16
Step 17
Step 18
Step 19
Verifying Services, Patches, and Hotfixes
To confirm that the upgrade completed successfully, verify that all services that are listed in your Services window are running. Choose Start > Programs > Administrative Tools > Services and verify the following services:
•
•
•
•
•
•
•
Depending on which services you have installed on your system, some services shown in the preceding list may not appear in your Services window.
Verify that you have the latest Microsoft patches and hotfixes running on your system. QFECheck, a program that was created by Microsoft, verifies the hotfixes that are installed on the Windows 2000 operating system. To obtain QFECheck, you must download the appropriate service pack after the upgrade; refer to the Cisco IP Telephony BIOS and Operating System Roadmap for more information. For information on using QFECheck, contact the software manufacturer.
Viewing the Component Versions Installed on the Server
The stiver.exe program reports the current version of all installation components, including such components as the operating system, upgrade, and backup and restore utility. Be aware that Cisco does not report the actual Cisco CallManager version through this program. Recognize that most of these components, which are run from the installation CD-ROMs during the initial installation, no longer exist on the system.
The version for OS Image equals your operating system CD-ROM version number. The version of OS Image will change only if you do a new installation with the Cisco IP Telephony Server Operating System Hardware Detection CD-ROM (CD #1).
The version for stiOSUpg.exe equals the version of the operating system upgrade that you last ran either via CD-ROM or via the web. When Cisco updates and releases the Cisco IP Telephony Server Operating System OS/BIOS Upgrade CD-ROM (CD #2), the version of stiOSUpg changes.
Perform the following procedure to view the component versions that are installed on the server:
Procedure
Step 1
C:\sti\stiver
Step 2
Drive Mirroring for the MCS-7830, MCS-7835, IBM xSeries 340 or 342 Server
Perform the following procedure only if you did not use a spare hard drive during the backup of Cisco CallManager data. Make sure that the system functions properly before performing the following procedure. Run your Cisco CallManager system for several days to verify that no problems exist. After you verify the services, you must reinsert the hard drives that you removed prior to installation.
To reinsert the hard drives, complete the following steps:
Note
Procedure
Step 1
Step 2
a.
For the customer-provided IBM xSeries 340 or 342 servers, choose Start > Programs > ServeRaid Manager> ServeRaid Manager.
b.
Step 3
Configuring Cisco MOH Audio Translator and Cisco TFTP
If you run the Cisco TFTP service and the Cisco MOH Audio Translator service on two separate servers in the cluster, perform the following configuration tasks. These tasks ensure that the server with the Cisco MOH Audio Translator can access and has write privileges to the server where the Cisco TFTP service runs.
Note
Procedure
Step 1
Step 2
Step 3
Step 4
Step 5
Step 6
Step 7
Step 8
Step 9
Step 10
Step 11
a.
b.
c.
d.
e.
f.
g.
h.
i.
j.
k.
l.
Step 12
Note
Step 13
Step 14
Step 15
Step 16
Step 17
For more information about the Cisco Music On Hold Audio Translator and Cisco TFTP services, refer to the Cisco CallManager Administration Guide and the Cisco CallManager System Guide.
Using the Cisco CallManager Attendant Console
Cisco strongly recommends that you download and use the Cisco CallManager Attendant Console with this version of Cisco CallManager.
Like Cisco WebAttendant, Cisco CallManager Attendant Console, a client-server application, allows you to set up Cisco IP phones as attendant consoles. Employing a graphical user interface, the attendant console uses speed-dial buttons and quick directory access to look up phone numbers, monitor line status, and direct calls. A receptionist or administrative assistant can use the attendant console to handle calls for a department or company, or another employee can use it to manage his own telephone calls.
The attendant console installs on a PC with IP connectivity to the Cisco CallManager system. The attendant console works with a Cisco IP phone that is registered to a Cisco CallManager system (one attendant console for each phone that will be used as an attendant console). Multiple attendant consoles can connect to a single Cisco CallManager system.
The application registers with and receives call-dispatching services from the Cisco Telephony Call Dispatcher (TCD) services on the Cisco CallManager.
For information on downloading and using Cisco CallManager Attendant Console, refer to the latest versions of the following documentation:
•
•
Upgrading TAPI, JTAPI, and Cisco Unity-CM Telephony Service Provider (TSP)
You must upgrade the Telephony Application Programming Interface and Java Telephony Application Programming Interface (TAPI/JTAPI) client software on any application server or client workstation on which TAPI/JTAPI applications are installed. If you do not upgrade the TAPI/JTAPI client, your application will fail to initialize.
The following information applies if you have integrated a Cisco Unity system with Cisco CallManager. TSP makes the voice-mail ports available to Cisco Unity. To ensure that Cisco Unity integrates properly with Cisco CallManager, you may need to upgrade the Cisco Unity TSP that is associated with the voice-mail system. To ensure that you upgrade to the appropriate Cisco Unity TSP release, refer to the Cisco CallManager Compatibility Matrix.
Upgrading the Cisco TAPI/TSP for Cisco SoftPhone
Perform the following procedure to upgrade the Cisco SoftPhone TAPI/TSP to the version that is stated in the Cisco CallManager Compatibility Matrix.
Procedure
Step 1
Tip
Step 2
Step 3
Step 4
Step 5
Upgrading the Cisco WebAttendant Client
Perform the following procedure to upgrade the Cisco Telephony Call Dispatcher /Cisco WebAttendant to the version that is stated in the Cisco CallManager Compatibility Matrix:
Procedure
Step 1
Tip
Step 2
Step 3
Step 4
Step 5
Using the Cisco CallManager Music On Hold Download
Note
When you initially install Cisco CallManager on your server, a default music on hold audio file sample automatically installs for customer use. To increase your music on hold (MOH) selection, you may download one of the following two files via the web:
•
•
For information on the MOH feature, refer to the latest version of the Cisco CallManager Administration Guide and the latest version of the Cisco CallManager System Guide.
As a Cisco CallManager user, you can use any of the contents of the CD-ROM/files with music on hold. Because of licensing restrictions, you must not distribute the Cisco CallManager Music on Hold CD-ROM/files to anyone else, and you must not use it for any other purpose.
Reverting to the Previous Configuration after an Upgrade Attempt
In the unlikely event of an upgrade failure, or if you prefer an earlier version of Cisco CallManager, perform the following steps to return the Cisco IP Telephony Applications Server to the configuration that was in effect prior to the upgrade.
Reverting a 3.1 Cisco Device Load to a 3.0 Cisco Device Load
Caution
If you want to revert from Cisco CallManager Release 3.1 to Cisco CallManager Release 3.0, perform the following procedure:
Procedure
Step 1
Step 2
Step 3
Step 4
Step 5
To continue the reversion, see the "Reconfiguring the MCS-7820, MCS-7822, MCS-7825, MCS-7815-1000, or IBM xSeries 330 Server After an Upgrade Attempt" section or the "Reconfiguring the MCS-7830, MCS-7835, IBM xSeries 340 or 342 Server After an Upgrade Attempt" section for information on how to reconfigure your server.
Reconfiguring the MCS-7820, MCS-7822, MCS-7825, MCS-7815-1000, or IBM xSeries 330 Server After an Upgrade Attempt
To reconfigure the MCS-7820, MCS-7822, MCS-7825, or IBM xSeries 330 server after an upgrade attempt, perform the following procedure:
Procedure
Step 1
http://www.cisco.com/univercd/cc/td/doc/product/voice/c_callmg/index.htm
Step 2
Note
Step 3
Reconfiguring the MCS-7830, MCS-7835, IBM xSeries 340 or 342 Server After an Upgrade Attempt
To reconfigure the MCS-7830, MCS-7835, or IBM xSeries 340 or 342 server after an upgrade attempt, perform the following procedure:
Procedure
Step 1
Step 2
Step 3
Step 4
Step 5
Step 6
Step 7
Step 8
Reverting the Hard Drive After Driving Mirroring Completes
If you want to revert a hard drive after drive mirroring is complete, you must remove the server from the domain and then add it back to the domain. You must have rights to join the server to the domain before you perform this procedure.
Procedure
Step 1
Step 2
Step 3
Step 4
Step 5
Step 6
Step 7
Step 8
Step 9
Step 10
Step 11
Reverting Upgraded Cisco IP Telephony Applications After You Revert Cisco CallManager
If you reverted the cluster to a previous version of Cisco CallManager, you must revert upgraded Cisco IP telephony applications that are integrated with Cisco CallManager to the appropriate version that is compatible with the reverted Cisco CallManager. To revert the application, perform the following procedure:
Procedure
Step 1
Step 2
Step 3
Tip
Step 4
Step 5
•
•
•
Step 6
Obtaining Documentation
The following sections explain how to obtain documentation from Cisco Systems.
World Wide Web
You can access the most current Cisco documentation on the World Wide Web at the following URL:
Translated documentation is available at the following URL:
http://www.cisco.com/public/countries_languages.shtml
Documentation CD-ROM
Cisco documentation and additional literature are available in a Cisco Documentation CD-ROM package, which is shipped with your product. The Documentation CD-ROM is updated monthly and may be more current than printed documentation. The CD-ROM package is available as a single unit or through an annual subscription.
Ordering Documentation
Cisco documentation is available in the following ways:
•
http://www.cisco.com/web/ordering/root/index.html.
•
http://www.cisco.com/go/subscription
•
Documentation Feedback
If you are reading Cisco product documentation on Cisco.com, you can submit technical comments electronically. Click Feedback at the top of the Cisco Documentation home page. After you complete the form, print it out and fax it to Cisco at 408 527-0730.
You can e-mail your comments to bug-doc@cisco.com.
To submit your comments by mail, use the response card behind the front cover of your document, or write to the following address:
Cisco Systems, Inc.
Attn: Document Resource Connection
170 West Tasman Drive
San Jose, CA 95134-9883We appreciate your comments.
Obtaining Technical Assistance
Cisco provides Cisco.com as a starting point for all technical assistance. Customers and partners can obtain documentation, troubleshooting tips, and sample configurations from online tools by using the Cisco Technical Assistance Center (TAC) Web Site. Cisco.com registered users have complete access to the technical support resources on the Cisco TAC Web Site.
Cisco.com
Cisco.com is the foundation of a suite of interactive, networked services that provides immediate, open access to Cisco information, networking solutions, services, programs, and resources at any time, from anywhere in the world.
Cisco.com is a highly integrated Internet application and a powerful, easy-to-use tool that provides a broad range of features and services to help you to
•
•
•
•
•
You can self-register on Cisco.com to obtain customized information and service. To access Cisco.com, go to the following URL:
Technical Assistance Center
The Cisco TAC is available to all customers who need technical assistance with a Cisco product, technology, or solution. Two types of support are available through the Cisco TAC: the Cisco TAC Web Site and the Cisco TAC Escalation Center.
Inquiries to Cisco TAC are categorized according to the urgency of the issue:
•
•
•
•
Which Cisco TAC resource you choose is based on the priority of the problem and the conditions of service contracts, when applicable.
Cisco TAC Web Site
The Cisco TAC Web Site allows you to resolve P3 and P4 issues yourself, saving both cost and time. The site provides around-the-clock access to online tools, knowledge bases, and software. To access the Cisco TAC Web Site, go to the following URL:
All customers, partners, and resellers who have a valid Cisco services contract have complete access to the technical support resources on the Cisco TAC Web Site. The Cisco TAC Web Site requires a Cisco.com login ID and password. If you have a valid service contract but do not have a login ID or password, go to the following URL to register:
http://www.cisco.com/register/
If you cannot resolve your technical issues by using the Cisco TAC Web Site, and you are a Cisco.com registered user, you can open a case online by using the TAC Case Open tool at the following URL:
http://www.cisco.com/tac/caseopen
If you have Internet access, it is recommended that you open P3 and P4 cases through the Cisco TAC Web Site.
Cisco TAC Escalation Center
The Cisco TAC Escalation Center addresses issues that are classified as priority level 1 or priority level 2; these classifications are assigned when severe network degradation significantly impacts business operations. When you contact the TAC Escalation Center with a P1 or P2 problem, a Cisco TAC engineer will automatically open a case.
To obtain a directory of toll-free Cisco TAC telephone numbers for your country, go to the following URL:
http://www.cisco.com/warp/public/687/Directory/DirTAC.shtml
Before calling, please check with your network operations center to determine the level of Cisco support services to which your company is entitled; for example, SMARTnet, SMARTnet Onsite, or Network Supported Accounts (NSA). In addition, please have available your service agreement number and your product serial number.
CCIP, the Cisco Arrow logo, the Cisco Powered Network mark, the Cisco Systems Verified logo, Cisco Unity, Follow Me Browsing, FormShare, Internet Quotient, iQ Breakthrough, iQ Expertise, iQ FastTrack, the iQ Logo, iQ Net Readiness Scorecard, Networking Academy, ScriptShare, SMARTnet, TransPath, and Voice LAN are trademarks of Cisco Systems, Inc.; Changing the Way We Work, Live, Play, and Learn, Discover All That's Possible, The Fastest Way to Increase Your Internet Quotient, and iQuick Study are service marks of Cisco Systems, Inc.; and Aironet, ASIST, BPX, Catalyst, CCDA, CCDP, CCIE, CCNA, CCNP, Cisco, the Cisco Certified Internetwork Expert logo, Cisco IOS, the Cisco IOS logo, Cisco Press, Cisco Systems, Cisco Systems Capital, the Cisco Systems logo, Empowering the Internet Generation, Enterprise/Solver, EtherChannel, EtherSwitch, Fast Step, GigaStack, IOS, IP/TV, LightStream, MGX, MICA, the Networkers logo, Network Registrar, Packet, PIX, Post-Routing, Pre-Routing, RateMUX, Registrar, SlideCast, StrataView Plus, Stratm, SwitchProbe, TeleRouter, and VCO are registered trademarks of Cisco Systems, Inc. and/or its affiliates in the U.S. and certain other countries.
All other trademarks mentioned in this document or Web site are the property of their respective owners. The use of the word partner does not imply a partnership relationship between Cisco and any other company. (0206R)
Copyright © 2002. Cisco Systems, Inc.
All rights reserved.