[an error occurred while processing this directive]

Cisco Unified Communications Manager (CallManager)

Upgrading Cisco CallManager Release 3.0(6) from the Web

 Feedback

Table Of Contents

Upgrading Cisco CallManager Release 3.0(6) from the Web

Cisco CallManager Release 3.0 Upgrade

Upgrading Cisco CallManager Release 3.0

Post-Installation Checklist

Obtaining Technical Assistance

Cisco Connection Online

Technical Assistance Center

Documentation Feedback


Upgrading Cisco CallManager Release 3.0(6) from the Web


Cisco CallManager Release 3.0(6) Upgrade is a full version of Cisco CallManager and is an upgrade of previous releases of 3.0. This upgrade should be performed on all servers in the cluster, beginning with the publisher. This document assumes that all of the servers in y our cluster are currently in an operational state. Follow all the following steps to ensure a successful install. For a complete description of Cisco CallManager, see the Cisco CallManager Administration Guide, Release 3.0. You can view this document by clicking on the following URL:

http://www.cisco.com/univercd/cc/td/doc/product/voice/c_callmg/3_0/admin_gd/admin_gd/index.htm

Cisco CallManager Release 3.0 Upgrade

For a list of new features and enhancements in Cisco CallManager Release 3.0, see the Release Notes for Cisco CallManager Release 3.0. You can view this document by clicking on the following URL:

http://www.cisco.com/univercd/cc/td/doc/product/voice/c_callmg/3_0/rel_note

Upgrading Cisco CallManager Release 3.0

Before you begin, make sure you have a good backup of the Cisco CallManager 3.0 data stored on tape or on a network directory. For instructions on backing up Cisco CallManager data, see Installing Cisco CallManager Release 3.0 on the Cisco Media Convergence Server. You can view this document by clicking on the following URL:

http://www.cisco.com/univercd/cc/td/doc/product/voice/c_callmg/3_0/install/cm30inst.htm


Note If you are running a Cisco CallManager cluster, all the servers in the cluster must be upgraded. You must perform the upgrade on the publisher server first and then on each subscriber server.


Note During the upgrade process, Cisco CallManager services are automatically stopped so that the software can be upgraded. The services are then restarted at the end of the process. Because of this brief interruption, call processing service is temporarily stopped. You should notify your users that telephone service will be interrupted during this time.


Caution This install disrupts call-processing service and requires a reboot. Close all programs before proceeding.


Caution If you are upgrading from Cisco CallManager 3.0(5a) to Cisco CallManager 3.0(6), skip to Step 21.


Note If you are upgrading Cisco CallManager on an MCS 7835 Server, you must upgrade the BIOS. If you are upgrading on any other platform, skip to Step 10.


Note The 7835-Bios-08-24-2000.exe should only be applied to 7835 servers running Cisco CallManager 3.0(4) or later. Previous versions do not require and have not been tested with the 7835 08-24-2000 BIOS.


Step 1 Obtain a formatted 1.44 MB disk.

Step 2 Download the Softpaq, 7835-BIOS-08-24-00.exe, from http://www.cisco.com/cgi-bin/tablebuild.pl/callmgr to a directory on your hard drive, and change to that directory.

Step 3 From that drive and directory, double-click 7835-BIOS-08-24-2000.

Step 4 You will be prompted to insert the formatted 1.44 MB disk into a disk drive.

Step 5 After the disk is created, you may delete the downloaded file 7835-BIOS-08-24-00.exe.

Step 6 Power off, wait 10 seconds, and power on the machine. (Windows Restart will not allow upgrade to proceed unless the machine is powered off and on again; i.e., cold boot.)

Step 7 Leave the disc in the drive, and the upgrade launches automatically.


Note Do not power off or restart during the BIOS update process. The README.TXT file located on the BIOS disk that is created using the preceding steps provides further instructions.


Step 8 Follow the prompts on the screen.

Step 9 After the BIOS update completes, remove the 1.44 MB disk and reboot your machine.


Note The following standard install for Service Pack 1 contains general enhancements and performance improvements for Windows 2000 Server. Use on all Media convergence Servers (MCS), 7820, 7822, 7830, and 7835. Apply Service Pack 1 to servers running Cisco CallManager 3.0(5a) or later. You may also apply Service Pack 1 to servers running Cisco CallManager 3.0(4); previous versions do not require, and have not been tested for, use with Service Pack 1.


Step 10 Download win-servicpack1.exe from http://www.cisco.com/cgi-bin/tablebuild.pl/callmgr and place it in a directory where you can easily find it.

Step 11 Find win-servicepack1.exe on your drive and double-click it.

Step 12 Wait while the files load to your server.

Step 13 Read and accept the license agreement.

Step 14 Select Install.

Step 15 After install completes, restart your computer for the update to take effect.

Step 16 Now you must install the Windows Virtual Memory fix.


Caution Install the Windows Virtual Memory fix after installing Service Pack 1.


Note This Windows 2000 fix enhances the way virtual memory is allocated and de-allocated. The result is a lower baseline of `used' virtual memory. Use on all Media Convergence Servers (MCS), 7820, 7822, 7830, and 7835. Apply the virtual memory fix to servers running Cisco CallManager 3.0(5a) or later. You may also apply the virtual memory fix to servers running 3.0(4); previous versions do not require and have not been tested for, use with the virtual memory fix.


Caution This install disrupts call-processing service and requires you to reboot. Close all programs before proceeding.

Step 17 Download win-virtual-memory-fix.exe from http://www.cisco.com/cgi-bin/tablebuild.pl/callmgr and place it in a directory where you can easily find it.

Step 18 Find win-virtual-memory-fix.exe on your drive and double-click it.

Step 19 Wait while the files load to your server.

Step 20 After the install completes, you must reboot your computer for the update to take effect.

Step 21 After the server you are upgrading reboots, log in to the server as the Administrator user. If the administrator user has been changed, change it back.

Step 22 Download the Cisco CallManager 3.0(6) upgrade file from http://www.cisco.com/cgi-bin/tablebuild.pl/callmgr to your hard drive. Make note of the location where you save the downloaded file.

Step 23 Double-click on the downloaded file to begin the installation.

Step 24 If the Cisco Product Activation popup window appears, click Yes.

Step 25 Click Next at the Welcome to the Cisco CallManager Installation Wizard window.

Step 26 On the CallManager Components window, select the services you wish to activate in this initial installation; then, click Next. When Cisco CallManager services are activated, they are placed in a stopped state. To start services after the installation is complete, refer to the "Control Center" chapter in the Cisco CallManager Administration Guide or to online help in the Cisco CallManager application.


Note The Cisco IP Voice Media Streamer contains the Media Termination Point (MTP) and Conference Bridge services.


Note If you are installing TFTP only, the database option will be selected automatically when you select TFTP. Database installation is required for TFTP support.


Note To add or remove services later, see the "Activating Cisco CallManager Services" section in Installing Cisco CallManager Release 3.0(6).


Step 27 If you have CiscoWorks2000 installed on a server on your network, select the Configure CiscoWorks2000 Syslog Collector checkbox and enter the domain host name in the form "myserver.mydomain.com." Otherwise, make sure the checkbox is deselected. Click Next.


Caution If you are configuring a subscriber database server, the server you are installing must be able to connect to the publishing database server before the installation can continue. This connection is necessary because the subscriber server attempts to connect to the publisher server so that the publisher database can be copied from that server to the local drive on the subscriber server. To make sure a good connection exists between the servers, issue a ping command from the subscriber server to the publisher server before you try to authenticate to it. If you are using DNS, use a fully qualified domain name (for example, `hostname.cisco.com') with the ping command. If the ping command is not successful, you must exit the installation program, fix the problem, and begin the installation process again.

Step 28 If the server you are upgrading is the publisher database, select I am upgrading/installing the CallManager Publisher. Refer to the following screen shot.

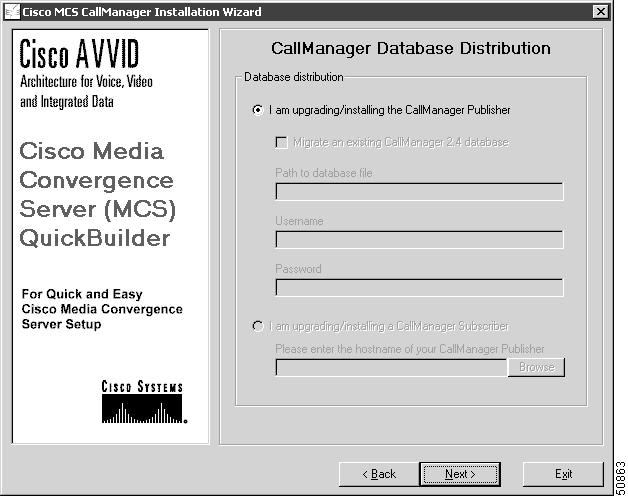
If a publisher database already exists and you are configuring a subscriber database server, select I am upgrading/installing the CallManager Subscriber and enter the computer name of the publishing database server.

Step 29 Click Next.


Note The publisher database is the master database for all servers in the cluster. All servers except the publishing database server maintain subscriber databases, which are copies of the publisher database.


Caution This upgrade utility can only be used to upgrade Cisco CallManager Release 3.0. This procedure does not support releases prior to 3.0.

Step 30 If you selected I am upgrading/installing the CallManager Publisher in the previous step, go to Step 32. If you selected I am upgrading/installing the CallManager Subscriber, an authentication window opens and prompts you to enter usernames and passwords for a Windows 2000 user with administrative privileges and a SQL Server user with SQL Server administrative privileges on the publishing database server. Enter the account information in the appropriate fields as prompted and then click Next. The system connects to the publishing database server.

Step 31 You have completed the configuration of Cisco CallManager and the database server. The Cisco CallManager and other included software are ready to be installed. Click Next. This part of the installation takes about 30 minutes.

Step 32 The Cisco MCS Backup Utility Setup loads automatically. You must specify whether this server will act as a backup target or the backup server during the backup and restore operation.

The backup server actually performs the backup operation. It stores the backup data in the directory or tape drive destination that you specify. If a server is configured as a backup server, it automatically will be added to the backup target list.

A backup target is a server that contains data to be backed up. You can select more than one target, but you can select only one server.

Select either Server or Target and then click OK.


Note Cisco strongly recommends that you use the Cisco MCS Backup Utility to perform backups and that no third-party backup software is used. However, if you do not want to use the Cisco MCS Backup Utility, complete the installation as instructed, and then stop the service called "stiBack for Cisco MCS." To stop the service, select Start > Run, enter services.msc /s, select the service in the main window, and click Stop Service.


Step 33 If you selected Target in the previous step, a message appears indicating that the setup is complete. You will need to configure this server as a CallManager target on the backup server. Click OK and then go to Step 41.

If you selected Server in the previous step, continue with Step 34.

Step 34 On the Backup Utility Configuration window, add the name of any additional Cisco CallManager servers you want to back up by clicking Add, entering the server name, and then clicking OK. Click Delete to remove servers from the target list. If you want to add a remote server, you must install it and connect it to the network before you add it to the target list. You are prompted to enter a username and password with administrator access rights on the remote server and then click Verify.


Note The Backup Utility attempts to connect to the remote server. If the remote server is not found, the authentication fails. The server name remains in the target list, but may not be accessible.


Step 35 Select the Destination tab. Select a destination location where the backup data will be stored. You must select a destination for backups to be performed. There is no default destination setting.


Note If you select a network directory as the backup destination, the directory must be shared in Windows 2000. To share a directory, log in on that server, right-click on the directory folder icon you want to share, click Sharing..., click Share this folder, and then click OK.


Step 36 Select Network directory, Local directory, or Tape device to specify where backup files will be backed up. To enter a network or local directory, you can enter the path and directory name or select it from a browse box by clicking Browse. For network directories, you must supply a username and password with administrator access rights on that server. In the tape device box, only tape drives configured in Windows NT or Windows 2000 appear. To add new devices, click Add device....


Note Tape drives are available on the MCS-7835.


Step 37 Select the Schedule tab.

Step 38 Select the days and times you want the backup to run. The default is 2:00 am Tuesday through Saturday. You can also select the length of the system log in days; then, click OK.


Caution Cisco CallManager backups should be timed to occur during off-peak hours because CPU utilization is high during the backup process.

Step 39 Click OK to save your settings and exit the Backup Utility Configuration. For more information on the Backup Utility, see the "Performing Backup and Restore Procedures" section in Installing Cisco CallManager Release 3.0(6).

Step 40 You are prompted to enter a new password for the local Administrator account. Enter the new password in the New Password field and then enter it in the Retype Password field. Click OK.


Caution When entering passwords for the local Administrator and SA (SQL Server system administrator) accounts, do not use the apostrophe.

Step 41 You are prompted to enter a new password for the SA (SQL Server system administrator) account. Enter a new password of at least 5 characters in the New Password field and then enter it in the Retype Password field. Click OK.

Step 42 A message indicates that the password was changed successfully. Click OK.

Step 43 You can select to remain a workgroup member or join an NTdomain. If you want to join a domain, enter the NTdomain name, and the username and password of a user with administrator privileges on this server; then, click OK.

Step 44 Click No when prompted if you want to reboot the system.

Step 45 Reboot your system.


Note After you have performed the upgrade and your Cisco CallManager is operational, you should back up your Cisco CallManager data. For information on backing up Cisco CallManager data, see the "Backing Up the Cisco CallManager Data" section in Installing Cisco CallManager Release 3.0(6).


Post-Installation Checklist

To verify that the upgrade completed successfully consult the following list:


Step 1 Click Start > Programs > Administrative Tools > Services.
Verify that all the services listed in your Services screen are running.

Cisco CallManager

Cisco Database Layer Monitor

Cisco IP Voice Media Streaming App

Cisco Messaging Interface

Cisco SNMP Data Collector

Cisco TFTP

DC Directory Server


Note Depending on which services you have installed on your system, all services shown in the preceding list may not appear in your Services window.


Obtaining Technical Assistance

Cisco provides Cisco Connection Online (CCO) as a starting point for all technical assistance. Warranty or maintenance contract customers can use the Technical Assistance Center. All customers can submit technical feedback on Cisco documentation using the web, e-mail, a self-addressed stamped response card included in many printed docs, or by sending mail to Cisco.

Cisco Connection Online

Cisco continues to revolutionize how business is done on the Internet. Cisco Connection Online is the foundation of a suite of interactive, networked services that provides immediate, open access to Cisco information and resources at anytime, from anywhere in the world. This highly integrated Internet application is a powerful, easy-to-use tool for doing business with Cisco.

CCO's broad range of features and services helps customers and partners to streamline business processes and improve productivity. Through CCO, you will find information about Cisco and our networking solutions, services, and programs. In addition, you can resolve technical issues with online support services, download and test software packages, and order Cisco learning materials and merchandise. Valuable online skill assessment, training, and certification programs are also available.

Customers and partners can self-register on CCO to obtain additional personalized information and services. Registered users may order products, check on the status of an order and view benefits specific to their relationships with Cisco.

You can access CCO in the following ways:

WWW: www.cisco.com

Telnet: cco.cisco.com

Modem using standard connection rates and the following terminal settings: VT100 emulation; 8 data bits; no parity; and 1 stop bit.

From North America, call 408 526-8070

From Europe, call 33 1 64 46 40 82

You can e-mail questions about using CCO to cco-team@cisco.com.

Technical Assistance Center

The Cisco Technical Assistance Center (TAC) is available to warranty or maintenance contract customers who need technical assistance with a Cisco product that is under warranty or covered by a maintenance contract.

To display the TAC web site that includes links to technical support information and software upgrades and for requesting TAC support, use www.cisco.com/techsupport.

To contact by e-mail, use one of the following addresses:

Language
E-mail Address

English

tac@cisco.com

Hanzi (Chinese)

chinese-tac@cisco.com

Kanji (Japanese)

japan-tac@cisco.com

Hangul (Korean)

korea-tac@cisco.com

Spanish

tac@cisco.com

Thai

thai-tac@cisco.com


In North America, TAC can be reached at 800 553-2447 or 408 526-7209. For other telephone numbers and TAC e-mail addresses worldwide, consult the following web site: http://www.cisco.com/warp/public/687/Directory/DirTAC.shtml.

Documentation Feedback

If you are reading Cisco product documentation on the World Wide Web, you can submit technical comments electronically. Click Feedback in the toolbar and select Documentation. After you complete the form, click Submit to send it to Cisco.

You can e-mail your comments to bug-doc@cisco.com.

To submit your comments by mail, for your convenience many documents contain a response card behind the front cover. Otherwise, you can mail your comments to the following address:

Cisco Systems, Inc.
Document Resource Connection
170 West Tasman Drive
San Jose, CA 95134-9883

We appreciate and value your comments.


[an error occurred while processing this directive]