-
Troubleshooting Guide for Cisco CallManager, Release 4.1(3)
-
Index
-
Preface
-
Troubleshooting Overview
-
Troubleshooting Tools
-
Installation, Backup, and Restore Issues
-
Cisco CallManager System Issues
-
Directory Issues
-
Device Issues
-
Dial Plans and Routing Issues
-
Cisco CallManager Services Issues
-
Voice Messaging Issues
-
Opening a Case With TAC
-
Case Study: Troubleshooting Intracluster Phone Calls
-
Case Study: Troubleshooting Cisco IP Phone to Cisco IOS Gateway Calls
-
Case Study: Troubleshooting Intercluster Phone Calls
-
 Feedback
Table Of Contents
Cisco CallManager System Issues
Cisco CallManager System Not Responding
Cisco CallManager System Stops Responding
Checking Settings on the Backup Utility to Avoid High CPU
Setting up Performance Monitor Counter Logs
Cisco CallManager Administration Page Does Not Display
Errors Occur When Attempting to Access the Cisco CallManager Administration Page from the Browser
You Are Not Authorized to View This Page
Problems Displaying or Adding Users With Cisco CallManager
Name to Address Resolution Failing
Unable to Change the Server Name for Cisco CallManager
Default Web Site Under IIS Has Improper Setting
You Attempt to Access a Machine Where Access Is Explicitly Denied
Improper Network Setting Exists in the Remote Machine Where You Are Browsing
Replication Fails Between the Publisher and the Subscriber
Cannot Update Data Because the Publisher Is Not Available
Subscriber Stops Replicating Data From the Publisher
Mismatched Duplex Port Settings
JTAPI Subsystem Startup Problems
JTAPI Subsystem is OUT_OF_SERVICE
MIVR-SS_TEL-4-ModuleRunTimeFailure
MIVR-SS_TEL-1-ModuleRunTimeFailure
JTAPI Subsystem is in PARTIAL_SERVICE
Changing IIS Parameters for Security
Cisco CallManager System Issues
This section covers solutions for the following most common issues related to a Cisco CallManager system.
•
Cisco CallManager System Not Responding
•
•
Cisco CallManager System Not Responding
This section covers the following issues for a Cisco CallManager system not responding:
•
•
•
•
•
•
•
•
•
Cisco CallManager System Stops Responding
Symptom
The Cisco CallManager system does not respond.
Possible Cause
When the Cisco CallManager service (ccm.exe) crashes, the following message displays in the System Event log:
The Cisco CallManager service terminated unexpectedly.It has done this 1 time. The following corrective actionwill be taken in 60000 ms. Restart the service.Other messages you may see in the event of a crash are:
Timeout 3000 milliseconds waiting forCisco CallManager service to connect.The Cisco CallManager failed to start due to the following error:
The service did not respond to the start or control request in a
timely fashion.
At this time, when devices such as the Cisco IP Phones and gateways unregister from the Cisco CallManager, users receive delayed dial tone, and/or the Cisco CallManager server freezes due to high CPU usage. For event log messages not included here, view the Cisco CallManager Event Logs.
The Cisco CallManager service can crash due to one of the following reasons:
–
–
Depending on what type of crash you experience, you will need to gather different data that will help determine the root cause of the crash.
Related Topics
•
•
Unexpected Event
Use the following procedure as a guide for what information to gather and provide to TAC in the event of Cisco CallManager crash.
Procedure
Step 1
Step 2
Step 3
Step 4
Step 5
C:\Documents and Settings\All Users\Documents\DrWatson.The file is named Drwtsn32.log.
Step 6
Note
Step 7
The following is an example of the header of a crash entry in the Drwtsn32.log file.
Application exception occurred:App: (pid=680)When: 3/8/2003 @ 14:01:06.978Exception number: e06d7363Along with the date of the crash, there is a PID. If that PID corresponds to the PID for ccm.exe in the task list, then you know that Cisco CallManager crashed.
Note
The task list in the Drwtsn32.log looks similar to the following:
Example
PID PROCESS8 System.exe212 SMSS.exe240 CSRSS.exe264 WINLOGON.exe292 SERVICES.exe304 LSASS.exe424 termsrv.exe520 svchost.exe560 msdtc.exe696 DLLHOST.exe736 Ipvmsapp.exe752 DLLHOST.exe824 AudioTranslator.exe848 RisDC.exe860 LogoutService.E.exe884 DCX500.exe936 svchost.exe980 LLSSRV.exe1028 sqlservr.exe1112 ntpd.exe1140 rcmdsvc.exe1172 regsvc.exe1176 mstask.exe1204 SNMP.exe1244 WinMgmt.exe1260 cpqnimgt.exe1284 cqmgserv.exe1296 cqmgstor.exe1308 sysdown.exe1372 cqmghost.exe1524 aupair.exe1552 sqlagent.exe276 svchost.exe2400 inetinfo.exe2412 explorer.exe2752 sqlmangr.exe2700 taskmgr.exe2704 mmc.exe680 ccm.exe868 DRWTSN32.exeIf there is no list of the PIDs, look at the timestamp of the last entry of the Drwtsn32.log and the timestamp of the error in the Event Log (refer to the Cisco CallManager Service Crash Description section). If they are the exact same time, it is likely that you experienced an Unexpected Event Cisco CallManager crash.
What makes a crash unique is the stack trace. This is why you will see the requested complete Drwtsn32.log file in the Unexpected Event section.
If the PID for the day of the crash is not ccm.exe or the timestamp did not correspond, then you are most likely experiencing a lack-of- resource crash or a crash of another process.
Lack of Resources
Use the following procedure if there is a lack of resources crash.
Procedure
Step 1
Step 2
Step 3
Step 4
Checking Settings on the Backup Utility to Avoid High CPU
To avoid a system crash due to the Cisco IP Telephony Applications Backup running for an extended time at high CPU utilization, ensure that you are running the latest Cisco IP Telephony Applications Backup.
If you are running Cisco CallManager 3.1(3a)spC and later or Cisco CallManager 3.2(1)spA and later, per Cisco bug ID CSCdt91655 ( registered customers only) , the new Backup utility runs at low priority by default.
Registered customers can download the latest version of Cisco IP Telephony Applications Backup from the Voice Software download page under Cisco CallManager.
Prior to this change, the previous versions used a tab called Performance to change the Base Priority of the process running the Cisco IP Telephony Applications Backup application. Changing the performance to below normal or low ensures that this process does not compete with other processes (that are running at normal Base Priority) for CPU, such as ccm.exe.
Setting up Performance Monitor Counter Logs
In order to verify the processes running, and the amount of CPU and memory that are being consumed, use the following procedure to gather counters for the crash.
Procedure
Step 1
Step 2
Step 3
Step 4
Use the local computer counters and make sure that you are configuring this directly on the Cisco CallManager that is experiencing the crash.
Step 5
Step 6
% Processor Time / All Instances
ID Process / All Instance
Virtual Bytes / All Instances
Private Bytes / All Instances
Step 7
From the Log Files tab, make sure that the log file type is Text File - CSV. Also note where these are located. The default is C:\PerfLogs. Select a log file limit of 20,000 Kb.
Step 8
Step 9
Step 10
Step 11
Step 12
Step 13
Note
Step 14
Note
Step 15
a.
b.
c.
d.
Cisco CallManager Administration Page Does Not Display
Symptom
Administration web page does not display.
Possible Cause
The Cisco CallManager service stopped.
Recommended Action
Use the following procedure to verify that the Cisco CallManager service is active on a server that is local or remote.
1.
The Cisco CallManager Serviceability window displays.
2.
3.
The server that you chose displays next to the Current Server title, and a box with configured services displays.
Activation Status column displays either Activated or Deactivated in the Cisco CallManager line.
If Activated, the Cisco CallManager is active on the chosen server and you need to contact TAC for further assistance.
If Deactivated, continue with the following steps.
4.
5.
The Activation Status column displays Activated in the Cisco CallManager line.
Cisco CallManager is now active for the chosen server.
Perform the following procedure if the Cisco CallManager has been in service and you want to check if it is currently active.
1.
The Cisco CallManager Serviceability window displays.
2.
3.
The server that you chose displays next to the Current Server title, and a box with configured services displays.
The Activation Status column displays Activated in the Cisco CallManager line.
Cisco CallManager is active for the chosen server. Contact TAC for further assistance.
If Deactivated, continue with the following steps.
4.
5.
The Activation Status column displays Activated in the Cisco CallManager line.
Cisco CallManager is now active for the chosen server.
Repeat the preceding procedure to verify that the Cisco CallManager service is activated.
Errors Occur When Attempting to Access the Cisco CallManager Administration Page from the Browser
Symptom
One of the following error messages displays when you are trying to access the administration page from the same server where the Cisco CallManager resides.
•
•
Possible Cause
The IIS Admin service or the WWW publishing service does not start automatically as expected. One of these services stopping represents the most frequent reason for the pages not displaying locally.
Recommended Action
Use the following procedure to start the IIS.
Note
1.
A window displays listing IIS Administration.
2.
3.
4.
The IIS starts.
Start the other services using the following procedure.
1.
2.
3.
4.
The service starts.
Verification
Use the following procedure to verify that IIS is started.
1.
2.
3.
4.
Use the following procedure to start the IIS.
Note
1.
A window displays listing IIS Admin Service.
2.
3.
4.
5.
Start the other services using the following procedure.
1.
2.
3.
4.
5.
Viruses can also cause the IIS service to stop and display strange messages when attempting to access the administration page. See the Virus Protection section for more information.
You Are Not Authorized to View This Page
Symptom
When accessing the administration page, the following error message displays.
Error Message You Are Not Authorized to View This Page
and other similar error messages that may occur include:
–
–
–
–
Possible Cause
The NTFS permissions have been modified on your C drive off the root directory to propagate into child directories on the Cisco CallManager server.
NTFS permissions have been changed from the default settings on the server and are no longer sufficient for IIS to run properly.
Recommended Action
Visit the Microsoft site for details on the issue: Q271071 "Minimum NTFS Permissions Required for IIS 5.0 to Work" at the following URL:
http://support.microsoft.com/default.aspx?ln=EN-GB&pr=kbinfo&
Verification
Use the following procedure to verify that IIS is started.
1.
2.
3.
4.
Use the following procedure to start the IIS.
Note
1.
A window displays listing IIS Admin Service.
2.
3.
4.
The IIS starts.
Start the other services using the following procedure.
1.
2.
3.
4.
The service starts.
Errors Occur When Attempting to Access the Cisco CallManager Administration Page from a Browser on a Remote Server
If you can access the Administration Web page locally on the Cisco CallManager server, but not when you browse from a remote machine, verify whether one of the following situations applies to you. They appear in order, from the most frequent reason to the least frequent reason.
Problems Displaying or Adding Users With Cisco CallManager
Symptom
You are not able to add a user or conduct a search on the Cisco CallManager Administration user pages.
Possible Cause
You may encounter the following problems if you are working with Cisco CallManager 3.x installed on a server that has a special character (such as an underscore) in its hostname, or MS Internet Explorer 5.5 with SP2 and a Q313675 patch or above.
–
–
The following error occurred while trying to execute the
command.
Sorry, your session object has timed out.Click here to Begin a New SearchRecommended Action
You may not be able to add a user or do a search on the Cisco CallManager Admin user pages, if your Cisco CallManager hostname contains any special characters such as underscore or period (for example, Call_Manager). Domain Name System (DNS)-supported characters include all letters (A-Z, a-z), numbers (0-9), and hyphen (-), and any special characters are not allowed. If the Q313675 patch is installed on your browser, make sure that the URL does not contain any non-DNS supported characters.
For more information about the Q313675 patch, refer to MS01-058: File Vulnerability Patch for Internet Explorer 5.5 and Internet Explorer 6.
To resolve this problem, you have the following options:
–
–
–
SQLSvc User Cannot Log In
Symptom
The SQLSvc user cannot log in, and dependent services do not start.
Possible Cause
The SQLSvc user must log in to the local system before the Cisco CallManager, SQLServerAgent, MSSQLServer, and COM+ Event System services can start and execute their specific functions. If the SQLSvc password is not configured correctly, both locally and within the cluster, the SQLSvc user cannot log in and these dependent services do not start. Cisco CallManager and its basic functionality can be affected.
Note
This problem affects the following:
–
–
–
–
Recommended Action
Use the following procedure to recover an SQLSvc account password.
1.
2.
3.
4.
5.
6.
7.
8.
9.
10.
11.
12.
13.
14.
15.
16.
17.
18.
19.
20.
21.
22.
23.
24.
25.
26.
27.
28.
29.
30.
31.
Name to Address Resolution Failing
Symptom
One of the following error messages displays when you try to access the following URL:
http://your-cm-server-name/ccmadmin
Internet Explorer: This page cannot be displayed
Netscape: Not Found. The requested URL /ccmadmin was not found on this server.
If you try to access the same URL using the Cisco CallManager IP address (http://10.48.23.2/ccmadmin) instead of the name, the page displays.
Possible Cause
The name that you entered as "your-cm-server-name" is mapping to the wrong IP address in DNS or hosts file.
Recommended Action
1.
2.
You can find the "hosts" file at C:\WINNT\system32\drivers\etc\hosts on your Windows station.
Unable to Change the Server Name for Cisco CallManager
Symptom
You attempt to change the name of the Cisco CallManager server and the service fails. Other services , such as CTI Manager, Extended Functions, and Voice Media Streaming, also fail.
Possible Cause
Cisco does not support changing the name of a Cisco CallManager server.
Recommended Action
Use the following procedure to change the IP address instead of changing the name of a Cisco CallManager server.
Note
1.
Note
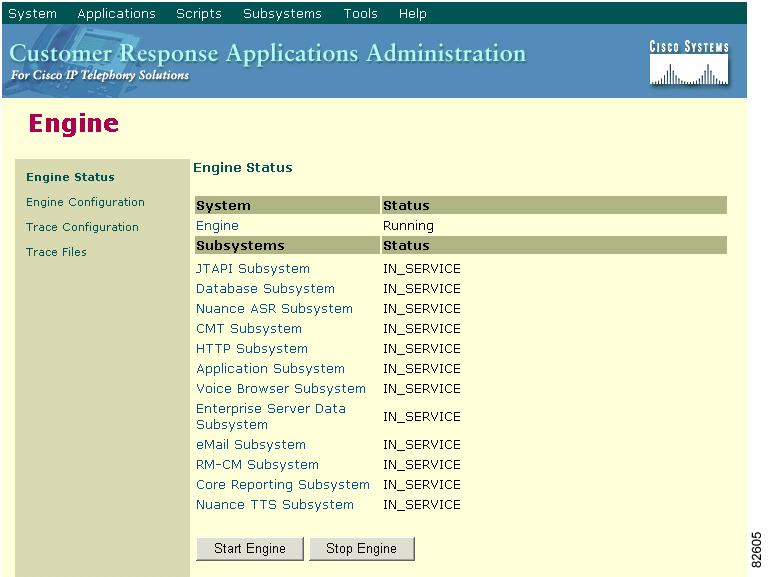
Figure 4-1 Engine Window—Engine Status Area
The Engine Status area displays information about the CRS system and its subsystems.
2.
Note
3.
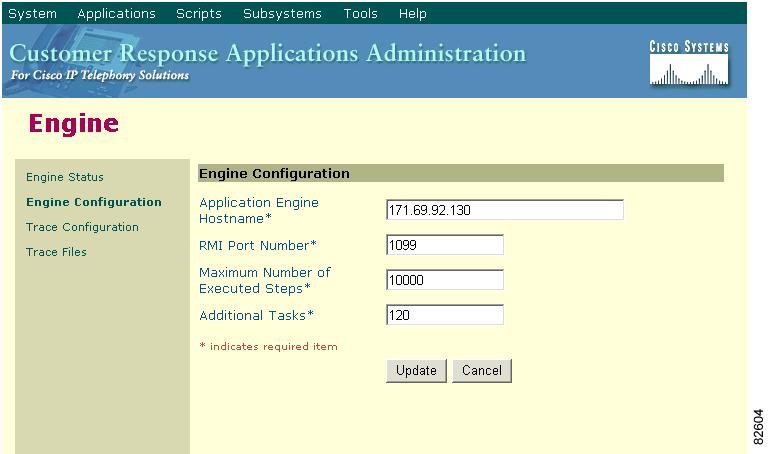
Figure 4-2 Engine Window—Engine Configuration Area
4.
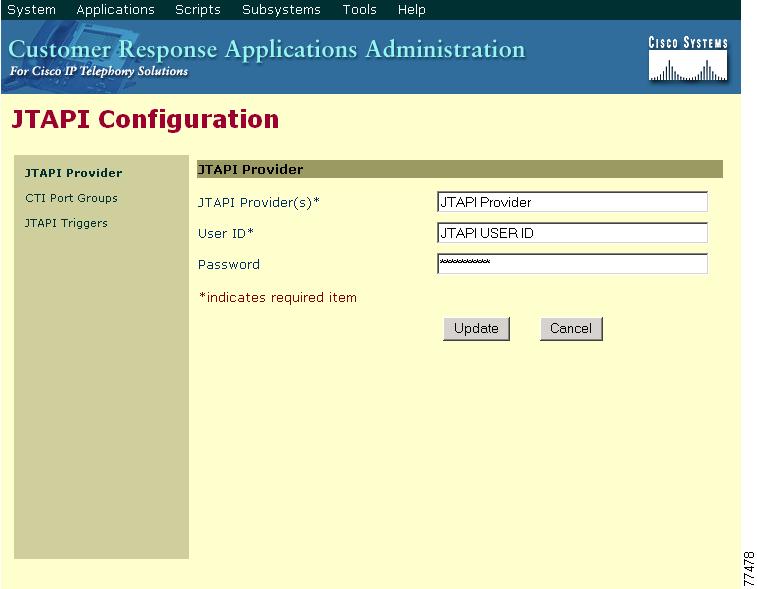
5.
The JTAPI Configuration web page displays.
Figure 4-3 JTAPI Configuration Window
6.
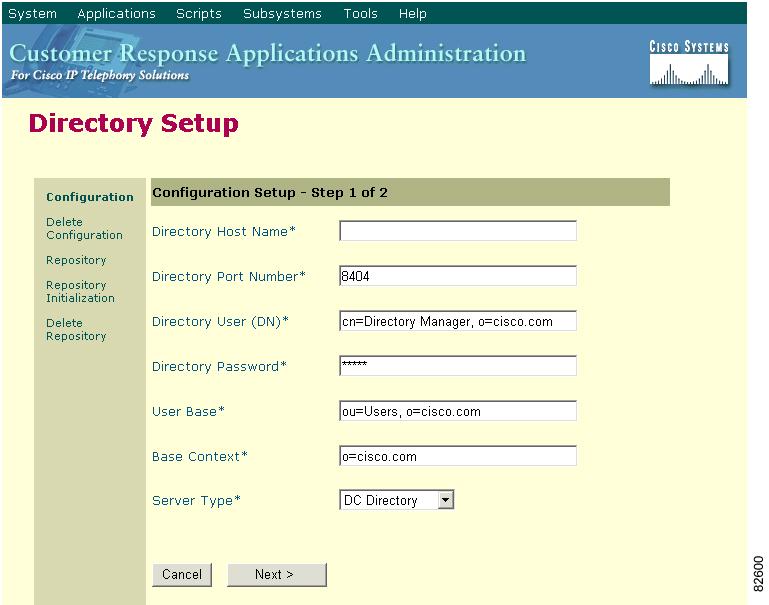
7.
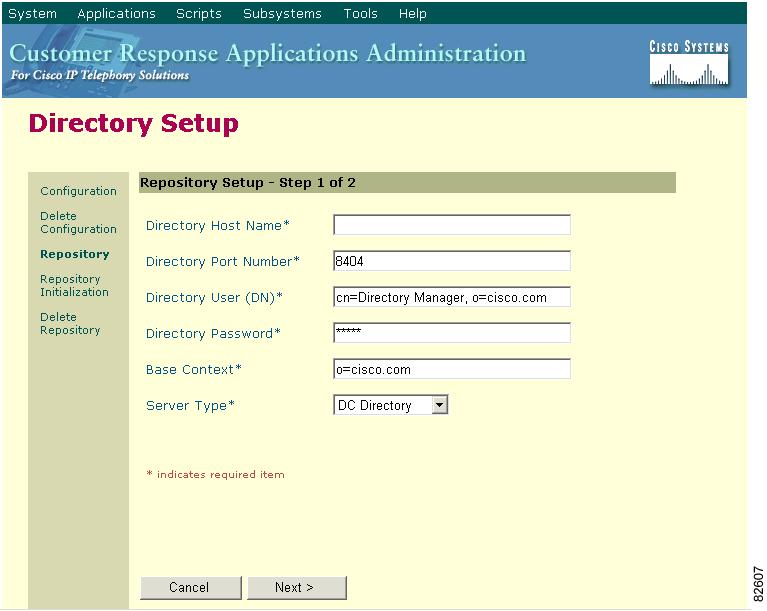
The Directory Setup Window displays.
Figure 4-4 Directory Setup Window—Configuration Setup Area
8.
9.
The Repository Setup area displays.
Figure 4-5 Directory Setup Window—Repository Setup Area
10.
11.
12.
13.
14.
15.
16.
17.
18.
19.
20.
21.
22.
23.
24.
25.
26.
Note
27.
28.
Default Web Site Under IIS Has Improper Setting
Symptom
One of the following error messages displays when you try to access the following URL:
http://your-cm-server-name/ccmadmin
•
•
If you try to access the same page using the Cisco CallManager IP address (http://10.48.23.2/ccmadmin) instead of the name, the page displays.
Possible Cause
An incorrect setting in the Default Web Site tab for the IIS has been set on the server.
Recommended Action
1.
You can verify that setting by choosing
Start > Programs > Administrative tools/Internet Service Manager.
Expand the icon that shows your server name.2.
Note
Port 80 Is Blocked in One or More Routers Between Your Local Browser and the Cisco CallManager Server
Symptom
One of the following error messages displays when a firewall blocks the port that is used by the web server or the http traffic:
•
•
Possible Cause
For security reasons, the system blocked the http access from your local network to the server network.
Recommended Action
1.
2.
3.
You Attempt to Access a Machine Where Access Is Explicitly Denied
Symptom
One of the following error messages displays:
•
•
•
Possible Cause
This represents a security policy that is applied by the network administrator.
Recommended Action
1.
2.
3.
Start > Programs > Administrative tools/Internet Service Manager.4.
5.
6.
Improper Network Setting Exists in the Remote Machine Where You Are Browsing
Symptom
There is no connectivity, or there is no connectivity to other devices in the same network as the Cisco CallManager.
When you attempt the same action from other remote machines, the Cisco CallManager Administration Page displays.
Possible Cause
Improper network configuration settings on a station or on the default Gateway can cause a web page not to display because partial or no connectivity to that network exists.
Recommended Action
1.
2.
3.
If you are using TCP-IP over a LAN to connect, continue with the following steps to verify the network settings on the remote station.
4.
5.
The list of communication protocols displays as checked.
6.
7.
The possibility exists that a browser-specific setting could be improperly configured.
8.
9.
By default, the LAN settings and the dial-up settings are not configured. The generic network setting from Windows is used.
10.
Note
Refer to the following URL for more information on configuration settings:
http://www.cisco.com/en/US/tech/tk331/tk336/tk542/tsd_technology_support_sub-protocol_home.html
Replication Fails Between the Publisher and the Subscriber
Replicating the SQL database is a core function of Cisco CallManager clusters. The server with the master copy of the database is called the publisher, while the servers replicating the database are called subscribers.
Cannot Update Data Because the Publisher Is Not Available
Symptom
The following error message displays:
Error Message    Cannot update data because the publisher is not
available. Please try again later. (58)
Possible Cause
The subscriber build failed.
Recommended Action
1.
2.
Hosts is used for DNS resolution. LMHOSTS uses NetBIOS for name resolution. Also, SQL uses NetBIOS for name resolution.
If the Cisco CallManager fails to update, the database layer on the subscriber cannot find the publisher.
3.
4.
5.
6.
For SQL, enable Authentication.
Note
7.
The software will download the SQL database to the subscriber(s).
Subscriber Stops Replicating Data From the Publisher
Symptom
Changes made on the publisher are not reflected on phones that are registered with the subscriber.
Possible Cause
Replication fails between the publisher and subscriber.
Recommended Action
Complete the following steps to reestablish the relationship between the two systems. First, the subscriber subscription will need to be recreated on the publisher. Then, delete the subscription and re-create it on the subscriber system.
Recreating the Subscription on the Publisher
1.
2.
The Register SQL Server Wizard displays. Make sure the From now on I want to perform the task without using a wizard checkbox is not checked.
3.
The other SQL servers that reside on the Cisco CallManagers should display in the Additional Servers box.
4.
5.
Click The SQL Server login information that was assigned to me by the system administrator.
6.
7.
Note
8.
9.
After selecting finish, the wizard will display status of the addition of the added server(s).
The display should read "Registered successfully."
10.
The listing of the two servers in the display means they are recognized by the publisher, so data can be shared with them.
Deleting the Subscription on the Publisher
Use the following procedure to delete the subscription on the publisher.
1.
2.
Note
A warning displays indicating the subscription has been removed at the publisher, but not the subscriber and if you want to connect to the subscriber and delete the subscription.
3.
The next message indicates that the subscription has been deleted but the data has not.
4.
Re-creating the Subscription on the Subscriber
Next, the subscription must be added back into the subscriber SQL server. Use the following procedure to re-create the subscription on the subscriber.
1.
2.
3.
Note
The Pull Subscription Wizard displays.
4.
5.
6.
7.
The login name will be sa and the password will be the same password for the publisher sa account.
8.
9.
10.
11.
12.
13.
14.
15.
16.
The Wizard will set up the subscription and display a success when completed.
A display indicating success should appear when the process is completed.
17.
18.
19.
The snapshot agent will run at this point. It will take about 3-5 minutes to complete the task. Once the snapshot agent completes, the pull agent will start to apply the snapshot to the subscriber. This will take another 3-5 minutes.
20.
The subscription should be in a running state and waiting for updates.
Note
At this time, the subscriber is now resynchronized with the publisher and updates are getting recorded in the local subscriber SQL database.
Verification
Use the following procedure to verify that the SQL Subscription is working.
1.
Note
2.
The device does not need to be functional.
3.
4.
Slow Server Response
This section addresses a problem related to a slow response from the server: Mismatched Duplex Port Settings.
Mismatched Duplex Port Settings
Symptom
Slow response from the server occurs.
Possible Cause
Slow response could result if the duplex of the switch does not match the duplex port setting on the Cisco CallManager server.
Recommended Action
1.
Cisco does not recommend using the Auto setting on either the switch or the server.
2.
JTAPI Subsystem Startup Problems
The JTAPI (Java Telephony API) subsystem is a very important component of the Cisco Customer Response Solutions (CRS) platform. JTAPI is the component that communicates with the Cisco CallManager, and is responsible for telephony call control. The CRS platform hosts telephony applications, such as Cisco AutoAttendant, Cisco IP ICD, and Cisco IP-IVR. This section is not specific to any of these applications; the JTAPI subsystem is an underlying component that is used by all of them.
Before starting the troubleshooting process, ensure that the software versions that you are using are compatible. To verify compatibility, read the Cisco CallManager Release Notes for the version of Cisco CallManager that you are using.
To check the version of CRS, log in to the AppAdmin page by typing http://servername/appadmin, where servername is the name of the server on which CRS is installed. The current version is located in the lower-right corner of the main menu.
JTAPI Subsystem is OUT_OF_SERVICE
Symptom
The JTAPI subsystem does not start.
Possible Cause
One of the following exceptions displays in the trace file:
–
–
MIVR-SS_TEL-4-ModuleRunTimeFailure
Search for the MIVR-SS_TEL-1-ModuleRunTimeFailure string in the trace file. At the end of the line, an exception reason is given.
The following are the most common errors:
•
•
•
•
•
•
Unable to create provider—bad login or password
Possible Cause
The user name or password entered in the JTAPI configuration is incorrect.
Full Text of Error Message
%MIVR-SS_TEL-4-ModuleRunTimeFailure:Real-timefailure in JTAPI subsystem: Module=JTAPISubsystem,Failure Cause=7,FailureModule=JTAPI_PROVIDER_INIT,Exception=com.cisco.jtapi.PlatformExceptionImpl:Unable to create provider -- bad login or password.%MIVR-SS_TEL-7-EXCEPTION:com.cisco.jtapi.PlatformExceptionImpl:Unable to create provider -- bad login or password.Recommended Action
Verify that the user name and password are correct. Try logging into the CCMuser page (http://servername/ccmuser) on the Cisco CallManager to ensure that the Cisco CallManager is able to authenticate correctly.
Unable to create provider -- Connection refused
Possible Cause
The JTAPI connection to the Cisco CallManager is refused by the Cisco CallManager.
Full Text of Error Message
%MIVR-SS_TEL-4-ModuleRunTimeFailure:Real-timefailure in JTAPI subsystem: Module=JTAPI Subsystem,Failure Cause=7,Failure Module=JTAPI_PROVIDER_INIT,Exception=com.cisco.jtapi.PlatformExceptionImpl: Unableto create provider -- Connection refused%MIVR-SS_TEL-7-EXCEPTION:com.cisco.jtapi.PlatformExceptionImpl:Unable to create provider -- Connection refusedRecommended Action
Verify that the CTI Manager service is running in the Cisco CallManager Control Center.
Unable to create provider -- login=
Possible Cause
Nothing has been configured in the JTAPI configuration page.
Full Text of Error Message
%MIVR-SS_TEL-4-ModuleRunTimeFailure:Real-timefailure in JTAPI subsystem: Module=JTAPI Subsystem,Failure Cause=7,Failure Module=JTAPI_PROVIDER_INIT,Exception=com.cisco.jtapi.PlatformExceptionImpl:Unable to create provider -- login=%MIVR-SS_TEL-7-EXCEPTION:com.cisco.jtapi.PlatformExceptionImpl:Unable to create provider -- login=Recommended Action
Configure a JTAPI provider in the JTAPI configuration page on the CRS server.
Unable to create provider -- hostname
Possible Cause
The CRS engine is not able to resolve the host name of the Cisco CallManager.
Full Text of Error Message
%M%MIVR-SS_TEL-4-ModuleRunTimeFailure:Real-timefailure in JTAPI subsystem: Module=JTAPI Subsystem,Failure Cause=7,Failure Module=JTAPI_PROVIDER_INIT,Exception=com.cisco.jtapi.PlatformExceptionImpl:Unable to create provider -- dgrant-mcs7835.cisco.com%MIVR-SS_TEL-7-EXCEPTION:com.cisco.jtapi.PlatformExceptionImpl:Unable to create provider -- dgrant-mcs7835.cisco.comRecommended Action
Verify that DNS resolution is working correctly from the CRS engine. Try using an IP address instead of the DNS name.
Unable to create provider -- Operation timed out
Possible Cause
The CRS engine does not have IP connectivity with the Cisco CallManager.
Full Text of Error Message
101: Mar 24 11:37:42.153 PST%MIVR-SS_TEL-4-ModuleRunTimeFailure:Real-timefailure in JTAPI subsystem: Module=JTAPI Subsystem,Failure Cause=7,Failure Module=JTAPI_PROVIDER_INIT,Exception=com.cisco.jtapi.PlatformExceptionImpl:Unable to create provider -- Operation timed out102: Mar 24 11:37:42.168 PST %MIVR-SS_TEL-7-EXCEPTION:com.cisco.jtapi.PlatformExceptionImpl:Unable to create provider -- Operation timed outRecommended Action
Check the IP address that is configured for the JTAPI provider on the CRS server. Check the default gateway configuration on the CRS server and the Cisco CallManager. Make sure there are no IP routing problems. Test connectivity by pinging the Cisco CallManager from the CRS server.
Unable to create provider -- null
Possible Cause
There is no JTAPI provider IP address or host name configured, or when the JTAPI client is not using the correct version.
Full Text of Error Message
%MIVR-SS_TEL-4-ModuleRunTimeFailure:Real-timefailure in JTAPI subsystem: Module=JTAPI Subsystem,Failure Cause=7,Failure Module=JTAPI_PROVIDER_INIT,Exception=com.cisco.jtapi.PlatformExceptionImpl:Unable to create provider -- nullRecommended Action
Verify that a host name or IP address is configured in the JTAPI configuration. If the JTAPI version is incorrect, download the JTAPI client from the Cisco CallManager Plugins page and install it on the CRS server.
MIVR-SS_TEL-1-ModuleRunTimeFailure
Symptom
This exception usually occurs when the JTAPI subsystem is unable to initialize any ports.
Possible Cause
The CRS server can communicate with the Cisco CallManager, but is unable to initialize any CTI ports or CTI route points through JTAPI. This error occurs if the CTI ports and CTI route points are not associated with the JTAPI user.
Full Text of Error Message
255: Mar 23 10:05:35.271 PST %MIVR-SS_TEL-1-ModuleRunTimeFailure:Real-time failure in JTAPI subsystem: Module=JTAPI Subsystem,Failure Cause=7,Failure Module=JTAPI_SS,Exception=nullRecommended Action
Check the JTAPI user on the Cisco CallManager, and verify that CTI ports and CTI route points that are configured on the CRS server are associated with the user.
JTAPI Subsystem is in PARTIAL_SERVICE
Symptom
The following exception displays in the trace file:
MIVR-SS_TEL-3-UNABLE_REGISTER_CTIPORT
Possible Cause
The JTAPI subsystem is unable to initialize one or more CTI ports or route points.
Full Text of Error Message
1683: Mar 24 11:27:51.716 PST%MIVR-SS_TEL-3-UNABLE_REGISTER_CTIPORT:Unable to register CTI Port: CTI Port=4503,Exception=com.cisco.jtapi.InvalidArgumentExceptionImpl:Address 4503 is not in provider's domain.1684: Mar 24 11:27:51.716 PST %MIVR-SS_TEL-7-EXCEPTION:com.cisco.jtapi.InvalidArgumentExceptionImpl:Address 4503 is not in provider's domain.Recommended Action
The error message in the trace will tell you which CTI port or route point was unable to be initialized. Verify that this device exists in the Cisco CallManager configuration, and is also associated with the JTAPI user on the Cisco CallManager.
Security
This section covers the following security issues and provides information on where to find detailed documentation regarding the security process:
•
Changing IIS Parameters for Security
Symptom
You lose settings for locking down the IIS servers to protect the Cisco CallManager from hackers, attacks, or threats.
Possible Cause
Whenever you upgrade or reinstall the Cisco CallManager, all the IIS settings revert to the Cisco CallManager defaults.
Recommended Action
Test all your settings on a non-production Cisco CallManager before changing the settings on your production server.
Make note of the settings because they will change every time that you perform an upgrade or reinstall, and you will have to reset them.
Note
Near-Term Security Solutions
Refer to the following documents to ensure that you have quality of service (QoS) configured properly throughout your network to help ensure voice quality is affected as little as possible during the remainder of cleanup operations:
•
•
•
The following URL provides the guides:
http://www.cisco.com/univercd/cc/td/doc/product/voice/ip_tele/index.htm
Refer to the Cisco IP Telephony Network Design Guide to establish separate Voice/Data VLANs.
Note
Long-Term Security Solutions
Refer to documentation located at and below the following URL:
http://www.cisco.com/univercd/cc/td/doc/product/voice/ip_tele/index.htm
Related Information
The following URL provides Cisco CallManager Security Patch Process:
http://www.cisco.com/warp/public/cc/pd/nemnsw/callmn/prodlit/cmspp_qa.pdf
Cisco highly recommends that you do not install any patches from Microsoft. Download the wrapped versions from CCO.
You can sign up for Microsoft security patch alerts at the following URL:
http://www.microsoft.com/technet/treeview/default.asp?url=/technet/security/
bulletin/notify.aspThe alerts include an associated rating, which gives you an estimated time of a HotFix posting to CCO.
Refer to the following URL for security considerations for an IP telephony network:
http://www.cisco.com/univercd/cc/td/doc/product/voice/ip_tele/index.htm
Virus Protection
Refer to the following URL for procedures for stopping an active security attack or preventing an imminent security risk:
http://www.cisco.com/en/US/partner/products/sw/voicesw/ps556/prod_security_advisories_list.html
To verify that the server has the latest patches, refer to the following documents:
•
•
•