-
Cisco CallManager Administration Guide, Release 4.0(1)
-
Index
-
Preface
-
Introduction
-
Server Configuration
-
Cisco CallManager Configuration
-
Cisco CallManager Group Configuration
-
Date/Time Group Configuration
-
Device Defaults Configuration
-
Region Configuration
-
Device Pool Configuration
-
Enterprise Parameters Configuration
-
Location Configuration
-
Auto-Registration Configuration
-
Survivable Remote Site Telephony Configuration
-
Automated Alternate Routing Group Configuration
-
Application Dial Rules Configuration
-
Partition Configuration
-
Calling Search Space Configuration
-
Route Filter Configuration
-
Line Group Configuration
-
Route Group Configuration
-
Route/Hunt List Configuration
-
Route Pattern/Hunt Pilot Configuration
-
Translation Pattern Configuration
-
External Route Plan Wizard
-
Route Plan Report
-
Cisco IPMA Configuration Wizard
-
Cisco CallManager Attendant Console Configuration
-
Annunciator Configuration
-
Conference Bridge Configuration
-
Media Termination Point Configuration
-
Transcoder Configuration
-
Media Resource Group Configuration
-
Media Resource Group List Configuration
-
Service Parameters Configuration
-
Call Park
-
Call Pickup and Group Call Pickup Configuration
-
Cisco IP Phone Services Configuration
-
Meet-Me Number/Pattern Configuration
-
Cisco Voice-Mail Port Configuration
-
Cisco Voice Mail Port Wizard
-
Message Waiting Configuration
-
Cisco Voice-Mail Pilot Configuration
-
Voice-Mail Profile Configuration
-
Device Configuration
-
CTI Route Point Configuration
-
Device Profile Configuration
-
Device Profile Default Configuration
-
Gatekeeper Configuration
-
Gateway Configuration
-
Addendum to Gateway Configuration
-
Cisco IP Phone Configuration
-
Trunk Configuration
-
Phone Button Template Configuration
-
Softkey Template Configuration
-
Adding a New User
-
Searching the Global Directory
-
Multilevel Administration Access Configuration
-
Plugin Configuration
-
Dependency Records
-
Removing a Subscriber Server from Cisco CallManager
-
 Feedback
Table Of Contents
Cisco CallManager Attendant Console Configuration
Cisco CallManager Attendant Console Configuration Checklist
Configuring Cisco CallManager Attendant Console Users
Finding an Attendant Console User
Adding an Attendant Console User
Updating or Deleting an Attendant Console User
Cisco CallManager Attendant Console User Configuration Settings
Updating or Deleting a Pilot Point
Pilot Point Configuration Settings
Associating Devices and Pilot Points with the ac User
Configuring Linked Hunt Groups
Updating or Deleting Hunt Group Members
Hunt Group Configuration Settings
Activating the Cisco Telephony Call Dispatcher Service
Activating the CTIManager Service
Cisco CallManager Attendant Console Server Configuration
Viewing Cisco CallManager Attendant Console Performance Monitors
Creating Cisco CallManager Attendant Console Dial Rules
Installing the Plugin on an Attendant PC
Configuring Cisco CallManager Attendant Console Settings
Attendant Console Configuration Settings
Configuring Cisco CallManager Attendant Console System Files
Using the Attendant Console Configuration Tool
Attendant Console Configuration Tool Configuration Settings
Cisco CallManager Attendant Console Configuration
Cisco CallManager Attendant Console, a client-server application, allows you to set up Cisco IP Phones as attendant consoles. Employing a graphical user interface, the attendant console uses speed-dial buttons and quick directory access to look up phone numbers, monitor line status, and direct calls. A receptionist or administrative assistant can use the attendant console to handle calls for a department or company, or another employee can use it to manage his own telephone calls.
The attendant console installs on a PC with IP connectivity to the Cisco CallManager system. The attendant console works with a Cisco IP Phone that is registered to a Cisco CallManager system. Multiple attendant consoles can connect to a single Cisco CallManager system.
The application registers with and receives call-dispatching, login, line state, and directory services from the Cisco Telephony Call Dispatcher (TCD) service.
This section describes the following configuration procedures for Cisco CallManager Attendant Console:
•
Configuring Cisco CallManager Attendant Console Users
•
•
•
•
•
•
•
•
•
Cisco CallManager Attendant Console Configuration Checklist
Perform the following steps to set up the attendant console:
1.
2.
3.
4.
5.
6.
7.
8.
Related Topic
•
Configuring Cisco CallManager Attendant Console Users
This section covers the following procedures:
•
•
•
Finding an Attendant Console User
Procedure
Step 1
The Find and List window displays.
Step 2
•
•
•
•
•
•
Step 3
Tip
A list of attendant console users displays by Name.
Related Topics
•
•
Adding an Attendant Console User
This section describes how to add an attendant console user. You must add users through the Cisco CallManager Attendant Console User Configuration window in Cisco CallManager Administration before the users can log in to an attendant console.
Note
Procedure
Step 1
Step 2
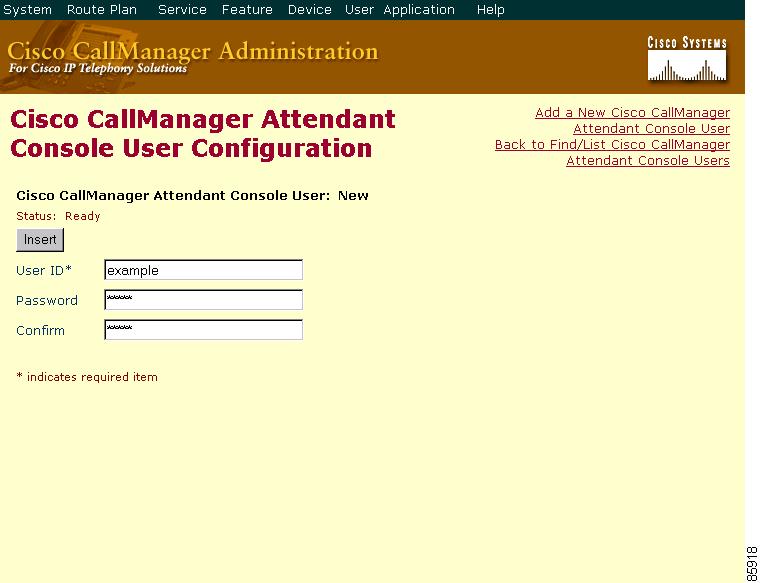
The Cisco CallManager Attendant Console User Configuration window displays, as shown in Figure 26-1.
Figure 26-1 Cisco CallManager Attendant Console User Configuration Window
Step 3
Step 4
Step 5
Related Topics
•
•
•
Updating or Deleting an Attendant Console User
This section describes how to view, update, or delete a Cisco attendant console user.
Before You Begin
To find out which hunt groups are using the attendant console user, click the Dependency Records link from the Cisco CallManager Attendant Console User Configuration window. If the dependency records are not enabled for the system, the dependency records summary window displays a message. For more information about dependency records, see the "Accessing Dependency Records" section on page A-3. If you try to delete an attendant console user that is in use, Cisco CallManager displays an error message. To delete an attendant console user that is currently in use, you must perform either or both of the following tasks:
•
•
Procedure
Step 1
Step 2
Step 3
Tip
Step 4
Related Topics
•
•
•
•
Cisco CallManager Attendant Console User Configuration Settings
Table 26-1 describes Cisco CallManager Attendant Console user configuration settings.
Related Topics
•
•
•
Configuring the ac User
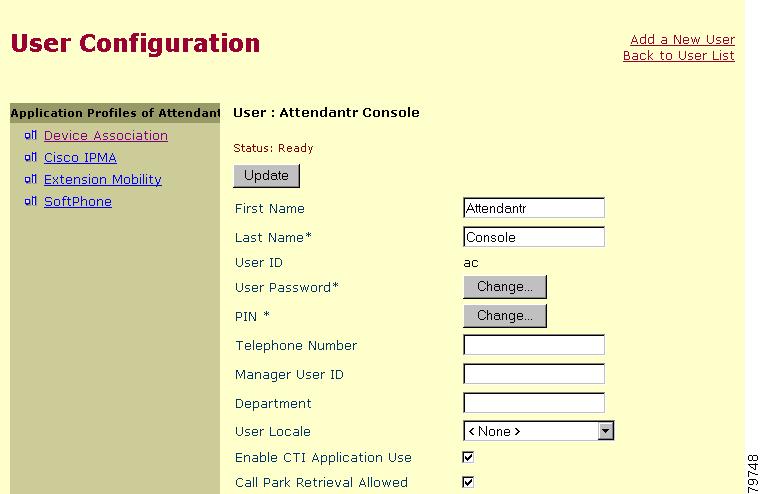
You must configure one user named "ac" and associate the attendant phones and the pilot points with the user. If you do not configure this user, the attendant console cannot interact with CTIManager, and the attendant cannot receive calls.
Perform the following procedure to configure the ac user.
Procedure
Step 1
The User Information window displays, as shown in Figure 26-2.
Figure 26-2 User Information Window
Step 2
Step 3
Step 4
Step 5
Step 6
Step 7
Step 8
If you forget to check the check box, an error message displays when the attendant attempts to log in to the attendant PC.
Step 9
Step 10
Related Topics
•
Configuring Pilot Points
Before the Cisco Telephony Call Dispatcher (TCD) can route calls, you must configure pilot points and hunt groups through Cisco CallManager Administration.
Note
This section contains the following topics:
•
•
•
Finding a Pilot Point
This section describes how to find a pilot point.
Procedure
Step 1
The Find and List window displays.
Step 2
•
•
•
•
•
•
Step 3
Tip
A list of pilot points displays.
Related Topics
•
•
•
•
Adding a Pilot Point
This section describes how to add a pilot point.
Procedure
Step 1
Step 2
Step 3
Now that the pilot point is created, the Pilot Point Configuration window refreshes to display the name of the new pilot point in the list on the left. The new pilot point and its settings display.
After the pilot point is created, you must configure a hunt group to specify how the calls that come in to the pilot point are redirected.
Tip
Related Topics
•
•
•
•
Updating or Deleting a Pilot Point
This section describes how to view, update, or delete a pilot point.
Before You Begin
To find out which virtual directory numbers are using the pilot point, click the Dependency Records link from the Pilot Point Configuration window. If the dependency records are not enabled for the system, the dependency records summary window displays a message. For more information about dependency records, see the "Accessing Dependency Records" section on page A-3. If you try to delete a pilot point that is in use, Cisco CallManager displays an error message. To delete a pilot point that is currently in use, you must delete the virtual directory numbers that are using the pilot point. See Step 4.
Note
Procedure
Step 1
Step 2
Step 3
Approximately 10 minutes after you delete a pilot point, Cisco TCD stops directing calls to any hunt group members that are associated with that pilot point.
Tip
Step 4
Step 5
Related Topics
•
•
•
Resetting a Pilot Point
You must reset the pilot point after you update pilot point configuration settings. When you reset the pilot point, the Cisco CallManager service continues to run, and call processing continues to occur. Perform the following procedure to reset the pilot point:
Procedure
Step 1
The Pilot Point Configuration window displays, and the list on the left side of the window shows all currently configured pilot points.
Step 2
Step 3
Step 4
Step 5
The Reset window displays.
Step 6
•
•
•
Related Topics
•
•
•
•
Pilot Point Configuration Settings
Table 26-2 describes pilot point configuration settings.
Table 26-2 Pilot Point Configuration Settings
Pilot Name
Enter up to 50 alphanumeric characters, including spaces, to specify a descriptive name for the pilot point.
Device Pool
The device pool comprises a group of Cisco CallManagers in prioritized order. The first Cisco CallManager in the list represents the primary Cisco CallManager for the pilot point.
Partition
Choose the partition to which the pilot point belongs. Make sure that the pilot point that you enter in the Pilot Number field is unique within the partition that you choose. If you do not want to restrict access to the pilot number, choose <None> for the partition.
If more partitions exist than the number that are configured in the Max List Box Items enterprise parameter, the ellipsis (...) button displays next to the drop-down list box. Click the ... button to display the Select Partition window. Enter a partial partition name in the List items where Name contains field. Click the desired partition name in the list of partitions that displays in the Select item to use box, and click OK.
Calling Search Space
To designate the partitions that the pilot point searches when it attempts to route a call, choose a calling search space from the drop-down list.
Pilot Number (DirN)
Enter a directory number in this field to designate a directory number for this pilot point.
Make sure that this number is unique throughout the system (that is, it cannot be a shared line appearance).
Route Calls To
From the drop-down list, choose the First Available Hunt Group Member option to route incoming calls to the first available member of a hunt group.
From the drop-down list, choose the Longest Idle Hunt Group Member option to order members based on the time that each directory number or line remains idle.
If the voice-mail number is the longest idle member of the group, Cisco TCD will route the call to voice mail without first checking the other members of the group.
If you want to use the Circular Hunting or Broadcast Hunting routing options, use the Attendant Console Configuration Tool as described in the "Using the Attendant Console Configuration Tool" section.
Related Topics
•
•
Associating Devices and Pilot Points with the ac User
Before the attendant uses the attendant console, you must associate the attendant console phones and pilot points to the ac user. Perform the following procedure:
Procedure
Step 1
Step 2
Step 3
a.
b.
•
•
•
•
Step 4
Step 5
Related Topics
Configuring Hunt Groups
After you configure the pilot point, you must configure the hunt group. A hunt group comprises a list of destinations (either directory numbers or attendant console user/line numbers) that determine the call redirection order.
This section covers the following procedures:
•
•
•
Adding Hunt Group Members
This section describes how to add hunt group members.
Procedure
Step 1
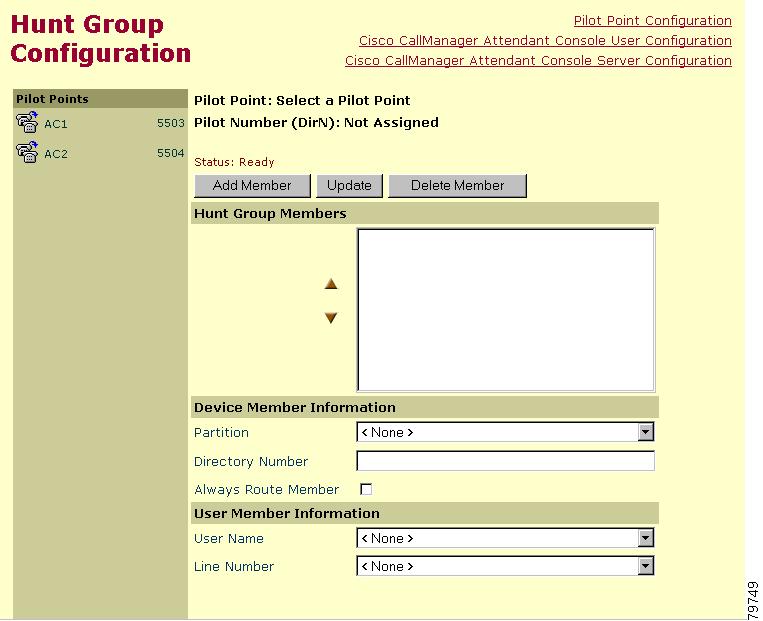
The Hunt Group Configuration window displays.
Figure 26-3 shows an example of the Hunt Group Configuration window.
Figure 26-3 Hunt Group Configuration Window
Step 2
Step 3
Step 4
•
Note
•
Step 5
•
•
Note
As you make selections, the Hunt Group Members list box reflects the information that you choose. The Hunt Group Members list displays either the device directory number or the attendant console user name and line number; for example:
#1 Call directory number 35201 (directory number example)
#2 Direct Call to Mary Brown, Line 1 (user and line number example)
Step 6
Tip
Step 7
Related Topics
•
•
•
•
Configuring Linked Hunt Groups
This section describes how to configure linked hunt groups.
Procedure
Step 1
•
Caution
•
•
Step 2
Caution
Step 3
Related Topics
•
•
•
•
Updating or Deleting Hunt Group Members
This section describes how to view, update, or delete hunt group members.
Procedure
Step 1
The Hunt Group Configuration window displays.
Step 2
The Hunt Group Configuration window displays information for the chosen pilot point.
Step 3
•
•
•
•
Step 4
Related Topics
•
•
•
•
Hunt Group Configuration Settings
Table 26-3 describes hunt group configuration settings.
Related Topics
•
•
Activating the Cisco Telephony Call Dispatcher Service
The following procedure describes how to activate the Cisco TCD service on each server in the cluster that runs the Cisco CallManager service.
Procedure
Step 1
Step 2
Step 3
The window refreshes.
Step 4
Step 5
The service activates and starts automatically on the server.
Step 6
Related Topics
•
•
Activating the CTIManager Service
For hunt groups and the attendant console to function properly, verify that the CTIManager service runs on one server in the cluster. Perform the following procedure to activate the service if it is not activated:
Procedure
Step 1
Step 2
Step 3
The window refreshes.
The Service Name column lists all services that are configured on this server.
Step 4
Step 5
The service activates and starts automatically on the server.
Related Topics
•
•
•
Cisco CallManager Attendant Console Server Configuration
The Cisco CallManager Attendant Console Server Configuration window lists service parameters and enables you to configure trace parameters for the Cisco Telephony Call Dispatcher (TCD). You obtain information about the parameters by clicking the "i" button help icon in the upper, right corner of the Cisco CallManager Attendant Console Server Configuration window.
Caution
Perform the following steps to update Cisco TCD trace parameters.
Procedure
Step 1
The Cisco CallManager Attendant Console Server Configuration window appears.
Step 2
Note
The window refreshes and displays all configured service parameters for the Cisco TCD. Figure 26-4 shows an example of the Cisco CallManager Attendant Console Server Configuration window.
Figure 26-4 Cisco CallManager Attendant Console Server Configuration Window
Note
Related Topic
•
Viewing Cisco CallManager Attendant Console Performance Monitors
Perform the following procedures to view CcmLineLinkState and other performance monitoring information for Cisco TCD and the attendant console:
Procedure
Step 1
Step 2
Step 3
Step 4
Step 5
Step 6
Related Topics
•
•
Creating Cisco CallManager Attendant Console Dial Rules
You can create dial rules and directory lookup rules for Cisco CallManager Attendant Console to transform directory numbers and caller IDs. Dial rules transform directory numbers to create a dialable pattern. Directory lookup rules transform caller IDs to numbers that can be looked up in the directory.
Step 1
Step 2
The following examples show the appropriate format for the dial rules and directory lookup rules.
<DialRules><DialRule BeginsWith="408525" NumDigits="10" DigitsToRemove="5" PrefixWith="89"/></DialRules><DirectoryLookupRules><DirectoryLookupRule BeginsWith="5" NumDigits="5" DigitsToRemove="" PrefixWith="40852"/></DirectoryLookupRules>For more detailed descriptions of the dial rules and directory lookup rule parameters, refer to "Cisco CallManager Attendant Console Dial Rules" in the Cisco CallManager System Guide.
Step 3
Step 4
Related Topics
•
•
Installing the Plugin on an Attendant PC
This section describes how to install the attendant console on a user PC.
Procedure
Step 1
Step 2
Tip
Step 3
Step 4
The Cisco CallManager Attendant Console installation wizard runs.
Step 5
Step 6
Step 7
Step 8
Step 9
Step 10
After you install the application, you can configure or update any attendant console settings that you did not configure during the installation process.
Related Topics
•
•
•
Configuring Cisco CallManager Attendant Console Settings
Configure each attendant console to meet the following criteria:
•
•
After you install the attendant console, you must configure the attendant console before a user can log in to the console. Use the procedure in this section to configure settings that are not specified during installation, to view current settings, or to update the attendant console configuration.
After it is configured, the attendant console operates with the specified settings until the administrator changes them.
Procedure
Step 1
Step 2
Step 3
Step 4
Related Topics
•
•
•
Attendant Console Configuration Settings
Table 26-4 describes Cisco CallManager Attendant Console configuration settings.
Related Topics
•
•
Configuring Cisco CallManager Attendant Console System Files
Some Cisco CallManager Attendant Console configuration procedures, including configuring circular hunt groups, require that you must edit various system files.
This section covers the following procedures:
•
Configuring Held Icon Timers
The color of the held icons on the attendant console indicates how long a call has been on hold. To configure the duration after which the held icons change color, perform the following procedure.
Note
Procedure
Step 1
Step 2
Step 3
Step 4
Related Topics
•
•
Using the Attendant Console Configuration Tool
This section describes how to use the Attendant Console Configuration Tool. The Attendant Console Configuration Tool enables you to perform the following tasks:
•
•
•
•
Before You Begin
Before you create circular or broadcast hunt groups, create the pilot points as described in the "Configuring Pilot Points" section.
Procedure
Step 1
Step 2
Step 3
Related Topics
•
•
•
Attendant Console Configuration Tool Configuration Settings
Table 26-5 describes Attendant Console Configuration Tool configuration settings. Use the fields on the Basic tab to enter JTAPI and directory information. Use the fields on the Advanced tab to enable call queuing and to configure circular and broadcast hunt groups.