-
Cisco CallManager Administration Guide, Release 3.1(1)
-
Index
-
Preface
-
Introduction
-
Server Configuration
-
Cisco CallManager Configuration
-
Cisco CallManager Group Configuration
-
Date/Time Group Configuration
-
Device Defaults Configuration
-
Region Configuration
-
Device Pool Configuration
-
Enterprise Parameters Configuration
-
Location Configuration
-
Auto-Registration Configuration
-
Partition Configuration
-
Calling Search Space Configuration
-
Route Filter Configuration
-
Route Group Configuration
-
Route List Configuration
-
Route Pattern Configuration
-
Translation Pattern Configuration
-
External Route Plan Wizard
-
Special Characters and Settings
-
Route Plan Report
-
Cisco Messaging Interface Configuration
-
Cisco TFTP Configuration
-
Cisco WebAttendant Configuration
-
Conference Bridge Configuration
-
Media Termination Point Configuration
-
Music On Hold Configuration
-
Media Resource Group Configuration
-
Media Resource Group List Configuration
-
Service Parameters Configuration
-
Transcoder Configuration
-
Starting and Stopping Services
-
Call Park Configuration
-
Call Pickup and Group Call Pickup Configuration
-
Cisco IP Phone Services Configuration
-
Device Configuration
-
CTI Route Point Configuration
-
Cisco Voice Mail Configuration
-
Device Profile Configuration
-
Gatekeeper Configuration
-
Gateway Configuration
-
Cisco IP Phone Configuration
-
Phone Button Template Configuration
-
Adding a New User
-
Searching the Global Directory
-
Plugin Configuration
-
Cisco TAPI Service Provider Installation and Configuration
-
Cisco JTAPI Installation and Configuration
-
Personal Directory
-
 Feedback
Table Of Contents
Understanding Personal Directory
Configuring Personal Directory
Configuring the Personal Address Book Service
Personal Address Book Service Parameter Settings
Configuring the Personal Fast Dials Service
Personal Fast Dials Service Parameter Settings
Downloading the Cisco IP Phone Address Book Synchronizer
Preparing the Phone User for Personal Directory
Personal Directory
Personal Directory provides a personal address book stored in the Cisco CallManager LDAP directory, a Cisco IP Phone synchronizer, and two Cisco IP Phone services: Personal Address Book and Personal Fast Dials.
This section contains the following sections:
•
Understanding Personal Directory
•
•
•
Understanding Personal Directory
With the stored personal address book, users can synchronize their Microsoft Outlook and/or Outlook Express address book entries. The Personal Address Book service accesses the stored entries. From a Cisco IP Phone 7960 or 7940, users can look up entries, choose a selection, and press a softkey to dial the chosen number.
With Personal Fast Dials, the Cisco IP phone user can assign index numbers (from 1 to 99) for quick dialing. The index numbers can be assigned to Personal Address Book entries or to directory entries the user adds that do not correspond to the address book. Users can assign and remove the Personal Fast Dials entries from their phones.
Figure A-1 illustrates how the Personal Address Book and Personal Fast Dials services interact with other components in your system.
Figure A-1 Using Personal Address Book and Personal Fast Dials
Cisco Personal Assistant allows users to synchronize their exchange server with the Personal Address Book stored in the LDAP directory in Cisco CallManager. With Personal Directory, the Cisco CallManager directory synchronizes with Exchange Server (A) and with Microsoft Outlook clients on your users' PCs (B).
System Requirements
Make sure your system contains the following components:
•
•
•
•
•
Note
Configuring Personal Directory
To configure the Personal Directory, perform the following procedures:
•
•
Configuring the Personal Address Book Service
You configure Personal Address Book by adding the service to Cisco CallManager Administration and configuring the service parameters. To configure the Personal Address Book service, perform the following steps.
Procedure
Step 1
The Cisco IP Phone Services Configuration pane displays.
Step 2
Step 3
Step 4
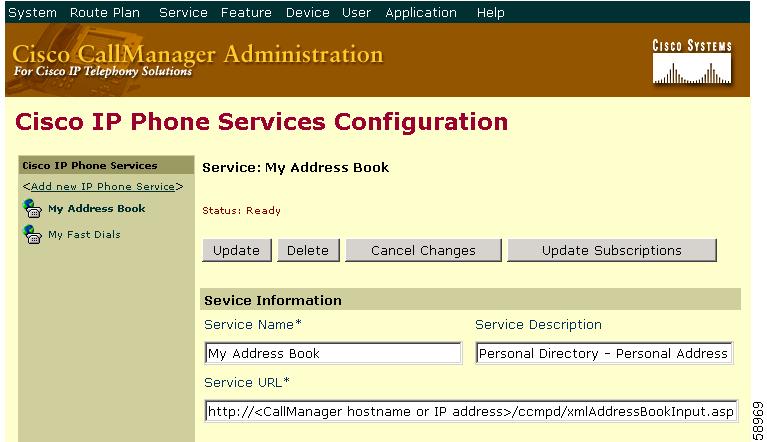
http://<CallManager hostname or IP address>/ccmpd/xmlAddressBookInput.asp
Figure A-2 shows the service configuration entries for Personal Address Book.
Figure A-2 Personal Address Book Service Configuration
Step 5
Step 6
The Configure Cisco IP Phone Service Parameter window appears.
Step 7
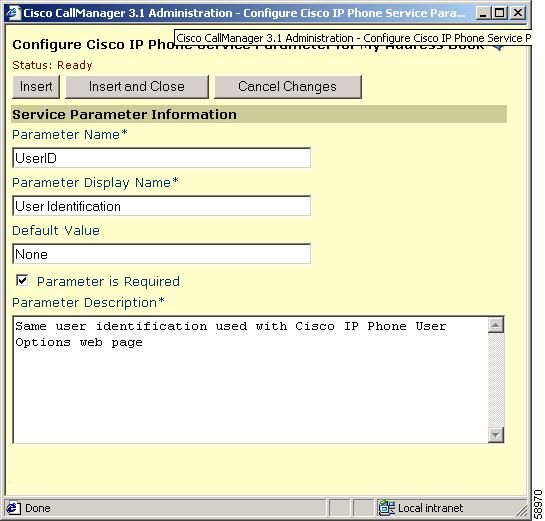
Figure A-3 shows the UserID service parameter settings for this service.
Figure A-3 UserID Service Parameter Settings
Step 8
Step 9
The Cisco IP Phone Services Configuration pane displays.
Step 10
Related Topics
•
•
•
Personal Address Book Service Parameter Settings
Table A-1 contains the service parameter settings for the three service parameters required for the Personal Address Book service. When indicated, use the exact parameter name.
For a general description of these fields, see Table A-1.
Configuring the Personal Fast Dials Service
You configure Personal Fast Dials by adding the service to Cisco CallManager Administration and configuring the appropriate service parameters. To configure the Personal Fast Dials service, perform the following steps.
Procedure
Step 1
The Cisco IP Phone Services Configuration pane displays.
Step 2
Step 3
Step 4
http://<CallManager hostname or IP address>/ccmpd/xmlFastDials.asp
Step 5
Step 6
The Configure Cisco IP Phone Service Parameter window appears.
Step 7
Step 8
Step 9
The Cisco IP Phone Services Configuration pane displays.
Step 10
Related Topics
•
•
•
Personal Fast Dials Service Parameter Settings
Table A-2 contains the service parameter settings for the three service parameters required for Personal Fast Dials service. When indicated, use the exact parameter name.
For a general description of these fields, see Table A-2.
Downloading the Cisco IP Phone Address Book Synchronizer
Users must install the Cisco IP Phone Address Book Synchronizer plugin on their computers before they can use the Personal Directory. Use the following procedure to download the Cisco IP Phone Address Book Synchronizer installation file. Once you download the file, you can distribute it to the users in your network.
Procedure
Step 1
Step 2
Step 3
Step 4
Preparing the Phone User for Personal Directory
Once you have added the Personal Directory services and configured the service parameters, provide the phone user with the following information:
•
•
•
•
•