Feedback Feedback
|
Table Of Contents
Cisco Unified CallConnector for Microsoft Office
Quick Reference GuideStarting and Accessing Features
Handling Calls Using the Toolbar
Using QuickDial From Microsoft Windows Applications
Quick Reference
Cisco Unified CallConnector for Microsoft Office
Quick Reference Guide
1 Overview
Cisco Unified CallConnector for Microsoft Office (formally know as Cisco Unified CallConnector) enables you to setup and manage your communication sessions from toolbars and various information windows embedded within Microsoft's Internet Explorer and Outlook. From these interfaces, you can:
•
Make and answer calls
•
•
•
Cisco Unified CallConnector is available in two configurations:
•
•
Note
2 Starting and Accessing Features
You can access the Cisco Unified CallConnector functions from within Internet Explorer, Outlook, and the call popup window using a set of services that you must start on a PC.
Starting Cisco Unified CallConnector
Step 1
Step 2
Viewing the Cisco Unified CallConnector Toolbar
Step 1
The toolbar is also automatically displayed when Outlook is started.
Step 2
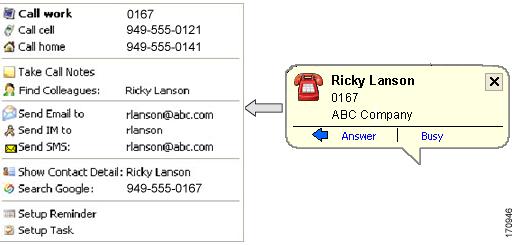
3 Using the Call Popup Window
The Cisco Unified CallConnector call popup window displays information on the calls at your phone. Each call is represented by one window. The call popup window looks up the phone number in your contact database or Outlook and displays the name and organization information.
The Cisco Unified CallConnector call popup window provides two call control buttons and enables you to access the Actions menu, as shown in the figure below.
Controlling Calls From the Call Popup Window
Step 1
Step 2
Selecting Additional Communication Options
Step 1
This opens the Actions menu populated with the contact, collaboration, and communication choices available for the caller.
Step 2
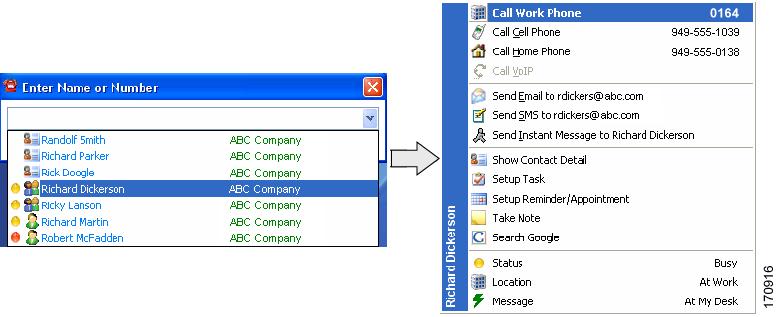
4 Using QuickSearch
From within any application, you can quickly locate and setup communication sessions with your contacts using QuickSearch. Communication options include making calls to work or mobile numbers, launching e-mail, SMS, or QuickMessage windows.
Step 1
Note
Step 2
Step 3
Note
Step 4
The Actions menu is populated with the information of the selected contact, including their availability, location, and away message.
Step 5
5 Toolbar Overview
The Cisco Unified CallConnector toolbar runs within Internet Explorer and Outlook and provides unified one-click access to tools that enable you to control calls, quickly locate your contacts, send messages, and start collaboration sessions. Click the Contacts button to view information about your contacts, call logs, or the presence status of your colleagues.
6 Handling Calls Using the Toolbar
When your line is idle, you can use the buttons on the toolbar for:
•
•
•
•
Note
After you connect on a call, the call control buttons on the toolbar change to display new options. These options include:
•
•
•
•
•
Note
7 Accessing Views
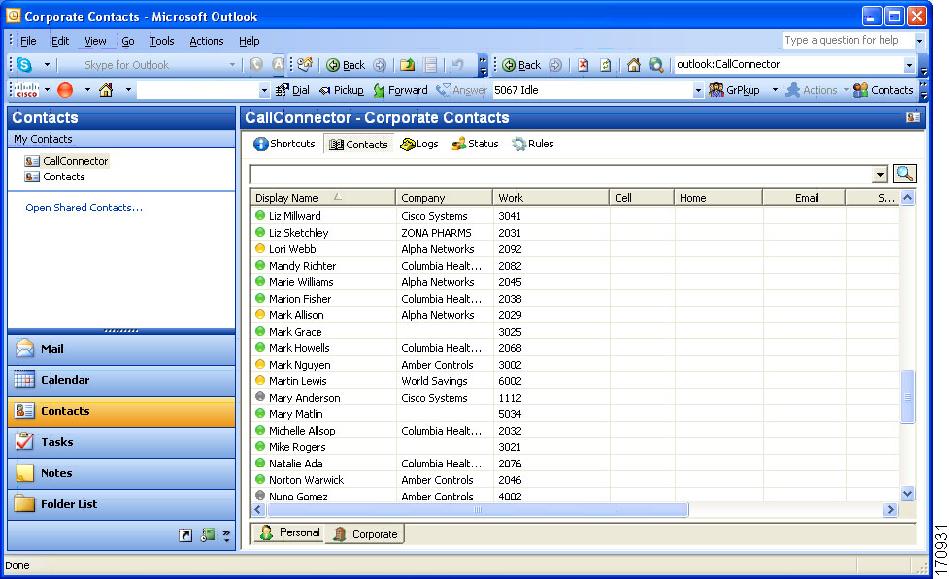
You can access a suite of contact and presence management views for Cisco Unified CallConnector from within Internet Explorer and Outlook. Below is an example of the Contacts view in Outlook.
Click the Contacts button in the Cisco Unified CallConnector toolbar. In Outlook, you can also access these views by clicking the Contacts folder and then selecting CallConnector from the My Contacts list. Buttons at the top of the window allow you to switch to a specific view. The tabs at the bottom of the window allow you to select different folders or groups of information. You can access the following views:
•
•
•
•
•
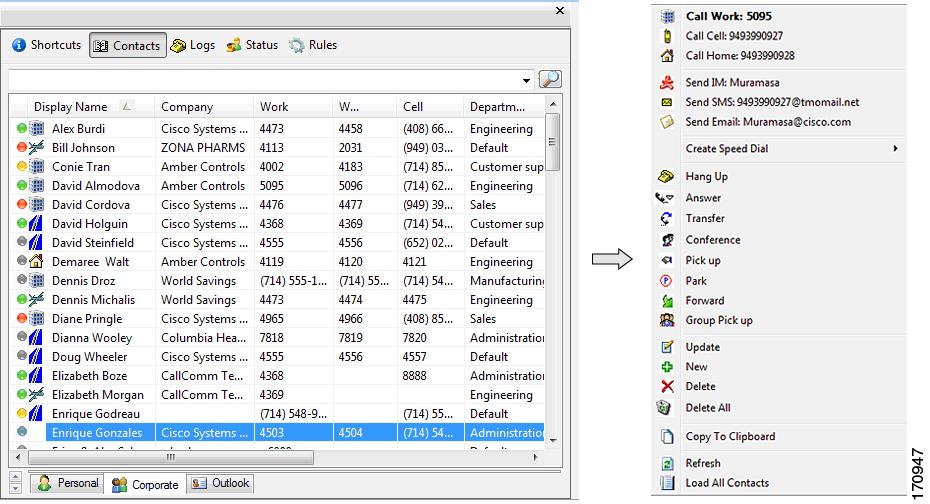
8 Managing Contacts
Cisco Unified CallConnector supports three contact databases — a Corporate database for shared organization contact information, a Personal database that is available for each individual user, and the Outlook contacts. The Contacts view (shown below) allows you to search, view, and manage this information. You can also right-click to access the Actions menu for each contact, as shown below.
Viewing Contacts
In the Cisco Unified CallConnector Contacts window, click the Contacts button. To view contacts from another database, click the tab at the bottom of the window.
Locating a Contact
Type the first few letters in the search bar, press Enter. To search for information in a column, first click the appropriate field label.
Dialing a Number
Double-click an entry to dial the work number.
Accessing Additional Features
Right-click to auto-dial, access telephony features, or send messages.
9 Using the Call Log
The Cisco Unified CallConnector Call Log view displays a history of the calls that have been made to or from your phone, as shown in the following example.
Viewing Missed, Incoming, or Outgoing Calls
Click the tab in the bottom of the window to select the view.
Dialing a Number
Double-click an entry to dial the number. Right-click to access other options.
Locating a Log Entry
Type the first few letters (or date) in the search bar, press Enter. To search for information in a column, first click the appropriate field label.
10 Using QuickDial From Microsoft Windows Applications
You can auto-dial numbers from web pages or from any Windows application using QuickDial.
Dialing a Number from Any Windows Application
Highlight the telephone number and click the Cisco Unified CallConnector icon in the system tray.
Using QuickDial from a Web Page
Click the Number Highlighter button in the toolbar to highlight the telephone numbers in the web page and click the number you want to dial.
11 Monitoring Presence Status
Note
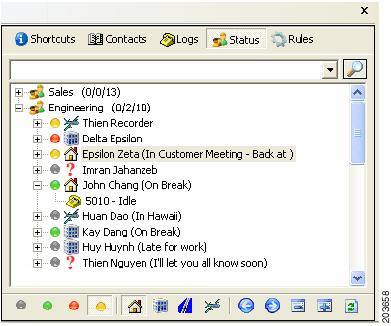
The Cisco Unified CallConnector Status view provides a real-time view of the entire organization and has information on the availability of users and groups, the location of people, and the status of each extension. Users can manage their own presence status, make calls, and send QuickMessages from this view, as shown in the following example.
Viewing Groups (Departments)
Step 1
The list of Groups is displayed.
Step 2
For each Group, three figures are displayed (for example, (1/4/10):
•
•
•
Viewing Users
Step 1
The users in the group display. Each user's availability and location is displayed through icons and the Away Message is displayed to the right.
Step 2
Viewing Contacts
Step 1
A list of the user's contact numbers is displayed.
Step 2
12 Updating Availability
Note
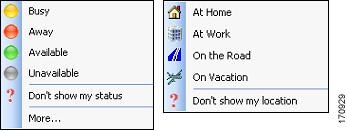
Cisco Unified CallConnector maintains three components of a user's presence information:
•
•
•
In the server configuration, this information is broadcast to the Cisco Unified CallConnector subscribers.
The following figure shows the availability and location icons and their meanings.
Note
Step 1
Step 2
Step 3
13 Sending QuickMessages
Note
Sending QuickMessages in the workplace allows you to quickly resolve a question or communicate without interrupting the workflow. With the server version of Cisco Unified CallConnector, users can send QuickMessages and text (SMS) messages to their colleagues.
Sending an QuickMessage
Step 1
You can also double-click the name of the person to which you want to send a message in the Status view or right-click a contact in the Contacts view and select the appropriate message option.
The appropriate message window displays.
Step 2
Sending a Group QuickMessage
Right-click the Group name in the Status view and select Send Group Message. This starts a QuickMessage session with all the available users in the group that have an IM address.
14 Additional Information
For more information about Cisco Unified CallConnector, see the Cisco Unified CallConnector User Guide available at http://www.cisco.com/en/US/products/ps7067/tsd_products_support_series_home.html