Feedback Feedback
|
Table Of Contents
Release Notes for Cisco CDA Visual Quality Experience Application, Release 3.0
New and Changed Features and Functionality
Significant Changes to Be Aware of When Upgrading to VQE Release 3.0
Significant Changes to the Set of Parameters Used to Configure VQE
Configuring Trusted Channel-Provisioning Servers for VQE-S Is Required
Security Restrictions for Logins and Root Privileges
VQE SDP Channel Information Compatibility
Changing System Time Causes Unicast Retransmission and RCC Disruptions
Performing a Date and Time Change with NTP
Performing a Date and Time Change with the Linux date Command
Routes May Not Be Carried Forward from VQE Release 2.1 to Release 3.0
Random "rtc: lost some interrupts at 8192Hz." Messages Displayed on Serial Console
Deprecated sysctl Message Displayed on Serial Console
Upgrading VQE Software from Release 2.1 to Release 3.0
Backing Up Files Before Upgrading or Installing Software
Using an ISO Upgrade Installation
Using an ISO Clean Installation
Migrating Channel-related Files from VQE Release 2.1 to VQE Release 3.0
Creating VCPT Configuration Files for Release 3.0
Creating VQE-S and VQE-C Channel Configuration Files for Release 3.0
Supporting Software Hardening Guides and VQE
The 60 Minute Network Security Guide
GNU General Public License Information
Obtaining Documentation and Submitting a Service Request
Release Notes for Cisco CDA Visual Quality Experience Application, Release 3.0
Revised: September 2, 2008, OL-17351-01CDC Date September 2, 2008
Contents
These release notes contain the following sections:
•
"New and Changed Features and Functionality" section
•
•
•
•
•
•
Introduction
Cisco CDA Visual Quality Experience Application (VQE), Release 3.0, offers service providers a set of technologies and products associated with the delivery of IPTV video services. VQE is designed to improve the quality of IPTV services and subscribers' viewing experiences. VQE is part of a Cisco end-to-end solution that builds video awareness into the network infrastruture. For Release 3.0, VQE technology is intended for wireline operators who offer managed broadcast (multicast) IPTV services using xDSL.
Cisco Content Delivery Application (CDA) Visual Quality Experience Application, Release 3.0, includes these major software components:
•
•
These release notes cover VQE Server software and two related software components: VQE Channel Provisioning Tool (VCPT) and VQE Client Channel Configuration Delivery Server (VCDS).
For information on VQE Server, VQE Channel Provisioning Tool, and VQE Client Channel Configuration Delivery Server, see the Cisco CDA Visual Quality Experience Application User Guide, Release 3.0.
For information on VQE Client, see the documentation that is provided in the TAR file containing the VQE Client software.
New and Changed Features and Functionality
The new features and functionality in VQE Release 3.0 include the following:
•
•
•
–
–
–
–
•
Support for RTP Control Protocol (RTCP) Extended Reports and the Extended Report (XR) packet type. Three XR report block types are supported:
–
–
–
The changed functionality in VQE Release 3.0 includes the following:
•
•
•
•
System Requirements
VQE Server runs on one Content Delivery Engine 110 (CDE110) appliance. VQE Channel Provisioning Tool and VQE Client Channel Configuration Delivery Server run on a separate CDE110 appliance.
The Cisco CDE110 comes with the required software pre-installed—either VQE Server software or Tools (VQE Channel Provisioning Tool and VQE Client Channel Configuration Delivery Server) software. In each case, the required Linux, Apache web server, and other software is also pre-installed.
To access the VQE-S Application Monitoring Tool (VQE-S AMT or AMT) or the VQE Channel Provisioning Tool, you need a web browser. For these tools, the following web browsers are supported:
•
•
The minimum screen resolution required for VQE-S AMT and VCPT is 1024 x 768 pixels.
To display the Channels Status Summary graph of active, inoperative, and inactive channels in the AMT VQE-S Status window, Adobe Flash Player must be installed on the computer that hosts the browser accessing AMT. Adobe Flash Player is free and can be found at this URL:
http://get.adobe.com/flashplayer/
Important Notes
The important notes are on these topics:
•
•
•
•
Significant Changes to Be Aware of When Upgrading to VQE Release 3.0
If you are upgrading from Cisco VQE Release 2.1 to Release 3.0, be aware of these significant changes in Cisco VQE Release 3.0.
The mechanisms used for configuring the Cisco Content Delivery Engine 110 (CDE110) servers that host VQE Server and VQE Tools have changed:
•
•
–
–
–
In Cisco VQE Release 3.0, the major VQE and system processes are implemented as Linux services. Table 1 lists these services. The services are managed using the Linux service command. The /etc/inittab file is no longer used for starting the process_monitor process. For information on configuring, starting, and monitoring the VQE and system services, see Appendix D, "Manual Initial VQE System Configuration," in the Cisco CDA Visual Quality Experience Application User Guide, Release 3.0.
Significant Changes to the Set of Parameters Used to Configure VQE
In VQE Release 3.0, the number of parameters used to configure the VQE-S and VQE Tools servers has been simplified and enhanced to make the configuration tasks easier to accomplish. In previous VQE releases, the vqes.conf options included many internal options that are useful for Cisco engineering testing but are unlikely to be useful in a deployment. These internal options are not available in the VQE Release 3.0 vcdb.conf file.
Note
Table 2 lists the vqes.conf options that were used in VQE Release 2.1 and the corresponding VCDB parameters that are used in VQE Release 3.0. If you use an ISO upgrade installation to upgrade from VQE Release 2.1 to VQE Release 3.0, the vqes.conf options in Table 2 are translated into VCDB parameters and carried over into your VQE Release 3.0 configuration.
If a vqes.conf option is not shown in Table 2, no VCDB (vcdb.conf) parameter is available for this option in VQE Release 3.0.
In VQE Release 2.1, the STUN Server was enabled by specifying run = true; in the STUN Server process definition in vqes.conf. In VQE Release 3.0, the STUN Server is enabled by default, and the VCDB parameter vqe.vqes.stun_enable is used to enable or disable the STUN Server.
For complete information on the set of VCDB parameters, see Appendix A, "VQE, System, and Network Parameters," in the Cisco CDA Visual Quality Experience Application User Guide, Release 3.0 and also see the /etc/opt/vqes/vcdb.conf.sample file.
Configuring Trusted Channel-Provisioning Servers for VQE-S Is Required
For security purposes, Cisco VQE Release 3.0 requires that the VQE-S host be configured with the IP addresses of the trusted channel-provisioning servers (for example, VCPT). This configuration can be accomplished with the Cisco VQE Startup Configuration Utility or with the VCDB parameter vqe.iptables.trusted_vcpt. For information on VQE-S host configuration, see the Cisco CDA Visual Quality Experience Application User Guide, Release 3.0.
Note
Security Restrictions for Logins and Root Privileges
For security reasons, the following restrictions apply to VQE.
•
•
If you want to add user accounts to the wheel group so that additional users can use su and sudo, log in as root and issue the following command:
usermod -G wheel username
In the preceding, username specifies the user who will be added to the wheel group.
Limitations and Restrictions
Cisco CDA Visual Quality Experience Application, Release 3.0, technology is intended for wireline operators who offer managed broadcast (multicast) IPTV services using xDSL.
See the following sections for information on other limitations and restrictions in Cisco VQE, Release 3.0:
•
•
•
VQE SDP Channel Information Compatibility
Cisco VQE channel configuration information in Session Description Protocol (SDP) format is sent to VQE Servers and VQE Clients. VQE-S and VQE-C create channel configuration files from the information received.
Set-top boxes with VQE-C Release 2.1 and 3.0 can be used in the same deployment. Both VQE-C Release 2.1 and 3.0 can read Release 2.1 and 3.0 channel configuration files.
Table 3 and the notes that follow the table provide the SDP channel configuration compatibility requirements for VQE Release 2.1 and 3.0.
Table 3 SDP Channel Information Compatibility Requirements
VQE 2.1 SDP
Yes
Yes
Yes **
Yes **
VQE 3.0 SDP
Yes *
Yes *
Yes
Yes
* When VQE-S or VQE-C Release 2.1 receives a channel configuration for a VQE Release 3.0 feature that it does not support, the new feature is ignored, but all Release 2.1 functionality will operate without change.
** Release 2.1 channel configuration files created with VCPT are usable with the Release 3.0 version of VQE-S, VCDS, and VQE-C. When a Release 2.1 channel configuration file is used, new VQE Release 3.0 functionality will not be used because it is not configured.
Note
For information on the migrating channel-related files from VQE Release 2.1 to Release 3.0, see the "Migrating Channel-related Files from VQE Release 2.1 to VQE Release 3.0" section.
Changing System Time Causes Unicast Retransmission and RCC Disruptions
When the system time is changed on a VQE-S server that is actively repairing network errors, all Unicast Retransmissions will stop indefinitely, and output gaps will be seen on the VQE Clients.
•
•
For a VQE-S server that is actively repairing network errors, an explicit system time change (that is, by using the date command) will always result in the failure of Unicast Retransmission and RCC operations until corrective action is taken.
Workaround: Any time change performed on the VQE-S system should be done during a maintenance window. The procedures for changing the date and time vary depending on whether Network Time Protocol (NTP) or the Linux date command is used. See one of the following sections:
•
•
Note
Performing a Date and Time Change with NTP
When performing a date and time change with NTP, do the following:
Step 1
Step 2
[root@system]# service vqes stopStep 3
[root@system]# service ntpd stopStep 4
Step 5
date -s "date_time_string"
For example:
[root@system]# date -s "16:55:30 July 7, 2008"Step 6
[root@system]# ntpd -qIf the system clock is off by a lot, the command will take considerable time to return.
Step 7
[root@system]# service ntpd startStep 8
[root@system]# /sbin/hwclock --systohcStep 9
[root@system]# ntpq -pStep 10
[root@system]# init 6
Performing a Date and Time Change with the Linux date Command
When performing a time/date change with the Linux date command only, perform the following commands:
Step 1
Step 2
[root@system]# service vqes stopStep 3
Step 4
date -s "date_time_string"
For example:
[root@system]# date -s "16:55:30 July 7, 2008"Step 5
[root@system]# /sbin/hwclock --systohcStep 6
[root@system]# init 6
Routes May Not Be Carried Forward from VQE Release 2.1 to Release 3.0
When upgrading from VQE Release 2.1 to Release 3.0 with an ISO upgrade installation for a VQE-S host or a VQE Tools host, some or all of the routes, including the management route, may not be carried forward from Release 2.1 to Release 3.0.
Since there are many ways routes could possibly have been configured on a Release 2.1 system, such as using multiple route files, the VQE ISO upgrade installations cannot support all possible configurations. The VQE ISO upgrade installations do carry forward to VQE Release 3.0 the routes that were configured through the VQE 2.1 Startup Configuration Utility. All other route configurations are considered best effort.
Note
Workaround: Add any missing routes using the VQE CMS system and VCDB. For information on the VQE CMS, see Chapter 6, "Configuring VQE Server and VQE Tools," in the Cisco CDA Visual Quality Experience Application User Guide, Release 3.0.
Open Caveats
VQE Release 3.0 contains the following open caveats:
CSCsi67816
Manual startup or restart of tomcat5 service daemon fails.
The symptom is that the VQE-S Application Management Tool (AMT) does not work and simple restarts of the tomcat5 service fail to clear the problem. The tomcat 5 service is required for the VQE-S AMT to operate.
In some conditions, an attempt to restart the tomcat5 service fails and leaves tomcat5 in an inoperable state even though the process itself may appear to be running. The root cause of the problem is not known. However, the issue only seems to occur when the tomcat5 service has been started, or restarted, from within a Linux shell environment that has been reached with the su command rather than through a direct login.
Workaround: Perform the following:
1.
ssh -l root vqes-system
2.
service tomcat5 restart
CSCs142168
A java exception is thrown at the console when tomcat is restarted.
If tomcat is currently not running and the command to restart tomcat is issued from the console, a java exception is thrown.
Workaround: No workaround is needed. The exception can be safely ignored.
CSCsl75266
In VCPT, a validation error is displayed when all fields have correct data.
When a channel is cloned and all data is updated so that it is unique, VCPT displays a validation error.
Workaround: When the error is displayed, position the cursor in the field that is highlighted as red. The validation error will be removed, and the Create button will be accessible.
CSCs177161
The error provided for a VQE-S misconfiguration is missing details about what is invalid in the configuration file.
When a newline is entered at the end of a string for a variable in the vqes.conf file, the invalid configuration error occurs.
Workaround: Remove the newline and ensure that any modifications to string variables in the vqes.conf file for do not have a newline in the string.
CSCsl65623
In a channel lineup where two different channels share the same multicast address (but different ports), one or both of the channels fail to receive data on the VQE-S, or only receive packets intermittently.
Multiple channels with the same multicast address but different RTP ports can be sent to VQE-S and will be accepted. This configuration causes errors within the Multicast Load Balancer, which in turn may cause one or both of the channels to fail to be received on the VQE-S.
Workaround: Change the channel configuration so that each channel uses a unique multicast address.
CSCsj70513
An "Invalid module format" error is thrown on ipmi/imb.ko.
The following errors are shown on the CDE110 system console and saved in first_boot_addon.log file during VQE-S installation first boot phase:
+ /usr/local/ism/driver/imbload startinsmod: error inserting '/usr/local/ism/driver/imb.ko': -1 Invalid module format/bin/mknod: missing operand after `0'Try `/bin/mknod --help' for more information.The error always occurs during the first boot phase of initial VQE-S install. The VQE-S installation patches the Linux kernel during first boot phase, and installs the Intel IPMI driver for the new kernel. The IPMI driver tries to load before the new kernel is loaded and causes the error messages shown on console and in first_boot_addon.log.
Workaround: No work around is required. The system will function correctly since the patched kernel will be used once the installation is complete and system is reloaded.
CSCsj95844
The ifup command produces a core dump of the arping process.
The ifup command used to activate an Ethernet interface executes a system utility named arping to do duplicate address detection on the network. In certain cases, the arping utility may stop unexpectedly while running an interface up or interface down operation. A message indicating that the duplicate address detection check has failed is displayed. However, the interface up operation will continue to run and apply configuration changes as expected. A second message to the console will indicate that arping has segfaulted. A core dump file of the arping process will be found in /var/core.
This failure can occur whenever an interface is started using the /sbin/ifup command and the VQE-S application is running.
Workaround: Retry the interface up operation by first issuing the interface down command /sbin/ifdown ethX. Then issue the interface up command /sbin/ifup ethX again.
CSCsr81644
In VCPT, channel update details are not provided in the "Status of Last Send" column.
This issue occurs in the following situations:
•
•
Workaround: Last send details can be seen in the syslog location for the system being used:
•
•
•
•
Or update one of the systems to the same VQE version as the other system.
CSCsr78421
Trusted channel-provisioning servers are not restricted to the defined VCPT server configuration on VQE-S initial configuration.
This issue occurs when a VQE Server host uses the default VQE-S Domain Name System (DNS) or host definition configuration. (The default DNS configuration is to have no DNS server defined.)
Workaround: Use an IP address (not a host name) when configuring the trusted channel-provisioning server on the VQE Server host, for example, with the VQE Startup Configuration Utility or with the VCDB parameter vqe.iptables.trusted_vcpt.
Resolved Caveats
These caveats have been resolved in VQE Release 3.0 for VQE Server and VQE Tools: none.
These caveats have been resolved in VQE Release 3.0 for VQE Client:
CSCsr21130 (VQE-C)
The setting of the VQE-C reorder delay and repair trigger point has previously been supported using the "repair_trigger_point" and "reorder_delay" system configuration parameters, with the units being in terms of percentage of jitter buffer size. As a result of these units the reorder delay and repair trigger point parameters would be modified following any change to the jitter buffer size.
This fix decouples of reorder delay and repair trigger point parameters from the "jitter_buff_size" parameter.
VQE-C may be configured using two system configuration parameters: repair_trigger_point_abs and reorder_delay_abs.
The new parameters allow configuration of the repair trigger point and reorder delay via specification of an amount of time in absolute form (having units of milliseconds). The existing parameters (non "abs" forms) require configuration of the repair trigger point and reorder delay as a relative percentage of the "jitter_buff_size".
Workaround (prior to this release): Modify the reorder_delay and repair_trigger_point parameters in conjunction with any changes to the jitter_buff_size parameters to maintain the appropriate settings.
Further Problem Description: It is recommended that the new forms of the system configuration parameters be used whenever possible.
CSCso50781 (VQE-C)
Unable to specify the VQE-C CLI interface (for example, the target platform's loopback interface).
This fix allows the VQE-C to be configured to provide telnet CLI access from an user specified interface using the new system configuration parameter "cli_ifname". The default is the target platform's loopback interface.
There is a security risk in enabling the VQE-C CLI in deployment scenarios. This fix addresses the issue by allowing the integrator to restrict access of the CLI port to the loopback interface (127.0.0.1). Thus allowing the target platform's existing security measures to be employed to access to the VQE-C CLI (that is, ssh).
Workaround (prior to this release): Disable VQE-C CLI for real deployments.
Further Problem Description: As the default configuration is to use the loopback interface existing integrations will need to first log into the target platform and then access the VQE-C CLI via a local loopback telnet session (i.e. telnet 127.0.0.1 8182).
Known Problems
These known problems exist in Cisco VQE, Release 3.0.
Random "rtc: lost some interrupts at 8192Hz." Messages Displayed on Serial Console
A message or block of messages indicating "rtc" has lost some interrupts can appear sporadically on the serial console, usually after entering a command, but the message is unrelated to any specific command.
No workaround is needed. This does not appear to have any operational impact and is believed to be informational only related to an underlying Linux process.
Deprecated sysctl Message Displayed on Serial Console
On the serial console, the system will occasionally display a message of the form:
process `sysctl' is using deprecated sysctl (syscall)
net.ipv6.neigh.eth4.retrans_time; Use net.ipv6.neigh.eth4.retrans_time_ms instead.
No workaround is needed. This has no known operational impact and is a Red hat Linux binary message.
Upgrading VQE Software from Release 2.1 to Release 3.0
To upgrade from VQE Release 2.1 to Release 3.0 requires that you perform either an ISO clean installation or ISO upgrade installation of the VQE Release 3.0 software on the Cisco CDE110 that hosts VQE-S and on the (optional) CDE110 that hosts the VQE Tools (VCPT and VCDS). Red Hat Package Manager (RPM) installations are not supported for the Release 2.1 to 3.0 upgrade.
•
•
Note
When using an ISO clean installation to install VQE Release 3.0, read each of the following sections, in the order shown:
1.
2.
When using an ISO upgrade installation to upgrade from VQE Release 2.1 to Release 3.0, read each of the following sections, in the order shown:
1.
2.
The software for Cisco VQE Release 3.0, Redhat Linux, Apache web server, and other required facilities is distributed on one CD for VQE-S, and on one CD for VQE Tools.
Note
Backing Up Files Before Upgrading or Installing Software
Caution
Before upgrading the software on a CDE110, be sure to backup all needed files to a safe location (for example, on a server separate from the CDE110s being upgraded).
Before the hard disk is formatted, an ISO upgrade installation does a backup of configuration files under the /etc directory. After the hard disk is formatted, an ISO upgrade installation restores your VQE 2.1 configurations in the files under /etc—but only configuration items for which a VCDB parameter exists are restored. Nevertheless, it is recommended that you manually backup these files to another server before proceeding with an ISO upgrade installation in case of a catastrophic failure.
•
•
The easiest way to back up the /etc configuration files is to use the tar command to create a TAR file archive of all directories and files under /etc.
Note
If additional functions are enabled on the CDE110, there may be additional files not listed in these tables that need to be backed up.
Using an ISO Upgrade Installation
This section explains how to use an ISO upgrade installation to upgrade from VQE Release 2.1 to Release 3.0 and preserve your VQE Release 2.1 configurations.
Note
For terminal emulation software configuration, see "Configuring Terminal Emulation Software" in Chapter 2 of the Cisco CDA Visual Quality Experience Application User Guide, Release 3.0.
Note
To perform an ISO upgrade installation, do the following:
Caution
Backup configuration files as described in the "Backing Up Files Before Upgrading or Installing Software" section.
Step 1
Step 2
Changing the Boot Sequence to Start from the CD/DVD Combo Drive
Note
Step 3
Step 4
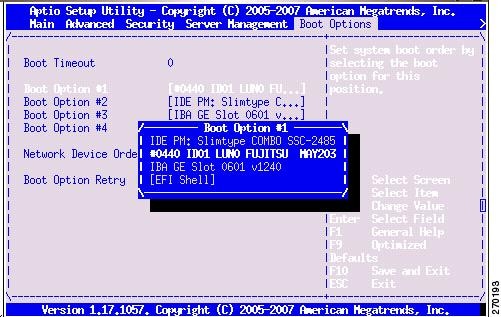
Figure 1 Boot Options Menu
Step 5
1.
2.
3.
4.
Note
To change the boot sequence, use the arrow keys to move to the boot option you will change (for example, Boot Option #1) and press Enter. Then use the arrow keys to move to the required boot device and press Enter.
The updated Boot Option is displayed.
Step 6
The Setup Confirmation message "Save Configuration Changes and exit now?" is displayed.
Step 7
The CDE110 restarts.
Loading the VQE Software
When the VQE installation software runs, the boot: prompt is displayed.
Step 8
boot: upgrade
Note
This message is harmless. Enter correct input (upgrade) and proceed with the installation.The installation software checks that VQE software and configuration files exist. If either of these checks fail, the installation is terminated.
If the VQE software and configuration files exist, the following message is displayed before the actual upgrade process starts.
You are performing VQE upgrade from 2.1.0 to 3.0.x. If this is incorrect, please power
off the server within 30 seconds.
You can power off the server to stop the ISO upgrade installation if the wrong CD has been used for the installation.
When you select an ISO upgrade installation and the installation begins, no further user input is required or possible.
An ISO upgrade installation does the following:
•
•
•
•
–
–
–
Note
Table 6 shows additional files that are saved to the CDE110 hard drive.
•
–
–
•
–
–
•
Step 9
Step 10
Step 11
Note
Step 12
You can examine the /vqe-etc/etc-diff file to determine the /etc file parameters (beyond the control of the VQE CMS) that have been changed.
For information on migrating channel-related files from VQE Release 2.1 to VQE Release 3.0, see the "Migrating Channel-related Files from VQE Release 2.1 to VQE Release 3.0" section.
Using an ISO Clean Installation
Caution
An ISO clean installation reformats the hard drive and reinstalls the operating system and other packages, such as the VQE software. All old configurations are removed.
After the ISO clean installation is complete, the system automatically reboots and allows you to log in as root. Next the VQE Startup Configuration Utility automatically runs. This utility allows you to specify initial configuration values for the CDE110 server and the VQE software. Using this input, the startup utility generates initial VQE Configuration Database (VCDB) contents and reboots the CDE110 server. When the server comes back up, VQE Configuration Engine applies the changes in VCDB to the configuration files under the /etc directory.
Note
For terminal emulation software configuration, see "Configuring Terminal Emulation Software" in Chapter 2 of the Cisco CDA Visual Quality Experience Application User Guide, Release 3.0.To perform an ISO clean installation, do the following:
Caution
Backup configuration files as described in the "Backing Up Files Before Upgrading or Installing Software" section. With this backup of the configuration files, you will have the VQE 2.1 configuration files available for reference if you need them after the ISO clean installation is complete.
Step 1
Step 2
Changing the Boot Sequence to Start from the CD/DVD Combo Drive
Note
Step 3
Step 4
Figure 2 Boot Options Menu
Step 5
1.
2.
3.
4.
Note
To change the boot sequence, use the arrow keys to move to the boot option you will change (for example, Boot Option #1) and press Enter. Then use the arrow keys to move to the required boot device and press Enter.
The updated Boot Option is displayed.
Step 6
The Setup Confirmation message "Save Configuration Changes and exit now?" is displayed.
Step 7
The CDE110 restarts.
Loading the VQE Software
When the VQE installation software runs, the boot: prompt is displayed.
Step 8
boot: clean
Note
This message is harmless. Enter correct input (clean) and proceed with the installation.When you select an ISO clean installation and the installation begins, no further user input is required or allowed until the initial configuration of the CDE110 server.
An ISO clean installation does the following:
1.
2.
3.
4.
5.
a.
b.
6.
Step 9
Note
Step 10
localhost.localdomain login: rootYou are required to change your password immediately (root enforced)You can now choose the new password or passphrase.A valid password should be a mix of upper and lower case letters,digits, and other characters. You can use an 8 character longpassword with characters from at least 3 of these 4 classes, ora 7 character long password containing characters from all theclasses. An upper case letter that begins the password and adigit that ends it do not count towards the number of characterclasses used.A passphrase should be of at least 3 words, 12 to 40 characterslong and contain enough different characters.Enter new password:Re-type new password:Step 11
When you change the root password, the VQE Startup Configuration Utility runs:
Welcome to the Cisco VQE startup configuration utility. This utility isintended to facilitate the initial setup of the VQE system. This is notintended as a complete configuration tool, but merely to assist in the mostcommon configuration needs, therefore you may still need to customize the VQEconfiguration for your specific needs after this utility is complete.The VQE Startup Configuration Utility allows you to specify initial configuration values for the CDE110 server and the VQE software. Using this input, the startup utility generates initial VQE Configuration Database (VCDB) contents and reboots the CDE110 server. When the server comes back up, VQE Configuration Engine applies the changes in VCDB to the configuration files under the /etc directory.
For information on using the startup utility, see Chapter 2, "Getting Started with the VQE Startup Configuration Utility" in the Cisco CDA Visual Quality Experience Application User Guide, Release 3.0.
For information on the VQE Configuration Database and Configuration Engine, see Chapter 6, "Configuring VQE Server and VQE Tools" in the Cisco CDA Visual Quality Experience Application User Guide, Release 3.0.
For information on migrating channel-related files from VQE Release 2.1 to VQE Release 3.0, see the "Migrating Channel-related Files from VQE Release 2.1 to VQE Release 3.0" section.
Migrating Channel-related Files from VQE Release 2.1 to VQE Release 3.0
VQE can use three types of channel-related configuration files:
•
•
•
The following sections provide information on migrating channel-related files from VQE Release 2.1 to VQE Release 3.0:
•
•
Note
Creating VCPT Configuration Files for Release 3.0
VCPT Release 3.0 is able to open and use valid VCPT 2.1 configuration files. When VCPT Release 3.0 opens a VCPT 2.1 configuration file, the fields for new Release 3.0 functionality items related to Rapid Channel Change and Extended RTCP Reports are blank. When you save the Release 2.1 file, VCPT converts the files to the Release 3.0 format, updating the file so that any changed channel values (including those related to Rapid Channel Change and Extended RTCP Reports) are saved.
Creating VQE-S and VQE-C Channel Configuration Files for Release 3.0
Release 2.1 channel configuration files created with VCPT are usable with the Release 3.0 version of VQE-S and VQE-C. When a Release 2.1 channel configuration file is used, new VQE Release 3.0 functionality will not be used because it is not configured.
When migrating from VQE Release 2.1 to VQE Release 3.0, the easiest way to create a valid Release 3.0 channel configuration file for VQE-S and VQE-C is to open a 3.0 channel-provisioning server configuration file and send the channel information to the Release 3.0 VQE Servers and VQE Client Channel Configuration Delivery Servers (VCDS). For example with VCPT, do the following:
1.
2.
When VQE-S and VCDS receive the channel information, VQE-S and VCDS use it to create valid Release 3.0 channel configuration files for VQE-S or VQE-C, respectively.
As an alternative to the above method for creating a Release 3.0 channel configuration file, you can use VCPT to create a new VCPT Release 3.0 configuration file by manually entering your existing VQE Release 2.1 channel, server, and association information into the new VCPT configuration file.
Supporting Software Hardening Guides and VQE
Customers who wish to apply the security recommendations published by SysAdmin, Audit, Network, Security Institute (SANS) or National Security Agency (NSA), as described in the documents referenced in the following sections, should be aware of some issues in using these recommendations that may affect the correct operation of the VQE-S.
The following sections describe the particular areas where customers should exercise care in following the security recommendations in these hardening guides:
•
Linux Security Checklist
Document: Linux Security Checklist, Version 2
Document URL:
http://www.sans.org/score/checklists/linuxchecklist.pdf
For the Linux operating system, the following are SANS requirements where it appears that if the user were to follow the specific recommendations of the guide it would likely break behavior that VQE implements.
•
•
•
•
•
The 60 Minute Network Security Guide
The NSA's The 60 Minute Network Security Guide has guidance relevant to the Apache web server and the VQE Server software.
Document: The 60 Minute Network Security Guide, Version 2.1
Document URL:http://www.nsa.gov/ia/_files/support/I33-011R-2006.pdf
If VQE customers follow instructions in the "Unix Web Servers" section of The 60 Minute Network Security Guide, it will not break the VQE web application system.
The following guidance applies to VQE Server software except for the Apache web server, which was discussed in the preceding paragraph.
•
•
•
•
•
•
Notices
The following notices pertain to this software license.
OpenSSL/Open SSL Project
This product includes software developed by the OpenSSL Project for use in the OpenSSL Toolkit (http://www.openssl.org/).
This product includes cryptographic software written by Eric Young (eay@cryptsoft.com).
This product includes software written by Tim Hudson (tjh@cryptsoft.com).
License Issues
The OpenSSL toolkit stays under a dual license, i.e. both the conditions of the OpenSSL License and the original SSLeay license apply to the toolkit. See below for the actual license texts. Actually both licenses are BSD-style Open Source licenses. In case of any license issues related to OpenSSL please contact openssl-core@openssl.org.
OpenSSL License:
Copyright © 1998-2007 The OpenSSL Project. All rights reserved.
Redistribution and use in source and binary forms, with or without modification, are permitted provided that the following conditions are met:
1.
2.
3.
4.
5.
6.
"This product includes software developed by the OpenSSL Project for use in the OpenSSL Toolkit (http://www.openssl.org/)".
THIS SOFTWARE IS PROVIDED BY THE OpenSSL PROJECT "AS IS"' AND ANY EXPRESSED OR IMPLIED WARRANTIES, INCLUDING, BUT NOT LIMITED TO, THE IMPLIED WARRANTIES OF MERCHANTABILITY AND FITNESS FOR A PARTICULAR PURPOSE ARE DISCLAIMED. IN NO EVENT SHALL THE OpenSSL PROJECT OR ITS CONTRIBUTORS BE LIABLE FOR ANY DIRECT, INDIRECT, INCIDENTAL, SPECIAL, EXEMPLARY, OR CONSEQUENTIAL DAMAGES (INCLUDING, BUT NOT LIMITED TO, PROCUREMENT OF SUBSTITUTE GOODS OR SERVICES; LOSS OF USE, DATA, OR PROFITS; OR BUSINESS INTERRUPTION) HOWEVER CAUSED AND ON ANY THEORY OF LIABILITY, WHETHER IN CONTRACT, STRICT LIABILITY, OR TORT (INCLUDING NEGLIGENCE OR OTHERWISE) ARISING IN ANY WAY OUT OF THE USE OF THIS SOFTWARE, EVEN IF ADVISED OF THE POSSIBILITY OF SUCH DAMAGE.
This product includes cryptographic software written by Eric Young (eay@cryptsoft.com). This product includes software written by Tim Hudson (tjh@cryptsoft.com).
Original SSLeay License:
Copyright © 1995-1998 Eric Young (eay@cryptsoft.com). All rights reserved.
This package is an SSL implementation written by Eric Young (eay@cryptsoft.com).
The implementation was written so as to conform with Netscapes SSL.
This library is free for commercial and non-commercial use as long as the following conditions are adhered to. The following conditions apply to all code found in this distribution, be it the RC4, RSA, lhash, DES, etc., code; not just the SSL code. The SSL documentation included with this distribution is covered by the same copyright terms except that the holder is Tim Hudson (tjh@cryptsoft.com).
Copyright remains Eric Young's, and as such any Copyright notices in the code are not to be removed. If this package is used in a product, Eric Young should be given attribution as the author of the parts of the library used. This can be in the form of a textual message at program startup or in documentation (online or textual) provided with the package.
Redistribution and use in source and binary forms, with or without modification, are permitted provided that the following conditions are met:
1.
2.
3.
"This product includes cryptographic software written by Eric Young (eay@cryptsoft.com)".
The word `cryptographic' can be left out if the routines from the library being used are not cryptography-related.
4.
THIS SOFTWARE IS PROVIDED BY ERIC YOUNG "AS IS" AND ANY EXPRESS OR IMPLIED WARRANTIES, INCLUDING, BUT NOT LIMITED TO, THE IMPLIED WARRANTIES OF MERCHANTABILITY AND FITNESS FOR A PARTICULAR PURPOSE ARE DISCLAIMED. IN NO EVENT SHALL THE AUTHOR OR CONTRIBUTORS BE LIABLE FOR ANY DIRECT, INDIRECT, INCIDENTAL, SPECIAL, EXEMPLARY, OR CONSEQUENTIAL DAMAGES (INCLUDING, BUT NOT LIMITED TO, PROCUREMENT OF SUBSTITUTE GOODS OR SERVICES; LOSS OF USE, DATA, OR PROFITS; OR BUSINESS INTERRUPTION) HOWEVER CAUSED AND ON ANY THEORY OF LIABILITY, WHETHER IN CONTRACT, STRICT LIABILITY, OR TORT (INCLUDING NEGLIGENCE OR OTHERWISE) ARISING IN ANY WAY OUT OF THE USE OF THIS SOFTWARE, EVEN IF ADVISED OF THE POSSIBILITY OF SUCH DAMAGE.
The license and distribution terms for any publicly available version or derivative of this code cannot be changed. i.e. this code cannot simply be copied and put under another distribution license [including the GNU Public License].
GNU General Public License Information
Cisco CDA Visual Quality Experience (VQE) Application, Release 3.0, includes Cisco-modified software derived from the following packages that are licensed under version 2 of the GNU General Public License (GPLv2):
•
•
•
Cisco will make the source code of these modified packages available upon request, in accordance with the terms of the GPLv2 license. Interested parties may obtain the source code by making a written request to:
Cisco Legal Department
300 E. Tasman Drive,
San Jose, California 95134Please include the product name, version number, date of purchase, and specifics regarding the code you are requesting.
Related Documentation
Refer to the following documents for additional information about Cisco VQE and the Cisco CDE110 appliance:
•
http://www.cisco.com/en/US/docs/video/cds/cda/vqe/3_0/user/guide/vqe_userguide3_0.pdf
•
http://www.cisco.com/en/US/docs/video/cds/cde/cde110/installation/guide/cde110_install.html
•
http://www.cisco.com/en/US/docs/video/cds/cde/regulatory/compliance/cde110_rcsi.pdf
The entire Content Delivery Systems documentation suite is available on Cisco.com at:
http://www.cisco.com/en/US/products/ps7191/Products_Sub_Category_Home.html
The VQE Client (VQE-C) documentation is included in the VQE-C software TAR file. If you are a registered Cisco.com user, the file can be downloaded from the following location:
http://www.cisco.com/public/sw-center/content-delivery/cda.shtml
Table 7 lists the VQE Client documentation that is provided.
Obtaining Documentation and Submitting a Service Request
For information on obtaining documentation, submitting a service request, and gathering additional information, see the monthly What's New in Cisco Product Documentation, which also lists all new and revised Cisco technical documentation, at:
http://www.cisco.com/en/US/docs/general/whatsnew/whatsnew.html
Subscribe to the What's New in Cisco Product Documentation as a Really Simple Syndication (RSS) feed and set content to be delivered directly to your desktop using a reader application. The RSS feeds are a free service and Cisco currently supports RSS version 2.0.
This document is to be used in conjunction with the documents listed in the "Related Documentation" section.
CCDE, CCENT, CCSI, Cisco Eos, Cisco HealthPresence, Cisco IronPort, the Cisco logo, Cisco Nurse Connect, Cisco Pulse, Cisco SensorBase, Cisco StackPower, Cisco StadiumVision, Cisco TelePresence, Cisco Unified Computing System, Cisco WebEx, DCE, Flip Channels, Flip for Good, Flip Mino, Flipshare (Design), Flip Ultra, Flip Video, Flip Video (Design), Instant Broadband, and Welcome to the Human Network are trademarks; Changing the Way We Work, Live, Play, and Learn, Cisco Capital, Cisco Capital (Design), Cisco:Financed (Stylized), Cisco Store, Flip Gift Card, and One Million Acts of Green are service marks; and Access Registrar, Aironet, AllTouch, AsyncOS, Bringing the Meeting To You, Catalyst, CCDA, CCDP, CCIE, CCIP, CCNA, CCNP, CCSP, CCVP, Cisco, the Cisco Certified Internetwork Expert logo, Cisco IOS, Cisco Lumin, Cisco Nexus, Cisco Press, Cisco Systems, Cisco Systems Capital, the Cisco Systems logo, Cisco Unity, Collaboration Without Limitation, Continuum, EtherFast, EtherSwitch, Event Center, Explorer, Follow Me Browsing, GainMaker, iLYNX, IOS, iPhone, IronPort, the IronPort logo, Laser Link, LightStream, Linksys, MeetingPlace, MeetingPlace Chime Sound, MGX, Networkers, Networking Academy, PCNow, PIX, PowerKEY, PowerPanels, PowerTV, PowerTV (Design), PowerVu, Prisma, ProConnect, ROSA, SenderBase, SMARTnet, Spectrum Expert, StackWise, WebEx, and the WebEx logo are registered trademarks of Cisco Systems, Inc. and/or its affiliates in the United States and certain other countries.
All other trademarks mentioned in this document or website are the property of their respective owners. The use of the word partner does not imply a partnership relationship between Cisco and any other company. (0910R)
Any Internet Protocol (IP) addresses used in this document are not intended to be actual addresses. Any examples, command display output, and figures included in the document are shown for illustrative purposes only. Any use of actual IP addresses in illustrative content is unintentional and coincidental.
© 2008 Cisco Systems, Inc. All rights reserved.