Cisco Nexus 1000V Installation and Upgrade Guide, Release 4.2(1)SV2(1.1a)
Bias-Free Language
The documentation set for this product strives to use bias-free language. For the purposes of this documentation set, bias-free is defined as language that does not imply discrimination based on age, disability, gender, racial identity, ethnic identity, sexual orientation, socioeconomic status, and intersectionality. Exceptions may be present in the documentation due to language that is hardcoded in the user interfaces of the product software, language used based on RFP documentation, or language that is used by a referenced third-party product. Learn more about how Cisco is using Inclusive Language.
Chapter: Upgrading the Cisco Nexus 1000V
- Information About the Software Upgrade
- Prerequisites for the Upgrade
- Guidelines and Limitations for Upgrading the Cisco Nexus 1000V
- Upgrade Procedures
- Upgrade Types
- Upgrading the Cisco Nexus 1000V Only
- Combined Upgrade of vSphere and Cisco Nexus 1000V
- VSM Upgrade Procedures
- VEM Upgrade Procedures
- VUM Upgrade Procedures
- Creating an Upgrade ISO with a VMware ESX Image and a Cisco Nexus 1000V VEM Image
- Upgrading the vCenter Server to Release 5.1
- Upgrading the VEMs Using VMware Update Manager from Release 4.2(1)SV1(4, 4a, 4b, 5.1, 5.1a, 5.2, 5.2b), Release 4.2(1)SV2(1.1) to Release 4.2(1)SV2(1.1a)
- Accepting the VEM Upgrade
- VUM Upgrade Procedures
- Manual Upgrade Procedures
- Upgrading the VEM Software Using the vCLI
- Upgrading the VEMs Manually from Release 4.2(1)SV1(4, 4a, 4b, 5.1, 5.1a, 5.2), Release 4.2(1)SV2(1.1) to Release 4.2(1)SV2(1.1a)
- Installing the VEM Software on a Stateless ESXi Host
- Installing the VEM Software on a Stateless ESXi Host Using esxcli
- Installing the VEM Software on a Stateless ESXi Host Using VUM
Upgrading the Cisco Nexus 1000V
This chapter contains the following sections:
- Information About the Software Upgrade
- Prerequisites for the Upgrade
- Guidelines and Limitations for Upgrading the Cisco Nexus 1000V
- Upgrade Procedures
- Upgrade Types
- Simplified Upgrade Process
- Upgrading from Releases 4.0(4)SV1(3, 3a, 3b, 3c, 3d) to the Current Release
- Migrating from Layer 2 to Layer 3
- Feature History for Upgrading the Cisco Nexus 1000V
Information About the Software Upgrade
Upgrade Software Sources
 Note | An interactive upgrade tool has been provided to assist you in determining the correct upgrade steps based on your current environment and the one to which you want to upgrade. |
You can obtain your upgrade-related software from the following sources listed in the following table:
Source |
Description |
||
|---|---|---|---|
Cisco |
Download the current release of the Cisco Nexus 1000V software from Cisco.com. |
||
VMware |
Download the VMware software from the VMware website.
|
For information about your software and platform compatibility, see Cisco Nexus 1000V and VMware Compatibility Information.
Prerequisites for the Upgrade
Before You Begin
- The Upgrade Application cannot be used for the upgrade of the Virtual Supervisor Modules (VSMs) from Release 4.2(1)SV1(4) to the current release.
- A pair of VSMs in a high availability (HA) pair is required in order to support a nondisruptive upgrade.
- A system with a single VSM can only be upgraded in a disruptive manner.
The network and server administrators must coordinate the upgrade procedure with each other.
The upgrade process is irrevocable. After the software is upgraded, you can downgrade by removing the current installation and reinstalling the software. For more information, see the “Recreating the Installation” section of the Cisco Nexus 1000V Troubleshooting Guide.
A combined upgrade of ESX and the VEM in a single maintenance mode is supported in this release. A combined upgrade requires at least vCenter 5.0 Update 1 whether you upgrade manually or are using the VMware Update Manager.
You can manually upgrade the ESX and VEM in one maintenance mode as follows:
- Place the host in maintenance mode.
- Upgrade ESX to 4.1 or 5.0 as needed.
- Install the VEM VIB while the host is still in maintenance mode.
- Remove the host from maintenance mode.
The steps for the manual combined upgrade procedure do not apply for VUM-based upgrades.
You can abort the upgrade procedure by pressing Ctrl-C.
Prerequisites for Upgrading VSMs
Upgrading VSMs has the following prerequisites:
- Close any active configuration sessions before upgrading the Cisco Nexus 1000V software.
- Save all changes in the running configuration to the startup configuration, to be preserved through the upgrade.
- Save a backup copy of the running configuration in external storage.
- Perform a VSM backup. For more information, see the “Configuring VSM Backup and Recovery” chapter in the Cisco Nexus 1000V System Management Configuration Guide.
- Use the VSM management IP address to log into VSM and perform management tasks.
Important: If you connect to a VSM using the VSA serial port or the "connect host" from the CIMC, do not initiate commands that are CPU intensive, such as copying image from tftp server to bootflash or generate a lot of screen output or updates. Use the VSA serial connections, including CIMC, only for operations such as debugging or basic configuration of the VSA.
Prerequisites for Upgrading VEMs
 Caution | If the VMware vCenter Server is hosted on the same ESX/ESXi host as a Cisco Nexus 1000V VEM, a VMware Update Manager (VUM)-assisted upgrade on the host will fail. You should manually VMotion the vCenter Server VM to another host before you perform an upgrade. |
Note | When you perform any VUM operation on hosts that are a part of a cluster, ensure that VMware HA, VMware fault tolerance (FT), and VMware Distributed Power Management (DPM) features are disabled for the entire cluster. Otherwise, VUM will fail to install the hosts in the cluster. |
- You are logged in to the VSM command-line interface (CLI) in EXEC mode.
- You have a copy of your VMware documentation available for installing software on a host.
- You have already obtained a copy of the VEM software file from one of the sources listed in VEM Software. For more information, see the Cisco Nexus 1000V and VMware Compatibility Information.
- If you need to migrate a vSphere host from ESX to ESXi, do it before the Cisco Nexus 1000V upgrade.
- You have placed the VEM software file in /tmp on the vSphere host. Placing it in the root (/) directory might interfere with the upgrade. Make sure that the root RAM disk has at least 12 MB of free space by entering the vdf command.
- On your upstream switches, you must have the following configuration.
- On your upstream switches, we highly recommend that you globally enable the following:
- On your upstream switches where you cannot globally enable BPDU Filtering and BPDU Guard, we highly recommend that you enter the following commands:
- For more information about configuring spanning tree, BPDU, or PortFast, see the documentation for your upstream switch.
Guidelines and Limitations for Upgrading the Cisco Nexus 1000V
Before attempting to migrate to any software image version, follow these guidelines:
Caution | During the upgrade process, the Cisco Nexus 1000V does not support any new additions such as modules, Virtual NICs (vNICs), or VM NICs and does not support any configuration changes. VM NIC and vNIC port-profile changes might render VM NICs and vNICs in an unusable state. |
Note | vSphere 5.0 Update 1 or later is recommended over vSphere 5.0. |
- You are upgrading the Cisco Nexus 1000V software to the current release.
- Scheduling — Schedule the upgrade when your network is stable and steady. Ensure that everyone who has access to the switch or the network is not configuring the switch or the network during this time. You cannot configure a switch during an upgrade.
- Hardware — Avoid power interruptions to the hosts that run the VSM VMs during any installation procedure.
- Connectivity to remote servers — do the following:
- Software images — do the following:
- Commands to use — do the following:
- Verify connectivity to the remote server by using the ping command.
- Use the one-step install all command to upgrade your software. This command upgrades the VSMs.
- Do not enter another install all command while running the installation. You can run commands other than configuration commands.
- During the VSM upgrade, if you try to add a new VEM or any of the VEMs are detached due to uplink flaps, the VEM attachment is queued until the upgrade completes.
Note | If the ESX hosts are not compatible with the software image that you install on the VSM, a traffic disruption occurs in those modules, depending on your configuration. The install all command output identifies these scenarios. The hosts must be at the right version before the upgrade. |
Before upgrading the VEMs, note these guidelines and limitations:
- The VEM software can be upgraded manually using the CLI or upgraded automatically using VUM.
- During the VEM upgrade process, VEMs reattach to the VSM.
- Connectivity to the VSM can be lost during a VEM upgrade when the interfaces of a VSM VM connect to its own Distributed Virtual Switch (DVS).
- If you are upgrading a VEM using a Cisco Nexus 1000V bundle, follow the instructions in your VMware documentation. For more details about VMware bundled software, see the Cisco Nexus 1000V and VMware Compatibility Information.
- With ESX and ESXi 4.1, after the upgrade, the esxupdate --vib-view query command might show two Cisco VIBs as installed. If the upgrade has otherwise been successful, you can ignore this condition.
Caution | Do not enter the vemlog, vemcmd, or vempkt commands during the VEM upgrade process because these commands impact the upgrade. |
Note | This procedure is different from the upgrade to Release 4.2(1)SV1(4). In this procedure, you upgrade the VSMs first by using the install all command and then you upgrade the VEMs. |
Note | If your hosts are running a release prior to VMware 4.1, upgrade to VMware 4.1, VMware 5.0, or VMware 5.1. See Installing and Upgrading VMware. |
Upgrade Procedures
The following table lists the upgrade steps.
If you are running this configuration |
Follow these steps |
|---|---|
Release 4.0(4)SV1(1) or 4.0(4)SV1(2) |
Upgrades from these releases are not supported. |
Releases 4.0(4)SV1(3), 4.0(4)SV1(3a), 4.0(4)SV1(3b), 4.0(4)SV1(3c), or 4.0(4)SV1(3d) |
|
Release 4.2(1)SV1(4, 4a, or 4b) with a vSphere release 4.0 Update 1 or later |
|
Release 4.2(1)SV1(4, 4a, or 4b) with a vSphere release 4.1 GA, patches, or updates |
|
Release 4.2(1)SV1(4a) or 4.2(1)SV1(4b) with a vSphere release 5.0 GA, patches, or updates |
The following table lists the upgrade steps when upgrading from Release 4.2(1)SV1(5.1, 5.1a, 5.2), 4.2(1)SV2(1.1) to the current release.
If you are running this configuration |
Follow these steps |
|---|---|
With vSphere 4.1 GA, patches, or updates. |
|
With vSphere 5.0 GA, patches, or updates. |
|
With ESX version upgrade. |
Upgrade Types
Upgrades can be one of three types:
- Upgrade of Cisco Nexus 1000V version only, with vSphere version intact. See Upgrading the Cisco Nexus 1000V Only.
- Upgrade of both vSphere and Cisco Nexus 1000V versions together. See Combined Upgrade of vSphere and Cisco Nexus 1000V.
- Upgrade of vSphere version only, with Cisco Nexus 1000V version intact. See the Installing and Upgrading VMware appendix.
- Upgrading the Cisco Nexus 1000V Only
- Combined Upgrade of vSphere and Cisco Nexus 1000V
- VSM Upgrade Procedures
- VEM Upgrade Procedures
- Manual Upgrade Procedures
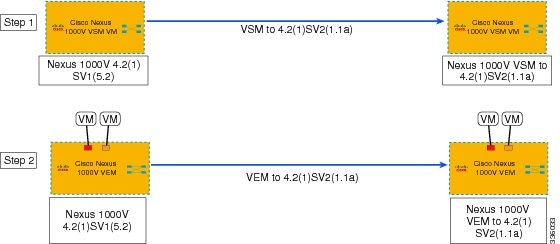
Upgrading the Cisco Nexus 1000V Only
You must complete the following procedures to upgrade the Cisco Nexus 1000V only.
- Upgrade the VSM. See VSM Upgrade Procedures.
- Upgrade the VEM.
- For Stateless ESXi, see Installing the VEM Software on a Stateless ESXi Host.
- For a VUM-based upgrade of a Stateful ESX or ESXi, use a host upgrade baseline with the VEM depot. See Upgrading the ESXi Hosts to Release 5.1.
- For a stateful manual upgrade using the esxupdate or esxcli commands, see Installing ESXi 5.1 Host Software Using the CLI.
The following figure shows the workflow for a Cisco Nexus 1000V only upgrade.
Combined Upgrade of vSphere and Cisco Nexus 1000V
You can perform a combined upgrade of vSphere and Cisco Nexus 1000V.
If any of the hosts are running ESX 4.0 when the VSM is upgraded, the installer command displays that some VEMs are incompatible. You can proceed if you are planning a combined upgrade of the Cisco Nexus 1000V and ESX after the VSM upgrade completes.
Note | A combined upgrade is supported only for vCenter Server 5.0 Update 1 or later. |
The following figure shows the workflow for a combined upgrade.
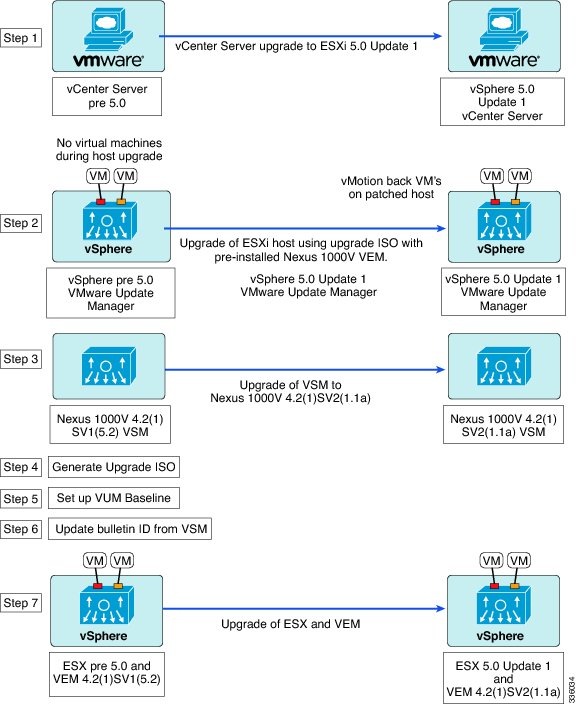
The following procedures are necessary to perform a combined upgrade.
- Upgrading the vCenter Server to Release 5.1
- Upgrading the vCenter Update Manager to Release 5.1
- Upgrading VSMs from Releases 4.2(1)SV1(4, 4a, 4b, 5.1, 5.1a, 5.2, 5.2b), 4.2(1)SV2(1.1) to Release 4.2(1)SV2(1.1a)
- Creating an Upgrade ISO with a VMware ESX Image and a Cisco Nexus 1000V VEM Image
- Upgrading the ESXi Hosts to Release 5.1
- Verifying the Build Number and Upgrade
VSM Upgrade Procedures
Software Images
The software image install procedure is dependent on the following factors:
- Software images—The kickstart and system image files reside in directories or folders that you can access from the Cisco Nexus 1000V software prompt.
- Image version—Each image file has a version.
- Disk—The bootflash: resides on the VSM.
- ISO file—If a local ISO file is passed to the install all command, the kickstart and system images are extracted from the ISO file.
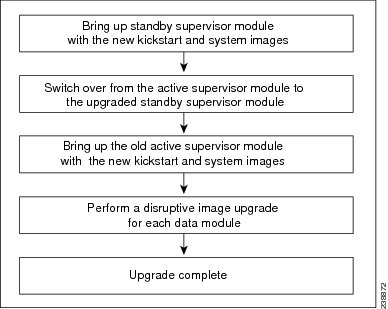
In-Service Software Upgrades on Systems with Dual VSMs
Note | Performing an In-Service Software Upgrade (ISSU) from Cisco Nexus 1000V Release 4.2(1)SV1(4) or Release 4.2(1)SV1(4a) to the current release of Cisco Nexus 1000V using ISO files is not supported. You must use kickstart and system files to perform an ISSU upgrade to the current release of Cisco Nexus 1000V. |
The Cisco Nexus 1000V software supports in-service software upgrades (ISSUs) for systems with dual VSMs. An ISSU can update the software images on your switch without disrupting data traffic. Only control traffic is disrupted. If an ISSU causes a disruption of data traffic, the Cisco Nexus 1000V software warns you before proceeding so that you can stop the upgrade and reschedule it to a time that minimizes the impact on your network.
Note | On systems with dual VSMs, you should have access to the console of both VSMs to maintain connectivity when the switchover occurs during upgrades. If you are performing the upgrade over Secure Shell (SSH) or Telnet, the connection will drop when the system switchover occurs, and you must reestablish the connection. |
An ISSU updates the following images:
All of the following processes are initiated automatically by the upgrade process after the network administrator enters the install all command.
ISSU Process for the Cisco Nexus 1000V
The following figure shows the ISSU process.
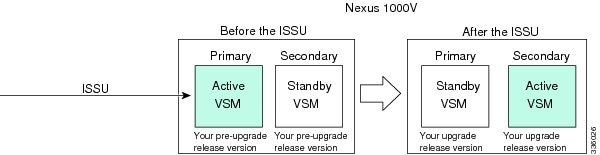
ISSU VSM Switchover
The following figure provides an example of the VSM status before and after an ISSU switchover.
ISSU Command Attributes
Support
The install all command supports an in-service software upgrade (ISSU) on dual VSMs in an HA environment and performs the following actions:
- Determines whether the upgrade is disruptive and asks if you want to continue.
- Copies the kickstart and system images to the standby VSM. Alternatively, if a local ISO file is passed to the install all command instead, the kickstart and system images are extracted from the file.
- Sets the kickstart and system boot variables.
- Reloads the standby VSM with the new Cisco Nexus 1000V software.
- Causes the active VSM to reload when the switchover occurs.
Benefits
The install all command provides the following benefits:
- You can upgrade the VSM by using the install all command.
- You can receive descriptive information on the intended changes to your system before you continue with the installation.
- You have the option to cancel the command. Once the effects of the command are presented, you can continue or cancel when you see this question (the default is no): Do you want to continue (y/n) [n]: y
- You can upgrade the VSM using the least disruptive procedure.
- You can see the progress of this command on the console, Telnet, and SSH screens:
- The install all command automatically checks the image integrity, which includes the running kickstart and system images.
- The install all command performs a platform validity check to verify that a wrong image is not used.
- The Ctrl-C escape sequence gracefully ends the install all command. The command sequence completes the update step in progress and returns to the switch prompt. (Other upgrade steps cannot be ended by using Ctrl-C.)
- After running the install all command, if any step in the sequence fails, the command completes the step in progress and ends.
Upgrading VSMs from Releases 4.2(1)SV1(4, 4a, 4b, 5.1, 5.1a, 5.2, 5.2b), 4.2(1)SV2(1.1) to Release 4.2(1)SV2(1.1a)
| Step 1 | Log in to the active VSM. | ||||
| Step 2 | Log in to Cisco.com to access the links provided in this document. To log in to Cisco.com, go to the URL http://www.cisco.com/ and click Log In at the top of the page. Enter your Cisco username and password.
| ||||
| Step 3 | Access the Software Download Center by using this URL: | ||||
| Step 4 | Navigate to the download site for your system. You see links to the download images for your switch. | ||||
| Step 5 | Choose and download the Cisco Nexus 1000V zip file and extract the kickstart and system software files to a server. | ||||
| Step 6 | Ensure that the required space is available for the image file(s) to be copied. switch# dir bootflash:
.
.
.
Usage for bootflash://
485830656 bytes used
1109045248 bytes free
1594875904 bytes total
| ||||
| Step 7 | Verify that there is space available on the standby VSM. switch# dir bootflash://sup-standby/
.
.
.
Usage for bootflash://
485830656 bytes used
1109045248 bytes free
1594875904 bytes total
| ||||
| Step 8 | Delete any unnecessary files to make space available if you need more space on the standby VSM. | ||||
| Step 9 | If you plan to install the images from the bootflash:, copy the Cisco Nexus 1000V kickstart and system images or the ISO image to the active VSM by using a transfer protocol. You can use ftp:, tftp:, scp:, or sftp:. The examples in this procedure use scp:.
| ||||
| Step 10 | Check on the impact of the ISSU upgrade for the kickstart and system images or the ISO image.
| ||||
| Step 11 | Read the release notes for the related image file. See the Cisco Nexus 1000V Release Notes. | ||||
| Step 12 | Determine if the Virtual Security Gateway (VSG) is configured in the deployment:
| ||||
| Step 13 | Save the running configuration to the startup configuration. switch# copy running-config startup-config
| ||||
| Step 14 | Save the running configuration on the bootflash and externally. switch# copy running-config bootflash:run-cfg-backup switch# copy running-config scp://user@tftpserver.cisco.com/n1kv-run-cfg-backup
| ||||
| Step 15 | Perform the upgrade on the active VSM using the ISO or kickstart and system images.
| ||||
| Step 16 | Continue with the installation by pressing Y.
Install is in progress, please wait.

Syncing image bootflash:/nexus-1000v-kickstart-4.2.1.SV2.1.1a.bin to standby.
[####################] 100% -- SUCCESS

Syncing image bootflash:/nexus-1000v-4.2.1.SV2.1.1a.bin to standby.
[####################] 100% -- SUCCESS

Setting boot variables.
[####################] 100% -- SUCCESS

Performing configuration copy.
[####################] 100%2011 Mar 31 03:49:42 BL1-VSM %SYSMGR-STANDBY-5-CFGWRITE_STARTED: Configuration copy started (PID 3660).
[####################] 100% -- SUCCESS
Continuing with installation, please wait Module 2: Waiting for module online -- SUCCESS Install has been successful | ||||
| Step 17 | After the installation operation completes, log in and verify that the switch is running the required software version. switch# show version
Nexus1000v# show version
Cisco Nexus Operating System (NX-OS) Software
TAC support: http://www.cisco.com/tac
Copyright (c) 2002-2012, Cisco Systems, Inc. All rights reserved.
The copyrights to certain works contained herein are owned by
other third parties and are used and distributed under license.
Some parts of this software are covered under the GNU Public
License. A copy of the license is available at
http://www.gnu.org/licenses/gpl.html.
Software
loader: version unavailable [last: loader version not available]
kickstart: version 4.2(1)SV2(1.1a) [build 4.2(1)SV2(1.1a)]
system: version 4.2(1)SV2(1.1a) [build 4.2(1)SV2(1.1a)]
kickstart image file is: bootflash:/nexus-1000v-kickstart-4.2.1.SV2.1.1a.bin
kickstart compile time: 1/11/2012 3:00:00 [01/11/2012 12:49:49]
system image file is: bootflash:/nexus-1000v-4.2.1.SV2.1.1a.bin
system compile time: 1/11/2012 3:00:00 [01/11/2012 13:42:57]
Hardware
cisco Nexus 1000V Chassis ("Virtual Supervisor Module")
Intel(R) Xeon(R) CPU with 2075740 kB of memory.
Processor Board ID T5056B1802D
Device name: Nexus1000v
bootflash: 1557496 kB
Kernel uptime is 4 day(s), 8 hour(s), 31 minute(s), 3 second(s)
plugin
Core Plugin, Ethernet Plugin, Virtualization Plugin
...
| ||||
| Step 18 | Copy the running configuration to the startup configuration to adjust the startup-cgf size. switch# copy running-config startup-config [########################################] 100% switch# | ||||
| Step 19 | Display the log of the last installation. switch# show install all status
This is the log of last installation.
Verifying image bootflash:/nexus-1000v-kickstart-4.2.1.SV2.1.1a.bin for boot variable "kickstart".
-- SUCCESS
Verifying image bootflash:/nexus-1000v-4.2.1.SV2.1.1a.bin for boot variable "system".
-- SUCCESS
Verifying image type.
-- SUCCESS
Extracting "system" version from image bootflash:/nexus-1000v-4.2.1.SV2.1.1a.bin.
-- SUCCESS
Extracting "kickstart" version from image bootflash:/nexus-1000v-kickstart-4.2.1.SV2.1.1a.bin.
-- SUCCESS
Notifying services about system upgrade.
-- SUCCESS
Compatibility check is done:
Module bootable Impact Install-type Reason
------ -------- -------------- ------------ ------
1 yes non-disruptive reset
2 yes non-disruptive reset
Images will be upgraded according to following table:
Module Image Running-Version New-Version Upg-Required
------ ---------- ---------------------- ---------------------- ------------
1 system 4.2(1)SV1(5.2) 4.2(1)SV2(1.1a) yes
1 kickstart 4.2(1)SV1(5.2) 4.2(1)SV2(1.1a) yes
2 system 4.2(1)SV1(5.2) 4.2(1)SV2(1.1a) yes
2 kickstart 4.2(1)SV1(5.2) 4.2(1)SV2(1.1a) yes
Images will be upgraded according to following table:
Module Running-Version ESX Version VSM Compatibility ESX Compatibility
------ ---------------------- ---------------------------------------------------- ---------------------- ----------------------
3 4.2(1)SV1(5.2) VMware ESXi 5.0.0 Releasebuild-469512 (3.0) COMPATIBLE COMPATIBLE
4 4.2(1)SV1(5.2) VMware ESXi 5.0.0 Releasebuild-469512 (3.0) COMPATIBLE COMPATIBLE
Install is in progress, please wait.
Syncing image bootflash:/nexus-1000v-kickstart-4.2.1.SV2.1.1a.bin to standby.
-- SUCCESS
Syncing image bootflash:/nexus-1000v-4.2.1.SV2.1.1a.bin to standby.
-- SUCCESS
Setting boot variables.
-- SUCCESS
Performing configuration copy.
-- SUCCESS
Module 2: Waiting for module online.
-- SUCCESS
Notifying services about the switchover.
-- SUCCESS
"Switching over onto standby".
switch#
switch#
switch#
switch# attach module 2
Attaching to module 2 ...
To exit type 'exit', to abort type '$.'
Cisco Nexus Operating System (NX-OS) Software
TAC support: http://www.cisco.com/tac
Copyright (c) 2002-2011, Cisco Systems, Inc. All rights reserved.
The copyrights to certain works contained in this software are
owned by other third parties and used and distributed under
license. Certain components of this software are licensed under
the GNU General Public License (GPL) version 2.0 or the GNU
Lesser General Public License (LGPL) Version 2.1. A copy of each
such license is available at
http://www.opensource.org/licenses/gpl-2.0.php and
http://www.opensource.org/licenses/lgpl-2.1.php
switch(standby)#
switch(standby)# show install all status
This is the log of last installation.
Continuing with installation, please wait
Trying to start the installer...
Module 2: Waiting for module online.
-- SUCCESS
Install has been successful.
switch(standby)#
|
VEM Upgrade Procedures
- VUM Upgrade Procedures
- Generate an upgrade ISO. See Creating an Upgrade ISO with a VMware ESX Image and a Cisco Nexus 1000V VEM Image.
- Set up VUM baselines. See Upgrading the ESXi Hosts to Release 5.1.
- Initiate an upgrade from VUM. See Upgrading the VEMs Using VMware Update Manager from Release 4.2(1)SV1(4, 4a, 4b, 5.1, 5.1a, 5.2, 5.2b), Release 4.2(1)SV2(1.1) to Release 4.2(1)SV2(1.1a).
- Upgrade VEM from VSM. See Upgrading the VEMs Using VMware Update Manager from Release 4.2(1)SV1(4, 4a, 4b, 5.1, 5.1a, 5.2, 5.2b), Release 4.2(1)SV2(1.1) to Release 4.2(1)SV2(1.1a).
- Manual upgrade procedures
- Upgrading VIB Manually from the CLI. See Upgrading the VEMs Manually from Release 4.2(1)SV1(4, 4a, 4b, 5.1, 5.1a, 5.2), Release 4.2(1)SV2(1.1) to Release 4.2(1)SV2(1.1a)
- Installing or upgrading stateless ESXi. See Installing the VEM Software on a Stateless ESXi Host.
VEM upgrades fall into three types:
- An upgrade of an ESX or stateful ESXi host, without a migration from ESX (with a console OS) to ESXi. This upgrade type is described further in this section.
- An upgrade of a stateless ESXi host. This involves installing a new image on the host by updating the image profile and rebooting the host. The upgrade is described in Installing the VEM Software on a Stateless ESXi Host.
- An upgrade that involve a migration from ESX to ESXi (of the same or different vSphere version).
An upgrade of an ESX or stateful ESXi host without a migration from ESX (which has a console OS) to ESXi falls into two separate workflows.
- Upgrade the VEM alone, while keeping the ESX/ESXi version intact. The first figure shows this flow.
- Upgrade the ESX/ESXi without a change of the Cisco Nexus 1000V version. This process is addressed in the Workflow 2 figure.
The following figure shows Workflow 1 where Cisco Nexus 1000V Release 4.2(1)SV1(4.x) or 4.2(1)SV1(5.x) is upgraded to the current release, without a change of ESX versions.

If you are using VUM, set up a host patch baseline with the VEM’s offline bundle. Then follow Upgrading the VEMs Using VMware Update Manager from Release 4.2(1)SV1(4, 4a, 4b, 5.1, 5.1a, 5.2, 5.2b), Release 4.2(1)SV2(1.1) to Release 4.2(1)SV2(1.1a).
If you are upgrading from the command line, see Upgrading the VEMs Manually from Release 4.2(1)SV1(4, 4a, 4b, 5.1, 5.1a, 5.2), Release 4.2(1)SV2(1.1) to Release 4.2(1)SV2(1.1a).
The following figure shows Workflow 2 where Cisco Nexus 1000VRelease 4.2(1)SV2(1.1) is installed and VMware 4.1 is upgraded to 5.0.

If you are using VMware Update Manager, the following considerations apply:
- If you are using VUM versions prior to 5.0, do one of the following:
- If you are upgrading the ESX host to a new patch level, use a host patch baseline (independent of whether the VEM version is being changed as well).
- If you are upgrading the ESX host to a new update within a release or major release, use a host upgrade baseline (again independent of whether the VEM version is being changed as well).
- You cannot upgrade the ESX version and VEM version simultaneously. You need to schedule them as two separate upgrades.
- If you are using VUM version 5.0 or later, use the following method (independent of whether the VEM version is being changed as well):
- If you are upgrading the ESX host to a new patch level within a release, use a host patch baseline. For example, vSphere 4.1 GA to 4.1 Patch 03.
- If you are upgrading the ESX host to a new update within a release, use a host upgrade baseline. For example, vSphere 5.0 GA to 5.0 U1.
- If you are upgrading the ESX host to a major release (for example, vSphere 4.1 U2 to 5.0 U1), generate an upgrade ISO and set up a host upgrade baseline. The upgrade ISO must have the desired final images for both ESX and VEM. The procedure to generate an upgrade ISO is in Creating an Upgrade ISO with a VMware ESX Image and a Cisco Nexus 1000V VEM Image.
- You can upgrade the ESX version and VEM version simultaneously if you are using VUM 5.0 Update 1 or later. VUM 5.0 GA does not support a combined upgrade.
Note | If you plan to perform Workflow 2 and manually update to vSphere 5.0 or later, you must boot the host from an upgrade ISO with both ESX and VEM images. |
VUM Upgrade Procedures
Creating an Upgrade ISO with a VMware ESX Image and a Cisco Nexus 1000V VEM Image
- Install the VMware PowerCLI on a Windows platform. For more information, see the vSphere PowerCLI Installation Guide.
On the same Windows platform, where the VMware PowerCLI is installed, do one of the following: - Download the ESX depot, which is a .zip file, to a local file path.
- Download the VEM offline bundle, which is a .zip file, to a local file path.
NoteIn the following procedure, the ESX depot is available as C:\VMware-ESXi-5.0.0-469512-depot.zip and the VEM bundle is available as VEM500-201301152108-BG-Zip.
Upgrading the vCenter Server to Release 5.1
Note | This upgrade procedure also applies to vCenter Server 5.0 and vCenter Server 5.0 Update 1 and later. |
| Step 1 |
Navigate to the VMware vSphere 5.1 installation file.
| ||
| Step 2 | Double-click autorun. | ||
| Step 3 | In the VMware vCenter Installer window, click vCenter Server. | ||
| Step 4 | Click Install. | ||
| Step 5 | Choose a language and click OK. | ||
| Step 6 | Click Next. | ||
| Step 7 | In the Patent Agreement window, click Next. | ||
| Step 8 | In the License Agreement window, click the I agree to the terms in the license agreement radio button. | ||
| Step 9 | Click Next. | ||
| Step 10 | In the Database Options screen, click Next. | ||
| Step 11 | Click the Upgrade existing vCenter Server database radio button and check the I have taken a backup of the existing vCenter Server database and SSL certificates in the folder: C:\ProgramData\VMware\VMware VirtualCenter\SSL\. check box. | ||
| Step 12 | From the Windows Start Menu, click Run. | ||
| Step 13 | Enter the name of the folder that contains the vCenter Server database and click OK. | ||
| Step 14 | Drag a copy of the parent folder (SSL) to the desktop as a backup. | ||
| Step 15 | Return to the installer program. | ||
| Step 16 | Click Next. | ||
| Step 17 | In the vCenter Agent Upgrade window, click the Automatic radio button. | ||
| Step 18 | Click Next. | ||
| Step 19 | In the vCenter Server Service screen, check the Use SYSTEM Account check box. | ||
| Step 20 | Click Next. | ||
| Step 21 | Review the port settings and click Next. | ||
| Step 22 | In the vCenter Server JVM Memory screen based on the number of hosts, click the appropriate memory radio button. | ||
| Step 23 | Click Next. | ||
| Step 24 | Click Install. | ||
| Step 25 | Click Finish. This step completes the upgrade of the vCenter Server. | ||
| Step 26 | Upgrade the VMware vSphere Client to ESXi 5.1. | ||
| Step 27 | Open the VMware vSphere Client. | ||
| Step 28 | From the Help menu, choose About VMware vSphere. | ||
| Step 29 | Confirm that the vSphere Client and the VMware vCenter Server are both version VMware 5.1. | ||
| Step 30 | Click OK, and exit the VMware vSphere Client. |
What to Do Next
Complete the steps in Upgrading the vCenter Update Manager to Release 5.1.
Upgrading the VEMs Using VMware Update Manager from Release 4.2(1)SV1(4, 4a, 4b, 5.1, 5.1a, 5.2, 5.2b), Release 4.2(1)SV2(1.1) to Release 4.2(1)SV2(1.1a)
Caution | If removable media is still connected (for example, if you have installed the VSM using ISO and forgot to remove the media), host movement to maintenance mode fails and the VUM upgrade fails. |
| Step 1 |
Display the current configuration. switch# show vmware vem upgrade status
Upgrade VIBs: System VEM Image
Upgrade Status:
Upgrade Notification Sent Time:
Upgrade Status Time(vCenter):
Upgrade Start Time:
Upgrade End Time(vCenter):
Upgrade Error:
Upgrade Bundle ID:
VSM: VEM410-201301152108-BG
DVS: VEM410-201208144101-BG
switch#
| ||||
| Step 2 | Coordinate with and notify the server administrator of the VEM upgrade process. switch# vmware vem upgrade notify Warning: Please ensure the hosts are running compatible ESX versions for the upgrade. Refer to corresponding "Cisco Nexus 1000V and VMware Compatibility Information" guide. | ||||
| Step 3 | Verify that the upgrade notification was sent. switch# show vmware vem upgrade status
Upgrade VIBs: System VEM Image
Upgrade Status: Upgrade Availability Notified in vCenter
Upgrade Notification Sent Time: Fri Jan 11 13:40:51 2013
Upgrade Status Time(vCenter):
Upgrade Start Time:
Upgrade End Time(vCenter):
Upgrade Error:
Upgrade Bundle ID:
VSM: VEM410-201301152108-BG
DVS: VEM410-201208144101-BG
switch#
| ||||
| Step 4 | Verify that the server administrator has accepted the upgrade in the vCenter. For more information about how the server administrator accepts the VEM upgrade, see Accepting the VEM Upgrade. Coordinate the notification acceptance with the server administrator. After the server administrator accepts the upgrade, proceed with the VEM upgrade. switch# show vmware vem upgrade status
Upgrade VIBs: System VEM Image
Upgrade Status: Upgrade Accepted by vCenter Admin
Upgrade Notification Sent Time: Fri Jan 11 13:40:51 2013
Upgrade Status Time(vCenter): Fri Jan 11 13:40:51 2013
Upgrade Start Time:
Upgrade End Time(vCenter):
Upgrade Error:
Upgrade Bundle ID:
VSM: VEM410-201301152108-BG
DVS: VEM410-201208144101-BG
switch#
| ||||
| Step 5 | Initiate the VUM upgrade process.
The vCenter Server locks the DVS and triggers VUM to upgrade the VEMs. switch# vmware vem upgrade proceed
switch# show vmware vem upgrade status
Upgrade VIBs: System VEM Image
Upgrade Status: Upgrade In Progress in vCenter
Upgrade Notification Sent Time: Fri Jan 11 13:40:51 2013
Upgrade Status Time(vCenter) : Fri Jan 11 13:40:51 2013
Upgrade Start Time: : Fri Jan 11 13:40:51 2013
Upgrade End Time(vCenter):
Upgrade Error:
Upgrade Bundle ID:
VSM: VEM410-201301152108-BG
DVS: VEM410-201301152108-BG
switch#
| ||||
| Step 6 | Check for the upgrade complete status. switch# show vmware vem upgrade status
Upgrade VIBs: System VEM Image
Upgrade Status: Upgrade Complete in vCenter
Upgrade Notification Sent Time: : Fri Jan 11 13:40:51 2013
Upgrade Status Time(vCenter): : Fri Jan 11 13:40:51 2013
Upgrade Start Time: : Fri Jan 11 13:40:51 2013
Upgrade End Time(vCenter): : Fri Jan 11 13:40:51 2013
Upgrade Error:
Upgrade Bundle ID:
VSM: VEM410-201301152108-BG
DVS: VEM410-201301152108-BG
switch#
| ||||
| Step 7 | Clear the VEM upgrade status after the upgrade process is complete. switch# vmware vem upgrade complete
switch# show vmware vem upgrade status
Upgrade VIBs: System VEM Image
Upgrade Status:
Upgrade Notification Sent Time:
Upgrade Status Time(vCenter):
Upgrade Start Time:
Upgrade End Time(vCenter):
Upgrade Error:
Upgrade Bundle ID:
VSM: VEM410-201301152108-BG
DVS: VEM410-201301152108-BG
switch#
| ||||
| Step 8 | Verify that the upgrade process is complete. switch# show module Mod Ports Module-Type Model Status --- ----- -------------------------------- ------------------ ------------ 1 0 Virtual Supervisor Module Nexus1000V ha-standby 2 0 Virtual Supervisor Module Nexus1000V active * 3 248 Virtual Ethernet Module NA ok 4 248 Virtual Ethernet Module NA ok Mod Sw Hw --- ------------------ ------------------------------------------------ 1 4.2(1)SV2(1.1a) 0.0 2 4.2(1)SV2(1.1a) 0.0 3 4.2(1)SV2(1.1a) VMware ESXi 5.0.0 Releasebuild-469512 (3.0) 4 4.2(1)SV2(1.1a) VMware ESXi 5.0.0 Releasebuild-623860 (3.0) Mod MAC-Address(es) Serial-Num --- -------------------------------------- ---------- 1 00-19-07-6c-5a-a8 to 00-19-07-6c-62-a8 NA 2 00-19-07-6c-5a-a8 to 00-19-07-6c-62-a8 NA 3 02-00-0c-00-03-00 to 02-00-0c-00-03-80 NA 4 02-00-0c-00-04-00 to 02-00-0c-00-04-80 NA Mod Server-IP Server-UUID Server-Name --- --------------- ------------------------------------ -------------------- 1 10.104.249.171 NA NA 2 10.104.249.171 NA NA 3 10.104.249.172 7d41e666-b58a-11e0-bd1d-30e4dbc299c0 10.104.249.172 4 10.104.249.173 17d79824-b593-11e0-bd1d-30e4dbc29a0e 10.104.249.173 * this terminal session switch#
The upgrade is complete. |
Accepting the VEM Upgrade
| Step 1 | In the vCenter Server, choose Inventory > Networking. |
| Step 2 | Click the vSphere Client DVS Summary tab to check for the availability of a software upgrade. 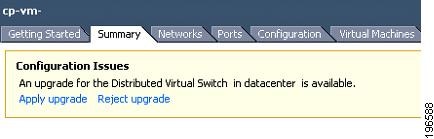 |
| Step 3 | Click Apply upgrade. The network administrator is notified that you are ready to apply the upgrade to the VEMs. |
Manual Upgrade Procedures
Upgrading the VEM Software Using the vCLI
You can upgrade the VEM software by using the vCLI.
- If you are using vCLI, do the following:
- You have downloaded and installed the VMware vCLI. For information about installing the vCLI, see the VMware vCLI documentation.
- You are logged in to the remote host where the vCLI is installed.
NoteThe vSphere command-line interface (vCLI) command set allows you to enter common system administration commands against ESX/ESXi systems from any machine with network access to those systems. You can also enter most vCLI commands against a vCenter Server system and target any ESX/ESXi system that the vCenter Server system manages. vCLI commands are especially useful for ESXi hosts because ESXi does not include a service console.
- If you are using the esxupdate command, you are logged in to the ESX host.
- Check Cisco Nexus 1000V and VMware Compatibility Information for compatible versions.
- You have already copied the VEM software installation file to the /tmp directory. Do not copy the files to the root (/) folder.
- You know the name of the VEM software file to be installed.
| Step 1 |
Go to the directory where the new VEM software was copied. [root@serialport -]# cd tmp [root@serialport tmp]# | ||||||
| Step 2 | Determine the upgrade method that you want to use and enter the appropriate command:
vihostupdate --install --bundle [path to Cisco updated VEM offline bundle] --server [vsphere host IP address]
[root@serialport tmp]# vihostupdate –install –bundle  VEM410-201301152101.zip

Enter username: root
Enter password:
Please wait installation in progress …
The update completed successfully, but the system needs to be rebooted for the changes to be effective.
[root@serialport tmp]#
For ESX/ESXi 4.1.0 hosts, enter the following commands: /tmp # esxupdate --bundle VEM410-201301152101.zip update Unpacking cross_cisco-vem-v152-esx_4.2.1.2.1.1a.0.. ######################################################################## [100%] Installing packages :cross_cisco-vem-v152-esx_4.2.. ######################################################################## [100%] Running [/usr/sbin/vmkmod-install.sh]... ok. /tmp # /tmp # esxupdate -b cross_cisco-vem-v152-4.2.1.2.1.1a.0-2.0.1.vib update Unpacking cross_cisco-vem-v152-esx_4.2.1.2.1.1a.0.. ######################################################################## [100%] Installing packages :cross_cisco-vem-v152-esx_4.2.. ######################################################################## [100%] Running [/usr/sbin/vmkmod-install.sh]... ok. /tmp # For ESXi 5.0.0 or a later release host, enter the appropriate commands as they apply to you: ~ # esxcli software vib install -d /absolute-path/VEM_bundle ~ # esxcli software vib install -v /absolute-path/vib_file
~ # esxcli software vib install -d /tmp/VEM500-201301152108-BG.zip Installation Result Message: Operation finished successfully. Reboot Required: false VIBs Installed: Cisco_bootbank_cisco-vem-v152-esx_4.2.1.2.1.1a.0-3.0.1 VIBs Removed: VIBs Skipped: ~ # ~ # esxcli software vib install -v /tmp/cross_cisco-vem-v152-4.2.1.2.1.1a.0-3.0.2.vib Installation Result Message: Operation finished successfully. Reboot Required: false VIBs Installed: Cisco_bootbank_cisco-vem-v152-esx_4.2.1.2.1.1a.0-3.0.1 VIBs Removed: VIBs Skipped: ~ # | ||||||
| Step 3 | Display values with which to compare to Cisco Nexus 1000V and VMware Compatibility Information. [root@serialport tmp]# vmware -v VMware ESXi 5.0.0 build-469512 root@serialport tmp]# # esxupdate query ------Bulletin ID------- -----Installed----- --------------Summary--------------- VEM410-201301152101 2012-08-21T08:18:22 Cisco Nexus 1000V 4.2(1)SV2(1.1a) [root@host212 ~]# . ~ # vem status -v Package vssnet-esx5.5.0-00000-release Version 4.2.1.2.1.1a-3.0.1 Build 1 Date Fri Aug 3 00:02:21 PDT 2012 Number of PassThru NICs are 0 VEM modules are loaded Switch Name Num Ports Used Ports Configured Ports MTU Uplinks vSwitch0 128 3 128 1500 vmnic2 DVS Name Num Ports Used Ports Configured Ports MTU Uplinks switch 256 40 256 1500 vmnic7,vmnic6,vmnic5,vmnic4,vmnic3 Number of PassThru NICs are 0 VEM Agent (vemdpa) is running ~ # [root@host212 ~]# vemcmd show version VEM Version: 4.2.1.2.1.1a-3.0.1 VSM Version: 4.2(1)SV2(1.1a) System Version: VMware ESXi 4.1.0 Releasebuild-502767 ~ # | ||||||
| Step 4 | Display that the VEMs were upgraded by entering the following commands from the VSM. switch# show module Mod Ports Module-Type Model Status --- ----- -------------------------------- ------------------ ------------ 1 0 Virtual Supervisor Module Nexus1000V ha-standby 2 0 Virtual Supervisor Module Nexus1000V active * 3 248 Virtual Ethernet Module NA ok 4 248 Virtual Ethernet Module NA ok Mod Sw Hw --- ------------------ ------------------------------------------------ 1 4.2(1)SV2(1.1a) 0.0 2 4.2(1)SV2(1.1a) 0.0 3 4.2(1)SV2(1.1a) VMware ESXi 5.0.0 Releasebuild-469512 (3.0) 4 4.2(1)SV2(1.1a) VMware ESXi 5.0.0 Releasebuild-623860 (3.0) Mod MAC-Address(es) Serial-Num --- -------------------------------------- ---------- 1 00-19-07-6c-5a-a8 to 00-19-07-6c-62-a8 NA 2 00-19-07-6c-5a-a8 to 00-19-07-6c-62-a8 NA 3 02-00-0c-00-03-00 to 02-00-0c-00-03-80 NA 4 02-00-0c-00-04-00 to 02-00-0c-00-04-80 NA Mod Server-IP Server-UUID Server-Name --- --------------- ------------------------------------ -------------------- 1 10.104.249.171 NA NA 2 10.104.249.171 NA NA 3 10.104.249.172 7d41e666-b58a-11e0-bd1d-30e4dbc299c0 10.104.249.172 4 10.104.249.173 17d79824-b593-11e0-bd1d-30e4dbc29a0e 10.104.249.173 * this terminal session switch#
|
If the upgrade was successful, the installation procedure is complete.
Upgrading the VEMs Manually from Release 4.2(1)SV1(4, 4a, 4b, 5.1, 5.1a, 5.2), Release 4.2(1)SV2(1.1) to Release 4.2(1)SV2(1.1a)
Note | If VUM is installed, it should be disabled. |
To manually install or upgrade the Cisco Nexus 1000V VEM on an ESX/ESXi host, follow the steps in Upgrading the VEM Software Using the vCLI.
To upgrade the VEMs manually, perform the following steps as network administrator:
Note | This procedure is performed by the network administrator. Before proceeding with the upgrade, make sure that the VMs are powered off if you are not running the required patch level. |
Caution | If removable media is still connected, (for example, if you have installed the VSM using ISO and forgot to remove the media), host movement to maintenance mode fails and the VEM upgrade fails. |
| Step 1 |
Coordinate with and notify the server administrator of the VEM upgrade process. switch# vmware vem upgrade notify Warning: Please ensure the hosts are running compatible ESX versions for the upgrade. Refer to corresponding "Cisco Nexus 1000V and VMware Compatibility Information" guide. | ||||
| Step 2 | Verify that the upgrade notification was sent. switch# show vmware vem upgrade status
Upgrade VIBs: System VEM Image
Upgrade Status:
Upgrade Notification Sent Time:
Upgrade Status Time(vCenter):
Upgrade Start Time:
Upgrade End Time(vCenter):
Upgrade Error:
Upgrade Bundle ID:
VSM: VEM410-201301152108-BG
DVS: VEM410-201208144101-BG
switch#
| ||||
| Step 3 | Verify that the server administrator has accepted the upgrade in vCenter Server. For details about the server administrator accepting the VEM upgrade, see Accepting the VEM Upgrade. After the server administrator accepts the upgrade, proceed with the VEM upgrade. switch# show vmware vem upgrade status
Upgrade VIBs: System VEM Image
Upgrade Status: Upgrade Availability Notified in vCenter
Upgrade Notification Sent Time: Mon Aug 20 23:40:51 2012
Upgrade Status Time(vCenter):
Upgrade Start Time:
Upgrade End Time(vCenter):
Upgrade Error:
Upgrade Bundle ID:
VSM: VEM410-201301152108-BG
DVS: VEM410-201208144101-BG
switch#
| ||||
| Step 4 | Perform one of the following tasks: | ||||
| Step 5 | Initiate the Cisco Nexus 1000V Bundle ID upgrade process.
Enter the vmware vem upgrade proceed command so that the Cisco Nexus 1000V Bundle ID on the vCenter Server gets updated. If VUM is enabled and you do not update the Bundle ID, an incorrect VIB version is pushed to the VEM when you next add the ESX to the VSM. switch# vmware vem upgrade proceed
switch# show vmware vem upgrade status

Upgrade VIBs: System VEM Image
Upgrade Status: Upgrade In Progress in vCenter
Upgrade Notification Sent Time: Mon Aug 20 23:40:51 2012
Upgrade Status Time(vCenter): Tue Aug 21 19:13:07 2012
Upgrade Start Time: Mon Aug 20 23:44:50 2012
Upgrade End Time(vCenter):
Upgrade Error:
Upgrade Bundle ID:
    VSM: VEM410-201301152108-BG
    DVS: VEM410-201301152108-BG
switch#
| ||||
| Step 6 | Check for the Upgrade Complete status. switch# show vmware vem upgrade status
Upgrade VIBs: System VEM Image
Upgrade Status: Upgrade Complete in vCenter
Upgrade Notification Sent Time: Mon Aug 20 23:40:51 2012
Upgrade Status Time(vCenter): Tue Aug 21 19:13:07 2012
Upgrade Start Time: Mon Aug 20 23:44:50 2012
Upgrade End Time(vCenter): Tue Aug 21 19:14:38 2012
Upgrade Error:
Upgrade Bundle ID:
VSM: VEM410-201301152108-BG
DVS: VEM410-201301152108-BG
switch#
| ||||
| Step 7 | Coordinate with and wait until the server administrator upgrades all ESX host VEMs with the new VEM software release and informs you that the upgrade process is complete. The server administrator performs the manual upgrade by using the vihostupdate command or the esxcli command. For more information, see Upgrading the VEM Software Using the vCLI. | ||||
| Step 8 | Clear the VEM upgrade status after the upgrade process is complete. switch# vmware vem upgrade complete
switch# show vmware vem upgrade status
Upgrade VIBs: System VEM Image
Upgrade Status:
Upgrade Notification Sent Time:
Upgrade Status Time(vCenter):
Upgrade Start Time:
Upgrade End Time(vCenter):
Upgrade Error:
Upgrade Bundle ID:
VSM: VEM410-201301152108-BG
DVS: VEM410-201301152108-BG
switch#
| ||||
| Step 9 | Verify that the upgrade process is complete. switch# show module Mod Ports Module-Type Model Status --- ----- -------------------------------- ------------------ ------------ 1 0 Virtual Supervisor Module Nexus1000V ha-standby 2 0 Virtual Supervisor Module Nexus1000V active * 3 248 Virtual Ethernet Module NA ok 4 248 Virtual Ethernet Module NA ok Mod Sw Hw --- ------------------ ------------------------------------------------ 1 4.2(1)SV2(1.1a) 0.0 2 4.2(1)SV2(1.1a) 0.0 3 4.2(1)SV2(1.1a) VMware ESXi 5.0.0 Releasebuild-469512 (3.0) 4 4.2(1)SV2(1.1a) VMware ESXi 5.0.0 Releasebuild-623860 (3.0) Mod MAC-Address(es) Serial-Num --- -------------------------------------- ---------- 1 00-19-07-6c-5a-a8 to 00-19-07-6c-62-a8 NA 2 00-19-07-6c-5a-a8 to 00-19-07-6c-62-a8 NA 3 02-00-0c-00-03-00 to 02-00-0c-00-03-80 NA 4 02-00-0c-00-04-00 to 02-00-0c-00-04-80 NA Mod Server-IP Server-UUID Server-Name --- --------------- ------------------------------------ -------------------- 1 10.104.249.171 NA NA 2 10.104.249.171 NA NA 3 10.104.249.172 7d41e666-b58a-11e0-bd1d-30e4dbc299c0 10.104.249.172 4 10.104.249.173 17d79824-b593-11e0-bd1d-30e4dbc29a0e 10.104.249.173 * this terminal session switch#
The upgrade is complete. |
Installing the VEM Software on a Stateless ESXi Host
The following list outlines the VEM installation process on a stateless ESXi host.
| Step 1 | See the procedure for Adding the Cisco Nexus 1000V to an ESXi Image Profile. |
| Step 2 | Installing the VEM software using one of the two following procedures: |
| Step 3 | See the procedure for Configuring Layer 2 Connectivity. |
Installing the VEM Software on a Stateless ESXi Host Using esxcli
| Step 1 |
Display the VMware version and build number. ~ # vmware -v VMware ESXi 5.0.0 build-441354 ~ # ~ # vmware -l VMware ESXi 5.0.0 GA | ||
| Step 2 | Log in to the ESXi stateless host. | ||
| Step 3 | Copy the offline bundle to the host. ~ # esxcli software vib install -d /vmfs/volumes/newnfs/MN-VEM/VEM500-201301152108-BG-release.zip
Installation Result
Message: WARNING: Only live system was updated, the change is not persistent.
Reboot Required: false
VIBs Installed: Cisco_bootbank_cisco-vem- v152-esx_4.2.1.2.1.1a.0-3.0.1
VIBs Removed:
VIBs Skipped:
| ||
| Step 4 | Verify that the VIB has installed. ~ # esxcli software vib list | grep cisco
cisco-vem-v152-esx 4.2.1.2.1.1a.0-3.0.1 Cisco PartnerSupported 2012-12-13
| ||
| Step 5 | Check that the VEM agent is running. ~ # vem status -v
Package vssnet-esxmn-ga-release
Version 4.2.1.2.1a.0-3.0.1
Build 5
Date Thu Jul 28 01:37:10 PDT 2011
Number of PassThru NICs are 0
VEM modules are loaded
Switch Name Num Ports Used Ports Configured Ports MTU Uplinks
vSwitch0 128 4 128 1500 vmnic4
Number of PassThru NICs are 0
VEM Agent (vemdpa) is running
| ||
| Step 6 | Display the VEM version, VSM version, and ESXi version. ~ # vemcmd show version
VEM Version: 4.2.1.2.1a.0-3.0.1
VSM Version:
System Version: VMware ESXi 5.0.0 Releasebuild-441354
| ||
| Step 7 | Display the ESXi version and details about pass-through NICs. ~ # vem version -v
Number of PassThru NICs are 0
Running esx version -441354 x86_64
VEM Version: 4.2.1.2.1a.0-3.0.1
VSM Version:
System Version: VMware ESXi 5.0.0 Releasebuild-441354
| ||
| Step 8 | Add the host to the DVS by using the vCenter Server. | ||
| Step 9 | On the VSM, verify that the VEM software has been installed. switch# show module
Mod Ports Module-Type Model Status
--- ----- -------------------------------- ------------------ ------------
1 0 Virtual Supervisor Module Nexus1000V active *
2 0 Virtual Supervisor Module Nexus1000V ha-standby
3 248 Virtual Ethernet Module NA ok
Mod Sw Hw
--- ---------------- ------------------------------------------------
1 4.2(1)SV1(4a) 0.0
2 4.2(1)SV1(4a) 0.0
3 4.2(1)SV1(4a) VMware ESXi 5.0.0 Releasebuild-441354 (3.0)
Mod MAC-Address(es) Serial-Num
--- -------------------------------------- ----------
1 00-19-07-6c-5a-a8 to 00-19-07-6c-62-a8 NA
2 00-19-07-6c-5a-a8 to 00-19-07-6c-62-a8 NA
3 02-00-0c-00-03-00 to 02-00-0c-00-03-80 NA
Mod Server-IP Server-UUID Server-Name
--- --------------- ------------------------------------ --------------------
1 10.104.62.227 NA NA
2 10.104.62.227 NA NA
3 10.104.62.216 3fa746d4-de2f-11de-bd5d-c47d4f7ca460 sans2-216.cisco.com
|
Installing the VEM Software on a Stateless ESXi Host Using VUM
Simplified Upgrade Process
Combined Upgrade
You can upgrade the VEM and ESX version simultaneously. It requires vSphere version 5.0 Update1 and later versions. It is supported in Cisco Nexus 1000V Release 4.2(1)SV1(5.2) and later. This upgrade can be implemented manually or by using VUM.
Selective Upgrade
Background Upgrade
- Upgrade the VSM first as usual. This may be done in a maintenance window
- Place one host at a time in maintenance mode (to vacate the VMs)
- Upgrade the VEM image on that host using manual commands or scripts
- Take the host out of maintenance mode, allowing the DRS to rebalance the VMs.
- Repeat the same procedure for every host in the DVS.
Note | Make sure there is enough spare capacity for HA and that all required ports have system profiles (such as mgmt vmk). Check the host health before upgrading. |
Extended Upgrade
Note | Do not make configuration changes during a maintenance window when the VEMs are being upgraded. |
- Add or remove modules
- Add or remove ports (ETH and VETH)
- Shut or no-shut a port
- Migrate ports to or from a vswitch
- Change port modes (trunk or access) on ports
- Add or remove port profiles
- Modify port profiles to add or remove specific features such as VLANS, ACLs, QoS, or PortSec.
- Change port channel modes in uplink port profiles
- Add or delete VLANs and VLAN ranges
- Add or delete static MACs in VEMs
Note | Queuing configuration changes are not supported on QoS. |
Upgrading from Releases 4.0(4)SV1(3, 3a, 3b, 3c, 3d) to the Current Release
Upgrading from Releases 4.0(4)SV1(3, 3a, 3b, 3c, 3d) to Release 4.2(1)SV2(1.1a) is a two-step process.
| Step 1 | See the Upgrading from Releases 4.0(4)SV1(3, 3a, 3b, 3c, 3d) to Release 4.2(1)SV1(4b) section in the Cisco Nexus 1000V Software Upgrade Guide, Release 4.2(1)SV1(4b). |
| Step 2 | See the Upgrade Paths. |
Migrating from Layer 2 to Layer 3
Layer 3 Advantages
The following lists the advantages of using a Layer 3 configuration over a Layer 2 configuration:
- The VSM can control the VEMs that are in a different subnets.
- The VEMs can be in different subnets.
- Because the VEMs can be in different subnets, there is no constraint on the physical location of the hosts.
- Minimal VLAN configurations are required for establishing the VSM-VEM connection when compared to Layer 2 control mode. The IP address of the VEM (Layer 3 capable vmknic’s IP address) and the VSM’s control0/mgmt0 interface are the only required information.
- In the VSM, either the mgmt0 or the control0 interface can be used as the Layer 3 control interface. If mgmt0 is used, there is no need for another IP address as the VSM’s management IP address is used for VSM-VEM Layer 3 connection.
- If the management VMKernel (vmk0) is used as the Layer 3 control interface in the VEM, there is no need for another IP address because the host’s management IP address is used for VSM-VEM Layer 3 connectivity.
Note | These advantages are applicable only for ESX-Visor hosts. On ESX-Cos hosts, a new VMKernel must be created. |
Layer 2 to 3 Conversion Tool
About VSM-VEM Layer 2 to 3 Conversion Tool
Use the VSM-VEM Layer 2 to 3 Conversion Tool as an optional, simplified method to migrate from Layer 2 to Layer 3 mode. The tool enables you to do the following:
- Check whether the prerequisites are met for the migration from L2 to L3 mode.
- Migrate the VSM from Layer 2 to Layer 3 Mode, with user interaction. In the process of migration, the tool creates a port profile. You can use port profiles to configure interfaces, which you can assign to other interfaces to give them the same configuration. The VSM-VEM Layer 2 to 3 Conversion Tool also gives you the option of retrieving the IP addresses from a local file (static).
Prerequisites for Using VSM-VEM Layer 2 to 3 Conversion Tool
The L2-L3_CT.zip file contains the applications required to run VSM-VEM Layer 2 to 3 Conversion Tool
Before you begin:
- Log in as administrator to use this conversion tool script.
- Download the L2-L3_CT.zip file from the CCO Download Center.
- Install Tool Conversion Language (TCL) version 8.4 or later on the workstation.
- Install VMware PowerShell API version 5.0 or later on both the vCenter and the workstation.
- Install OpenSSH on the workstation.
- In the workstation environment variables, add installation_directory_for_OpenSSH\bin directory to the end of the Windows path variable.
- Ensure that VLANs are allowed on the uplinks.
Note | You must install vCenter, VSM, and OpenSSH with admin privileges. |
Using VSM-VEM Layer 2 to 3 Conversion Tool
| Step 1 | On your workstation, unzip the L2-L3_CT.zip file to any folder. When you unzip the file, a Pre-Migrate-Check-Logs folder is created that holds all the running logs. Debugging log files will be created in this folder. |
| Step 2 | Inside the L2-L3_CT folder, run migration.bat as an administrator. This starts the VSM-VEM Layer 2 to 3 Conversion Tool. |
| Step 3 | Enter the VSM IP address. |
| Step 4 | Enter the VSM username. |
| Step 5 | Enter the vCenter IP. |
| Step 6 | Enter the vCenter username. |
| Step 7 | Enter the VSM password. |
| Step 8 | Enter the vCenter password. The migration tool begins creating the .csv file for the user, and then checks for a port profile with layer 3 capability. |
| Step 9 | If there is no layer 3-capable port profile, the tool will prompt for the creation of one. If you don't want to create a layer-3 capable port profile, skip to the next step.
This creates a port profile with the required configuration. You can select this port profile when prompted by the tool. The migration tool checks for connectivity between VSM, vCenter, and VEM modules. Wait for the message to display that all connectivity is fine. |
| Step 10 | Enter yes to continue when asked if you want to continue. The migration tool proceeds to create an extract .csv file. |
| Step 11 | Open the extract.csv file (in C:\Windows\Temp). |
| Step 12 | Enter the vmknic IP details at the end of the text, delimited by semicolons, and save the file as convert.csv. |
| Step 13 | Press any key to continue. |
| Step 14 | Enter yes to confirm when asked if you are sure you completed the required steps. |
| Step 15 | Enter the VSM password. |
| Step 16 | Enter the vCenter password. The migration tool connects to the vCenter and VSM of the user. |
| Step 17 | Enter yes to confirm when asked if you want to continue. The migration process continues. |
| Step 18 | Enter the port profile name from the list of port profiles that appears at the prompt. Once the port profile is selected, the max port value is automatically changed to 128. |
| Step 19 | Enter yes to confirm when asked if you have updated convert.csv file as per the instructions. |
| Step 20 | Enter yes to confirm, when asked if you want to continue. The tool checks the connectivity between VSM, vCenter, and VEM modules. A message is displayed that the addition to vmknics are successful and all connectivity is fine. The VmkNicAddingToHost window will remain open until the configuration is complete. |
| Step 21 | Enter yes to confirm that you would like to proceed with mode change from L2 to L3. |
| Step 22 | Enter yes to confirm when asked if you wish to continue. Wait for the SUCCESSFULLY COMPLETED MIGRATION message to display. The migration from layer 2 to layer 3 is now complete. The operating mode should now be listed as L3. |
Using Extract Mode
You can use Extract Mode to extract the attached VEM states and save them to the Extract.csv file, which is located in C:\Windows\Temp.
| Command or Action | Purpose |
|---|
Using Convert Mode
You can use Convert Mode to migrate the VSM from Layer 2 to Layer 3.
| Command or Action | Purpose |
|---|
Example
The following example shows how to use the VSM-VEM Layer 2 to 3 Conversion Tool.
Enter VSM IP:
enter VSM Username:
Enter VC IP:
enter VC Username:
Enter VSM password:
Enter VC password:
create the Csv File for User I/P: C:\windows\temp\extract.csv
#### VSM DETAILS STARTS ##########
.........
.............
#### VC DETAILS END ##########
.............
................
Operating Mode : L2
Operatoinal Mode is L2 Currently ......
###############################################################################
List of port profiles on VSM:
-----------------------------
###############################################################################
=========
 CHECK 1: Checking for a port profile with capability l3control set and Enabled.
................
=========
There is not even One L3 Capable Port Profile

Do you want to Create One L3 Capable Port Profile
Please Give Option (Yes/No):Yes
Please Enter L3 PortProfile Name: L3-Control
Please Give Access Vlan Id :5
Creating L3 Port Profile : L3-Control with Access Vlan : 5
……………………………….
………………………………………………..
L3 capable port profiles: L3-Control
Modules Registered:[10.105.228.116]
=========
 CHECK 3:  Checking for connectivity between VSM and VC, VSM and VEM Modules
=========
…………………..
……………………………………

## All connectivity is fine
###############################################################################
Please wait for a few minutes.
Do you want to Continue,Please Type ....(yes/no):yes
Migration Tool Proceeding ....
Creating csv file: C:\windows\temp\extract.csv
Modules : 10.105.228.116
#########################################################
Modules Registered:[3 10.105.228.116]
#########################################################

#########################################################
###########################################################################
Extraction of VEM connection status has been dumped in: C:\windows\temp\extract.
csv
Please rename this file before using Convert Mode
Update the VMKNic IP and NetMask for all disconnected entries
###########################################################################
!###############################################################################
########!
!Open c:\windows\temp\Extract.csv and save as Convert.csv (in the same directory
)
!Enter the VMKNic IP and netmask in the Convert.csv file as shown below
!VEM_Host_IP;PPConnectionStatus;Vem_Vmk_IP;NetMask!
!PPConnectionStatus Should not be changed!
!10.10.10.12;DisConnected;10.10.10.100;255.255.255.0!
!After Updating the IP and Netmask, save the file in the same directory
!###############################################################################
########!
Press any key to continue . . .
Are you sure you completed the above steps? (yes/no):yes

##############################################################################

##Tool expects this File have an IP/Netmask given for disconnected VEM in the co
rrect format : C:\windows\temp\Convert.csv

##10.10.10.12;DisConnected;10.10.10.100;255.255.255.0

###############################################################################
VSM password required 10.105.228.115:

VC password required 10.105.228.113:

create the Csv File for User I/P: C:\windows\temp\extract.csv
……………………..
…………………………….
## All connectivity is fine

###############################################################################
Please wait for a few minutes.
Do you want to Continue,Please Type ....(yes/no):yes
Migration Tool Proceeding ....
……………………………
……………………………………………….
#########################################################
Name the port profile you want to proceed with : [l3-pp]
Please type any port profile mentioned above       ||:l3-pp
You Selected : l3-pp
…………………..
……………………………….
###################################################################
## Have you created a Convert.csv file with a proper VMKNic IP and NetMask?
## In the C:\windows\temp\Convert.csv file for disconnected VEMs.
###################################################################
Have you Updated C:\windows\temp\Convert.csv as per the above instructions?(Yes)
:yes
Do you want to Continue,Please Type ....(yes/no):yes
Migration Tool Proceeding ....
………………………….
……………………………………………..

Addition to VmKNics are successful
## All connectivity is Fine
……………………………
…………………………………..
###############################################################################

Would You Like to Proceed with Mode Change from L2 to L3....(yes/no):yes
Do you want to Continue,Please Type ....(yes/no):yes
Migration Tool Proceeding ....
…………………..
……………………..
switch#
Operating Mode : L3
Operatoinal Mode is L3 Currently
Svs Connection Mode : L3
Vem IP : 10.10.10.108 Connected Back
………………
……………………
All VEMs are back: pass
 ==============SUCCESSFULLY COMPLETED MIGRATION===========================
Interface Comparisons Between mgmt0 and control0
The following describes the differences between using a mgmt0 interface or a control0 interface:
- On the VSM, there are two ways of connectivity via the mgmt0 or control0 interface.
- Setting mgmt0 as Layer 3 interface uses the mgmt0 interface on the VSM.
- The control0 interface is a special interface created for Layer 3 connectivity.
- The Layer 3 interface on the VEM is selected by designating the interface with the Layer 3 control capability.
- The egress control traffic route is decided by the VMware routing stack.
- On a VEM, the management vmknic (vmk0) can be used for Layer 3 control connectivity if it is managed by the Cisco Nexus 1000V and is designated with the Layer 3 control capability.
Configuring the Layer 3 Interface
Configure either the control0 (see Step 1) or mgmt0 interface (see Step 2).
| Step 1 |
Configuring the control0 interface.
| ||
| Step 2 | Configure the mgmt0 interface.
switch# show running-config interface mgmt 0
!Command: show running-config interface mgmt0
!Time: Mon Dec 12 02:43:25 2011
version 4.2(1)SV1(5.1)
interface mgmt0
  ip address 10.104.249.37/27
|
Creating a Port Profile with Layer 3 Control Capability
- You are creating a port profile with Layer 3 control capability.
- Allow the VLAN that you use for VSM to VEM connectivity in this port profile.
- Configure the VLAN as a system VLAN.
Note | VEM modules will not register to the VSM before a vmkernel interface (vmk) is migrated to a Layer 3 control capable port profile. You must migrate a vmk to the Layer 3 port profile after migrating host vmnics to Ethernet port profiles. Migrate your management vmkernel interface into the Layer 3 capable port profile. Do not use multiple vmkernel interfaces on the same subnet. |
| Step 1 |
Create a Layer 3 port profile. VSM_1# configure terminal VSM_1(config)# port-profile type vethernet l3_control VSM_1(config-port-prof)# switchport mode access VSM_1(config-port-prof)# switchport access vlan 3160 VSM_1(config-port-prof)# capability l3control VSM_1(config-port-prof)# vmware port-group VSM_1(config-port-prof)# state enabled VSM_1(config-port-prof)# no shutdown |
| Step 2 | Display the port profile. VSM_1# show port-profile name l3_control port-profile l3_control type: Vethernet description: status: enabled max-ports: 32 min-ports: 1 inherit: config attributes: switchport mode access switchport access vlan 3160 (Allow the VLAN in access mode.) no shutdown evaluated config attributes: switchport mode access switchport access vlan 3160 no shutdown assigned interfaces: Vethernet1 port-group: l3_control system vlans: 3160 (Configure the VLAN as a system VLAN.) capability l3control: yes (Configure capability l3 control.) capability iscsi-multipath: no capability vxlan: no capability l3-vn-service: no port-profile role: none port-binding: static |
Creating a VMKernel on the Host
| Step 1 | Log in to the vCenter Server. | ||
| Step 2 | Choose Home > Inventory > Hosts and Clusters. | ||
| Step 3 | Choose the host. | ||
| Step 4 | Click the Configuration tab. | ||
| Step 5 | In the Hardware pane, choose Networking. | ||
| Step 6 | Click the vSphere Distributed Switch button. | ||
| Step 7 | Go to Manage Virtual Adapters. | ||
| Step 8 | Add and create a new VMKernel.
| ||
| Step 9 | Assign the VMkernel to the port profile created in Creating a Port Profile with Layer 3 Control Capability. | ||
| Step 10 | Assign an IP address. |
Configuring the SVS Domain in the VSM
The control0 or mgmt0 interface can be assigned as the Layer 3 control interface.
| Step 1 |
Disconnect the VSM to vCenter Server connection. switch# configure terminal switch(config)# svs connection toVC switch(config-svs-conn)# no connect switch(config-svs-conn)# exit | ||
| Step 2 | (Optional)Remove the control and the packet VLAN configuration. switch(config)# svs-domain switch(config-svs-domain)# no control vlan switch(config-svs-domain)# no packet vlan | ||
| Step 3 | Change the svs mode from Layer 2 to Layer 3 with the mgmt0 interface as the Layer 3 control interface. switch(config-svs-domain)# svs mode l3 interface mgmt0 switch(config-svs-domain)# exit
| ||
| Step 4 | Restore the VSM to vCenter Server connection. switch(config)# svs connection toVC switch(config-svs-conn)# connect switch(config-svs-conn)# end
| ||
| Step 5 | Display the SVS domain configuration. switch# show svs domain
SVS domain config:
Domain id: 3185
Control vlan: NA
Packet vlan: NA
L2/L3 Control mode: L3
L3 control interface: mgmt0
Status: Config push to VC successful.
Note: Control VLAN and Packet VLAN are not used in L3 mode.
|
Feature History for Upgrading the Cisco Nexus 1000V
The following table lists the release history for upgrading the Cisco Nexus 1000V.
Feature Name |
Releases |
Feature Information |
|---|---|---|
Combined Upgrade |
4.2(1)SV1(5.2) |
The ability to perform a simultaneous upgrade of the VEM and ESXi host. |
Upgrading the Cisco Nexus 1000V |
4.0(4)SV1(2) |
Introduced in this release. |
 Feedback