Downloads |
 Feedback Feedback
|
Table Of Contents
Understanding CLI Command Hierarchy
Configuration Mode Commands and Submodes
Navigating Through CLI Commands
Using the no and Default Forms of Commands
Displaying the Current Directory
Listing the Files in a Directory
Deleting an Existing Directory
Executing Commands Specified in a Script
Displaying the Last Line in a File
Setting the Switch's Shell Timeout
Setting the Switch's Terminal Timeout
Setting the Switch's Terminal Type
Setting the Switch's Terminal Length
Setting the Switch's Terminal Width
Saving Command Output to a File
Using Valid Formats and Ranges
Before You Begin
This chapter prepares you to configure switches from the CLI. It also lists the information you need to have before you begin, and it describes the CLI command modes.
This chapter includes the following sections:
•
Understanding CLI Command Hierarchy
•
•
About the Switch Prompt
If you are connected to the console port when the switch boots up, you see the output show in Figure 2-1:
Note
Once the switch is powered on successfully, you see the default switch prompt (switch#). You can perform embedded CLI operations, access command history, and use command parsing functions at this prompt. The switch gathers the command string upon detecting an Enter (CR) and accepts commands from a terminal.
Figure 2-1 Output When a Switch Boots Up
About the CLI Command Modes
Switches in the Cisco MDS 9000 Family have two main command modes—user EXEC mode and configuration mode. The commands available to you depend on the mode you are in. To obtain a list of available commands in either mode, type a question mark (?) at the system prompt.
Table 2-1 lists and describes the two commonly used modes, how to enter the modes, and the resulting system prompts. The system prompt helps you identify which mode you are in and hence, which commands are available to you.
Table 2-1 Frequently Used Switch Command Modes
EXEC
Enables you to temporarily change terminal settings, perform basic tests, and display system information.
Note
At the switch prompt, enter the required EXEC mode command.
Configuration mode
Enables you to configure features that affect the system as a whole.
Note
From EXEC mode, enter the config terminal command.
You can abbreviate commands and keywords by entering just enough characters to make the command unique from other commands. For example, you can abbreviate the config terminal command to conf t.
Understanding CLI Command Hierarchy
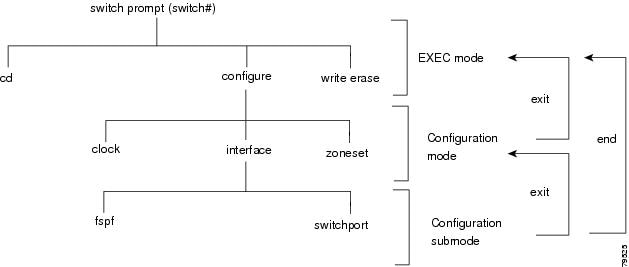
The CLI commands are organized hierarchically, with commands that perform similar functions grouped under the same level. For example, all commands that display information about the system, configuration, or hardware are grouped under the show command, and all commands that allow you to configure the switch are grouped under the config terminal command. Figure 2-2 illustrates a portion of the config terminal command hierarchy.
Figure 2-2 CLI Command Hierarchy Example
To execute a command, you enter the command by starting at the top level of the hierarchy. For example, to configure a Fibre Channel interface, use the config terminal command. Once you are in configuration mode, issue the interface command. When you are in the interface submode, you can query the available commands there.
The following example shows how to query the available commands in the interface submode:
switch# config tEnter configuration commands, one per line. End with CNTL/Z.switch(config)# interface fc1/1switch(config-if)# ?Interface configuration commands:channel-group Add to/remove from a port-channelexit Exit from this submodefcdomain Enter the interface submodefspf To configure FSPF related parametersno Negate a command or set its defaultsshutdown Enable/disable an interfaceswitchport Configure switchport parametersEXEC Mode Options
When you start a session on the switch, you begin in EXEC mode. Based on the role or group to which you belong, you have access to limited commands or to all commands (see the "Role-Based Authorization" section). From the EXEC mode, you can enter configuration mode. Most of the EXEC commands are one-time commands, such as show commands, which display the current configuration status. Here is a list of EXEC mode commands:
switch# ?Exec Commands:attach Connect to a specific linecardcallhome Callhome commandscd Change current directoryclear Reset functionsclock Manage the system clockconfig Enter configuration modecopy Copy from one file to anotherdebug Debugging functionsdelete Remove filesdir Directory listing for filesdiscover Discover informationexit Exit from the EXECfcping Ping an N-Portfctrace Trace the route for an N-Port.find Find a file below the current directoryformat Format disksinstall Upgrade softwareload Load system imagemkdir Create new directorymove Move filesno Disable debugging functionsping Send echo messagespurge Deletes unused datapwd View current directoryreload Reboot the entire boxrmdir Remove existing directoryrun-script Run shell scriptssend Send message to all the open sessionssetup Run the basic SETUP command facilityshow Show running system informationsleep Sleep for the specified number of secondssystem System management commandstail Display the last part of a filetelnet Telnet to another systemterminal Set terminal line parameterstest Test commandtraceroute Trace route to destinationundebug Disable Debugging functions (See also debug)write Write current configurationzone Execute Zone Server commandsConfiguration Mode
Configuration mode allows you to make changes to the existing configuration. When you save the configuration, these commands are preserved across switch reboots. Once you are in configuration mode, you can enter interface configuration mode, zone configuration mode, and a variety of protocol-specific modes. Configuration mode is the starting point for all configuration commands. When you are in configuration mode, the switch expects configuration commands from the user.
The following example shows output from the config terminal command:
switch# config terminalEnter configuration commands, one per line. End with CNTL/Z.switch(config)#Configuration Mode Commands and Submodes
The following is a list of configuration mode commands:
switch# config tEnter configuration commands, one per line. End with CNTL/Z.switch(config)# ?Configure commands:aaa Configure AAAarp [no] remove an entry from the ARP cacheboot Configure boot variablescallhome Enter the callhome configuration modeclock Configure time-of-day clockend Exit from configure modeexit Exit from configure modefcalias Fcalias configuration commandsfcanalyzer Configure cisco fabric analyzerfcc Configure FC Congestion Controlfcdomain Enter the fcdomain configuration modefcdroplatency Configure switch or network latencyfcflow Configure fcflowfcinterop Interop commands.fcns Name server configurationfcroute Configure FC routesfcs Configure Fabric Config Serverfctimer Configure fibre channel timersfspf Configure fspfin-order-guarantee Set in-order delivery guaranteeinterface Select an interface to configureip Configure IP featuresline Configure a terminal linelogging Modify message logging facilitiesno Negate a command or set its defaultsntp NTP Configurationpower Configure power supplypoweroff Poweroff a module in the switchqos Configure priority of FC control framesradius-server Configure RADIUS related parametersrole Configure rolesrscn Config commands for RSCNsnmp-server Configure snmp serverspan Enter SPAN configuration modessh Configure SSH parametersswitchname Configure system's network namesystem System config commandtelnet Enable telnettrunk Configure Switch wide trunk protocolusername Configure user information.vsan Enter the vsan configuration modewwn Set secondary base MAC addr and range for additional WWNszone Zone configuration commandszoneset Zoneset configuration commandsConfiguration mode, also known as terminal configuration mode, has several submodes. Each of these submodes places you deeper in the prompt hierarchy. When you type exit, the switch backs out one level and returns you to the previous level. When you type end, the switch backs out to the user EXEC level. You can also type Ctrl-Z in configuration mode as an alternative to typing end.
Note
— Ctrl-z instead of the end command, and
— Ctrl-g instead of the exit commandYou can execute an EXEC mode command from a configuration mode or submode prompt. You can issue this command from any submode within the configuration mode. When in configuration mode (or in any submode), enter the do command along with the required EXEC mode command. The entered command is executed at the EXEC level and the prompt resumes its current mode level.
switch(config)# do terminal session-timeout 0switch(config)#In this example, terminal session-timeout is an EXEC mode command—you are issuing an EXEC mode command using the configuration mode do command.
The do command applies to all EXEC mode commands other than the end and exit commands. You can also use the help (?) and command completion (tab) features for EXEC commands when issuing a do command along with the EXEC command.
Table 2-2 displays the commonly used configuration submodes.
Table 2-2 Submodes Within the Configuration Mode
Call Home
callhome
switch(config-callhome)#
Contact, destination, and e-mail
FCS Registration
fcs register
switch(config-fcs-register)#
FCS attribute registration
From FCS registration submode:
platform name name vsan vsan-id
switch(config-fcs-register-att rib)#
Platform name and VSAN ID association
Fibre Channel alias
fcalias name name vsan vsan-id
switch(config-fcalias)#
Alias member
FSPF
fspf config vsan vsan-id
switch(config-(fspf-config))#
Static SPF computation, hold time, and autonomous region
Interface configuration
interface type slot/port
switch(config-if)#
Channel groups, Fibre Channel domains, FSPF parameters, switch port trunk and beacon information, and IP address
From the VSAN or mgmt0 (management) interface configuration submode:
vrrp number
switch(config-if-vrrp)#
Virtual router (see "Creating or Removing a Virtual Router" section)
Line console
line console
switch(config-console)#
Primary terminal console
VTY
line vty
switch(config-line)#
Virtual terminal line
Role
role name
switch(config-role)#
Rule
SPAN
span session number
switch(config-span)#
SPAN source, destination, and suspend session information
VSAN database
vsan database
switch(config-vsan-db)#
VSAN database
Zone
zone name string vsan vsan-id
switch(config-zone)#
Zone member
Zone set
zoneset name name vsan vsan-id
switch(config-zoneset)#
Zone set member
Navigating Through CLI Commands
To redisplay a command you previously entered, press the Up Arrow key. You can continue to press the Up Arrow key to see more previously issued commands. Similarly, you can press the Down Arrow, Right Arrow, Left Arrow, and Delete keys to navigate through the command history and to modify an existing command string.
Getting Help
In any command mode, you can get a list of available commands by entering a question mark (?).
switch# ?To obtain a list of commands that begin with a particular character sequence, type in those characters followed immediately by the question mark (?). Do not include a space.
switch# co?configure copyTo list keywords or arguments, enter a question mark in place of a keyword or argument. Include a space before the question mark. This form of help is called command syntax help, because it reminds you which keywords or arguments are applicable based on the commands, keywords, and arguments you have already entered.
switch# config ?terminal Configure the system from the terminal
Tip
Command Completion
In any command mode, you can begin a particular command sequence and immediately press the Tab key to complete the rest of the command.
switch (config)# ro<Tab>
switch (config)# role <Tab>
switch (config)# role name
This form of help is called command completion, because it completes a word for you. If several options are available for the typed letters, all options that match those letters are presented:
switch(config)# fc<Tab>fcalias fcdomain fcsfcanalyzer fcdroplatency fcns fctimerfcc fcinterop fcrouteswitch(config)# fcd<Tab>fcdomain fcdroplatencyswitch(config)# fcdo<Tab>switch(config)# fcdomainUsing the no and Default Forms of Commands
You can issue the no form of any command to perform the following actions:
•
If you issue the zone member command, you can undo the results:
switch(config)# zone name test vsan 1switch(config-zone)# member pwwn 12:12:12:12:12:12:12:12switch(config-zone)# no member pwwn 12:12:12:12:12:12:12:12WARNING: Zone is empty. Deleting zone test. Exit the submode.switch(config-zone)#•
If you want to delete a zone that you created:
switch(config)# zone name test vsan 1switch(config-zone)# exitswitch(config)# no zone name test vsan 1switch(config)#You cannot delete a zone facility called test while residing in it. You must first exit the zone submode and return to configuration mode.
Entering CLI Commands
You can configure the software in one of two ways:
•
•
Viewing a Configuration
You can view the ASCII form of the configuration file when required. To view the current configuration tree from the EXEC prompt, issue the show running-config command. If the running configuration is different from the startup configuration, issue the show startup-config command to view the ASCII version of the current startup configuration that was used to boot the switch.
You can gather specific information on the entire switch configuration by issuing the relevant show commands. Available show commands for each feature are listed at the end of each chapter. Examples 2-1 to 2-3 display a few show command examples.
Example 2-1 Displays the Specified Interface
switch# show interface fc1/1fc1/1 is upHardware is Fibre Channel, 20:01:ac:16:5e:4a:00:00vsan is 1Port mode is ESpeed is 1 GbpsBeacon is turned offFCID is 0x0b01000 frames input, 0 bytes, 0 discards0 runts, 0 jabber, 0 too long, 0 too short0 input errors, 0 CRC, 0 invalid transmission words0 address id, 0 delimiter0 EOF abort, 0 fragmented, 0 unknown class0 frames output, 0 bytes, 0 discardsReceived 0 OLS, 0 LRR, 0 NOS, 0 loop initsTransmitted 0 OLS, 0 LRR, 0 NOS, 0 loop initsExample 2-2 Displays the Software and Hardware Version
switch# show versionCisco Storage Area Networking Operating System (SAN-OS) SoftwareTAC support: http://www.cisco.com/tacCopyright (c) 2002-2003 by Cisco Systems, Inc. All rights reserved.The copyright for certain works contained herein are owned byAndiamo Systems, Inc. and/or other third parties and are used anddistributed under license.SoftwareBIOS: version 1.0.3loader: version error [last 1.0(1)]kickstart: version 1.1(1) [build 1.1(0.94)] [gdb]system: version 1.1(1) [build 1.1(0.94)] [gdb]BIOS compile time: 11/18/02kickstart image file is: bootflash:/bootimagekickstart compile time: 2/12/2003 11:00:00system image file is: isanimagesystem compile time: 2/12/2003 12:00:00HardwareRAM 1027628 kBbootflash: 1000944 blocks (block size 512b)slot0: 0 blocks (block size 512b)172.22.90.171 uptime is 0 days 2 hours 48 minute(s) 26 second(s)Last reset at 669882 usecs after Thu Feb 13 07:20:41 2003Reason: Reset Requested by CLI command reloadSystem version: 1.0(1)Example 2-3 Displays the Running Configuration
switch# show running-configBuilding Configuration ...interface fc1/1interface fc1/2interface fc1/3interface fc1/4interface mgmt0ip address 172.22.95.112 255.255.255.0no shutdownvsan databaseboot system bootflash:system-237; sup-1boot kickstart bootflash:boot-237 sup-1callhomeip default-gateway 172.22.95.1switchname switchtrunk protocol enableusername admin password 5 /AFDAMD4B2xK2 role network-adminUsing the File System
The file system on a switch in the supervisor module provides a number of useful commands to help you manage software image files and configuration files.
All switches in the Cisco MDS 9000 Family have one internal bootflash: that resides in the supervisor or switching module.You have access to two directories within the internal bootflash: file system.
•
•
Setting the Current Directory
The cd command changes the current directory level to a specified directory level. CLI defaults to the volatile: files system. This command expects a directory name input.
Tip
The syntax for this command is cd directory name
This example changes the current directory to the mystorage directory that resides in the slot0 directory:
switch# cd slot0:mystorageThis example changes the current directory to the mystorage directory that resides in the current directory.
switch# cd mystorageIf the current directory is slot0:mydir, this command changes the current directory to slot0:mydir/mystorage.Displaying the Current Directory
The pwd command displays the current directory location. This example changes the directory and displays the current directory.
switch# cd bootflash:switch# pwdbootflash:Listing the Files in a Directory
The dir command displays the contents of the current directory or the specified directory. The syntax for this command is dir directory or file name
This example shows how to list the files on the default volatile: file system:
switch# dirUsage for volatile: filesystem0 bytes total used20971520 bytes free20971520 bytes availableCreating a New Directory
The mkdir command creates a directory at the current directory level or at a specified directory level.
The syntax for this command is mkdir directory name
This example creates a directory called test in the slot0 directory.
switch# mkdir slot0:testThis example creates a directory called test at the current directory level.
switch# mkdir testIf the current directory is slot0:mydir, this command creates a directory called slot0:mydir/test.Deleting an Existing Directory
The rmdir command deletes an existing directory at the current directory level or at a specified directory level. The directory must be empty to be deleted.
The syntax for this command is rmdir directory name
This example deletes the directory called test in the slot0 directory.
switch# rmdir slot0:testThis example deletes the directory called test at the current directory level.
switch# rmdir testIf the current directory is slot0:mydir, this command deletes the slot0:mydir/test directory.Moving Files
The move command removes a file from the source directory and places it in the destination directory. If a file with the same name already exists in the destination directory, that file is overwritten by the moved file.
This example moves the file called samplefile from the slot0 directory to the mystorage directory.
switch# move slot0:samplefile slot0:mystorage/samplefileThis example moves a file from the current directory level.switch# move samplefile mystorage/samplefileIf the current directory is slot0:mydir, this command moves slot0:mydir/samplefile to slot0:mydir/mystorage/samplefile.Copying Files
The copy command copies a file.
This example copies the file called samplefile from the slot0 directory to the mystorage directory.
switch# copy slot0:samplefile slot0:mystorage/samplefileThis example copies a file from the current directory level.switch# copy samplefile mystorage/samplefileIf the current directory is slot0:mydir, this command copies slot0:mydir/samplefile to slot0:mydir/mystorage/samplefile.You can also use the copy command to upload and download files from the slot0: or bootflash: file system to or from a FTP, TFTP, SFTP, or SCP server (see the "Copying Files" section).Displaying File Contents
The show file command displays the contents of a specified file in the file system.
The syntax for this command is show file file_name
This example displays the contents of the test file that resides in the slot0 directory.
switch# show file slot0:testconfig tInt fc1/1no shutendshow intThis example displays the contents of a file residing in the current directory.
switch# show file myfile
Displaying Disk Usage
The show flash command displays the disk usage of various devices.
switch# show flashFilesystem 1k-blocks Used Available Use% Mounted onnone 409600 37024 372576 10% /systemnone 204800 39816 164984 20% /varnone 102400 2084 100316 3% /dev/shmnone 20480 0 20480 0% /volatile/dev/hd-cfg0 19976 1699 17246 9% /mnt/cfg/0/dev/hd-pss 20005 1473 17499 8% /mnt/pssDisplaying Users
The show users command displays all users currently accessing the switch.
switch# show usersadmin pts/7 Jan 12 20:56 (10.77.202.149)admin pts/9 Jan 12 23:29 (modena.cisco.com)admin pts/11 Jan 13 01:53 (dhcp-171-71-49-49.cisco.com)Executing Commands Specified in a Script
The run-script command executes the commands specified in a file. To use this command, be sure to create the file and specify commands in the required order.
Note
The syntax for this command is run-script file_name
This example displays the CLI commands specified in the testfile that resides in the slot0 directory.
switch# show file slot0:testfileconf tinterface fc 1/1no shutdownendsh interface fc1/1This file output is in response to the run-script command executing the contents in the testfile file:
switch# run-script slot0:testfile'conf t'Enter configuration commands, one per line. End with CNTL/Z.'interface fc1/1''no shutdown''end''sh interface fc1/1'fc1/1 is down (Fcot not present)Hardware is Fibre ChannelPort WWN is 20:01:00:05:30:00:48:9eAdmin port mode is auto, trunk mode is onvsan is 1Beacon is turned offCounter Values (current):0 frames input, 0 bytes, 0 discards0 runts, 0 jabber, 0 too long, 0 too short0 input errors, 0 CRC, 0 invalid transmission words0 address id, 0 delimiter0 EOF abort, 0 fragmented, 0 unknown class0 frames output, 0 bytes, 0 discardsReceived 0 OLS, 0 LRR, 0 NOS, 0 loop initsTransmitted 0 OLS, 0 LRR, 0 NOS, 0 loop initsCounter Values (5 minute averages):0 frames input, 0 bytes, 0 discards0 runts, 0 jabber, 0 too long, 0 too short0 input errors, 0 CRC, 0 invalid transmission words0 address id, 0 delimiter0 EOF abort, 0 fragmented, 0 unknown class0 frames output, 0 bytes, 0 discardsReceived 0 OLS, 0 LRR, 0 NOS, 0 loop initsTransmitted 0 OLS, 0 LRR, 0 NOS, 0 loop initsSetting the Delay Time
The sleep command delays an action by a specified number of seconds.
The syntax for this command is sleep <seconds>
switch# sleep 30You will see the switch prompt return after 30 seconds.
This command is useful within scripts. For example, if you create a script called lashtest-script:
switch# show file slot0:test-scriptdiscover scsi-target remotesleep 10show scsi-target diskswitch# run-script slot0:test-scriptWhen you execute the slot0:test-script, the switch software executes the discover scsi-target remote command, and then waits for 10 seconds before executing the show scsi-target disk command.
Displaying the Last Line in a File
The tail command displays the last lines (tail end) of a specified file.
The syntax for this command is tail <file name> [<number of lines>]
switch# tail mylog 10You see the last 10 lines of the mylog file.
If you specify a long file and would like to exit in the middle, enter Ctrl-c to exit this command.
Setting the Switch's Shell Timeout
Use the exec-timeout command in configuration mode to configure the lifetime of all terminal sessions on that switch. When the time limit configured by this command is exceeded, the shell exits and closes that session.
The syntax for this command from is exec-timeout minutes
The default is 30 minutes. You can configure different timeout values for a console or a virtual terminal line (VTY) session. You can set the exec-timeout value to 0 to disable this feature so the session remains active until you exit the switch. This change is saved in the configuration file.
•
switch(config)# line consoleswitch(config-console)# exec-timeout 60Specifies the current console shell timeout to be 60 minutes.
•
switch(config)# line vtyswitch(config-line)# exec-timeout 60Specifies the current console shell timeout to be 60 minutes.
Setting the Switch's Terminal Timeout
Use the terminal session-timeout command in EXEC mode to configure the automatic logout time for the current terminal session on that switch. When the time limit configured by this command is exceeded, the switch closes that session and exits.
The syntax for this command from is terminal session-timeout minutes
The default is 30 minutes. You can set the terminal session-timeout value to 0 to disable this feature so the terminal remains active until you choose to exit the switch. This change is not saved in the configuration file.
switch# terminal session-timeout 600Specifies the terminal timeout to be 600 minutes for the current session.
Setting the Switch's Terminal Type
Use the terminal terminal-type command in EXEC mode to specify the terminal type for a switch:
The syntax for this command is terminal terminal-type terminal-type
switch# terminal terminal-type vt100Specifies the terminal type. The terminal-type string is restricted to 80 characters and must be a valid type (for example vt100 or xterm). If a Telnet or SSH session specifies an unknown terminal type, the switch uses the vt100 terminal by default.
Setting the Switch's Terminal Length
To set the terminal screen length for the current session, use the terminal length command in EXEC mode. This command is specific to only the console port. Telnet and SSH sessions set the length automatically.
The syntax for this command is terminal length lines
switch# terminal length 20Sets the screen length for the current session to 20 lines for the current terminal session. The default is 24 lines.
Setting the Switch's Terminal Width
To set the terminal screen width for the current session, use the terminal width command in EXEC mode. This command is specific to only the console port. Telnet and SSH sessions set the width automatically.
The syntax for this command is terminal width columns
switch# terminal width 86Sets the screen length for the current session to 86 columns for the current terminal session. The default is 80 columns.
Displaying Terminal Settings
The show terminal command displays the terminal settings for the current session:
switch# show terminalTTY: Type: "vt100"Length: 24 lines, Width: 80 columnsSession Timeout: 525600 minutesSaving Command Output to a File
You can force all screen output to go to a file by appending > filename to any command. For example, enter show interface > samplefile at the EXEC mode switch prompt to save the interface configuration to samplefile—a file created at the same directory level. At the EXEC mode switch prompt, issue a dir command to view all files in this directory, including the recently saved samplefile.See "Initial Configuration," for information on saving and copying configuration files, and "Software Images," for information on saving and copying software images.
Note
Sending Messages to Users
The send command sends a message to all active CLI users currently using the switch. This message is restricted to 80 alphanumeric characters with spaces.
This example sends a warning message to all active users about the switch being shut down.
switch# send Shutting down the system in 2 minutes. Please log off.Broadcast Message from admin@excal-112(/dev/pts/3) at 16:50 ...Shutting down the system in 2 minutes. Please log off.Using the ping Command
The ping command verifies the connectivity of a remote host or server by sending echo messages.
The syntax for this command is ping <host or ip address>
switch# ping 198.133.219.25PING 198.133.219.25 (198.133.219.25) 56(84) bytes of data.64 bytes from 198.133.219.25: icmp_seq=1 ttl=245 time=0.856 ms64 bytes from 198.133.219.25: icmp_seq=2 ttl=245 time=1.02 ms--- 198.133.219.25 ping statistics ---2 packets transmitted, 2 received, 0% packet loss, time 999msrtt min/avg/max/mdev = 0.856/0.941/1.027/0.090 msTo abnormally terminate a ping session, type the Ctrl-C escape sequence
Using traceroute
The traceroute command prints the routes taken by a specified host or IP address.
The syntax for this command is traceroute <host or ip address>
switch# traceroute www.cisco.comTracing route to www.cisco.com [198.133.219.25] 30 hops max, 38 byte packets1 bras3-l0.pltnca.sbcglobal.net [151.164.184.79] 30 ms 30 ms 20 ms2 dist2-vlan50.pltn13.pbi.net [64.164.97.67] 20 ms 20 ms 30 ms3 bb2-g1-1.pltn13.pbi.net [67.116.251.194] 20 ms 20 ms 20 ms4 bb1-p12-0.pltn13.pbi.net [151.164.40.17] 20 ms 21 ms 20 ms5 bb2-p13-0.sntc01.pbi.net [151.164.191.65] 20 ms 20 ms 30 ms6 ex1-p3-0.eqsjca.sbcglobal.net [64.161.1.54] 20 ms 20 ms 30 ms7 sl-st20-sj-0-0.sprintlink.net [144.223.242.81] 20 ms 20 ms 30 ms8 sl-bb25-sj-10-0.sprintlink.net [144.232.20.62] 20 ms 30 ms 20 ms9 sl-gw11-sj-10-0.sprintlink.net [144.232.3.134] 70 ms 30 ms 30 ms10 sl-ciscopsn2-11-0-0.sprintlink.net [144.228.44.14] 20 ms 30 ms 20 ms11 sjce-dmzbb-gw1.cisco.com [128.107.239.89] 20 ms 30 ms 30 ms12 sjck-dmzdc-gw1.cisco.com [128.107.224.69] 20 ms 30 ms 20 ms13 www.cisco.com (198.133.219.25) 2.496 ms * 2.135 msTo abnormally terminate a traceroute session, enter Ctrl-C.
Saving a Configuration
To save the configuration, enter the copy running-config startup-config command from the EXEC mode prompt to save the new configuration into nonvolatile storage. Once this command is issued, the running and the startup copies of the configuration are identical.
See the "Copying Files" section.
Clearing a Configuration
To clear a startup configuration, enter the write erase command from the EXEC mode prompt. Once this command is issued, the switch's startup configuration reverts to factory defaults. The running configuration is not affected. The write erase command erases the entire startup configuration with the exception of any configuration that affects the loader functionality.
The write erase boot command only erases the configuration that affects the loader functionality. The loader functionality configuration includes the boot variables and the mgmt0 IP configuration information (IP address, netmask and default gateway).
switch# write erase bootThis command will erase the boot variables and the ip configuration of interface mgmt 0Role-Based CLI
By default, two roles exist in all switches:
•
•
When you execute a command, perform command completion, or obtain context sensitive help, the switch software allows the operation to progress if you have the correct permission as specified in the description of the command.
Using Valid Formats and Ranges
Note
Some commands require a MAC address, IP address, or IDs that must be designated in a standard format or given a range. See Table 2-3.