Feedback Feedback
|
Table Of Contents
Release Notes for Cisco AnyConnect VPN Client,
Version 2.1Security Appliances and Software Supported
Interoperability Considerations
AnyConnect Client and Cisco Secure Desktop
Upgrading to AnyConnect Release 2.1
New Features and Enhancements in Release 2.1
AnyConnect with Start Before Logon Supports Cisco Secure Desktop 3.2.1
Improved User Experience During Download and Installation
Localization for Mac OS X Systems
AnyConnect Support for Smartcards and PPP
Support for RSA SecurID Software Token Client Software
New AnyConnect Client Disconnect Behavior
SDI Token (SoftID) Integration
Comparing Native SDI with RADIUS SDI
Categories of SDI Authentication Exchanges
Normal SDI Authentication Login
New User, Clear PIN, and New PIN Modes
"Next Passcode" and "Next Token Code" Challenges
Ensuring RADIUS/SDI Proxy Compatibility with the AnyConnect Client
AnyConnect Client and RADIUS/SDI Server Interaction
Configuring the Security Appliance to Support RADIUS/SDI Messages
Where to Find the AnyConnect Client Files for Installation
Before You Install the AnyConnect Client
Ensuring Automatic Installation of AnyConnect Clients
AnyConnect Client and New Windows 2000 Installations
Adding a Security Appliance to the List of Trusted Sites (IE)
Adding a Security Certificate in Response to Browser Alert Windows
Installing the AnyConnect Client on a System Running Windows
Installing the AnyConnect Client on a System Running Linux
Installing the AnyConnect Client on a System Running MAC OSX
Using the AnyConnect CLI Commands
Loading the AnyConnect Client and Configuring the Security Appliance with ASDM
Loading the AnyConnect Client and Configuring the Security Appliance with CLI
Disabling Permanent Client Installation
Enabling AnyConnect Client Profile Downloads
Enabling Start Before Logon for the AnyConnect Client
CSA Interoperability with the AnyConnect Client and Cisco Secure Desktop
Uninstalling the Cisco AnyConnect VPN Client
Internet Explorer Proxy With the AnyConnect Client
Setting the Secure Connection (Lock) Icon
Cisco Security Agent Version Requirements
PC Wireless Client Configurations
Certificate Revocation List Processing
Zyxel Modem SSH Incompatibility
Dynamic Install Fails on Windows Vista When Running Low-rights Internet Explorer
AnyConnect Fails to Establish a DTLS Tunnel When Using RC4-MD5 Encryption
Linux Client Weblaunch Requires an Account with Sudo Access
msvcp60.dll Must Be Available for Installation of the AnyConnect Client
Secure VPN Via Windows Remote Desktop Is Now Supported
AnyConnect Start Before Logon GINA Might Not Appear on Login Screen after Reboot
When Using a Client-Side Proxy and Full Tunneling, the Proxy Should Be Reset
Linux-Specific AnyConnect Client Issue
Setting the AnyConnect Pre-Login Banner
AnyConnect Requires That the ASA Be Configured to Accept TLSv1 Traffic
Mac OS X and Linux Clients Might Disconnect If a Security Appliance Failover Occurs
IPv6 AnyConnect Failover is Not Supported for the Security Appliance
Framed IP Address Is Not Available in a Start Accounting Request
AnyConnect Split-tunneling Now Works on Windows Vista
Selecting Crypto Toolkits for AnyConnect on Windows Platforms
First User Message for Double-byte Languages Does Not Translate Correctly
Ensuring Reliable DTLS Connections Through Third-Party Firewalls
No AnyConnect Confirmation Dialog for Cisco Secure Desktop Users
AnyConnect OpenSSL Libraries Have Been Updated to 0.9.8f
Firewall Blocks DTLS (UDP) Traffic if Idle for 40 Seconds
Optionally Disable Tearing Down Tunnel Upon Smartcard Removal
Upgrading Standalone AnyConnect Client for Windows Vista Shows Activity Indication
SSL VPN Clients Do Not Support DNS Fallback for Split Tunneling
Synchronizing a Mobile Device to a PC While a Tunnel Is Active
Open Caveats in Cisco AnyConnect VPN Client, Release 2.1
Release Notes for Cisco AnyConnect VPN Client,
Version 2.1
Revised: May 24, 2010, OL-14893-08Introduction
These release notes are for the Cisco AnyConnect VPN Client, Version 2.1, which provides remote users with secure VPN connections to the Cisco ASA 5500 Series Adaptive Security Appliance using the Secure Socket Layer (SSL) protocol.
The AnyConnect client provides remote end users running Microsoft Vista, Windows XP or Windows 2000, Linux, or Macintosh OS X, with the benefits of a Cisco SSL VPN client, and supports applications and functions unavailable to a clientless, browser-based SSL VPN connection. In addition, the AnyConnect client supports IPv6 over an IPv4 network.
The client can be loaded on the security appliance and automatically downloaded to remote users when they log in, or it can be manually installed as an application on PCs by a network administrator. The client includes the ability to create user profiles that are displayed in the user interface and define the names and addresses of host computers.
The AnyConnect client can be installed manually on the remote PC by the system administrator. It can also be loaded onto the security appliance and made ready for download to remote users. After downloading, it can automatically uninstall itself after the connection terminates, or it can remain on the remote PC for future SSL VPN connections.
This release supports only the SSL protocol. This release does not include IPSec support.
These release notes describe new features, limitations and restrictions, open and resolved caveats, and related documentation. They also include procedures you should follow before loading this release. The section Usage Notes describes interoperability considerations and other issues you should be aware of when installing and using the AnyConnect client. Read these release notes carefully prior to installing this software.
Contents
This document includes the following sections:
New Features and Enhancements in Release 2.1
Feature Overview
The Cisco AnyConnect VPN Client provides remote users with secure VPN connections to the Cisco 5500 Series Adaptive Security Appliance.
Additional features of the AnyConnect client include:
•
Datagram Transport Layer Security (DTLS) with SSL connections—Avoids latency and bandwidth problems associated with some SSL-only connections and improves the performance of real-time applications that are sensitive to packet delays. DTLS is a standards-based SSL protocol that provides a low-latency data path using UDP. For detailed information about DTLS, see RFC 4347 (http://www.ietf.org/rfc/rfc4347.txt).
•
•
•
•
•
•
•
•
•
•
•
•
•
System Requirements
The following table indicates the system requirements to install the Cisco AnyConnect VPN Client on each of the supported platforms.
•
•
•
Computer with a Pentium®-class processor or greater.
In addition, x64 or x86 processors are supported for Windows XP and Windows Vista.
•
•
–
–
–
•
The following Linux distributions have been tested and are known to work with the AnyConnect Client, while following the requirements listed in this document:
•
•
•
•
•
•
•
•
•
•
•
•
•
•
•
•
•
•
gdk: required 2.0.0,
libpango: required 1.0.•
•
Mac OS X, Version 10.4 or later
Macintosh computer1
50 MB hard disk space
1 The AnyConnect VPN Client is not compatible with Parallels Desktop for Mac.
If you are using Internet Explorer, use version 5.0, Service Pack 2 or later.
Note
Security Appliances and Software Supported
The Cisco AnyConnect VPN Client supports all Cisco Adaptive Security Appliance models. It does not support PIX devices. Table 1 shows the Cisco ASA 5500 Adaptive Security Appliance software images that support the AnyConnect client.
Interoperability Considerations
This section describes how the AnyConnect VPN Client interoperates with other software. The AnyConnect client can be loaded on the security appliance and automatically deployed to remote users when they log in to the security appliance, or it can be installed as an application on PCs by a network administrator using standard software deployment mechanisms. You can use a text editor to create user profiles as XML files. These profiles drive the display in the user interface and define the names and addresses of host computers.
AnyConnect Client and Cisco Secure Desktop
Table 2 shows the interoperability of the AnyConnect Client modes with Cisco Secure Desktop modules on remote computers.
Table 2 AnyConnect Client and Cisco Secure Desktop Interoperability
Standalone
Microsoft Windows Vista
Yes
Yes
-
-
Microsoft Windows XP
Yes
Yes
Yes
-
Microsoft Windows 2000
Yes
Yes
Yes
-
Apple Macintosh OS X 10.4 (PowerPC or Intel)
Yes
Yes
-
-
Linux
Yes
Yes
-
-
WebLaunch
Microsoft Windows Vista
Yes
Yes
-
Yes
Microsoft Windows XP
Yes
Yes
Yes
Yes
Apple Macintosh OS X 10.4 (PowerPC or Intel)
Yes
Yes
Yes
Yes
Linux
Yes
Yes
Yes
Yes
1 By default, the Start Before Logon (SBL) feature of AnyConnect Client is disabled. Cisco Secure Desktop, Release 3.2(1), interoperates with AnyConnect Client, regardless of whether SBL is enabled. Cisco Secure Desktop. Release 3.2(0) modules are not interoperable with AnyConnect Client if SBL is enabled.
2 Includes both English and non-English support of 32-bit Microsoft operating systems. Cisco Secure Desktop does not support the 64-bit versions.
AnyConnect and PIX
PIX does not support SSL VPN connections, either clientless or AnyConnect.
AnyConnect and IOS
Certain features of the Cisco AnyConnect VPN Client are supported in conjunction with IOS routers with SSL VPN support. Please see the IOS SSL VPN Feature Guide for specific details.
Upgrading to AnyConnect Release 2.1
This section contains information about upgrading from the Cisco SSL VPN client to Cisco AnyConnect VPN Client, Release 2.1.
Before You Begin
Be aware of the considerations listed in the Usage Notes, section of these Release Notes before you upgrade. These are known product behaviors, and knowing about them at the beginning of the process should expedite the upgrade. Where appropriate, the number of the caveat documenting the issue appears at the end of the item. See the "Caveats" section for a list of open and resolved caveats.
New Features and Enhancements in Release 2.1
Cisco AnyConnect VPN Client, Release 2.1, offers the following new features.
AnyConnect with Start Before Logon Supports Cisco Secure Desktop 3.2.1
Release 2.1 of the AnyConnect client supports Release 3.2.1 of Cisco Secure Desktop, regardless of whether the Start Before Logon feature is enabled. In AnyConnect Release 2.0, the AnyConnect Client interoperated with Cisco Secure Desktop only if Start Before Logon was disabled.
Improved User Experience During Download and Installation
AnyConnect 2.1 is optimized to shorten the time required for download and installation. This effect is most noticeable on lower-speed connections.
Localization for Mac OS X Systems
Localization capability is now available on Mac OS X systems, as well as on Windows systems.
AnyConnect Support for Smartcards and PPP
The Cisco AnyConnect VPN Client supports Smartcards on Windows operating systems, via the Windows Crypto API (CAPI) interface, and on Mac OS X, version 10.4 or higher. On the Mac, the Smartcard must be able to work with Keychain. While Cisco can validate compatibility with only a subset of the available cards, readers, and drivers on the market, testing has shown to be compatible with Smartcards that meet these requirements. If a particular combination is not functioning with AnyConnect but meets the above specifications, we recommend contacting your Smartcard manufacturer to determine whether there are known defects in the product implementation.
The Cisco AnyConnect VPN Client provides compatibility with IP/Ethernet over Point-to-Point Protocol (PPP) environments. Most DUN/RAS connectivity options that provide PPP support function with the client, although Cisco cannot guarantee interoperability with those environments not specifically validated. For some environments, split tunneling might be required to allow the connectivity protocol to continue to communicate after a VPN session has been established.
The only differences the user sees are the status bar strings that appear while the client is processing the user's input. These strings are feedback to the user to let the user know what is going on. One other possibility is an error message that might occur when the USB token and RSA DLL do not function correctly.
Support for RSA SecurID Software Token Client Software
Cisco AnyConnect VPN Client supports integration of SDI token software on Windows 2000 and Windows XP systems. AnyConnect does not support multiple tokens imported into the RSA Secure ID Software Token client software, and AnyConnect does not support SofToken II, by Secure Computing Corporation. For a fuller description, see SDI Token (SoftID) Integration.
Remote User Interface
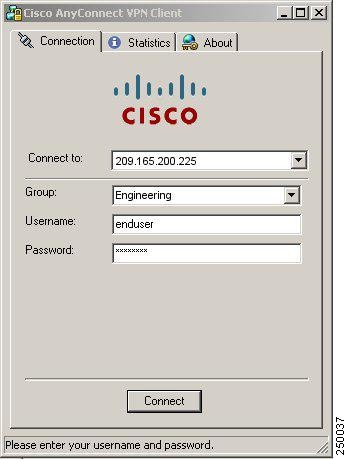
Figure 1 shows the Cisco AnyConnect VPN Client user interface. The Connection tab provides a drop-down list of profiles for connecting to remote systems.
Figure 1 Cisco AnyConnect VPN Client User Interface, Connection Tab
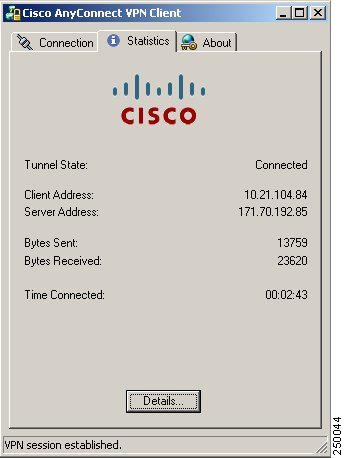
Figure 2 shows the Statistics tab, including current connection information.
Figure 2 Cisco AnyConnect VPN Client User Interface, Statistics Tab
New AnyConnect Client Disconnect Behavior
If you click Disconnect, the AnyConnect client, Release 2.1, terminates the connection, and the status bar at the bottom of the dialog box, and the AnyConnect GUI displays a login dialog box with a "Connect to" field. To reconnect, the remote user must select the server to connect to and the group name, and enter the username, if necessary, and the password, PIN, or Passcode, as appropriate and click Select.
SDI Token (SoftID) Integration
Cisco AnyConnect VPN Client, Release 2.1, integrates support for RSA SecurID client software running on Windows XP and Windows 2000 platforms. This support allows IT administrators to make strong authentication a convenient part of doing business. RSA SecurID software authenticators reduce the number of items a user has to manage for safe and secure access to corporate assets. RSA SecurID Software Tokens residing on a remote device generate a random, one-time-use passcode that changes every 60 seconds. The term SDI stands for Security Dynamics, Inc. technology, which refers to this one-time password generation technology that uses hardware and software tokens.
Note
Comparing Native SDI with RADIUS SDI
The network administrator can configure the secure gateway to allow SDI authentication in either of the following modes:
•
•
In Release 2.1, except for one case, described later, Native SDI and RADIUS SDI appear identical to the remote user. Because the SDI messages are configurable on the SDI server, the message text (see Table 3) on the security appliance must match the message text on the SDI server. Otherwise, the prompts displayed to the remote client user might not be appropriate for the action required during authentication. The AnyConnect client might fail to respond and authentication might fail.
RADIUS SDI challenges, with minor exceptions, essentially mirror native SDI exchanges. Since both ultimately communicate with the SDI server, the information needed from the client and the order in which that information is requested is the same. Except where noted, the remainder of this section deals with native SDI.
When a remote user using RADIUS SDI authentication connects to the security appliance with the AnyConnect VPN client and attempts to authenticate using an RSA SecurID token, the security appliance communicates with the RADIUS server, which in turn, communicates with the SDI server about the authentication.
For more information about configuring the ASA to ensure AnyConnect client compatibility, see Ensuring RADIUS/SDI Proxy Compatibility with the AnyConnect Client.
Using SDI Authentication
In the AnyConnect client, Release 2.1, the login (challenge) dialog box changes to match the type of authentication configured for the tunnel group to which the user belongs. The input fields of the login dialog box clearly indicate what kind of input is required for authentication. Users who rely on username/password authentication see a dialog box like that in Figure 3.
Figure 3 Username/Password Authentication Login Dialog Box
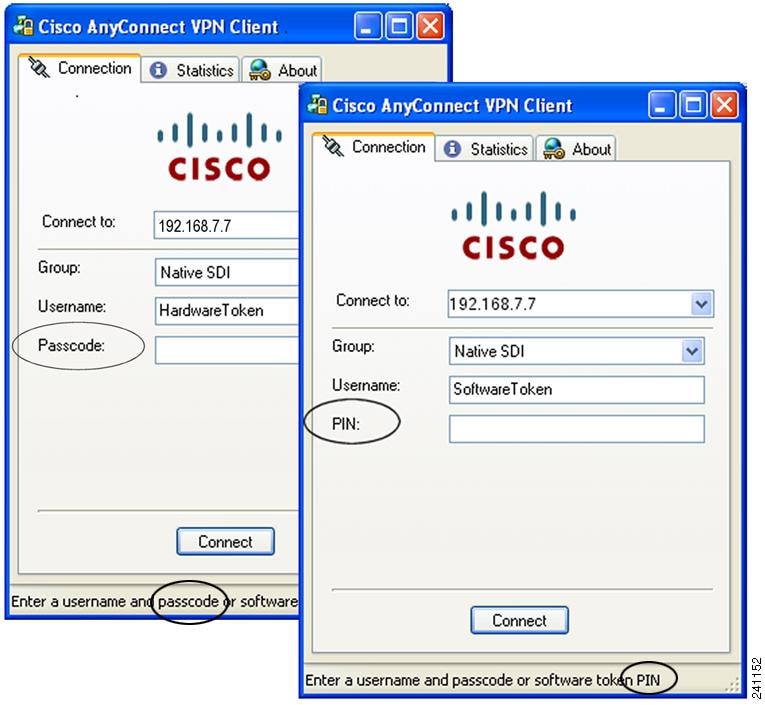
Users who use RSA SecurID hardware or software tokens see input fields indicating whether the user should enter a passcode or a PIN, and the status line at the bottom of the dialog box provides further information about the requirements. The user enters a software token PIN or passcode directly into the AnyConnect user interface. See Figure 4.
Figure 4 PIN and Passcode Dialog Boxes
The appearance of the initial login dialog box depends on the secure gateway settings: the user can access the secure gateway either through the main login page, the main index URL, or through a tunnel-group login page, a tunnel group URL (URL/tunnel-group). To access the secure gateway via the main login page, the "Allow user to select connection" check box must be set in the secure gateway's SSL VPN Connection Profiles. In either case, the secure gateway sends the client a login page. The main login page contains a drop-down box in which the user selects a tunnel group; the tunnel-group login page does not since the tunnel-group is specified in the URL.
Starting with AnyConnect Release 2.1, in the case of a main login page (with a drop-down tunnel-group list), the authentication type of the default tunnel group determines the initial setting for the password input field label. For example, if the default tunnel group uses SDI authentication, the field label is "Passcode"; but if the default tunnel group uses NTLM authentication, the field label is "Password". In Release 2.1, the field label is not dynamically updated with the user selection of a different tunnel group. For a tunnel-group login page, the field label matches the tunnel-group requirements.
Also starting with AnyConnect Release 2.1, the client supports input of RSA SecurID Software Token PINs in the password input field. If the RSA SecurID Software Token software is installed and the tunnel-group authentication type is SDI, the field label is "Passcode" and the status bar states "Enter a username and passcode or software token PIN." and the user may enter a PIN. If a PIN is used, subsequent consecutive logins for the same tunnel group and username have the field label "PIN". The client retrieves the passcode from the RSA SecurID Software Token DLL using the entered PIN. With each successful authentication, the client saves the tunnel group, the username, and authentication type, and the saved tunnel group becomes the new default tunnel group.
The AnyConnect client accepts passcodes for any SDI authentication. Even when the password input label is "PIN", the user may still enter a passcode as instructed by the status bar. The client sends the passcode to the secure gateway as is. If a passcode is used, subsequent consecutive logins for the same tunnel group and username have the field label "Passcode".
Categories of SDI Authentication Exchanges
All SDI authentication exchanges fall into one of the following categories:
•
•
•
•
•
Normal SDI Authentication Login
A normal login challenge is always the first challenge. The SDI authentication user must provide a user name and token passcode (or PIN, in the case of a software token) in the username and passcode or PIN fields, respectively. The client returns the information to the secure gateway (central-site device), and the secure gateway verifies the authentication with the authentication server (SDI or SDI via RADIUS proxy).
If the authentication server accepts the authentication request, the secure gateway sends a success page back to the client, and the authentication exchange is complete.
If the passcode is not accepted, the authentication fails, and the secure gateway sends a new login challenge page, along with an error message. If the passcode failure threshold on the SDI server has been reached, then the SDI server places the token into next token code mode. See "Next Passcode" and "Next Token Code" Challenges.
New User, Clear PIN, and New PIN Modes
The PIN can be cleared only on the SDI server and only by the network administrator.
In the New User, Clear PIN, and New PIN modes, the AnyConnect client caches the user-created PIN or system-assigned PIN for later use in the "next passcode" login challenge.
Clear PIN mode and New User mode are identical from the point of view of the remote user and are both treated the same by the secure gateway. In both cases, the remote user either must enter a new PIN or be assigned a new PIN by the SDI server. The only difference is in the user response to the initial challenge.
For New PIN mode, the existing PIN is used to generate the passcode, as it would be in any normal challenge. For Clear PIN mode, no in is used at all for hardware tokens, with the user entering just a token code. A PIN Of eight consecutive zeros is used to generate a passcode for RSA software tokens. In either case, the SDI server administrator must inform the user of what, if any, PIN value to use.
Adding a new user to an SDI server has the same result as clearing the PIN of an existing user. In both cases, the user must either provide a new PIN or be assigned a new PIN by the SDI server. In these modes, for hardware tokens, the user enters just a token code from the RSA device. In either case, the SDI server administrator must inform the user of what, if any, PIN value to use.
Getting a New PIN
If there is no current PIN, the SDI server requires that one of the following conditions be met, depending on how the system is configured:
•
•
•
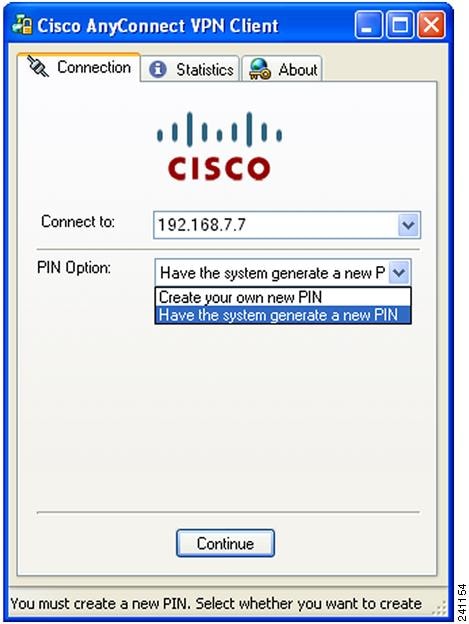
By default, the system simply assigns a PIN. If the SDI server is configured to allow the remote user to choose whether to create a PIN or have the system assign a PIN, the login screen presents a drop-down menu showing the options (Figure 5).
Figure 5 New PIN Creation or Generation Selection Dialog Box
The status line provides a prompt message. In either case, the user must remember the new PIN for future login authentications.
Creating a New PIN
If the user chooses to create a new PIN and clicks Continue, the AnyConnect client presents a dialog box on which to enter that PIN (Figure 6). The PIN must be a number from 4 to 8 digits long.
Figure 6 Creating a New PIN
For a user-created PIN, after entering and confirming the new PIN, the user clicks Continue. Because the PIN is a type of password, anything the user enters into these input fields is displayed as asterisks. With RADIUS proxy, the PIN confirmation is a separate challenge, subsequent to the original dialog box. The client sends the new PIN to the secure gateway, and the secure gateway continues with a "next passcode" challenge.
For a system-assigned PIN, if the SDI server accepts the passcode that the user enters on the login page, then the secure gateway sends the client the system-assigned passcode. The user must click Continue. The client sends a response back to the secure gateway, indicating that the user has seen the new PIN, and the system continues with a "next passcode' challenge.
In both cases, the user must remember the PIN for subsequent login authentications.
"Next Passcode" and "Next Token Code" Challenges
For a "next passcode" challenge, the client uses the PIN value cached during the creation or assignment of a new PIN to retrieve the next passcode from the RSA SecurID Software Token DLL and return it to the secure gateway without prompting the user. Similarly, in the case of a "next Token Code" challenge for a software token, the client retrieves the next Token Code from the RSA SecurID Software Token DLL.
Ensuring RADIUS/SDI Proxy Compatibility with the AnyConnect Client
This section describes procedures to ensure that the AnyConnect client using RSA SecureID Software tokens can properly respond to user prompts delivered to the client through a RADIUS server proxying to an SDI server or servers. This section contains the following topics:
•
•
AnyConnect Client and RADIUS/SDI Server Interaction
When a remote user connects to the security appliance with the AnyConnect client and attempts to authenticate using an RSA SecurID token, the security appliance communicates with the RADIUS server, which in turn, communicates with the SDI server about the authentication.
During authentication, the RADIUS server presents access challenge messages to the security appliance. Within these challenge messages are reply messages containing text from the SDI server. The message text is different when the security appliance is communicating directly with an SDI server than when communicating through the RADIUS proxy. Therefore, in order to appear as a native SDI server to the AnyConnect client, the security appliance must interpret the messages from the RADIUS server.
Also, because the SDI messages are configurable on the SDI server, the message text on the security appliance must match (in whole or in part) the message text on the SDI server. Otherwise, the prompts displayed to the remote client user may not be appropriate for the action required during authentication. The AnyConnect client may fail to respond and authentication may fail.
The following section describes how to configure the security appliance to ensure successful authentication between the client and the SDI server:
Configuring the Security Appliance to Support RADIUS/SDI Messages
The following section describes the steps to configure the security appliance to interpret SDI-specific RADIUS reply messages and prompt the AnyConnect user for the appropriate action. Each step has information for both ASDM and CLI.
Step 1
ASDM Procedure
Go to Configuration > Remote Access VPN > Network (Client) Access > SSL VPN Connection Profiles. The Edit SSL VPN Connection Profile window displays (Figure 7).
Check Enable the display of SecurID messages on the login screen.
Figure 7 Edit SSL VPN Connection Profile Screen
CLI Procedure
Use the proxy-auth sdi command from tunnel-group webvpn configuration mode. For example:
hostname(config)# tunnel-group sales webvpn attributeshostname(tunnel-group-webvpn)# proxy-auth sdiStep 2
The default message text used by the security appliance is the default message text used by Cisco Secure Access Control Server (ACS). If you are using Cisco Secure ACS, and it is using the default message text, you do not need to configure the message text on the security appliance. Otherwise, configure the messages to ensure the message text matches.
Table 3 shows the message code, the default RADIUS reply message text, and the function of each message. Because the security appliance searches for strings in the order that they appear in the table, you must ensure that the string you use for the message text is not a subset of another string.
For example, "new PIN" is a subset of the default message text for both new-pin-sup and next-ccode-and-reauth. If you configure new-pin-sup as "new PIN", when the security appliance receives "new PIN with the next card code" from the RADIUS server, it will match the text to the new-pin-sup code instead of the next-ccode-and-reauth code.
Table 3
SDI Opcodes, Default Message Text, and Message Function
ASDM Procedure
Go to Configuration > Remote Access VPN > AAA Server Groups. The Add AAA Server window displays (Figure 8).
In the SDI Messages area, click Message Table to expand the table and view the messages. Double-click a message text field to edit the message.
Figure 8 Configuring RADIUS SDI Messages
CLI Procedure
Use the proxy-auth_map sdi command from tunnel-group webvpn configuration mode. The following example enters aaa-server-host mode and changes the text for the RADIUS reply message new-pin-sup:
hostname(config)# aaa-server radius_sales host 10.10.10.1hostname(config-aaa-server-host)# proxy-auth_map sdi new-pin-sup "This is your new PIN"
Installation Notes
This section contains procedures for installing the AnyConnect client software on the ASA5500 using the Adaptive Security Device Manager (ASDM) or the CLI command interface.
Without a previously-installed client, remote users enter the IP address or DNS name in their browser of an interface configured to accept clientless SSL VPN connections. Unless the security appliance is configured to redirect http:// requests to https://, users must enter the URL in the form https://<address>.
Note
After entering the URL, the browser connects to that interface and displays the login screen. If the user satisfies the login and authentication, and the security appliance identifies the user as requiring the client, it uploads the client that matches the operating system of the remote computer. After uploading, the client installs and configures itself, establishes a secure SSL connection and either remains or uninstalls itself (depending on the security appliance configuration) when the connection terminates.
In the case of a previously-installed client, when the user authenticates, the security appliance examines the revision of the client, and upgrades the client as necessary.
When the client negotiates an SSL VPN connection with the security appliance, it connects using Transport Layer Security (TLS). The client can also negotiate a simultaneous Datagram Transport Layer Security (DTLS) connection. DTLS avoids latency and bandwidth problems associated with some SSL connections and improves the performance of real-time applications that are sensitive to packet delays.
The AnyConnect client can be downloaded from the security appliance, or it can be installed manually on the remote PC by the system administrator. For more information about configuring the AnyConnect client, see the Cisco 5500 Series Adaptive Security Appliance CLI Configuration Guide.
The security appliance uploads the client based on the group policy or username attributes of the user establishing the connection. You can configure the security appliance to automatically download the client, or you can configure it to prompt the remote user about whether to download the client. In the latter case, if the user does not respond, you can configure the security appliance to either download the client after a timeout period or present the login page.
The installation and configuration consists of two parts: what you have to do on the security appliance, and what you have to do on the remote PC. The AnyConnect client software is built into the ASA Release 8.0(1) and later. You can decide whether to make the AnyConnect client software permanently resident on the remote PC, or whether to have it resident only for the duration of the connection.
Note
This section describes installation-specific issues and procedures for AnyConnect client Release 2.1, and contains the following sections:
•
•
•
•
•
•
•
•
Where to Find the AnyConnect Client Files for Installation
All of the AnyConnect clients are located in the same place: http://www.cisco.com/pcgi-bin/tablebuild.pl/anyconnect
Before You Install the AnyConnect Client
The following sections contain recommendations to ensure successful AnyConnect client installation, as well as tips about certificates, Cisco Security Agent (CSA), adding trusted sites, and responding to browser alerts:
•
•
•
•
Ensuring Automatic Installation of AnyConnect Clients
The following recommendations and caveats apply to the automatic installation of AnyConnect client software on client PCs:
•
–
–
The procedure varies by browser. See the procedures that follow this section.
–
•
Current shipping versions of CSA do not have a built-in rule that is compatible with the AnyConnect client. You can create the following rule using CSA version 5.0 or later by following these steps:
Step 1
Priority Allow, no Log, Description: "Cisco Secure Tunneling Browsers, read/write
vpnweb.ocx"
Applications in the following class: "Cisco Secure Tunneling Client - Controlled Web Browsers"Attempt: Read file, Write FileOn any of these files: @SYSTEM\vpnweb.ocx
Step 2
**\vpndownloader.exe@program_files\**\Cisco\Cisco AnyConnect VPN Client\vpndownloader.exeThis rule will be built into a future version of CSA.
•
AnyConnect Client and New Windows 2000 Installations
In rare circumstances, if you install the AnyConnect client on a computer that has a new or clean Windows 2000 installation, the AnyConnect client might fail to connect, and your computer might display the following message:
The required system DLL (filename) is not present on the system.This could occur if the computer does not have the file MSVCP60.dll or MSVCRT.dll located in the winnt\system32 directory. For more information about this problem, see the Microsoft Knowledge Base, article 259403, at http://support.microsoft.com/kb/259403.
Adding a Security Appliance to the List of Trusted Sites (IE)
To add a security appliance to the list of trusted sites, use Microsoft Internet Explorer and do the following steps.
Note
Step 1
The Internet Options window opens.
Step 2
Step 3
Step 4
The Trusted Sites window opens.
Step 5
Step 6
Step 7
The Trusted Sites window closes.
Step 8
For information on how to use Microsoft Active Directory to add the security appliance to the list of trusted sites for Internet Explorer, see Appendix B of Cisco AnyConnect VPN Client Administrator Guide.
Adding a Security Certificate in Response to Browser Alert Windows
This section explains how to install a self-signed certificate as a trusted root certificate on a client in response to the browser alert windows.
In Response to a Microsoft Internet Explorer "Security Alert" Window
The following procedure explains how to install a self-signed certificate as a trusted root certificate on a client in response to a Microsoft Internet Explorer Security Alert window. This window opens when you establish a Microsoft Internet Explorer connection to a security appliance that is not recognized as a trusted site. The upper half of the Security Alert window shows the following text:
Information you exchange with this site cannot be viewed or changed by others.
However, there is a problem with the site's security certificate. The security
certificate was issued by a company you have not chosen to trust. View the certificate
to determine whether you want to trust the certifying authority.
Install the certificate as a trusted root certificate as follows:
Step 1
The Certificate window opens.
Step 2
The Certificate Import Wizard Welcome opens.
Step 3
The Certificate Import Wizard - Certificate Store window opens.
Step 4
Step 5
The Certificate Import Wizard - Completing window opens.
Step 6
Step 7
The Certificate Import Wizard window indicates the import is successful.
Step 8
Step 9
Step 10
The security appliance window opens, signifying the certificate is trusted.
In Response to a Netscape, Mozilla, or Firefox "Certified by an Unknown Authority" Window
The following procedure explains how to install a self-signed certificate as a trusted root certificate on a client in response to a "Web Site Certified by an Unknown Authority" window. This window opens when you establish a Netscape, Mozilla, or Firefox connection to a security appliance that is not recognized as a trusted site. This window shows the following text:
Unable to verify the identity of <Hostname_or_IP_address> as a trusted site.Install the certificate as a trusted root certificate as follows:
Step 1
The Certificate Viewer window opens.
Step 2
Step 3
The security appliance window opens, signifying the certificate is trusted.
Installing the AnyConnect Client on a System Running Windows
To install the AnyConnect client on a PC running Windows, follow these steps. We suggest you accept the defaults unless your system administrator has instructed otherwise.
Note
Step 1
Step 2
Step 3
Step 4
Step 5
Step 6
Step 7
Installing the AnyConnect Client on a System Running Linux
To install the AnyConnect client on a system Running Linux, follow these steps:
Step 1
tar xvzf AnyConnect-Linux-Release-2.1.xxxx.tar.gzThe files necessary for installation are placed in the folder ciscovpn.
Step 2
[root@linuxhost]# cd ciscovpn[root@linuxhost]# ./vpn_install.shThe client installs in the directory /opt/cisco/vpn. This script also installs the daemon vpnagentd and sets it up as a service that is automatically started when the system boots.
After installing the client, you can start the client manually with the Linux command /opt/cisco/vpn/bin/vpnui or with the client CLI command /opt/cisco/vpn/bin/vpn.
Installing the AnyConnect Client on a System Running MAC OSX
The AnyConnect client image for MAC OSX is a DMG disk image installation package. To install the AnyConnect client on a System Running MAC OSX, follow these steps:
Step 1
Step 2
Step 3
Step 4
The installation is complete.
Using the AnyConnect CLI Commands
The Cisco AnyConnect VPN Client provides a command line interface (CLI) for users who prefer to issue commands instead of using the graphical user interface. The following sections describe how to launch the CLI command prompt.
For Windows
To launch the CLI command prompt and issue commands on a Windows system, locate the file vpncli.exe in the Windows folder C:\Program Files\Cisco\Cisco AnyConnect VPN Client. Double-click the file vpncli.exe.
For Linux
To launch the CLI command prompt and issue commands on a Linux system, locate the file vpn in the folder /opt/cisco/vpn/bin/. Execute the file vpn.
You can run the CLI in interactive mode, in which it provides its own prompt, or you can run it with the commands on the command line. Table 4 shows the CLI commands.
The following examples shows the user establishing and terminating a connection from the command line:
/opt/cisco/vpn/bin/vpn connect 1.2.3.4Establishes a connection to a security appliance with the address 1.2.3.4.
/opt/cisco/vpn/bin/vpn connect some_asa_aliasEstablishes a connection to a security appliance by reading the profile and looking up the alias some_asa_alias in order to find its address.
/opt/cisco/vpn/bin/vpn statsDisplays statistics about the vpn connection.
/opt/cisco/vpn/bin/vpn disconnectDisconnect the vpn session if it exists.
Loading the AnyConnect Client and Configuring the Security Appliance with ASDM
Loading the client on the security appliance consists of copying a client image to the security appliance and identifying the file to the security appliance as a client image. With multiple clients, you must also assign the order that the security appliance uploads the clients to the remote PC. Perform the following steps to install the client:
Step 1
Step 2
Step 3
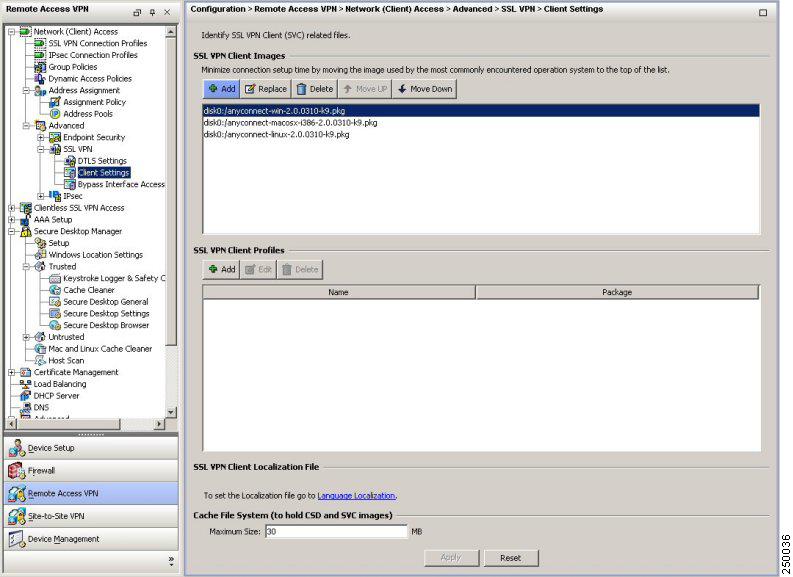
This panel lists any AnyConnect client files that have been identified as AnyConnect client images. The order in which they appear in the table reflects the order that they download to the remote computer.
Figure 9 SSL VPN Client Settings Panel
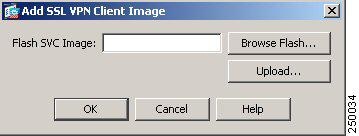
To add an AnyConnect client image, Click Add in the SSL VPN Client Images area. The Add SSL VPN Client Image dialog appears (Figure 10).
Figure 10 Add SSL VPN Client Image Dialog
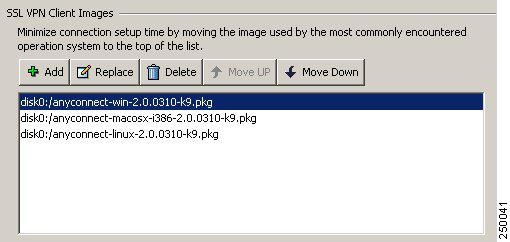
If you already have an image located in the flash memory of the security appliance, you can enter the name of the image in the Flash SVC Image field, and click OK. The SSL VPN Client Images panel now shows the AnyConnect client images you identified (Figure 11).
Figure 11 SSL VPN Client Panel with AnyConnect Client Images
Step 4
This establishes the order in which the security appliance uploads them to the remote computer. It uploads the AnyConnect client image at the top of the list of images first. Therefore, you should move the image used by the most commonly-encountered operating system to the top of the list.
Step 5
Figure 12 Enable SSL VPN Client Check Box
Step 6
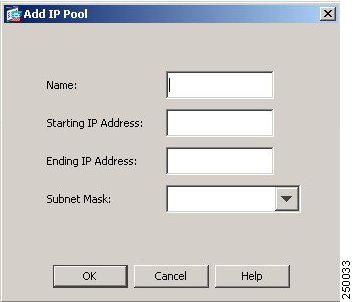
To create an IP address pool, choose Network Access > Address Management > Address Pools. Click Add. The Add IP Pool dialog appears (Figure 13).
Figure 13 Add IP Pool Dialog
Enter the name of the new IP address pool. Enter the starting and ending IP addresses, and enter the subnet mask and click OK.
Step 7
Figure 14 Connection Address Pool Assignment
Highlight a connection in the table, and click Edit. The Edit SSL VPN Connection dialog appears.
Click Select in the Client Address Assignment area. The Select Address Pool dialog appears (Figure 15), containing available address pools. Select a pool and click OK.
Figure 15 Select Address Pool Dialog
Step 8
Step 9
The Edit Internal Group Policy dialog appears (Figure 16):
Figure 16 Edit Internal Group Policy, General Tab
Step 10
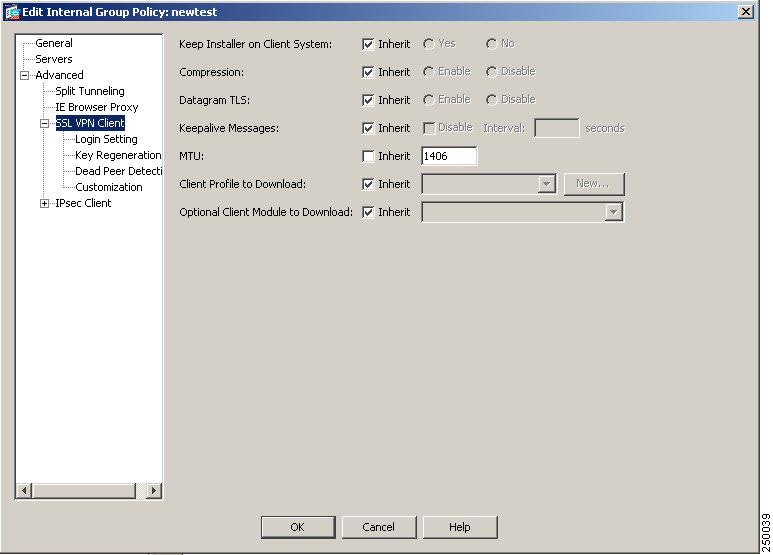
Step 11
Figure 17 SSL VPN Client Features
Step 12
•
•
•
•
•
•
•
Loading the AnyConnect Client and Configuring the Security Appliance with CLI
This section covers the following topics:
•
•
•
•
Loading the AnyConnect Client
Loading the client on the security appliance consists of copying a client image to the security appliance and identifying the file to the security appliance as a client image. With multiple clients, you must also assign the order that the security appliance uploads the clients to the remote PC. Perform the following steps to install the client:
Step 1
hostname# copy tftp flashAddress or name of remote host []? 209.165.200.226Source filename []? anyconnect-win-2.0.1.xxx-k9.pkgDestination filename []? anyconnect-win-2.0.1.xxx-k9.pkgAccessing tftp://209.165.200.226/anyconnect-win-2.0.1.xxx-k9.pkg...!!!!!!!!!!!!!!!!!!!!!!!!!!Writing file disk0:/cdisk71...!!!!!!!!!!!!!!!!!!!!!!!!!!!!!!!!!!!!!!!!!!!!!!!!!!!!!!!!!!!!!!!!!!!!!!!!319662 bytes copied in 3.695 secs (86511 bytes/sec)Step 2
svc image filename order
The security appliance expands the file in cache memory for downloading to remote PCs. If you have multiple clients, assign an order to the client images with the order argument.
The security appliance uploads portions of each client in the order you specify until it matches the operating system of the remote PC. Therefore, assign the lowest number to the image used by the most commonly-encountered operating system. For example:
hostname(config-webvpn)# svc image windows.pkg 1hostname(config-webvpn)# svc image linux.pkg 2
Note
Step 3
hostname(config-webvpn)# show webvpn svc1. disk0:/windows.pkg 1CISCO STC win2k+ 1.0.01,0,2,132Thu 03/22/2007 21:51:30.432. disk0:/linux.pkg 2CISCO STC linux 1.0.01,0,0,164Thu 03/15/2007 20:09:22.432 SSL VPN Client(s) installedEnabling SSL VPN Connections
After installing the client, enable the security appliance to allow SSL VPN client connections by performing the following steps:
Step 1
enable interface
For example:
hostname(config)# webvpnhostname(config-webvpn)# enable outsideThe following is an example for an IPv6 connection that enables IPv6 on the outside interface:
hostname(config)# interface GigabitEthernet0/0hostname(config-if)# ipv6 enableStep 2
For example:
hostname(config-webvpn)# svc enableStep 3
ip local pool poolname startaddr-endaddr mask mask
The following example assumes the authentication server group is LOCAL. The example creates the local IP address pool vpn_users:
hostname(config)# ip local pool vpn_users 209.165.200.225-209.165.200.254
mask 255.255.255.224
Step 4
address-pool poolname
To do this, first enter the tunnel-group name general-attributes command to enter general-attributes mode. Then specify the local IP address pool using the address-pool command.
In the following example, the user configures the existing tunnel group telecommuters to use the address pool vpn_users created in step 3:
hostname(config)# tunnel-group telecommuters general-attributeshostname(config-tunnel-general)# address-pool vpn_usersStep 5
default-group-policy name
In the following example, the user assigns the group policy sales to the tunnel group telecommuters:
hostname(config-tunnel-general)# default-group-policy salesStep 6
group-alias name enable
First exit to global configuration mode, and then enter the tunnel-group name webvpn-attributes command to enter tunnel group webvpn attributes mode.
In the following example, the user enters webvpn attributes configuration mode for the tunnel group telecommuters, and creates the group alias sales_department:
hostname(config)# tunnel-group telecommuters webvpn-attributeshostname(config-tunnel-webvpn)# group-alias sales_department enableStep 7
tunnel-group-list enable
First exit to global configuration mode, and then enter webvpn mode.
In the following example, the user enters webvpn mode, and then enables the tunnel group list:
hostname(config)# webvpnhostname(config-webvpn)# tunnel-group-list enableStep 8
vpn-tunnel-protocol svc
To do this, first exit to global configuration mode, enter the group-policy name attributes command to enter group-policy mode, or the username name attributes command to enter username mode, and then enter the webvpn command to enter webvpn mode and change the settings for the group or user.
The following example identifies SSL as the only permitted tunneling protocol for the group-policy sales:
hostname(config)# group-policy sales attributeshostname(config-group-policy)# webvpnhostname(config-group-webvpn)# vpn-tunnel-protocol svcFor more information about assigning users to group policies, see Cisco Security Appliance Command Line Configuration Guide, Chapter 30, "Configuring Tunnel Groups, Group Policies, and Users."
Enabling IPv6 Connections
The AnyConnect client allows access to IPv6 resources over a public IPv4 connection (only for Windows XP SP2, Windows Vista, Mac OS X, and Linux). You must use the command line interface to configure IPv6 access. ASDM does not support IPv6.
You enable IPv6 access using the ipv6 enable command as part of enabling SSL VPN connections. The following is an example for an IPv6 connection that enables IPv6 on the outside interface:
hostname (config)# interface GigabitEthernet0/0hostname (config-if)# ipv6 enableTo enable IPv6 SSL VPN, do the following general actions:
1.
2.
3.
4.
To implement this procedure, do the following steps:
Step 1
interface GigabitEthernet0/0nameif outsidesecurity-level 0ip address 192.168.0.1 255.255.255.0ipv6 enable ; Needed for IPv6.!interface GigabitEthernet0/1nameif insidesecurity-level 100ip address 10.10.0.1 255.255.0.0ipv6 address 2001:DB8::1/32 ; Needed for IPv6.ipv6 enable ; Needed for IPv6.Step 2
ipv6 local pool ipv6pool 2001:DB8:1:1::5/32 100 ; Use your IPv6 prefix here
Note
Step 3
tunnel-group YourTunGrp1 general-attributes ipv6-address-pool ipv6pool
Note
Step 4
ipv6 route inside ::/0 X:X:X:X::X tunneled
Disabling Permanent Client Installation
Disabling permanent AnyConnect client installation disables the automatic uninstalling feature of the client. The client remains installed on the remote computer for subsequent connections, reducing the connection time for the remote user.
To disable permanent AnyConnect client installation for a specific group or user, use the svc keep-installer command from group-policy or username webvpn modes:
svc keep-installer none
The default is that permanent installation of the client is enabled. The client on the remote computer stays installed at the end of every session. The following example configures the existing group-policy sales to not keep the client installed on the remote computer:
hostname(config)# group-policy sales attributeshostname(config-group-policy)# webvpnhostname(config-group-policy)# svc keep-installer nonePrompting Remote Users
You can enable the security appliance to prompt remote SSL VPN client users to download the client with the svc ask command from group policy webvpn or username webvpn configuration modes:
[no] svc ask {none | enable [default {webvpn | svc} timeout value]}
svc ask enable prompts the remote user to download the client or go to the portal page for a clientless connection and waits indefinitely for user response.
svc ask enable default svc immediately uploads the client.
svc ask enable default webvpn immediately goes to the portal page.
svc ask enable default svc timeout value prompts the remote user to download the client or go to the portal page and waits the duration of value before taking the default action—downloading the client.
svc ask enable default webvpn timeout value prompts the remote user to download the client or go to the portal page, and waits the duration of value before taking the default action—displaying the portal page.
Figure 18 shows the prompt displayed to remote users when either default svc timeout value or default webvpn timeout value is configured:
Figure 18 Prompt Displayed to Remote Users for SSL VPN Client Download
The following example configures the security appliance to prompt the remote user to download the client or go to the portal page and to wait 10 seconds for user response before downloading the client:
hostname(config-group-webvpn)# svc ask enable default svc timeout 10Enabling AnyConnect Client Profile Downloads
An AnyConnect client profile is a group of configuration parameters, stored in an XML file, that the client uses to configure the connection entries that appear in the client user interface. The client parameters (XML tags) include the names and addresses of host computers and settings to enable additional client features.
You can create and save XML profile files using a text editor. The client installation contains one profile template (AnyConnectProfile.tmpl) that you can edit and use as a basis to create other profile files.
The profile file is downloaded from the security appliance to the remote users's PC, so you must first import the profile(s) into the security appliance in preparation for downloading to the remote PC. You can import a profile using either ASDM or the command-line interface. See Appendix A of the Cisco AnyConnect VPN Client Administrator Guide for a sample AnyConnect profile.
When the AnyConnect client starts, it reads the preferences.xml file in the following directory:
C:\Documents and Settings\<your_username>\Application Data\Cisco\Cisco AnyConnect VPN Client.
The preferences.xml file contains the username and the security appliance IP address/hostname from the last successful connection. The client then establishes an initial connection to the security appliance to get the list of tunnel groups to display in the GUI. during this initial connection, if the security appliance is no longer accessible or if the hostname cannot be resolved, the user sees the message, "Connection attempt has failed" or "Connection attempt has failed due to unresolvable host entry."
You can place a copy of your profile (for example, CiscoAnyConnectProfile.xml) in the directory: C:\Documents and Settings\All Users\Application Data\Cisco\Cisco AnyConnect VPN Client\Profile The location for Windows Vista is slightly different: C:\ProgramData\Cisco\Cisco AnyConnect VPN Client\Profile The host that appears in the Connect to combo box is the first one listed in the profile or the last host you successfully connected with.
For more information about editing AnyConnect client profiles, see the Cisco AnyConnect VPN Client Administrator Guide.
After you create an AnyConnect client profile, follow these steps to enable the security appliance to download them to remote AnyConnect client users:
Step 1
[no] svc profiles {value profile | none}
This command makes profiles available to group policies and username attributes of AnyConnect client users.
In the following example, the user previously created two new profile files (sales_hosts.xml and engineering_hosts.xml) from the cvcprofile.xml file and uploaded them to the flash memory.
Now the user specifies these files as AnyConnect client profiles for use by group policies, specifying the names sales_hosts and engineering_hosts:
asa1(config-webvpn)# svc profiles sales disk0:/sales_hosts.xmlasa1(config-webvpn)# svc profiles engineering disk0:/engineering_hosts.xmlEntering the dir cache:stc/profiles command shows the profiles loaded in cache memory:
asa1(config-webvpn)# dir cache:/stc/profilesDirectory of cache:stc/profiles/0 ---- 774 11:54:41 May 22 2007 engineering.xml0 ---- 774 11:54:29 May 22 2007 sales.xml2428928 bytes total (18219008 bytes free)asa1(config-webvpn)#Step 2
[no] svc profiles {value profile | none}
In the following example, the user follows the svc profiles value command with a question mark (?) to query the security appliance so see the available profiles. Then the user configures the group policy to use the AnyConnect client profile sales:
asa1(config-group-webvpn)# svc profiles value ?config-group-webvpn mode commands/options:Available configured profile packages:engineeringsalesasa1(config-group-webvpn)# svc profiles sales
Enabling Rekey
When the security appliance and the AnyConnect client perform a rekey, they renegotiate the crypto keys and initialization vectors, increasing the security of the connection.
To enable the client to perform a rekey on an SSL VPN connection for a specific group or user, use the svc rekey command from group-policy and username webvpn modes.
[no] svc rekey {method {new-tunnel | none | ssl} | time minutes}
method new-tunnel specifies that the client establishes a new tunnel during rekey.
method none disables rekey.
method ssl specifies that SSL renegotiation takes place during rekey.
time minutes specifies the number of minutes from the start of the session until the rekey takes place, from 1 to 10080 (1 week).
In the following example, the client is configured to renegotiate with SSL during rekey, which takes place 30 minutes after the session begins, for the existing group-policy sales:
hostname(config)# group-policy sales attributeshostname(config-group-policy)# webvpnhostname(config-group-policy)# svc rekey method sslhostname(config-group-policy)# svc rekey time 30Enabling or Disabling DTLS
Datagram Transport Layer Security (DTLS) allows the AnyConnect client establishing an SSL VPN connection to use two simultaneous tunnels—an SSL (TLS) tunnel and a DTLS tunnel. DTLS requires the TLS tunnel for a number of reasons, including protocol negotiation and fallback technologies. Using DTLS avoids latency and bandwidth problems associated with some SSL connections and improves the performance of real-time applications that are sensitive to packet delays.
DTLS is enabled implicitly when you enable the interface. If you decide to disable DTLS, SSL VPN connections connect with an SSL VPN tunnel only.
Use the following command options to enable an interface with DTLS or just with TLS:
You can enable DTLS for all AnyConnect client users with the dtls enable command in webvpn configuration mode:
[no] enable interface | tls-only}
For example, to enable the outside interface with DTLS, enter the following:
hostname(config-webvpn)# enable outside
To disable DTLS and allow only TLS, enter the following command instead:
hostname(config-webvpn)# enable outside tls-onlyYou can enable DTLS or TLS on a per-user or per-group basis.
Note
Enabling Start Before Logon for the AnyConnect Client
To minimize download time, the AnyConnect client requests downloads (from the security appliance) only of core modules that it needs for each feature that it supports. To enable new features, such as Start Before Logon (SBL), you must specify the module name using the svc modules command from group policy webvpn or username webvpn configuration mode:
[no] svc modules {none | value string}
The string for SBL is vpngina
In the following example, the user enters group-policy attributes mode for the group policy telecommuters, enters webvpn configuration mode for the group policy, and specifies the string vpngina to enable SBL:
hostname(config)# group-policy telecommuters attributeshostname(config-group-policy)# webvpnhostame(config-group-webvpn)# svc modules value vpnginaIn addition, the administrator must ensure that the AnyConnect profile.xml file has the <UseStartBeforeLogon> statement set to true. For example:
<UseStartBeforeLogon UserControllable="false">true</UseStartBeforeLogon>The system must be rebooted before Start Before Logon takes effect.
Note
CSA Interoperability with the AnyConnect Client and Cisco Secure Desktop
If your remote users have Cisco Security Agent (CSA) installed, you must import new CSA policies to the remote users to enable the AnyConnect VPN Client and Cisco Secure Desktop to interoperate with the security appliance.
To do this, follow these steps:
Step 1
•
•
The filenames are AnyConnect-CSA.zip and CSD-for-CSA-updates.zip
Step 2
Step 3
Step 4
Step 5
For more information, see the CSA document Using Management Center for Cisco Security Agents 5.2. Specific information about exporting policies is located in the section Exporting and Importing Configurations.
Uninstalling the Cisco AnyConnect VPN Client
To manually uninstall the AnyConnect client from a Windows system, use the standard "Add or Remove Programs" Control Panel available from the Start menu.
The procedure for manually uninstalling the AnyConnect client from a Linux or Mac OS X system is the same for both systems. As root, run the following shell script:
/opt/cisco/vpn/bin/vpn_uninstall.shTypically, you would do this via sudo, as follows:
$ sudo /opt/cisco/vpn/bin/vpn_uninstall.shIf you do not use sudo, use a root shell:
# /opt/cisco/vpn/bin/vpn_uninstall.shUsage Notes
This section lists known interoperability considerations and other issues to consider before installing and using the Cisco AnyConnect VPN Client, Release 2.1.
Windows Vista Might Become Unresponsive During Sleep/Resume Cycles or Other High-load Conditions (KB-952876)
If you use sleep and resume on Vista, you might find that the tunnel cannot be established due to the AnyConnect driver not being enabled. A reboot is typically required to recover from this condition.
The problem is caused by an issue in the Vista Kernel component as described in KB-952876 (http://support.microsoft.com/kb/952876). When this issue occurs, another core Vista component, TCPIPREG.sys, fails to function. The Cisco AnyConnect VPN Client relies on this service to set the IP address of the Virtual Adapter. If you see an error stating that the Virtual Adapter could not be set up, you might have encountered this issue. We recommend that you apply the patch if you are experiencing issues on Vista where the AnyConnect adapter fails to enable. After applying the patch, you might still see an occasional failure due to a timing issue in the TCPIPREG.sys service. This is rare and should be recoverable by simply trying the tunnel a second time. Cisco is working with Microsoft to correct this remaining issue.
AnyConnect over Proxies
AnyConnect supports connections to the security appliance via a proxy server that uses Basic and NTLM authentication. Socks proxies are not supported. DTLS (using UDP) is not supported if the proxy server runs only TCP.
Additionally, on Windows only, you can also use authenticating proxies that use Basic or NTLM for authorization. You must enable "Use HTTPS 1.1 for proxies" in the advanced Internet Explorer settings.
Internet Explorer Proxy With the AnyConnect Client
If you have Internet Explorer configured with a proxy, you must activate the "Use HTTP 1.1 through proxy connections" setting to use the AnyConnect client. If this option is not set, the AnyConnect client connection does not come up.
In Internet Explorer, choose Internet Options from the Tools menu. Click the Advanced tab, and under the HTTP 1.1 Settings, check "Use HTTP 1.1 through proxy connections."
Setting the Secure Connection (Lock) Icon
The Lock icon indicates a secure connection. XP automatically hides this icon among those that have not been recently used. The end user can prevent XP from hiding this icon as follows:
Step 1
Step 2
Step 3
Cisco Security Agent Version Requirements
Cisco Security Agent (CSA) Version 4.5 and higher is the only version compatible with the AnyConnect client. The appropriate CSA policy ships with CSA and is attached to the group "Remote desktops and laptops." These policies are not enabled by default; you must select them to prevent the AnyConnect client from failing with CSA version 4.5.
PC Wireless Client Configurations
If a client wireless adapter profile supports scanning for a better access point, and you use the Cisco AnyConnect VPN Client or Cisco VPN Client (IPSec) with that profile, disable such scanning. These scans can cause disconnections or stall traffic on the tunnel. To support scanning for non-SSL/IPSec connections, create another profile.
Certificate Revocation List Processing
A Certificate Revocation List (CRL) contains a number of certificate serial numbers that have been revoked. The client downloads this list from a CRL server and looks up the certificate of the security appliance in the list.
The Cisco AnyConnect VPN Client requires a Certificate Revocation key with a value of 1 to enable the checking of the certificate revocation list. The following path shows the Certificate Revocation key and value on the remote PC:
My Computer | HKEY_USERS | <Secure ID_of_Logged_User> | Software | Microsoft | Windows | CurrentVersion | CertificateRevocation REG_DWORD 0x00000001
The client attempts to read the value of the flag CertificateRevocations shown above to determine whether the client checks for revocation of the security appliance certificate.
To set the Revocation flag, select Control Panel > Internet Options. Click the Advanced tab, and click the Restore Defaults button near the bottom of the window. This option restores all of the options under the Advanced tab to the original settings.
Alternatively, to avoid restoring original settings, you can perform the following:
Step 1
Step 2
Step 3
Step 4
If Revocation is enabled, a dialog window prompts the remote user to accept or deny the certificate that has a revocation error.
Zyxel Modem SSH Incompatibility
The AnyConnect client is not compatible with the Zyxel Prestige 643 V2.50 (AP.3) DSL modem running the Putty SSH protocol.
Dynamic Install Fails on Windows Vista When Running Low-rights Internet Explorer
Internet Explorer 7 on Windows Vista has a new security feature called Low Rights Internet Explorer. This feature changes the rights of the sandbox that the browser operates from to the lowest level possible. Because Windows Installer service has the ability to elevate all the way to Local System, the Windows Installer refuses to accept calls from Low Rights processes (as IE7 now is).
When using low-rights Internet Explorer to attempt a first-time web installation of the AnyConnect client, the MSI install fails immediately. The MSI log contains the following entry:
Failed to connect to server. Error: 0x80070005To avoid this, users on Vista must add the Secure Gateway to the Trusted Zone.
AnyConnect Fails to Establish a DTLS Tunnel When Using RC4-MD5 Encryption
When the ASA to which the AnyConnect client is attempting to connect is configured to only do RC4-MD5 encryption, the client is unable to establish a DTLS tunnel.
Linux Client Weblaunch Requires an Account with Sudo Access
Launching the AnyConnect client for Linux from the browser does not work when the user is non-root and when the user does not have sudo access on the machine. To work around this problem, install sudo, adding a line like "someusername ALL = (ALL) ALL" (without the quotes) to /etc/sudoers.
msvcp60.dll Must Be Available for Installation of the AnyConnect Client
To use the Cisco AnyConnect VPN Client, you must have the file msvcp60.dll — c++ runtime located in the winnt\system32 directory on your system. This dll is likely already to be present on most images, since installing other products (such as Office 2000) results in this file being placed on the system.
Because of this common practice, this dll file is excluded to reduce the image size for AnyConnect client dynamic installations. For more information about this problem, see the Microsoft Knowledge Base, article 259403, at http://support.microsoft.com/kb/259403.
Secure VPN Via Windows Remote Desktop Is Now Supported
The AnyConnect VPN Client, Release 2.1, supports VPN connection establishment via a Windows Remote Desktop session. If you connect to the PC via Remote Desktop, your VPN connection will be allowed.
AnyConnect Start Before Logon GINA Might Not Appear on Login Screen after Reboot
When the AnyConnect Start Before Logon GINA is installed on a user's PC using the standalone installer (WinGinaSetup-xxxx.msi), the GINA does not appear on the login screen after a reboot. This occurs because the AnyConnect GINA requires that the following be installed:
•
•
<UseStartBeforeLogon UserControllable="false">true</UseStartBeforeLogon>Network administrators must push out a profile using their SMS or other software deployment engine along with the MSI files if they want to perform a preinstall of the profile.
When Using a Client-Side Proxy and Full Tunneling, the Proxy Should Be Reset
When a client side proxy is used to connect to the internet, full tunneling cannot not be enforced on the client since users can still connect to the proxy server even when in full tunneling mode. This behavior inherent in the nature of SSL VPN solutions.
Linux-Specific AnyConnect Client Issue
The AnyConnect client might not establish DTLS tunnel in Linux and might revert to TLS.
In addition, the AnyConnect client reports that statistics in the Linux user interface are not available. Closing the user interface without disconnecting and launching another (while the tunnel is still active) seems to fix the problem.
Setting the AnyConnect Pre-Login Banner
The pre-login banner is the optional banner message that appears as a pop-up window in the end-user AnyConnect client interface, as shown in Figure 19.
Figure 19 Pre-Login Banner
You can use either of the following methods to configure the banner on the security appliance:
•
<copyright-panel><mode>enable</mode><text>Copyright...</text><copyright-panel>The <text> element value is the pre-banner text.
•
AnyConnect Requires That the ASA Be Configured to Accept TLSv1 Traffic
The AnyConnect client cannot establish a connection with the following ASA settings for "ssl server-version":
•
•
Smartcard Support
AnyConnect 2.1 supports Aladdin eTokenPro32k and Axalto Smartcards and readers on Windows Vista Ultimate, Windows XP Professional with SP2 and Windows 2000 Professional with SP4.
AnyConnect supports the Safari KeyChain on Mac OS, but not FireFox.
AnyConnect does not support smartcards for Linux.
Mac OS X and Linux Clients Might Disconnect If a Security Appliance Failover Occurs
When the security appliance is operating in a high-availability Active/Standby configuration and a failover occurs, causing the Standby security appliance to resume current connections, Mac OS X or Linux AnyConnect connections might disconnect. If a MAC OS X or Linux AnyConnect connection disconnects after a failover you must reconnect.
IPv6 AnyConnect Failover is Not Supported for the Security Appliance
ASA Release 8.0 does not support IPv6 failover, so failover of IPv6 AnyConnect (as well as failover of clientless SSL VPN) sessions is also not supported.
Framed IP Address Is Not Available in a Start Accounting Request
The AnyConnect client does not provide a framed IP address in a START accounting request. The framed IP address is unavailable only for this condition. It is available in the paired STOP request.
AnyConnect Split-tunneling Now Works on Windows Vista
In AnyConnect Release 2.1, split-tunneling works correctly with Windows XP, Windows 2000, and Windows Vista.
Selecting Crypto Toolkits for AnyConnect on Windows Platforms
To use Windows certificates and proxy support, the AnyConnect client uses the cryptography support present on the operating system to establish an authentication session. The cryptographic cipher used for authentication is bounded by what the host operating system supports and is distinct from the cipher used to encrypt the AnyConnect tunnel data.
This is commonly encountered when an administrator configures "ssl encryption aes128-sha1" on the security appliance. Because older versions of Windows (pre-Vista) do not support AES, neither Internet Explorer nor the AnyConnect client in stand-alone mode can establish clientless or AnyConnect sessions on these platforms when only AES is configured.
Since the AnyConnect client always attempts to use the strongest tunnel encryption possible, it is possible to work around this by using "ssl encryption aes128-sha1 3des-sha1". This causes the initial authentication session to use triple DES, but causes all tunneled data to be encrypted with AES.
First User Message for Double-byte Languages Does Not Translate Correctly
With the Unicode version of the AnyConnect VPN Client—which allows for double-byte languages such as Japanese, Chinese, and so on—the first user message to appear does not correctly translate, because that message is missing from the AnyConnect translation table.
To work around this problem, add the following lines to the translation table file that you are using for translations:
msgid "Please enter your username and password."
msgstr ""
The message string (msgstr) value should be your translation of the English string in msgid.Ensuring Reliable DTLS Connections Through Third-Party Firewalls
A third-party network firewall blocks DTLS (UDP) traffic if traffic is idle for 40 seconds and if DTLS keepalive is not enabled.
When a 3rd party network firewall is located between the client PC and the security appliance, it inspects each DTLS packet and makes a decision whether to pass the packet along to the destination. If there has been an idle period of DTLS traffic, the firewall might stop sending data to the client or security appliance.
A customer has observed that the default behavior of a third party firewall in their network results in the DTLS (UDP) traffic being dropped after an idle period of 40 seconds. This occurs when the DTLS keepalive is not configured, or is configured with a value that is greater than the timeout interval of the third party firewall.
By default, the DTLS keepalive is disabled.
When DTLS traffic is stopped by the firewall, applications such as Microsoft Outlook stop responding while the DTLS tunnel remains active. The time of inactivity is directly related to the interval set for client DTLS DPD. By default, DPD is set to an optimal value of 30 seconds which should work in most cases.
If the client DTLS DPD is too high, failover does not occur quickly enough, and a user notices applications being unresponsive. Once the client DTLS DPD is set correctly, the customer then notices excessive loss and re-establishment of the DTLS channel. This might also be perceived as poor performance of the tunnel.
To correct this problem, do the following steps:
Step 1
For example, set this value to 2 minutes when using the default setting with the third party firewall (40 seconds). The client DTLS DPD value should be no greater than 10 minutes to ensure TLS fallback occurs in a timely manner.
Step 2
For example, set this value to 30 seconds if using the default configuration (40 seconds) of the third party firewall.
No AnyConnect Confirmation Dialog for Cisco Secure Desktop Users
When contacting a central-site security appliance that enforces a Cisco Secure Desktop policy, the AnyConnect client no longer lets the user terminate the connection attempt prior to starting the download and execution of Cisco Secure Desktop. In AnyConnect Release 2.0, the dialog appears for each connection attempt. AnyConnect Release 2.1, however, removes this dialog for Cisco Secure Desktop users, and Cisco Secure Desktop processing continues without further input from the user.
AnyConnect OpenSSL Libraries Have Been Updated to 0.9.8f
AnyConnect uses the OpenSSL cryptography libraries to perform encryption and security protocol encapsulation. A new version of OpenSSL has been released that fixes several issues in older versions of OpenSSL. The OpenSSL libraries used by the AnyConnect client have been updated by merging in 0.9.8f changes with custom Cisco changes. For more information see the following URLs:
•
•
Firewall Blocks DTLS (UDP) Traffic if Idle for 40 Seconds
Applications, such as Microsoft Outlook, stop responding after a short period of time while the DTLS tunnel remains active. The time of inactivity is directly related to the interval set for client DTLS DPD. If the client DTLS DPD is too high, failover does not occur quickly enough, and a user notices applications being unresponsive. After the client DTLS DPD is set correctly, the customer then notices excessive loss and re-establishment of the DTLS channel. This is also be perceived as poor performance of the tunnel.
A customer has observed that the default behavior of the Checkpoint FW-1 firewall results in the DTLS (UDP) traffic being dropped after an idle period of 40 seconds. This occurs when the DTLS-keepalive is not configured, or when it is configured with a value that is greater than the timeout interval of the Checkpoint FW-1 firewall (40 seconds by default).
When the firewall device is located between the client PC and the security appliance, the firewall inspects each DTLS packet and makes a decision whether to pass the packet along to the destination. If there has been an idle period of DTLS traffic, the firewall might stop sending data to the client or security appliance.
To correct this problem, do the following steps:
Step 1
Step 2
The client attempts to re-establish DTLS each time this occurs up to the limit of the retry counter. The tunnel falls back to TLS during this period if the DTLS DPD is set to a sufficient value. For example, a typical setting for DPD from both the client and security appliance might be 120 seconds. If the DTLS session is blocked by the firewall, a user experiences an outage and then eventually the session falls back to TLS. This outage is directly proportional to the value set for DTLS DPD.
DTLS is a UDP based protocol and is connectionless. There is a flow associated with the DTLS session that is based on the source and destination addresses and ports. Firewalls build a session table based on these values and track this as a unique session.
By default, DTLS is enabled when SSL VPN access is enabled on an interface.
Optionally Disable Tearing Down Tunnel Upon Smartcard Removal
A network administrator can optionally disable tearing down a tunnel when the remote user removes the Smartcard. Some companies impose a requirement that a user must remove his/her Smartcard when the laptop is unattended. If the remote user in such a situation is downloading an application or replicating data to the central site and needs to step away from the laptop, the transfer fails and must be restarted because the tunnel has been dropped.
Upgrading Standalone AnyConnect Client for Windows Vista Shows Activity Indication
When Windows Vista users upgrade via standalone AnyConnect client, the client briefly displays a message "Exiting. Update in progress." and then the client exits. There is no AnyConnect or Installer windows or dialogs visible on the user's desktop for the duration of the upgrade. When the upgrade completes, the AnyConnect icon appears in the system tray.
When Windows Vista users upgrade via the browser launch of AnyConnect, the AnyConnect Downloader window is visible for the duration of the upgrade, but the Installer window is not visible. When the upgrade completes, the Downloader exits and the AnyConnect icon appears in the system tray.
SSL VPN Clients Do Not Support DNS Fallback for Split Tunneling
Neither the AnyConnect 2.1 client nor the older SSL VPN Client (which the AnyConnect client replaces) support DNS Fallback for Split Tunneling (also called Split DNS).
Synchronizing a Mobile Device to a PC While a Tunnel Is Active
If using ActiveSync or Windows Mobile Device Center to synchronize a mobile device to your PC while the tunnel is active, you must either enable Local LAN in the security appliance configuration or configure your device to use a serial port instead of Remote Network Driver Interface Specification (RNDIS).
When RNDIS is enabled, mobile devices are assigned a link-local address when they are connected to the PC. When Tunnel All is configured on the security appliance, all network traffic, including link-local traffic, is sent to the tunnel interface.
If Tunnel All is a requirement for your deployment, you can try to configure the mobile device to synchronize using a serial port interface, you can synchronize your device while Tunnel All is configured. On the Mobile Device, under Start > Settings > Connections > USB-to-PC, deselect the "Enable advanced network functionality" check box to disable RNDIS.
AnyConnect Support Policy
We support all AnyConnect software versions available on the Cisco AnyConnect VPN Software Download site; however, we provide fixes and enhancements only in maintenance or feature releases based on the most recently released version.
Caveats
Caveats describe unexpected behavior or defects in Cisco software releases. The open caveats in Release 2.1 appear first in this list.
Note
Open Caveats in Cisco AnyConnect VPN Client, Release 2.1
Table 5 lists the caveats that are unresolved in the Cisco AnyConnect VPN Client, Release 2.1.
Resolved Caveats
Cisco AnyConnect VPN Client, Release 2.1, resolves the following caveats:
Notices
The following notices pertain to this software license.
OpenSSL/Open SSL Project
This product includes software developed by the OpenSSL Project for use in the OpenSSL Toolkit (http://www.openssl.org/).
This product includes cryptographic software written by Eric Young (eay@cryptsoft.com).
This product includes software written by Tim Hudson (tjh@cryptsoft.com).
License Issues
The OpenSSL toolkit stays under a dual license, i.e. both the conditions of the OpenSSL License and the original SSLeay license apply to the toolkit. See below for the actual license texts. Actually both licenses are BSD-style Open Source licenses. In case of any license issues related to OpenSSL please contact openssl-core@openssl.org.
OpenSSL License:
Copyright © 1998-2007 The OpenSSL Project. All rights reserved.
Redistribution and use in source and binary forms, with or without modification, are permitted provided that the following conditions are met:
1.
2.
3.
4.
5.
6.
"This product includes software developed by the OpenSSL Project for use in the OpenSSL Toolkit (http://www.openssl.org/)".
THIS SOFTWARE IS PROVIDED BY THE OpenSSL PROJECT "AS IS"' AND ANY EXPRESSED OR IMPLIED WARRANTIES, INCLUDING, BUT NOT LIMITED TO, THE IMPLIED WARRANTIES OF MERCHANTABILITY AND FITNESS FOR A PARTICULAR PURPOSE ARE DISCLAIMED. IN NO EVENT SHALL THE OpenSSL PROJECT OR ITS CONTRIBUTORS BE LIABLE FOR ANY DIRECT, INDIRECT, INCIDENTAL, SPECIAL, EXEMPLARY, OR CONSEQUENTIAL DAMAGES (INCLUDING, BUT NOT LIMITED TO, PROCUREMENT OF SUBSTITUTE GOODS OR SERVICES; LOSS OF USE, DATA, OR PROFITS; OR BUSINESS INTERRUPTION) HOWEVER CAUSED AND ON ANY THEORY OF LIABILITY, WHETHER IN CONTRACT, STRICT LIABILITY, OR TORT (INCLUDING NEGLIGENCE OR OTHERWISE) ARISING IN ANY WAY OUT OF THE USE OF THIS SOFTWARE, EVEN IF ADVISED OF THE POSSIBILITY OF SUCH DAMAGE.
This product includes cryptographic software written by Eric Young (eay@cryptsoft.com). This product includes software written by Tim Hudson (tjh@cryptsoft.com).
Original SSLeay License:
Copyright © 1995-1998 Eric Young (eay@cryptsoft.com). All rights reserved.
This package is an SSL implementation written by Eric Young (eay@cryptsoft.com).
The implementation was written so as to conform with Netscape SSL.
This library is free for commercial and non-commercial use as long as the following conditions are adhered to. The following conditions apply to all code found in this distribution, be it the RC4, RSA, lhash, DES, etc., code; not just the SSL code. The SSL documentation included with this distribution is covered by the same copyright terms except that the holder is Tim Hudson (tjh@cryptsoft.com).
Copyright remains Eric Young's, and as such any Copyright notices in the code are not to be removed. If this package is used in a product, Eric Young should be given attribution as the author of the parts of the library used. This can be in the form of a textual message at program startup or in documentation (online or textual) provided with the package.
Redistribution and use in source and binary forms, with or without modification, are permitted provided that the following conditions are met:
1.
2.
3.
"This product includes cryptographic software written by Eric Young (eay@cryptsoft.com)".
The word `cryptographic' can be left out if the routines from the library being used are not cryptography-related.
4.
THIS SOFTWARE IS PROVIDED BY ERIC YOUNG "AS IS" AND ANY EXPRESS OR IMPLIED WARRANTIES, INCLUDING, BUT NOT LIMITED TO, THE IMPLIED WARRANTIES OF MERCHANTABILITY AND FITNESS FOR A PARTICULAR PURPOSE ARE DISCLAIMED. IN NO EVENT SHALL THE AUTHOR OR CONTRIBUTORS BE LIABLE FOR ANY DIRECT, INDIRECT, INCIDENTAL, SPECIAL, EXEMPLARY, OR CONSEQUENTIAL DAMAGES (INCLUDING, BUT NOT LIMITED TO, PROCUREMENT OF SUBSTITUTE GOODS OR SERVICES; LOSS OF USE, DATA, OR PROFITS; OR BUSINESS INTERRUPTION) HOWEVER CAUSED AND ON ANY THEORY OF LIABILITY, WHETHER IN CONTRACT, STRICT LIABILITY, OR TORT (INCLUDING NEGLIGENCE OR OTHERWISE) ARISING IN ANY WAY OUT OF THE USE OF THIS SOFTWARE, EVEN IF ADVISED OF THE POSSIBILITY OF SUCH DAMAGE.
The license and distribution terms for any publicly available version or derivative of this code cannot be changed. i.e. this code cannot simply be copied and put under another distribution license [including the GNU Public License].
Related Documentation
For more information, refer to the following documentation:
•
•
•
•
•
•
•
•
•
CCDE, CCENT, CCSI, Cisco Eos, Cisco Explorer, Cisco HealthPresence, Cisco IronPort, the Cisco logo, Cisco Nurse Connect, Cisco Pulse, Cisco SensorBase, Cisco StackPower, Cisco StadiumVision, Cisco TelePresence, Cisco TrustSec, Cisco Unified Computing System, Cisco WebEx, DCE, Flip Channels, Flip for Good, Flip Mino, Flipshare (Design), Flip Ultra, Flip Video, Flip Video (Design), Instant Broadband, and Welcome to the Human Network are trademarks; Changing the Way We Work, Live, Play, and Learn, Cisco Capital, Cisco Capital (Design), Cisco:Financed (Stylized), Cisco Store, Flip Gift Card, and One Million Acts of Green are service marks; and Access Registrar, Aironet, AllTouch, AsyncOS, Bringing the Meeting To You, Catalyst, CCDA, CCDP, CCIE, CCIP, CCNA, CCNP, CCSP, CCVP, Cisco, the Cisco Certified Internetwork Expert logo, Cisco IOS, Cisco Lumin, Cisco Nexus, Cisco Press, Cisco Systems, Cisco Systems Capital, the Cisco Systems logo, Cisco Unity, Collaboration Without Limitation, Continuum, EtherFast, EtherSwitch, Event Center, Explorer, Follow Me Browsing, GainMaker, iLYNX, IOS, iPhone, IronPort, the IronPort logo, Laser Link, LightStream, Linksys, MeetingPlace, MeetingPlace Chime Sound, MGX, Networkers, Networking Academy, PCNow, PIX, PowerKEY, PowerPanels, PowerTV, PowerTV (Design), PowerVu, Prisma, ProConnect, ROSA, SenderBase, SMARTnet, Spectrum Expert, StackWise, WebEx, and the WebEx logo are registered trademarks of Cisco and/or its affiliates in the United States and certain other countries.
All other trademarks mentioned in this document or website are the property of their respective owners. The use of the word partner does not imply a partnership relationship between Cisco and any other company. (1002R)
Any Internet Protocol (IP) addresses and phone numbers used in this document are not intended to be actual addresses and phone numbers. Any examples, command display output, network topology diagrams, and other figures included in the document are shown for illustrative purposes only. Any use of actual IP addresses or phone numbers in illustrative content is unintentional and coincidental.
© 2007-2010 Cisco Systems, Inc. All rights reserved.