Downloads |
 Feedback Feedback
|
Table Of Contents
System Requirements for Windows
Selecting IP or IPX Operation with Windows
The Device View and Main Window
Right-Clicking in the Device View
Generate Root/Server Certificate
Certificates/Show Certificate Details
Certificates/Show Certificate (PEM Format)
Certificates/Show Generator Status
Moving and Customizing the Windows
Installation and Overview
Quickstart
Use the following instructions to get the Cisco VPN 5000 Manager up and running quickly.
Step 1
Follow the instructions in the Installation Guide for your internetworking device to connect it to your network.
Step 2
Step 3
Step 4
Step 5
Step 6
Step 7
Step 8
Step 9
Parameters and options in this manual which are marked with a > symbol must be set in order to use the associated device feature.
If this Quickstart section is a little too quick, don't worry. This manual completely documents the Cisco VPN 5000 Manager.
About this Manual
This manual documents the Cisco VPN 5000 Manager v5.5.x, which can be used to configure and manage all Cisco VPN 5000 products.
The Cisco VPN 5000 Manager v5.5.x is for Windows environments only.
For the latest documentation on Cisco products, including the most current version of this manual, visit the Technical Support section of our Web site.
Installation Notes
The Cisco VPN 5000 Manager can be installed or updated simply by running the installation program, vpn-5000-manager-x.x.x-des.exe on the CD-ROM. The program will install the Cisco VPN 5000 Manager and its associated files on the drive you specify.
System Requirements for Windows
The Cisco VPN 5000 Manager for Windows requires a 486 machine or faster, running Microsoft Windows 95/98 or later, or Windows NT (version 4.0 or later).
Windows 95, Windows 98 and Windows NT are shipped with IP and IPX protocol stacks. See your operating system documentation for instructions on setting up these stacks.
Selecting IP or IPX Operation with Windows
The Cisco VPN 5000 Manager for Windows defaults to using IP as a transport protocol. The IP protocol does not provide a method for the Cisco VPN 5000 Manager to automatically discover the device. To initially contact the device over IP using the Cisco VPN 5000 Manager, you must first enter a valid IP address into the device. You can do this either on a console directly connected to the device or by setting a workstation's IP address to 198.41.12.2 with a Class C subnet mask (255.255.255.0) so that it can communicate over Ethernet with 198.41.12.1 (the shipping default of Ethernet A/0 on all devices). After setting the device's IP address, be sure to change the workstation's configuration back to its original settings.
To use IPX, which will allow you to contact the device without setting any parameters over the device's Console port, you can either set the appropriate radio button in the Database menu's Options dialog box or click on the IP/IPX box at the bottom of the main Cisco VPN 5000 Manager screen. (The status bar must be checked in the View menu for the latter to work.)
Menus and Main Windows
There are four main menus and three main windows in the Cisco VPN 5000 Manager. The File, Database and Control menus are loosely tied to the Device View and Main Windows. The Statistics menu is directly tied to the Output Window. More information on the windows and menus follows.
•
•
•
•
The Cisco VPN 5000 Manager also provides several other menus.
•
•
•
Some of the menu items will be grayed out unless you are currently logged into a device. Where applicable, menu selections are put into effect for the current device. This is the device which is currently highlighted in the Device View and is shown in the title of the Cisco VPN 5000 Manager screen.
The Device View and Main Window
The Device View (Figure 1-1) displays a list of configurations. These configurations may be generic configuration files which are not associated with a particular device, or they may be a specific device's configuration file. The File menu allows you to add both types of configurations to the Device View.
Figure 1-1 Screen shot of the Device View and Main Window
Included in the window are the configuration's name, type, network address, and a checkmark if it has been loaded. Clicking on the + symbol next to a device loads the device's configuration into the Cisco VPN 5000 Manager's memory and brings up a list of the device's configuration section icons, such as device information, interfaces, global device settings, and options. Some of these configuration section icons contain a further list of protocol icons. If the device is a multislot product such as a VSR or VPN 5008, both the slot number and the interface number are shown, separated by a colon (e.g., Ethernet 0:0 indicates Slot 0, Ethernet 0, while Ethernet 1:0 indicates Slot 1, Ethernet 0).
Administrative information will also be included if it has been set using the Item Properties option under the Database Menu.
The list of configuration items associated with each device is an edit area. To view or edit the configuration information for a specific interface and protocol, click on the protocol icon. A configuration dialog box will be opened in the Main Window.
The information in these configuration dialog boxes is used by a device's operating software to determine how it will interface with wide area communications devices, communicate on IPX subnets, filter network packets, etc.
If you determine that a device needs to use new or different configuration information, you must change the configuration file which is stored in its Flash ROM. (See the File Menu section for more information on downloading a set of configuration parameters to a device.)
If you have made changes to a configuration and then quit the Cisco VPN 5000 Manager without downloading those changes, they will be lost.
If the parameters in an edit area are different from the configuration which is currently in the device (because of changes you have made in the edit area), the protocol, interface and device labels in the Device View will be red.
These devices are designed to require less configuration than other devices. Whenever possible, auto-configuration is used to preset parameters with working values.
Right-Clicking in the Device View
Right-clicking when the mouse is on any item within the Device View will bring up a menu which allows you to add or delete subinterfaces and VPN ports, restart or delete the selected device, or set administrative properties, including how the device will handle Save commands (see the Save/Restart Tab under the Database Menu for more information). The other options are also available as menu items and are documented in detail under the appropriate menu section.
The Output Window
There is an Output Window (Figure 1-2) at the bottom of the Device View which lets you quickly check the current status of the selected configuration parameter or review the device configuration. The tabs show different types of parameter values. In some cases, these parameters may be different than those stored in the device's Flash ROM due to auto-configuration.
Figure 1-2 The Output Window
The Output Window is broken up into three tabbed sections.
•
•
•
The File Menu
The File menu provides options which allow you to create and manage configurations in the Cisco VPN 5000 Manager's Device View.
New Config
This option loads default parameters for a particular type of device in the Device View. You will first be asked to select a device type from a list. This option may be useful to preconfigure a device or to use as a base configuration for multiple devices.
You can edit and view the parameter information by double-clicking on the protocol icons under each configuration section icon. This window will immediately reflect any values you change in the edit area.
Open - Device
This option provides a way to load a device's configuration into the Cisco VPN 5000 Manager's Device View.
The exact method of adding a device depends on the transport protocol you are using with the Cisco VPN 5000 Manager.
•
•
Open - Config File
This option loads a previously saved configuration file from disk. This will open a browser to allow you to select a configuration file.
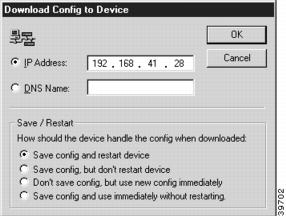
Save to - Device
This option allows you to download the changes you have made to a configuration from the Cisco VPN 5000 Manager to a device's Flash ROM. Enter the IP address or a DNS (Domain Name Service) Name for the device to download a configuration to in the Download Config to device dialog box (Figure 1-3).
Figure 1-3 Download Config to Device Dialog Box
Save / Restart Options
The settings in this dialog box are specific for this device. For global Save/Restart settings use the Database menu, select options, and choose the Save/Restart tab. To change the Save/Restart mode for a particular device, modify the "Device Properties" for that device.
•
•
•
•
While the download is taking place, arrows will move in a circular motion around the device icon in the Device View. To display the amount of time left for the download, click on the + sign next to the device icon.
Caution
Save To - File
This option saves a configuration as a text file. Use this option to back up the configurations you have downloaded to the devices on your network. When you select this item, you will be asked to enter a file name. The edit area which is exported will correspond to the current configuration.
Configuration text files are useful to technical support when diagnosing network problems. It is generally a good idea to keep a full set of backup copies of your device configurations in case one of your devices develops a hardware fault and must be replaced. It is not recommended that a text file be used to edit the configuration, since there is no syntax checker and even small mistakes can create configuration errors.
If any changes are made to a configuration text file while the Cisco VPN 5000 Manager has the configuration loaded, you will be asked whether you wish to reload the text file or keep the Cisco VPN 5000 Manager's version. If you keep the Manager's version, any externally made changes will be lost.
Certificates
The VPN 5000 Concentrator can be configured to support PKI certificates. Use the following menu items to gain access to PKI certificate configurations.
Generate Root/Server Certificate
This menu item opens the Generate Certificates dialog box. From this dialog box you can generate PKI root and server certificates.
Export Root Certificate
This men item allows you to export a root certificate into another application. You can choose to export a root certificate in either X.509 or PEM format.
Approve/Reject
Select this menu item to approve or reject a server certificate request from other concentrators. This menu item is only available is your server has been configured as a certificate generator. This menu item opens the Approve/Reject Certificate window.
Generate Certificate Request
This menu item opens the Generate Certificate Request dialog box. If your server is not configured for certificate generation, you must request a server certificate to be exported to a CG or Certificate Authority (CA). The CA, or CG then generates a certificate, which must be imported back into the non-CG server.
Export Certificate Request
This menu item opens a window that shows the certificates that are available for you to export into another application. If you have a non-CG server, you must export your certificate to a Certificate Authority (CA), or CG.
Subinterface
This option allows you to add or delete an IP subinterface to one of the device's current interfaces. Add opens a dialog box which allows you to specify a port and the subinterface number to create. Delete opens a confirmation prompt to delete the subinterface. You must have a subinterface selected to enable the Delete option.
VPN Port
This option allows you to add or delete VPN ports for the device. Add opens a dialog box which allows you to specify the VPN port number to create. Delete opens a confirmation prompt to delete the port. You must have a VPN port selected to enable the Delete option.
Firewall Path
This option allows you to add or delete firewall paths for an IntraGuard Firewall. Add opens a dialog box which allows you to name the firewall path. Delete opens a confirmation prompt to delete the path. You must have a firewall path selected to enable the Delete option.
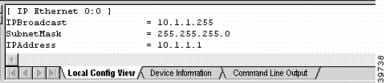
View
This menu item brings up the Local Config View tab in the Output Window, which displays the configuration text file for the current device.
This menu item prints the configuration text file for the current device.
Recent File
This menu item holds a list of files that have recently been saved.
Exit
Exiting takes you out of the Cisco VPN 5000 Manager. If you made changes to the information in one or more edit areas (which will now appear in red) and have not saved or downloaded them, you will be given an opportunity to do so.
The Database Menu
New Device Database
This option allows you to create configuration database files. If no other database files have been created, the Cisco VPN 5000 Manager automatically saves a database file, "MASTER.INI," every time you close. When you use this option, an empty configuration database will be created to which you may add new devices and configurations.
Open Device Database
This option allows you to open existing configuration database files. When you use this option, a list of files will be opened. Select a file from the list, or browse through the files to find the one you want.
Delete Device
Use this menu option to delete a configuration from the Cisco VPN 5000 Manager's Device View.
First, mark the configuration in the list you wish to delete by clicking on it. When you select the Delete menu option, you will be asked whether you wish to remove the configuration from the Device View.
Device Properties
To access the Device Properties dialog box (Figure 1-4), select Device Properties from the Database Menu. Use this menu option to add administrative information for a particular device.
Figure 1-4 Device Propterties Dialog Box
General Tab
The following fields are read only and list information about the selected device.
•
•
•
The following entry fields reside in the Manager software only for administrative purposes and are not saved to the device.
•
•
•
System Clock Tab
•
•
Save/Restart Tab
Use the options on this tab to change the Save/Restart modes for a particular device.
•
•
•
•
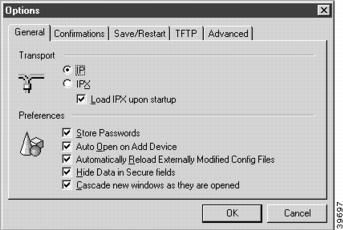
Options
This menu item brings up the Database Options dialog box (Figure 1-5), which allows you to set a variety of options having to do with the Cisco VPN 5000 Manager's operation.
Figure 1-5 Database Options Dialog Box
General Tab
•
•
•
•
•
•
•
Confirmations Tab
•
•
•
•
•
•
•
Save/Restart Tab
These selections are global and only set the "default" for a device when it is added to the database. They do not change the mode for a device. To change the Save/Restart mode for a particular device, modify the "Device Properties" for that device.
•
•
•
•
Some of these options are not yet available for all products. To find out whether your device supports them, you must right-click on any configuration item for that device in the Device View and select Properties from the popup menu, then click on the Save/Restart tab.
TFTP Tab
This tab allows the Manager to specify the timeouts for TFTP download packets to the concentrators.
•
•
Advanced Tab
•
•
•
The default value of 40 seconds for the Maximum Connection Timeout is long enough to bring up a modem-based dial-on-demand link.
The Control Menu
The Control menu is primarily concerned with operations on physical devices.
These products use Flash ROM technology to store their operating software and configuration parameters. Flash Roms can be rewritten tens of thousands of times and will maintain the information which has been written in them regardless of whether they are powered on or not.
The Control menu lets you update the software contained in the Flash ROM of a device.
Download Software
When new features are added to the operating software for a particular type of device, you may wish to update a device with the new version.
When you are using IPX transport protocols and select this option, a window listing all eligible devices will appear. You will first be asked to select one or more devices (which must all be of the same type). To select multiple devices, hold down the Control key on your keyboard while clicking on devices.
When you are using IP transport protocols and select this option, you will be asked to enter an IP address (the IP address of the current device will be provided as a hint when the window opens).
Once you select one or more devices, the Manager will log in to the first device in the list (requesting a password from you if it isn't stored in the Manager), and then will ask you to select a download file from disk. This file will be downloaded into Flash ROM in the device(s).
Although the old software stored in Flash ROM will be overwritten, the device will maintain any configuration information (addresses, device name, password, etc.) you had previously loaded.
Whenever the Flash ROM in a device is downloaded, whether with new software or with a new configuration, the device will automatically be restarted. The download/restart process will take from 1 to 2 minutes, depending on the amount of memory in the device.
TFTP Download
This menu option allows you to use the Trivial File Transfer Protocol (TFTP) to download software to a device. This feature is generally only useful if you have erased the operating software in a device's Flash ROM and are attempting to reload it.
When you select the option, you will be asked for an IP address. The VPN 5000 Manager will then provide a file dialog to allow you to choose the download file.
TFTP can also be used to download operating software into a device which is running standard software from Flash ROM.
Restart Device
Use this menu option to restart a device in the Manager's Device View.
Mark the device in the list you wish to restart by clicking on it. The device you select will be restarted after you select this menu item.
The Statistics Menu
This menu allows you to display protocol routing tables and other information for a device. The output from these options is displayed in the Command Line Output tab in the Output Window. The specific menu options available depend on the current device type.
The first set of menu items displays the same information that is available when using certain commands within the command line interface. Refer to the section in the Cisco VPN 5000 Concentrator Series Command Reference Guide as indicated for a detailed description of the output from these menu items.
If you are experienced with internetworking devices, the information in these windows will be familiar to you. If you are not, this information can be used by technical support to determine the cause of many problems.
Ethernet
This menu item displays ethernet port statistics and is the equivalent of the command line's show ethernet statistics command. (See the ethernet(show) section.)
WAN State
This menu item displays WAN port status and connection statistics and is the equivalent of the command line's show wan state command. (See the wan(show) section.)
Serial Statistics
This menu item displays packet and physical layer statistics for the WAN ports and is the equivalent of the command line's show wan serial statistics command. (See the wan(show) section.)
PPP Statistics
This menu item displays packet statistics for WAN interfaces set for PPP and is the equivalent of the command line's show ppp statistics command. (See the ppp(show) section.)
Frame Relay Statistics
This menu item displays packet statistics for WAN interfaces set for Frame Relay and is the equivalent of the command line's show frelay statistics command. (See the frelay(show) section.)
Frame Relay State
This menu item displays the status of the PVCs (Permanent Virtual Circuits) on WAN interfaces set for Frame Relay and is the equivalent of the command line's show frelay pvc command. (See the frelay(show) section.)
ARP Cache
This menu item displays the ARP cache, which is the mapping between high level protocol addresses and physical addresses. This command is the equivalent of the command line's show arp command. (See the arp(show) section.)
IP Route Table
This menu item displays the IP route table and is the equivalent of the command line's show ip routing command. (See the ip(show) section.)
IP Routing
This menu item displays IP statistics and is the equivalent of the command line's show ip statistics command. (See the ip(show) section.)
IPX Route Table
This menu item displays the IPX route table, and is the equivalent of the command line's show ipx routing command. (See the ipx(show) section.)
IPX SAP Table
This menu item displays the IPX server table, and is the equivalent of the command line's show ipx sap command. (See the ipx(show) section.)
AppleTalk Route Table
This menu item displays the AppleTalk route table and is the equivalent of the command line's show appletalk routing command. (See the appletalk(show) section.)
AppleTalk Routing
This menu item displays AppleTalk statistics and is the equivalent of the command line's show appletalk statistics command. (See the appletalk(show) section.)
OSPF/Configuration
This menu item displays user-configured values that are currently being used by the OSPF protocol and is the equivalent of the command line's show ospf config command. (See the ospf(show) section).
OSPF/Statistics
This menu item displays how many of each of the five types of OSPF packets (Hello, Database Description, Link State Request, Link State Update, and Link State Acknowledgement) have been received and sent. This is the equivalent of the command line's show ospf stats command. (See the ospf(show) section).
OSPF/Database
This menu item displays the OSPF interface database and is the equivalent of the command line's show ospf if command. (See the ospf(show) section).
OSPF/Neighbors
This menu item displays an abbreviated list of current neighbors an their state. This is equivalent to the command line's show ospf nbr command. (See the ospf(show) section)
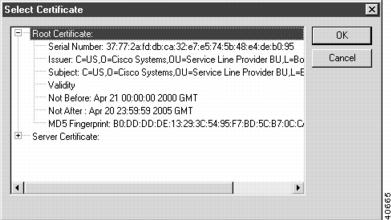
Certificates/Show Installed
When any certificate item is selected, a window (Figure 1-6) that displays all available root and server certificates. Select the certificate you wish to view and click OK.
Figure 1-6 Select Certificate Window
This menu item lists each certificate installed on the server number of the specific request.
Certificates/Show Certificate Details
This menu item displays detailed information about the requested certificate.
Certificates/Show Certificate (PEM Format)
This menu item displays the requested certificate in PEM format.
Certificates/Show Fingerprint
This menu item displays the certificate fingerprint.
Certificates/Show Generator Status
This menu item shows the status of the certificate generator. The status is displayed on the Command Line Output tab in the Output window.
VPN/Show Users
This menu item displays the VPN users database. This list includes the user, the vpn group to which they belong, the client IP address, the local IP address, and connect time.
VPN/Show Partners
This menu item displays the list of currently active tunnel partners for this vpn server. The tunnel partner is the IP Address of the interface at the remote end of the tunnel.
VPN/Show Statistics
This menu item displays current and historical connection statistics for vpn users and tunnel partners.
VPN/Show Hardware
This menu item displays configuration and statistics for currently active LAN-to-LAN connections.
RADIUS
This menu item displays packet statistics for the RADIUS client and is the equivalent of the command line's show radius statistics command. (See the radius(show) section.)
Buffer
This menu item displays detailed information on the current status of the device's memory allocation and is the equivalent of the command line's show os memory command. (See the os(show) section.)
Show Restart Info
This menu item displays detailed information about the status of the device when the last restart event occurred, and is the equivalent of the command line's show os resevent command. (See the os(show) section.)
Device Log
This menu item displays the log buffer, and is the equivalent of the command line's show system log buffer command. (See the system(show) section.)
Command Line Interface
This menu item allows you to enter other show commands in the Command Line entry box.
Reset Statistics
This menu item sends a command to the current device which causes it to reset all of its statistic counters.
The Command Line Edit Box
This box is both a pull-down list and an edit box which allows you to enter command line show commands. Any Statistics menu item you use will be added to this pull-down menu. To enter other show commands which are not included in the Statistics menu, choose the Statistics menu's Command Line Interface option to enter the command in the edit box (Figure 1-7). Press the Return key to send the command to the device.
Figure 1-7 The Command Line Edit Box
Other types of commands (e.g., reset, add, etc.) are not fully supported by the Manager. Only show commands should be used.
Moving and Customizing the Windows
Right-clicking in the area between windows brings up a popup menu which controls the placement of the windows.
•
•
Clicking and dragging the double bars at the top or side of a window allows you to move the window around on the screen, according to the options described. Pressing the Control key as you click and drag will disable docking, and the window can be placed anywhere on the screen, including outside the Main window.
The View menu
Use this menu option to view your display in full screen or in workbook mode. You can also change the size of the window or move the window around the screen by clicking and dragging the double bars at the top of the window.
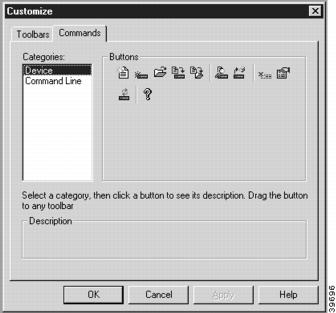
Customize
To customize the display windows, select Customize in the View menu. This dialog box (Figure 1-8) gives options for customizing the toolbars and command icons.
Figure 1-8 Customize Window View Dialog Box
Toolbars
This tab allows you to choose the toolbars that you want in your display window.
Commands
This tab allows you to create your own toolbar by placing device commands or command line buttons onto any toolbar.
The Window Menu
This menu allows you to toggle the database workspace (device view) and the output window. You can also choose how your windows will be displayed in the workspace.