Feedback Feedback
|
Table Of Contents
Regulatory Compliance and Safety Information
Shutting Down and Powering Off
Changing the Battery on the VPN 3005 Concentrator
Changing the Battery on the VPN 3002 Hardware Client
China RoHS Hazardous Substance Table
VPN 3005 Concentrator and VPN 3002 Hardware Client Battery Upgrade Instructions
with China RoHS Hazardous Substance Table
Part Number: 78-19230-01Follow these instructions to change the battery for the VPN 3005 Concentrator and the VPN 3002 Hardware Client. These include the following models:
•
CVPN3005-E/FE
•
•
Note
This document includes the following sections:
•
•
•
•
•
•
Regulatory Compliance and Safety Information
Before you remove or install the AIP SSM or the CSC SSM in the Cisco ASA 5500 series adaptive security appliances, please read the Working in an ESD Environment section in this document and the Regulatory Compliance and Safety Information for the Cisco ASA 5500 Series Adaptive Security Appliance document on Cisco.com or on the product CD that ships with the chassis.
Working in an ESD Environment
Electrostatic discharge (ESD) can damage equipment and impair electrical circuitry. ESD damage occurs when electronic components are improperly handled and can result in complete or intermittent failures. Always follow ESD-prevention procedures when you remove and replace components. Ensure that the chassis is electrically connected to earth ground. Wear an ESD-preventive wrist strap, ensuring that it makes good skin contact. Connect the grounding clip to an unpainted surface of the chassis frame to safely ground unwanted ESD voltages. To guard against ESD damage and shocks, the wrist strap and cord must operate properly. If no wrist strap is available, ground yourself by touching the metal part of the chassis.
Before You Begin
Save the current VPN 3005 or VPN 3002 configuration file and copy it to a remote system before you proceed. See the Administration | File Management | TFTP Transfer screen in the VPN Concentrator Manager.
Caution
Parts Cisco Supplies
The battery upgrade kit includes these parts:
•
•
•
Tools You Need
No. 2 Phillips screwdriver.
Shutting Down and Powering Off
Shut down and power off the VPN 3005 Concentrator or VPN 3002 Hardware Client before you install the module.
Step 1
Step 2
Step 3
Step 4
Warning
Changing the Battery on the VPN 3005 Concentrator
After you shut down the VPN 3005/3002 and disconnect the power cord, you can change the battery.
Caution
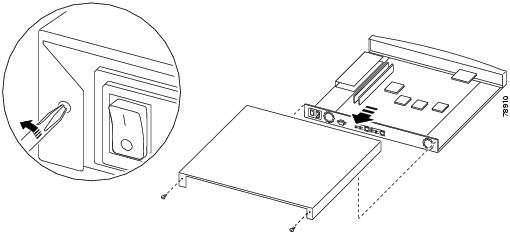
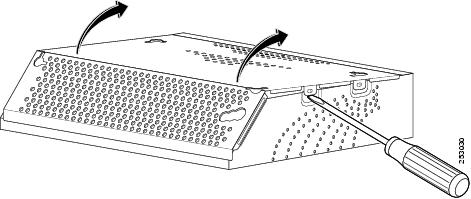
Step 1
Figure 1 Removing the VPN 3005 Concentrator Chassis Cover
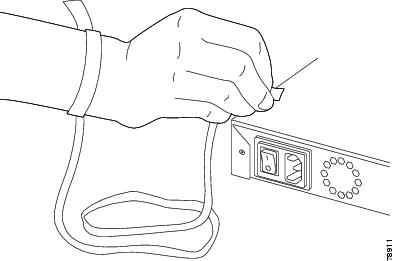
Step 2
Figure 2 Properly Connecting the Wrist Strap
Step 3
Step 4
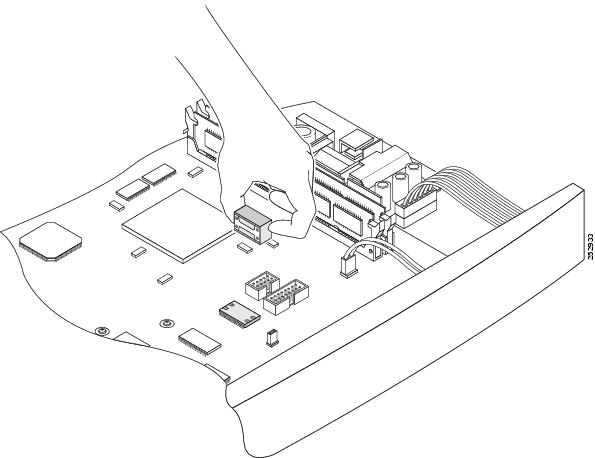
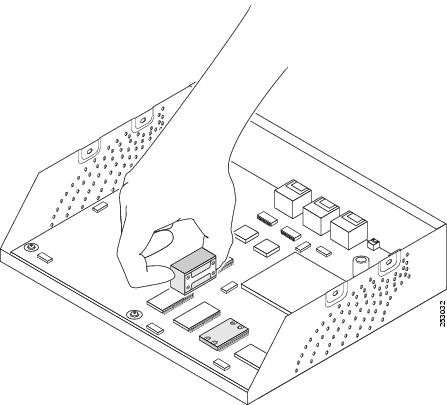
Caution
Figure 3 Removing the Old Battery from the VPN 3005 Concentrator
Step 5
Step 6
•
•
Figure 4 Installing the New Battery in the VPN 3005 Concentrator
Step 7
Step 8
Testing the Battery
After you have installed the new battery, to test it follow these steps.
Step 1
Step 2
Step 3
Step 4
Step 5
Step 6
Step 7
Changing the Battery on the VPN 3002 Hardware Client
After you shut down the VPN 3002 and disconnect the power cord, you can change the battery.
Caution
Step 1
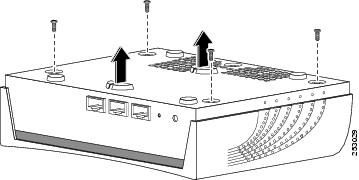
Figure 5 Removing the VPN 3002 Chassis Cover
Step 2
Caution
Figure 6 Removing the Metal Shield from the VPN 3002 Chassis
Step 3
Figure 7 Properly Connecting the Wrist Strap
Step 4
Step 5
Caution
Figure 8 Removing the Old Battery from the VPN 3002 Concentrator
Step 6
Step 7
•
•
Figure 9 Installing the New Battery in the VPN 3002 Concentrator
Step 8
Step 9
Caution
Testing the Battery
After you have installed the new battery, to test it follow these steps.
Step 1
Step 2
Step 3
Step 4
Step 5
Step 6
Obtaining Documentation
For more information on using ASDM or the CLI to configure your adaptive security appliance, see the appropriate configuration guide listed in Navigating the Cisco ASA 5500 Series Documentation on Cisco.com at the following URL:
http://www.cisco.com/en/US/docs/security/asa/roadmap/asaroadmap.html
China RoHS Hazardous Substance Table
Note
CCDE, CCENT, CCSI, Cisco Eos, Cisco HealthPresence, Cisco IronPort, the Cisco logo, Cisco Nurse Connect, Cisco Pulse, Cisco SensorBase, Cisco StackPower, Cisco StadiumVision, Cisco TelePresence, Cisco Unified Computing System, Cisco WebEx, DCE, Flip Channels, Flip for Good, Flip Mino, Flipshare (Design), Flip Ultra, Flip Video, Flip Video (Design), Instant Broadband, and Welcome to the Human Network are trademarks; Changing the Way We Work, Live, Play, and Learn, Cisco Capital, Cisco Capital (Design), Cisco:Financed (Stylized), Cisco Store, Flip Gift Card, and One Million Acts of Green are service marks; and Access Registrar, Aironet, AllTouch, AsyncOS, Bringing the Meeting To You, Catalyst, CCDA, CCDP, CCIE, CCIP, CCNA, CCNP, CCSP, CCVP, Cisco, the Cisco Certified Internetwork Expert logo, Cisco IOS, Cisco Lumin, Cisco Nexus, Cisco Press, Cisco Systems, Cisco Systems Capital, the Cisco Systems logo, Cisco Unity, Collaboration Without Limitation, Continuum, EtherFast, EtherSwitch, Event Center, Explorer, Follow Me Browsing, GainMaker, iLYNX, IOS, iPhone, IronPort, the IronPort logo, Laser Link, LightStream, Linksys, MeetingPlace, MeetingPlace Chime Sound, MGX, Networkers, Networking Academy, PCNow, PIX, PowerKEY, PowerPanels, PowerTV, PowerTV (Design), PowerVu, Prisma, ProConnect, ROSA, SenderBase, SMARTnet, Spectrum Expert, StackWise, WebEx, and the WebEx logo are registered trademarks of Cisco Systems, Inc. and/or its affiliates in the United States and certain other countries.
All other trademarks mentioned in this document or website are the property of their respective owners. The use of the word partner does not imply a partnership relationship between Cisco and any other company. (0910R)