Feedback Feedback
|
Table Of Contents
Troubleshooting the DOM Issue for CS-MARS 25R, 25, or 55 Running a Release Prior to 6.0.3
How To Resolve It for a Standalone Local Controller
How To Resolve It for a Managed Local Controller
Downloading and Burning a Recovery DVD
Restoring Archived Data after Re-Imaging a MARS Appliance
Updating the Appliance to the 6.0.3 Software
Licensing the Appliance Using the 6.0.3 Software
Obtaining Documentation and Submitting a Service Request
Troubleshooting the DOM Issue for CS-MARS 25R, 25, or 55 Running a Release Prior to 6.0.3
Published: July 8, 2009Revised: July 20, 2009, 78-19151-01This document describes the procedures required to restore configuration and event data from a software release prior to 6.0.3 to a MARS 25R, 25, and 55 appliance that includes an updated Disk on Module (DOM) memory device.
Problem Description
The refurbished or new MARS 25R, 25, and 55 appliance you are receiving from Cisco Service may not be able to run software versions prior to Release 6.0.3. The symptom of this condition is that you cannot install the Cisco license key when attempting to run any Release between 5.3.2 and 6.0.2, thus preventing access to the GUI.
In June 2009, the DOM memory device in all CS-MARS 25R, 25, and 55 models was updated. This hardware change required a software change (CSCsx16387) to enable appliance licensing. The software and hardware changes coincided with MARS release 6.0.3.
Does This Affect Me?
This issue affects you if either of the following statements is true:
•
The MARS Appliance sent to Cisco Service was running a software release prior to 6.0.3 and you want to restore the configuration and/or event data it archived before being sent to Cisco Service. See How To Resolve It for a Standalone Local Controller.
•
How To Resolve It for a Standalone Local Controller
The MARS Appliance that you received from Cisco Service is imaged with MARS release 6.0.3. To restore your data, you must first re-image the appliance to the version used to create the configuration and/or data archive. However, you will not be able to license the appliance at that time. Once the data is restored, you must then upgrade the MARS Appliance by applying each subsequent patch to return the appliance to 6.0.3 or later so that you can apply the Cisco license and unlock the web interface.
Summary Steps
1.
2.
3.
4.
5.
6.
7.
How To Resolve It for a Managed Local Controller
To restore a managed Local Controller, you must do more than just re-imaging with the old software image and upgrade it to 6.0.3. Once the data is restored, you must upgrade the managing Global Controller and all of its managed Local Controllers to 6.0.3.
Summary Steps
1.
2.
3.
4.
5.
6.
7.
8.
Downloading and Burning a Recovery DVD
If you do not have the MARS Appliance Recovery DVD-ROM that shipped with your MARS Appliance or you want to use a new image to expedite the post recovery upgrade process, you can download the current recovery image from the Cisco.com software download pages dedicated to MARS. You can access these pages at the following URL, assuming you have a valid Cisco.com account and that you have registered your SMARTnet contract number for your MARS Appliance.
•
After you download the ISO image, for example, csmars-6.0.1.iso, you must burn that file on to a DVD-ROM. The files are typically 1.42 GB or larger.
The following guidelines are defined:
•
•
•
Re-Imaging a Local Controller
Use the MARS Appliance Recovery DVD-ROM to re-image the Local Controller if necessary. This operation destroys all data and installs a new image. In addition to preparing the device and later restoring any archived date, you must also perform three time-consuming appliance recovery phases:
•
•
•
Caution
To re-image your Local Controller, follow these steps:
Step 1
Step 2
Step 3
Step 4
•
•
Result: The following message displays on the console:
Please Choose A MARS Model To Install...1. Distributed Mars - Local Controller2. Distributed Mars - Global Controller3. Mars Operating System Recovery4. QuitStep 5
Result: The image download to the appliance begins. This process takes approximately 15 minutes. After the image download is complete, the Recovery DVD is ejected and the following message appears on the console:
Please remove the installation CD and press Reboot to finish the installation.Step 6
Step 7
Result: The MARS Appliance reboots, performs some configurations, including building the Oracle database. The configurations that occur after the first reboot take a significant amount of time (between an hour and an hour and a half), during which there is no feedback; this is normal system behavior.
Step 8
Note
You will be unable to license the appliance until you have completed the data reimport and upgraded the appliance to 6.0.3 as described in "Updating the Appliance to the 6.0.3 Software" and "Licensing the Appliance Using the 6.0.3 Software".Step 9
Restoring Archived Data after Re-Imaging a MARS Appliance
When you restore a MARS Appliance using archived data, you are restoring the system to match the data and configuration settings found in the archive. The configuration data includes the operating system, MARS software, license key, user accounts, passwords, and device list in effect at the time the archive was performed.
Caution
For additional information on how the archives are restored, see "Guidelines for Restoring."
Note
If you have archived your data and you have recovered your MARS Appliance as described in Re-Imaging a Local Controller, perform the following steps:
Step 1
pnrestore -p <ArchiveServerIP>:/<archive_path>Where ArchiveServerIP is the value specified in the Remote Host IP field and archive_path is the value specified in the Remote Path field in the settings found in the web interface at Admin > System Maintenance > Data Archiving. You must identify the archive server by IP address, separated by a :/ and then the pathname ArchiveServerIP:/archive_path.
Step 2
Updating the Appliance to the 6.0.3 Software
After you complete the data restore, you need to upgrade the appliance to the 6.0.3 software.
Note
For more information and procedures on updating the software, see"Checklist for Upgrade of Appliance Software." For details on using the CLI to perform an upgrade, see "Upgrade from the CLI" and "pnupgrade."
Licensing the Appliance Using the 6.0.3 Software
Your appliance comes with a Software License Claim Certificate, which you use to generate your license key using a web browser. Adding the license file is only performed using the web interface; there is no CLI support.
Note
To provision the license on 6.0.3 software, follow these steps:
Step 1
Step 2
Step 3
Step 4
•
•
where machine_name is the name of the appliance and ip_address is the address assigned to the interface to which you are attempting to connect (either eth0 or eth1).
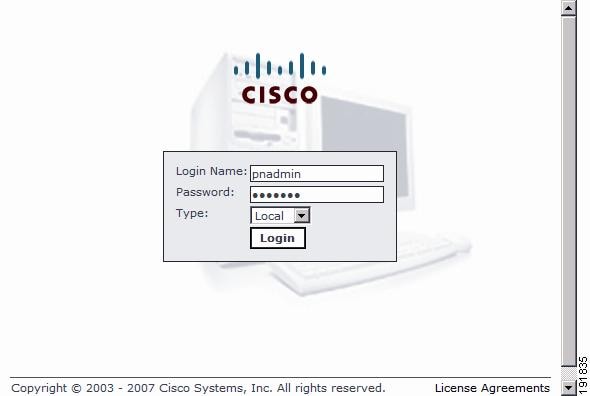
You will be prompted to accept the security certificate before you can proceed. After you accept the certificate, the login page appears.
Note
Note
Step 5
Step 6
The Local versus Global distinction refers to the type of account you are using to log in to this appliance. Typically, you log in using an account that is defined on the Local Controller, which corresponds to the Local option in the Type list. If you are logging in using an account that is defined on the Global Controller, select Global. When you chose to manage a Local Controller from a Global Controller, the administrative accounts defined for the Global Controller are pushed down to the Local Controller.
Note
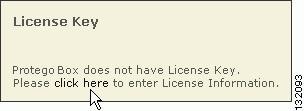
If the MARS license key is not configured, the License Key dialog prompts you to enter this key.
Step 7
You must load this key to activate the MARS Appliance before you can use it.
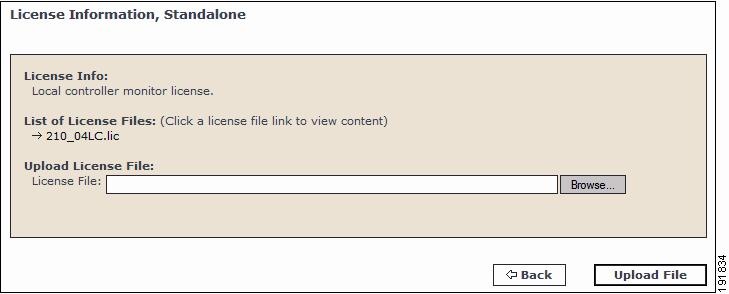
The License Information page displays.
I
Step 8
The license key file is uploaded appears under List of License Files. The license key information field is populated based on the information found in the license file.
Step 9
Note
Product Documentation
For the complete list of documents supporting this release, see the release-specific document roadmap:
•
http://www.cisco.com/en/US/products/ps6241/products_documentation_roadmaps_list.html
Lists document set that supports the MARS release and summarizes contents of each document.
•
Obtaining Documentation and Submitting a Service Request
For information on obtaining documentation, submitting a service request, and gathering additional information, see the monthly What's New in Cisco Product Documentation, which also lists all new and revised Cisco technical documentation, at:
http://www.cisco.com/en/US/docs/general/whatsnew/whatsnew.html
Subscribe to the What's New in Cisco Product Documentation as a Really Simple Syndication (RSS) feed and set content to be delivered directly to your desktop using a reader application. The RSS feeds are a free service and Cisco currently supports RSS Version 2.0.
This document is to be used in conjunction with the documents listed in the "Product Documentation" section.CCDE, CCSI, CCENT, Cisco Eos, Cisco HealthPresence, the Cisco logo, Cisco Lumin, Cisco Nexus, Cisco Nurse Connect, Cisco Stackpower, Cisco StadiumVision, Cisco TelePresence, Cisco WebEx, DCE, and Welcome to the Human Network are trademarks; Changing the Way We Work, Live, Play, and Learn and Cisco Store are service marks; and Access Registrar, Aironet, AsyncOS, Bringing the Meeting To You, Catalyst, CCDA, CCDP, CCIE, CCIP, CCNA, CCNP, CCSP, CCVP, Cisco, the Cisco Certified Internetwork Expert logo, Cisco IOS, Cisco Press, Cisco Systems, Cisco Systems Capital, the Cisco Systems logo, Cisco Unity, Collaboration Without Limitation, EtherFast, EtherSwitch, Event Center, Fast Step, Follow Me Browsing, FormShare, GigaDrive, HomeLink, Internet Quotient, IOS, iPhone, iQuick Study, IronPort, the IronPort logo, LightStream, Linksys, MediaTone, MeetingPlace, MeetingPlace Chime Sound, MGX, Networkers, Networking Academy, Network Registrar, PCNow, PIX, PowerPanels, ProConnect, ScriptShare, SenderBase, SMARTnet, Spectrum Expert, StackWise, The Fastest Way to Increase Your Internet Quotient, TransPath, WebEx, and the WebEx logo are registered trademarks of Cisco Systems, Inc. and/or its affiliates in the United States and certain other countries.
All other trademarks mentioned in this document or website are the property of their respective owners. The use of the word partner does not imply a partnership relationship between Cisco and any other company. (0903R)
Any Internet Protocol (IP) addresses and phone numbers used in this document are not intended to be actual addresses and phone numbers. Any examples, command display output, network topology diagrams, and other figures included in the document are shown for illustrative purposes only. Any use of actual IP addresses or phone numbers in illustrative content is unintentional and coincidental.
© <year> Cisco Systems, Inc. All rights reserved.