Feedback Feedback
|
Table Of Contents
RAID Battery Backup Unit Replacement and RAID Firmware Upgrade for Cisco Security MARS
Procedure for Upgrading the RAID Firmware
Procedure to Replace the RAID Battery Backup Unit
RAID Battery Backup Unit Replacement and RAID Firmware Upgrade for Cisco Security MARS
Published: August 20, 2009This document ships with the Cisco Security MARS RAID Controller Back-Up Battery Unit (BBU), Cisco part number CS-MARS-X10-BB=.
Hardware Supported
Procedure for Upgrading the RAID Firmware
The current RAID BBU (CS-MARS-X10-BB=) is a Lithium ion (Li-ion) battery. Previously, Cisco shipped a Nickel Metal Hydride (NiMH) battery as the RAID BBU. To report the status of the Li-ion RAID BBU, the MARS Appliance must be running RAID firmware version 1.12.220-0560 or more recent. To check the firmware version use the raidstatus CLI command.
Step 1
Download the RAID firmware ISO image (cs-mars_raid_1-12-220-0560.iso) from the CS-MARS supplementary files Software Download site: http://tools.cisco.com/support/downloads/pub/Redirect.x?mdfid=279644034
This site requires that you login with your Cisco Connection Online login name and password.
Step 2
Step 3
Step 4
Step 5
MARS executes a batch file on the CD that launches the RAID firmware update utility which prompts you to upgrade the RAID firmware.
Step 6
MARS then upgrades the firmware and returns you to the DOS shell prompt, "R >".
Step 7
MARS reboots normally.
Step 8
Step 9
The firmware version should be 1.12.220-0560 or more recent.
The RAID array components should have the same status as before the upgrade.
Procedure to Replace the RAID Battery Backup Unit
The RAID BBU replacement procedure can be summarized as follows:
1.
2.
3.
4.
5.
6.
To replace the Cisco Security MARS RAID BBU complete the following detailed procedure:
Note
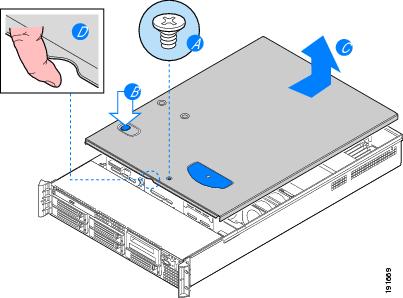
Remove the Chassis Cover
Step 1
Step 2
Step 3
Step 4
Step 5
Step 6
Figure 1 Removing the MARS Appliance Cover
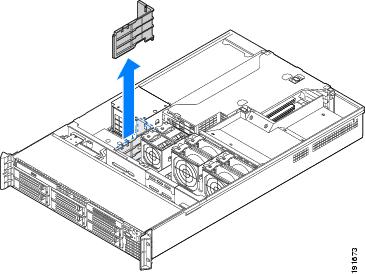
Remove the Large Air Baffle
Step 7
Step 8
Figure 2 Removing the Large Air Baffle
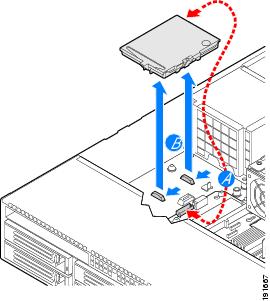
Remove the RAID BBU
Step 9
Step 10
Figure 3 Removing the RAID Battery Backup Unit
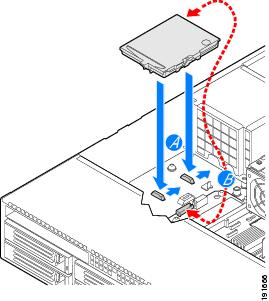
Install the Replacement RAID BBU
Step 11
Step 12
Figure 4 Installing the RAID Battery Backup Unit
Replace the Large Air Baffle
Step 13
Make sure to route the cables beneath the air baffle as were recorded in Step 7.
Replace the Chassis Cover
Step 14
MARS Appliance sidewalls.Step 15
Step 16
Step 17
End of Procedure
Related Documentation
Cisco Security MARS Hardware Installation and Maintenance Guide 6.X
Chapter 5, Hardware Maintenance Tasks for MARS 55, 110R, 110, 210, GC2R, and GC2:Cisco Security MARS Initial Configuration and Upgrade Guide, 6.X
Establishing a Console ConnectionThis document is to be used in conjunction with the documents listed in the "Related Documentation" section.CCDE, CCENT, Cisco Eos, Cisco HealthPresence, the Cisco logo, Cisco Lumin, Cisco Nexus, Cisco StadiumVision, Cisco TelePresence, Cisco WebEx, DCE, and Welcome to the Human Network are trademarks; Changing the Way We Work, Live, Play, and Learn and Cisco Store are service marks; and Access Registrar, Aironet, AsyncOS, Bringing the Meeting To You, Catalyst, CCDA, CCDP, CCIE, CCIP, CCNA, CCNP, CCSP, CCVP, Cisco, the Cisco Certified Internetwork Expert logo, Cisco IOS, Cisco Press, Cisco Systems, Cisco Systems Capital, the Cisco Systems logo, Cisco Unity, Collaboration Without Limitation, EtherFast, EtherSwitch, Event Center, Fast Step, Follow Me Browsing, FormShare, GigaDrive, HomeLink, Internet Quotient, IOS, iPhone, iQuick Study, IronPort, the IronPort logo, LightStream, Linksys, MediaTone, MeetingPlace, MeetingPlace Chime Sound, MGX, Networkers, Networking Academy, Network Registrar, PCNow, PIX, PowerPanels, ProConnect, ScriptShare, SenderBase, SMARTnet, Spectrum Expert, StackWise, The Fastest Way to Increase Your Internet Quotient, TransPath, WebEx, and the WebEx logo are registered trademarks of Cisco Systems, Inc. and/or its affiliates in the United States and certain other countries.
All other trademarks mentioned in this document or website are the property of their respective owners. The use of the word partner does not imply a partnership relationship between Cisco and any other company. (0812R)
Any Internet Protocol (IP) addresses and phone numbers used in this document are not intended to be actual addresses and phone numbers. Any examples, command display output, network topology diagrams, and other figures included in the document are shown for illustrative purposes only. Any use of actual IP addresses or phone numbers in illustrative content is unintentional and coincidental.
© 2009 Cisco Systems, Inc. All rights reserved.