Feedback
Table Of Contents
System Time and NTP Server Settings
Configuring System Alarm Settings
Configuring Alarm Syslog Targets
Viewing Patch Install and Rollback Changes in the Audit Report
Administering Cisco ISE
This chapter describes the administrative activities for the Cisco Identity Services Engine (ISE) and how to perform them. The following topics are covered:
•
System Time and NTP Server Settings
•
•
Logging In
The Cisco ISE GUI is supported on HTTPS-enabled Mozilla Firefox version 3.x and Microsoft Internet Explorer version 8 (in Internet Explorer 8-only mode).
Note
After you have installed Cisco ISE as described in the Cisco Identity Services Engine Hardware Installation Guide, Release 1.0, you can log into ISE.
To log into the Cisco ISE GUI, complete the following steps:
Step 1
The ISE login window appears.
Step 2
Step 3
Note
Step 4
If your login is successful, you will be prompted to change your password.
Step 5
You can now access the menus in the ISE user interface.
Note
System Time and NTP Server Settings
Cisco ISE allows you to view the system time setting through the ISE user interface. The Cisco Application Deployment Engine (ADE) operating system, which is the operating system in the Cisco ISE, allows you to configure three Network Time Protocol (NTP) servers. You can use the NTP servers to maintain accurate time and synchronize time across different time zones. This procedure ensures that your logs are always reliable.
Note
Prerequisite:
Every ISE administrator account is assigned one or more administrative roles. To perform the operations described in the following procedure, you must have one of the following roles assigned: Super Admin or System Admin. See Cisco ISE Admin Group Roles and Responsibilities for more information on the various administrative roles and the privileges associated with each of them.
To view system time and configure NTP server settings, complete the following steps:
Step 1
Step 2
Note
The timezone that you have configured appears in the Time Zone field. You cannot edit this value from the ISE user interface. To configure the time zone, you must enter the following command from the ISE CLI:
clock timezone timezone
For more information on the clock timezone command, see the Cisco Identity Services Engine CLI Reference Guide, Release 1.0.
Step 3
If you have only one NTP server in your network, enter the IP address in the Primary Server text box. If you have two NTP servers, enter the IP address in the Primary Server and Secondary Server text boxes.
Note
Step 4
Now, when you hover your cursor over to the hostname in the top right corner of the Cisco ISE dashboard window, the current server role and server system time appear in the Server Information quick-view pop-up.
Note
Configuring Email Settings
This section shows you how to specify the address of the email server and the name that is displayed for this address. This address is used for sending and receiving log messages.
Note
To specify email settings for the mail server, complete the following steps:
Step 1
Step 2
Step 3
Note
Step 4
Step 5
Configuring System Alarm Settings
System alarms notify you of critical conditions that are encountered. System alarms are standard and cannot be created or deleted.
This section describes the available system alarms, shows you how to enable and disable the alarms, and how to configure to receive notification. Cisco ISE provides the following system alarms:
•
–
–
–
–
•
•
–
–
•
•
•
•
You can choose to send alarm notifications through email and as syslog messages. To send syslog messages successfully, you must configure Alarm Syslog Targets, which are syslog message destinations. For more information, see Configuring Alarm Syslog Targets.
Enabling and Configuring System Alarms
The following task shows you how to activate and configure notification for system alarms.
To enable and configure a system alarm, complete the following steps:
Step 1
Step 2
Step 3
Step 4
Step 5
When a system alarm occurs, an email is sent to all the recipients in the Email Notification User List.
Step 6
Step 7
For more information:
See the System Alarm Settings section of Appendix A, "User Interface Reference."
Disabling System Alarms
The following task shows you how to deactivate system alarms.
To disable system alarms, complete the following steps:
Step 1
Step 2
Step 3
For more information:
See the System Alarm Settings section of Appendix A, "User Interface Reference."
Configuring Alarm Syslog Targets
This section shows you how to create, edit, and delete alarm syslog targets.
If you configure system alarm notifications to be sent as syslog messages, then you need a syslog target to receive the notification. Alarm syslog targets are the destinations to which alarm syslog messages are sent. A system that is configured as a syslog server is also required to receive syslog messages.
Creating and Editing Alarm Syslog Targets
When you create or edit an alarm syslog target, you establish or modify the destination to which syslog messages are sent.
To create and edit an alarm syslog target, complete the following steps:
Step 1
Step 2
Step 3
a.
b.
c.
The newly created alarm syslog target appears in the list.
Step 4
a.
b.
c.
Your changes are applied to the alarm syslog target.
For more information:
See the Alarm Syslog Targets section of Appendix A, "User Interface Reference."
Deleting Alarm Syslog Targets
You can delete an alarm syslog target at any time.
To delete an alarm syslog target, complete the following steps:
Step 1
Step 2
Step 3
Step 4
For more information:
See the Alarm Syslog Targets section of Appendix A, "User Interface Reference."
Managing Software Patches
You can install patches on ISE servers in your deployment from the primary administration node. ISE patches are usually cumulative, however, any restrictions on the patch installation will be described in the README file that will be included with the patch. Cisco ISE allows you to perform patch installation and rollback from either the command-line interface (CLI) or GUI.
When you install or roll back a patch from a standalone or primary administration node, ISE restarts the application. You might have to wait for a few minutes before you can log back in.
Note
To roll back a patch from ISE nodes in a deployment, you must roll back the change from the primary node and if successful, the patch is rolled back from the secondary nodes. If it fails on the primary node, the rollback process is aborted. However, if it fails on any of the secondary nodes, it still continues to roll back the patch from the next secondary node in your deployment.
Note
To install and roll back patches from the CLI, refer to the Cisco Identity Services Engine CLI Reference Guide, Release 1.0.
This section contains:
•
•
Installing a Software Patch
To install a patch from the GUI, you must download the patch from the following location to the system that runs your client browser:
Note
Prerequisite:
Every ISE administrator account is assigned one or more administrative roles. To perform the operations described in the following procedure, you must have one of the following roles assigned: Super Admin or System Admin. See Cisco ISE Admin Group Roles and Responsibilities for more information on the various administrative roles and the privileges associated with each of them.
To install a patch on Cisco ISE nodes in a deployment, complete the following steps:
Step 1
The Patch Management page appears, which lists the patches that are installed on your ISE node.
Step 2
The Install Patch Bundle page appears.
Step 3
Step 4
Ensure that you install patches that are applicable for the Cisco ISE version that is deployed in your network. Cisco ISE reports any mismatch in versions and also any errors in the patch file.
After the patch is installed on the primary administration node, Cisco ISE logs you out and you have to wait for a few minutes before you can log back in.
Note
Step 5
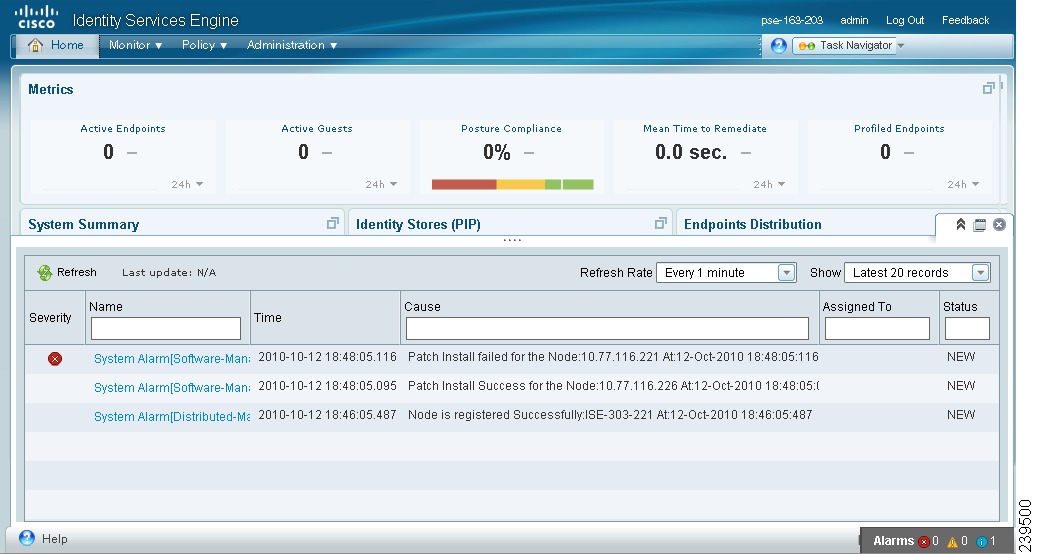
Note
Figure 8-1 Patch Installation Status in the Dashboard
Step 6
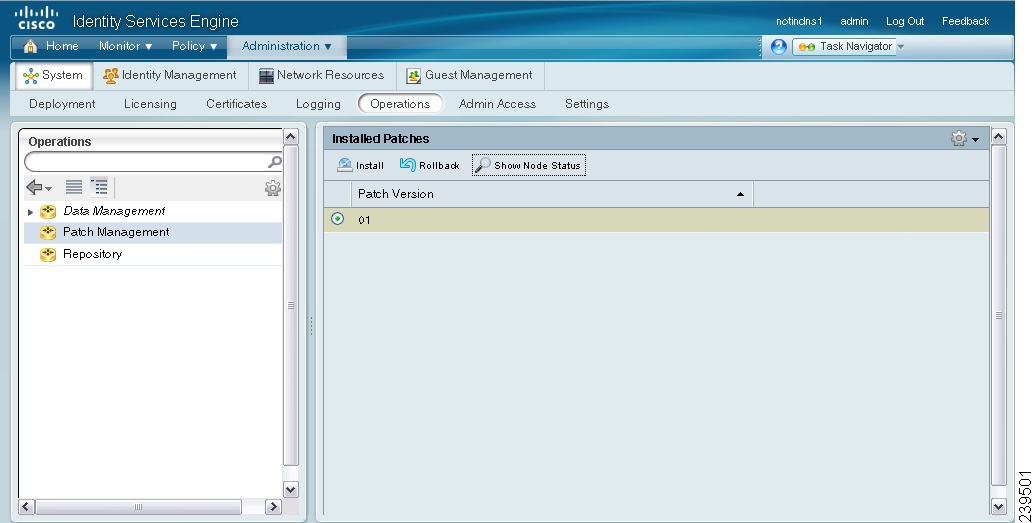
Step 7
Figure 8-2 Patch Listing Page
This page lists all the patches that you have installed so far.
Step 8
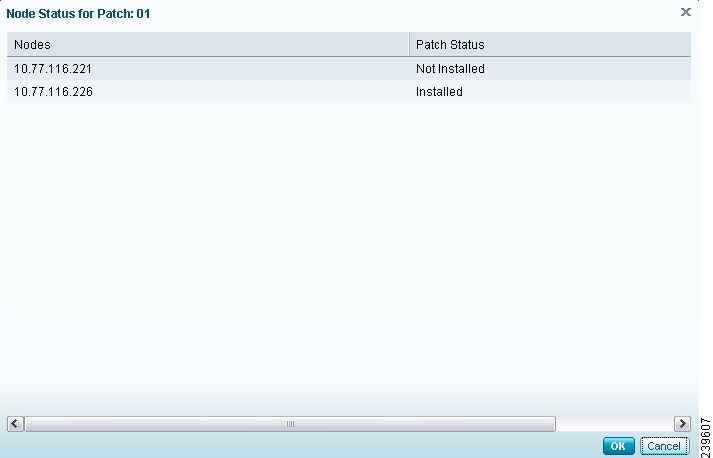
A pop-up appears that shows the status of this patch (Installed, Not Installed, or Node is Down) on the various nodes in your deployment as shown in Figure 8-3.
Figure 8-3 Node Status Pop-Up
Step 9
While installing a patch on the secondary nodes, the primary administration node is not restarted and you can continue to perform your tasks on the primary administration node. During this time, the secondary ISE nodes are restarted consecutively after the patch is installed on those nodes. At any point during the installation process, you can click the Show Node Status button to see the status of patch installation.
If for some reason, the patch installation fails on the primary administration node, the installation does not proceed to the secondary nodes.
Step 10
Note
A pop-up similar to the one shown in Figure 8-4 appears.
Figure 8-4 Node Status Pop Up: Installation Complete
Patch installation is now complete on all the ISE nodes.
If for some reason the patch is not installed on one or more secondary nodes, ensure that the node is up and repeat the process from Step 2 to install it on the remaining nodes. Cisco ISE installs the patch on those nodes that do not have this version of the patch.
Related Topics:
•
•
Rolling Back Software Patches
Prerequisite:
Every ISE administrator account is assigned one or more administrative roles. To perform the operations described in the following procedure, you must have one of the following roles assigned: Super Admin or System Admin. See Cisco ISE Admin Group Roles and Responsibilities for more information on the various administrative roles and the privileges associated with each of them.
To roll back a patch from Cisco ISE nodes in your deployment, complete the following steps:
Step 1
The Installed Patches page appears.
Step 2
Note
After the patch has been rolled back on the primary administration node, Cisco ISE will roll back the patch from the secondary nodes. If for some reason the patch rollback fails on the primary node, the patches are not rolled back from the secondary nodes.
After the patch is rolled back from the primary administration node, Cisco ISE logs you out and you have to wait for a few minutes before you can log back in.
Step 3
Note
Step 4
Step 5
A pop-up appears that shows the status of the patch on the various ISE nodes in your deployment.
While Cisco ISE rolls back the patch from the secondary nodes, you can continue to perform other tasks from your primary administration node GUI. The secondary nodes will be restarted after the rollback.
Step 6
If the patch is not rolled back from any of the secondary nodes, ensure that the node is up and repeat the process from Step 2 to roll back the changes from the remaining nodes. Cisco ISE rolls back the patch only from those nodes that still have this version of the patch installed.
Related Topics:
•
Viewing Patch Install and Rollback Changes in the Audit Report
The monitoring and troubleshooting component of Cisco ISE provides information on the patch installation and rollback operations that are performed on your ISE nodes.
Prerequisite:
Every ISE administrator account is assigned one or more administrative roles. To perform the operations described in the following procedure, you must have one of the following roles assigned: Super Admin or Monitoring Admin or Helpdesk Admin. See Cisco ISE Admin Group Roles and Responsibilities for more information on the various administrative roles and the privileges associated with each of them.
To view these reports, complete the following steps:
Step 1
Step 2
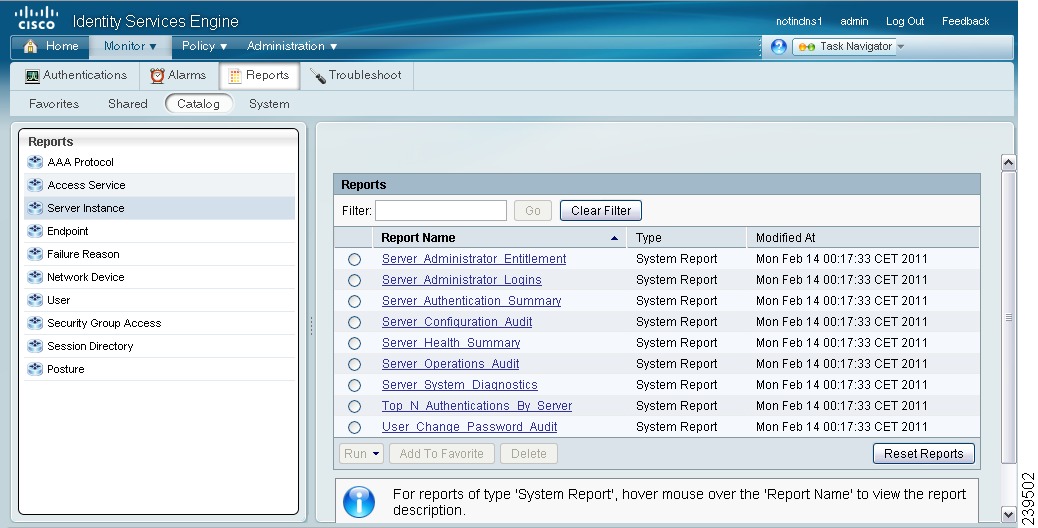
A page similar to the one shown in Figure 8-5 appears.
Figure 8-5 Server Instance Reports Page
Step 3
Step 4
This report provides information on the patch installation and rollback operations that were performed within the time period that you have chosen.
Figure 8-6 ISE Operations Audit Report
Step 5
Figure 8-7 ISE Operations Report: Interactive View
For information on how to use the interactive viewer features, see the "Working with the Interactive Viewer Toolbar" section on page 23-12.
Related Topics: