Feedback
Table Of Contents
Listing or Searching for Users
Assigning Multiple Users to Roles
Assigning Multiple Users to Groups
Viewing Role and Group Memberships of a User
Export Users to an MS Excel File
Listing or Searching for Groups
Assigning Resources to a Group
Assigning Multiple Users to a Group
Assigning Multiple Groups to a Role
Listing or Searching for Roles
Assigning Multiple Users to a Role
Assigning Multiple Groups to a Role
Viewing PAP Role Delegation Information
Entitlement Management by Users
Entitlement Management by Groups
Entitlement Management by Roles
Entitlement Management by Resources
Creating Multiple Policies for a Role Using Map Expression
Importing Policies into PAP from XML File
Exporting Policies from PAP to XML File
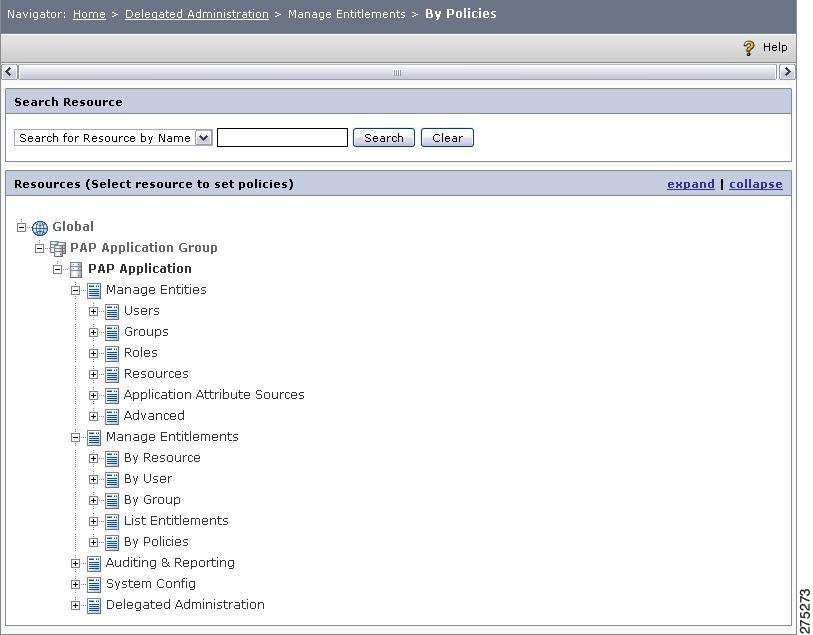
Entitlement Management by Policies
Assigning Multiple Resources to a Role
Reviewing the Delegated Components of a PAP Role
Delegated Administration
This section of the PAP console is used to delegate all or any of the activities performed by the superuser to one or more PAP Users. This chapter the explains various operations that you can perform under the Delegated Administration section in the PAP administration console, such as:
•
PAP User Management—Create PAP users, delegate authority, and assign responsibilities to them.
•
•
•
•
You can create users equivalent to superuser or users with limited administrative authority over the PAP console under this section. After creating PAP users other than the superuser, the superuser can distribute the PAP administration authority among multiple PAP users either directly or indirectly by defining a group or role. For example, you can create a PAP user called Mary with partial authority to administer only the Auditing and Reporting section of the PAP for an application group or application. This is possible when Mary is mapped to one of the default roles called Auditor before delegating this role to the appropriate application. When Mary logs in to the PAP console, Mary can only access the Auditing and Reporting section. In this way, you can create and update any number of user profile under this section.
Note
PAP User Management
A PAP user is an administrator who can have full or partial control over managing the PAP console. The superuser can carry out the following functions related to the management of PAP users:
•
•
•
•
•
•
•
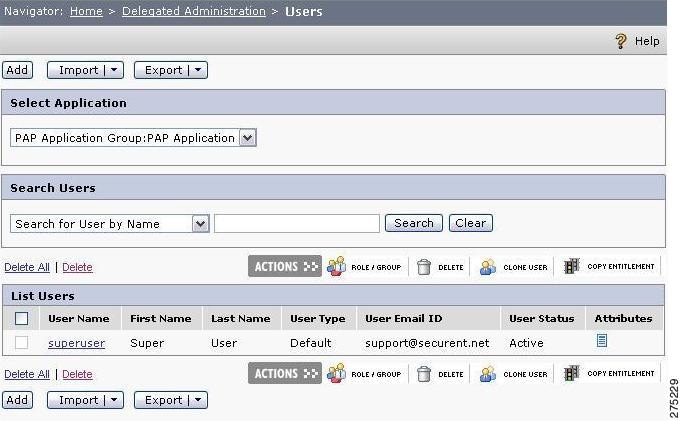
Listing or Searching for Users
To view a list of PAP users or search for a PAP user, you must:
Step 1
User Management page is displayed, which contains a list of PAP users.
Figure 8-1 Delegated Administration - Users
Step 2
Figure 8-2 Search User
This section allows you to search for specific users depending upon the search criteria that can be selected from the list box on the left and the search value that can be entered in the text box beside the search criteria list. You can use any of the following search criteria to search for users:
•
•
•
•
Enter the value to search in the text box that is next to the search criteria list. You can also use the asterisk wild card character (*), as part of the search value.
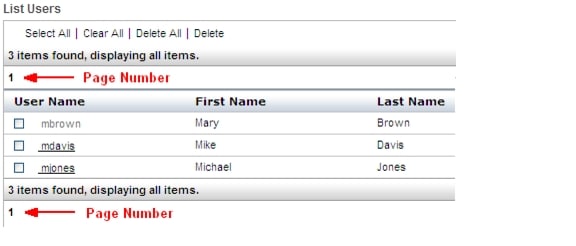
For example, to get a list of all the users having M as the first character in their first name, select the search criteria, Search for User by First Name, enter a search value of M*, and click Search. The list of users who match the search criteria and search value is displayed in the List Users section. The following is a sample search result.
Figure 8-3 Sample search result
If the search result contains more than 50 users, then the list of users span more than one page. In that case, the list will show multiple page numbers in a sequence starting from 1 (1 2 3...). You can navigate to a particular page by clicking the page number (see the red arrow in the preceding figure).
Step 3
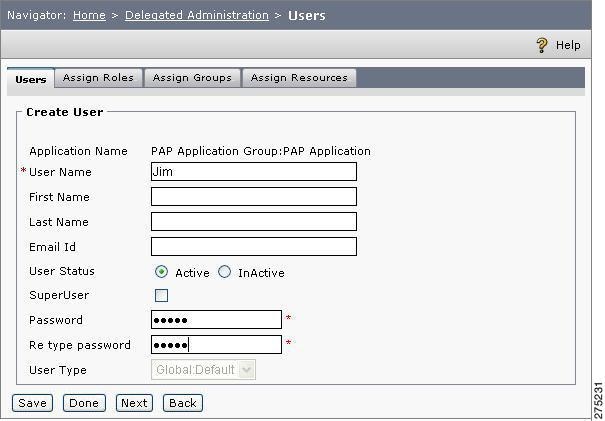
Creating or Updating a User
To create/update a PAP user, you must:
Step 1
The User Management page is displayed.
Step 2
The Create/Update User page is displayed.
Figure 8-4 Create User
Step 3
•
Note
•
•
•
•
•
Step 4
Step 5
Step 6
Note
1.
2.
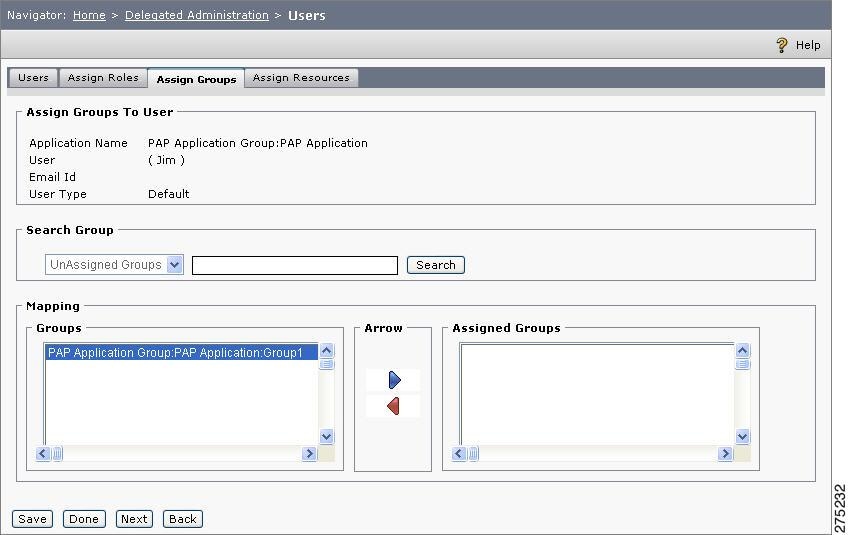
Assigning Groups to a User
After creating a user, you can assign groups to it.
To assign groups to a user, you must:
Step 1
The Assign Groups page is displayed.
Figure 8-5 Assign Groups to Users
The Assign Group page contains two list boxes. The Groups list box contains the groups that are not assigned to the user. The Assigned Groups list box contains the groups that are assigned to the user.
Step 2
Step 3
Step 4
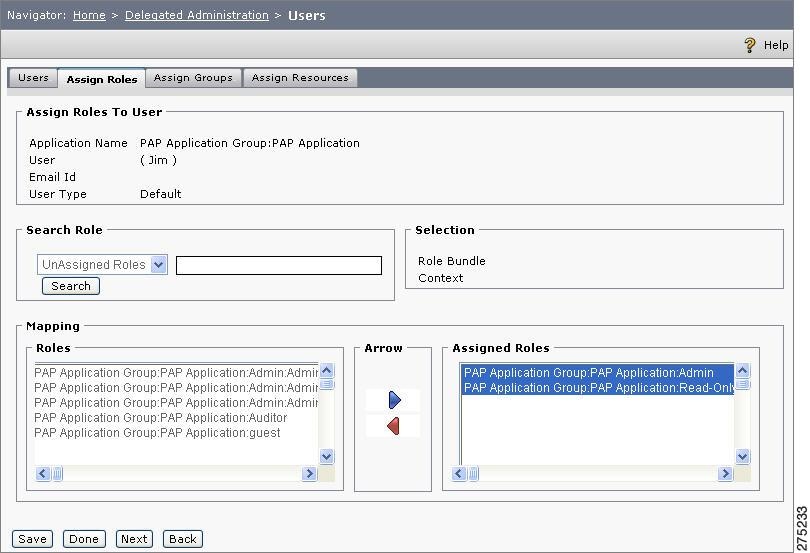
Assigning Roles to a User
After creating a user, you can assign roles to the user. To assign roles to a user, you must:
Step 1
The Assign Roles page is displayed.
Figure 8-6 Assign Roles to Users
The Assign Role page contains two list boxes. The Roles list box contains the roles that are not assigned to the user. The Assigned Roles list box contains the roles that are assigned to the user.
Step 2
Step 3
Step 4
In Delegated Administration, if a user is mapped to a role that has a parent role, the user inherits all the permissions granted to the parent role. For example, if a PAP Role, Role1 has view, create, delete, and update actions allowed on the following:
•
•
•
•
•
This allowed permission is given at resource level and not at action level. Another PAP Role "Role2" is defined under the role "Role1". This role has only View actions allowed on Add User To Role functionality in DA Entity Assignment. A PAP user "Mary" is assigned to role, "Role2". When "Mary" logs in to the PAP-GUI and clicks on Add Users To Roles link, Mary can map users to any Role. Even though Role2 has only view permission, Mary is able to map User to Role because Role2 inherits this permission from Role1.
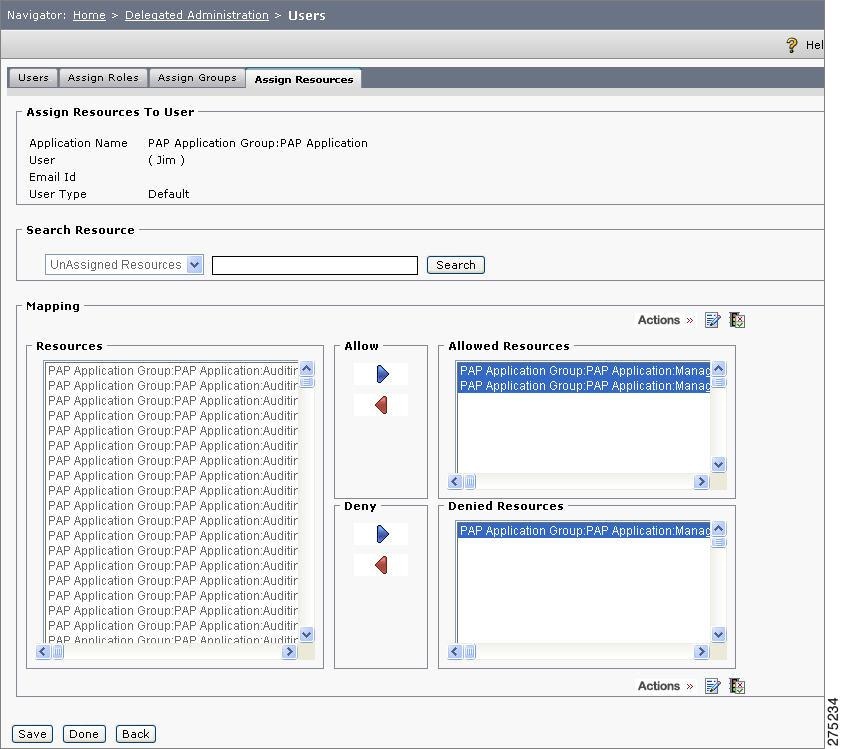
Assigning Resources to a User
After creating a user, you can assign resources to the user.
To assign resources to a user, you must:
Step 1
The Assign Resources page is displayed.
Figure 8-7 Assigning Resources to a User
The Assign Resources page contains three list boxes. The Resources list box contains the resources that are not assigned to the user. On the right side, the Allowed Resources and Denied Resources list boxes contain the resources that are assigned to the user, with the Allowed permission or the Denied permission.
Step 2
Step 3
Step 4
Step 5
a.
b.
Step 6
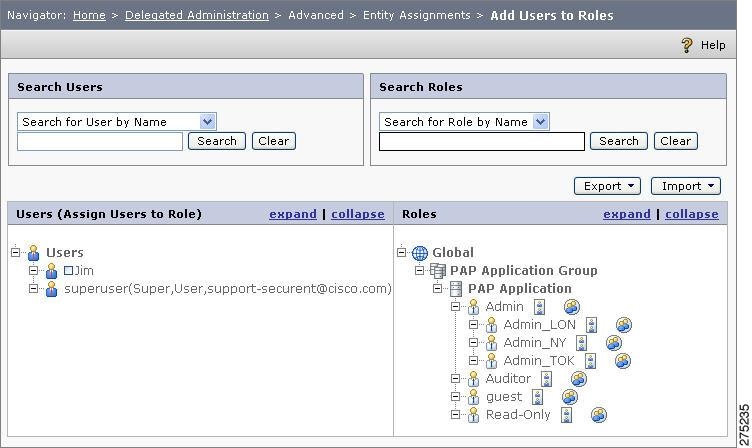
Assigning Multiple Users to Roles
You can assign multiple users to a role in the PAP.
To assign multiple users to a role in the PAP, you must:
Step 1
The Assign Users to Roles page is displayed.
All the PAP users and PAP roles are displayed in the Users section and Roles section respectively. You can click the expand link to view all the users and roles that are in the list.
Figure 8-8 Add Multiple Users to Roles
Step 2
Step 3
Step 4
This completes the mapping of the selected users to the selected roles.
You can also view the users that are assigned to a role by clicking the List Users icon near that role name.
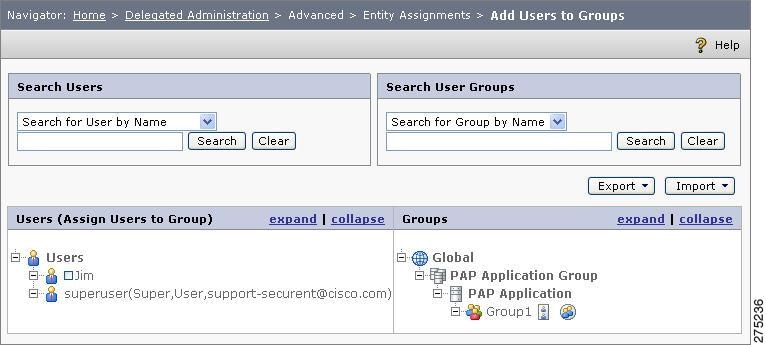
Assigning Multiple Users to Groups
You can assign multiple users to a group in the PAP.
To assign multiple users to a group in the PAP, you must:
Step 1
The Assign Users to Groups page is displayed.
All the PAP users and PAP groups are displayed in the Users section and Groups section respectively. You can click the expand link to view all the users and groups that are in the list.
Figure 8-9 Assigning Multiple Users to Groups
Step 2
Step 3
Step 4
This completes the mapping of the selected users to the selected groups.
You can also view the users that are assigned to a group by clicking the List Users icon near that group name.
Deleting a User
PAP User Management allows you to delete PAP users from the PAP console:
•
•
•
•
•
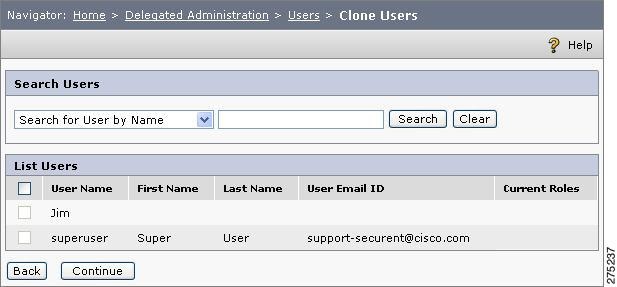
Cloning a User
A cloned user inherits the membership of all the user groups and roles to which the parent user belongs. All the attributes and properties of the parent user get copied to the cloned user. But the policies created on the parent user's role and parent user's group are not inherited by the cloned user.
To create a clone of an existing user in the User Management page, you must:
Step 1
The User Management page is displayed.
Figure 8-10 Clone Users
A list of all the PAP users is displayed. Search for the user that you want to clone.
Step 2
A page is displayed where you can search of the user whom you want to make as a clone of the parent user.
Step 3
The Clone Confirmation page is displayed containing the summary of the users who are selected for the cloning process. This page also provides you with an option to override existing roles. If you select Yes for the OverRide Existing Roles, the cloned user's existing role memberships are deleted and the parent user's role memberships are copied to the cloned user. If you select No, for the OverRide Existing Roles, the cloned user retains the existing role memberships and in addition also inherits the parent user's role memberships.
Step 4
Viewing Role and Group Memberships of a User
You can view the role and group memberships of a user in the PAP User Management page.
To view the role and group memberships of a user, you must:
Step 1
The User Management page is displayed.
A list of all the PAP users is displayed. Search for the user whose role and group memberships you want to see.
Step 2
Importing Users
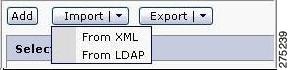
In the Delegated Administration tab, you can import PAP users from an XML file or from an LDAP server into the PAP Application Group or PAP Application.
To import the users, choose Delegated Administration > Users.
The User Management page is displayed, which contains the Import button for importing users.
Figure 8-11 Importing Users
The PAP provides the functionality of importing the users information from:
•
•
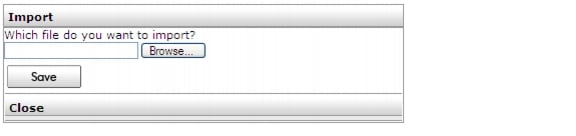
Import Users from an XML file
You must enable LDAP Authentication in the pap_config.xml file so that users who are imported from an LDAP server can log in to CEPM. Refer to the CEPM PAP Configuration Guide for more information on LDAP Authentication. To import users from an XML file, you must:
Step 1
Figure 8-12 Importing Users from XML File
Step 2
Import Users from LDAP/AD
When PAP users are imported from LDAP, the passwords (values stored in LDAP) do not get imported. CEPM uses the username as password. When the PAP users log in to the PAP console, user authentication is done through LDAP or CEPM DB. To make use of the former, enable LDAP Authentication feature using <uiauth type="ldap"> tag available in the pap_config.xml. (Refer to Appendix B, "PAP User Login Authentication Using LDAP and SSO" for more information). If this feature is not enabled, you can use the default password or reset the password by editing the PAP Users.
Note
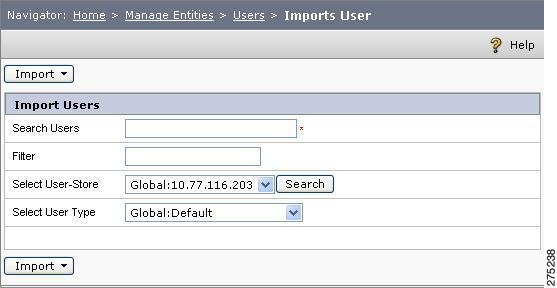
To import users from an LDAP/AD server, you must:
Step 1
The User Import page for selecting the user store for importing users is displayed.
Figure 8-13 Import Users from LDAP/AD
Step 2
Step 3
Tip
Sun One Server:
Search Users: ou=people,ou=external,dc=cepm,dc=in
Filter: &(uid=p*)(mail=p*)) or uid=p*
Novell eDirectory Server:
Search Users: cn=people,o=cepm-net
Filter: cn=b*
Active Directory 2000 Server:
Search Users: ou=people,ou=users, dc=win2k-ad,dc=cepm,dc=net
Filter: cn=p* or sAMAccountName=* or sAMAccountName=v* Dont Specify the '(' or ')' or '&'
In the Search Users, field base directory to search, for example, ou=people,ou=external,dc=cepm,dc=net. For a refined search, you can also specify the filter as uid=s* in the Filter field.
Step 4
Step 5
Export Users
From the User Management page, you can export PAP users to a Microsoft Excel file or to an XML file.
To export users, choose Delegated Administration > Users.
The User Management page is displayed.
The User Management page contains the Export button for exporting users.
Figure 8-14 Export Users
The PAP provides the functionality of exporting the user information to:
•
•
Export Users to an MS Excel File
To export users to an Excel file, you must:
Step 1
Step 2
Export Users to an XML File
To export users to an XML file, you must:
Step 1
Step 2
PAP Group Management
The administration console simplifies the complex security administration by use of user groups to organize access privileges. CEPM uses PAP group hierarchies and constraints to configure a wide range of security policies. In the administration console, rights can be granted to an individual user as well as to multiple users in a group to access the PAP resources in the PAP application.
The Group Management functionality allows you to carry out the following functions related to the management of user groups:
•
•
•
•
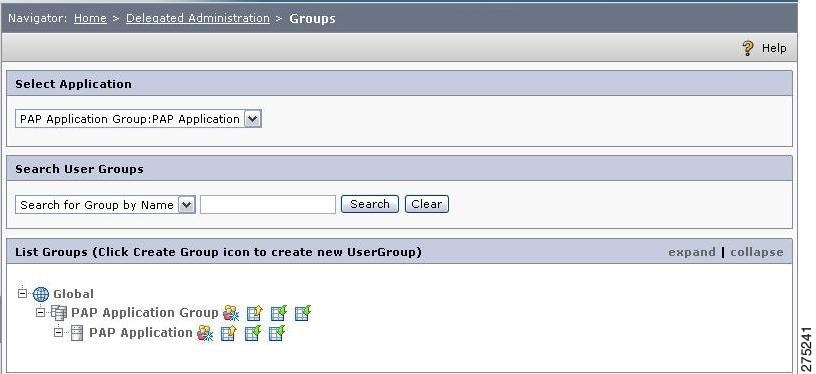
Listing or Searching for Groups
To view a list of PAP groups or search for a PAP group, you must:
Step 1
Group Management page is displayed.
Step 2
Figure 8-15 Delegated Administration - Groups
Step 3
Figure 8-16 Search Groups
Enter the value to search in the text box. You can also use the asterisk wild card character (*), as part of the search value.
For example, to get the list of all the groups having 'M' as the first character in their name, enter search value of M*, and click Search. The list of groups that match the search criteria and search value is displayed in the List Groups section.
Click Clear to clear the value entered in the search value text box.
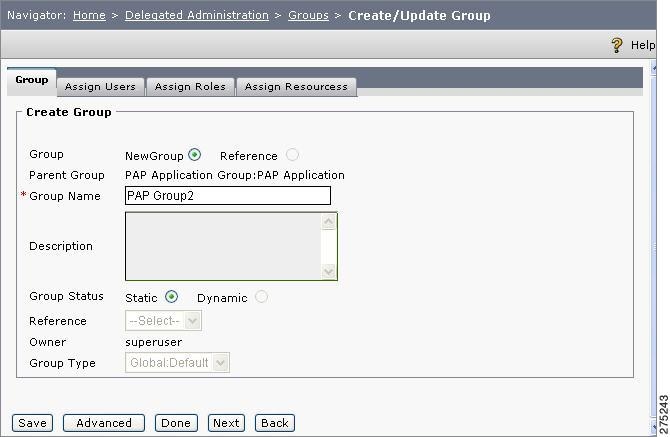
Creating or Updating a Group
To create/update a PAP group, you must:
Step 1
The Group Management page is displayed.
Step 2
The Create/Update Group page is displayed.
Figure 8-17 Create or Update Group
Step 3
•
•
Note
•
•
•
Step 4
Step 5
Step 6
Note
a.
b.
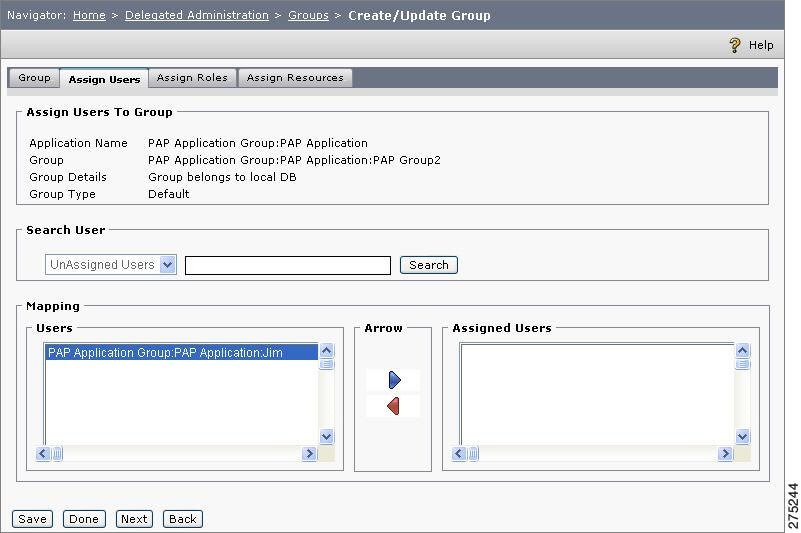
Assigning Users to a Group
After creating a group, you can assign users to the group.
To assign users to a group, you must:
Step 1
The Assign Users page is displayed.
Figure 8-18 Assign Users to Groups
The Assign Users page contains two list boxes. The Users list box contains the users that are not assigned to the group. The Assigned Users list box contains the users that are assigned to the group.
Step 2
Step 3
Step 4
Assigning Roles to a Group
After creating a group, you can assign roles to the group.
To assign roles to a group, you must:
Step 1
The Assign Roles page is displayed.
Figure 8-19 Assign Roles to Groups
The Assign Role page contains two list boxes. The Roles list box contains the roles that are not assigned to the group. The Assigned Roles list box contains the roles that are assigned to the group.
Step 2
Step 3
Step 4
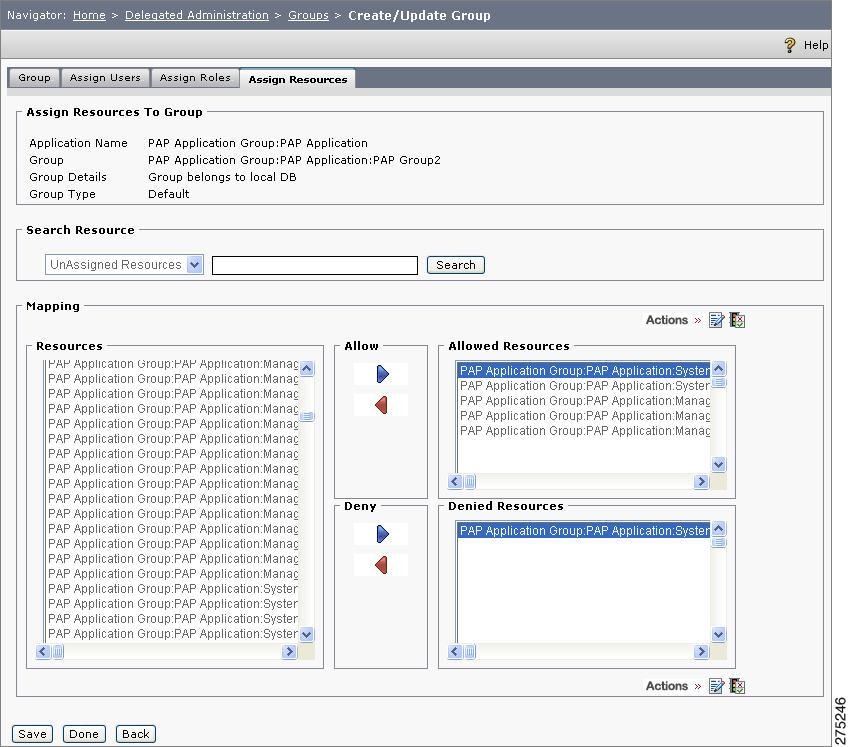
Assigning Resources to a Group
After creating a group, you can assign resources to the group
To assign resources to a group, you must:
Step 1
The Assign Resources page is displayed.
Figure 8-20 Assign Resources to Group
The Assign Resources page contains three list boxes. The Resources list box contains the resources that are not assigned to the group. On the right side, the Allowed Resources and Denied Resources list boxes contain the resources that are assigned to the group, with either the Allowed permission or the Denied permission.
Step 2
Step 3
Step 4
Step 5
a.
b.
Step 6
Assigning Multiple Users to a Group
Refer to Assigning Multiple Users to Groups, page 8-10.
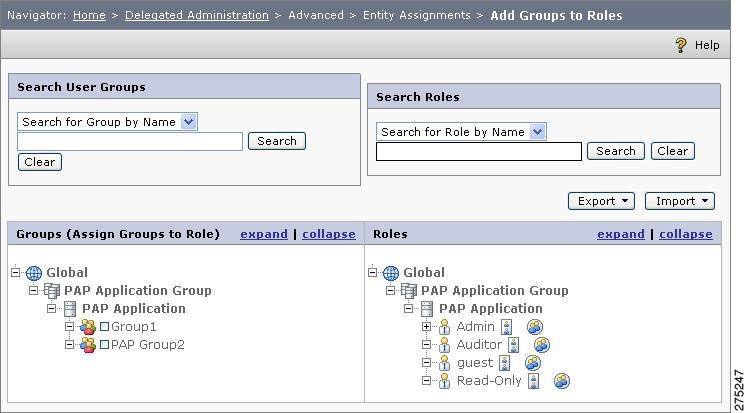
Assigning Multiple Groups to a Role
You can assign multiple groups to a role in the PAP.
To assign multiple groups to a role in the PAP, you must:
Step 1
All the groups and roles are displayed in the Groups section and Roles section respectively. You can click the expand link to view all the groups and roles that are in the respective lists.
Figure 8-21 Assigning Multiple Groups to Role
Step 2
Step 3
Step 4
This completes the mapping of the groups to the roles.
You can also view the groups that are assigned to a role by clicking the List Groups icon
next to that role name.
Deleting a Group
The Group Management page allows you to delete groups which are already created in the PAP. Click the Delete icon next to the group name to delete that group from the PAP.
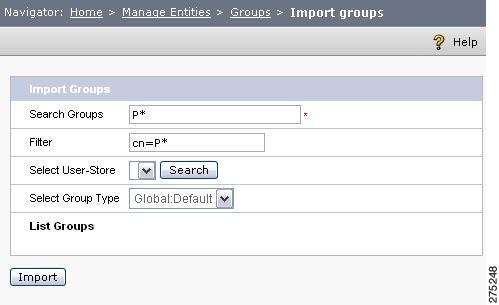
Importing Groups
The CEPM provides the functionality of importing groups into PAP from LDAP Servers, such as Sun One Server, Novell eDirectory Server, and Active Directory Server.
Note
To import the groups in to the PAP, you must:
Step 1
The Group Management page is displayed.
Step 2
The Import Groups page is displayed.
Figure 8-22 Import Groups
Step 3
Step 4
Tip
Sun One Server:
Search Groups: ou=people,ou=external,dc=cepm,dc=in
Filter: cn=p*
Novell eDirectory Server:
Search Groups: cn=people,o=cepm-net
Filter: cn=p*
Active Directory 2000 Server:
Search Groups: ou=people,ou=users, dc=win2k-ad,dc=cepm,dc=net
Filter: cn=p*
In the Search Group field, you can type in the base directory to search, for example, ou=people,ou=external,dc=cepm,dc=in. For a refined search, you can also specify the filter as cn=p* in the Filter field.
Step 5
Step 6
PAP Role Management
The administration console simplifies the complex security administration by use of roles to organize access privileges. This operation is performed by using role hierarchies and constraints to configure a wide range of security policies. In the administration console, rights can be granted to an individual PAP user as well as multiple users in a group or to a role to access various resources in the application.
The PAP role management functionality allows you to carry out the following functions related to the management of PAP roles:
•
•
•
•
•
•
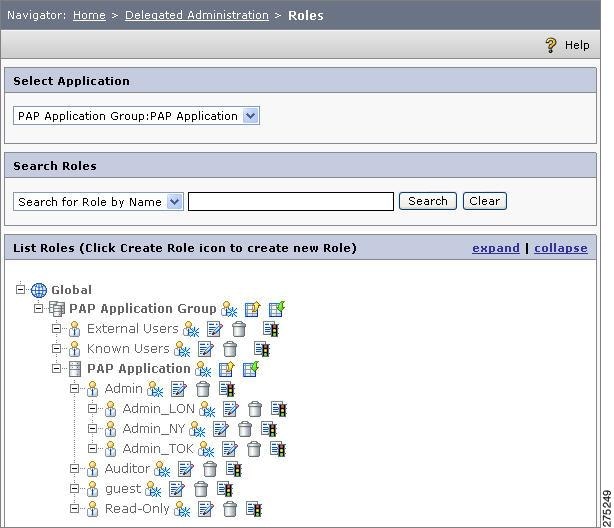
Listing or Searching for Roles
To view a list of roles or search for a role in a particular application, application group, or Global, you must:
Step 1
The Role Management page is displayed.
A list of PAP roles is displayed in the List Roles section. You can click the expand link to view all the roles that are in the list.
Figure 8-23 Roles List
Step 2
Figure 8-24 Search Roles
For example, to get the list of all the roles having M as the first character in their name, enter a search value of M*, and click Search. The list of roles that match the search criteria and search value is displayed in the List Roles section.
Step 3
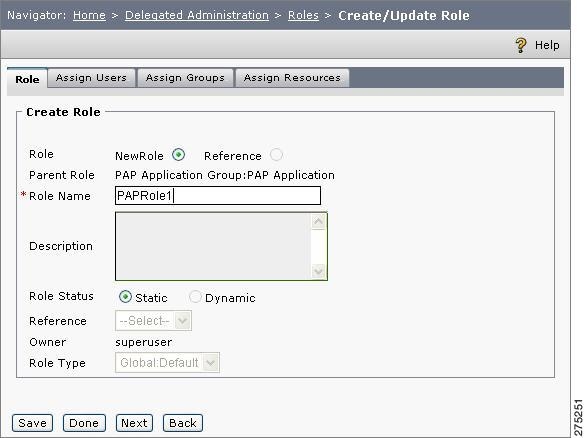
Creating or Updating a Role
To create/update a role in a particular application/application group/role/Global, you must:
Step 1
Step 2
The Create/Update Role page is displayed.
Figure 8-25 Create or Update Role
Step 3
•
Note
•
Step 4
Step 5
Step 6
Note
a.
b.
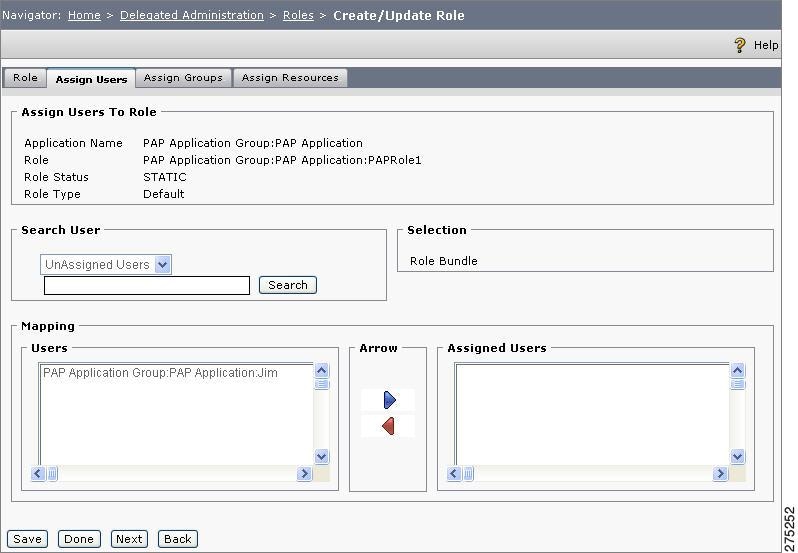
Assigning Users to Roles
After creating a role, you can assign users to the role.
To assign users to a role, you must:
Step 1
The Assign Users page is displayed.
Figure 8-26 Assign Users to Role
The Assign Users page contains two list boxes. The Users list box contains the users that are not assigned to the role. The Assigned Users list box contains the users that are assigned to the role.
Step 2
Step 3
Step 4
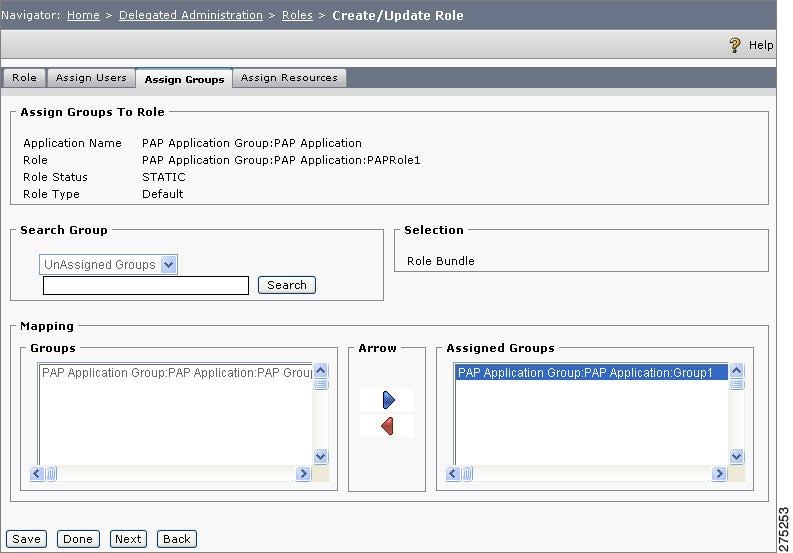
Assigning Groups to Roles
After creating a role, you can assign groups to the role.
To assign groups to a role, you must:
Step 1
The Assign Groups page is displayed.
Figure 8-27 Assign Groups to Roles
The Assign Group page contains two list boxes. The Groups list box contains the groups that are not assigned to the role. The Assigned Groups list box contains the groups that are assigned to the role.
Step 2
Step 3
Step 4
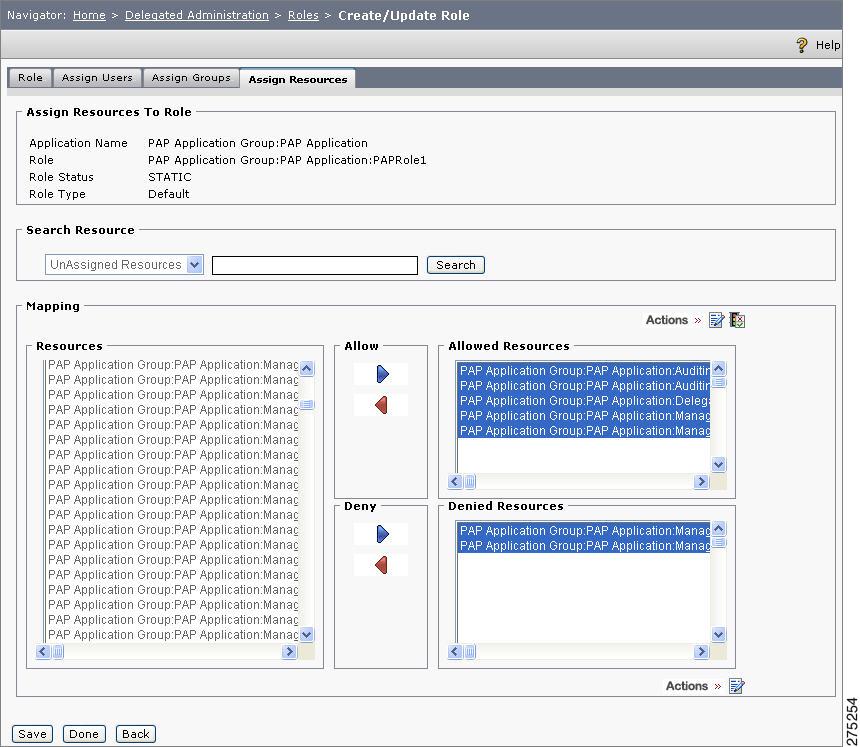
Assigning Resources to a Role
After creating a role, you can assign resources to the role.
To assign resources to a role, you must:
Step 1
The Assign Resources page is displayed.
Figure 8-28 Assign Resources to a Role
The Assign Resources page contains three list boxes. The Resources list box contains the resources that are not assigned to the role. On the right side, the Allowed Resources and Denied Resources list boxes contain the resources that are assigned to the role, with either the Allowed permission or the Denied permission.
Step 2
Step 3
Step 4
Step 5
a.
b.
Step 6
Assigning Multiple Users to a Role
Refer to Assigning Multiple Users to a Role, page 4-11.
Assigning Multiple Groups to a Role
Refer to Assigning Multiple Groups to a Role, page 4-38.
Deleting a Role
The PAP Role Management page allows you to delete the PAP roles that are already created in the PAP. Click the Delete icon next to the role name to delete that role from the PAP.
Importing Roles
You can import roles from an XML file into a PAP application group or PAP application.
To import the roles in to the PAP, you must:
Step 1
Step 2
A dialog box for importing the roles information from the XML file is displayed.
Figure 8-29 Importing Roles
Step 3
Exporting Roles
You can export roles from PAP application group or PAP application to an XML file.
To export the roles from PAP, you must:
Step 1
Step 2
A dialog box for opening/saving the roles information in XML format is displayed.
Step 3
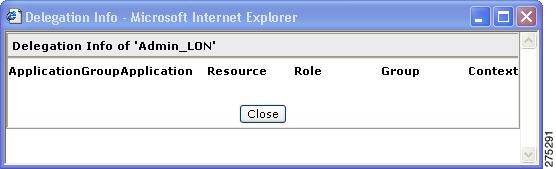
Viewing PAP Role Delegation Information
To view the delegation information for a particular PAP role, you must:
Step 1
The Role Management page is displayed. The list of roles is displayed in the List Roles section.
Step 2
The Delegation Info page is displayed that lists the application groups, applications, resources, roles, groups, and contexts that are delegated to the selected role.
Figure 8-30 PAP Role Delegation Information
PAP Resource Management
A PAP resource is a navigation link in the PAP console that may have an associated action. These resources (PAP navigation links) and actions can be protected from unauthorized access using authorization policies. Resources are hierarchical and child resources inherit policies from their parent in the resource hierarchy.
To view all the PAP resources and their actions, you must:
Step 1
The Resource Management page is displayed.
You can click the expand link to view all the PAP resources that are in the list.
Figure 8-31 Resource Management
The actions are denoted by Green arrows next to their names.
Step 2
Figure 8-32 Search Resource
Enter the value to search in the text box. You can also use the asterisk wild card character (*), as part of the search value.
For example, to get the list of all the resources having M as the first character in their name, enter a search value of M*, and click Search. A list of resources having M as the first character in their name will be displayed in the List Resources section.
Step 3
Manage Entitlements
The PAP console provides the functionality to create entitlements for the PAP administrators.
This section describes the various entitlement operations that you can perform for various PAP entities, such as PAP users, PAP groups, and PAP roles.
•
•
•
•
•
•
•
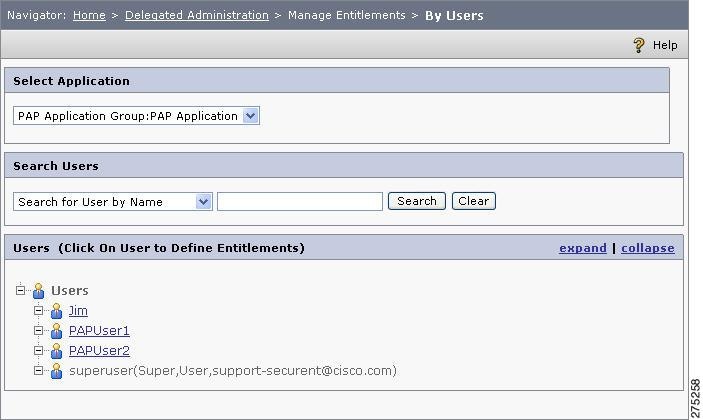
Entitlement Management by Users
To create entitlements for a user, you must:
Step 1
A list of all the PAP users is displayed in the List Users section. You can click the expand link to view all the users who are in the list.
Step 2
Figure 8-33 Search Users
You can search for specific users depending upon the search criteria that can be selected from the list box and the search value that can be entered in the text box. The following search criteria can be used for searching the users:
•
•
•
•
For example, to get a list of all users having M as the first character in their First Name, select the search criteria of Search for User by First Name and enter a search value of M*, and click Search. A list of users who match the search criteria and search value is displayed in the List Users section.
Click Clear to clear the search value.
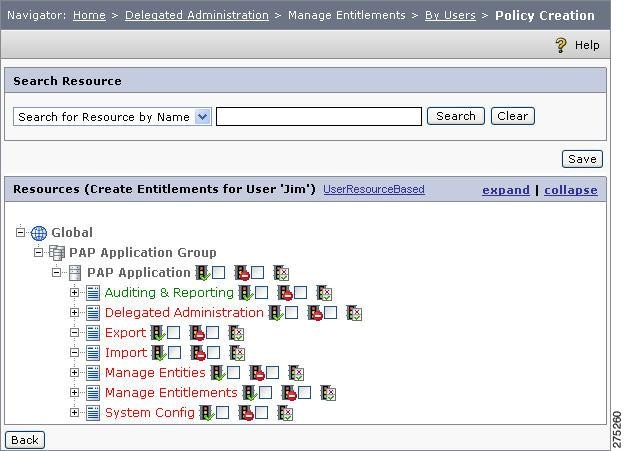
Step 3
A list of all the PAP resources is displayed. You can click the expand link to view all the resources that are in the list.
Figure 8-34 Policy Creation for Resources
Step 4
Step 5
Step 6
Step 7
You can configure the basic policy settings by clicking the Edit Policy icon. For more information, refer to Edit Policy Configurations, page 5-7.
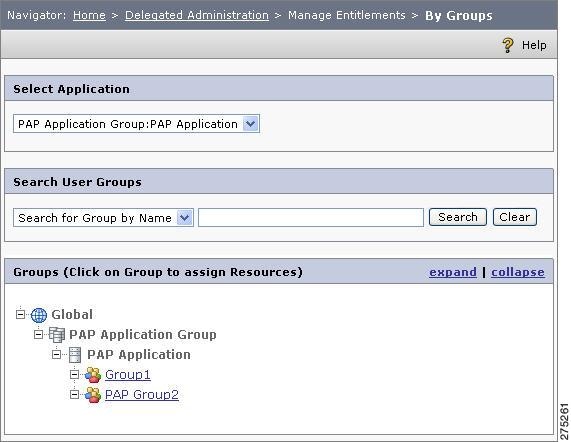
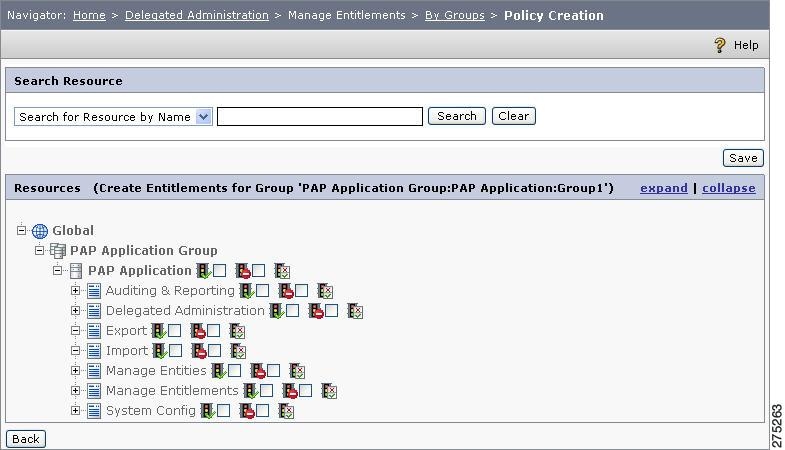
Entitlement Management by Groups
To create entitlements for a group, you must:
Step 1
A list of all the PAP groups is displayed in the List Groups section. You can click the expand link to view all the groups that are in the list.
Figure 8-35 Entitlement Management by Groups
Step 2
Figure 8-36 Search Groups
T o example, to get a list of all the groups having M as the first character in their names, enter a search value of M*, and click Search. The list of groups that match the search are displayed in the List Groups section.
Click Clear to clear the valuesearch.
Step 3
A list of all the PAP resources is displayed. You can click the expand link to view all the resources that are in the list.
Figure 8-37 Policy Creation by Groups
Step 4
Step 5
Step 6
Step 7
You can configure the basic policy settings by clicking Edit Policy icon. For more information, refer to Edit Policy Configurations, page 5-7.
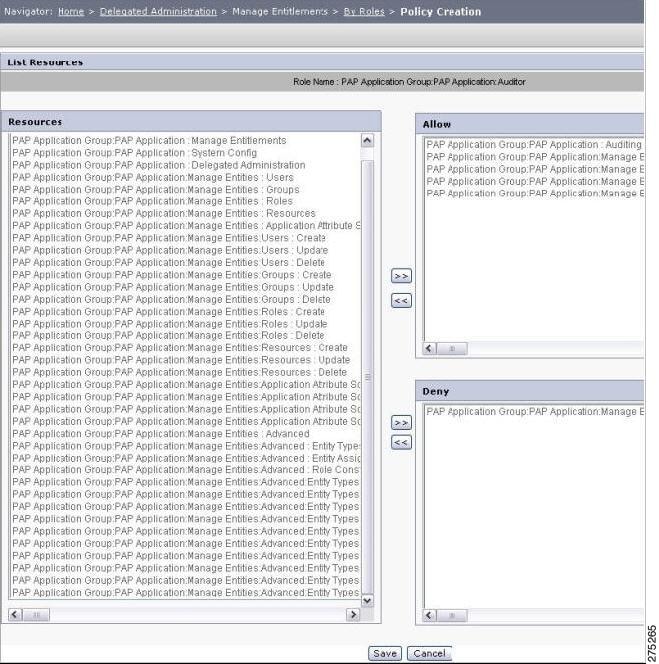
Entitlement Management by Roles
To create entitlements for a role, you must:
Step 1
A list of all the PAP roles is displayed in the List Roles section.
Figure 8-38 Entitlement Management by Roles
Step 2
A list of all the PAP resources is displayed in the Resources list.
Figure 8-39 PAP Resource List
The page contains three list boxes. The Resources list box contains the resources that are not assigned to the role. On the right side, the Allow and Deny list boxes contain the resources that are assigned to the role, with the Allowed permission and Denied permission respectively.
Step 3
Step 4
Step 5
Step 6
a.
b.
Step 7
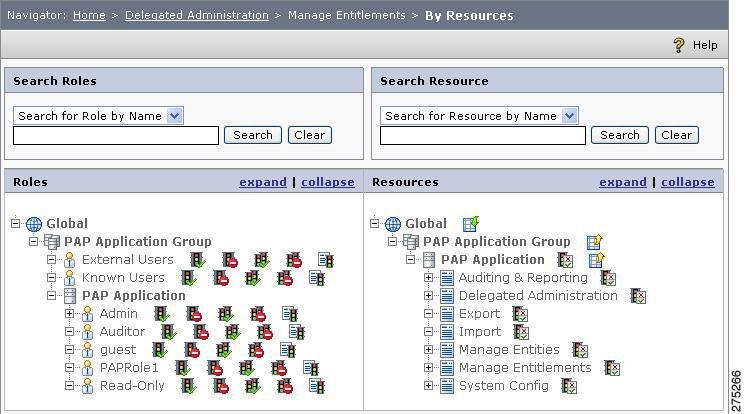
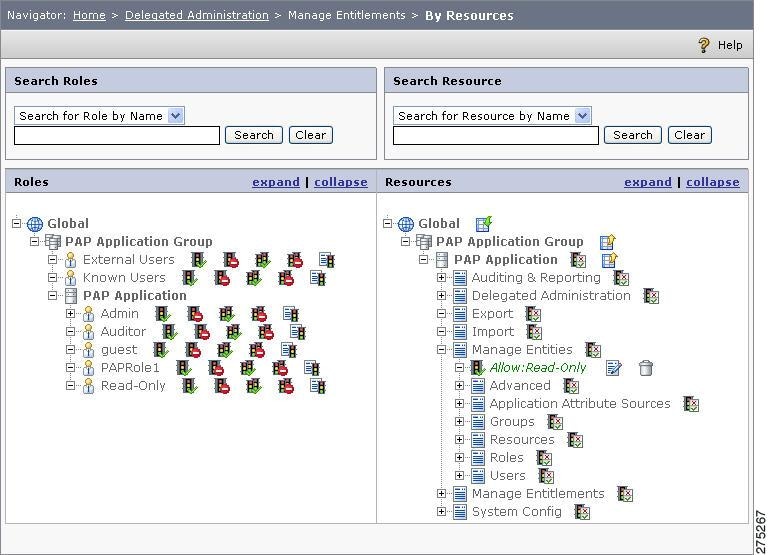
Entitlement Management by Resources
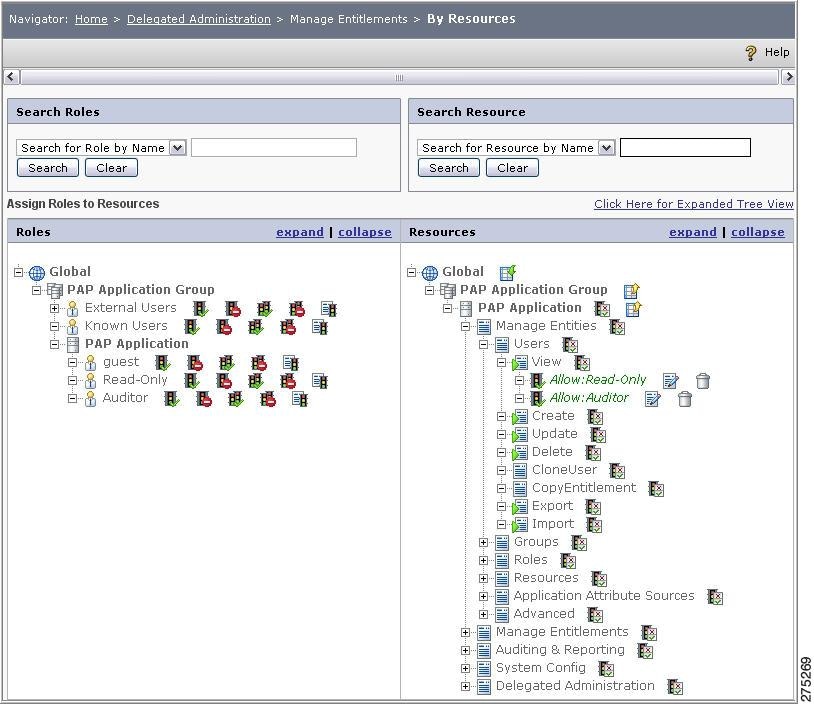
This page allows you do the role-to-resources mapping. To create entitlements by resource (basically resource-based policy creation), you must:
Step 1
A list of all the PAP roles and PAP resources is displayed. You can click the expand link in the upper-right corner of there list boxes to view all the roles and resources.
Figure 8-40 Entitlement Management by Resources
Step 2
is displayed next to the cursor and moves with the cursor.
To create Deny policy, double-click the Map Deny Policy button next to the role name for which you want to create the Deny policy for a particular resource. A blue label
is displayed next to the cursor and moves with the cursor.
Step 3
•
•
The following figure shows a sample Allow policy created by role, PAP Role 1 for the resource Manage Entities.
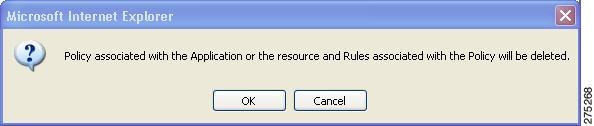
Figure 8-41 Roles and Resources
Step 4
a.
b.
c.
Figure 8-42 Delete Confirmation
Step 5
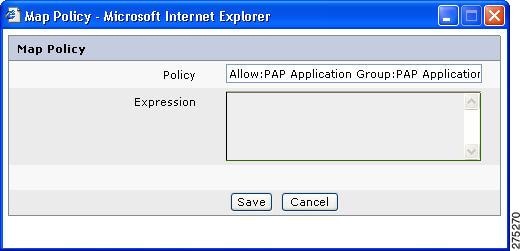
Creating Multiple Policies for a Role Using Map Expression
CEPM allows you to create multiple policies (Allow or Deny) for a role by executing a single map expression, that avoids the process of repeatedly creating policies for every single role for multiple resources in the resource hierarchy.
To create policies using a map expression for a role, you must:
Step 1
Figure 8-43 Creating Multiple Policies for a Role Using Map Expression
Step 2
Step 3
A pop-up page appears where you can enter the policy creation expression. The Following figure shows the sample Allow Policy Map Expression page.
Figure 8-44 Map Policy
Examples of map expression:
Example 8-1 Consider the Allow Expression value, Prime group:Prime portal:*, configured for Role1. This results in the creation of Allow: Role1 policies for all the resources and their child resources under the Prime portal application.
Example 8-2 Consider the Allow Expression value, Prime group:Prime portal:*:Report 6, configured for Role1. This results in the creation of Allow: Role1 policies for all the resources having the name Report 6. Here * means all resources.
Example 8-3 Consider the Allow Expression value, Send Trades:#:Report 1, configured for Role1. Only resource names can be mentioned before and after #. This results in the creation of Allow: Role1 policies for the immediate level of the given resources, that is, all subresources with the name Report 1 under the resource Send Trades.
Step 4
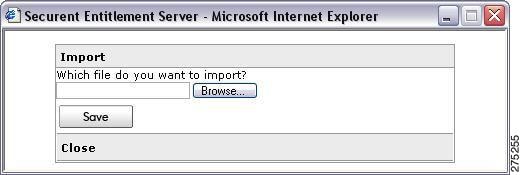
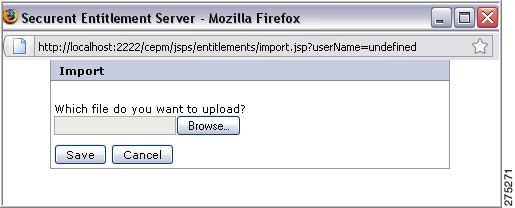
Importing Policies into PAP from XML File
The PAP provides the functionality to import policies from an XML file into the PAP.
To import the policies into the PAP, you must:
Step 1
Step 2
A pop-up page is displayed where you can select the XML file name that contains the policies to be imported.
Figure 8-45 Importing Policies into PAP from XML File
Step 3
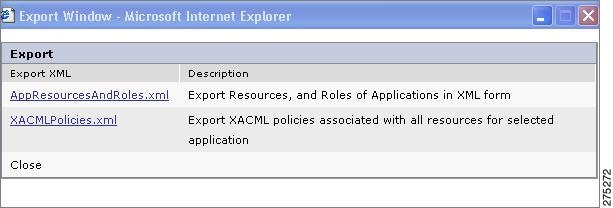
Exporting Policies from PAP to XML File
The PAP provides the functionality to export policies from PAP application or application group to an XML file.
To export the policies from the PAP, you must:
Step 1
Step 2
A pop-up page is displayed that contains the AppResourcesndRoles.xml and XACMLPolicies.xml.
Figure 8-46 Export Policy
•
•
Step 3
Entitlement Management by Policies
The PAP provides the functionality to create policies for PAP users, PAP groups, and PAP roles at a single place.
To create policy for any of these entities (PAP users, PAP groups, and PAP roles) in a single place, you must:
Step 1
A list of all the PAP resources is displayed in the List Resources section in the same page. You can click the expand link to view all the resources that are in the list.
Figure 8-47 Manage Entitlement by Policies
Step 2
You can also use the asterisk wild card character (*) as part of the search value.
Figure 8-48 Search Resource
For example, to get a list of all the resources having M as the first character in their name, enter a search value of M*, and click Search. A list of all the resources that match the search criteria in the List Resources section.
Click Clear to clear the search value.
Step 3
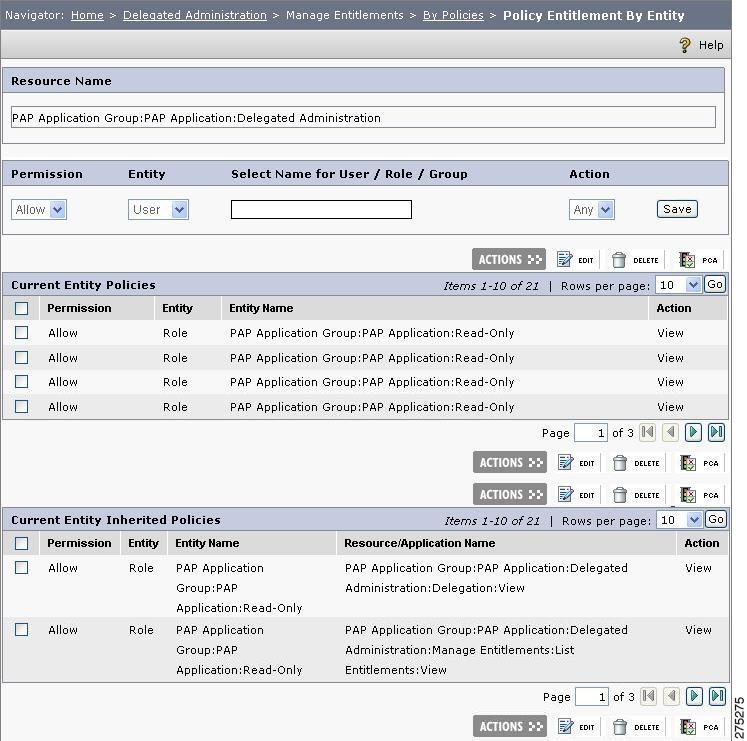
The Policy Entitlement By Entity page is displayed. The page displays a list of all the policies for all the PAP users, PAP groups, and PAP roles for the selected PAP resource.
Figure 8-49 Policy Entitlement by Entity
Step 4
Table 8-1 Policy Icons
Click the Edit Policy icon to edit the policy. For more information, refer to "Edit Policy Configurations"
Click the Delete icon to delete/revoke the policy.
Click the PCA icon to configure Policy Combining Algorithm and Obligations for the policy. For more information, refer to "Policy Combining Algorithm"
Step 5
Figure 8-50 Create New Policy
a.
b.
c.
d.
e.
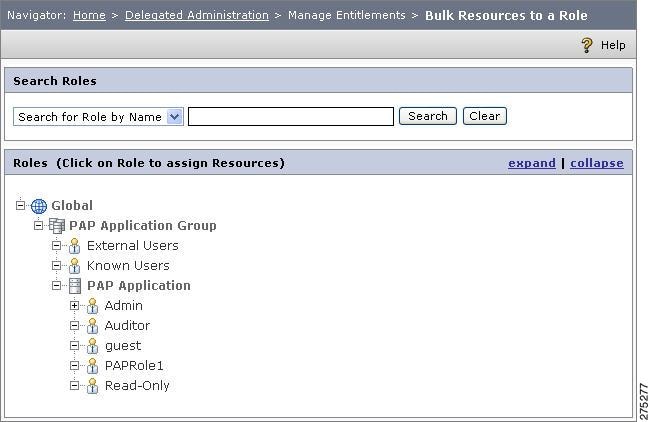
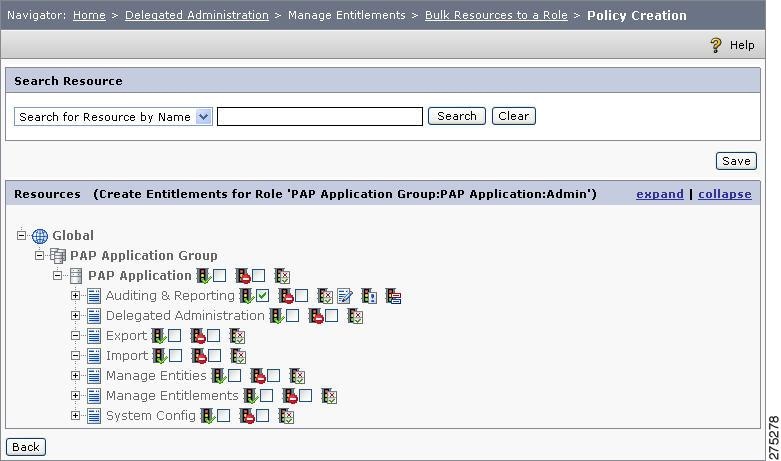
Assigning Multiple Resources to a Role
You can assign multiple resources to a role in PAP.
To assign multiple resources to a role in the PAP, you must:
Step 1
A list of all the PAP roles is displayed in the List Roles section. You can click the expand link to view all the roles that are in the list.
Figure 8-51 Bulk Resources to Role
Step 2
The Policy Management By Role page is displayed, that contains a list of all the PAP resources. You can click the expand link to view all the resources that are in the list.
Figure 8-52 Policy Management by Role
Step 3
Step 4
Step 5
Step 6
Step 7
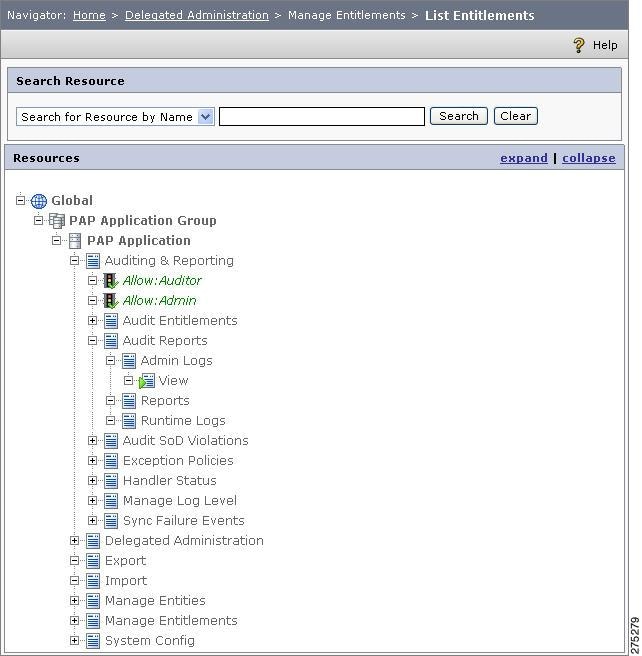
Listing the Entitlements
The PAP provides the functionality to view a list of all the PAP entitlements for all the resources in the PAP application.
To view the list of PAP entitlements, choose Delegated Administration > Manage Entitlements > List Entitlements. The List Entitlements page is displayed.
A list of all the PAP resources is displayed with their entitlements in the List Resources section.
Figure 8-53 List Entitlements
User Attribute Source
CEPM allows you to import PAP users and groups from an LDAP directory service. User attribute source (also called as user store) is a virtual store of users and user groups created in the PAP and is configured to refer to the users and user groups in the LDAP directory.
This feature is useful when the application to be secured already contains a large number of users and user groups stored in an LDAP directory. Instead of creating these users and user groups again in the PAP, you can import them from the existing LDAP directory.
CEPM supports the following LDAP directory services for importing external users and user groups into the PAP application:
•
•
•
In the administration console, you can create, update, view, and delete the user stores for an application or for an application group.
For more information, refer to User Attribute Sources, page 7-26.
Delegate Operation
With central IT departments struggling to meet the service needs of existing applications, any new application that you introduce must have provisions to reduce help desk expenses. CEPM is designed to deliver smart delegation of access control policy administration to line-of-business owners, which significantly reduces the help desk load and improves the organization's responsiveness to changing market conditions.
Since there are multiple applications, resources, and groups of subjects that are all being managed from the same administration environment, there is a need to allow delegated administration of these entities. CEPM supports the capability to delegate administration up to an individual resource level, and individual subject group level enabling multiple administrator ownership even within the same user population and application.
In addition to delegated administration of resources and groups, for applications that are hosted in a multitenant model, wherein an application is offered as a service to multiple partners/customers, there is a need to create the notion of a hierarchical delegated context allowing autonomous delegated control to administrators to create mappings of subjects to roles, and association of privileges to roles. This model supports a default context in which roles and their associated privileges are defined, and allows delegated administrators to inherit / override these default mappings and privileges for their domain. CEPM supports delegated administration through the context construct.
CEPM is enhanced with a composite delegate functionality. You can delegate global level, application group, and application. under teach head delegation of resources, roles, groups, and context.
Delegation of resources, roles, groups, application groups, and application enables an authorized PAP user-role to delegate these components to other PAP roles if it owns them. Owning means authorization by the superuser to access the particular component. For example, considering the resource delegation, a user can delegate a resource to other roles if and only if that user is entitled by the Superuser to access that resource.
After an application group is delegated, the delegated role is authorized to access all the applications under that application group as well as every resources and child resources that constitutes it. Similarly, if the owner delegates only an application from an application group, the delegated role can access all the resources and subresources under that application only. The delegation is not available to remaining applications that constitute the application group.
When the owner delegates any resource, the delegated role is considered to be the deemed owner of that resource. For example, even though a role has a Deny policy configured for a particular resource, it is denounced when the owner of that particular resource delegates the same to the said role.
Delegate operation is divided into five types:
1.
2.
3.
4.
5.
6.
7.
Note
Global Delegation
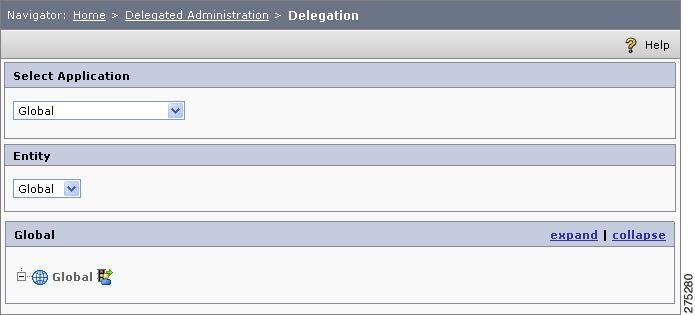
The superuser can delegate the authority for functions, tasks, and decisions to other PAP users right from the Global level in the resource hierarchy. This is called Global delegation. By doing this, the superuser transfers the authority to undertake specific activities or decisions that the delegated user can perform across the whole resource hierarchy. After the Global delegation, the delegated user is considered to be at par with the superuser. Applying this technique, the delegated user can perform all the operations that the superuser can perform. This user, in return, can navigate the resource hierarchy right from Global to the leaf level resources to forge strategic entitlement management.
To perform Global delegation, you must:
Step 1
The Delegation page is displayed.
Figure 8-54 Global Delegation
Step 2
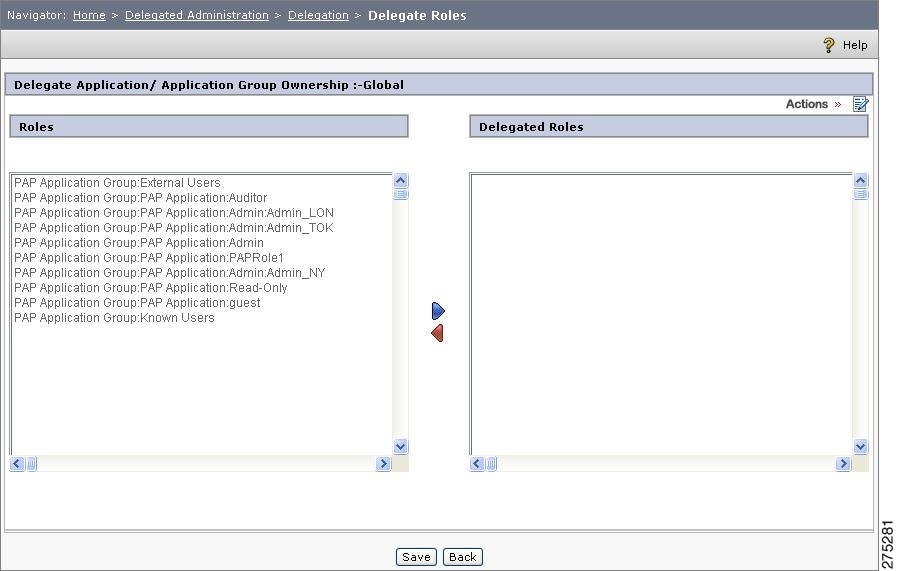
Step 3
The Delegate Ownership page is displayed.
Figure 8-55 Delegate Role
Step 4
Step 5
Step 6
Figure 8-56 Date and Time
•
•
Note
The following recurrence period can be defined for this purpose:
•
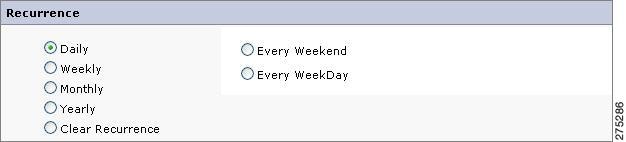
Figure 8-57 Recurrence-Daily
•
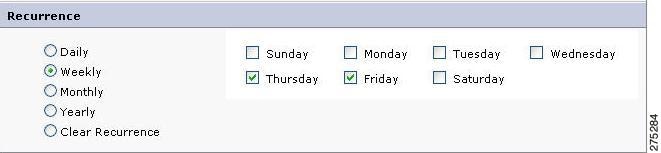
Figure 8-58 Recurrence-Weekly
You can select multiple days of a week on which the copied user can use your entitlements.
•
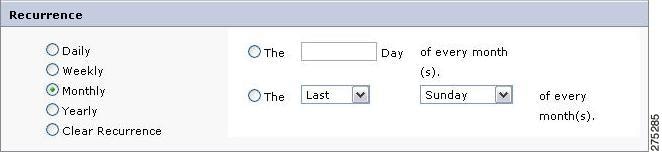
Figure 8-59 Recurrence-Monthly
You get two options for this purpose:
–
–
•
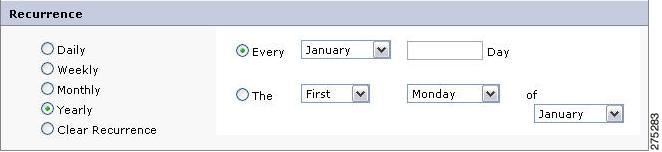
Figure 8-60 Recurrence-Yearly
This enables the delegated role(s) to inherit all the rights of the owner to deal with the specified resources within the specified time frame.
Step 7
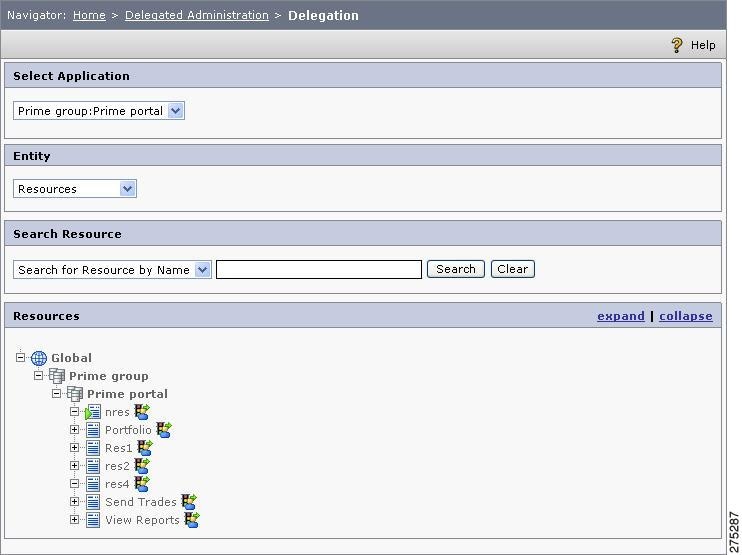
Delegating a Resource
When a user other than the superuser logs in to the PAP console, the Home page displays all applications groups and applications that the user owns along with the delegated application groups and applications. As a result of delegation, the delegated owner can carry on all activities, such as defining entitlements and administering entitlements for the delegated resource and its child resources as the owner does.
To delegate a resource to other roles, you must:
Step 1
The Delegate page is displayed.
Step 2
Figure 8-61 Delegating a Resource
It is important to note that though the resource tree displays all the resources with their parent resources, the user can delegate only those resources that are owned by the user. For example Mary, an admin user, is the delegated owner of Buy Trades and Sell Trades, but not Send Trade. On logging in, Mary can view Send Trades in the resource tree. While trying to define a policy on Send Trades, Mary will get an "Unauthorized Access" message. The user can also search for a particular resource from the resource tree by using the search option.
Step 3
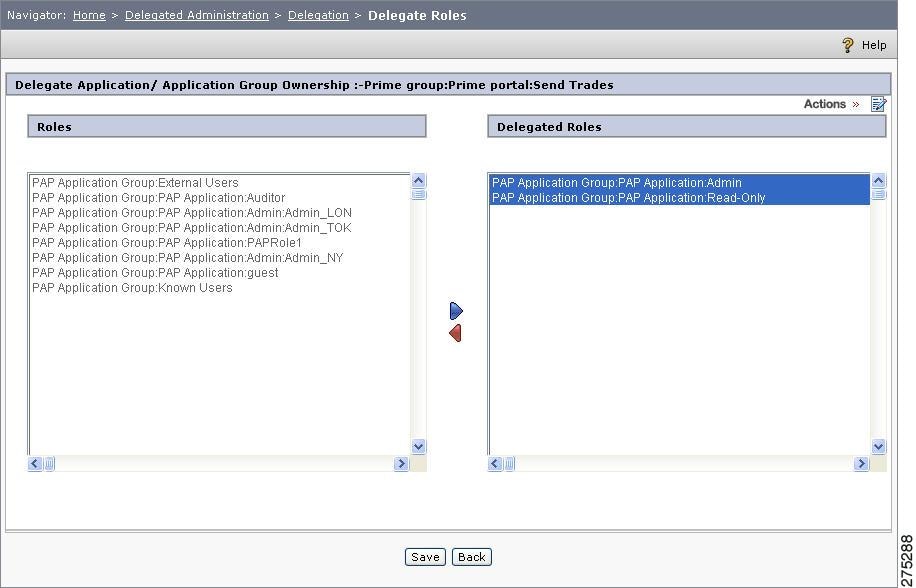
Figure 8-62 Delegate Roles
This page contains the Roles and Delegated Roles lists. The Roles list contains all the PAP roles created by the superuser. To delegate entitlement to a role:
a.
b.
c.
d.
Step 4
This enables the delegated role(s) to inherit all the rights of the owner to deal with the specified resources within the specified time frame.
Delegating Roles
An authorized user can delegate any PEP role to a PAP role by using the Delegated Role function. When a role is delegated to a PAP role, the delegated owner can perform all the operations as the owner does, such as creating a child role for the role, defining a policy for that role on a resource, and mapping users to the role. All the child roles of the selected parent role come under delegation, unless and until anything to the contrary has been defined. When a child role is delegated, its child roles are also delegated to the delegated owner.
After logging in, the delegated owner can view all the roles with their parent application and roles in the roles tree whether or not authorized. While trying to perform any operation on the parent roles, the owner gets an "Unauthorized access" message. For example, Mary, an admin user, is the delegated owner of the role Internal Dev London, but not of its parent role Internal Dev. On logging in Mary can view both Internal Dev and Internal Dev London in the roles tree but while trying to map a user to Internal Dev, Mary gets the "Unauthorized access" message.
The superuser can delegate all the roles registered within the application. All other users can delegate only those roles that they are authorized to delegate.
To delete roles, any user other than the superuser must:
•
The Delegate page appears.
•
•
Please refer to Delegating a Resource section for the rest of the steps.
Delegating Groups
User groups come under the purview of Delegate function. Any PAP role can delegate any PEP group to a PAP role. For delegation purpose, the PAP role that delegates a group must be the owner of that group. After delegation, the delegated owner can perform all operations on the delegated group, such as adding user to a user group and mapping group to role. The delegation is extended to all the child groups of the specified group, but not its parent.
When delegation is done for a group, all the delegated owner can perform all activities as the real owner does, such as creating child group, mapping users to the group, and mapping roles to the group.
On logging in, the delegated owner can view all the delegated groups along with their parent groups whether or not delegated. If the delegated owner tries to perform any operation on the parent groups that are not delegated, the "Unauthorized access" message is displayed.
To delegate groups, any user other than the superuser must:
•
•
•
Please refer to Delegating a Resource, page 8-57 section for the rest of the steps.
Delegating Application Groups
A PAP role can delegate an application group, which it owns, to any other PAP role. This renders the delegated owner a complete control over the application group right from creating applications, creating resource and creating roles, to creating and deleting policies.
To delegate application groups, any user other than the superuser you must:
•
•
•
Please refer to Delegating a Resource, page 8-57 section for the rest of the steps.
Delegating Application
A PAP user can delegate an application to any other PAP role. This provides the delegated owner authority over the application group to create resources and subresources, create application specific roles, create user-role map, create policies, and so on.
To delegate application groups, any user other than the superuser you must:
•
•
•
Please refer to Delegating a Resource, page 8-57 section for the rest of the steps.
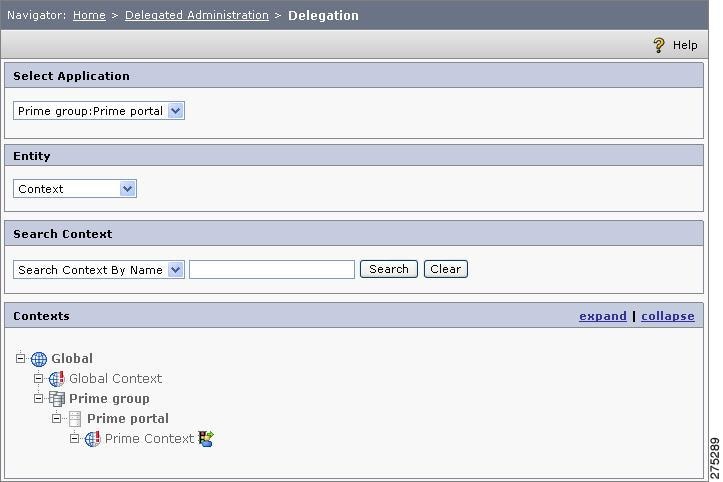
Delegating Context
A PAP user can delegate context to roles which enables that the roles to access all the resources available within the delegated context.
To delegate context, you must:
•
•
Figure 8-63 Delegation Context
Click the Delegate icon of the corresponding context in the context tree, which displays the Delegate Ownership page.
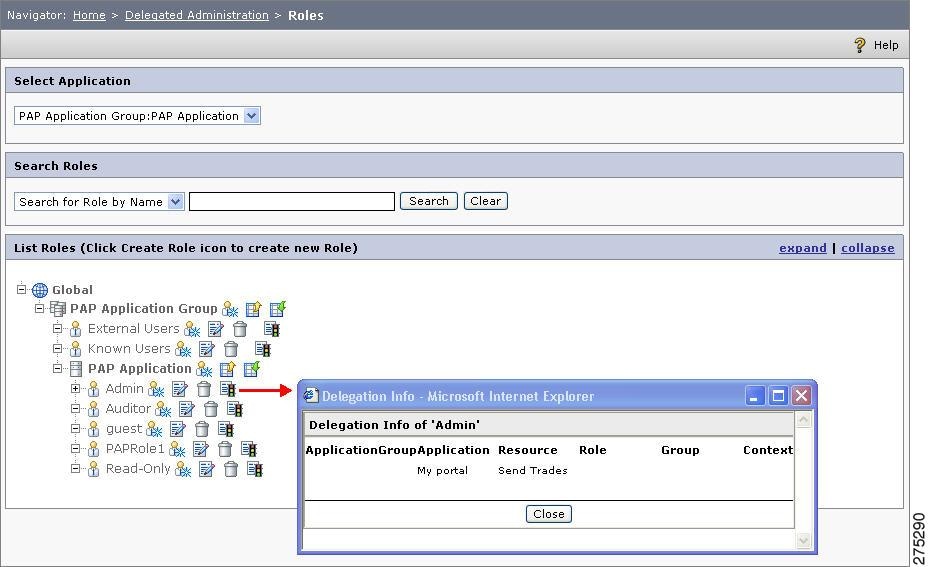
Reviewing the Delegated Components of a PAP Role
To review all the resources, roles, groups, application groups, and applications delegated to a PAP role:
Choose Home > Delegated Administration > Roles. In the Roles tree, click the Delegate Info button of the selected role. All the delegated components are displayed in a single page.
Figure 8-64 Delegation Information