-
Cisco Traffic Anomaly Detector Configuration Guide (Software Version 6.1)
-
Index
-
Preface
-
Product Overview
-
Intitializing the Detector
-
Configuring the Detector
-
Configuring Zones
-
Configuring Zone Filters
-
Configuring Policy Templates and Policies
-
Learning Zone Traffic Characteristics
-
Detecting Zone Traffic Anomalies
-
Using Interactive Detect Mode
-
Using Attack Reports
-
Using Detector Diagnostic Tools
-
Performing Maintenance Tasks
-
 Feedback
Table Of Contents
Configuring Flex-Content Filters
Configuring the tcpdump-expression Syntax
Configuring the pattern-expression Syntax
Displaying Flex-Content Filters
Changing the State of a Flex-Content Filter
Preventing the Production of Dynamic Filters
Configuring Zone Filters
This chapter describes how to configure the Cisco Traffic Anomaly Detector (Detector) network traffic filters.
This chapter refers to the Cisco Guard (Guard), the companion product of the Detector. The Guard is a Distributed Denial of Service (DDoS) attack detection and mitigation device that cleans the zone traffic as the traffic flows through it, dropping the attack traffic and injecting the legitimate traffic back into the network. When the Detector determines that the zone is under attack, it can activate the Guard attack mitigation services. The Detector can also synchronize zone configurations with the Guard. For more information about the Guard, see the Cisco Anomaly Guard Module Configuration Guide or the Cisco Guard Configuration Guide.
This chapter contains the following sections:
•
Configuring Flex-Content Filters
Understanding Zone Filters
Zone filters define how the Detector handles a specific traffic flow. You can configure filters to customize the methods that the Detector uses to detect traffic anomalies.
Zone filters enable the Detector to perform the following functions:
•
•
The Detector has the following types of filters:
•
•
•
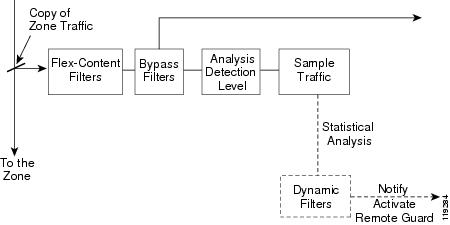
Figure 5-1 displays the Detector filter system.
Figure 5-1
Detector Filter System
The Detector applies the analysis detection level to a copy of the zone traffic flow to analyze the traffic.
To perform a statistical analysis of the traffic flow, the Detector uses the zone policies which are all configured to handle specific types of traffic. The zone policies constantly measure traffic flows and take action against a particular traffic flow if they identify that flow as malicious or abnormal, which occurs when the flow exceeds the policy threshold. When the Detector identifies anomalies in the zone traffic, it creates new filters (dynamic filters) which can activate a Guard to protect the zone, or the Detector records the event in its syslog.
Configuring Flex-Content Filters
Flex-content filters filter zone traffic based on the fields in the packet header or the patterns in the packet payload. You can identify attacks that are based on the patterns that appear in the traffic. These patterns can identify known worms or flood attacks that have a constant pattern.
Use the flex-content filters to count a desired packet flow and to identify a specific malicious source of traffic.
The flex-content filter applies the filtering criteria in the following order:
1.
2.
3.
Note
This section contains the following topics:
•
•
•
Adding a Flex-Content Filter
The Detector creates a list of flex-content filters that you create and activates the filters in an ascending order. When you add a new flex-content filter, make sure that you place it in the correct location in the filter list.
To configure a flex-content filter, perform the following steps:
Step 1
Step 2
flex-content-filter renumber [start [step]]Table 5-1 provides the arguments for the flex-content-filter renumber command.
Step 3
Step 4
flex-content-filter row-num {disabled | enabled} {drop | count} protocol port [start
start-offset [end end-offset]] [ignore-case] expression tcpdump-expression pattern
pattern-expression
Table 5-2 provides the arguments and keywords for the flex-content-filter command.
Table 5-2 Arguments and Keywords for the flex-content-filter Command
row-num
Unique number from 1 to 9999 that identifies the filter and defines the priority among the flex-content filters. The Detector operates the filters in ascending row-number order.
disabled
Sets the filter state to disabled. The filter does not monitor traffic.
enabled
Sets the filter state to enabled. The Detector monitors traffic and performs the action (drop or count) on the flow that matches the filter.
This is the default state.
drop
Drops the flow that matches the filter. You can configure the drop action in Guard configuration mode if you have created the zone from the Guard zone templates. The drop action is applicable to the Guard only.
count
Counts the flow that matches the filter.
protocol
Traffic from a specific protocol. Use an asterisk (*) to indicate any protocol. Enter an integer from 0 to 255.
Review possible protocol numbers at the Internet Assigned Numbers Authority (IANA) website:
port
Traffic destined to a specific destination port. Enter an integer from 0 to 65535. To define a specific port number, you must define a specific protocol number.
Use an asterisk (*) to indicate any destination port. You can use an asterisk if you configure the protocol number to 6 (TCP) or 17 (UDP).
Review possible port numbers at the Internet Assigned Numbers Authority (IANA) website:
start-offset
Offset, in bytes, from the beginning of the packet payload, where the pattern matching for the pattern-expression argument begins. The default is 0, which is the start of the payload. Enter an integer from 0 to 1800.
If you copy the pattern from the show packet-dump signatures command output, copy this argument from the Start Offset field in the command output.
end-offset
Offset, in bytes, from the beginning of the packet payload, where the pattern matching for the pattern-expression argument ends. The default is the packet length, which is the end of the payload. Enter an integer from 0 to 1800.
If you copy the pattern from the show packet-dump signatures command output, copy this argument from the End Offset field in the command output.
ignore-case
Defines the pattern-expression argument as case insensitive.
By default, the pattern-expression argument is case sensitive.
expression tcpdump-
expressionSpecifies the expression that is matched with the packet. The expression is in Berkeley Packet filter format. See the "Configuring the tcpdump-expression Syntax" section for more information and configuration examples.
If you use spaces in the expression, enclose the expression in quotation marks (" ").
To enter an empty expression, use double quotation marks (" ").
To use a quotation mark in the expression, use the backslash escape character before the quotation mark (\").
Note
pattern pattern-
expressionSpecifies the regular expression data pattern that is to be matched with the packet payload. See the "Configuring the pattern-expression Syntax" section for more information.
You can activate the Detector to generate the signature by using the show packet-dump signatures command. See the "Generating Attack Signatures from Packet-Dump Capture Files" section on page 11-20.
If you use spaces in the expression, enclose the expression in quotation marks (" ").
To enter an empty expression, use double quotation marks (" ").
To use a quotation mark in the expression, use the backslash escape character before the quotation mark (\").
Note
You can change the filter state to enable or disable at any time (see the "Changing the State of a Flex-Content Filter" section).
The following example shows how to configure the flex-content filter:
user@DETECTOR-conf-zone-scannet# flex-content-filter enabled count * * expression "ip[6:2]
& 0x1fff=0" pattern
"/ HTTP/1\.1\ x0D\0AAccept: .*/.*\x0D\x0AAccept-Language: en*\x0D\x0AAccept-Encoding:
gzip, deflate\x0D\x0AUser-Agent: Mozilla/4\.0"
This section contains the following topics:
•
•
Configuring the tcpdump-expression Syntax
The tcpdump-expression is in the Berkeley Packet filter format and specifies the expression to be matched with the packet.
Note
The expression contains one or more elements which usually consist of an ID preceded by one or more qualifiers.
There are three types of qualifiers:
•
•
•
Table 5-3 describes the tcpdump-expression elements.
Table 5-3 tcpdump-expression Elements
dst host host_ip_address
Specifies traffic to a destination host IP address.
src host host_ip_address
Specifies traffic from a source host IP address.
host host_ip_ address
Specifies traffic to and from both source and destination host IP addresses.
net net mask mask
Specifies traffic to a specific network.
net net/len
Specifies traffic to a specific subnet.
dst port destination_port_number
Specifies TCP or UDP traffic to a destination port number.
src port source_port_number
Specifies TCP or UDP traffic from a source port number.
port port_number
Specifies TCP or UDP traffic to and from both source and destination port numbers.
less packet_length
Specifies packets with a length equal to or less than the specific length in bytes.
greater packet_length
Specifies packets with a length equal to or greater than the specific length in bytes.
ip proto protocol
Specifies packets with a protocol number of the following protocols: ICMP, UDP, and TCP.
ip broadcast
Specifies broadcast IP packets.
ip multicast
Specifies multicast packets.
ether proto protocol
Specifies either protocol packets of a specific protocol number or name such as IP, ARP, or RARP. The protocol names are also keywords. If you enter the protocol name, you must use a backslash (\) as an escape character before the name.
expr relop expr
Traffic that complies with the specific expression. Table 5-4 describes the tcpdump-expression rules.
Table 5-4 describes the tcpdump-expression rules.
You can combine expression elements using the following methods:
•
Note
•
•
•
Negation has the highest precedence. Alternation and concatenation have equal precedence and are associated from left to right. Explicit and tokens, not juxtaposition, are required for concatenation. If you specify an identifier without a keyword, the most recent keyword is used.
For a detailed explanation of the Berkeley Packet filter configuration options, go to this location:
http://www.freesoft.org/CIE/Topics/56.htm.
The following example shows how to count unfragmented datagrams and fragmented zeros of fragmented datagrams only. This filter is implicitly applied to the TCP and UDP index operations. For instance, tcp[0] always indicates the first byte of the TCP header and never indicates the first byte of an intervening fragment as shown in this example:
user@DETECTOR-conf-zone-scannet# flex-content-filter enabled count * * expression
ip[6:2]&0x1fff=0 pattern ""
The following example shows how to count all TCP RST packets:
user@DETECTOR-conf-zone-scannet# user@DETECTOR-conf-zone-scannet# flex-content-filter
enabled count * * expression tcp[13]&4!=0 pattern ""
The following example shows how to count all ICMP packets that are not echo requests/echo replies (ping):
user@DETECTOR-conf-zone-scannet# flex-content-filter enabled count * * expression "icmp
[0]!=8 and icmp[0] != 0" pattern ""
The following example shows how to count all TCP packets that are destined to port 80 and that did not originate from port 1000:
user@DETECTOR-conf-zone-scannet# flex-content-filter enabled count * * expression "tcp and
dst port 80 and not src port 1000" pattern ""
Configuring the pattern-expression Syntax
The pattern-expression syntax is a regular expression that describes a string of characters. The pattern-expression describes a set of strings without actually listing its elements. This expression consists of normal characters and special characters. Normal characters include all printable ASCII characters that are not considered to be special characters. Special characters have a special meaning and specify the type of matching that the Detector performs on the pattern-expression. The flex-content filter matches the pattern-expression with the content of the packet (the packet payload). For example, the three strings version 3.1, version 4.0, and version 5.2 are described by the following pattern: version .*\..*
Table 5-5 describes the special characters that you can use.
By default, the pattern-expression is case sensitive. To define the pattern-expression as case insensitive, use the flex-content-filter command with the ignore-case keyword. See the "Adding a Flex-Content Filter" section for more information.
The following example shows how to drop packets with a specific pattern in the packet payload. The pattern in the example was extracted from the Slammer worm. The protocol, port, and tcpdump-expression parameters are nonspecific.
user@DETECTOR-conf-zone-scannet# flex-content-filter enabled drop * * expression " "
pattern \x89\xE5Qh\.dllhel32hkernQhounthickChGetTf\xB9ll
Qh32\.dhws2_f\xB9etQhsockf\xB9toQhsend\xBE\x18\x10\xAEB
Displaying Flex-Content Filters
To display the flex-content filters, use the following command in zone configuration mode:
show flex-content-filters
Table 5-6 describes the fields in the show flex-content-filters command output.
Table 5-6 Field Descriptions for the show flex-content-filters Command Output
Row
Flex-content filter priority.
State
Filter state (enabled or disabled).
Action
Action that the filter performs on the specific traffic type.
Protocol
Protocol number of the traffic that the filter processes.
Port
Destination port of the traffic that the filter processes.
Start
Offset, in bytes, from the beginning of the packet payload where the pattern matching begins. This offset applies to the pattern field.
End
Offset, in bytes, from the beginning of the packet payload where the pattern matching ends. This offset applies to the pattern field.
Match-case
Whether the pattern expression that the filter matches is case sensitive or not case sensitive.
yes=case-sensitive no=case-insensitive
TCPDump-expression
tcpdump-expression to be matched with the packet in Berkeley Packet filter format. See the "Configuring the tcpdump-expression Syntax" section for the information about the tcpdump-expression syntax.
Pattern-filter
Regular expression data pattern to be matched with the packet payload. See the "Configuring the pattern-expression Syntax" section for information about the pattern-expression syntax.
RxRate (pps)
Current traffic rate in packets per second that is measured for this filter.
Deleting Flex-Content Filters
You can delete a flex-content filter when you no longer need it to filter packets based on the filter expression.
Note
To delete a flex-content filter, enter the following command in zone configuration mode:
no flex-content-filter row-num
The row-num argument specifies the flex-content filter row number to delete. To display the list of flex-content filters and identify the row number of the flex-content filter to delete, use the show flex-content-filters command (See the "Displaying Flex-Content Filters" section). To delete all flex-content filters, enter an asterisk (*) for the row number.
This example shows how to delete a flex-content filter:
user@DETECTOR-conf-zone-scannet# no flex-content-filters 5Changing the State of a Flex-Content Filter
You can disable a flex-content filter to prevent the Detector from filtering packets based on the filter expression and to prevent it from filtering specific types of traffic. When you disable the filter, it remains in the flex-content filter list, which allows you to enable the filter again if needed.
If you do not intend to use a flex-content filter again, you can delete it (see the "Deleting Flex-Content Filters" section).
To change the state of a flex-content filter, enter the following command in zone configuration mode:
flex-content-filter row-num {disabled | enabled}
Table 5-7 provides the arguments and keywords for the flex-content-filter command.
To display the list of flex-content filters and identify the row number of the flex-content filter to enable or disable, enter the show flex-content-filters command (see the "Displaying Flex-Content Filters" section).
The following example shows how to disable a flex-content filter:
user@DETECTOR-conf-zone-scannet# flex-content-filters 5 disabledConfiguring Bypass Filters
The bypass filter prevents the Detector from analyzing specific traffic flows by directing trusted traffic away from the Detector's anomaly detection functions.
This section contains the following topics:
Adding a Bypass Filter
To add a bypass filter, use the following command in zone configuration mode:
bypass-filter row-num src-ip [ip-mask] protocol dest-port [fragments-type]
Table 5-8 provides the arguments for the bypass-filter command.
Note
Displaying Bypass Filters
To display the list of bypass filters, use the following command in zone configuration mode:
show bypass-filters
Table 5-9 describes the fields in the show bypass-filters command output.
The source IP address, source address mask, protocol number, and destination port may be nonspecific. An asterisk (*) indicates that the filter acts on all field values or that more than one value was matched for the filter.
Deleting Bypass Filters
To delete a bypass filter, enter the following command in zone configuration mode:
no bypass-filter row-num
The row-num argument specifies the bypass filter row number to be deleted. To display the list of bypass filters and identify the row number of the bypass filter that you want to delete, use the show bypass-filters command (see the "Displaying Bypass Filters" section). To delete all bypass filters, enter an asterisk (*) for the row number.
The following example shows how to delete a bypass filter:
user@DETECTOR-conf-zone-scannet# no bypass-filter 10Configuring Dynamic Filters
Dynamic filters apply the required protection level to traffic flow and define how to handle the attack. The Detector creates dynamic filters when it identifies an anomaly in the zone traffic, which occurs when the flow exceeds the zone policy thresholds. The Detector creates new dynamic filters as changes occur to the zone traffic and the type of DDoS attack. The dynamic filters have a limited life span and the Detector deletes them when the attack ends. The Detector supports a maximum of 150,000 dynamic filters that are active concurrently in all zones.
Dynamic filters produce a notification record in the Detector syslog or activate remote Guards to protect the zone.
This section contains the following topics:
•
Displaying Dynamic Filters
You can display the dynamic filters that the Detector created by using one of the following commands in zone configuration mode:
•
•
•
Table 5-10 provides the arguments and keywords for the show dynamic-filters command.
Note
Note
The following example shows how to display a dynamic filter in detail:
user@DETECTOR-conf-zone-scannet# show dynamic-filters 876 detailsTable 5-11 describes the fields in the show dynamic-filters command output.
The source IP address, source address mask, protocol number, and destination port may be nonspecific. An asterisk (*) indicates that the filter acts on all field values or that more than one value was matched for the filter.
Table 5-12 describes the additional fields in the show dynamic-filters details command output.
Table 5-12 Field Descriptions for show dynamic-filters details Command Output
Attack flow
Attack flow characteristics. The attack flow contains the Source IP, Source Mask, Proto, DPort, and Frg fields that are described in Table 5-11.
Triggering Rate
Rate of the attack flow that exceeded a policy threshold.
Threshold
Policy threshold that was exceeded by the attack flow.
Policy
Policy that produced the dynamic filter. See Chapter 6, "Configuring Policy Templates and Policies," for more information.
Adding Dynamic Filters
During an attack on the zone, you can add a dynamic filter to manipulate zone anomaly detection. You can configure a dynamic filter to activate the Guards that you define in the remote Guard lists (remote Guard) to protect the zone. The remote activation will fail if the destination IP address of the dynamic filter does not match the Guard-protection activation method that you defined for the zone by using the protect-ip-state command and the zone address range. You can configure the dynamic filter to activate zone protection on the remote Guard in one of the following ways:
•
•
See the "Activating Remote Guards to Protect a Zone" section on page 8-5 and the "Configuring Guard-Protection Activation Methods" section on page 8-4 for more information.
To add a dynamic filter, use the following command in zone configuration mode:
dynamic-filter remote-activate {exp-time | forever} [dst-ip]
You can use multiple dynamic-filter commands to add multiple dynamic filters.
Table 5-13 provides the arguments and keywords for the dynamic-filter command.
The following example shows how to add a dynamic filter that activates protection for the entire zone on the remote Guard:
admin@GUARD-conf-zone-scannet# dynamic-filter remote-activate 600Deleting Dynamic Filters
When you delete dynamic filters, the deletion is effective for a limited period of time because the Detector continues to create new dynamic filters when you have zone anomaly detection enabled and the zone is under attack. See the "Preventing the Production of Dynamic Filters" section for information about how to prevent the Detector from producing a dynamic filter.
To delete a dynamic filter, enter the following command in zone configuration mode:
no dynamic-filter dynamic-filter-id
The dynamic-filter-id argument specifies the dynamic filter identifier. To display the list of dynamic filters and identify the dynamic filter to delete, use the show dynamic-filters command (see the "Displaying Dynamic Filters" section). To delete all zone dynamic filters, enter an asterisk (*) for the dynamic filter identifier.
The following example shows how to delete a dynamic filter:
user@DETECTOR-conf-zone-scannet# no dynamic-filter 876Preventing the Production of Dynamic Filters
To prevent the Detector from producing unwanted dynamic filters, perform one of the following actions:
•
•
•