[an error occurred while processing this directive]

Cisco AS5300 Series Universal Gateways

Upgrading Modem Code and Cisco IOS Images from Diskettes

 Feedback

Table Of Contents

Cisco AS5300: Upgrading Cisco IOS Images and Modem Code from Diskettes

Required Tools

Upgrading Cisco IOS Images from Diskettes

Copy the Image to Your Hard Disk

Install the Image on Your Cisco AS5300

Install a TFTP Application on the PC

Connect your PC and the Access Server

Establish a HyperTerminal Session

Ping the PC and Access Server

Copy the Image from the PC to the Access Server

Upgrading Modem Code From Diskettes

Copy the Modem Code to Your Hard Disk

Copy the Modem Code from Your PC to the Modems

Install a TFTP Application on the PC

Connect your PC and the Access Server

Establish a HyperTerminal Session

Ping the PC and Access Server

Download Modem Code to the Access Server

Cisco Connection Online

CD-ROM/WWW Feedback


Cisco AS5300: Upgrading Cisco IOS Images and Modem Code from Diskettes


Your Cisco AS5300 universal access server includes the factory-installed Cisco IOS image and the Cisco IOS software-compatible version of modem code (portware). Occasionally, Cisco Systems will ship you a Cisco IOS image or modem code on diskette that fixes existing bugs, provides additional features, or enhances performance.

This document includes the following sections:

Required Tools

Upgrading Cisco IOS Images from Diskettes

Upgrading Modem Code From Diskettes

Cisco Connection Online

CD-ROM/WWW Feedback

Required Tools

You need the following tools:

A PC running Microsoft Windows, a Macintosh, or a UNIX workstation.

A TFTP application. (Cisco includes a diskette with a TFTP application with your modem code update diskette.)

Console and Ethernet cables


Note   The PC, Macintosh, or UNIX workstation used for the upgrade and the access server you are upgrading must have the same subnet mask.


Upgrading Cisco IOS Images from Diskettes

The section describes how to upgrade the Cisco IOS images from a set of diskettes. This is a two-step process:

Copy the Image to Your Hard Disk

Install the Image on Your Cisco AS5300

Copy the Image to Your Hard Disk

This section describes how to copy the Cisco AS5300 software image to your hard disk in a PC environment. The steps are similar if you are using a UNIX workstation.


Step 1 Insert diskette 1 of 2 into the floppy disk drive.

Step 2 Choose Start/Run to display the Run dialog box.

Step 3 Enter a:/install.exe (where a is your diskette drive) and press Enter.

A DOS window appears with instructions on how to install the software in DOS and UNIX environments.

Step 4 Press Enter to accept the default (yes) at the following prompt:

Do you wish to continue (y/n)? [y]

Step 5 Press Enter to accept the default location for the files at the following prompt:

Where will files be installed? [c:\tftpboot]

Step 6 Press Enter to create the c:\tftpboot directory. This prompt is only displayed if the directory does not exist on your hard disk.

The system displays status messages while it is installing and copying the files. When done with the first diskette, the system prompts you to enter the second diskette. This could take 2 to 3 minutes.

Step 7 Insert diskette 2 of 2 into the diskette drive and press Enter.

Step 8 When done, close the DOS window.

Step 9 Continue with the following section "Install the Image on Your Cisco AS5300."

Install the Image on Your Cisco AS5300

If you are using a PC running Microsoft Windows 95, installing the software image from a hard drive onto a Cisco AS5300 involves:

1 Installing a TFTP application on your PC

2 Connecting your PC and the access server

3 Establishing a HyperTerminal session on your PC

4 Pinging the PC and access server to make sure they are talking to each other

5 Copying the image from the PC to the access server.

See the following sections for details.


Note   The steps are similar if you are using a Macintosh or a UNIX workstation.


Install a TFTP Application on the PC


Note   You can also use an rcp application available from independent software vendors. A number of TFTP programs are also available as shareware from public sources on the World Wide Web.


Step 1 Insert the Cisco-provided TFTP diskette in the PC diskette drive.


Note   The TFTP program provided on diskette is authored by Cisco Systems and is provided as a courtesy of Cisco Systems and is not an officially supported product.


Step 2 Use the Microsoft Windows 95 Explorer to create a directory labeled tftp on your hard disk.

Step 3 Copy the TFTP files from the diskette to the directory created in Step 2. The TFTP files include tFTPSERV.EXE, TFTPSERV.DLL, MFC42.DLL, and MSVCRT.DLL.

Step 4 Double-click tftpsrv.exe in the Microsoft Windows 95 Explorer to launch the TFTP application.

Step 5 Set your TFTP server root directory:

(a) Choose Server Root Directory from the Options menu.

(b) Double-click tftpboot in [...] list box. If necessary, choose drive c from the Drives list box.

(c) Click OK. The status bar below the menu bar displays c:\tftpboot as the TFTP server root directory.


Caution   If you do not select the c:\tftpboot directory as your TFTP server directory, you will not be able to perform the copy procedure. This also applies if you are using rcp on your system.

Step 6 Continue with the following section "Connect your PC and the Access Server."

Connect your PC and the Access Server


Step 1 Use straight-through cables to connect the PC and access server via a 10BaseT hub, as shown in . Also note that both Ethernet ports must have the same baseband.

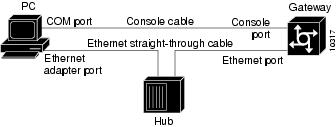
Figure 1 Connecting a PC and an Access Server


Note   You can also connect your PC's Ethernet port to the Cisco AS5300 Ethernet port using the 10BaseT crossover cable provided.


Step 2 Connect your PC's COM port to the Cisco AS5300 console port using the standard Cisco console cable, as shown in .

Step 3 Make sure your PC and access server are powered ON.

Step 4 Continue with the following section "Establish a HyperTerminal Session."

Establish a HyperTerminal Session

Use the steps in this section to establish a HyperTerminal session from your local PC to the Cisco AS5300. You will use the HyperTerminal session to talk to the access server.


Step 1 In Microsoft Windows 95 on your PC, choose Start/Programs/Accessories/HyperTerminal.

Step 2 Double-click Hypertrm.exe to display the Connection Description dialog box.

Step 3 Enter a name for your connection, for example, Console and then click OK. HyperTerminal displays the Phone Number dialog box.

Step 4 Choose the COM port connecting the PC and the access server in the Connect Using list box. You have options to connect directly to one of four COM ports.

Step 5 Click OK. HyperTerminal displays the COM Properties dialog box.

Step 6 Choose these options in the COM Properties dialog box:

Bits per second: 9600

Data bits: 8

Parity: None

Stop bits: 1

Flow control: None

Step 7 Click OK. The HyperTerminal dialog box appears.

Step 8 Press Enter to display the 5300> prompt.


Note   If the access server prompt does not appear, you might have selected the wrong COM port, the cable connections could be incorrect or bad, or the access server might not be powered on.


Step 9 Enter the enable mode by entering the enable command and the password:

5300> enable
Password: <password>
5300#

Step 10 Continue with the following section "Ping the PC and Access Server."

Ping the PC and Access Server

Ping the access server and the PC to make sure they are talking to each other and there are no configuration problems on your access server.


Step 1 Choose the correct Ethernet adapter connecting to the access server and note the PC's IP address:

(a) Choose Start/Run to display the Run dialog.

(b) Enter winipcfg and click OK to display the IP Configuration dialog box.

(c) Choose the PC Ethernet adapter connector used for the connection to the access server if you have more than one Ethernet adapter connector installed on your PC.

(d) Make a note of the PC IP address, and then click OK.


Note   Enter the show running-configuration command at the 5300# prompt to verify the access server has an IP address assigned. If the access server does not have an IP address, assign an IP address before continuing.


Step 2 In the HyperTerminal dialog box (seen the section "Establish a HyperTerminal Session" for details), make sure you are at the 5300# prompt.

Step 3 Enter the ping command with your PC's IP address.

5300# ping XXX.XXX.X.X

The access server displays five exclamation points (!) if everything is working and it displays five dots (.) if there is a problem. In the latter case, check the cabling between the router and the PC and check the access server configuration.

Step 4 Continue with the following section "Copy the Image from the PC to the Access Server."

Copy the Image from the PC to the Access Server


Note   Use the copy rcp flash command if you are using an rcp application.


Step 1 Enter the copy tftp flash command to copy the new software image from the PC to the Cisco AS5300:

5300# copy tftp flash

Note   If the system Flash memory on your access server is partitioned, the access server prompts you to choose the partition for the upload. The default is partition 1, which you should use.


Step 2 When prompted, enter the IP address of your PC:

Address or name of remote host [255.255.255.255]? 131.108.1.1

Step 3 When prompted, enter the filename of the Cisco IOS image to be copied to the Cisco AS5300:

Source file name? XXXXXXXX

Note   You can look at your tftpboot directory contents to verify the filename for the Cisco IOS image you are copying.


Step 4 When prompted, enter the destination filename and press Enter to indicate that you want to copy the image. We recommend using the descriptive image name (shown below) because this will be the Cisco IOS image name displayed on the Cisco AS5300. The image file name is also listed on the diskette label.

Destination file name [XXXXXXXX]? c5300-i-mz.112-9.XA1

During the transfer process, the software displays messages indicating that it has accessed the file you specified and is loading it.

Step 5 Press y when the following prompt appears to confirm the deletion:

Erase flash device before writing? [confirm] y

Step 6 When prompted, press y to reconfirm the deletion.

Step 7 Type yes and then press Enter when the following prompt appears:

Copy `57199401' from server as `5300-i-mz.112-9.XA1' into Flash with erase? 
[yes/no] yes

The router displays messages while erasing the Flash memory device, and then loading the new image. The message "Verifying Checksum... OK" indicates a successful load of the new image.

Step 8 Enter the reload command to reload the Cisco AS5300 configuration:

5300# reload

Step 9 When prompted, press Enter to confirm the reload. The reload can take several minutes. After the reload is complete, you are returned to the 5300> prompt.

Step 10 Enter the following commands to verify the upload was successful:

5300> enable
Password: <password>
5300# show version

The Cisco IOS version displayed should match the version on your upgrade diskettes. If you have questions or need assistance, see the sections "Cisco Connection Online" and "CD-ROM/WWW Feedback," later in this document.

Upgrading Modem Code From Diskettes

This section describes how to copy the Cisco AS5300 modem code from diskettes to your hard disk in a PC environment, and then upload the modem code to the modems. The steps are similar if you are using a UNIX workstation.

Upgrading modem code from diskettes is a two-step process:

1 Copy the Modem Code to Your Hard Disk

2 Copy the Modem Code from Your PC to the Modems

Copy the Modem Code to Your Hard Disk

This section describes how to copy the modem code file to your hard disk in a PC environment. The steps are similar if you are using a Macintosh or a UNIX workstation.


Step 1 Insert the modem code diskette into the diskette drive.

Step 2 Use Microsoft Windows 95 Explorer to create a folder tftpboot on your hard disk root c:.

Step 3 Use the Microsoft Windows 95 Explorer to copy the modem code file into your c:/tftpboot folder.

Step 4 Continue with the following section "Copy the Modem Code from Your PC to the Modems."

Copy the Modem Code from Your PC to the Modems

If you are using a PC running Microsoft Windows 95, upgrading the modem image from a hard drive onto a Cisco AS5300 involves:

1 Installing a TFTP application on your PC

2 Connecting your PC and the access server

3 Establishing a HyperTerminal session on your PC

4 Pinging the PC and access server to make sure they are talking to each other

5 Copying the image from the PC to the access server.

See the following sections for details.


Note   The steps are similar if you are using a Macintosh or a UNIX workstation.


Install a TFTP Application on the PC


Note   You can also use an rcp application available from independent software vendors. A number of TFTP programs are also available as shareware from public sources on the World Wide Web.


Step 1 Insert the Cisco-provided TFTP diskette in the diskette drive.


Note   The TFTP program provided on diskette is authored by Cisco Systems and is provided as a courtesy of Cisco Systems and is not an officially supported product.


Step 2 Use the Microsoft Windows 95 Explorer to create a directory labeled tftp on your hard disk.

Step 3 Copy the TFTP files from the diskette to the directory created in Step 2. The TFTP files include tFTPSERV.EXE, TFTPSERV.DLL, MFC42.DLL, and MSVCRT.DLL.

Step 4 Double-click tftpsrv.exe in the Microsoft Windows 95 Explorer to launch the TFTP application.

Step 5 Set your TFTP server root directory:

(a) Choose Server Root Directory from the Options menu.

(b) Choose c:\tftpboot from the Drives and [...] list boxes.

(c) Click OK.


Caution   If you do not select the c:\tftpboot directory as your TFTP server directory, you will not be able to perform the copy procedure. This also applies if you are using rcp on your system.

Step 6 Continue with the following section "Connect your PC and the Access Server."

Connect your PC and the Access Server


Step 1 Connect your PC and access server using straight-through cables via a 10BaseT hub, as shown in . Note that both Ethernet ports must have the same baseband.

Figure 2 Connecting a PC and an Access Server


Note   You can also connect your PC's Ethernet port to the Cisco AS5300 Ethernet port using the 10BaseT crossover cable provided.


Step 2 Connect your PC's COM port to the Cisco AS5300 console port using the standard Cisco console cable, as shown in .

Step 3 Make sure your PC and access server are powered ON.

Step 4 Continue with the following section "Establish a HyperTerminal Session."

Establish a HyperTerminal Session

Use the steps in this section to establish a HyperTerminal session from your local PC to the Cisco AS5300. You will use the HyperTerminal session to talk to the access server.


Step 1 In Microsoft Windows 95 on your PC, choose Start/Programs/Accessories/HyperTerminal.

Step 2 Double-click Hypertrm.exe to display the Connection Description dialog box.

Step 3 Enter a name for your connection, for example, Console and then click OK. HyperTerminal displays the Phone Number dialog box.

Step 4 Choose the COM port connecting the PC and the access server in the Connect Using list box. You have options to connect directly to one of four COM ports.

Step 5 Click OK. HyperTerminal displays the COM Properties dialog box.

Step 6 Choose these options in the COM Properties dialog box:

Bits per second: 9600

Data bits: 8

Parity: None

Stop bits: 1

Flow control: None

Step 7 Click OK. The HyperTerminal dialog box appears.

Step 8 Press Enter to display the 5300# prompt.


Note   If the access server prompt does not appear, you might have selected the wrong COM port, the cable connections could be incorrect or bad, or the access server might not be powered on.


Step 9 Continue with the following section "Ping the PC and Access Server."

Ping the PC and Access Server

Ping the access server and the PC to make sure they are talking to each other and there are no configuration problems on your access server.


Step 1 Choose the correct Ethernet adapter connecting to the access server and note the PC's IP address:

(a) Choose Start/Run to display the Run dialog.

(b) Enter winipcfg and click OK to display the IP Configuration dialog box.

(c) Choose the PC Ethernet adapter connector used for the connection to the access server if you have more than one Ethernet adapter connector installed on your PC.

(d) Make a note of the PC IP address, and then click OK.


Note   Enter the show running config command at the 5300# prompt to verify the access server has an IP address assigned. If the access server does not have an IP address, assign an IP address before continuing.


Step 2 In the HyperTerminal dialog box (see the section "Establish a HyperTerminal Session" for details), make sure you are at the 5300# prompt.

Step 3 Enter the ping command with your PC's IP address.

5300# ping 131.108.1.1

The access server displays five exclamation points (!) if everything is working and it displays five dots (.) if there is a problem. In the latter case, check the cabling between the router and the PC and check the access server configuration.

Step 4 Continue with the following section "Download Modem Code to the Access Server."

Download Modem Code to the Access Server

The procedure for copying the modem code file from your PC set up as a local TFTP server to the access server system Flash memory is a two-step process:

1 Transfer the code to the access server.

2 Transfer the code to the modems.

Perform these two steps only once. After you copy the modem code file into system Flash memory for the first time, you should not have to perform these steps again. Because the modem code runs from modem RAM, the Cisco IOS software must automatically copy the modem code to each modem each time the access server power cycles.

Perform the following steps to download modem code to MICA modems:


Step 1 Check the image in the access server Flash memory.

5300# show flash
System flash directory:
File  Length   Name/status
  1   4530624   images/c5300-js-mx 
 [498776 bytes used, 16278440 available, 16777216 total]
16384K bytes of processor board System flash (Read/Write)

Step 2 Enter the copy tftp flash command to download the modem code file from the TFTP server into the access server Flash memory. You are prompted for the download destination and the remote host name.

5300# copy tftp flash
System flash directory:
File  Length   Name/status
  1   4530624   images/c5300-js-mx  
[498776 bytes used, 16278440 available, 16777216 total]
Address or name of remote host [255.255.255.255]? 
Source file name? c5300_portware1-1
Destination file name [images/c5300_portware1-1]? 
Accessing file 'c5300_portware1-1' on 255.255.255.255...
Loading images/c5300_portware1-1 from 2.2.0.1 (via Ethernet0): ! [OK]
Erase flash device before writing? [confirm] no
Copy 'images/c5300_portware1-1' from server
  as 'images/c5300_portware1-1' into Flash WITHOUT erase? [yes/no] yes
Loading images/c5300_portware1-1 from 2.2.0.1 (via Ethernet0): 
!!!!!!!!!!!!!!!!!!!!!!!!!!!!!!!!!!!!!!!!!!!!!!!!!
[OK - 249108/16278440 bytes]
Verifying checksum...  OK (0xE009)
Flash device copy took 00:00:02 [hh:mm:ss]

Step 3 Verify the file has been copied into the access server Flash memory.

5300# show flash
System flash directory:
File  Length   Name/status
  1   4530624  images/c5300-js-mz
  2   210104   images/c5300_portware1-1
  [747948 bytes used, 16029268 available, 16777216 total]
16384K bytes of processor board System flash (Read/Write)

Step 4 Copy the modem code file from the access server Flash memory to the modems by entering the copy flash modem privileged EXEC command.

5300# copy flash modem
Modem Numbers (<slot>/<port> | group <number> | all)? all
System flash directory:
File  Length   Name/status
  1   4530624  images/c5300-js-mz  
  2   210104   images/c5300_portware1-1 
[747948 bytes used, 16029268 available, 16777216 total]
Name of file to copy? images/c5300_portware1-1
Type of service [busyout/reboot] busyout
Copy 'flash:images/c5300_portware1-1' from Flash to modems? [yes/no] yes

*Feb 30 21:17:43.574: %MODEM-5-DL_START: Modem (2/0) started portware download
.
.
.
*Feb 30 21:17:43.598: %MODEM-5-DL_START: Modem (2/13) started portware download
*Feb 30 21:17:53.598: %MODEM-5-DL_GOOD: Modem (2/14) completed portware download:

Note   The modem code is downloaded to the module, not the individual slots as shown.


Cisco Connection Online

Cisco Connection Online (CCO) is Cisco Systems' primary, real-time support channel. Maintenance customers and partners can self-register on CCO to obtain additional information and services.

Available 24 hours a day, 7 days a week, CCO provides a wealth of standard and value-added services to Cisco's customers and business partners. CCO services include product information, product documentation, software updates, release notes, technical tips, the Bug Navigator, configuration notes, brochures, descriptions of service offerings, and download access to public and authorized files.

CCO serves a wide variety of users through two interfaces that are updated and enhanced simultaneously: a character-based version and a multimedia version that resides on the World Wide Web (WWW). The character-based CCO supports Zmodem, Kermit, Xmodem, FTP, and Internet e-mail, and it is excellent for quick access to information over lower bandwidths. The WWW version of CCO provides richly formatted documents with photographs, figures, graphics, and video, as well as hyperlinks to related information.

You can access CCO in the following ways:

WWW:  http://www.cisco.com

WWW:  http://www-europe.cisco.com

WWW:  http://www-china.cisco.com

Telnet:  cco.cisco.com

Modem:  From North America, 408 526-8070; from Europe, 33 1 64 46 40 82. Use the following terminal settings: VT100 emulation; databits: 8; parity: none; stop bits: 1; and connection rates up to 28.8 kbps.

For a copy of CCO's Frequently Asked Questions (FAQ), contact cco-help@cisco.com. For additional information, contact cco-team@cisco.com.


Note   If you are a network administrator and need personal technical assistance with a Cisco product that is under warranty or covered by a maintenance contract, contact Cisco's Technical Assistance Center (TAC) at 800 553-2447, 408 526-7209, or tac@cisco.com. To obtain general information about Cisco Systems, Cisco products, or upgrades, contact 800 553-6387, 408 526-7208, or cs-rep@cisco.com.


CD-ROM/WWW Feedback

Cisco documentation and additional literature are available in a CD-ROM package, which ships with your product. The Documentation CD-ROM, a member of the Cisco Connection Family, is updated monthly. Therefore, it might be more current than printed documentation. To order additional copies of the Documentation CD-ROM, contact your local sales representative or call customer service. The CD-ROM package is available as a single package or as an annual subscription. You can also access Cisco documentation on the World Wide Web at http://www.cisco.com, http://www-china.cisco.com, or http://www-europe.cisco.com.

If you are reading Cisco product documentation on the World Wide Web, you can submit comments electronically. Click Feedback in the toolbar, select Documentation, and click Enter the feedback form. After you complete the form, click Submit to send it to Cisco. We appreciate your comments.

78-4965-01


[an error occurred while processing this directive]