Table Of Contents
AAA in the Mobile IP Environment
Configuring RADIUS in the Mobile IP Environment
Configuring TACACS+ in the Mobile IP Environment
Example of a AAA Server Configuration
IPSec in the Mobile IP Environment
Example of IPSec Mobile Network Configuration
Mobile Network Security Testing
Manual Certificate Enrollment (TFTP and Cut-and-Paste) Prerequisites
Manual Certificate Enrollment (TFTP and Cut-and-Paste) Restrictions
Manual Certificate Enrollment Concepts
Cut-and-Paste Certificate Enrollment
How to Configure Manual Certificate Enrollment
Configuring Certificate Enrollment by Using TFTP
Configuring Certificate Enrollment by Using Cut-and-Paste
Verifying Manual Certificate Enrollment
Mobile IP Security
All registration messages between a mobile node and home agent are required to contain the Mobile-Home Authentication Extension (MHAE).
The integrity of the registration messages is protected by a shared 128-bit key between a mobile node and home agent. The keyed message digest algorithm 5 (MD5) in "prefix+suffix" mode is used to compute the authenticator value in the appended MHAE. Mobile IP also supports the hash-based message authentication code (HMAC-MD5). The receiver compares the authenticator value it computes over the message with the value in the extension to verify the authenticity.
Optionally, the Mobile-Foreign Authentication Extension and Foreign-Home Authentication Extension are appended to protect message exchanges between a mobile node and foreign agent and between a foreign agent and home agent, respectively.
Replay protection uses the identification field in the registration messages as a time stamp and sequence number. The home agent returns its time stamp to synchronize the mobile node for registration.
The Cisco IOS software allows the mobility keys to be stored on an authentication, authorization, and accounting (AAA) server that can be accessed using Terminal Access Controller Access Control System Plus (TACACS+) or Remote Authentication Dial-In User Service (RADIUS) protocols. You can restrict who is allowed to register by using registration filters.
For more information on security in a Mobile IP environment, refer to the "Configuring Mobile IP" chapter of the Cisco IOS IP Configuration Guide, Release 12.2.
AAA in the Mobile IP Environment
To configure AAA in the Mobile IP environment, use the following commands in global configuration mode:
Configuring RADIUS in the Mobile IP Environment
RADIUS is a method for defining the exchange of AAA information in the network. In the Cisco implementation, RADIUS clients run on Cisco routers and send authentication requests to a RADIUS server that contains all user authentication and network server access information. For detailed information about RADIUS configuration options, refer to the "Configuring RADIUS" chapter in the Cisco IOS Security Configuration Guide.
To configure RADIUS in the Mobile IP environment, use the following commands in global configuration mode:
Configuring TACACS+ in the Mobile IP Environment
Terminal Access Controller Access Control System Plus (TACACS+) is an authentication protocol that provides remote access authentication and related services, such as event logging. For detailed information about TACACS+ configuration options, refer to the "Configuring TACACS+" chapter in the Cisco IOS Security Configuration Guide.
To configure TACACS+ in the Mobile IP environment, use the following commands in global configuration mode:
Example of a AAA Server Configuration
In the following AAA server configuration, the home agent can use an AAA server for storing security associations. Mobile IP has been authorized using TACACS+ server to retrieve the security association information, which is used by the home agent to authenticate registrations. The user is the mobile node IP address. The syntax for the security association is spi#num = string, where string is the rest of the IP address. This format can be imported into a CiscoSecure server.
user = 20.0.0.1 {service = mobileip {set spi#0 = "spi 100 key hex 12345678123456781234567812345678""}}user = 20.0.0.2 {service = mobileip {set spi#0 = "spi 100 key hex 12345678123456781234567812345678"}}user = 20.0.0.3 {service = mobileip {set spi#0 = "spi 100 key hex 12345678123456781234567812345678"}}The following example shows how the home agent is configured to use the AAA server:
aaa new-modelaaa authorization ipmobile tacacs+!ip mobile home-agentip mobile network 20.0.0.0 255.0.0.0ip mobile host 20.0.0.1 20.0.0.3 virtual-network 20.0.0.0 255.0.0.0 aaa!tacacs-server host 1.2.3.4tacacs-server key ciscoIPSec in the Mobile IP Environment
Security associations establish trust between two devices in a peer-to-peer relationship. There are two types of security association. The first is Internet Key Exchange (IKE), which provides negotiation, peer authentication, key management, and key exchange. IKE provides a secure communication channel between two devices that is used to negotiate an encryption algorithm, a hash algorithm, an authentication method, and any relevant group information.
The second type of security association is called IPsec security association (IPsec SA). IPsec SA is unidirectional, thus requiring that separate IPsec SAs be established in each direction to provide non-repudiation, data integrity, and payload confidentiality. Non-repudiation is often necessary to verify that a transaction has taken place, such as a financial exchange between parties. Data integrity verifies that packets are not altered in transit by a third party. Payload confidentiality is provided by encryption.
It might be necessary to protect certain traffic on the mobile network. This is accomplished by enabling IPSec between the mobile access router and an IPSec gateway located behind the home agent. Since an IPSec tunnel is established within the Mobile IP tunnel, IKE renegotiation is unnecessary as the mobile access router moves about. The result is secure, scalable mobile networks based on standards.
The IPSec encryption algorithm that runs between the mobile access router and the IPSec gateway can either be Triple Data Encryption Standard (DES) or Advanced Encryption Standard (AES). Note that AES provides greater security than DES and is more efficient than 3DES.
IPSec Interoperability
IPsec sets up its peering between the egress interface of the encrypting router and any interface on the decrypting router. This relationship is hampered because the egress interface of a mobile access router changes based on available network connectivity. In addition, the egress interfaces might have non-routable IP addresses associated with them, which makes setting up an IPsec session impossible using the standard model.
To overcome the problems, all traffic must exit the same interface that will always be up and will always have a routable IP address. The method applied in this example is anchoring the IPsec session to the loopback interface on the mobile access router. The home address of the mobile access router should be configured on a loopback interface because loopback interfaces are software and are always up.
It is possible to forward traffic into a loopback interface. If the traffic is not destined for the IP address of the loopback, the traffic exits the interface and is looped back into the router. At this point, normal routing processes take delivery of the packet.
The only way to forward traffic out a loopback is with the set interface target of a route map command. Using the features of route maps and loopback interfaces, you can configure IPsec on a mobile access router. All traffic from the mobile network that needs to be encrypted is sent by a route map out the loopback and back in to the router for normal delivery. When the traffic exits the loopback interface, the crypto map is applied and traffic is encrypted as necessary. For traffic to the mobile access router, the ingress interface is the loopback interface that has the crypto map to decrypt any protected content.
In summary, the loopback interface is always up and not affected by the movement of the mobile access router (in which the interface or point of attachment changes dynamically). This provides the invariant endpoint of the IPSec connection. Thus, the IPSec connection is always alive in conjunction with mobility.
IPSec Gateway
The IPSec gateway might be any Cisco router with IPSec software and an IPSec-capable image that corresponds to the mobile access router. The IPSec gateway is not required to have the Mobile IP feature set, because it is not providing mobility service. Since this router is acting as an IPSec traffic aggregator, it is recommended that you install hardware accelerator modules in the connected device for better performance. Ideally, the IPSec gateway router is a Cisco 7200 Series router with an ISA/VPN Acceleration Module (VAM) card, or a Catalyst 6500 switch with an American Contractors Exchange (ACE) card.
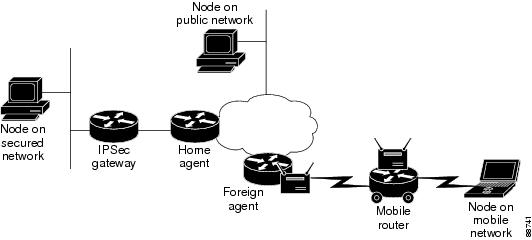
Figure 9-1 IPSec Gateway Network Topology
Figure 9-1 shows three types of nodes in the network topology: nodes on a mobile network, nodes on a secured network, and nodes on a public network. The mobile access router establishes an IPSec tunnel between it and the IPSec gateway to protect traffic to nodes on the secured network. Communications with nodes on the public network is not encrypted. The home agent and IPSec gateway must be deployed in the Demilitarized Zone (DMZ).
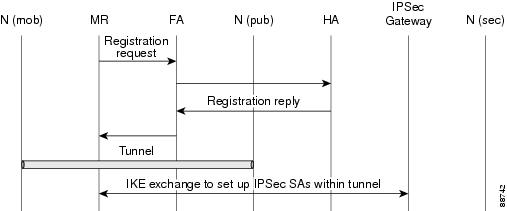
Figure 9-2 shows how a mobile access router sets up an IPSec tunnel with the IPSec gateway by exchanging IKE messages, which traverse the Mobile IP tunnel. The IPSec tunnel is established when traffic flows between a node on the secured network and a node on a mobile network.
Figure 9-2 IPSec Control Flow
Data traffic can be categorized into either secure or public. Communications that must be protected are encrypted and wrapped in IPSec. Otherwise, packets are sent in the clear.
IPSec Configuration
This section contains configurations for the mobile access router, IPSec gateway, home agent, foreign agent, and mobile nodes in a specified network topology. Traffic is secured between the mobile access router network and networks in the home domain. The IPSec endpoints are the mobile access router and the IPSec Gateway located behind the home agent on the home network. The networks in the home domain in which protection is desired are placed behind the IPSec gateway.
Figure 9-3 IPSec Configuration Example
Example of IPSec Mobile Network Configuration
The mobile access router has one Ethernet interface on the mobile network and two interfaces, serial and Ethernet, connected to a foreign agent. The foreign agent is providing Mobile IP service only on the Ethernet interface, not on the serial interface.
The serial interface is a roaming interface with static collocated care-of-address. The roaming Ethernet interface is used to detect foreign agents. The other Ethernet interface is for the LAN on the mobile access router. All nodes on the mobile network use the mobile access router as the default gateway.
Note
If the mobile access router has only one network interface, the mobile network and the roaming interface functions should be combined. If the mobile access router has multiple interfaces or VLANs, it should have a dedicated roaming interface and a mobile network interface.
The IPSec configuration must meet the following criteria:
•
•
•
•
•
access-list 155 permit ip 80.80.80.0 0.0.0.255 60.60.60.0 0.0.0.255Since the source is 80.80.80.0/24, it corresponds to the mobile access router network connected on the Ethernet interface. The destination network is 60.60.60.0/24, which implies that all traffic towards 60.60.60.0/24 will be encrypted. Since communication with the network 60.60.60.0/24 is IPSec protected, this network is referred to as a protected network. All protected networks must be listed in the access control list. The last implicit entry in the access control list is deny ip any any. If the traffic does not match any of the previous entries and was not marked for encryption, the traffic is sent in clear.
Unprotected access is provided to all other (public) networks (those not listed the access control list with the permit clause). For example:
crypto isakmp policy 1hash md5authentication pre-sharegroup 2crypto isakmp key 1234567890 address 200.200.200.1!crypto isakmp peer address 200.200.200.1!crypto IPsec transform-set testtrans esp-des!!crypto map ToSecureNet 10 IPsec-isakmpset peer 200.200.200.1set transform-set testtransmatch address 155!interface Loopback1ip address 65.1.1.1 255.255.255.255crypto map ToSecureNet!interface Ethernet3/2ip address 10.10.10.1 255.255.255.0ip mobile router-service roam!interface Ethernet3/3ip address 80.80.80.4 255.255.255.0ip policy route-map SecureNetPolicy!interface Serial4/1ip address 50.50.50.1 255.255.255.0ip mobile router-service roamip mobile router-service collocated gateway 50.50.50.2!router mobile!ip local policy route-map SecureNetPolicy!ip mobile secure home-agent 100.100.100.3 spi 100 key hex 1122334455667788112334455667788 algorithm md5 mode prefix-suffixip mobile routeraddress 65.1.1.1 255.0.0.0home-agent 100.100.100.3reverse-tunnel!access-list 155 permit ip 80.80.80.0 0.0.0.255 60.60.60.0 0.0.0.255!route-map SecureNetPolicy permit 10match ip address 155set interface Loopback1Example of IPSec Gateway
The IPSec gateway IP address must be configured on a physical WAN interface of the mobile access router. Typically, this is the interface that receives traffic from and sends traffic to the home agent.
Home domain networks in which sensitive data requires encryption are located behind this gateway. Traffic between these networks and mobile access router networks is provided IPSec protection. The crypto map in sample configuration has the following access control list:
access-list 156 permit ip 60.60.60.0 0.0.0.255 80.80.80.0 0.0.0.255This indicates that any traffic from protected network 60.60.60.0/24 that is going to mobile access router network 80.80.80.0/24 is selected for encryption and decryption. For example:
crypto isakmp policy 1hash md5authentication pre-sharegroup 2crypto isakmp key 1234567890 address 65.1.1.1!!crypto IPsec transform-set testtrans esp-des!crypto map ToMobileNet 10 IPsec-isakmpset peer 65.1.1.1set transform-set testtransmatch address 156!interface Ethernet1/0/2ip address 200.200.200.1 255.255.255.0crypto map ToMobileNet!interface Ethernet1/0/3ip address 60.60.60.60 255.255.255.0!access-list 156 permit ip 60.60.60.0 0.0.0.255 80.80.80.0 0.0.0.255Foreign Agent Example
To support mobile access router home domain network IPSec, no special configuration of the foreign agent is required. For example:
interface Serial1/2ip address 50.50.50.2 255.255.255.0!interface Ethernet3/1ip address 100.100.100.1 255.255.255.0!interface Ethernet3/3ip address 70.70.70.1 255.255.255.0ip irdpip irdp maxadvertinterval 5ip irdp minadvertinterval 2ip irdp holdtime 15ip mobile foreign-service reverse-tunnel!router mobile!router ripredistribute mobilenetwork 50.0.0.0network 70.0.0.0network 100.0.0.0!ip mobile foreign-agent care-of Ethernet3/1Home Agent Example
Because the home agent does not participate in providing traffic protection, no special IPSec configuration is required at the home agent. The Mobile IP configurations are shown below:
interface Ethernet3/1ip address 100.100.100.3 255.255.255.0!interface Ethernet3/2ip address 200.200.200.2 255.255.255.0!interface Ethernet3/3ip address 150.150.150.2 255.255.255.0!router mobile!router ripredistribute mobile metric 1network 100.0.0.0network 150.150.150.0network 200.200.200.0!ip mobile home-agentip mobile virtual-network 65.0.0.0 255.0.0.0ip mobile host 65.1.1.1 virtual-network 65.0.0.0 255.0.0.0ip mobile mobile-networks 65.1.1.1description SecureTransportnetwork 80.80.80.0 255.255.255.0ip mobile secure host 65.1.1.1 spi 100 key hex 1122334455667788112334455667788 algorithm md5 mode prefix-suffixno ip mobile tunnel path-mtu-discoveryNode on Mobile Network Example
interface Ethernet3/3ip address 80.80.80.1 255.255.255.0!ip route 60.60.60.0 255.255.255.0 80.80.80.4Node in Public Network Example
interface Ethernet1/1ip address 150.150.150.1 255.255.255.0!ip route 0.0.0.0 0.0.0.0 150.150.150.2Node in Secure Network Example
interface Ethernet1/1ip address 60.60.60.1 255.255.255.0!ip route 0.0.0.0 0.0.0.0 60.60.60.60Mobile Network Security Testing
From a node on the mobile network, you can ping a node in the protected network. You can ping from the protected network node to the mobile network node with same results. The first few packets might be dropped (due to ARP, IKE, or IPSec secure area setup). After the initial packet loss, ping should be successful.
IKE and IPSec security associations are established at mobile access router and IPSec Gateway. To see the IKE security association (SA) state, use the show crypto command. For example:
MobileRouter# show crypto isakmp saf_vrf/i_vrf dst src state conn-id slot/ 200.200.200.1 65.1.1.1 QM_IDLE 3 0After the security area has been established, the state is typically QM_IDLE.
To see the IPSec secure area, use the show crypto ipsec sa command:
MobileRouter#show crypto ipsec sainterface: Loopback1Crypto map tag: ToSecureNet, local addr. 65.1.1.1protected vrf:local ident (addr/mask/prot/port): (80.80.80.0/255.255.255.0/0/0)remote ident (addr/mask/prot/port): (60.60.60.0/255.255.255.0/0/0)current_peer: 200.200.200.1:500PERMIT, flags={origin_is_acl,}#pkts encaps: 397876, #pkts encrypt: 397876, #pkts digest 0#pkts decaps: 397559, #pkts decrypt: 397559, #pkts verify 0#pkts compressed: 0, #pkts decompressed: 0#pkts not compressed: 0, #pkts compr. failed: 0#pkts not decompressed: 0, #pkts decompress failed: 0#send errors 1, #recv errors 0local crypto endpt.: 65.1.1.1, remote crypto endpt.: 200.200.200.1path mtu 1514, media mtu 1514current outbound spi: 21E53ABFinbound esp sas:<snip>Notice the #pkts encaps and #pkts decaps counters. To clear the counters, use the clear crypto sa counters command.
Ping from a mobile access router node to a node on the secured network (or vice versa), and look at the value of counters again. The counters should match the number of ping packets you sent.
Other methods for detecting the encryption activity:
•
•
•
To clear the IKE security associations, use the clear crypto isakmp command:
MobileRouter#clear crypto isakmp <0-32766>where <0-32766> is the connection ID of the secure area.
To clear the IPSec security associations, use the clear crypto sa command:
MobileRouter#clear crypto sa [counters | map | peer | spi | vrf]where:
counters resets the secure area counters
map clears all secure areas for a given crypto map
peer clears all secure areas for a given crypto peer
spi clears secure areas by SPI
vrf clears VRF (Routing/Forwarding) instanceThis command can also clear the packet counters, and it can be used for debugging.
IPSec Commands
encryption Command
Use the encryption command, a isakmp policy command, to establish IKE policy.
encryption {aes | aes 192 | aes 256}Where: aes specifies 128-bit AES aes 192 specifies 192-bit AES aes 256 specifies 256-bit AESView information about the configuration by using the show crypto isakmp policy EXEC command.
crypto ipsec transform-set Command
Use the crypto ipsec transform-set command to define IPSec security protocols and algorithms.
crypto ipsec transform-set transform-set-name transform1 [transform2 transform3]The accepted transform values are expanded. Under the category of Encapsulating Security Payload (ESP) Encryption Transform, one of the following can be chosen:
esp-aes ESP with the 128-bit AES encryption algorithm
esp-aes192 ESP with the 192-bit AES encryption algorithm
esp-aes256 ESP with the 256-bit AES encryption algorithm
esp-des ESP with the 56-bit Data Encryption Standard (DES) encryption algorithm
esp-3des ESP with the 168-bit 3DES encryption algorithm
esp-null null encryption algorithmView information about the configuration by using the show crypto ipsec transform-set and show crypto isakmp policy EXEC commands.
Manual Certificate Enrollment
The TFTP and cut-and-paste (Manual Certificate Enrollment) generates a certificate request and accept certification authority (CA) certificates as well as the router certificates. These tasks are accomplished by using a TFTP server or manual cut-and-paste operations. Use TFTP or manual cut-and-paste enrollment in the following situations:
•
•
Brief descriptions of some of the commands are provided in this section. A detailed explanation of the commands needed to configure Manual Certificate Enrollment can be found in the "Command Reference" section of Manual Certificate Enrollment (TFTP and Cut-and-Paste), and can be found at http://www.cisco.com/univercd/cc/td/doc/product/software/ios122/122newft/122t/122t13/ftmancrt.htm.
Manual Certificate Enrollment (TFTP and Cut-and-Paste) Prerequisites
TFTP and cut-and-paste enrollment has been added to the public key infrastructure (PKI) subsystem. The PKI subsystem requires the crypto subsystem.
Manual Certificate Enrollment (TFTP and Cut-and-Paste) Restrictions
You can switch between TFTP and cut-and-paste; for example, you can paste the CA certificate by using the enrollment terminal command, and then enter the no enrollment terminal and enrollment url tftp://certserver/file_specification commands to TFTP the requests and router certificates. However, Cisco does not recommend switching URLs if SCEP is used; that is, if the enrollment URL is "http://," do not change the enrollment URL between fetching the CA certificate and enrolling the certificate.
Manual Certificate Enrollment Concepts
This section describes the TFTP Certificate Enrollment and Cut-and-Paste Certificate Enrollment concepts.
TFTP Certificate Enrollment
A user might enable TFTP certificate enrollment if his or her CA does not support SCEP, which is the most commonly used method for sending and receiving requests and certificates. This feature takes the existing enrollment ca-trustpoint configuration subcommand and enhances the url url option to support TFTP certificate enrollment—enrollment url tftp://certserver/file_specification.
This subcommand specifies that TFTP should be used to send the enrollment requests and to retrieve the certificate of the CA and the certificate of the router. The file_specification is optional. However, if the file_specification is included in the URL, the router appends an extension to the file specification.
When the crypto ca authenticate command is entered, the router retrieves the certificate of the CA from the specified TFTP server. As appropriate, the router appends the extension ".ca" to the filename or the fully qualified domain name (FQDN). (If the url url option does not include a file specification, the router FQDN is used.) For example, if a user enters enrollment url tftp://CA-server/TFTPfiles/router1, the TFTPfiles/router1.ca file is read from the TFTP server CA-server. If the router FQDN is router1.cisco.com, and you enter enrollment url tftp://CA.cisco.com, the router1.cisco.com.ca file is read from the TFTP server CA.cisco.com.
The file must contain the certificate of the CA in binary format or base 64 encoded.
When a user enrolls the router by using the crypto ca enroll command, he or she is prompted for information regarding the enrollment. The filename that is to be written is already determined at this point, and an extension of .req is appended to indicate that this is a certificate request.
For usage keys, two requests are generated and two certificates are expected to be granted. Thus, the extension for the certificate requests are -sign.req and -encr.req.
After the user enters the crypto ca import command, the router attempts to fetch the granted certificate by using TFTP and using the same filename that was used to send the request, except that .req extension is replaced by a .crt extension. (The certificates are expected to be base 64 encoded PCKS#10 format certificates.) The router parses the files it receives, verifies the certificates, and inserts the certificates into the internal certificate database.
Cut-and-Paste Certificate Enrollment
A user might want to manually cut-and-paste certificate enrollment requests and certificates when he or she does not have a network connection between the router and CA. Cut-and-paste enrollment introduces a new ca-trustpoint configuration subcommand—enrollment. This command should be used when configuring the trustpoint CA. After entering the crypto ca enroll command, you are asked the same questions about the IP address and serial number as a TFTP enrollment. The base 64 encoded certificate request is displayed on the terminal.
Similar to the TFTP process, the user enters the crypto ca import command to enter the granted certificate. With cut-and-paste, the base 64 encoded certificate is accepted from the console terminal. Certificate input ends after the user enters "quit" on a line by itself.
How to Configure Manual Certificate Enrollment
To enable manual certificate enrollment via TFTP or cut-and-paste, you must configure a trustpoint CA and the relevant enrollment tasks. This section contains the following procedures:
•
•
•
Configuring Certificate Enrollment by Using TFTP
To declare the trustpoint CA that your router should use and to configure that trustpoint CA for manual enrollment by using TFTP, use the commands described in this section.
•
•
Configuring Certificate Enrollment by Using Cut-and-Paste
To declare the trustpoint CA that your router should use and to configure that trustpoint CA for manual enrollment via cut-and-paste, use the commands described in this section.
Certificate Enrollment Command Descriptions
crypto ca import Command
To import a certificate manually by using TFTP or cut-and-paste at the terminal, use the crypto ca import command in global configuration mode:
crypto ca import name certificatewhere name certificate specifies the name of the CA. This name is the same name used when the certification authority (CA) was declared with the crypto ca trustpoint command (declares the CA that your router should use).
You must enter the crypto ca import command twice if usage keys (signature and encryption keys) are used. The first time the command is entered, one of the certificates is pasted into the router; the second time the command is entered, the other certificate is pasted into the router. (It does not matter which certificate is pasted first.)
enrollment terminal Command
To specify manual cut-and-paste certificate enrollment, use the enrollment terminal command in ca-trustpoint configuration mode.
enrollment terminalTo delete a current enrollment request, use the no form of this command.
enrollment Command
To specify the enrollment parameters of your certification authority (CA), use the enrollment command in ca-trustpoint configuration mode:
enrollment [mode] [retry minutes] [retry number] URL urlWhere url specifies the URL of the CA where your router should send certificate requests. If you are using TFTP for enrollment, the URL must be in the form tftp://certserver/file_specification. The file_specification is optional. If the file_specification is included in the URL, the router appends an extension to the file specification.
To remove any of the configured parameters, use the no form of this command.
Example of Manual Certificate Enrollment Configuration
The following example shows how to specify a manual cut-and-paste certificate enrollment by using the enrollment terminal subcommand of the crypto ca trustpoint command. In this example, the name of the trustpoint CA is "MS," and the crypto ca import command is entered twice because usage keys (signature and encryption keys) are used.
Router(config)# crypto ca trustpoint MSRouter(ca-trustpoint)# enrollment terminalRouter(ca-trustpoint)# crypto ca authenticate MSEnter the base 64 encoded CA certificate.End with a blank line or the word "quit" on a line by itself-----BEGIN CERTIFICATE-----MIICNDCCAd6gAwIBAgIQOsCmXpVHwodKryRoqULV7jANBgkqhkiG9w0BAQUFADA5MQswCQYDVQQGEwJVUzEWMBQGA1UEChMNQ2lzY28gU3lzdGVtczESMBAGA1UEAxMJbXNjYS1yb290MB4XDTAyMDIxNDAwNDYwMVoXDTA3MDIxNDAwNTQ0OFowOTELMAkGA1UEBhMCVVMxFjAUBgNVBAoTDUNpc2NvIFN5c3RlbXMxEjAQBgNVBAMTCW1zY2Etcm9vdDBcMA0GCSqGSIb3DQEBAQUAA0sAMEgCQQCix8nIGFg+wvy3BjFbVi25wYoGK2N0HWWHpqxFuFhqyBnIC0OshIn9CtrdN3JvUNHr0NIKocEwNKUGYmPwWGTfAgMBAAGjgcEwgb4wCwYDVR0PBAQDAgHGMA8GA1UdEwEB/wQFMAMBAf8wHQYDVR0OBBYEFKIacsl6dKAfuNDVQymlSp7esf8jMG0GA1UdHwRmMGQwL6AtoCuGKWh0dHA6Ly9tc2NhLXJvb3QvQ2VydEVucm9sbC9tc2NhLXJvb3QuY3JsMDGgL6AthitmaWxlOi8vXFxtc2NhLXJvb3RcQ2VydEVucm9sbFxtc2NhLXJvb3QuY3JsMBAGCSsGAQQBgjcVAQQDAgEAMA0GCSqGSIb3DQEBBQUAA0EAeuZkZMX9qkoLHfETYTpVWjZPQbBmwNRAoJDSdYdtL3BcI/uLL5q7EmODyGfLyMGxuhQYx5r/40aSQgLCqBq+yg==-----END CERTIFICATE-----Certificate has the following attributes:Fingerprint:D6C12961 CD78808A 4E02193C 0790082A% Do you accept this certificate? [yes/no]:yTrustpoint CA certificate accepted.% Certificate successfully importedRouter(config)#Router(config)#crypto ca enroll MS% Start certificate enrollment..% The subject name in the certificate will be:Router.cisco.com% Include the router serial number in the subject name? [yes/no]:n% Include an IP address in the subject name? [no]:nDisplay Certificate Request to terminal? [yes/no]:ySignature key certificate request -Certificate Request follows:MIIBhTCB7wIBADAlMSMwIQYJKoZIhvcNAQkCFhRTYW5kQmFnZ2VyLmNpc2NvLmNvbTCBnzANBgkqhkiG9w0BAQEFAAOBjQAwgYkCgYEAxdhXFDiWAn/hIZs9zfOtssKAdaoWYu0ms9Fe/Pew01dh14vXdxgacstOs2Pr5wk6jLOPxpvxOJPWyQM6ipLmyVxvojhyLTrVohrh6Dnqcvk+G/5ohss9o9RxvONwx042pQchFnx9EkMuZC7evwRxJEqRmBHXBZ8GmP3jYQsjS8MCAwEAAaAhMB8GCSqGSIb3DQEJDjESMBAwDgYDVR0PAQH/BAQDAgeAMA0GCSqGSIb3DQEBBAUAA4GBAMT6WtyFw95POY7UtF+YIYHiVRUf4SCqhRIAGrljUePLo9iTqyPU1Pnt8JnIZ5P5BHU3MfgP8sqodaWub6mubkzaohJ1qD06O87fnLCNid5Tov5jKogFHIki2EGGZxBosUw9lJlenQdNdDPbJc5LIWdfDvciA6jONl8rOtKnt8Q+---End - This line not part of the certificate request---Redisplay enrollment request? [yes/no]:Encryption key certificate request -Certificate Request follows:MIIBhTCB7wIBADAlMSMwIQYJKoZIhvcNAQkCFhRTYW5kQmFnZ2VyLmNpc2NvLmNvbTCBnzANBgkqhkiG9w0BAQEFAAOBjQAwgYkCgYEAwG60QojpDbzbKnyj8FyTiOcvTHkDP7XD4vLT1XaJ409z0gSIoGnIcdFtXhVlBWtpq3/O9zYFXr1tH+BMCRQi3Lts0IpxYa3D9iFPqev7SPXpsAIsY8a6FMq7TiwLObqiQjLKL4cbuV0Frjl0Yuv5A/Z+kqMOm7c+pWNWFdLe9lsCAwEAAaAhMB8GCSqGSIb3DQEJDjESMBAwDgYDVR0PAQH/BAQDAgUgMA0GCSqGSIb3DQEBBAUAA4GBACF7feURj/fJMojPBlR6fa9BrlMJx+2FH91YM/CIiz2n4mHTeWTWKhLoT8wUfa9NGOk7yi+nF/F7035twLfq6n2bSCTW4aem8jLMMaeFxwkrV/ceQKrucmNC1uVx+fBy9rhnKx8j60XE25tnp1U08r6om/pBQABUeNPFhozcaQ/2---End - This line not part of the certificate request---Redisplay enrollment request? [yes/no]:nRouter(config)#crypto ca import MS certificateEnter the base 64 encoded certificate.End with a blank line or the word "quit" on a line by itselfMIIDajCCAxSgAwIBAgIKFN7C6QAAAAAMRzANBgkqhkiG9w0BAQUFADA5MQswCQYDVQQGEwJVUzEWMBQGA1UEChMNQ2lzY28gU3lzdGVtczESMBAGA1UEAxMJbXNjYS1yb290MB4XDTAyMDYwODAxMTY0MloXDTAzMDYwODAxMjY0MlowJTEjMCEGCSqGSIb3DQEJAhMUU2FuZEJhZ2dlci5jaXNjby5jb20wgZ8wDQYJKoZIhvcNAQEBBQADgY0AMIGJAoGBAMXYVxQ4lgJ/4SGbPc3zrbLCgHWqFmLtJrPRXvz3sNNXYdeL13cYGnLLTrNj6+cJOoyzj8ab8TiT1skDOoqS5slcb6I4ci061aIa4eg56nL5Phv+aIbLPaPUcbzjcMdONqUHIRZ8fRJDLmQu3r8EcSRKkZgR1wWfBpj942ELI0vDAgMBAAGjggHMMIIByDALBgNVHQ8EBAMCB4AwHQYDVR0OBBYEFL8Quz8dyz4EGIeKx9A8UMNHLE4sMHAGA1UdIwRpMGeAFKIacsl6dKAfuNDVQymlSp7esf8joT2kOzA5MQswCQYDVQQGEwJVUzEWMBQGA1UEChMNQ2lzY28gU3lzdGVtczESMBAGA1UEAxMJbXNjYS1yb290ghA6wKZelUfCh0qvJGipQtXuMCIGA1UdEQEB/wQYMBaCFFNhbmRCYWdnZXIuY2lzY28uY29tMG0GA1UdHwRmMGQwL6AtoCuGKWh0dHA6Ly9tc2NhLXJvb3QvQ2VydEVucm9sbC9tc2NhLXJvb3QuY3JsMDGgL6AthitmaWxlOi8vXFxtc2NhLXJvb3RcQ2VydEVucm9sbFxtc2NhLXJvb3QuY3JsMIGUBggrBgEFBQcBAQSBhzCBhDA/BggrBgEFBQcwAoYzaHR0cDovL21zY2Etcm9vdC9DZXJ0RW5yb2xsL21zY2Etcm9vdF9tc2NhLXJvb3QuY3J0MEEGCCsGAQUFBzAChjVmaWxlOi8vXFxtc2NhLXJvb3RcQ2VydEVucm9sbFxtc2NhLXJvb3RfbXNjYS1yb290LmNydDANBgkqhkiG9w0BAQUFAANBAJo2r6sHPGBdTQX2EDoJpR/A2UHXxRYqVSHkFKZw0z31r5JzUM0oPNUETV7mnZlYNVRZCSEX/G8boi3WOjz9wZo=% Router Certificate successfully importedRouter(config)#Router(config)#crypto ca import MS certificateEnter the base 64 encoded certificate.End with a blank line or the word "quit" on a line by itselfMIIDajCCAxSgAwIBAgIKFN7OBQAAAAAMSDANBgkqhkiG9w0BAQUFADA5MQswCQYDVQQGEwJVUzEWMBQGA1UEChMNQ2lzY28gU3lzdGVtczESMBAGA1UEAxMJbXNjYS1yb290MB4XDTAyMDYwODAxMTY0NVoXDTAzMDYwODAxMjY0NVowJTEjMCEGCSqGSIb3DQEJAhMUU2FuZEJhZ2dlci5jaXNjby5jb20wgZ8wDQYJKoZIhvcNAQEBBQADgY0AMIGJAoGBAMButEKI6Q282yp8o/Bck4jnL0x5Az+1w+Ly09V2ieNPc9IEiKBpyHHRbV4VZQVraat/zvc2BV69bR/gTAkUIty7bNCKcWGtw/YhT6nr+0j16bACLGPGuhTKu04sCzm6okIyyi+HG7ldBa45dGLr+QP2fpKjDpu3PqVjVhXS3vZbAgMBAAGjggHMMIIByDALBgNVHQ8EBAMCBSAwHQYDVR0OBBYEFPDO29oRdlEUSgBMg6jZR+YFRWljMHAGA1UdIwRpMGeAFKIacsl6dKAfuNDVQymlSp7esf8joT2kOzA5MQswCQYDVQQGEwJVUzEWMBQGA1UEChMNQ2lzY28gU3lzdGVtczESMBAGA1UEAxMJbXNjYS1yb290ghA6wKZelUfCh0qvJGipQtXuMCIGA1UdEQEB/wQYMBaCFFNhbmRCYWdnZXIuY2lzY28uY29tMG0GA1UdHwRmMGQwL6AtoCuGKWh0dHA6Ly9tc2NhLXJvb3QvQ2VydEVucm9sbC9tc2NhLXJvb3QuY3JsMDGgL6AthitmaWxlOi8vXFxtc2NhLXJvb3RcQ2VydEVucm9sbFxtc2NhLXJvb3QuY3JsMIGUBggrBgEFBQcBAQSBhzCBhDA/BggrBgEFBQcwAoYzaHR0cDovL21zY2Etcm9vdC9DZXJ0RW5yb2xsL21zY2Etcm9vdF9tc2NhLXJvb3QuY3J0MEEGCCsGAQUFBzAChjVmaWxlOi8vXFxtc2NhLXJvb3RcQ2VydEVucm9sbFxtc2NhLXJvb3RfbXNjYS1yb290LmNydDANBgkqhkiG9w0BAQUFAANBAHaUhyCwLirUghNxCmLzXRG7C3W1j0kSX7a4fX9OxKR/Z2SoMjdMNPPyApuh8SoT2zBPZKjZU2WjcZG/nZF4W5k=% Router Certificate successfully importedVerifying Manual Certificate Enrollment
To verify that the Manual Certificate Enrollment feature is working, perform the following optional steps:
The following sample output is displayed after manual certificate enrollment has been successfully configured by using the enrollment terminal command (cut-and-paste):
Router# show crypto ca certificatesCertificateStatus:AvailableCertificate Serial Number:14DECE05000000000C48Certificate Usage:EncryptionIssuer:CN = msca-rootO = Cisco SystemsC = USSubject:Name:Router.cisco.comOID.1.2.840.113549.1.9.2 = Router.cisco.comCRL Distribution Point:http://msca-root/CertEnroll/msca-root.crlValidity Date:start date:18:16:45 PDT Jun 7 2002end date:18:26:45 PDT Jun 7 2003renew date:16:00:00 PST Dec 31 1969Associated Trustpoints:MSCertificateStatus:AvailableCertificate Serial Number:14DEC2E9000000000C47Certificate Usage:SignatureIssuer:CN = msca-rootO = Cisco SystemsC = USSubject:Name:Router.cisco.comOID.1.2.840.113549.1.9.2 = Router.cisco.comCRL Distribution Point:http://msca-root/CertEnroll/msca-root.crlValidity Date:start date:18:16:42 PDT Jun 7 2002end date:18:26:42 PDT Jun 7 2003renew date:16:00:00 PST Dec 31 1969Associated Trustpoints:MSCA CertificateStatus:AvailableCertificate Serial Number:3AC0A65E9547C2874AAF2468A942D5EECertificate Usage:SignatureIssuer:CN = msca-rootO = Cisco SystemsC = USSubject:CN = msca-rootO = Cisco SystemsC = USCRL Distribution Point:http://msca-root/CertEnroll/msca-root.crlValidity Date:start date:16:46:01 PST Feb 13 2002end date:16:54:48 PST Feb 13 2007Associated Trustpoints:MSRelated Documents
Table 9-1 shows documents that contain additional information on Mobile IP Security.