Downloads |
 Feedback Feedback
|
Table Of Contents
Hardware and Software Requirements
Hardware Requirements for the IPM Server and Client
Hardware Requirements for the IPM Client Only
Overview of Installing IPM on Windows
Installing IPM on Windows from the CD-ROM
Installing the IPM Client on Windows from the Web Server
Installing the Java Plug-In on Windows from the Web Server
Installing the Java Plug-In for Netscape
Installing the Java Plug-In for Internet Explorer
Verifying IPM Installation on Windows
Installing IPM on Windows
This chapter describes how to install the IPM server software on Windows NT, Windows 2000 Professional, or Windows 2000 Server system, and how to install the IPM client software on a Windows 98, Windows NT, Windows 2000 Professional, or Windows 2000 Server system. It explains how to verify the installation, and how to uninstall and reinstall IPM on Windows.
The IPM server and client software can be installed from the CD-ROM, or the client software can be downloaded from the IPM server's Web Server. This chapter provides the following information about installing the IPM software on Windows 98, Windows NT, Windows 2000 Professional, or Windows 2000 Server:
•
Hardware and Software Requirements
•
•
•
•
•
Hardware and Software Requirements
This section describes the hardware and software requirements to run IPM on a Windows 98, Windows NT, Windows 2000 Professional, or Windows 2000 Server system. It includes the following sections:
•
•
Note
Hardware Requirements for the IPM Server and Client
Your system must meet the following hardware requirements to run the IPM server and client together:
•
•
•
•
•
Hardware Requirements for the IPM Client Only
Your system must meet the following hardware requirements to run the IPM client by itself:
•
•
•
•
Software Requirements
Your system must meet the following software requirements to run IPM:
•
The IPM client software can be installed on Windows 98, Windows NT version 4.0, Windows 2000 Professional, or Windows 2000 Server.
The IPM server software can be installed only on Windows NT version 4.0, Windows 2000 Professional, or Windows 2000 Server.
•
version 2.0.•
•
•
Before you install IPM on a Windows system, verify the following:
•
•
•
•
Overview of Installing IPM on Windows
IPM supports running the IPM client software on a Windows 98, Windows NT, Windows 2000 Professional, Windows 2000 Server, or Solaris system. However, the IPM server is currently available only on Windows NT, Windows 2000 Professional, Windows 2000 Server, and Solaris. An IPM server on Windows or Solaris can be accessed by IPM clients running on Windows 98, Windows NT, Windows 2000 Professional, Windows 2000 Server, or Solaris systems.
The IPM client software can either reside with the IPM server, or it can be installed on another system, located on the same network as the IPM server.
On Windows 98 the IPM installation process defaults to client-only installation. On Windows NT, Windows 2000 Professional, or Windows 2000 Server, the following IPM installation menu options are provided:
•
•
•
Installing IPM on Windows from the CD-ROM
Installing IPM on Windows takes approximately 5 minutes. To install the IPM software on Windows:
Step 1
Step 2
Note
Step 3
Step 4
Note
Step 5
•
•
•
The Choose Destination Location window appears.
Step 6
Step 7
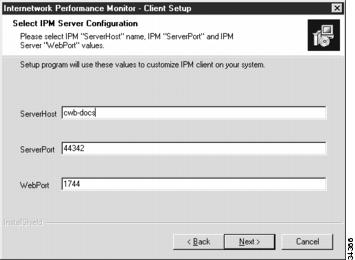
Figure 5-1 Select IPM Server Configuration Window
Figure 5-1 shows the Select IPM Server Configuration window if you are installing only the IPM client. If you are installing the IPM server the window is similar, but the DbPort field is displayed instead of the Server Host field.
Step 8
If you are installing only the IPM client, in the ServerHost field enter the name of the host on which the IPM server software is installed.
Step 9
If you are installing only the IPM client, verify that the IPM server is using default port number 44342/udp. If the IPM server is using a different port number, enter that number in this field. The IPM client and server can communicate only if they are configured for the same port number.
Step 10
Step 11
Step 12
Step 13
Step 14
Step 15
Step 16
Step 17
Installing the IPM Client on Windows from the Web Server
You can use the IPM Web Server to access the client installation software if you do not have access to the CD-ROM, or if you prefer to download the IPM client software from the IPM server to run the installation.
Note
To install the IPM client on a Windows system from the IPM Web Server:
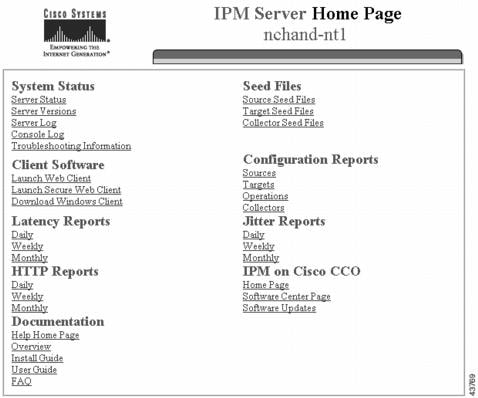
Step 1
Figure 5-2 IPM Server Home Page
Note
Step 2
Figure 5-3 IPM Client for Windows Page
Step 3
Step 4
Step 5
The installation files automatically uncompress into a temporary directory, and the installation setup program starts.
Step 6
Installing the Java Plug-In on Windows from the Web Server
If you want to run the IPM client as an applet from a Web browser, you need the Java plug-in 1.3.
To install the Java plug-in on a Windows system from the IPM Web Server:
Step 1
Note
Step 2
Note
The installation process varies according to the browser that you are using. Refer to the following sections and complete the install process typical to your browser. After the successful installation of the Java Plug-in, the IPM client appears.
Note
This prompt does not appear if you have granted permission for all sessions while using CiscoWorks2000 or any of its applications, earlier.
Installing the Java Plug-In for Netscape
If you want to run the IPM client as an applet from a Web browser, you need the Java plug-in 1.3. If the IPM Client detects that the Java plug-in is not installed, the prompt Click here to get the plug-in appears.
To install the Java plug-in for Netscape browser:
Step 1
Step 2
Step 3
Step 4
Step 5
Step 6
Step 7
Step 8
Step 9
Step 10
If the installation is successful, the Java applet loads and the Web client launches.
Installing the Java Plug-In for Internet Explorer
If you want to run the IPM client as an applet from a Web browser, you need the Java plug-in 1.3. If the IPM Client detects that the Java plug-in is not installed, the Security Warning window appears and prompts you to install and run the Java plug-in.
To install the Java plug-in for Internet Explorer:
Step 1
Step 2
Step 3
The download process begins.
After the successful completion of the download process, the Install shield for Java (TM) 2 runtime environment, Standard Edition, v 1.3 is activated, and the Software License Agreement window appears.
Step 4
Step 5
On successful completion of the installation process, a message appears. The Java applet loads and the IPM Web client appears.
Verifying IPM Installation on Windows
To verify the IPM server installation:
Step 1
•
•
•
•
•
Step 2
To verify the IPM client installation:
Step 1
Step 2
Step 3
•
•
•
•
•
•
•
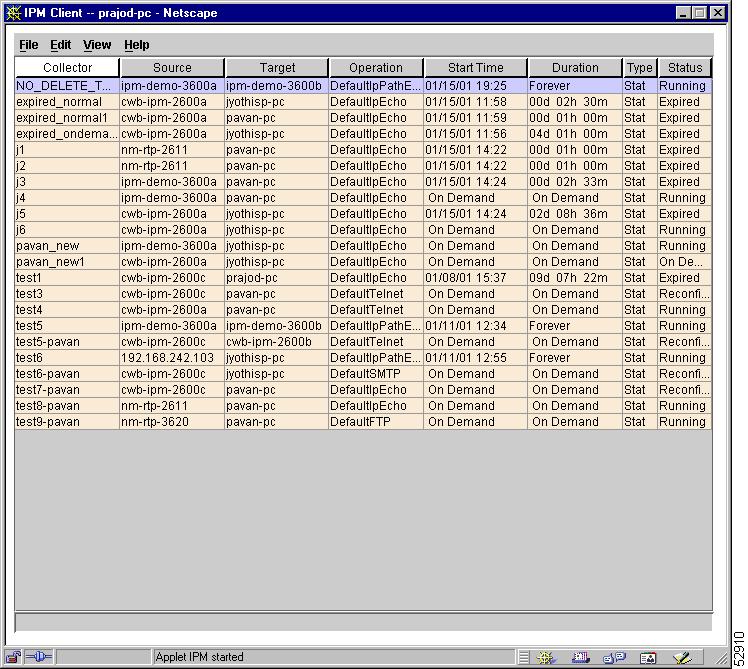
Step 4
Figure 5-4 IPM Main Window
Uninstalling IPM on Windows
You can use the standard Add/Remove Programs icon in the Windows Control Panel to uninstall IPM on Windows 98, Windows 2000 Professional, Windows 2000 Server, or Windows NT.
You can also uninstall IPM from the Windows Start menu by selecting Start > Programs > Internetwork Performance Monitor > Uninstall IPM.
Note
To uninstall IPM:
Step 1
Step 2
Step 3
Step 4
•
•
Step 5
Step 6
•
•
Step 7
Step 8
If you are running IPM, or if you have the IPM Main window open when you uninstall IPM, you might receive a message that not all the files were removed. Click Details to see a list of those files. Make note of them and remove them manually.
IPM has been successfully uninstalled.