Downloads |
 Feedback Feedback
|
Table Of Contents
What's New in CWCS Online Help
Linking Context-Sensitive Help Buttons
Creating the Main Help Contents and Index
Summarizing the Display Process
Understanding the Search Engine
Displaying the Search Dialog Box
Searching the Files and Displaying the Search Results
Summarizing the Search Process
Mapping File Conventions and Requirements
Implementing Help: Engineering Tasks
Adding a Call to the Help Engine
Calling Help From a Java Application
Calling Help From an HTML-Based Application
Implementing Help: Writing Tasks
Setting Up Your Authoring Environment
Setting Up the Native HTML Authoring Environment
Setting Up the XML Authoring Environment
Setting Up the FrameMaker/WebWorks Authoring Environment
Maintaining Your Help System's Mapping File
Defining the Main Help Page Contents and Index
Maintaining the Search Index File
Adding Online Help
CWCS uses a customized Cisco help engine to display online help. The Cisco help engine produces a help system suite, composed of one or more help systems that you can install or uninstall when you need them. When you add a new application to CWCS:
•
The help system for your application is added to the help system suite.
•
•
The following topics describe the CWCS help engine and how to add help for your application to the help system suite:
•
•
•
For more information about the Cisco help system, refer to the Cisco Online Help support website (http://wwwin-olh-support.cisco.com/index.html). This website provides access to templates, APIs, and many process documents, including:
•
•
•
•
•
•
•
Note
What's New in CWCS Online Help
This release of CWCS uses Cisco help system version 2.0, which incorporates the following major changes from version 1.0:
•
•
•
Overview of Online Help
Cisco help consists of:
•
•
–
–
–
–
•
•
The following topics describe these components:
•
•
How Help Is Displayed
The Cisco help engine displays help files in a separate browser window.
To organize the content of a suite of help systems, the help engine creates a top-level help page that contains links to the help system for each installed application. Figure 17-1 shows an example of the Main Help Window for a help system suite.
Figure 17-1 Help Suite: Main Page Layout
For this top-level page in a help suite, the help window contents and functions are as follows:
•
–
–
•
–
–
–
•
These frames are created by a file called index.html. For a help system suite, there is one index.html file per help system as well as a master, or main, index.html file.
The look of individual pages with only one help system is nearly identical to Figure 17-1. The only differences are:
•
•
Understanding the Help Engine
The Cisco help engine is a customized Java application that displays help topics in a separate browser window. This help engine:
•
•
•
•
The following topics describe these help engine functions:
•
•
•
Displaying Help Topics
The Cisco help engine uses the following behaviors to display help topics associated with the navigation tree options in the CWCS desktop:
•
•
The first page of a help system also appears when you select Help from the toolbar (where the application has toolbar), then chooses the option for this application.
•
Linking Context-Sensitive Help Buttons
To support context-sensitive help, each dialog box requires a link to its associated help topic. Therefore, for each dialog box, the engineer must add an engineering tag to the code. Mapping files correlate these engineering tags to corresponding help file paths. Mapping files are described in the "Understanding Mapping Files" section.
Note
When the user opens the help system from a context-sensitive link, such as a Help button on a dialog box, the help engine creates a URL to display the topic specified in the mapping file.
Creating the Main Help Contents and Index
The Cisco help engine creates the master table of contents and index files for the installed help systems.
The help engine reads special DROPIN and DROPINPLACE lines in each mapping file. Using this information, it creates a top-level help page that contains links to the help files for all installed applications, including in-house and third-party drop-ins. If no DROPIN or DROPINPLACE lines are present in any mapping files, the help system does not create the top-level help page.
Related Topics
Handling Error Conditions
The Cisco help engine handles context-sensitive links when the target file is not available. The Cisco help engine reads all the mapping files, looking for a match to the engineering tag sent by the application.
•
•
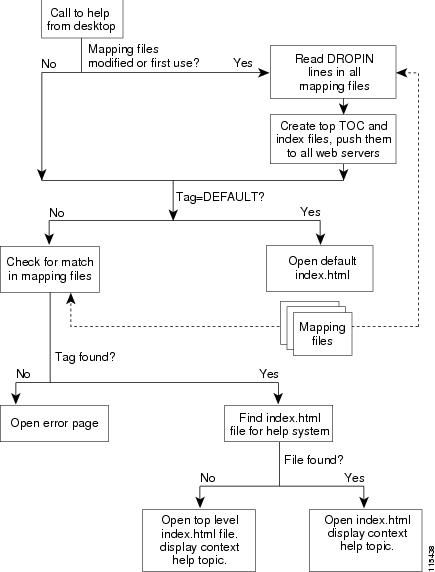
Summarizing the Display Process
Figure 17-2 illustrates the process the Cisco help engine API uses to display the help topics.
Figure 17-2 Help API Process Overview
Understanding the Search Engine
The search engine allows the user to search all files in the help system or the help files for a single help system. The search engine consists of several parts, discussed in the following topics:
•
•
•
Displaying the Search Dialog Box
When the reader clicks the Search button in the banner frame, HelpSearchServlet.java displays the search dialog box in the topic frame. Figure 17-3 shows a sample search dialog box.
Figure 17-3 Sample Search Dialog Box
Mapping files define the scope of the search for each help system. A special SEARCH line in each mapping file defines:
•
•
Note
Related Topics
•
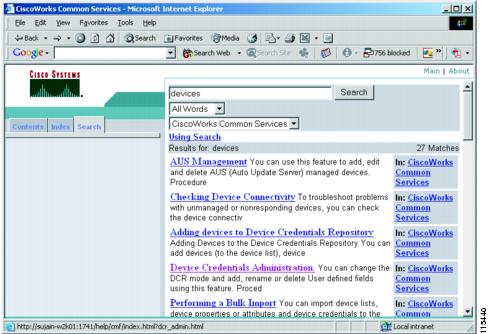
Searching the Files and Displaying the Search Results
After the user has entered the search parameters, HelpSearchServlet.java looks for matches in the search index files and displays the results. Figure 17-4 shows a sample search results page. When the user clicks a link in the search results page, the search engine displays the associated help topic.
Figure 17-4 Sample Search Results Page
Summarizing the Search Process
Figure 17-5 illustrates the process the search engine uses to find and display its results.
Figure 17-5 Search Process Overview
Understanding Mapping Files
Mapping files are an integral part of the help display process. The Cisco help engine API uses mapping files to:
•
•
•
The search engine also depends on mapping files to define:
•
•
The following topics contain more information about mapping files:
•
Mapping File Conventions and Requirements
The conventions shown in Table 17-1must be used by all mapping files for the Cisco help engine API to work properly:
Mapping File Line Types
Table 17-2 summarizes the available mapping file line types. These line types allow you to:
•
•
•
•
•
•
Table 17-2 Mapping File Line Types
Tag/helpfile
The tag/filepath pair used to implement context-sensitive help.
tag /filepath
where:
tag is a help tag name. It must be unique among all installed mapping files.
/filepath is the path name of the HTML file. The Cisco help engine assumes the top-level directory is /help.
Comment
# <any text>
DROPIN
Adds an entry to the contents in the main help page.
DROPIN, "level 1 name" [,"level x name"] [...] [, /filepath]
where:
level x name defines a contents structure (books and pages; books can contain other books or pages)
/filepath is the path name of the HTML file that corresponds to the last entry in the list. If /filepath is not present, level x name is added to the contents but no link is created.
The number of level x name entries in the DROPIN line determines the location of the link in the contents hierarchy. Use DROPIN lines to add a link in the main help page contents to your help system when the order in which the help system entry appears in the list of book entries is not important.
You can put DROPIN lines anywhere in the file, but it is best to put them before any tag/filepath pairs.
DROPINPLACE
Forces the last level x name entry to the top or end of the list in the main help page contents.
DROPINPLACE, "order#", "level 1 name" [, "level x name"] [...] [, /filepath]
where:
order# is the order in which these entries appear. For details on how the help system uses this value to order the main help page contents, see the "Defining the Main Help Page Contents and Index" section.
level x name defines a contents structure.
/filepath is the path name of the HTML file that corresponds to the last entry in the list. If /filepath is not present, level x name is added to the contents but no link is created.
Use DROPINPLACE lines to force book or page entries for a help system to appear in a specific location in that book in relation to other entries at the same level.
You can put DROPINPLACE lines anywhere in the file, but it is best to put them at the top, before any tag/filepath pairs, for easy access.
SEARCH
Defines the entry in the search scope list that is displayed in the search page and the search index files to be searched when the user selects that entry.
SEARCH, "search scope", "app.sch"[, "app.sch"...]
where:
search scope is the name you want to appear in the search drop-down box. If this field is not present, the search results page displays "Unknown" in the application name column for any hits to this help system.
app.sch is the name of the search index files you want the search utility to look at when the user selects this option. You can specify multiple search files. For example, if you want to search your help topics and the glossary, make sure there is a search index for the glossary, then add that filename to this line. For example:
SEARCH, "Management Connection","mngconnect.sch", "glossary.sch"
SEARCHALL
Special line that defines the text to search "all" help systems.
SEARCHALL "all_name"
If SEARCHALL is not specified in any installed mapping file, the search engine uses the default text "All."
Sample Mapping File
Example 17-1 shows a typical mapping file.
Example 17-1 Sample Mapping File
#################################################### MyApp Manager Mapping file (MyAppmgr.hlp)# for context-sensitive help.## Last modified 02/31/2004## Copyright (c) 1997-2004 by Cisco Systems, Inc.# All rights reserved############################################################################ Top-level TOC entry########################DROPIN,"Server Configuration","Administration","Process Management",/myappmgr/index.htmlSEARCH,"Process Management", "myappmgr.sch"#-------------------------# TOP-LEVEL FOLDER#-------------------------# This is for the MyApp Server > Administration > Process Managementprocmgr_folder /myappmgr/myappmgr_overv.html#------------------------# PROCESS ADMIN OPERATIONS#------------------------# this page would start a single process or systemmyapp_mgr_start_processes /myappmgr/ad_procs_start.html# this page would stop a single process or systemmyapp_mgr_stop_processes /myappmgr/ad_procs_stop.html# this page would display myapp.log with selected processmyapp_mgr_myapp_log# this page would display the status of processesmyapp_mgr_process_status /myappmgr/ad_procs_status.html# this page would display process propertiesmyapp_mgr_process_report /myappmgr/ad_procs_detail.html#-------------------------- EOF -------------------------#
Implementing Help: Engineering Tasks
Implementing help for a new application typically requires effort on the part of both the development engineers and the writers. These tasks must be performed by the engineer:
1.
2.
3.
4.
Installing the Help Packages
CWCS supplies the help and search engine class files as part of the pxhlp (Windows) and CSCOhlp (Solaris) packages. To install the Help system, include these packages in your install. If performed correctly, the following files should appear in your classpath:
com\cisco\nm\help\ClientServerHelpAPI.classcom\cisco\nm\help\ConfigReadWrite.classcom\cisco\nm\help\CvHelpApiIf.classcom\cisco\nm\help\DataHandler.classcom\cisco\nm\help\HelpCache.classcom\cisco\nm\help\HelpCacheServlet.classcom\cisco\nm\help\HelpConstants.classcom\cisco\nm\help\HelpEngine.classcom\cisco\nm\help\HelpSearch.classcom\cisco\nm\help\HelpSearchServlet.classcom\cisco\nm\help\HelpTree.classcom\cisco\nm\help\HelpTreeNode.clascom\cisco\nm\help\ListenerServlet.classcom\cisco\nm\help\PopHelp.classcom\cisco\nm\help\PostSearch.classcom\cisco\nm\help\PreSearch.classcom\cisco\nm\help\SearchHelpServlet.classcom\cisco\nm\help\ServerHelpEngine.classcom\cisco\nm\help\ServerSearchEngine.classcom\cisco\nm\help\SystemUtils.classFor a complete list of required files, see the pxhlp.bom file in the ClearCase VOB for the version of CWCS you are using.
Adding a Call to the Help Engine
The following topics describe how to call the Cisco help engine:
•
•
Calling Help From a Java Application
Use the Java class ClientServerHelpAPI summarized in Table 17-3 to start the help system from your Java application. Each code module that creates a dialog box with a Help button must include a call to this servlet.
Calling Help From an HTML-Based Application
Use the JavaScript function pophelp to start the help system from your HTML-based application. This function exists in the parent window (the CWCS desktop). Each HTML dialog box that includes a help button must include a call to this function.
Updating the Mapping File
To implement context-sensitive help, the engineer must work closely with the help writer. Although the writer typically creates and maintains the mapping file, the engineer is responsible for:
•
•
•
•
Note
Packaging the Help Files
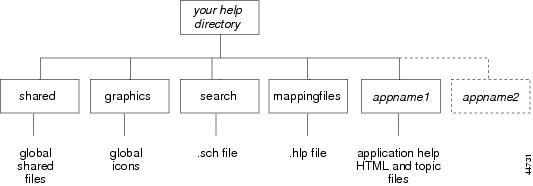
The required runtime structure, shown in Figure 17-6, includes all help systems and any shared help resources.
Figure 17-6 Required Help Runtime Structure
Table 17-5 describes each directory and lists the required files that should be installed in each directory.
For a complete list of required files, see the pxhlp.bom file in the ClearCase VOB for the version of CWCS you are using.
Implementing Help: Writing Tasks
Implementing and maintaining online help typically requires that the writer perform these tasks:
Step 1
Step 2
Step 3
Step 4
Step 5
Step 6
Selecting an Authoring Tool
Cisco help was designed to allow for more than one authoring method. You can use any of the following methods to create online help:
•
•
•
–
–
Setting Up Your Authoring Environment
The structure of your local writing environment is determined by the authoring tool you have selected. These topics describe the recommended environment for each authoring tool:
•
•
•
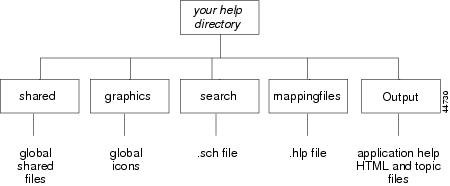
Setting Up the Native HTML Authoring Environment
Use the instructions in the following document to set up your writing environment: Creating Online Help Using Native HTML, EDCS-298882.
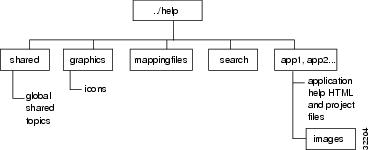
When your environment is set up, (typically, on your local machine), it should look like Figure 17-7.
Figure 17-7 Local Native HTML Writing Environment
Each of the subdirectories under the main help directory contains specific files:
•
•
•
–
–
•
If you are working on help for more than one application and therefore have more than one native HTML project, you can add application subdirectories for each help system and share the other subdirectories (search, shared, graphics, and so on). In this case, your search and mappingfiles subdirectories will contain one .sch and one .hlp file for each help system.
Setting Up the XML Authoring Environment
Use the instructions in the following document to set up your writing environment: Creating Online Help Using XML, EDCS-357012.
When your environment is set up, (typically, on your local machine), it should look like Figure 17-7.
Figure 17-8 Local XML Writing Environment
Each of the subdirectories under the main help directory contains specific files:
•
•
•
–
–
•
If you are working on help for more than one application and therefore have more than one XML project, you can add application subdirectories for each help system and share the other subdirectories (search, shared, graphics, and so on). In this case, your search and mappingfiles subdirectories will contain one .sch and one .hlp file for each help system.
Setting Up the FrameMaker/WebWorks Authoring Environment
Use the instructions in the following document to set up your writing environment: Creating Cisco Online Help Using FrameMaker and WebWorks, ENG-104742.
When your development environment is set up (typically, on your local machine), it should look like Figure 17-9.
Figure 17-9 Local FrameMaker/WebWorks Writing Environment
Each of the subdirectories under the main help directory contains specific files:
•
•
•
–
–
•
Store your FrameMaker source files, WebWorks template file (wdt), and illustrations in the top-level help directory. When you run WebWorks, it will automatically copy your help topics and supporting files to the Output subdirectory.
Caution
Creating the Help Topic Files
Use these manuals to help you create your help topics:
•
•
•
In addition, use these guidelines when working in your local authoring environment:
•
•
Maintaining Your Help System's Mapping File
Mapping files require either inputs from both the engineer and the writer, or an agreement that the writer will create the engineering tags in the mapping file and the engineer will add these tags to the source code.
The following topics describe how to create and maintain your mapping file:
•
Creating the Mapping File
Note
If you are using Native HTML or XML authoring, follow this procedure to create a mapping file for your help system:
Step 1
Step 2
Step 3
Step 4
Step 5
Step 6
If you are not using the NMTG ClearCase processes, copy the mapping file to the following runtime directory:
NMSROOT/htdocs/help/mappingfiles
where NMSROOT is the directory in which the product is installed.
Defining the Main Help Page Contents and Index
The Cisco help engine reads the DROPIN and DROPINPLACE lines in the mapping files to create the Main Help page index and contents.
•
•
Figure 17-10 shows the contents for a sample Main Help page.
Figure 17-10 Main Help Page Contents
Although the order of the index entries is fixed, the writer can determine the order in which the contents entries appear.
The DROPIN and DROPINPLACE lines in the mapping files determine the entries that appear in the main help contents and their relative locations. The following topics discuss these special lines:
•
•
Adding Contents Entries in the Default Order
Use DROPIN lines to add a link in the Main Help page contents to your help system when the order in which the help system entry appears in the list of book entries is not important.
Note
The DROPIN line requires this syntax:
DROPIN, "level 1 name" [,"level 2 name"] [...] [, /filepath]
The number of level name entries in the DROPIN line determines the location of the link in the contents hierarchy. The following examples illustrate different ways to use the DROPIN line:
Example 1
DROPIN,"Server Configuration","Desktop",/CWCS/index.html
Because this DROPIN line contains two entries, "Server Configuration" and "Desktop," the Cisco help engine will create a book called "Server Configuration" that contains the page, "Desktop."
Example 2
DROPIN,"Server Configuration","Administration","Basic Administration",/admin/index.html
This DROPIN line contains three entries: "Server Configuration," "Administration," and "Basic Administration." The Cisco help engine will create a book called "Server Configuration" that contains a second book called "Administration." The book "Administration" will contain the page, "Basic Administration."
Example 3
DROPIN,"Resource Manager Essentials","24-Hour Reports","Software Upgrade Report", /swim/sw_hist_24hr.html
(all on one line)
You can also create a book in the contents that contains links to topics from many different help systems. This DROPIN line creates a book in the "Resource Manager Essentials" book called "24-Hour Reports" and adds the page, "Software Upgrade Report" to this book. Other help systems that must add an entry to the "24-Hour Reports" book can add a similar line to their mapping files. For example, in its mapping file, the Syslog help system adds the report "Syslog Messages" to the "24-Hour Reports" book:
DROPIN,"Resource Manager Essentials","24-Hour Reports","Syslog Messages", /syslog/sa_uinfo.html
(all on one line)
Note
Related Topics
•
Adding Contents Entries in a Specific Order
Use the DROPINPLACE keyword to force book or page entries for a help system to appear in a specific location in that book in relation to other entries at the same level.
Note
The DROPINPLACE line requires this format:
DROPINPLACE,"order#","level 1 name"[,"level 2 name"][...][, /filepath]The Cisco help engine applies the order# field to all entries at the same tree level. The order number default value is 999. Order numbers lower than 999 will appear before book and page entries that use the default. Order numbers higher than 999 will appear after book and page entries using the default. Table 17-6 illustrates this logic.
Use these guidelines when adding a DROPINPLACE line to your mapping file:
•
•
•
DROPINPLACE, "1", "Campus Manager", "Using Campus Manager", /CMcore/UGuide/index.html
(all on one line)
•
•
DROPINPLACE, "1", "Server Configuration"
(all on one line)
•
The order number you use determines the location of your link. The following examples illustrate different ways to use the DROPINPLACE line:
Example 1
User guides should appear at the top of the entries for a product suite. To add the user guide for Campus Manager, add the following line to the Campus Manager user guide mapping file:
DROPINPLACE, "1", "Campus Manager", "Using Campus Manager", /CMcore/UGuide/index.html
(all on one line)
The number 1 tells the Cisco help engine to place the "Using Campus Manager" entry at the top of the Campus Manager contents entries.
Example 2
To move the 24-Hour Reports book to the bottom of the Resource Manager Essentials list, add the following line to the RMcore mapping file:
DROPINPLACE, "1001", "Resource Manager Essentials", "24-Hour Reports"
(all on one line)
The number 1001 tells the Cisco help engine to place this entry at the bottom of the list of Resource Manager Essentials entries (books and pages). Because this is a book in the contents, a filepath is not required.
Related Topics
•
Adding Search Support
To implement search for a new help system:
Step 1
Step 2
The new search index file has an .sch file extension. The default name is your mapfile name; for example, avmgr.sch.
Step 3
Step 4
If you are not using the NMTG ClearCase processes, copy the search index file to the following runtime directory:
NMSROOT/htdocs/help/search
where NMSROOT is the directory in which the product is installed.
Step 5
For example, the search line for the Availability help system would look like this:
SEARCH,"Availability","avmgr.sch"
In this example, when the user selects Availability from the search scope list, the search engine looks at the Availability search index file.
Related Topics
•
Maintaining the Search Index File
When the contents of your help system change, you must update the search index file to reflect these changes. Each authoring tool updates the search index file by re-reading all the help topics for your application and replacing the old file with a new search index file.
To update the search index file:
Step 1
Step 2
Step 3
Delivering Your Help System
When you deliver your files—whether that means adding them to ClearCase or copying them directly to the build machine or putting them in a location that the build engineer can access—you should understand the help runtime environment requirements.
When you copy your files, follow these guidelines. Refer to Figure 17-6 for the help runtime directory structure, and Figure 17-7, Figure 17-9 and Figure 17-8 for the local development directory structures.
•
Note
•
•
•
Adding Drop-In Help Systems
"Drop-in help" refers to online help for in-house or third-party products that are not part of the CiscoWorks software release, but for which access from the main help window is required. For example, a customer who wants access to HP OpenView online help can add this functionality to the installed help system.
Merging in-house and third-party drop-in help into the main help system requires, at a minimum:
•
If possible, rename the first page of the drop-in help system to index.html. If the first page uses this name, the Cisco help engine replaces the main help page with the drop-in help system. If the first page is not called index.html, the drop-in help system appears in the right frame of the help window.
•
Even if the drop-in help system does not supply context-sensitive help or uses a different method, you must supply a mapping file that contains a DROPIN line. This line defines the location of the link to the help system in the main help page contents and index (see the "Updating the Mapping File" section.
Note
•
The HELPURL tag in the application registry file accepts either a tag or a filepath. For drop-ins, enter the filepath for the help system in this field.