Downloads |
 Feedback Feedback
|
Table Of Contents
Using the Installation Framework
About the Installation Framework
Understanding the CWCS Installation Framework
Understanding Installation Team Responsibilities
Understanding Developer Responsibilities
Getting Started with the Installation Framework
Third-Party Tools for Installation Framework
Understanding Install Component and Image Structures
Understanding the Package Properties File
Understanding Suite Properties
Creating the Table of Contents
How the Installer Processes Properties
Preparing Installation Protopackages
Including Files in the Protopackage
Using the Installation Framework
Understanding the Common Services Upgrade
Understanding and Implementing the casuser
Providing Licensing Information During Installation
Upgrade Installation Paths and Strategies
About the CWCS Upgrade Mechanism
Overriding the Dependency Handler
Application Registration with ACS during Installation
Windows Installation Reference
Setting File Permissions During Installation on Windows
Using the Windows Installation Hooks
Using the pkg.rul Installation File
Using Installer Global Variables
Preloading the Global List, lAnswerFile
Reducing Windows Installation Time
Using the Windows Installation APIs
Accessing and Setting Package Properties to Perform Version Comparisons
Controlling Responses to Terminated Installations
Sending Informational Messages to a Log File
Informing the Installer That a Component Requires More Space
Registering and Unregistering CWCS Daemons
Locating the Root Directory Path Name
Registering and Controlling Windows Services
Step 1: Install Third-Party Tools for Windows
Step 2: Install the Framework on Windows Platforms
Step 3: Prepare the Make Image on Windows Platforms
Debugging on Windows Platforms
Example: Using Windows Build Tools
Customizing the Installation Workflow for Windows
Getting Started with Windows Installer Tools
Creating the Installation Project File
Specifying Conditions For Install Actions and Panels
Creating the Install Staging Area
Example: Adding Message Boxes to an Installation
Example: Creating Custom Password Dialogs
Example: Adding User Data to Show Details
Solaris Installation Reference
Setting Ownership for Package Files on Solaris
Setting Ownership from package_name.owner File
Understanding the package_name.owner File
Setting Ownership During Build/Installation
Setting Ownership Assignment Details
Using the Solaris Installation Hooks
Where to Find Solaris Installation Examples
Using the Solaris Installation APIs
Using the Solaris Input/Output APIs
Using the Solaris Package APIs
Using the Solaris Installable Unit APIs
Step 1: Install Third-Party Tools On Solaris
Step 2: Install the Framework On Solaris Platforms
Step 3: Prepare the Make Image on Solaris
Customizing the Installation Workflow on Solaris
Solaris Getting Started Example
Using the Installation Framework
CWCS supplies several tools for application installation, uninstallation, and patching. Because each platform has its own set of standards, formats, and issues, you will need different tools. But the basic installation concepts are similar.
Note
Cisco encourages developers to leverage the installation framework discussed in this chapter. The tools for user interface and installation integration are free and will save your team time.
The installation framework allows you to consider dependencies and features such as uninstallation, which makes it easier for your package to work like other network management packages. The installation framework can help ensure that prerequisites such as version dependencies are set and followed.
Cisco recommends that you use both the build environment and the installation framework. The build environment is tuned to enforce Cisco procedures and policies. The installation framework facilitates a common look-and-feel and the required CWCS bundle behavior. However, the installation framework does not require using the build environment.
The following topics describe the installation framework and associated processes:
•
•
•
•
•
For information on installing CiscoWorks Common Services itself, refer to the "Installing CWCS" section on page 5-2.
About the Installation Framework
This section discusses the following topics:
•
•
•
What's New in This Release
New or changed features in this release of the CWCS installation framework include:
•
•
•
•
•
•
Understanding the CWCS Installation Framework
The CiscoWorks Common Services (CWCS) runtime environment provides shared functionality for applications when they are running. It provides services such as scheduling, process management, and database storage and retrieval so that your applications can perform their tasks. The CWCS installation framework provides shared functionality for individual applications so that they can install on different kinds of systems with similar interfaces and consistent install semantics.
The goals of the installation framework are:
•
•
•
•
•
•
The installation framework provides an installer, an uninstaller, and a set of functions that facilitate installation-specific tasks.
The installation team and the developer have separate roles to play in the process of adding packages for installation:
•
•
Understanding Installation Team Responsibilities
The installation team is responsible for the main installation script. This script is the same for CiscoWorks, Resource Manager Essentials, Campus Manager, and other CWCS-based products. It does not change (on Windows platforms, the main installation script can be customized; for details, see the "Customizing the Installation Workflow for Windows" section). It is important to use the installation framework to allow for the following:
•
•
•
•
•
•
•
The installation team is also responsible for the tools that create the installable CD image, which are discussed in the "Getting Started with the Installation Framework" section. Developers outside of NMTG can use their own build tools and build environment to produce their executable files, but should use the installation tools to build CDs. NMTG developers should use internal build and installation tools.
For assistance with running the installation framework software, reporting problems, or questions about the software:
•
•
Related Topics
See the:
•
•
Understanding Developer Responsibilities
The CWCS installation framework is provided by the installation team, but can be used in different ways depending on your requirements:
•
•
Related Topics
See the "Understanding Installation Team Responsibilities" section.
Getting Started with the Installation Framework
The Installation Framework is supported on Windows and Solaris platforms. It follows the server platform-support requirements for CWCS, but can be customized for other Windows and Solaris platforms. For other platform enquiries, contact the installation team (cmf-install-dev@cisco.com).
Main installation script and build tools for the CWCS installation framework are available from the CWCS 3.0 SDK Portal at https://mco.cisco.com/ubiapps/portal/go.jsp?portal_id=2537.
This section discusses the following topics:
•
•
•
Third-Party Tools for Installation Framework
The following tables describe the required third-party tools for Windows and Solaris:
Table 22-1 Third-Party Tools for Windows
InstallShield 5.53 Professional only
Installs packages and files. Purchase from InstallShield Software Corporation. The Maintenance Pack 3 for the InstallShield 5.5 is required.
InstallShield PackageForTheWeb version 4.x
Packages CD image into the self-extracting .EXE file. Download from InstallShield Software Corporation. See http://www.installshield.com.
MKS Toolkit 6.1 or higher
Builds an image from protopackages. Purchase from the Mortice Kern Systems Inc., Tel: (519) 884-2251, http://www.mks.com
Table 22-2 Third-Party Tools for Solaris
Perl version 5.5 or higher
Builds an image from protopackages. Shareware/public domain software located at http://www.perl.com/pub.
Understanding Install Component and Image Structures
CWCS software is divided into a set of components that reflect the logical structure of the software. In this document, the following terms are used to describe the package structure:
•
•
•
•
•
•
•
The following topics describe the process to follow in building installable images, and the package components and image structures:
•
•
•
•
•
Building an Installable Image
Use the following process to build an installable image:
Step 1
Step 2
Step 3
•
•
Step 4
Step 5
Step 6
Selecting Package Names
A package name, or tag, is a short internal name that is used programmatically. Normally it is not presented to the end user.
Windows Package Names
For Windows platforms, the package name must match the name of .pkgpr file, for example ut.pkgpr must have PKG=ut. The following table describes the Windows package name requirements.
Solaris Package Names
For Solaris, the package name must begin with CSCO followed by up to five characters. The following table describes the Solaris package name requirements.
Specifying Package Properties
Use the package properties file (tag.pkgpr) to specify the component properties for each package. The package properties file contains name-value pairs for the platforms your package supports and specifies the properties for each platform.
Any platform-specific name value pairs should be specified in the package properties file using the following line immediately before the pairs appear in the file:
PLATFORM_NAME:
Note
The platform names are represented as:
•
•
For example, any Solaris-specific name value pairs in the package property file must have the line:
SOL:Several of them can be combined as follows:
SOL:NT:Understanding the Package Properties File
The package properties file (<tag>.pkgpr) include several groups of properties. The following topics describe these property groups:
•
•
Developer-Specified Properties
Table 22-5 show the package properties that developers must specify for both Windows and Solaris platforms. The image build tools will transfer these name-value pairs into the <tag>.info files. Finally, the installation process copies them into the target system.
Table 22-5 <tag>.pkgpr Files Name-Value Pairs
PKG
Solaris: CSCOxxxxx Windows: up to eight characters
Package tag. A short internal name, used programmatically. Normally invisible to the end user. For Solaris, it must begin with CSCO followed by a maximum of five characters. For Windows, it must match the name of the .pkgpr file. For example, ut.pkgpr must have PKG=ut.
Yes
NAME
String, up to 40 characters
One-line name to be presented to the end user whenever components are listed.
Yes
DESC
String
Short description (up to 1000 characters).
Yes
VERSION
X.Y, where X and Y are numbers
Version, major and minor
Yes
PATCHVER
Number
Patch level
0 by default
DEPENDS
String
Comma-separated list of components this one depends on, each in the form of pkgTag major.minor.patchlevel, where pkgTag is the package tag; major, minor, and patchlevel specify the version of dependency target. If a specific version of dependency target is not required, then you can omit major.minor.patchver.
Correct: DEPENDS=cmf, xrts 1.2.1, ani
Not correct: DEPENDS=xrts 1.2
(It should be DEPENDS=xrts 1.2.0.)
No
ROOTDIR
String
Alias for root directory. Default value NMSROOT. 1
No
PACKAGES
String
Space-separated list of packages that belong to this installable unit. This property must be specified for installable units only.
Yes, f or installable units only.
BACKVER
X.Y.Z (where X, Y, Z are numbers)
The major.minor.patchlevel, where major, minor, patchlevel specify the version. If you do not use all three version numbers, use no version numbering. This version is backward compatible with all versions starting from the one specified by this parameter.
Example:
VERSION=3.2, PATCHLEVEL=3, BACKVER=2.4.0.If any other package depends on version 2.6 of this package, it can be installed.
No
OPTIONAL
Y
Specifies that a package is optional. An optional package can be dropped if dependencies for it cannot be resolved. It is assumed that installable unit is operational with or without optional packages.
No
SIZE
Number
Space, in megabytes, required for this package. The installer calculates a package's footprint automatically. This property provides for override. Windows calculates this automatically.
Yes, for Solaris only.
REC_RAM
REC_SWAP
REC_DISK
REC_CPU
These properties can be set for packages or installable units but are normally set for Suites only.
No
CMFSERVICES
String
Comma-separated list used to register for specific CiscoWorks service bundle use. Possible values: System, Network, Core.
No
UNINSTALL_REBOOT
Windows only:
Y or yIndicates that the system needs to be rebooted at the end of uninstallation (if this package is uninstalled).
No
1 The installer maintains the list of root directories for all components. The value of ROOTDIR property is an alias, which can be used in installation hooks. See the "Locating the Root Directory Path Name" section for more information.
Appended and Generated Properties
Other properties are also present in the package properties file. These are appended to the file during the build process or generated by the installer:
Note
•
•
Table 22-6 Properties Appended During the Build Process
BUILD_ID
String
Build ID in the form platform_project_date_type.
For example: NT_CMF_RIGEL_19990408_0126_daily.
This ID id is generated by make protopackage1 by combining the values of PROP_ID and PROP_WHEN from the .bprops file.
BUILD_TSTAMP
Number
Timestamp, generated from PROP_TIMESTAMP in the .bprops file.
ALIAS
String
Contains the names following the PKG/SUITE property for each platform. Contents written to the .info file. For example, dmgt.info/CSCOmd.info both contain the new property ALIAS=dmgt CSCOmd. Using a space field separator, you can determine if a .info file matches the package by examining the ALIAS property.
1 make protopackage is specific to the NMTG build environment.
Solaris-Specific Properties
Table 22-8 describes Solaris properties that are not generated automatically, but that are required. Add these lines to your pkgpr file.
The information about prototype.header properties listed in Table 22-9 is provided for developers who are not familiar with Solaris packaging tools. The prototype.header file required for Solaris packaging is generated automatically and is not to be maintained by developers. If you create your own prototype.header file, we will overwrite it.
Note
Note
I_MODE
String
NEW, REINSTALL, DOWNGRADE, PATCH, or UPGRADE
NMSROOT
String
Path name of target directory
SETUPDIR
String
Path name from which the CD installation is running
Understanding Suite Properties
Suite properties describe different bundles of installable units and/or packages. Table 22-10 describes the suite properties for both Windows and Solaris.
Table 22-10 Suite Properties
SUITE
Up to eight characters
Suite tag. Tag is short internal name, which is used programmatically. Normally it is not presented to the end user.
NAME
String, up to 40 characters
One-line name to be presented to the end user.
DESC
String
Short description, up to 1000 characters.
VERSTR
String
Version string to be presented to end user. For example, "Service Pack 3."
DEPENDS
String
Comma-separated list of components this one depends on, each in the form of pkgTag major.minor.patchlevel, where pkgTag is the package tag; major, minor, and patchlevel specify the version of dependency target. If a specific version of dependency target is not required, then major.minor.patchver can be omitted.
Correct: DEPENDS=cmf, xrts 1.2.1, ani
Incorrect: DEPENDS=xrts 1.2 (It should be DEPENDS=xrts 1.2.0.)
TAGS
String
Space separated list of packages or installable units, which belong to this suite.
REC_RAM
REC_SWAPNumber
Specifies the recommended size of RAM (in MB) and swap/paging file size (in MB) for this suite.
The install process collects these requirements from all components, finds the maximum and verifies if the server has enough RAM and swap. This process displays a warning if these requirements are not satisfied. It is warning only. Installation will not abort.1
REC_CPU
Number
(Windows only.) Specifies the recommended CPU speed in MHz. The install process collects these requirements from all components, finds the maximum and verifies if the server has enough RAM and swap.
The install process displays a warning if these requirements are not satisfied. It is only a warning. Installation will not abort.1
SSL_COMPLIANT
String.
Possible values: Yes or No
Specifies whether the suite is SSL compliant. The installation process detects whether the suites are SSL compliant. The installation program does not allow the installation of the suite if the underlying Ciscoworks installation is SSL enabled.
This field is also used by other components, such as Daemon (Process) Manager, and Enable/Disable SSL.
The installation framework, daemon manager and other modules of CWCS check the SSL_COMPLIANT field in *.info files under NMSROOT/setup, only if the info files have a SUITE field. In other words, CWCS detects SSL compliance only in SUITE level information files.
If an application cannot add the SUITE tag in info files, you can use the others directory under NMSROOT/setup.
CWCS checks for SSL-compliance in all information files in NMSROOT/setup/others directory, irrespective of whether it contains the SUITE tag or not. The application should store such info files under NMSROOT/setup/others directory.
Note
1 On PCs, the CPU speed and RAM size are often reported incorrectly by MS Windows. For example, HP Vectra reports 1 MB RAM less than it actually has. For this reason, installation will consider RAM and CPU speed sufficient if the server has 5 MB less than required.
Creating the Table of Contents
The table of contents is specified by disk.toc, an ASCII file that contains:
•
•
•
•
The following is an example of a table of contents file:
[RELEASE]
NAME=Test Application with CiscoWorks Common Services 3.0
PRODUCT_NAME=CiscoWorks
SHORT_PRODUCT_NAME=CiscoWorks
VERSTR=1.0

[COMPONENTS]
TAGS=cdone, CSCOmyApp
UNINSTALLABLE=cdone, CSCOmyApp
VISIBLE=cdone, CSCOmyApp
DEFAULT=cdone, CSCOmyApp

[ADVANCED_CHOICE_1]
ADVANCED_CHOICE_1_CONDITION=TRUE
ADVANCED_CHOICE_1_TYPE=NONE
ADVANCED_CHOICE_1_DEFAULT=1
ADVANCED_CHOICE_1_1_TEXT=Everything
ADVANCED_CHOICE_1_1_TAGS=cdone, CSCOmyApp
The table of contents consists of the following sections. Each section defines one or more parameters in the form of name=value pairs.
•
•
•
•
•
•
•
•
Related Topics
See the:
•
•
•
•
Creating the RELEASE Section
The RELEASE section of the table of contents file, disk.toc, contains the properties of this release. This data is displayed to the end user during installation and is included in history and installation log files. It is not included in the component database.
Creating the COMPONENTS Section
The COMPONENTS section in the table of contents file (disk.toc) lists the major components available on this CD and the user information about these components. This section is mandatory.
Table 22-12 Table of Contents File — COMPONENTS Section
TAGS
Comma-separated list
Comma-separated list of components. Each value is a tag of component. Components are defined by corresponding property set (see the "Specifying Package Properties" section" and the "Creating the Table of Contents" section).
The installer starts processing the CD from this list. For each component listed, it looks for the subcomponents defined by the PACKAGES property.
It is not necessary to include all packages/installable units in this list. It requires only the roots of component hierarchy.
Mutually exclusive with PATCH_TAGS.
PATCH_TAGS
Comma-separated list
Comma-separated list of components. Each value is a tag of component. Components are defined by a corresponding property set (see the "Specifying Package Properties" section" and the "Creating the Table of Contents" section).
This list defines the top level components available on CD and also turns on the patch mode of installation. This information is used instead of the TAGS for patching as described in "Handling Patches" section.
VISIBLE
Comma-separated list
Comma-separated list of components, that are exposed to the end user during installation. This is the short form to specify VISIBLE=Y for several components.
The names of these components will show up in the Component Selection dialog (for custom installation) and in the Confirm dialog. If the component has both CHOICE and VISIBLE properties set to Y, the end user will be allowed to select or deselect this component during installation.
DEFAULT
Comma-separated list
Comma-separated list of component tags, which are selected for installation by default. The value can be ALL. Short form to specify DEFAULT=Y for several components.
CHOICE
Comma-separated list
Comma-separated list of components for user to select. These components can be turned on or off in the Component Selection dialog.
A component can be omitted during installation in one of the following cases:
•
•
Note
UNINSTALLABLE
Comma-separated list
List of component tags, which can be uninstalled later.
Windows only: The Uninstall componentName option will be created in the dialog displayed by the uninstallation process.
OVERRIDES
Comma-separated list
List of component tags, for which the tag sections are available in this table of contents.
Creating Overrides Sections
Each override section has a name that is a valid component tag. Parameters in this section either override those specified as component properties or provide additional properties.
The name of each section is the same as the component tag. It can be the name of the suite, installable unit, or package for which additional properties or override properties are specified in the tag.info or pkginfo file. The section name, tag, must be included in the OVERRIDES property in the COMPONENTS section.
Creating Advanced Component Sections
The Installation Framework supports complex component choice scenarios by specifying one or more ADVANCED_CHOICE_x sections. Each section defines a component choice scenario. There can be more than one scenario; each section describes one scenario. The section name must use this naming convention:
ADVANCED_CHOICE_xwhere x =1, 2, ...
Specify these sections sequentially starting from 1. Install attempts to load these sections beginning with ADVANCED_CHOICE_1, ADVANCED_CHOICE_2, and so on, and stops when the next section is not available.
For each section, the installer checks the condition parameter (see Table 22-13). If the condition fails, the installer looks for the next section. If the condition is satisfied, the installer starts using that section and ignores the remaining sections.
Creating the PROMPT_INSTALL_TYPE Section
The PROMPT_INSTALL_TYPE section in the table of contents file (disk.toc) specifies the installation types.
Note
Example
[PROMPT_INSTALL_TYPE] 	PROMPT_INSTALL_TYPE_SELECTION=Typical,Custom
PROMPT_INSTALL_TYPE_SELECTION_Typical="Typical installation is
recommended for all computers." PROMPT_INSTALL_TYPE_SELECTION_Custom="Custom installation can beselected if you want to customize the setup options." PROMPT_INSTALL_TYPE_SELECTION_Default=TypicalCreating the INSTALL_TYPE_SELECTION Section
The INSTALL_TYPE_SELECTION section specifies which installation modes (Typical or Custom) are provided.
Note
Example
[INSTALL_TYPE_SELECTION]OPTIONS=Typical, CustomTypical=Typical installation. Allows you to select components. Recommended for most users.Custom=Custom installation. Allows you to select components and customize settings. Recommended only for advanced users.DEFAULT=TypicalDESCRIPTION=Choose the type of Setup you prefer, then click Next.\nThis CD includes the following components:\nCommon Services 2.2, CiscoView 5.5, Integration Utility 1.5.
Note
Understanding the BUILD Section
The BUILD section in the table of contents file (disk.toc) contains two tags, and is generated at packaging time.
Note
Table 22-16 Table of Contents File—BUILD Section
BUILD_ID
The build ID of the CWCS build.
ITOOLS_BUILD_ID
The build ID of the itools build.
Example
[BUILD]BUILD_ID=SOL_CDONE2_2_20030115_0756ITOOLS_BUILD_ID=SOL_ITOOLS2_2_20030115_0017Creating the REQUIRED section
The REQUIRED section in the table of contents file (disk.toc) contains the list of components that must be installed before running this installation. The installer checks for these components before asking the user to answer other installation-specific questions. Package dependencies specified in the package properties file, on the other hand, are verified much later, after the user has finished all installation user inputs, and after running all preinstall logic.
How the Installer Processes Properties
Build image tools convert pkgpr files into newly-named platform-specific files (*.info on Windows and *.pkginfo on Solaris). The following steps describe how the installer processes package properties:
1.
2.
3.
4.
5.
6.
Specifying Properties
Properties for packages and installable units are specified by developers and included in the protopackages. NMTG does not recommended specifying VISIBLE, DEFAULT, CHOICE, or UNINSTALLABLE properties for packages or installable units. For suites, these properties can be specified in tag.info files if the suite is planned for more than one release.
For each CD, the developer must create a table of contents. This file should be included in a protopackage, just like all other files. To be able to reuse protopackages in multiple images, you should include disk.toc in a separate protopackage, such as <tag>.cd.tar, where <tag> matches one of the packages included in the image.
This CD protopackage shall be specified as an input to the buildImage command, along with the protopackage containing the installation files and application protopackages.
Preparing Installation Protopackages
A protopackage contains one directory named after the tag. This directory contains the following subdirectories:
•
This directory contains the directories and files to be installed on the destination server. All these files will be moved during the installation to directory specified by the user.
–
The runtime tree on the destination server will be a result of merging of runtime subtrees of all protopackages.
–
All files from all runtime directories will be included into data1.cab. Each protopackage makes a file set. The runtime directory can be empty.
•
This directory contains the following files:
–
–
–
–
•
•
•
Related Topics
See the "Including Files in the Protopackage" section.
Including Files in the Protopackage
Include this file in each protopackage:
•
The following files are optional:
•
•
•
All files mentioned above should be included in protopackages located in the install subdirectory and cannot be changed.
Related Topics
See the "Preparing Installation Protopackages" section.
Using the Installation Framework
The following topics describe the general tasks involved when using the installation framework:
•
•
•
•
Understanding the Common Services Upgrade
The CWCS team has updated the CD One 4th Edition installation and subsequent releases to disable all applications (with the exception of CiscoView) and change the ownership of the application files to the new user, casuser.
CWCS installation disables applications by unregistering daemons that do not belong to CWCS. Corresponding Windows Services will be removed. After disabling and changing file ownership, the newer version of Common Services is installed, using the installation framework upgrade procedure. As newer versions of the applications are installed, they will be able to access their data from previous versions and upgrade using the current installation framework procedure.
An additional step is required for developers updating existing code dependent on CMF 1.2 or CMF 2.2. For details on build and packaging tasks under these conditions, review the application-specific build requirements in the section "Implementing the Bin Replacment User", which appears on page 8-36 of ENG-71441, Bin:Bin Security Implementation Design Specification.
Understanding and Implementing the casuser
If you have existing applications that are dependent on CMF 1.2 or earlier and must upgrade, read this topic to understand how the CWCS team has implemented security changes for owner and group.
The CWCS team has updated the CD One installation to disable all applications (with the exception of CiscoView) and change the ownership of the application files to the new user, casuser. Application developers must modify the post-install hooks andscripts to add chown and chgrp commands for each file that existed in previous CWCS or CMF releases and were not initially a part of the installation packages. This includes dynamically created files, such as data files and properties files.
To assist this process, the resetcasuser script in NMSROOT/setup/support was enhanced to allow you to randomly generate the casuser password, or enter it manually.
Related Topics
See the:
•
•
Providing Licensing Information During Installation
CWCS 3.0 introduced Flex LM-based licensing as describ ed in Chapter 32, "Using the Licensing APIs."
To provide Flex LM-based licensing information during installation:
Step 1
PRODUCT_INFO=Product Version
Where:
•
•
Step 2
Installing Database Upgrades
This topic provides information about the structure and APIs needed to upgrade the database. This feature relies on the implementation of the dbupdate.pl script script provided by CWCS. This feature is not required. Use this database upgrade information only if your team is using or integrating with the CWCS Server database.
NMTG developers should refer to ENG-29984 for requirements if you are bundling with RME CD (copackaging).
The following topics are covered:
•
•
•
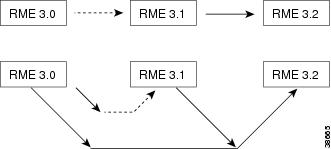
Upgrade Installation Paths and Strategies
There are two main approaches to upgrading the database.
•
•
Figure 22-1 depicts both approaches for RME. Each arrow represents an upgrade script. The solid arrows represent scripts that have been implemented to upgrade Rigel releases. The dashed arrows represent scripts that will handle an upgrade to RME3.1. The dotted arrows represent scripts to handle upgrade to RME 3.2 sometime in the future.
Figure 22-1 RME Upgrade Approaches
The incremental approach assumes that the script upgrading RME3.0 to RME 3.1 handles only the upgrade from 3.0.
With the one-step approach, the script that you used to upgrade 3.0 to 3.1 needs to be replaced by the new script that is capable of upgrading from both 3.1 and 3.2. The complexity of such a script increases for each release, because the script must handle upgrades from all previous versions.
About the CWCS Upgrade Mechanism
CWCS has one mechanism to modify the database. The dbupdate script is integrated into the installation and enables you to register your database upgrade scripts in preinstall (Windows) or prerequisite (UNIX) hooks. Registered scripts are executed at the end of installation after all runtime files have been delivered. The database is upgraded in place.
The upgrade mechanisms described in this topic include:
•
•
Registration API for Upgrades
The functions described here can be used in preinstall (Windows) or prerequisite (UNIX) to register the database upgrade scripts for dbupdate. The following table describes the functions and recommended usage.
RegisterDBScript
Use for drop-ins
RegisterDBScriptByVersion
Applications that use incremental approach
RegisterDBScriptByVersionEx
Applications that use a one-step approach
API for Package Upgrade—CopyOut API
To provide a useful package-based CopyOut feature, a CopyOut API has been implemented. This saves the package developers time because they do not have to use just the hook to launch the copyout script. The reason is that the "just the hook" approach in the installation framework cannot verify the total disk space required for all copyouts, because copyouts are package-independent.
You may also have to do some housekeeping work. With CopyOut API solution, multiple manifest files, different storage destinations for each package, attributes for query such as DATE_COPYOUT, PREVIOUS_VERSION, and so on can be supported. Most importantly, disk space verification is possible.
You can call this API inside the prerequisite (preinstall on Windows in pkg.rul) script. The actual copyout does not happen until all prerequisites are satisfied. The CopyOut API stores all parameters into a temporary file.
At the end of all prerequisite verification, the API verifies copyout storage requirements, plus disk space required for the installation if copyout destination happens to be in the same partition of NMSROOT. After the copy is done, the manifest file is copied to the storage destination location. Pkgname.properties are also created and copied to the storage destination location containing name-value pairs:
COPYOUT_DATE=YYYYMMDDHHMMSOURCE_PATH=Path to copy data from specified in IF_CopyOut callOVERWRITE_MODE=Y|N specified in IF_CopyOut callPREV_VERSION=prevmajor.prevminorPREV_PATCHVER=prevpatchNEW_VERSION=newmajor.newminorNEW_PATCHVER=newpatchPkgname.info contains an entry pointing to this pkgname.properties. Therefore multiple entries of pkgname.properties may exist if CopyOut is executed more than once for each package using different storage locations. The property is named COPYOUT_XYZ starting with XYZ=001 and up.
For example:
COPYOUT_001=/opt/CiscoWorksOldData/conf/CSCOani.propertiesCOPYOUT_002=/opt/CiscoWorksOldData/etc/CSCOani.properties
Examples
Solaris prerequisite script:
#!/bin/sh. $SETUPDIR/commonscript.sh. $SETUPDIR/setup-lib.sh# checking for copyout condition# if this is an upgrade, call IF_CopyOutif [$NEED_COPY_OUT eq 1]; thenIF_CopyOut "$NMSROOT/conf" "ani.mfst""/opt/CW2000/CiscoWorksOldData" "Y"The same script on Windows:
Function ani_preinstall()NUMBER nvType, nvSize, nRc, nNeedCopyout;STRING bInstallingFirstTime;Begin// checking for requirementsnNeedCopyOut = 0;// check for upgrade case to call IF_CopyOutif (nNeedCopyOut = 1) thenIF_CopyOut((NMSROOT^"conf", "ani.mfst",NMSROOT^"OldData", "Y");endif;end;Uninstall Before Upgrade
The installation framework provides a hook to trigger package removal before the package is installed. For the package which prefers a clean installation, you can specify a combination of UNINSTALL=UPGRADE|PATCH|REINSTALL in the pkg.info(pkg.pkgpr) to make this work.
Caution
Uninstallation for package downgrade is not supported. The action taken depends on the combination of the flags given in the UNINSTALL:
•
For example, UNINSTALL=UPGRADE uninstalls package if package is upgraded, but not during reinstall or patching.
•
For example, UNINSTALL=UPGRADE PATCH uninstalls package if it is upgraded or patched, but not during reinstall.
•
For example, UNINSTALL=UPGRADE REINSTALL uninstalls the package if the package is upgraded or reinstalled, but not during patch case.
Function Prototypes
RegisterDBScript(<dsn>, <script>, <args>);RegisterDBScriptByVersion(<fromVersion>,<dsn>, <script>, <args>, <reserved>);RegisterDBScriptByVersionEx(<fromVersion>,<dsn>, <script>, <args>, <reserved>);Where:
•
•
•
•
Windows Example
On Windows the infsm.rul file contains:
function infsm_preinstall()STRING argString, scriptName;beginargString = "dsn=rme," + NMSROOT ^"IDS\\inventory\\desfiles\\fastswitch_wmod,CSCOinfsm";WriteLogFile("preinstall for infsm package");scriptName = NMSROOT ^ "IDS\\inventory\\scripts\\main.pl";RegisterDBScriptEx("rme", scriptName, argString, "");end;Solaris Example
On Solaris, the infsm.rul file contains:
. /opt/CSCOpx/etc/commonscript.shRunRequestScript CSCOinfsm#mainecho "preinstall for CSCOinfsm";argString="dsn=rme,/opt/CSCOpx/IDS/inventory/desfiles/fastswitch_wmod,CSCOinfsm";scrName="/opt/CSCOpx/IDS/inventory/scripts/main.pl";RegisterDBScriptEx "rme" $scrName $argString " ";Adding Unauthenticated URLs
This API allows applications to use URLs without authentication.
Applications need some of their URL calls to be allowed without any authentication. If the system checks for authentication for every URL, some functions of the application may fail.
This API is part of the CWCS installation framework, and provides an option to use application URLs without authentication. It uses a file, allow_files.conf, that contains a list of URLs that should be allowed without authentication.
To make use of this API, applications should:
•
•
Example of addURLs.txt:
/CSCOnm/servlet/com.cisco.nm.cmf.servlet.webreg.csNavServlet/help/cmf/jplug_enable.html/JSP/cmf/security/AutoLogin.jspYou can specify relative directory paths (with respect to web server) also in addURLs.txt. For directories, the format is as follows:
DIR=relative dirFor example, to allow the /opt/CSCOpx/htdocs/swintemp directory without the authentication check, you must add the following in addURLs.txt:
DIR=/swimtempDuring the installation of applications, the installation framework appends the contents of addURLs.txt to allow_files.conf.Overriding the Dependency Handler
This feature allows you to bypass the dependency handler during installation. Use it when normal policies are believed to be inappropriate (for example, to rollback a patch).
Caution
Refer to the engineering spec, ENG-29971, for details about using the override.
Handling Patches
This topic provides details about how to implement patching support and supplies a checklist for developers. For examples on how to patch a CD, refer to the "Example: Making a Patch CD" section.
This topic covers:
Patch Policy
Installation provides a way to prepare point patches as well as patch releases. Rollback is not supported. A typical patch contains new files that can be added to a previously installed product. Patches must be cumulative.
Creating a Patch
When creating a patch keep in mind that the version of a package is defined by the VERSION and PATCHVER package properties (see the "Specifying Package Properties" section). Developers must change the pkg.pkgpr file. Normally, the PATCHVER value should be increased for each patch.
The installer must know whether the package is a full or a sparse package:
•
•
SPARSE=YESPatch Mode Installation
Patch mode enables patch delivery of one or more packages provided that a full release had been installed before. Patch mode turns off the standard dependency verification. Each package available on CD will be installed only if the same or older version of that package had previously been installed.
Packages available on the CD are skipped if the newer version of the same package has been installed or this package has not been installed. There will be no error message in this case.
The patch mode installation is enabled by using the PATCH_TAGS property in the table of content. See the "Example: Making a Patch CD" section for sample code to create a CWCS patch CD.
To create a patch:
Step 1
a.
b.
c.
The TAGS and UNINSTALLABLE properties remain unchanged if the patch release has installable units with all packages.
If release delivers only selected packages and does not have any new package, the patch mode should be used. In this case the UNINSTALLABLE property is removed and the TAG property is replaced by the PATCH_TAGS property. The PATCH_TAGS property contains the list of packages included into release.
Step 2
Note
NMTG recommends that you create a full version on a regular basis. You can add only one CD image in the project file at this stage. Later, you can add more than one image created by one project, as needed.
Step 3
Step 4
Note
Step 5
SPARSE=YES
Example: Making a Patch CD
The installation framework allows you to create a CD with patches. A patch CD has selected packages that can only be installed on top of the entire product. In the Patch mode, installation does not check dependencies, instead it verifies that an older version of the same package had been installed before. If an older version of a package has not been installed or the newer version of a package has been installed, that package is skipped without error messages. For instructions about making patches, see the "Handling Patches" section.
This section provides an example of making a patch for CWCS. The first step describes creating a CD with the patch for a package. Next step describes how to make a CD containing patches for two related packages. This section uses my_app, my_appdev, and similar text to illustrate any network management package.
The following topics are covered:
•
Patching my_appdev
Perform the following steps to create your my_appdev patch.
2.
3.
Updating the *.pkgpr
Update your package by adding the patch version name value pair to your pkgpr file.
For example, if your CMF 1.0 package had version 1.0 and the my_app.pkgpr had the following properties:
NT:AIX:HPUX:SOL:DESC=My Network Management ApplicationNAME=My ApplicationVERSION=3.0...Update your pkgpr file to include the PATCHVER:
NT:AIX:HPUX:SOL:DESC=My Network Management ApplicationNAME=My ApplicationVERSION=3.0PATCHVER=1...Building the New Protopackage
For information on protopackages, see the "Step 3: Prepare the Make Image on Solaris" section.
Making the Table of Contents File
The following is an example of the table of contents file (see the "Creating the Table of Contents" section).
[RELEASE]NAME=CWCS3.0 Patch CD Version 1VERSTR=automatic buildREGISTRY_ROOT=SOFTWARE\Cisco\Resource Manager\CurrentVersion[COMPONENTS]PATCH_TAGS=my_appdevUNINSTALLABLE=VISIBLE=CHOICE=DEFAULT=ALL[REQUIRED]REQ_cdone=Install Common Services 3.0 firstA similar file has to be created for UNIX platforms if packages listed in the PATCH_TAGS property have different tags; otherwise, the same file can be used for all platforms. The table of contents file has to be built into a protopackage and must have the name disk.toc. Solaris also requires the configureMe file:
nm-build3-sol251% tar -tvf cmf.patchcd.tartar:blocksize = 11drwxrwxr-x 8186/25 0 Dec 1 14:55 1999 cmf/drwxrwxr-x 8186/25 0 Dec 1 14:55 1999 cmf/runtime/drwxrwxr-x 8186/25 0 Dec 1 14:55 1999 cmf/disk1/-rw-r--r-- 8186/25 199 Dec 1 14:35 1999 cmf/disk1/disk.toc-rwxr-xr-x 8186/25 1177 Nov 24 14:27 1999 cmf/disk1/configureMe
Note
The following text is an example of part of the configureMe file.
AIX_MIN_RAM=`echo "128 * 1024" | bc`; export AIX_MIN_RAMAIX_MIN_SWAP=`echo "$AIX_MIN_RAM * 2" | bc`; export AIX_MIN_SWAPAIX_OS_VERSION="5.5"; export AIX_OS_VERSIONDEF_IU_ROOT="/opt/CSCOpx"; export DEF_IU_ROOTDISKSPACE=0; export DISKSPACEHP_MIN_RAM=`echo "256 * 1024" | bc`; export HP_MIN_RAMHP_MIN_SWAP=`echo "1024 * 1024" | bc`; export HP_MIN_SWAPHPX_OS_VERSION="5.5"; export HPX_OS_VERSIONINSTALL_MODE="NEW"; export INSTALL_MODEIU_DBDIR="${IU_ROOT}/db/data";export IU_DBDIRIU_NAME="CSCOpx"; export IU_NAMEIU_ROOT="/opt/CSCOpx"; export IU_ROOTLOG_NAME="ciscoinstall.log"; export LOG_NAMEPRODUCT="CSCO NM"; export PRODUCTSERVER_EXP="[C]SCOpx"; export SERVER_EXPSOL_MIN_RAM=`echo "128 * 1024" | bc`; export SOL_MIN_RAMSOL_MIN_SWAP=`echo "$SOL_MIN_RAM * 1" | bc`; export SOL_MIN_SWAPSOL_OS_VERSION="5.7 5.8"; export SOL_OS_VERSIONSWMODOPTS="-xloglevel=0"; export SWMODOPTSSWOPTIONS="-x reinstall=true -x reinstall_files=true -x allow_multiple_versions=true -x write_remote_files=true -x autoselect_dependencies=false -x match_target=false"; export SWOPTIONSUPGRADE_VERSIONS="2.* 3.0"; export UPGRADE_VERSIONSYES_PUMP=${SETUPDIR}/install/yes.sol; export YES_PUMPREQ_OS="SunOS"; export REQ_OSCreating the CD
Use the following command to create the CD:
perl buildImage -r -d d:/cmfPatchImage path/is5.runtime.tar path/cmf.patchcd.tar
path/my_pkg.runtime.tar
For Solaris, use the pkgtools.runtime.tar file instead of is5.runtime.tar.
A patch is installed the same as a normal installation, by running the setup.sh script on Solaris.
Patching my_appdev and my_app
You can create a patch CD containing patches for both my_appdev and my_app using the very same processes presented in the "Patching my_appdev" section. The only difference is that my_app must be added to the PATCH_TAGS property in the table of contents.
The command to create the CD is (all on one line):
perl buildImage -r -d d:/cmfPatchImage path/is5.runtime.tarpath/cmf.patchcd.tar path/my_appdev.runtime.tarpath/my_app.runtime.tarApplication Registration with ACS during Installation
When the CiscoWorks server is configured for ACS Login mode and an application /Service-PackP/IDU/drop-in is installed, install framework attempts to register all the tasks of all applications currently installed on the server with ACS. In this process, any customization of roles done in ACS is overwritten for all applications.
Starting from Common Services 3.0 Service Pack 2 (CS3.0 SP2), Common Services install framework minimizes the risk of applications getting re-registered with ACS during install/re-install/upgrade.
For Applications based on CS 3.0 SP2/Corresponding ITOOLS or higher:
If server is in ACS mode and the particular IDU/Application/SP requires new tasks to be added, appropriate warning will be provided and that Application's tasks alone will be registered.
New tasks in addition to old tasks for that applications will be registered with ACS.
Applications need to pass the following information to the intall framework, so that registration with ACS is done accordingly:
•
•
•
Note
Applications need to add a file acsmap.txt under their disk1 directory. This file will be used for populating the ACS registration mapping file that CS maintains for selective registration of tasks with ACS. Install framework will also use this file to decide whether a Warning has to be displayed.
Contents of acsmap.txt should be of the format:
MDC_name;app_name;app_version (with patchver)=<New tasks to be registered -Y/N>
Example: If RME 4.0.2 has new tasks to be registered with ACS, the contents will be:
rme;rme;4.0.2=YIf an application has more than one MDC (to be registered with ACS), all of them should be mentioned in a separate line.
Example:
Rme1;rme;4.0.2=YRme2;rme;4.0.2=NRme3;rme;4.0.2=YThe application name mentioned here should preferably map to a corresponding <appname>.info file under NMSROOT/setup
Example:
cmf, rme, cvw1where there are corresponding info files. If needed, a displayable "Application name" can be picked from the INFO file. [PRODNAME attribute in the <app>.info file will be used for this purpose].
If the file acsmap.txt is not available under disk1, the MDC name of the product will be assumed as the "application name" as well.
Applications not based on CS -ITOOLs can choose to use the CLI script AcsRegCli.pl. The relevant documentation of such applications should be updated to recommend registering from CLI, as applicable.
AcsRegCli.pl command line script can be used to register an application without affecting the registration status of other applications. The script is located at NMSROOT/bin. AcsRegCli can be run only when the CiscoWorks server is in ACS mode.
AcsRegCli.pl has the following options:
•
•
•
•
Refer Appendix of CS 3.0 SP2 SFS - EDCS-447583, for more details
Windows Installation Reference
This topic covers the following reference information for Windows:
•
•
•
Setting File Permissions During Installation on Windows
With the release of CWCS 3.0, the Windows "Everyone" group does not have read permissions for files under NMSROOT. It is not possible to set permissions to individual directories and files; only administrators and casuser have permissions to NMSROOT and directories or files under it.
Writing Windows Scripts
Using the installation framework APIs provided with CWCS (see the "Using the Windows Installation APIs" section), you can write scripts that will allow you to specify any requirements and enforce constraints on a package on a Windows platform.
In addition to the basic scripts described in the following sections, you can write additional scripts to customize the logic flow of the installation (see the "Customizing the Installation Workflow for Windows" section).
The following topics describe how to write Windows scripts for your package:
•
•
•
•
•
Using the Windows Installation Hooks
You can use the following hooks to perform the required functions for Windows package installation:
Table 22-18 Windows Installation Hooks
Preinstall
The installer executes this hook before file transfer. The code in this hook should not make any changes on the target system because the user can abort installation later. Ensure that you stop execution and get the data for the components that have been installed.
This data specifies the disk space required and questions to be asked of the installer. If the information obtained by this script is required by another script, such as preinstall, then use SetPackageProperty and GetPackageProperty APIs. If preinstall wants the installation to fail, it should call the function SetAbortFlag (see the "Using the Windows Installation APIs" section for details).
Postinstall
This hook is executed after file transfer. Actual configuration of component. This is the correct place to register daemons.
Uninstall
This hook is executed when the component is uninstalled right before removing files. This is a good place to unregister daemons. You can use this to clean up files and directories that were created when the product is running. For example, use this script to remove log directories and files.
Hooks are executed in the following sequence:
1.
2.
3.
At uninstallation time, hooks are executed in the following sequence:
1.
2.
It is important to understand the order in which the hooks are executed. The installer follows these rules:
•
•
•
•
At uninstallation, the installer follows these rules:
•
•
•
Note
Using the pkg.rul Installation File
InstallShield has its own scripting language. If you use the *.rul file, the hooks are named specifically for the InstallShield. If all you plan to do with your package is to drop it in the runtime tree, you do not need to reconfigure the installation, and the *.rul file is not required. The pkg.rul file contains Windows scripts for installation. This is an optional file that contains InstallShield5 code for a hooks for a package or installable unit. The pkg must match the name of the pkgpr file described above as well as the value of PKG property.
The pkg.rul file begins with the line:
declarefollowed by #define statements and function prototypes. Prototypes are needed only for additional function, not for hooks themselves. For example:
declare#define MY_CONSTANT 5#define ANOTHER_CONSTANT "name of file"prototype MyFunction(STRING, BOOL, STRING);After that bodies for hook functions and additional functions are included. Hook functions are InstallShield5 functions with special names.
pkg_<hook_type>,
where pkg is package tag and hook_type is one of preinstall, postinstall, or uninstall hooks. Prototypes for hook functions are generated automatically and cannot be included into the pkg.rul file.
For example:
function mypkg_preinstall()beginStopService("srv");end;function mypkg_postinstall()NUMBER nRc;beginDmgrRegister("mydaemon", ....);nRc = MyFunction("mydaemon", TRUE, "parameter");end;function mypkg_uninstall()beginDmgrUnregister("mydaemon", ...);end;function MyFunction(dmName, flag, msg)begin...end;Functions can take advantage of APIs and global variables. See the "Using Installer Global Variables" section for more details.
You can call the Core Client Registry from an installation .rul file using ccraccess.dll. See the "Using the CCRAccess DLL" section on page 13-50.
Using Installer Global Variables
Caution
The following global variables are provided by the installer and can be used directly in installation hooks. Future marketing requirements may change these values.
To override these values, add a line to the RELEASE section of the table of contents without the TOC_ prefix. For example, the following overrides the TOC_REGISTRY_ROOT:
[RELEASE]REGISTRY_ROOT=HKEY_LOCAL_MACHINE\....Preloading the Global List, lAnswerFile
The installation framework automatically preloads the answer file into the global list lAnswerFile. The answer file is an ASCII file that provides the required inputs for quiet installations.
Note
The answer file is a plain ASCII file consisting of a name=value pair on each line:
#--- begin answer file#--- hash sign (#) is allowed to mark commentsadminPassword=admindestination=d:\cscopxsystemIdentityAccountPassword=admin#--- end of answer fileThe CWCS installation processes the properties described in Table 22-19. If your application image includes CWCS, make sure that the mandatory properties are included in the answer file. If your application image does not include CWCS, you can ignore these properties.
Assuming the above file was named c:\answerfile, you could call it as part of a silent installation as follows:
setup.exe QUIET answerfile=c:\answerfile.
Related Topics
For the similar procedure on Solaris, see the "Creating the Answer File" section.
Reducing Windows Installation Time
Developers trying to reduce total Windows installation time will want to avoid rewriting preinstall and postinstall scripts. Apart from requiring much additional developer time, this is error prone.
However, you can save substantial installation time by:
1.
2.
The existing build tools will attempt to do this by default (and will fail to do so if there are name conflicts), but developers have full control over whether scripts are combined or not, and which scripts are combined. To combine scripts under your control, add to disk.toc a SCRIPTS entry of the following form:
[SCRIPTS] combinedScript=[all_]sourceScript,...
Where:
•
•
•
For example, to combine all CWCS scripts:
[SCRIPTS] cdone_a=all_cdone,all_cmfj2
On Windows platforms, you can also save installation time by replacing any calls to CCRAccess.exe with calls to CCRAccess.dll. See the "Using the CCRAccess DLL" section on page 13-50.
Using the Windows Installation APIs
This topic covers the APIs you can use in package-specific hooks (install shell scripts for Windows). The functions you can perform using these APIs include:
•
•
•
•
•
•
•
Accessing and Setting Package Properties to Perform Version Comparisons
Use these APIs to access and set package properties and to perform different version comparisons:
CompareVersion
prototype CompareVersion(STRING);prototype CompareVersionEx(STRING, BYREF NUMBER, BYREF NUMBER,BYREF NUMBER);Compares the version of the component being installed with the one installed before. CompareVersionEx also returns the version and patch level of the latest.
Arguments
Return Values
CompareVersionTo
prototype CompareVersionTo (STRING, NUMBER, NUMBER, NUMBER, NUMBER);Compares pending or installed version of component to given values.
Arguments
Return Values
GetInstalledPackageVersion
prototype GetInstalledPackageVersion (STRING, BYREF STRING, BYREF NUMBER);prototype GetPendingPackageVersion (STRING, BYREF STRING, BYREF NUMBER);Determines the version and patch version of component that had been installed before this installation (GetInstalledPackageVersion) or is being installed (GetPendingPackageVersion).
Arguments
Return Values
GetPackageProperty
prototype GetPackageProperty(STRING, STRING, BYREF STRING, NUMBER);Get the value of package property.
Arguments
Return Values
IsInstalled
prototype IsInstalled(STRING);prototype IsInstalledEx(STRING, BYREF STRING, BYREF STRING);Verifies if package, installable unit, or suite has been installed before this installation started. The IsInstalledEx function also returns version and information string if the component is found.
Arguments
Return Values
LoadPackageProperties
prototype LoadPackageProperties(STRING, LIST, NUMBER);Loads property file into string list.
Arguments
Return Values
PROP_DIR
STRING PROP_DIR;(Global variable)Use this global directory name for temporary files. This directory is automatically removed after installation is completed. To avoid file name collisions do not use extension .info or .temp.
RecordKeyValue
prototype RecordKeyValue(STRING, STRING, STRING, STRING, BOOL);prototype RestoreKeyValue(STRING, STRING, STRING, STRING, BOOL);Save and restores Windows registry key values. Keys are saved permanently, and could be saved at installation time and restored at uninstallation. Each package has its own namespace to save or restore registry key values.
Arguments
Return Values
None
SavePackageProperties
prototype SaMvePackageProperties(LIST);Saves preloaded properties of current component from string list.
Arguments
1
LIST (input)
Valid string list initialized by the LoadPackage Properties function.
Return Values
None
Notes
•
SetPackageProperty
prototype SetPackageProperty(STRING, STRING);Sets the property of package or installable unit.
Arguments
Return Values
None
VersionToMajorMinor
prototype VersionToMajorMinor(STRING, BYREF NUMBER, BYREF NUMBER);Converts version string to numeric values.
Arguments
1
STRING (input)
Version number in string format (major.minor).
2
NUMBER (output)
Major version as a number.
3
NUMBER (output)
Minor version as a number.
Return Values
0
If the string does not contain a valid version, the returned major and minor versions are both set to 0.
-1
Component is not found.
VersionToMajorMinorPatch
prototype VersionToMajorMinorPatch (STRING, BYREF NUMBER, BYREF NUMBER, BYREF NUMBER);Converts patch version string to numeric values.
Arguments
Return Values
0
If the string does not contain a valid version, the returned major and minor versions are both set to 0.
-1
Component is not found.
IsVersionInRange
prototype IsVersionInRange(STRING, STRING, NUMBER);This function checks if the specified package version is within the specified range.
Arguments
Return Values
0
The version is within limits.
-1
The version is lower than the lower limit.
1
The version is higher than the higher limit.
-99
The specified version was not found.
isPackagePending
prototype isPackagePending (STRING);This function checks if the specified package is selected for installation.
Arguments
Return Values
TRUE
The specified package is selected for installation.
FALSE (0)
The specified package is not selected for installation.
Controlling Responses to Terminated Installations
Use the SetAbortFlag API to control a response to a terminated installation.
SetAbortFlag
prototype SetAbortFlag(STRING);SetAbortFlag allows your hook to terminate installation with an error message. Use in preinstalls only. Do not abort after user completes installation because that would leave the product in an unknown state. If you believe that some serious problem has occurred during postinstall, send a message (MessageBoxLog function) and proceed.
Arguments
Processing Name=Value Pairs
Use this set of APIs to process files containing name=value pairs , similar to Java property files:
addProperty
prototype addProperty(STRING, STRING, STRING, STRING);prototype getProperty(STRING, STRING, STRING, BYREF STRING);Adds or retrieves property to and from file.
Arguments
1
STRING (input)
Directory
2
STRING (input)
File name
3
STRING (input)
Property name
4
STRING (input or output)
Property value:
•
•
Return Values
•
•
addNumProperty
prototype addNumProperty(STRING, STRING, STRING, NUMBER);prototype getNumProperty(STRING, STRING, STRING, BYREF NUMBER);Adds or retrieves property to and from file.
Arguments
Return Values
•
•
loadPropertyFile
prototype loadPropertyFile(STRING, STRING, LIST);prototype savePropertyFile(STRING, STRING, LIST);These functions allow you to preload properties from a file into a string list to speed up processing.
Arguments
1
STRING (input)
Directory.
Do not use the string list directly. Instead, use addProperty, addNumProperty, or addStringPropertyToList to set or retrieve properties.
2
STRING (input)
File name
3
LIST (input or output)
String list:
•
•
addStringPropertyToList
prototype addStringPropertyToList (LIST, STRING, STRING);prototype addNumPropertyToList (LIST, STRING, NUMBER);prototype getStringPropertyFromList (LIST, STRING, BYREF STRING);prototype getNumPropertyFromList (LIST, STRING, BYREF NUMBER);These functions are similar to add.../get... functions described previously.
Arguments
Sending Informational Messages to a Log File
The following APIs enable you to send messages to a log file:
The log file is for information purposes only; it is not used for uninstallation.
WriteLogFile
prototype WriteLogFile(STRING);Writes the string into the log file. Names and locations for these log files use the convention %SystemDrive%\CW2000_inXXX.log, where XXX is equal to the log sequence (001, 002, and so on).
Arguments
AskYesNoLog
prototype AskYesNoLog(STRING,NUMBER);Displays the AskYesNo dialog and puts both the dialog message and user's reply into the log file.
Arguments
1
STRING (input)
Message. The same as InstallShield's AskYesNo function.
2
NUMBER (input)
Default answer.
AskYesNoLogTitle
prototype AskYesNoLogTitle (STRING,STRING,NUMBER);Specifies the AskYesNo dialog title. This is the same as InstallShield's AskYesNo function (info, warning, error).)
Arguments
1
STRING (input)
Dialog box title.
2
STRING (input)
Message. The same as InstallShield's AskYesNo function.
3
NUMBER (input)
Default answer
MessageBoxLog
prototype MessageBoxLog(STRING,NUMBER);Displays the MessageBox dialog and writes a message into the log file. (The same as the InstallShield's MessageBox function.)
Arguments
1
STRING (input)
Message. The same as InstallShield's AskYesNo function.
2
NUMBER (input)
Severity level. Predefined values: INFORMATION, WARNING, SEVERE
MessageBoxLogTitle
prototype MessageBoxLogTitle (STRING,STRING,NUMBER);Specifies the MessageBox dialog title.
Arguments
1
STRING (input)
Dialog box title.
2
STRING (input)
Message
3
NUMBER (input)
Severity level. Predefined values: INFORMATION, WARNING, SEVERE.
StringListLog
prototype StringListLog(LIST, STRING);Writes all elements of string list into log file.
Arguments
AddFileToLog
prototype AddFileToLog(STRING, STRING);Copies a file into log file.
Use this function to analyze results of processes executed using the Shell Task functions (see the "Running Commands in a Shell" section).
Arguments
Informing the Installer That a Component Requires More Space
The following APIs extract the disk cluster size and inform the installer that your component requires more space than its runtime footprint:
GetClusterSizeEx
prototype GetClusterSizeEx(STRING, BYREF NUMBER);Determines the size of cluster for specified path name.
Arguments
1
STRING (input)
Valid path name
2
NUMBER (output)
Number to return cluster size
needMoreSpace
prototype needMoreSpace (STRING, NUMBER, NUMBER);Informs installer that the component requires more space than its runtime footprint. Used only in preinstall hooks.
Arguments
1
STRING (input)
Path name
2
NUMBER (input)
Required size in bytes
3
NUMBER (input)
Number of files
Registering and Unregistering CWCS Daemons
The following APIs enable you to register and unregister processes with the CWCS Daemon Manager:
DmgrRegister
prototype DmgrRegister (STRING,INT,STRING,STRING,STRING);prototype DmgrRegisterEx (STRING,INT,STRING,STRING,STRING,STRING);prototype DmgrRegisterWR (STRING,INT,STRING,STRING,STRING,STRING,INT);Registers a process with the CWCS Daemon Manager.
Arguments
For cwjava daemons, use the Java versions of these APIs: DmgrRegisterJava, DmgrRegisterJavaEx, and DmgrRegisterJavaWR. These Java calls share the C syntax and arguments.
DmgrUnregister
DmgrUnregister (STRING);Unregisters a daemon from the CWCS Daemon Manager. Use this function with the uninstall hook to undo registration.
Arguments
1
String
Name of the daemon to unregister. This should match the Name parameter of the DmgrRegister, DmgrRegisterEx, or DmgrRegisterWR command used to register it.
Running Commands in a Shell
The following APIs enable you to run specified commands in a shell. The shell window is minimized. Control returns after command line task finishes.
LaunchShellAndWait
prototype LaunchShellAndWait(STRING, STRING, BYREF STRING, BYREF STRING);Runs the specified command and minimizes the shell window. It waits until the specified task is completed.
Arguments
Notes
•
•
•
InitBatchFile
prototype InitBatchFile(STRING, STRING, STRING, BYREF NUMBER);Initializes a batch file to execute by RunBatchAndWait command.
Arguments
Notes
For RunBatchAndWait (see the "RunBatchAndWait" section) to work properly, the batch file must be initialized by InitBatchFile. Several lines can be added by InstallShield's WriteLine function and closed by the CloseFile function.Then run the RunBatchAndWait command using the same first and second parameters as specified for InitBatchFile.
RunBatchAndWait
prototype RunBatchAndWait(STRING, STRING, BYREF STRING, BYREF STRING);Runs the batch file created by InitBatchFile.
Arguments
Notes
•
•
Locating the Root Directory Path Name
The GetRootDir function allows you to find the path name for the root directory.
GetRootDir
prototype GetRootDir(STRING, BYREF STRING);Find the path name for the root directory.
The installer sets actual directory path names at runtime:
1.
2.
The next time the installer runs, it gets the path names from the registry, requiring no input from the user. This allows multiple root directories, for example, one for CWCS and Essentials (NMSROOT) and another one for Connectivity suite (for example, CONNROOT).
3.
In package hooks, the value of ROOTDIR property for this package can be used directly as a global variable. If a hook needs a value of rootdir for another component, it can be obtained using the GetRootDir function.
Arguments
1
STRING (input)
Root directory name.
2
STRING (output)
Path name of root directory.
Return Values
Notes
The root directory path name for the current component is set to a global variable and can be used directly. This function is needed to obtain the path name of the root directory of another component. For example, package MYPKG has the property ROOTDIR=MYROOTDIR.
Example 22-1 Using GetRootDir
Function mypkg_postinstall()STRING mdPropertyPath, nmsRoot;STRING myPkgPropFileName;begin// property file for this package is under its root directory and// MYROOTDIR can be used directlymyPkgPropFileName = MYROOTDIR^"myPropFile.properties";...// md.property file is somewhere under daemon manager's root - NMSROOTif (GetRootDir("NMSROOT", nmsRoot) = 0) thenmdPropertyPath = nmsRoot^"subdir1\\...";...endif...end;
Registering and Controlling Windows Services
CWCS provides a set of APIs and constants for registering and controlling Windows services. Use the following service APIs to register and control Windows services:
Using Windows Service Constants
Whenever you use the service APIs, use the following constants to specify service types:
•
•
•
You can also use the following constants to specify service start types:
•
•
•
•
•
RegisterService
prototype RegisterService (STRING,STRING,STRING,LONG,LONG);Registers new Windows Services.
Arguments
1
STRING (input)
Service name
2
STRING (input)
Service display name
3
STRING (input)
Path name of executable
4
LONG (input)
Service type. Specify a service type constant (see the "Using Windows Service Constants" section).
5
LONG (input)
Service start type. Specify a service start type constant (see the "Using Windows Service Constants" section).
UnregisterService
prototype UnregisterService(STRING);Unregisters Windows services.
Arguments
StartService
prototype StartService(STRING);Starts Windows services immediately.
Arguments
ChangeServiceStartType
prototype ChangeServiceStartType(STRING, LONG);Changes service start type.
Arguments
1
STRING (input)
Service name
2
LONG (input)
Service start type. Specify a service start type constant (see the "Using Windows Service Constants" section).
ChangeServiceAccount
prototype ChangeServiceAccount (szServiceName, accountName,accountPassword);Changes the service account. Use this function after the service is created (see the "RegisterService" section).
Arguments
Related Topics
See the "ChangeService2Casuser" section.
ChangeService2Casuser
prototype ChangeService2Casuser(STRING, POINTER);This function reconfigures a service to run as casuser. This relieves the developer from the need to fetch the value of the casuser password, which is maintained by the Daemon Manager. This function can only be used after the Daemon Manager has been installed.
Arguments
1
String
The name of the service.
2
Pointer
The pointer to the string that contains the password. Specify NULL to use the password stored by the Daemon Manager.
Return Values
0 if successful.
Example
This function is implemented in secure.dll, which is a part of the installation framework. Therefore, a call to this function must be framed with the UseDll/UnUseDll calls. For example:
if (UseDLL(SUPPORTDIR ^ "secure.dll") != 0) thenMessageBoxLog("Cannot load secure.dll", SEVERE);endif;ChangeService2Casuser("myService", NULL);UnUseDll(SUPPORTDIR ^ "secure.dll");StopService
prototype StopService(STRING, NUMBER);Stops service.
Arguments
1
STRING (input)
Service name
2
NUMBER (input)
Stop mode. Options:
•
•
Notes
•
•
•
Using Generic Utilities
The generic installation framework utilities contain functions for string list processing, path processing, deleting files, displaying system error messages, and obtaining DNS names:
EmptyList
prototype EmptyList(LIST);Removes all elements from the list.
Arguments
1
LIST (input and output)
Name of valid string list. Input list will be modified.
InvertList
prototype InvertList(LIST);Changes the order of elements in a string list.
Arguments
1
LIST (input and output)
Name of valid string list. Input list will be modified.
GetStringFromList
prototype GetStringFromList(LIST, NUMBER, BYREF STRING);Retrieves an element from a string list by number. For example, it will return the third string in a list.
Arguments
1
LIST (input)
Name of valid string list
2
NUMBER (input)
Index
3
STRING (output)
String returned by the function. It is " " if the requested string is not available.
ListFindSubstring
prototype ListFindSubstring(LIST, STRING, NUMBER, BYREF STRING);Finds an element in a string list, which contains given string starting from the current element.
Arguments
Notes
•
•
AddDirToPath
prototype AddDirToPath(STRING);Adds a specified directory to the path.
Arguments
DeleteFromPath
prototype DeleteFromPath(STRING);Deletes path name from the path.
Arguments
pathToFS
prototype pathToFS(BYREF STRING);prototype pathToBackSlash(BYREF STRING);Converts backslashes in path name into forward slashes and vice versa.
Arguments
1
STRING (input)
String that contains path name. After execution, the modified path name.
ShowLastSysError
prototype ShowLastSysError(STRING, LONG);Display system error message in dialog box.
Arguments
Example
ShowLastSysError ("OpenSCManager failure",GetLastError());SureDeleteFile
prototype SureDeleteFile(STRING);Removes specified file.
Arguments
1
STRING (input)
Installer of a file to remove. Processes both short and long file names
GetHostName
prototype GetHostName(BYREF STRING);Retrieves the DNS host name.
Arguments
ModifySubParameter
prototype ModifySubParameter(BYREF STRING, STRING, STRING, BOOL, STRING, STRING);Modifies the value of a subparameter in a command line or removes it.
Arguments
Notes
For example, you can modify the line:
myExe.exe -d p1,p2,p3 -p jhgjhg -tto look like
myExe.exe -d p1,p2,p3,newP -p jhgjhg -tby calling
ModifySubParameter(myStr, "-d", "newP", TRUE, " ", " ,")where myStr has a string to modify.
Managing Passwords
In this release, there are two sets of functions that manage passwords:
•
•
This section contains the password management APIs:
AskPass
AskPass (Prompt_String, Temp_File_Name, DbPass, Password)The AskPass API:
1.
–
–
2.
3.
Arguments
Notes
This API is called in the preinstall function of the Db.rul.
Example
AskPass("Enter Common Services Database Password",
	"Changing Database Password",
	"enpass_cmf", 1);
GetPass
GetPass(Temp_File_Name, Password)Use this function to retrieve the value saved by the AskPass function. The GetPass API:
1.
GetPass accepts the file name and a string variable as the parameter.
2.
3.
GetPass returns 0 if it succeeds in getting the password, and 1 if it fails.
Arguments
Temp_File_Name
String
Name of the file where the password is stored.
Password
String
Variable where the password will be returned
Example
if (GetPass("casuser_pass",passwd) = 0) then
...
In this example, the API reads the password from the file casuser_pass. The variable passwd contains the password.
AskPassEx, AskPassExTitle
prototype AskPassEx (szDescription, szComment, dialogId, szDLL,fileName, mode, lLabels, nIdStartPwd);prototype AskPassExTitle (szDescription, szComment, dialogId, szDLL,fileName, mode, lLabels, nIdStartPwd, szTitle);These functions prompt the user to specify a new password or accept the default or existing password. The value of the password is stored at a temporary location in encrypted format and can be retrieved by the GetPassEx API (see the "GetPassEx" section). Use this function in the custom panel. For details and a sample, see the "Customizing the Installation Workflow for Windows" section.
Arguments
Return Codes
NEXT or BACK, depending on whether the user clicked the Next or Back buttons.
Example
The following code fragment displays a dialog that lets the user specify values for two passwords (with confirmation for each of them), and stores the result in the admin_pass file in a temporary location. Both passwords cannot be empty, must be at least 5 characters long, contain only alphanumeric characters, and the first character must be alphabetical.
lLabels = ListCreate(STRINGLIST);
ListAddString(lLabels, "User admin Password", AFTER);
ListAddString(lLabels, "User guest Password", AFTER);
nRc = AskPassExTitle("You may change the password of admin and guest users.\n" +
		"Leave fields empty to keep existing passwords.",
	"Password must begin with an alphabetic character and should be "+
		"at least 5 characters long.",
	13034,"13034,"", "admin_pass",
	PASS_EX_NONEMPTY + PASS_EX_ALPHANUM +
		PASS_EX_FIRST_ALPHA + PASS_EX_MIN_LENGTH * 5,
	lLabels, 0, "Change Admin and Guest Password");
ListDestroy(lLabels);
Related Topics
See the:
•
GetPassEx
prototype GetPassEx (szFileName, svField, nField);This API retrieves the values stored by AskPassEx or SetPassEx.
Arguments
Return Values
SetPassEx
prototype SetPassEx (lData, fileName);Stores values in the temporary location in an encrypted format. This is suitable to pass values from early stages of installation to later stages. Encryption will only work on a Windows operating system that supports encryption.
Arguments
lData
List of values to be preserved.
fileName
The name of temporary file that stores the values for the duration of the installation. Do not use path names.
Return Values
Notes
Subsequent calls with the same fileName parameter will replace the previously stored values.
ChangeDbPasswd.pl
$NMSROOT\bin\perl.exe$NMSROOT\objects\db\conf\ChangeDbPasswd.pl DSN New_PasswordThis API changes the password in the database and property files. It accepts the DSN name and password as the parameters and changes the password.
Note
The ChangeDbPasswd.pl API:
•
•
•
•
Arguments
Return Values
Example
$NMSROOT\bin\perl.exe$NMSROOT\objects\db\conf\ChangeDbPasswd.pl cmf ciscoConfiguring Tomcat
The Tomcat configuration APIs include:
ModifyFolderXML
ModifyFolderXML(fileName, replacedString, contextPath, finalString)Configures the application Desktop XML file to integrate it with CWCS.
Arguments
Notes
This method delegates its work to a MICE installation utility class. The actual command line that will be run looks like this:
<path to java>/java com.cisco.core.mice.util.install.FolderXMLModifier <Absolute Path to
XML> <String to replace> <context url pattern> <String to prepend>
Example
In this example,
java com.cisco.core.mice.util.install.FolderXMLModifierC:/MyApp.xml REPLACE_THIS_STRING /myAppThis command will replace all instances of the string REPLACE_THIS_STRING in the drawer file with the default prepend value from CCR, which consists of the URL values to talk to Common Services and initialize the session data between CiscoWorks applications and Common Services.
The ModifyFolderXML utility can transform this line fragment in the myApp.xml file from this:
<item NAME="Launch myApp"HREF="REPLACE_THIS_STRING/myapp?command=firstPage">to this (all one line):
<item NAME="Launch myApp"HREF="/CSCOnm/servlet/com.cisco.core.mice.util.cmf.CMFLIaisonServlet?command=initializeAndValidate&url=%2Fmyapp%3Fcommand%3DfirstPage&context=/myapp&port=443">This method:
•
•
•
UpdateTomcat
UpdateTomcat (aUrlPattern, aRelativePath, aMapping, appid)UninstallUpdateTomcat (aUrlPattern, aRelativePath, aMapping, appid)Call the UpdateTomcat method when you are finished populating CCR (the CWCS Client Registrar). This method:
Handles the configuration of Apache and Tomcat.
•
•
•
•
The UninstallUpdateTomcat method cleans up data related to the application.
Both methods perform some configuration, but delegate most of the work to the Java utility class TomcatServiceUpdate. This class is called from the command line within the installation framework.
Arguments
Notes
All arguments must be defined for full integration and interaction to occur with CWCS.
Example
This is a custom ContextInfo entry in CCR:
<Custom22><Name>ContextInfo</Name><Location>/testLiaison</Location><Data>/myApp</Data><appid>myApplication</appid><ReferenceCount>1</ReferenceCount><References><Core /></References></Custom22>Controlling Reboots
The SetRebootFlag function allows you to request a reboot at the end of an install or uninstall.
SetRebootFlag
SetRebootFlag()Causes the framework to request a system reboot from the user at the end of an installation or uninstallation.
Arguments
None.
Notes
This method tells the installation framework that the system should be rebooted once the installation or uninstallation is finished. The framework will open a dialog requesting the user to confirm the reboot. The user can choose to either reboot at the time of the prompt or to "reboot later".
You can use SetRebootFlag in a Preinstall or Postinstall to request reboot at the end of installation, or in an Uninstall to reboot after uninstallation.
You can also request reboot at the end of uninstallation by adding UNINSTALL_REBOOT=Y to the package properties file (see Table 22-5).
Example 22-2 Using GetRootDir
Function mypkg_postinstall()STRING mdPropertyPath, nmsRoot;STRING myPkgPropFileName;begin// property file for this package is under its root directory and// MYROOTDIR can be used directlymyPkgPropFileName = MYROOTDIR^"myPropFile.properties";...// md.property file is somewhere under daemon manager's root - NMSROOTif (GetRootDir("NMSROOT", nmsRoot) = 0) thenmdPropertyPath = nmsRoot^"subdir1\\...";...endif...end;
Using Windows Build Tools
This topic provides instructions for building an image from protopackages using the installation framework. The main steps are:
•
•
•
The following topics provide additional guidelines and examples:
•
•
For examples showing how to add your application to the CWCS image, see the "Solaris Getting Started Example" section.
Step 1: Install Third-Party Tools for Windows
Install the Windows third-party tools listed in the "Third-Party Tools for Installation Framework" section.
Step 2: Install the Framework on Windows Platforms
To install the framework, copy the following files to your Windows hard drive:
•
•
•
Step 3: Prepare the Make Image on Windows Platforms
Follow these steps to prepare the make image on Windows platforms:
Step 1
which shwhich perlwhich findThe returned path names for shell, perl, and find should refer to the MKS tools. If this is not true, modify the path to include MKS binaries.
Step 2
MK_IS55=full path where InstallShield is installed
MK_PFTW=full path where PackgeForTheWeb is installed
For both environment variables use backslashes with short path name. Spaces are not allowed. For example
set MK_IS55=d:\progra~1\instal~1\instal~1.5pr CORRECTset MK_PFTW=d:\progra~1\instal~1\packag~1 CORRECTset MK_IS55= D:\Program Files\InstallShield\InstallShield 5.5 Professional Edtn INCORRECT
Note
Step 3
perl buildimage -r -d image_path rtpath/is5.runtime.tar pkgpath/myPkg.runtime.tar
protopackage...
Where:
•
•
•
•
This command will create the following directories under image_path:
•
•
•
•
Debugging on Windows Platforms
After the buildImage script has created the extract directory, you do not have to extract protopackages again. Instead, you can change into the extract\is5\install directory and run the runme.sh script:
cd myImage_path\extract\is5\install
sh runme.sh > myImage_path\my.log 2>&1
You can apply changes directly to the files under the extract directory. Do not forget to put changes back into corresponding protopackages.
InstallShield's debugging information is available under image_path\temp\isproject\Script Files\*.dbg. To run installation hooks in the debugger, copy the corresponding .dbg file to the disk1 directory with the image and run installation from the command line with the DEBUGHOOKS parameter. For example:
cd myImage_path\disk1
copy ..\temp\isproject\Script files\tag.dbg
setup DEBUGHOOKS
Where tag is the tag of the protopackage you want to debug.
Installation will run preinstall and postinstall scripts in the debugger. It can also open message boxes complaining about .dbg files not being available for other protopackages. Click OK and proceed with the installation.
The installation framework contains a batch file, rul.cmd, that simplifies the development process on Windows. This file:
•
•
•
set IMAGE=d:\imagePathTo recompile the code for the hook of myApp package, modify the code in the d:\imagePath\extract\myApp\install\myApp.rul file, then run the following command:
d:\imagePath\extract\is5\install\rul.cmd myAppThis command recompiles the code directly into d:\imagePath\disk1 and copies the debugging information (myApp.dbg file).
Example: Using Windows Build Tools
The following topic provides examples on how to create an installable CWCS CD image with a customer application.In these examples, we assume the following:
•
•
The directory myapp\disk1 contains the following disk.toc file describing our sample application's table of contents.
[RELEASE]NAME=CWCS with Test ApplicationVERSTR=2.0REGISTRY_ROOT=SOFTWARE\Cisco\Resource Manager\CurrentVersion[COMPONENTS]TAGS=cwcs cmfwd cmfj2 myappUNINSTALLABLE=cmfwd myappVISIBLE=cwcs cmfwd myappCHOICE=cwcs cmfwd myappDEFAULT=ALL[ADVANCED_CHOICE_1]ADVANCED_CHOICE_1_CONDITION=cmfwd.1.0.0-1.9.99ADVANCED_CHOICE_1_TYPE=EXCLUSIVEADVANCED_CHOICE_1_DEFAULT=4ADVANCED_CHOICE_1_1_TEXT=CiscoWorks Common Services (CWCS) Base DesktopADVANCED_CHOICE_1_1_TAGS=cmfwdADVANCED_CHOICE_1_2_TEXT=CWCS (including Base Desktop)ADVANCED_CHOICE_1_2_TAGS=cwcsADVANCED_CHOICE_1_3_TEXT=myapp ApplicationADVANCED_CHOICE_1_3_TAGS=myappADVANCED_CHOICE_1_4_TEXT=myapp Application and CWCSADVANCED_CHOICE_1_4_TAGS=cwcs cmfwd myapp[ADVANCED_CHOICE_2]ADVANCED_CHOICE_2_CONDITION=TRUEADVANCED_CHOICE_2_TYPE=EXCLUSIVEADVANCED_CHOICE_2_DEFAULT=3ADVANCED_CHOICE_2_1_TEXT=CiscoWorks Common Services (CWCS) Base DesktopADVANCED_CHOICE_2_1_TAGS=cmfwdADVANCED_CHOICE_2_2_TEXT=CWCS (including Base Desktop)ADVANCED_CHOICE_2_2_TAGS=cwcsADVANCED_CHOICE_2_3_TEXT=myapp Application and CWCSADVANCED_CHOICE_2_3_TAGS=cwcs cmfwd myappFor this toc file you need the following:
–
Note
The ADVANCED_CHOICE section determines what is the correct scenario depending on what is already installed on the target machine. In the case where the target machine has a previous version of CWCS Desktop already installed, the customer has the following options:
–
–
–
–
In the case of a fresh installation, you don't have the option of a separate myapp installation. So in this case there are only the remaining three options mentioned in ADVANCED_CHOICE_2 section.
•
D:\myapp\install>cat myapp.bpropsPROP_ID = build_testPROP_TIMESTAMP = 939800833The myapp.pkgpr file contains package properties that specify the name, version, and dependencies. For example:
D:\myapp\install>cat myapp.pkgprNT:AIX:HPUX:SOL:NAME=Sample PackageDESC=This is an example of installation frameworkVERSION=5.0PATCHVER=0DEPENDS=cmfwdSOL:PKG=CSCOmyappNT:PKG=myappThe directory myapp\runtime contains the cgi-bin and htdocs subdirectories, corresponding to the structure of similar directories of the CiscoWorks-product to be used by the web-server. Two Perl scripts, cgi-bin\myappmyappcgi.pl and htdocs\myapp\myappframe.html file. Each developer must replace these files with their application files. Two files, htdocs\Xml\System\maintree\
myapp.xml and htdocs\Xml\System\maintree\myappcgi.xml, are for linking our html-and Perl-files to the appropriate tree structure of the CiscoWorks Home Page. Each developer must swap their xml-files in their place. For the details on integrating your application with CiscoWorks, refer to the "Integrating Your Application with CWHP" section on page 7-6.•
•
•
•
•
MK_IS55=c:\progra~1\instal~1\instal~1.5pr
MK_PFTW=c:\progra~1\instal~1\packag~1
•
C:\>which sh
C:\MKS\MKSNT/sh.exe
C:\>which perl
C:\MKS\MKSNT/perl.exe
C:\>which find
C:\MKS\MKSNT/find.exe
•
Note
To create the CWCS image, use the sample2.sh script in current directory.
•
>sh ./sample2.sh arg1 arg2 arg3 arg4
where:
–
–
–
–
This is the sample2.sh file:
####################################################################### INPUT:# 1 - Target_dir# 2 - myapp_dir# 3 - buildImage_dir# 4 - proto_dir protopackages&is5 directory######################################################################if [$# -ne 4]; thenecho "ERROR:sample2 called with insufficient args."elseTarget_dir=$1if [-d $Target_dir]; thenecho "Directory $Target_dir already exists, remove it first."elsemyapp_dir=$2buildImage_dir=$3proto_dir=$4mkdir $Target_dirperl $buildImage_dir/buildImage -r -d $Target_dir \$proto_dir/is5.runtime.tar $myapp_dir/myapp.runtime.tar \$myapp_dir/myapp.cd.tar $proto_dir/cam.runtime.tar \$proto_dir/cmf.runtime.tar $proto_dir/cmfj2.runtime.tar \$proto_dir/cmfwd.runtime.tar $proto_dir/db.runtime.tar \$proto_dir/dmgt.runtime.tar $proto_dir/eds.runtime.tar \$proto_dir/ess.runtime.tar $proto_dir/grid.runtime.tar \$proto_dir/jawt.runtime.tar $proto_dir/jchart.runtime.tar \$proto_dir/jext.runtime.tar $proto_dir/jgl.runtime.tar \$proto_dir/jpwr.runtime.tar $proto_dir/jre2.runtime.tar \$proto_dir/jrm.runtime.tar $proto_dir/lotusxsl.runtime.tar \$proto_dir/nmcs.runtime.tar $proto_dir/perl.runtime.tar \$proto_dir/plug.runtime.tar $proto_dir/pxhlp.runtime.tar \$proto_dir/snmp.runtime.tar $proto_dir/svc.runtime.tar\$proto_dir/swng.runtime.tar $proto_dir/vorb.runtime.tar \$proto_dir/web.runtime.tar $proto_dir/xml4j.runtime.tar \$proto_dir/xrts.runtime.tar $proto_dir/eds.cab.tar \$proto_dir/jgl.cab.tar $proto_dir/swng2.cab.tar \$proto_dir/vorb.cab.tar \fifiThe output of buildImage command is very lengthy. The actual set of tar files may be different from this example. Here is the result:
D:\image>ls<Name of Self-extracting installation file>.exe disk1 tempautoinstall.sh extract•
Note
D:\myapp\install>cat myapp.ruldeclarefunction mypp_preinstall()beginMessageBoxLog("Installing MyAP into \n"+NMSROOT,INFORMATION);end;function myapp_postinstall()beginMessageBoxLog("Running postinstall script for MyAPP",INFORMATION);end;function myapp_uninstall()beginMessageBoxLog("Running uninstall script for MyAPP",INFORMATION);end;Customizing the Installation Workflow for Windows
The workflow implemented by the CWCS installation framework can be customized for a specific product. You can also modify the workflow to display additional product-specific dialogs at installation time.
Note
The following topics describe how to customize the Windows installation workflow:
•
•
•
•
•
•
•
For information about limited customizations available on Solaris, see the "Customizing the Installation Workflow on Solaris" section.
About the Installer Workflow
The installation framework supplies the installer that:
•
•
•
Some products require that additional dialogs be displayed at installation time. If they are implemented in the xxx_preinstall functions, then the dialogs are displayed too late, and might be hidden in the background. This topic describes how dialogs (or non-interactive actions) can be added to the installation of a specific product.
The installer is implemented as a sequence of steps. Each step is either an action or a panel. The sequence is controlled by the project file. When creating an image, the installation framework build tools load the project file and automatically generate the code that invokes actions and panels and controls the sequence, including the processing of the Next / Back buttons required by the wizard model.
Customizing the installation workflow requires the following steps:
1.
2.
Getting Started with Windows Installer Tools
To develop InstallShield code that works with the installation framework, be sure your desktop has all required tools. You must have:
•
•
Creating the Installation Project File
The project file is an ASCII file that contains definitions of steps, one step per line. Normally one project file (the template) will contain steps only, with no operations. Other project files will contain additional steps or changes to the template, and use operations with references instructing the generator how to modify the template.
Each step definition uses the following format:
[%operation reference][label:]stepName;[sourceFile];condition[;condition[...]]
Where:
•
•
•
•
•
•
•
Creating Install Actions
Installer steps are implemented as InstallShield functions. Functions can be either panels or actions. All panels and actions must have a predefined set of parameters, and return codes for the installer to determine the next step. Each panel or action can be accompanied by one or more conditions. The installer evaluates specified conditions and calls the action or panel only if all conditions are positive.
The source code for actions must be included in one of the protopackages in the install/action directory. In the project file, the name of an action is the same as the function, and must be followed by the source file name (without a path). The source file name can be either a header (.h), or a source (.rul) file.
•
•
This gives you two options, as follows:.
Option 1
Put the source code for the custom action into the .rul file with no prototype, and specify the .rul file name in the project. For example:
1.
function myAction()begin...end;2.
... myAction;myActionSrc.rulOption 2
Put the source code of the custom function into the .rul file and create a matching header file with function prototypes. For example:
1.
function myAction()begin...end;2.
prototype myAction();3.
... myAction;myActionSrc.hNormally, Option 1 is more convenient for simple cases, where the action is the only function in the source file. If you want to include multiple functions in a single source file, then Option 2 is the better choice.
Non-Interactive Actions
Non-interactive actions are simple steps that are normally non-interactive, or display simple dialog boxes without Next/Back buttons. Functions implementing such steps must have no parameters, and return codes as follows:
•
•
To distinguish actions from panels, the name of non-interactive actions must not begin with panel_.
Creating Install Panels
Panels are the steps that implement dialogs displayed to the user running the installation. These dialogs use the Next and Back buttons following wizard paradigm. Functions implementing a panel must have:
•
•
Note
The return code of a panel must be one of the following:
•
•
•
•
Note
The implementation of a panel must be able to handle several special cases:
•
Example 22-3 Fetching Answers Using getStringFromList
if (bQuiet = TRUE) then// this is silent modeif (getStringPropertyFromList(lAnswerFile,"myParameter", svMyParameter) = 0) then// myParameter was specified in answerFile, proceed with this value... // some code that puts svMyParameter into temp location for// postinstall, see more on that laterelse// value is not specified in the answer file. Your postinstall must// be able to handle that situation, if it cannot than the default// value must be stored here// ...// In the case when there can be no default, it is time to abort:WriteLogFile("ERROR: the value myParameter is not specified in" +" the answer file, and silent installation can not proceed");return -1; // this instructs installer to abortendif;•
–
addProperty(PROP_DIR, "myTempFileName", "myParameter", szValue)in the code of the panel, followed by:
getProperty(PROP_DIR, "myTempFileName", "myParameter", svValue)in postinstall.
–
ListAddString(lTemp, svData1);ListAddString(lTemp, svData2);SetPassEx(lTemp, "myPanelData");In postinstall, you can retrieve data with:
if (GetPassEx("myPanelData", svData1, 0) = 0) then// use svData1else// that piece of data was not entered by user either because of silent mode// or the dialog was skippedendif;if (GetPassEx("myPanelData", svData2, 1) = 0) then// the same for the second field// ...In addition to passing data, these two functions ensure that temporary files are stored in a directory ciphered for the current user, so no other user can view the information. These functions are therefore safe for passwords and other security sensitive data.
•
•
function panel_myPanel()beginif (...) then// this will cause problem, don't do it!!!return NEXT;endif;// displaying actual panelreturn NEXT;end;In this case, the framework is unaware that the panel was not actually displayed. After calling the panel_myPanel function, the framework would proceed to the next dialog. If the user then clicks on the Back button, the framework will invoke panel_myPanel again, which is wrong. In order to avoid this situation, a condition must be specified as a function or inline condition in the project. The previous code can be corrected as follows:
function panel_myPanel()beginif (...) then// this return code notifies the framework that myPanel// was not displayed. When user goes back from the next// dialog, the framework would jump to the panel that// had been displayed before myPanelreturn SM_SKIP;endif;// displaying actual panelreturn NEXT;end;Specifying Conditions For Install Actions and Panels
Often, installer steps must be skipped, but the decision to execute or skip a step will be made only at installation time. You can allow for this by specifying conditions for actions or panels. The framework evaluates all conditions before executing an action or panel, and the action or panel function is invoked only if all conditions pass. Two types of conditions are supported:
•
myAction;myAction.rul;needAction;additionalConditionIn this example, the action myAction will only be invoked if both the needAction() and additionalCondition() functions return a positive number.
•
myAction;myAction.rul;svSetupType="custom"Creating the Install Staging Area
Note
There are two ways to create the staging area:
•
•
After creating the staging area, you can change the install code and rebuild the image as needed using one of the following options:
•
cd d:\image\extract\is5\installset debug=1sh runme.sh 2>&1 | tee d:\image\log.txtThese commands rebuild the CD image from the content of d:/image/extract area. The process takes about 10 to 20 minutes. Because the output of these commands is very lengthy, it is redirected into the file log.txt so it can be analyzed after runme.sh finishes. Setting the debug variable causes runme.sh to skip creating the self-extracting executable (this will save you 5 to 10 minutes), and adds debug information to the image.
•
set IMAGE=d:\imaged:/image/extract/is5/install/rul.cmd main projectFilesThese commands simply rebuild the source code of the installer from the specified project files. The rul.cmd file can be copied into the directory in the path to avoid typing the path each and every time.
The projectFiles variable requires that the path names of one or more project files be relative to the d:\image\extract directory. For example, to build the installer based on the CWCS project with additional steps in the file d:\image\extract\kilner\install\action\kilner.project, use the following command:
rul main cmf\install\action\core.projectkilner\install\action\kilner.projectThis method is available only after buildImage or runme.sh builds a complete image .
Example: Adding Message Boxes to an Installation
To add a simple message box to a CWCS installation:
Step 1
Step 2
cd d:\image\extract\is5\installset debug=1sh runme.sh 2>&1 | tee d:\image\log.txtWhen runme.sh finishes, the installable image is created at d:\image\disk1. You can run the beginning of installation and cancel it when the Installation Type dialog is displayed. Please note the sequence of dialog boxes before it.
Step 3
// helloWorld.rul - my first custom actionfunction helloWorld()beginMessageBoxLog("Hello World", INFORMATION);return 0;end;
Note
Note
Step 4
project adding HelloWorld to CWCS installation%AFTER panel_welcome helloWorld;helloWorld.rulStep 5
set IMAGE=d:\imagerul main cmf\install\action\core.project cmf\install\action\my.projectStep 6
Example: Creating Custom Password Dialogs
This example describes how to add a dialog that prompts the user to type a password. It is assumed that CWCS is included in the CD with the product image, and therefore all CiscoWorks dialogs need to be displayed. The dialog described here will be added in such a way that it is displayed by a custom installation only. If the product is installed for the first time, a random password must be generated.
The panel will be implemented by the panel_myPwd function. The file with this function will be added to the install\action\mypassword.rul, and the prototype will be added to the install\action\mypassword.h.
Note
Step 1
cd d:\image\extract\is5\installset debug=1sh runme.sh 2>&1 | tee d:\image\log.txtStep 2
The file extract\myPkg\install\action\mypassword.h contains one line:
prototype panel_myPwd(NUMBER);To add the panel to the installer, a new project file is needed (for example, extract\myPkg\install\action\my.project). This project file needs the following line (do not put extra spaces at the start):
%BEFORE addUserInputToInfoListpanel_myPwd;mypassword.h;svSetupType="custom"This condition ensures that the panel is displayed in custom mode only.
The rest of the code goes into the extract\myPkg\install\action\mypassword.rul file. It contains the code for the panel_myPkg function:
function panel_myPwd(lastStepRc)NUMBER nRc;STRING szPwd;LIST lLabels, lTemp;beginif (bQuiet) then// this is quiet mode.if (IsInstalled("myPkg") = 0) then// this is reinstallation case, leave it to postinstall to handleWriteLogFile("INFO: Reinstallation of myPkg, skipping password");return NEXT;else// original installation, let's try answer fileif (getStringPropertyFromList(lAnswerFile,"myPassword", szPwd) != 0) then// generate random passwordrandomWord(szPwd, 15, -2, RW_ALL);endif;// save the password for postinstall to pick uplTemp = ListCreate(STRINGLIST);ListAddString(lTemp, szPwd, AFTER);SetPassEx(lTemp, "myPwd");ListDestroy(lTemp);return NEXT;endif;endif;// let's do the dialog// here you might want to reinitialize the szPwd with the value of// existing password in the case of reinstallation / upgradelLabels = ListCreate(STRINGLIST);ListAddString(lLabels, "My Password", AFTER);nRc = skPassExTitle("Description","text of comment", PASS_DIALOG_ID,"PASS_DIALOG_ID,"", "myPwd",PASS_EX_DB_VALIDATION + PASS_EX_EMPTY_ALLOWED + 15,lLabels, 0, "Change My Password");ListDestroy(lLabels);return nRc;end;
Example: Adding User Data to Show Details
In the CWCS installation, information collected from the user or generated automatically is displayed in the Confirmation Dialog, which allows the user to review the options. This dialog is implemented by panel_installConfirmation. This step generates the standard portion (the one displayed while the details are hidden) and appends the details from the global list lUserOptions. This list is managed by the installation framework; the action addUserInputToInfoList populates CWCS-specific options.
To insert application-specific options into the details, you can either replace addUserInputToInfoList or add another step that appends the application-specific options to the list.
For example, to add the password created by panel_myPwd, create this action:
/*-----------------------------------------* adds the password to details*-----------------------------------------*/function addMyPwdToInfoList()STRING svTemp[1024];beginif (GetPassEx("myPwd", svTemp, 0) = 0 && svTemp != "") thenListSetIndex(lUserOptions, LISTLAST);ListAddString(lUserOptions," My password: " + svTemp, AFTER);endif;end;
Note
To add this step to the installation, put the following line into your project file (where the function is in mypassword.rul, and prototype is in mypassword.h):
%AFTER addUserInputToInfoList addMyPwdToInfoList;mypassword.hTo use application-specific information instead of that created by CWCS, or when your installation does not include CWCS, the code must be modified slightly. For example, to add the password created by panel_myPwd to a non-CWCS installation, or when replacing the details provided by CWCS, create an action that looks like this:
/*-----------------------------------------* adds the password to details*-----------------------------------------*/function addMyPwdToInfoList()STRING svTemp[1024];beginEmptyList(lUserOptions);if (GetPassEx("myPwd", svTemp, 0) = 0 && svTemp != "") thenListSetIndex(lUserOptions, LISTLAST);ListAddString(lUserOptions," My password: " + svTemp, AFTER);endif;end;
Note
To add this step to a non-CWCS installation, add the following line to your project file (where the function is in mypassword.rul, and prototype is in mypassword.h):
%BEFORE panel_installConfirmation addMyPwdToInfoList;mypassword.hTo add this step to CWCS installation in which the CWCS details are overridden, add the following line to your project file (where the function is in mypassword.rul, and prototype is in mypassword.h):
%REPLACE addUserInputToInfoList addMyPwdToInfoList;mypassword.hSolaris Installation Reference
This topic covers the following reference information for Solaris:
•
•
•
Setting Ownership for Package Files on Solaris
The CWCS team has updated installation on Solaris to set the ownership of application files properly during CWCS installation. If you have application files that existed in a previous release and were not part of the installation package, then you must modify the post-install hooks/scripts to add chown/chgrp commands for each file. This includes dynamically created files such as data files and properties files.
The options for setting ownership include:
•
•
This section provides information about setting ownership data during the image build process using the buildImage script. The buildImage script expands the protopackages and searches for the runme.sh file and runs it. On Solaris, the .../install/runme.sh comes from the pkgtools protopackage and performs the following tasks:
•
•
At the beginning of its execution, the script makesolpkg has the bin:bin ownership hard coded for $OWNER and $GROUP variables.
Additional facilities have been developed to supply you with the ability to have files owned, as they must be set in the image. These are getting ownership from package_name.owner file (for every package). The ownership setting sequence for particular package:
•
•
The prototype file is used by pkgmk utility for package creation.
Related Topics
See the:
•
•
•
•
Setting Ownership from package_name.owner File
The package_name.owner file (see the "Understanding the package_name.owner File" section) is a manifest-like file where you can specify the ownership for files/directories with wild cards. It is necessary to have a separate ownership description file for each package. The rules for this file are:
1.
2.
These two items specify the default owner/group for all the files in the package. This data may be set for any file/directory in the package by explicitly mentioning it in BOM file or by using PROP_IMAGE_OWNER and PROP_IMAGE_GROUP build environment variables.
3.
These items should be separated by spaces. You can use wild cards for directories (* -s at the end of directory_name string; no any space symbols are allowed between the end of directory name and `*'-symbol). One symbol (*) refers to the current directory only; the ownership described by owner_login/owner_group is to be assigned for every file/directory in current directory only. Two symbol ** string means recursion; the ownership provided by owner_login/owner_group is to be assigned for every descendant file/directory starting from those in the current directory.
Understanding the package_name.owner File
The protopackages are built as specified by the BOM files. Each package's BOM file provides the ownership data. The most convenient way to set up your .owner file is to use the appropriate .toc file. The .toc file is automatically produced from .bom file during the build procedure and contains more detailed data about your directories/files ownership.
An appropriate script (tocToOwner.pl) was written and the .owner file is now automatically put into protopackage tar-file (along with .bom file and others). So the packge_name.owner file is automatically located into right /../install directory.
Setting Ownership During Build/Installation
This topic provides information on typical scenarios for you to set desired ownership during image creating process or during installation. The typical scenarios are:
•
To implement this scenario, supply the input parameters OWNER/GROUP in the pkg_name.owner file. The makesolpkg file can then get them from DEFAULT_OWNER/DEFAULT_GROUP tags in pkg_name.owner file.
This scenario may be used to set casuser:casuser ownership for all the packages.
•
There are two possibilities for this scenario. First, specify fixed ownership in the .bom file for particular package. Second, prepare the .owner file manually and deliver it to appropriate /install directory during image build.
Setting Ownership Assignment Details
This procedure is implemented by the makesolpkg script. The ownership assignment rule works in the following manner.
•
•
•
•
The makesolpkg script is located in pkgtools.runtime.tar file. It is untared into the ../pkgtools/install directory. The package is created in two steps:
1.
2.
After the execution of pkgproto, the prototype file is modified so that the ownership is changed in accordance with ownership assignment rule. Then it creates the package file with the new ownership.
Creating the Answer File
The answer file is an ASCII file that provides the required inputs for quiet installations. It contains the name=value pairs shown in Table 22-20.
Caution
The answer file contains the following name=value pairs:
Notes
•
./setup.sh -q ""In this example, the blank quotes are required.
Example
Answer file:
#cat /tmp/answer_file##Sample Answer filedestination=/opt/ciscoadminPassword=adminpassSetup command:
#setup.sh -q /tmp/cscotmp/enpass_cmfRelated Topics
For the same procedure on Windows platforms, see the "Preloading the Global List, lAnswerFile" section.
Writing Solaris Scripts
Using the CWCS installation APIs, you can write Bourne shell scripts that will allow you to specify any requirements and enforce any constraints on a package on a Solaris platform.
The following topics describe how to write scripts for your package:
•
•
Using the Solaris Installation Hooks
Solaris developers can use the following Bourne shell scripts to perform the required functions for their package installation:
Note
If the information obtained by this script is required by another script, such as preinstall, then the script may set an environment variable or write a temporary file. The preferred method is to call AddProperty (see the "AddProperty" section) to save the value and GetProperty (see the "GetProperty" section) in a later script to retrieve the property. These functions are found in commonscript.sh.
Hooks are run in the following sequence:
1.
2.
At uninstallation time, hooks execute pkgrm for each component. Each pkgrm executes preremove, removes files, postremove.
It is important to understand in which order hooks are executed. The installer observes the following rules at installation:
•
•
At uninstallation the installer observes the following rules:
•
Note
Additional hooks are provided to permit custom operations at the completion of various install operations. For details, see the "Customizing the Installation Workflow on Solaris" section.
Where to Find Solaris Installation Examples
The following installation examples are documented:
•
•
•
A basic example is provided in the "Solaris Getting Started Example" section.
Using the Solaris Installation APIs
This topic covers the Solaris installation APIs, which you can use in in any hook:
•
•
•
•
Note
The following is a sample function header:
########################################################################## FUNCTION FunctionName <input> [<input>]## brief description of function.########################################################################The FUNCTION line shows the function name and all arguments with which it is called.
Note
Using the Solaris Input/Output APIs
The Input/Output APIs handle password management and input/output functions:
•
•
•
•
•
•
•
•
•
•
•
AskPass
AskPass PromptString Temp_File_Name DbPass PassName
Normally, this API is called in the prerequisite to the installation process. The AskPass API:
1.
This API asks the password twice to confirm the password.
2.
Note
Arguments
PromptString
Prompt which asks the user for password.
Temp_File_Name
Name of the file where the encrypted password will be stored. This file will be created in the temp directory (/tmp/cscotmp/<temp_filename> directory).
DbPass
Indicates whether to validate the password.
When set to 1: The password is validated according to database rules such as, The password should not start with a number, It should not contain any special characters and password length should not be more than 15 characters. These constraints are imposed by the Sybase DBD.
Note
When set to values other than 1: The password is not validated.
PassName
The name of the password. This name is displayed at the end of the installation process using the AddPassword API (see the "AddPassword" section).
Return Values
None
Example
AskPass "Enter the CWCS Database Password" "enpass_cmf" 1"VALUE_CCSDB_PASSWORD"In this example, the API:
1.
2.
3.
AskPassEx
AskPassEx prompt_string temp_filename pass_Name flag
This API will be normally called in the prerequisite to the installation process. The AskPassEx API:
1. Prompts users for passwords .
2. Prompts for the password twice, to confirm it.
3. Accepts special characters, such as punctuation marks, ampersands, and so on.
4. Validates the password, encrypts it, and stores it in a temporary file in the temp directory.
Note
Arguments
Return Values
None.
Example
AskPassEx "Enter the CiscoWorks admin password: " "enpass_admin" "Admin Password" 0
In this example, the API:
1. Displays the user prompt string Enter the CiscoWorks admin password:.
2. Reads the password the user enters, and stores it in the file enpass_admin. The typed characters are not displayed on the screen.
3. Prompts the user to retype the password to confirm.
4. Assigns "Admin Password" as the name of the password. This name is displayed at the end of the installation process using the GetPass API (see the "GetPass" section).
GetPass
retVal=GetPass Temp_File_NameThis API is used to retrieve the password from the temporary file. This API also deletes the password file.
Note
Arguments
Temp_File_Name
Name of the temp file where the encrypted password is kept. The file should be present in /tmp/cscotmp directory.
Return Values
retVal
0 = success. If successful, the global variable $PASS contains the clear text password.
1 = failure
Example
retVal=`GetPass enpass_cmf`In this example, the API reads the encrypted password from /tmp/cscotmp/enpass_cmf file, decrypts it and returns to the variable Pass.
ChangeDbPasswd.pl
$DBSWDIR/conf /ChangeDbPasswd.pl DSN PasswordThis API changes the password in the database and in property files. It accepts the DSN name and password as the parameters and changes the password. This function returns 0 if it is successful, and returns a value greater than 0 (> 0) if it has failed.
The API does the following:
•
•
•
•
This API is normally called in postinstall.
Note
Arguments
Return Values
None
Examples
This example changes the password of the CWCS database to "cisco".
$DBSWDIR/conf /ChangeDbPasswd.pl cwcs ciscoThe following example shows how to change the database password for the CWCS database in the CSCOdb package.
1.
2.
if [${YN} = 'y']; then
AskPass "Enter the CWCS Database Password" "enpass_cmf" 1
fi
3.
retVal=`GetPass enpass_cmf`
$DBSWDIR/conf /ChangeDbPasswd.pl cmf $PASS
AddPassword
AddPassword "password_name" "password_value"This API is used at the end of the installation to display the passwords that were either entered or randomly generated.
Note
Arguments
password_name
Name of the password
password_value
Value assigned to password name (either entered or randomly-generated)
Return Values
None
Example
AddPassword "VALUE_CCSDB_PASSWORD" "$PASSWORD"
PasswordRandomSelection
new_password = "PasswordRandomSelection"This API returns a randomly-generated password. It is used when user interaction is not required to enter the password.
Note
Valid Installation Modes
Typical
Arguments
None
Return Values
A randomly-generated string
Example
PASSWORD="PasswordRandomSelection"PortRandomSelection
port_number ="PortRandomSelection"
This API returns a randomly-generated port number. It is used when the designated port is already in use by another process.
Note
Valid Installation Modes
Typical
Arguments
None
Return Values
A randomly-generated port
Example
port_no="PortRandomSelection"Profile
Profile label [output file]If in debug mode, write the time stamp for profiling. Concatenate to a file if one is specified.
Debug
Debug output string [output file]If in debug mode, write the string. Concatenate to a file if one is specified.
PromptResponse
PromptResponse prompt string default stringPrompts user for input and store response in variable RESPONSE.
PromptYN
PromptYN prompt string default stringPrompts user for a yes or no respones and stores the response in lower case in the variable YN.
Using the Solaris Package APIs
This group of APIs contains package functions:
AddProperty
AddProperty package name property name property valueAdds a property to a package.
GetProperty
GetProperty package name property nameRetrieves a package's property and stores its value in variable PROPVALUE.
UpdateAnsFile
UpdateAnsFile package nameCalls this function at the beginning of postinstall.
RunRequestScript
Obsolete.
SetInstallMode_SOL
Obsolete.
UpdateInvFile
UpdateInvFile fileset path permissions uid gidUpdates the Fileset.inventory file. This function is necessary if you need to modify the attributes of files or directories that are part of the distribution.
Arguments
fileset
Fileset being processed
path
Installer to be modified. This is used as a key to locate a record.
permissions
Permissions.
uid
Owner.
gid
Group.
Installf
This is a platform-independent wrapper providing the functionality of the Solaris install function (installf). For parameters, refer to the Solaris man page on installf.
Use this inside pre- or post- installs if you are modifying or updating data in your package and must ensure that your changes are valid.
CheckPkgInstalled
CheckPkgInstalled packagenameVerifies the existence of a package.
GetPkgParam
GetPkgParam packagename parameternameGets the value of the parameter for the package. This is an abstraction of pkgparam -v pkg param_name for Solaris.
needsMoreDiskSpace
needsMoreDiskSpace packagenameGets the numeric value of the dynamically determined disk space required for installation and the estimated size required for use in MB from pkg.nmds.
SetInstallPkgMode_SOL
SetInstallPkgMode_SOL package_nameThis API sets the package installation mode after checking if that the package already exists.
Note
Note
Arguments
Return Values
Example
SetInstallPkgMode_SOL CSCOapchSetInstPkgMode_frmPrePst
SetInstPkgMode_frmPrePst packagenameThis API sets the package installation mode after checking if the specified package already exists.
Note
Note
Arguments
Return Values
Example
SetInstPkgMode_frmPrePst CSCOapchUsing the Solaris System APIs
This group of APIs includes system functions:
GetBootScript
Retrieves a package's boot script.
GetInitDir
Retrieves a package's initial directory.
GetLibPath
Retrieves the library path.
NetstatForPort
NetstatForPort portnumberVerifies that portnumber is used. Returns 1 if port is in use, else 0.
PortUsed
PortUsed portnumber tcp or udpVerifies that a port is used. Return 1 if port in use, else 0.
SaveBackFile
SaveBackFile file nameSaves a copy of file. Use before editing the file.
RestoreBackFile
RestoreBackFile file nameRestores a copy of file. Use when editing has failed.
RemoveBackFile
RemoveBackFile file nameRemoves a copy of this file.
DelServices
DelServices service nameRemoves an entry from /etc/services.
AddServices
AddServices service name service port service protocol [comment]Adds an entry to /etc/services.
GetDF
GetDF file systemRaw output from df or bdf command.
GetFreeDF
GetFreeDF file systemGets the numeric value of the disk space for this file system.
Note
MakeDir
MakeDir directory nameEnsures that the proposed directory exists. If not, creates the directory and sets the owner and group to casuser. If the directory exists, MakeDir assumes that the owner and group are casuser.
GetOS
Sets the environment variables LC_OS and OS to our canonical form of the OS name.
Using the Solaris Installable Unit APIs
These APIs include the installable unit functions:
GetNMSRoot
Retrieves the previously stored value of NMSROOT.
SetIMode
SetIMode install modeStores the value of NMSROOT.
GetIMode
Stores the value of I_MODE.
Using Solaris Build Tools
This topic provides instructions to build an image from protopackages using the installation framework on Solaris. The main steps are:
•
•
•
The following topics provide additional guidelines and examples:
•
•
•
Step 1: Install Third-Party Tools On Solaris
Install the Solaris-specific third-party tools referenced in the "Including Files in the Protopackage" section.
Step 2: Install the Framework On Solaris Platforms
To install the framework, copy the following files to the Solaris working directory:
•
•
•
•
•
Step 3: Prepare the Make Image on Solaris
Follow these steps to make the image on Solaris:
Step 1
which shwhich perlperl -vThe output displayed for these commands should show valid paths for each tool. Perl needs to be version 5.5 or higher.
Step 2
perl buildImage -r -d image_path toolpath/pkgtools.runtime.tar rtpath/myPkg.runtime.tar
protopackages
Where:
•
•
•
•
•
This command will create the following directories under image_path:
•
•
Customizing the Installation Workflow on Solaris
The CWCS installation framework workflow on Solaris does not offer the extensive custom action and panel features available on Windows (for details on these features, see "Customizing the Installation Workflow for Windows" section) .
However, the Solaris framework does offer two features that allow you to customize most installation workflows with a great deal of flexibility, as explained in the following topics:
•
•
Collecting User Interactions at the Start of a Solaris Install
You can streamline the user's workflow and make possible "unattended" Solaris installs by prompting the user for all installation inputs at the start of the install, instead of during each install phase when they are required. To do so, simply add the following tag to the corresponding info file:
USER_INTERACTION=TRUE
You may want to change the wording of the install prompts to ensure that they make sense to users when presented in a single group.
Executing Custom Operations During a Solaris Install
To execute custom operations at various steps during the install, using the hooks shown in Table 22-22.
You can specify conditions, titles and scripts for these operations much as you do for action customizations on Windows. For example, you can add the following section to your dsk.toc file to execute the script rmJrunWeb.sh after performing a prerequisite test to ensure that a version of CWCS earlier than 3.0 is present:
[AFTER_PREREQS]AFTER_PREREQS_0=UNINSTALL_JRE2_JRUN_WEB[UNINSTALL_JRE2_JRUN_WEB]AFTER_PREREQS_0_CONDITION=cmfwd.2.1.0-2.2.9AFTER_PREREQS_0_title=Uninstall CSCOjrun CSCOweb CSCOjext CSCOjre2AFTER_PREREQS_0_script=rmJrunWeb.shIn this example, the script will execute only after prerequisites are checked, and only if the condition is met. The title will be displayed before the script is executed.
Debugging on Solaris
To debug on Solaris, use generic shells. No additional coding is needed. Use set -x to add generic debugging information to your log file.
Verifying Packages on Solaris
The Solaris version of the CWCS installation framework provides the pkgchk command to permit package integrity verification. You can use pkgchk to perform package verification:
•
•
To verify a package before installation, run pkgchk as follows:
pkgchk -d location name
Where:
•
•
For example :
pkgchk -d disk1/packages CSCOapch
If a pre-installation verification fails, it will report the following errors:
ERROR: The following base package image is bad: CSCOname
ERROR: Package verification failed : CSCOname aborting.
If you get this kind of error, you can be sure that there was a problem during package creation in the build. Once the installation has aborted, you can try the command on the command line, to find out why it failed
To verify a package after installation, run pkgchk as follows:
pkgchk -n name
Where name is the package name.
Package verification may fail after installation if the files:
a. Were modified during postinstall. In this case, you may have to use the installf command during postinstall (for details, see the "Installf" section) to fix the problem.
b. The files are volatile (that is, they change in size, as with configuration files). In this case, you may need to use installif to declare this file as volatile.
Note
Solaris Getting Started Example
The following is an example of how to create an installable CD image of CWCS for a customer application. The myapp name refers to the application my application; it is truncated because Solaris package names must have five letters or less on Solaris (CSCOxxxx).
Before you use this example, verify that the tools are in the path.
# which shThe return value should display
/bin/sh
Perl V5.0 or higher is required.
# which perlThe return value should display
/auto/em_tools/sol/bin/perl
# perl -vThe return value should display
This is perl, version 5.005_03 built for sun4-solaris
Copyright 1987-1999, Larry Wall
For this example, it is assumed that:
•
[RELEASE]NAME=CWCS with Test ApplicationVERSTR=1.0[COMPONENTS]TAGS=cwcs cmfwd cmfj2 CSCOmyappUNINSTALLABLE=cmfwd CSCOmyappVISIBLE=cwcs cmfwd CSCOmyappCHOICE=cwcs cmfwd CSCOmyappDEFAULT=ALL[ADVANCED_CHOICE_1]ADVANCED_CHOICE_1_CONDITION=cmfwd.1.0.0-1.9.99ADVANCED_CHOICE_1_TYPE=EXCLUSIVEADVANCED_CHOICE_1_DEFAULT=4ADVANCED_CHOICE_1_1_TEXT=CiscoWorks Common Services (CWCS) Base DesktopADVANCED_CHOICE_1_1_TAGS=cmfwdADVANCED_CHOICE_1_2_TEXT=CWCS (including Base Desktop)ADVANCED_CHOICE_1_2_TAGS=cwcsADVANCED_CHOICE_1_3_TEXT=myapp ApplicationADVANCED_CHOICE_1_3_TAGS=CSCOmyappADVANCED_CHOICE_1_4_TEXT=myapp Application and CWCSADVANCED_CHOICE_1_4_TAGS=cwcs cmfwd CSCOmyapp[ADVANCED_CHOICE_2]ADVANCED_CHOICE_2_CONDITION=TRUEADVANCED_CHOICE_2_TYPE=EXCLUSIVEADVANCED_CHOICE_2_DEFAULT=3ADVANCED_CHOICE_2_1_TEXT=CiscoWorks Common Services (CWCS) Base DesktopADVANCED_CHOICE_2_1_TAGS=cmfwdADVANCED_CHOICE_2_2_TEXT=CWCS (including Base Desktop)ADVANCED_CHOICE_2_2_TAGS=cwcsADVANCED_CHOICE_2_3_TEXT=myapp Application and CWCSADVANCED_CHOICE_2_3_TAGS=cwcs cmfwd CSCOmyappFor this toc file you need the following:
–
Note
The ADVANCED_CHOICE section determines what is the correct scenario depending on what is already installed on the target machine. In the case where the target machine has a previous version of CiscoWorks Common Services (CWCS) Base Desktop already installed, the customer has the following options:
–
–
–
–
In the case of a fresh installation, you do not have the option of a separate myapp installation. In this case, there are only the remaining three options mentioned in the ADVANCED_CHOICE_2 section.
•
–
–
Each developer must swap their XML files in their place. For details on integrating your application with CiscoWorks, refer to the "Integrating Your Application with CWHP" section on page 7-6.
•
•
•
To create a CWCS image, use the sample1.sh in the current directory.
•
./sample1.sh arg1 arg2 arg3 arg4
where:
–
–
–
–
The sample1 file is shown below:
#!/bin/sh####################################################################### INPUT:# 1 - Target_dir# 2 - myapp_dir# 3 - buildImage_dir# 4 - proto_dir pkgtools.runtime.tar and protopackages dir# you should use to execute this script######################################################################if [$# -ne 4]; thenecho "ERROR:sample2.sh called with insufficient args."elseTarget_dir=$1myapp_dir=$2buildImage_dir=$3proto_dir=$4rm -rf $Target_dirmkdir $Target_dir/usr/local/bin/perl $buildImage_dir/buildImage -r -d $Target_dir \$proto_dir/pkgtools.runtime.tar \$myapp_dir/myapp.runtime.tar $myapp_dir/myapp.cd.tar \$proto_dir/cam.runtime.tar $proto_dir/cmf.runtime.tar \$proto_dir/cmfj2.runtime.tar $proto_dir/cmfwd.runtime.tar\$proto_dir/db.runtime.tar $proto_dir/dmgt.runtime.tar \$proto_dir/eds.runtime.tar $proto_dir/ess.runtime.tar \$proto_dir/grid.runtime.tar $proto_dir/jawt.runtime.tar \$proto_dir/jchart.runtime.tar $proto_dir/jext.runtime.tar \$proto_dir/jgl.runtime.tar $proto_dir/jpwr.runtime.tar \$proto_dir/jre2.runtime.tar $proto_dir/jrm.runtime.tar \$proto_dir/logmsg.runtime.tar $proto_dir/lotusxsl.runtime.tar \$proto_dir/nmcs.runtime.tar $proto_dir/perl.runtime.tar \$proto_dir/plug.runtime.tar $proto_dir/pxhlp.runtime.tar \$proto_dir/snmp.runtime.tar $proto_dir/swng2.runtime.tar \$proto_dir/jext.runtime.tar $proto_dir/vorb.runtime.tar \$proto_dir/web.runtime.tar $proto_dir/xml4j.runtime.tar \$proto_dir/xrts.runtime.tar $proto_dir/eds.cab.tar$proto_dir/jgl.cab.tar $proto_dir/swng2.cab.tar$proto_dir/vorb.cab.tarfiThe output of this command is very lengthy. The actual set of tar files may be different from this example. Here is the result:
#cd <Target Directory>#lsautoinstall.sh disk1 extract•