Downloads |
 Feedback Feedback
|
Table Of Contents
What You Can Do With Device Center
About Device Center Launch Points
About Device Center Dependencies
About the Device Center Runtime Structure
About the Device Center User Experience
Using Device Center With Your Application
Registering Your Application With Device Center
Creating and Registering the MST With CMIC
About Device Center Integration Tags
Using Device Center
CWCS Device Center provides an interface to invoke tools on a selected device from a single page. All information, tasks and reports for the device are made available at a single location. From the Device Center page, you can perform a variety of activities on a selected device, including:
•
Change the device attributes
•
•
•
The following topics explain Device Center and how to use it with your application:
•
For basic information on Device Center, see the "About Device Center Components" section on page 6-16.
For more information about Device Center, see:
•
•
•
•
•
•
•
Understanding Device Center
The information displayed on the Device Center comes from the CMIC registry. Applications register their management services with CMIC registry by defining a Management Service Template (MST), which has all the service URLs in a predefined XML format. The URLs, that need to be displayed on the Device Center, are tagged by keywords defined by the Device Center. The Device Center queries CMIC registry for these defined tags and the matched URLs will be shown in the Device Center.
The information shown in Device Center is controlled by registrations with CMIC. This provides scalability in terms of features as and when installed (registered) with CMIC without any changes to the Device Center.
The following topics provide additional detail on:
•
•
•
•
•
What You Can Do With Device Center
The Device Center allows you to:
•
•
•
•
•
About Device Center Launch Points
You can launch Device Center using any of the following:
•
•
•
•
CiscoWorks users can launch the Device Center page either from the overview screen or from applications, directly calling the Device Center URL.
What's Inside Device Center
Device center contains the following modules:
•
•
•
•
•
•
•
•
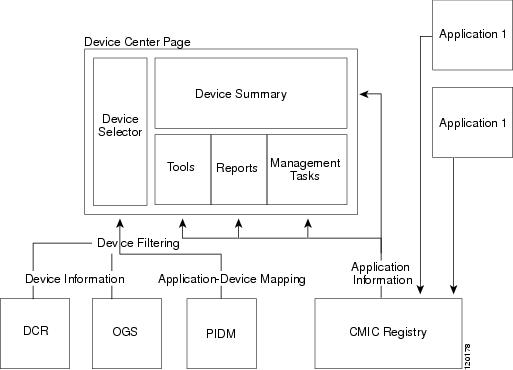
Figure 26-1 shows how Device Center concentrates application features on a single page.
Figure 26-1 Device Center Architecture
About Device Center Dependencies
Device Center depends on the following modules.
About the Device Center Runtime Structure
Device Center files are placed under: $NMSROOT/MDC/tomcat/webapps/cwhp/WEB-INF/classes/com/cisco/nm/cmf/devicecenter
JSP files related to Device Center are placed under the following directory:
$NMSROOT/MDC/tomcat/webapps/cwhp/screens/devicecenter
All Action classes are placed under the following directory:
$NMSROOT/MDC/tomcat/webapps/cwhp/WEB-INF/classes/com/cisco/nm/cmf/devicecenter/action
All Form Bean classes are placed under the following directory:
$NMSROOT/MDC/tomcat/webapps/cwhp/WEB-INF/classes/com/cisco/nm/cmf/devicecenter/actionform
All Utility classes are placed under the following directory:
$NMSROOT/MDC/tomcat/webapps/cwhp/WEB-INF/classes/com/cisco/nm/cmf/devicecenter/util
About the Device Center User Experience
User experience of Device Center varies depending on the following factors:
•
A device selector and message that guides the user to the Device Center is shown in the content area. Device selector displays a list of devices managed by various applications that have registered links that can be shown in the Device Center on that server.
•
The Device Center will not display the device selector as there are no applications managing any device. The user can type IP address or host name in the field provided. It will display default tools that are provided with the Common Services.
•
Device Center shows links pertaining to RME and CM only. There will be no VHM links for the device.
User selects a particular device that is managed by RME. A sub-task Config-Archive is shown which does not handle or support the device. In such cases, the respective task should display an appropriate error message.
•
All the content that goes in to the Device Center will be finalized and approved by the Device Center team in consultation with the application teams. The summary information should not be duplicated.
•
The relevant sections are displayed. In this case the summary information is displayed with the Reports.
•
The summary information is grouped by applications. The user can click on an application to see the summary. When the user clicks on the summary, only the summary part of the page is refreshed.
Using Device Center With Your Application
The following topics describe how to integrate Device Center into your application:
•
•
Launching Device Center
The Device Center appends two parameters to the link that the application has specified for the task in the CMIC MST file. The parameters are:
deviceID = <String value of DCR Device ID [ DeviceId.getValue() ] >deviceIP = <IP address or identity attribute of the Device [ such as hostname ]>device = <Display name of the Device>The applications should take these parameters and perform the required operations. For example, if the MST entry is
<TASKINFO TaskName="Chassis View" TaskIdentity="t002" TaskDescription="Device Management" TaskCategory="O" TaskSubCategory="O/admin" SecurityTag="read" TaskURL="/CVng/chassis.do" SubmitMethod="GET" IsAPI="true"><INTEGRATIONTAG TagName="DC_MANAGEMENT_TASKS"></INTEGRATIONTAG></TASKINFO>The Device Center Link for this task is, "/CVng/chassis.do?deviceID=12&deviceIP=10.77.210.22&device=test-pc". This information is displayed in Device Center as a link with the name Chassis View under the sub-group Management Tasks.
By default, all windows launched from the links in Device Center will not have Tool Bars and Menu Bars. If you want to display the pages of the application with Toolbars or Menu bars, the applications need to specify this in their application MST file as attributes for the each task:
<ATTRIBUTES Name="DC_TOOLBARS" Value="yes"/><ATTRIBUTES Name="DC_MENUBARS" Value="yes"/><ATTRIBUTES Name=" DC_LOCATIONBARS" Value="yes"/>For each link with these attributes, the Device Center window will be launched with a Tool bar and Menu bar.
Your application can launch Device Center by passing the URL in one of the following formats:
http://host:port/cwhp/device.center.do?DeviceID = <Device ID in String format
{DeviceId.getValue()}>
or
http://host:port/cwhp/device.center.do?device = <IP Address or display name of the System>The Tools, Tasks, Reports & Summary for a particular Device can be launched in three ways:
•
•
•
Registering Your Application With Device Center
Device Center does not have separate registration. It uses the CMIC registry to get the information on the applications.
To register an application with the Device Center:
Step 1
The MST Template is an XML file that lists all the tasks and URLs that the application intends to expose for integration with other components and applications. For more information on MST Template see the "About the Device Center MST" section.
To use the MST Template for the Device Center, the template must contain Device Center Tags. For more information on Device Center Tags see the "About Device Center Integration Tags" section.
The application should be a Cisco application in order to register with the Device Center. This can be set in the MST file with an IsCisco="true" tag.
Step 2
Step 3
Step 4
To provide privileges to the links, do a Task-Role mapping using SecurityTag attribute in the MST Template.
About the Device Center MST
The Management Service Template (MST) is organised under the tags, APPLICATIONRECORD, VENDORINFO, TASKGROUP, TASKINFO, and WSDL.
All attributes common to the applications are grouped under APPLICATIONRECORD.
The vendor details of the applications are captured under the VENDORINFO tag. The table provides description of the attributes under VENDORINFO. The only mandatory attribute is VendorName.
The following table describes the attributes under VENDORINFO.
All task attributes under an application are described in TASKINFO tag. An application can have multiple tasks associated with it. Each task is associated with one or more TASKGROUP in a nested manner. The task group indicates the functional hierarchy of the task starting from the first TASKGROUP tag. This allows multiple tasks to be grouped in a functional hierarchy.
Note
The following table describes the attributes under TASKINFO and TASKGROUP.
Applications that need a closer integration with other applications should tag their tasks using the INTEGRATIONTAG.
For example, Device Center generates various reports on a device and finds out all such applications that can generate reports. It then defines an integration tag (say DC_REPORT). All the applications that generate reports will specify an element INTEGRATIONTAG with following attributes of their tasks.
A task can be associated with one or more integration tags. INTEGRATIONTAG element has the following attributes and sub-elements:
Table 26-5 Attributes under INTEGRATION TAG
Tag Name
The value of this field depends on the component you want this task to get integrated with. E.g. DC_REPORT, CWHP_TASK etc.
ATTRIBUTES is a sub-element of the integration tag. The attribute element has two attributes (Name and Value). This element is used to specify custom attributes for the integrating component (Device Center and Cisco Works Home Page). The tag notifies some specific parameters to the integrating component.
Each task has a Web Services Description Language (WSDL) tag. WSDL is an XML format for describing network services as a set of endpoints operating on messages containing either document-oriented or procedure-oriented information. The operations and messages are described abstractly, and then bound to a concrete network protocol and message format to define an endpoint. Related concrete endpoints are combined into abstract endpoints (services). WSDL is extensible to allow description of endpoints and their messages regardless of what message formats or network protocols are used to communicate.
The information captured using WSDL will decide the input for the services, the output, and the format of the input and output. WSDL has a comprehensive way of defining a web service.
Sample Device Center MST
Example 26-1 shows a sample MST suitable for use with Device Center.
Example 26-1 Device Center MST
<?xml version="1.0" encoding="UTF-8"?><!-- All information common to all tasks put here --><APPLICATIONRECORD AppName="Resource Manager Essentials" AppVersion="4.0" AppDescription="An application remotely managing the devices in network " IsCiscoCertified="true" IsCisco="true" Protocol="" Host="" Port="1" ModifiedTime="" ModifiedUser="" xmlns:xsi="http://www.w3.org/2001/XMLSchema-instance" xsi:noNamespaceSchemaLocation="D:\Saras\CMIC\Docs\cmic_template.xsd"><!-- Vendor related information --><VENDORINFO VendorName="Cisco Systems" Address="300 East Tasman Drive, San Jose California" Phone="408 526-822" Fax="526 8222" Email="tac@cisco.com" ContactURL="http://www.cisco.com" SupportURL="http://www-tac.cisco.com"/><!-- Task level information starts --><TASKGROUP GroupName="RME"><TASKGROUP GroupName="SWIM"><TASKINFO TaskName="Add Image" TaskCategory="C" TaskSubCategory="C/image" SecurityTag="rme.swim.addimage" IntegrationTag="CWHP_FUNC_TASK" TaskURL="/rme/addImage.do" SubmitMethod="GET" IsAPI="false"><!-- Type definitions --><types><xsd:schema xmlns:xsd="http://www.w3.org/2001/XMLSchema"><xsd:complexType name="deviceContext"><xsd:sequence><xsd:element name="deviceIP" type="xsd:string"/><xsd:element name="WriteCommunity" type="xsd:string"/></xsd:sequence></xsd:complexType></xsd:schema></types><!-- Message definitions --><message name="AddImageRequest"><part name="DeviceContext" type="deviceContext"/></message><!-- Port type definitions --><portType name="AddImagePortType"><operation name="AddImage"><input message="AddImageRequest"/></operation></portType><!-- Binding definitions --><binding name="AddImageHTTPGetBinding" type="AddImagePortType"><http:binding verb="GET"/><operation name="AddImage"><http:operation location="AddImage"/><input><http:urlEncoded/></input><output><mime:content type="text"/></output></operation></binding></definitions><xsd:element name="deviceIP" type="xsd:string"/><xsd:element name="WriteCommunity" type="xsd:string"/></xsd:sequence></xsd:complexType></xsd:schema></types><!-- Message definitions --><message name="AddImageRequest"><part name="DeviceContext" type="deviceContext"/></message><!-- Port type definitions --><portType name="AddImagePortType"><operation name="AddImage"><input message="AddImageRequest"/></operation></portType><!-- Binding definitions --><binding name="AddImageHTTPGetBinding" type="AddImagePortType"><http:binding verb="GET"/><operation name="AddImage"><http:operation location="AddImage"/><input><http:urlEncoded/></input><output><mime:content type="text"/></output></operation></binding></definitions></WSDL></TASKINFO></TASKGROUP></TASKGROUP></APPLICATIONRECORD>
MST XML-Schema
Example 26-2 shows a sample XML-Schema for a Device Center MST.
Example 26-2 Device Center MST XML Schema
<?xml version="1.0"?><xs:schema xmlns:xs="http://www.w3.org/2001/XMLSchema" elementFormDefault="qualified"><xs:element name="APPLICATIONRECORD"><xs:complexType ><xs:sequence><xs:element ref="VENDORINFO"></xs:element><xs:choice minOccurs="0" maxOccurs="unbounded"><xs:element ref="TASKGROUP" minOccurs="0" maxOccurs="unbounded"/><xs:element ref="TASKINFO" minOccurs="1" maxOccurs="unbounded"/></xs:choice></xs:sequence><xs:attributeGroup ref="ApplicationRecordAttributes"> </xs:attributeGroup></xs:complexType></xs:element><xs:element name="VENDORINFO"><xs:complexType><xs:attributeGroup ref="VendorInfoAttributes"></xs:attributeGroup></xs:complexType></xs:element><xs:element name="TASKGROUP"><xs:complexType><xs:sequence><xs:element ref="TASKGROUP" minOccurs="0" maxOccurs="unbounded"></xs:element><xs:element ref="TASKINFO" minOccurs="0" maxOccurs="unbounded"></xs:element></xs:sequence><xs:attributeGroup ref="TaskGroupAttributes"></xs:attributeGroup></xs:complexType></xs:element><xs:element name="TASKINFO"><xs:complexType><xs:sequence><xs:element ref="INTEGRATIONTAG" minOccurs="0" maxOccurs="unbounded"></xs:element><xs:element ref="WSDL" minOccurs="0" maxOccurs="1"></xs:element></xs:sequence><xs:attributeGroup ref="TaskInfoAttributes"></xs:attributeGroup></xs:complexType></xs:element><xs:element name="INTEGRATIONTAG"><xs:complexType><xs:sequence><xs:element ref="ATTRIBUTES" minOccurs="0" maxOccurs="unbounded"></xs:element></xs:sequence><xs:attribute name="TagName" type="xs:string" default="required"></xs:attribute></xs:complexType></xs:element><xs:element name="WSDL"><xs:complexType><xs:sequence><xs:any namespace=http://schemas.xmlsoap.org/wsdl/ minOccurs="0" maxOccurs="unbounded" processContents="lax"></xs:any></xs:sequence><xs:attribute name="Version" type="xs:string"></xs:attribute></xs:complexType></xs:element><xs:element name="ATTRIBUTES"><xs:complexType><xs:attribute name="Name" type="xs:string" use="required"></xs:attribute><xs:attribute name="Value" type="xs:string" use="required"></xs:attribute></xs:complexType></xs:element><xs:attributeGroup name="ApplicationRecordAttributes"><xs:attribute name="AppName" type="xs:string" use="required"/><xs:attribute name="AppVersion" type="xs:string" use="required"/><xs:attribute name="TemplateVersion" type="xs:string" use="required"/><xs:attribute name="AppDescription" type="xs:string"/><xs:attribute name="DisplayName" type="xs:string"/><xs:attribute name="AppURL" type="xs:string"/><xs:attribute name="AppURLWindowName" type="xs:string"/><xs:attribute name="Host" type="xs:string"/><xs:attribute name="Port" type="xs:integer"/><xs:attribute name="Protocol" type="xs:string"/><xs:attribute name="ModifiedUser" type="xs:string"/><xs:attribute name="ModifiedTime" type="xs:string"/><xs:attribute name="IsCisco" type="xs:boolean" default="true"/><xs:attribute name="IsCiscoCertified" type="xs:string"/><xs:attribute name="SecurityServiceIdentifier" type="xs:string"/></xs:attributeGroup><xs:attributeGroup name="VendorInfoAttributes"><xs:attribute name="VendorName" type="xs:string" use="required"/><xs:attribute name="Address" type="xs:string"/><xs:attribute name="Phone" type="xs:string"/><xs:attribute name="Fax" type="xs:string"/><xs:attribute name="Email" type="xs:string"/><xs:attribute name="ContactURL" type="xs:string"/><xs:attribute name="SupportURL" type="xs:string"/></xs:attributeGroup><xs:attributeGroup name="TaskInfoAttributes"><xs:attribute name="TaskName" type="xs:string" use="required"/><xs:attribute name="TaskIdentity" type="xs:string" use="required"/><xs:attribute name="TaskCategory" type="xs:string"/><xs:attribute name="TaskDescription" type="xs:string"/><xs:attribute name="TaskSubCategory" type="xs:string"/><xs:attribute name="SecurityTag" type="xs:string"/><xs:attribute name="TaskURL" type="xs:string" use="required"/><xs:attribute name="TaskURLWindowName" type="xs:string" /><xs:attribute name="SubmitMethod"><xs:simpleType><xs:restriction base="xs:string"><xs:enumeration value="GET"/><xs:enumeration value="POST"/></xs:restriction></xs:simpleType></xs:attribute><xs:attribute name="IsAPI" type="xs:boolean" default="false"/></xs:attributeGroup><xs:attributeGroup name="TaskGroupAttributes"><xs:attribute name="GroupURL" type="xs:string"/><xs:attribute name="GroupURLWindowName" type="xs:string"/><xs:attribute name="GroupName" type="xs:string" use="required"/><xs:attribute name="DisplayName" type="xs:string"/><xs:attribute name="SecurityTag" type="xs:string"/></xs:attributeGroup></xs:schema>
Creating and Registering the MST With CMIC
To create and register an MST:
Step 1
The MST is an XML file which follows a specific MST XML-Schema.
Step 2
Step 3
About Device Center Integration Tags
For an application to show its links in Device Center, the application tasks must be tagged with Device Center integration tags. Table shows the integration tags for Summary, Tools, Reports and Management Tasks.
The application tagging shown in Example 26-3 will cause a "Monitoring Console" link to appear under the Tasks group in Device Center.
Example 26-3 Integration Link
        <TASKINFO TaskName="Monitoring Console" TaskIdentity="t001"
TaskDescription="Console monitoring traps in network" TaskCategory="F"
TaskSubCategory="F/admin" SecurityTag="nm.dfm.monitor"  TaskURL="/dfm/monitor.do"
SubmitMethod="GET" IsAPI="false">
<INTEGRATIONTAG TagName=" DC_MANAGEMENT_TASKS "></INTEGRATIONTAG></TASKINFO>Application teams must create the template with appropriate values. The template must be sent to mst-police@cisco.com. This alias comprises all the component integration owners. They will assist the application team in crreating a valid template and checking for syntactical errors and they would provide suggestions to improve the template. The review-team will not validate the content. They will only validate syntax and check if appropriate tags are provided for integration with their respective components.
Currently the identified integration component owners are Cisco Works Home page team (cwhp-dev), and the Device center team (devcenter-dev).
About UII Rendering Module
Note
The following table summarizes the various Device Center Integration tags:
Providing Summary Information
For Tools, Reports and Management Tasks, Device Center will display the links for the corresponding tasks. The case is different with Summary. Device Center will read data from the backend using the Summary URLs and display the information in the html format. It is the application's responsibility to provide the respective summary information.
Device Center will send the following three parameters appended with the link the application has specified for the Summary link in the MST file:
deviceID = < String value of DCR Device ID [ DeviceId.getValue() ] >deviceIP = < IP address or identity attribute of the Device >device= < Display name of the device >The application must take these parameters and provide the Summary information in the block format shown in Example 26-4.
Example 26-4 The Summary Data Format Block
<!--Block--><tr><TD align="right" bgColor="#cecfce" ><font face="Arial" size="1">Name</font></TD><TD align="left" bgColor="#e1e1e1"><font face="Arial" size="1"> Value</font></TD></tr><!--EndBlock-->Normally, the application will need to use multiple copies of the block shown in Example 26-4 to specify the summary information. The base blocks should not contain any <html> , <body> or <table> tags. The Name and Value can contain tables but they should be completely confined within themselves. Applications can construct an HTML page with multiple blocks containing all the summary information, and then remove all <html> , <body> or <table> tags to create a final Summary Data document like the one shown in Example 26-5.
Example 26-5 Sample Multi-Block Summary Data
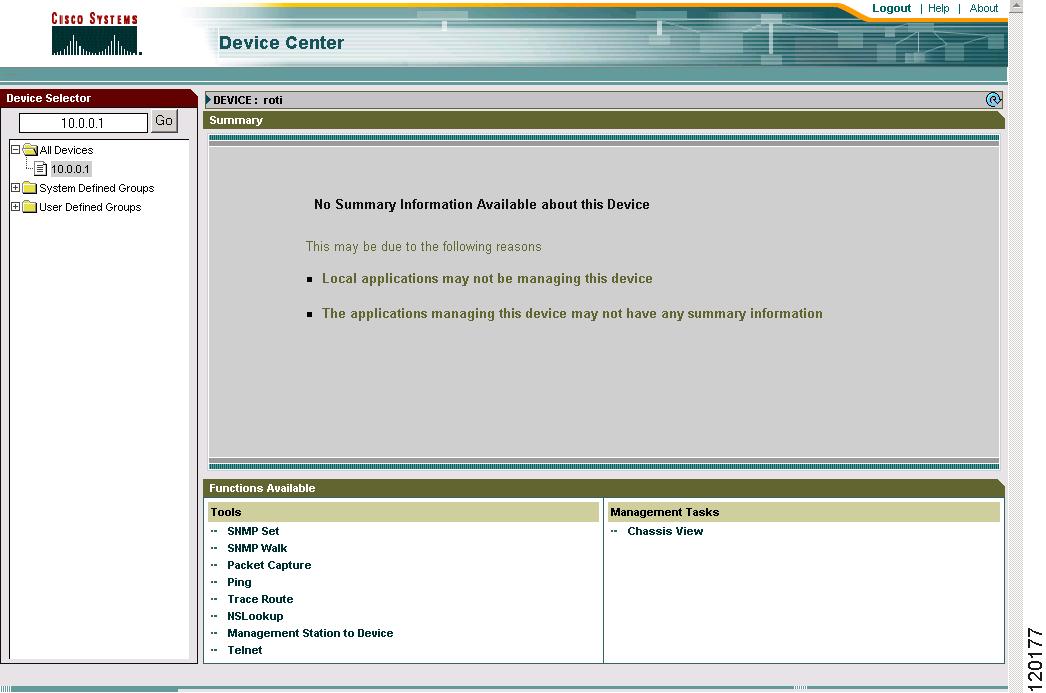
<!--Block--><tr><TD align="right" bgColor="#cecfce" ><font face="Arial" size="1">Device Type</font></TD><TD align="left" bgColor="#e1e1e1"><font face="Arial" size="1"> Layer 2 Device</font></TD></tr><!--EndBlock--><!--Block--><tr><TD align="right" bgColor="#cecfce" ><font face="Arial" size="1">Layer 2 Protocol</font></TD><TD align="left" bgColor="#e1e1e1"><font face="Arial" size="1"> 1 <10 ms <10 ms <10 ms 10.77.202.1<br> 2 <10 ms <10 ms <10 ms codc2-lab-2.cisco.com[10.77.201.5]<br> 3 <10 ms <10 ms <10 ms codc2-tbd.cisco.com [10.77.194.2]<br> 4 <10 ms <10 ms <10 ms 10.77.209.244</font></TD></tr><!--EndBlock--><!--Block--><tr><TD align="right" bgColor="#cecfce" ><font face="Arial" size="1">Physical Discrepancies</font></TD><TD align="left" bgColor="#e1e1e1"><font face="Arial" size="1"> None</font></TD></tr><!--EndBlock--><!--Block--><tr><TD align="right" bgColor="#cecfce" ><font face="Arial" size="1">Logical Discrepancies</font></TD><TD align="left" bgColor="#e1e1e1"><font face="Arial" size="1"> None</font></TD></tr><!--EndBlock--><!--Block--><tr><TD align="right" bgColor="#cecfce" ><font face="Arial" size="1">No. Of VLans</font></TD><TD align="left" bgColor="#e1e1e1"><font face="Arial" size="1"> 200</font></TD></tr><!--EndBlock-->The multi-block Summary Data in Example 26-5 would be displayed in Device Center as shown in Figure 26-2.
Figure 26-2 The Summary Data as Shown in Device Center
Understanding PIDM
Product Instance Device Mapping (PIDM) is a registry that stores mapping information between Devices and Applications.
Applications need to register with PIDM with the information about the Devices managed by the application. Applications can do this using PIDM APIs (which are also available via CSTM from
Common Services 3.0 Service Pack 2).Device Center depends on this information for showing the Devices in Device Selector and also for showing the information under Tools , Management Tasks , Reports and Summary sections.
Device Center usually shows only the devices managed by the applications in the Device Selector. On selecting a device, the links corresponding to the applications that manage the device are shown in Device Center.
Bypassing PIDM Checks
There are applications that do not manage any device on their own but use the devices managed by other applications. These application do not need to perform PIDM registrations.
If an application is not doing a PIDM registration, the application can bypass PIDM checks for its links in Device Center. In this case, Device Center shows the devices managed by other applications. On selecting a device, Device Center will show the links of the application which is bypassing PIDM along with other links.
To bypass the PIDM checks, the application must import the class com.cisco.nm.pidm.DeviceCenterPIDMRegister, located under the /lib/classpath directory of the CWCS installation. Table 26-8 shows the APIs. In all these APIs, "Appname" is the name of the application as given in the MST file.