Downloads |
 Feedback Feedback
|
Table Of Contents
Using the Device Credentials Repository
About DCR Features and Benefits
How DCR Masters and Slaves Interact
How DCR Secures Device and Credentials Data
How DCR Stores Proxy Device Data
How DCR Stores Enable-Mode Passwords
About the DCR Domain ID and Transaction ID
About DCR Events During Backup and Restore
DCR Tasks to Perform During Application Startup
Creating the APIExtraInfo Object
Adding and Updating Devices in Bulk
Retrieving DCR Devices in Bulk
Retrieving Data From a Device Object
Registering Third-Party Applications with DCR
Guidelines for DCR Application Development
DCR Error Codes and Interpretations
Using DCR Domain and Transaction IDs
Using the DCR Command-Line Interface
Using the Device Credentials Repository
The Device Credentials Repository (DCR) is a common repository of devices, their attributes and their credentials. An DCR system consists of one or more DCR Servers that store and distribute device information, applications using DCR APIs to access this information, and the Device & Credentials Admin GUI accessible from the CiscoWorks Home Page.
When implemented, DCR provides:
•
Easier, centralized access to device and credentials data.
•
•
•
Note
The following topics describe how to integrate DCR with your application:
For more information about DCR, see:
•
•
•
•
Note
Understanding DCR
All network management applications need to store basic attributes of the devices they manage. This includes device credentials, such as SNMP community strings consisting of a user ID-and-password pair.
Devices and their credentials represent a special data management problem. They must be both:
•
•
The DCR solution enables multiple applications to share device lists and credentials using a client-server mechanism, with secure storage and communications.
The following topics present basic information on DCR and how it works:
•
•
•
About DCR Features and Benefits
DCR offers the following capabilities:
•
•
•
•
•
•
•
•
•
•
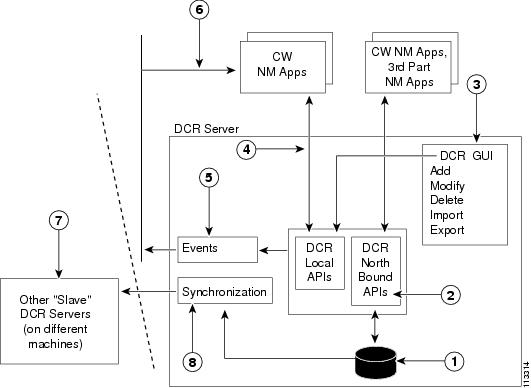
How DCR Works
Figure 14-1shows the DCR system flow:
1.
2.
3.
4.
5.
6.
7.
8.
Figure 14-1
DCR System Flow
About the DCR Modes
Any instance of DCR can run in Master, Slave, or Standalone mode:
•
•
•
When considering DCR modes, remember that:
•
•
•
•
•
About the DCR Components
An instance of DCR consists of the following components:
•
The Repository also includes DCR-specific functions. These include generating the unique DCR Device IDs used to identify each device on both Masters and Slaves, information about the DCR Server's current mode, and synchronization information.
•
•
•
•
•
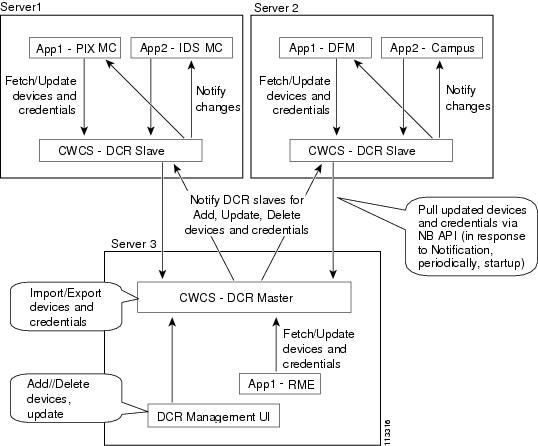
How DCR Masters and Slaves Interact
Figure 14-2 shows an example of a DCR Master/Slave setup. In this example, several CiscoWorks applications are installed on different CWCS Servers. Each server has one local DCR Server. The applications installed on each CWCS Server interact with the local DCR Server only. For example: PIX MC and IDS MC on Server 1 interact with the DCR Server in Slave mode on Server 1; DFM and Campus Manager interact with the DCR Server in Slave mode on Server 2; RME interacts with the DCR Server in Master mode on Server 3.
The Master sends notifications of any changes in its repository to both Slaves. The Slaves in turn make synchronize with the Master to get its device attribute and credential updates. Both the Master and the Slaves also broadcast events to applications via ESS (they also publish events via HTTP to subscribed third-party applications).
Figure 14-2
Example DCR Master/Slave Setup
The interactions among this Master and its Slaves vary depending on the kinds of operations being performed and the DCR Server mode. The following topics explain what happens in each case:
How DCR Adds Devices
Users whose application resides on the same CWCS server with a DCR Master can use the local DCR APIs or the DCA GUI to add a new device directly to that Master. When this happens:
1.
2.
3.
a.
b.
4.
–
–
Users whose application resides on the same CWCS Server with a Slave can use the application UI or the DCR local API to add a new device. When this happens:
1.
2.
3.
4.
a.
b.
5.
–
–
How DCR Modifies Devices
Users whose application resides on the same CWCS server with a DCR Master can use the local DCR APIs or the DCA GUI to update devices on that Master. When this happens::
1.
2.
3.
a.
b.
4.
–
–
Users whose application resides on the same CWCS Server with a Slave can use the application UI or the DCR local API to update an existing device. When this happens:
1.
2.
3.
4.
a.
b.
5.
–
–
How DCR Deletes Devices
Applications cannot delete devices directly. Only administrators using the DCA GUI or the DCR CLI on a DCR Server in Master or Standalone mode can delete devices. When this happens, the Master:
1.
2.
3.
4.
–
–
How DCR Secures Device and Credentials Data
DCR allows access to device and credentials data only by authenticated, authorized users. DCR provides a basic level of security by storing device credentials as encrypted data (other attribute data is in plain text), and by using secure communications protocols.
DCR also uses the following security keys:
•
•
•
How DCR uses these security keys varies with the kind of communication taking place:
•
•
•
•
About DCR Data Storage
The following topics explain how DCR stores device lists, their attributes and credentials:
•
•
Note
About the DCR Device ID
For every device, DCR maintains an internally generated, unique, sequential number called the DCR Device ID. This ID identifies the device's record in the DCR database. Your application must use this ID when communicating with DCR about a specific device and its data. DCR does not re-use deleted DCR Device IDs. Whenever an administrator deletes a DCR device using the DCA GUI or the DCR CLI, all information for that device, including the DCR Device ID, is removed from DCR.
Be sure not to confuse the DCR Device ID with other attributes used to identify the device in the network, such as the host_name or sysObjectID (for a complete list of these other attributes, see the "How DCR Stores Attributes" section).
If your application maintains its own set of device identifiers, you will need to create and maintain tables that map your application's device identifiers to the DCR Device IDs (see the "Guidelines for DCR Application Development" section).
How DCR Stores Attributes
In DCR, an attribute is all device data other than credentials (see the "How DCR Stores Credentials" section). Attribute data consists of displayable strings of printable ASCII characters. Attributes are considered unique to each device (e.g., host_name and management_ip_address).
DCR stores values for the attributes shown in Table 14-1 for all standard devices. Some proxy devices store additional attributes (see the "Integrating DCR with OGS" section)
Table 14-1 DCR Device Standard Attributes
host_name
Device host name.
domain_name
Domain name of the device.
management_ip_address
The IP address used to access the device. Both IPv4 and IPv6 address types are supported. Required if host_name is not specified.
display_name
The name the user wants the device to have in reports or graphical displays. This value can be derived from host_name or management_ip_address. Required.
sysObjectID1
A string with the sysObjectID value. This attribute is required, but DCR will fill in the value automatically if the mdf_type is specified.
mdf_type1
A normative name for the device type, taken from Cisco's Meta Data Framework (MDF) database. This attribute is required, but DCR will fill in the value automatically if the sysObjectID is specified.
dcr_device_type2
A name for the device type to be used in DCR. It has meaning only in the DCR context. This is not the actual network device attribute.
1 You cannot leave both of these attributes blank, but you can specify either one or both of them as "unknown". DCR will determine the sysObjectID value automatically if only the mdf_type is specified, and vice versa. If you enter both, DCR will not check that they map properly.
2 You must specify a value for dcr_device_type when adding a new device. The dcr_device_type and DCR Device Category are different terms for the same construct (e.g., the value of a device's dcr_device_type is set when you call the SetDCRDeviceCategory method on that device).
How DCR Stores Credentials
DCR credentials are the attribute values that applications use to access and operate on devices. For example, if the device has SNMP enabled, the SNMP read-only and read-write community strings used to access that device are considered DCR credentials. All credentials are encrypted and not displayable in encrypted form.
DCR associates the credentials shown in Table 14-2 with all standard devices, DSBU Clusters and DSBU Cluster Members. Some proxy devices use a different mix of credentials (see the "How DCR Stores Proxy Device Data" section).
Table 14-2 DCR Device Standard Credentials
primary_username
The primary user name used to access the device.
primary_password
The password for the primary_username.
primary_enable_password
The device's primary "enable password" or "enable secret" password. See the "How DCR Stores Enable-Mode Passwords" section.
snmp_v2_ro_comm_string
The device's SNMP V2 read-only community string.
snmp_v2_rw_comm_string
The device's SNMP V2 read/write community string.
snmp_v3_user_id
The device's SNMP V3 user ID.
snmp_v3_password
The device's SNMP V3 password.
snmp_v3_engine_ID
The device's SNMP V3 engine ID.
snmp_v3_auth_algorithm
The SNMP V3 authorization algorithm used on the device (i.e., MD5 or SHA-1).
rxboot_mode_username
The device's diagnostic user ID.
rxboot_mode_password
The device's diagnostic password.
The following credentials and attributes are added as part of Common Services 3.0 Service Pack 1 (CS3.0 SP1)
How DCR Stores Proxy Device Data
For standard network devices, DCR stores the attributes and credentials listed in the "How DCR Stores Attributes" section and in the "How DCR Stores Credentials" section. Some proxy devices use different attribute and credential schemes. DCR supports these devices with attributes and credentials appropriate to them, as follows:
•
•
•
•
The following are supported from CS3.0 SP1.
•
For the CNS Server, DCR stores the same attribute data used for standard devices.
•
For the CNS Server, DCR stores the same attribute data used for standard devices. In addition to this, it will have the parent_cns_id attribute
How DCR Stores Enable-Mode Passwords
Most managed devices feature "enable password" and "enable secret" commands. Both permit an Enable Mode password to be set and stored within the configuration for a managed device. Only administrators who know this password can change the device configuration. The "enable secret" command adds an extra layer of protection by encrypting the stored password, preventing anyone from discovering the password by examining the device configuration or a copy of it.
DCR retains only one Enable Mode password. If the Enable Mode password was set using the "enable password" command only, then DCR will store only that password. If an "enable secret" command has been used as well as (or instead of) the "enable password" command, the "enable secret" password will take precedence.
If you are importing device data from a product that does not use DCR, you may find a user database where both the "enable password" and "enable secret" have been set. In this case, the "enable password" should be discarded, and the "enable secret" password moved into the new DCR database. If only one of the values is populated in the source database, then only that value should be migrated.
About User-Defined Fields
The DCR database allows users to specify up to 10 user-defined fields. These fields, once specified by a user, become part of the device record structure and their values are stored as part of device records. While application developers can access data in user-defined fields for reporting and other purposes, they cannot add or change user-defined fields programmatically. User-defined fields are for users only, and must be added using the DCA GUI only.
Integrating DCR with OGS
To enable operations on groups of devices, DCR provides the following pre-defined groups:
•
•
OGS (see Chapter 28, "Using Object Grouping Services") incorporates these DCR Groups and provides the underlying shared and secured device grouping services to DCR.
The Device Selector provided with the CiscoWorks Home Page (see Chapter 7, "Using the CiscoWorks Home Page") performs basic filtering of devices based on IP address, host name, display name, user-defined attributes, etc. Once the DCR filtering is done, the DCR Device Selector will show the filtered device list within the predefined DCR Groups provided by OGS.
Integrating DCR with ACS
When DCR starts and the CWCS Server is in ACS mode, DCR will register all known devices in its repository with CAM. This registration process enables DCR APIs to authorize the devices for the user appropriately. DCR also registers devices with CAM whenever device(s) are added, as part of the "add" operation, and updates CAM appropriately whenever DCR devices are modified.
Each DCR device is mapped to an ACS device based on the device's IP address in both DCR and ACS. If a DCR device has no IP address, then its DCR display name is mapped to an ACS host name.
The DCR APIs authorize the user at the task level at all times, using the DCR and ACS Task IDs shown in Table 14-8 (this table ignores DCR-related ACS tasks that cannot be triggered by DCR API calls). See Table 14-9 for the list of default DCR Task-to-Role mappings; this table includes some DCR-related ACS tasks that can only be triggered using the DCR GUI.
Device-level authorizations are applied only when the CWCS Server is in ACS mode. Note that an application running on the same server as the CWCS Server can disable task- and device-level authorization for local DCR access. If your application uses the APIs to perform DCR tasks, and authorizes their use by particular users based on role, be sure that your application-level authorizations match those used by the DCR API tasks.
About DCR Events
DCR uses CWCS Event Services Software (ESS) (see Chapter 20, "Using Event Services Software") to broadcast events to all applications on the same CWCS Server. DCR clients listening to these events can choose to filter out unwanted data or events of no interest (e.g., events for classes of devices the application does not support). When filtering data, applications can query DCR for additional device details using the DCR APIs.
Applications that cannot use ESS can receive DCR events via HTTP. An application wanting to use this alternative method must first use the DCR API to register its HTTP URL with DCR. DCR will then use this URL to send events to the non-ESS application.
The DCR Server never listens to events broadcast by applications.
DCR generates:
•
•
•
The normal process of database backup and restore can also generate combinations of these events and accompanying notifications. For a summary of these, see the "About DCR Events During Backup and Restore" section.
In Master/Slave implementations, the DCR Notifier generates synchronization and update notifications, so DCR Slaves can get device updates from Masters. These notifications are not broadcast to DCR client applications. The events include all significant repository changes, such as device additions, deletions, credential updates, etc.
Note that events are not the same as notifications sent from a DCR Master to a Slave (see the "About the DCR Components" section). With DCR Servers in Standalone mode, events are generated directly and sent to applications who use that DCR. When a DCR Master's devices are updated, it generates events directly to applications using it, and then sends notifications to its Slaves. These Slaves, in turn, get their updates from the Master, and then generate events for the applications using the Slaves.
The details of event generation for DCR Slaves are the same as in DCR Master. From the application's perspective:
•
•
When a new application (that does not contain any device credential data) is installed, the application can get the device list available from DCR and present the devices in a pick list. The user can then select the devices from the list for management.
About the DCR Domain ID and Transaction ID
The Master DCR Server in every Master/Slave DCR setup has its own DCR Domain ID. The DCR Domain ID identifies the logical DCR domain in which the Master and its Slaves participate. Your application must:
•
•
–
–
•
•
–
–
Every DCR Server update of any kind (e.g., device additions, deletions, updates, etc.) has a transaction ID, which is simply a serial number. The DCR Transaction ID is the ID of the last transaction (e.g., device update, deletion, addition, etc.) an application conducted with its DCR Server. This transaction ID is maintained in the application database, and allows the application to determine whether updates occurred while the application was offline. To make use of it, your application must
•
•
•
–
–
For examples of code making use of the Domain ID and the Transaction ID, see the "Using DCR Domain and Transaction IDs" section.
About DCR Device Events
In addition to events for DCR changes (see the "About DCR Process Events" section) and data restores (see the "About DCR Restore Events" section), DCR broadcasts events whenever devices are updated (including addition or deletion).
A DCR device event contains the event's:
•
•
–
–
–
Table 14-10 shows the data for all types of device events. Applications can use this data to decide whether to process the event or not, and to query DCR for details about the target device(s).
About DCR Process Events
DCR broadcasts process events whenever the DCR Server starts, which is a common event. It also broadcasts events when the server changes modes, which happens much less often. A DCR process event consists of the event's:
•
For example: Event Subject Name = "cisco.mgmt.cw.cmf.dcr";.
•
–
–
Example 14-1 shows the event data for the only normal process event, a DCR Server start. Table 14-11 shows event data for the uncommon DCR mode-change process events. All of these events are broadcast because applications (such as OGS Server) need to know about them. Most applications can ignore process events unless they are also accompanied by a "data restored" event, in which case applications must receive and process them (see the "About DCR Restore Events" section).
Example 14-1 DCR Server Start Event Data (continued)
<DCREvent>
   <EventType>DCR_SERVER_START</EventType>
   <EventSource>
      <AppName>DCR Server</AppName>
      <AppVersion>1.0</AppVersion>
      <AppHostName>server1</AppHostName>
   </EventSource>
</DCREvent>
About DCR Restore Events
DCR sends the restore events shown in Table 14-12 when DCR data is changed due to specific DCR mode changes or a data restore from backup. The restore events are sent in different conditions:
•
–
–
–
–
Applications receiving this event must:
–
–
–
•
–
–
–
–
Applications receiving this event are expected to call getDCRUpdates() to get all new, updated, or deleted devices from DCR.
About DCR Events During Backup and Restore
DCR uses the CWCS backup and restore framework (see the Chapter 12, "Using Backup and Restore") to protect the DCR data stored in the main CWCS database and the DCR configuration file.
Data changes are a normal part of any restore from a backup. However, because DCR is a distributed system with varying modes, it is also possible for any restored DCR to:
•
•
•
Because any restore can involve a combination of data, mode, master/slave and domain changes, DCR provides special processing functions to handle:
•
•
Applications will need to process domain, mode, and master/slave change notifications from DCRs appropriately, as well as processing data change events. This includes:
•
•
•
Table 14-13 DCR Restore Behavior
If the DCR Group ID is different, DCR sends a DCR DATA RESTORED FROM DIFFERENT DCR DOMAIN event. If the DCR Group ID is the same, DCR sends a DCR DATA RESTORED event. Applications must process these events and query DCR to get updates.
After restore, the former Slave unregisters from the old Master and deletes old Master information. If the former Slave could not unregister and the old Master sends it notifications, it ignores them (as it is now in Standalone mode).
If the DCR Group ID is different, DCR sends a DCR DATA RESTORED FROM DIFFERENT DCR DOMAIN event. If the DCR Group ID is the same, DCR sends a DCR DATA RESTORED event. Applications must process these events and query DCR to get updates.
After restore, the former Master sends DCR MASTER MODE CHANGED events to all its former Slaves. These Slaves delete the Master contact information.
If the DCR Group ID is different, DCR sends a DCR DATA RESTORED FROM DIFFERENT DCR DOMAIN event. If the DCR Group ID is the same, DCR sends a DCR DATA RESTORED event. Applications must process these events and query DCR to get updates.
After restore, the server is in Master mode. We do this to preserve the device context1 . To finish conversion to Slave mode, use the GUI or CLI commands.
If the DCR Group ID is different, DCR sends a DCR DATA RESTORED FROM DIFFERENT DCR DOMAIN event. If the DCR Group ID is the same, DCR sends a DCR DATA RESTORED event. Applications must process these events and query DCR to get updates.
After restore, if the DCR Group ID is different, then the server moves to Standalone mode, and sends a mode change event and a DCR DATA RESTORED FROM DIFFERENT DCR DOMAIN event.
If the DCR Group ID is same and Master is different, then the DCR will unregister with the old Master, delete all data it took from the old Master, register and sync with the new Master, and send a "DCR DATA RESTORED" event. Applications must process these events and query DCR to get updates.
After restore, the server is in Slave mode. It sends a DCR MASTER MODE CHANGED event to all former Slaves. These Slaves delete the contact information for the former Master.
The new DCR Slave uses the restored Slave configuration information to contact, re-register and sync data with its Master.
If the DCR Group ID is different, DCR sends a DCR DATA RESTORED FROM DIFFERENT DCR DOMAIN event. If the DCR Group ID is the same, DCR sends a DCR DATA RESTORED event. Applications must process these events and query DCR to get updates.
After restore, the server is in Master mode. Some Slave information may be invalid2 , so the new DCR Master will delete all Slave information.
If the DCR Group ID is different, DCR sends a DCR DATA RESTORED FROM DIFFERENT DCR DOMAIN event. If the DCR Group ID is the same, DCR sends a DCR DATA RESTORED event. Applications must process these events and query DCR to get updates.
After restore, the server is in Master mode. Some Slave information may be invalid2, so the new Master will delete all Slave information. It also deletes all Master contact information left over from Slave mode.
If the DCR Group ID is different, DCR sends a DCR DATA RESTORED FROM DIFFERENT DCR DOMAIN event. If the DCR Group ID is the same, DCR sends a DCR DATA RESTORED event. Applications must process these events and query DCR to get updates.
After restore, the server is still in Master mode. It compares information about its Slaves that comes from the backup with the Slave information from pre-restore operations. It retains Slaves that exist in both and deletes all others.
If the DCR Group ID is different, DCR sends a DCR DATA RESTORED FROM DIFFERENT DCR DOMAIN event. If the DCR Group ID is the same, DCR sends a DCR DATA RESTORED event. Applications must process these events and query DCR to get updates.
1 Suppose we have a DCR Server in Standalone mode, and restore it using Slave data, If we convert directly to Slave mode (retain the Slave configuration from the backup) then the context of the devices known to the applications using the Standalone server will be different from the devices in the Slave. Since Slave and Master data are tightly coupled, the risk is high that all the restored Slave data will be overwritten or lost as soon as communications with the Master begin.
2 Some of the Slaves included in the backup information for this Master may have moved to another Master.
Using DCR
The following topics provide guidelines on and examples of how to integrate DCR with your application:
•
•
•
Getting Started With DCR
Use the following steps to create and populate a standalone DCR Server.
Step 1
DCR Server is included in this version of CWCS, and will be installed automatically. Upon conclusion of the installation, the CWCS Daemon Manager will start a local DCR Server. The DCR Server will run in Standalone mode, so it will not be part of a management domain or share devices with any other DCR.
If you need to manually control the DCR Server at any time after installation, enter the following at the command line:
•
•
Step 2
Point your browser to the CWCS installation at http://server_ip_address:1741. Log into CiscoWorks by providing a username and password (the default for both is admin).
Step 3
a.
b.
c.
d.
e.
f.
g.
h.
i.
Step 4
a.
b.
c.
Alternatively, you can use a spreadsheet application to create a CSV file from scratch, using the exported CSV file as a model for your entries. You can then load it using the following steps.
d.
e.
DCR Tasks to Perform During Application Startup
Every application using DCR should be sure to complete the following tasks at startup:
Note
1.
2.
a.
b.
c.
d.
3.
4.
a.
b.
c.
d.
5.
a.
b.
For an example of startup code that performs all of these tasks, see the "Using DCR Domain and Transaction IDs" section.
Using the DCR APIs
Once you have set up a working DCR Server as described in the "Getting Started With DCR" section, you can begin using the DCR APIs to interact with it.
To do this, your application must instantiate an object of class DCRProxy. DCRProxy is the main DCR abstraction. It provides the methods you need to access DCR device data, and hides communication and request details.
The following topics provide guidelines and examples for using DCRProxy and other DCR API classes and methods in application development:
•
•
•
•
•
•
•
•
About the DCR APIs
In addition to DCRProxy, DCR provides the classes shown in Table 14-14.
Note that:
•
•
•
•
•
All DCR classes are installed in $NMSROOT/CSCOpx/lib/classpath/com/Cisco/nm/dcr. All of them share the com.cisco.nm.dcr Java package name.
For DCR API Javadocs, see the CWCS 3.0 SDK portal.
Creating the DCRProxy Object
DCRProxy is the main DCR class. An object of class DCRProxy:
•
•
•
•
•
To start using DCR, your application should instantiate a single DCRProxy object, as shown below:
DCRProxy dcrProxy = new DCRProxy() ;Note that creating only a single instance of DCRProxy in the application or session eliminates the overhead required to establish socket-level communication with a local DCR Server.
Also note that DCRProxy uses CSTM classes for logging via log4j. Your application may do so as well. In order for CSTM to log its messages using log4J, either your application or DCRProxy must load the log4J message categories for CSTM (for more on interactions between CSTM and log4j, see the "Controlling CSTM Logging" section on page 29-3).
The log4j framework permits message categories to be loaded only once per JVM, and in one class loader. This requirement applies irrespective of the number of consumers for CSTM classes. For example: Since both the DCRProxy class and the application-related classes that use CSTM will be loaded in one JVM, the log4J categories for CSTM classes must be loaded either by DCRProxy or by your application class - not by both. If both load the log4J categories for CSTM, then the categories loaded last are the only active categories. If this occurs, log4J will throw exceptions whenever an inactive category object is used for logging, and all logged messages may go to different destinations.
To help you avoid these situations, DCRProxy provides an integer argument that controls the loading of log4J categories for DCR and CSTM classes. You specify this argument at instantiation; for example:
DCRProxy dcrProxy = new DCRProxy(0) ;
Table 14-15 shows the possible values for the argument and when to use them.
Note that DCRProxy(2) will not work for any web-based application context that runs under Tomcat. In this case, the application will not be able to load the categories for DCR classes because the DCR classes are loaded via the class loader, which is different from an application context-specific class loader. If your application runs under Tomcat, use either DCRProxy(0) or DCRProxy(1), depending on whether or not you are having the application load the log4J categories for CSTM classes.
If you pass any value other than those shown in Table 14-15 to this constructor, DCRProxy will reset the argument value to 0 and load the categories for both CSTM and DCR classes. The default constructor, DCRProxy(), assumes the argument value is 0 and loads the categories for both CSTM and DCR classes. Use the default constructor if your application does not use or load the log4J categories for CSTM classes.
Creating the APIExtraInfo Object
Most DCRProxy API calls accept objects of class APIExtraInfo in addition to their regular arguments. APIExtraInfo encapsulates:
•
•
•
Example 14-2 shows a modifiable code fragment that specifies this information. You will need to change this code before using it (i.e., comment out one of the two SecurityContext alternatives, and choose to pass either the password or secret key value, but not both, for remote API calls).
Example 14-2 Instantiating APIExtraInfo
AppId Myapp = new AppId("Device Manager", //unique AppID and application name"1.3.2", //application version number"192.168.1.15"); // host on which the application is runningSourceContext source = new SourceContext(Myapp) ;// For Local API callsSecurityContext security = new SecurityContext("username");// For North-Bound API callsSecurityContext security = new SecurityContext("username","password","secretKey")//Wrapper for Source and Security information:APIExtraInfo extraInfo = new APIExtraInfo(security,source);
Adding Devices to DCR
Example 14-3 shows sample code for adding a standard (non-proxy) device to DCR using the addDevice() call.
Example 14-3 Adding a Standard Device
Device device = new Device();device.SetDCRDeviceCategory(Device.STANDARD_DEVICE);device.SetAttribute("display_name", "Bldg X Floor Y Switch 1");device.SetAttribute("management_ip_address", "1.2.3.2");device.SetAttribute("sysObjectID", "1234567");// set other attributesDeviceId id = null;try{id = dcrProxy.addDevice(device,extraInfo);}catch (DCRException de){System.out.println("Error in adding Device " +de.getMessage());// Handle any error from DCR}catch (Exception e){System.out.println("Error in adding Device " +e.getMessage());// Do application-specific things}System.out.println("ID for New Device = "+ id.getValue());// This is the value that the application will retainTo add other types of devices using the same call, simply change the SetDCRDeviceCategory and SetAttribute portions of the code as appropriate for each device, as shown in the following examples.
Example 14-4 Adding an AUS Device
Device device = new Device();device.SetDCRDeviceCategory(Device.AUS_DEVICE);device.SetAttribute("display_name", "AUS 1");device.SetAttribute("management_ip_address", "1.2.3.2");device.SetAttribute("sysObjectID", "UNKNOWN");// set other attributesDeviceId id = null;...Example 14-5 Adding an AUS-Managed Device
Device device = new Device();device.SetDCRDeviceCategory(Device.STANDARD_DEVICE);device.SetAttribute("parent_aus_id", "999999");// Set the parent AUS iddevice.SetAttribute("display_name", "AUS Managed Device 1");device.SetAttribute("management_ip_address", "1.2.3.2");device.SetAttribute("sysObjectID", "1234567890");// set other attributesDeviceId id = null;...Example 14-6 Adding a DSBU Cluster
Device device = new Device();device.SetDCRDeviceCategory(Device.DSBU_DEVICE);device.SetAttribute("display_name", "DSBU-Cluster 1");device.SetAttribute("management_ip_address", "1.2.3.2");device.SetAttribute("sysObjectID", "UNKNOWN");device.SetAttribute("mdf_type","278283831");// set other attributesDeviceId id = null;...Example 14-7 Adding a DSBU Cluster Member
Device device = new Device();device.SetDCRDeviceCategory(Device.STANDARD_DEVICE);device.SetAttribute("parent_dsbu_id", "110");// Where "110" is the parent DSBU Cluster IDdevice.SetAttribute("display_name", "DSBU-Cluster Managed Device 1");device.SetAttribute("management_ip_address", "1.2.3.2");device.SetAttribute("sysObjectID", "122333");// set other attributesDeviceId id = null;...Example 14-8 Adding a CNS Configuration Engine (CNS Server)
Device device = new Device();device.SetDCRDeviceCategory(Device.CNS_DEVICE);device.SetAttribute("display_name", "CNS_Server_1");device.SetAttribute("management_ip_address", "1.2.3.2");device.SetAttribute("sysObjectID", "UNKNOWN");device.SetAttribute("mdf_type","277587376");// set other attributesDeviceId id = null;...Example 14-9 Adding a CNS managed device
Device device = new Device();device.SetDCRDeviceCategory(Device.STANDARD_DEVICE);device.SetAttribute("parent_cns_id", "110");// Where "110" is the parent CNS Server IDdevice.SetAttribute("display_name", "CNS_managed_1");device.SetAttribute("management_ip_address", "1.2.3.2");device.SetAttribute("sysObjectID", "UNKNOWN");// set other attributesDeviceId id = null;...Updating a DCR Device
You can use code like that shown in Example 14-10 to update attributes or credentials for any existing DCR Device.
Example 14-10 Updating a DCR Device
DeviceId deviceID = new DeviceId("<known-device-id>");Device device = new Device(deviceID);// Set new attribute valuesdevice.SetAttribute("display_name", "Device 2 New");// set other attributestry{dcrProxy.updateDevice(device,extraInfo);}catch (DCRException de){System.out.println("Error in updating Device " +de.getMessage());// Do application specific things}catch (Exception e){System.out.println("Error in updating Device " +e.getMessage());// Do application specific things}
Adding and Updating Devices in Bulk
These two APIs let you add or update more than one device object at a time:
•
•
Both APIs return an object of class DCRReturnValue, which holds all information about the operation on each device. The information is stored in two arrays: one for the DeviceId objects, and the second for operation error codes. The length of each array is always same as the number of Device objects you pass in the API call. The objects in these arrays correspond to each Device object in the devices array that you pass.
To get this information from the appropriate arrays in DCRReturnValue, use the following methods:
•
•
Example 14-11 shows typical code for a bulk addition. A bulk update would use the different method but have essentially the same structure.
Example 14-11 Adding Devices in Bulk
DCRReturnValues drv = null;// Call add API and collect its output in above DCRReturnValues object...int nErrorCode;if(drv != null){for(int nLoop = 0; nLoop < numberOfDevicesAdded; nLoop ++){// check if device was added successfully// If return array contains valid DeviceId, this means that device was added successfullyif(drv.getDeviceId(nLoop) != null) continue; // Valid DeviceId returned// Otherwise retrieve error codenErrorCode = drv.getErrorCode(nLoop);// The error code represents the ID of DCRException.// Handle the error here ...}// end for}// end if
Retrieving DCR Device Objects
Example 14-12 demonstrates how to retrieve selected DCR Device Objects and their data using a list of DCR Device IDs supplied by an update event.
Example 14-12 Retrieving Device Objects
DeviceId[] deviceIDs = <populate device ids...>String[] requiredAttributes = { "display_name","management_ip_address","snmp_v2_ro_comm_string"};Device[] devices = null;try{devices = dcrProxy.getDevices(deviceIDs,requiredAttributes,extraInfo);}catch (DCRException de){System.out.println("Error in getting Devices " +e.getMessage());// Do application-specific things}catch (Exception e){System.out.println("Error in getting Device " +e.getMessage());// Do application specific things}
Retrieving DCR Devices in Bulk
Example 14-13 demonstrates how to fetch a large number of DCR Devices at once. This code follows the guidelines given in the "Enhancing DCR Performance" section, specifically those for for h andling groups of devices with more than 5,000 members. Note that the DeviceIdIterator is a class in the package com.cisco.nm.dcr.
Example 14-13 Retrieving Devices in Bulk
DeviceId[] deviceIDs = <the array of DeviceId to be fetched>...Device[] devices = null;Vector v = null;try{DeviceIdIterator it = new DeviceIdIterator(deviceIDs);DeviceId[] onlyFewDeviceIDs = null;while(it.hasNext()){onlyFewDeviceIDs = it.next();devices = _dcrProxy.getDevices(onlyFewDeviceIDs, attributes, aei);if(devices != null){if(v == null) v = new Vector();v.addAll(Arrays.asList((Object[])devices));}}// end while}catch(DCRException ex){// Handle exception}catch(Exception ex){// Handle exception}if(v == null) return null;v.trimToSize();if(v.size() <= 0) return null;devices = new Device[v.size()];v.toArray(devices);// Here the devices object contain all the devices
Retrieving Data From a Device Object
Example 14-14 shows a couple of ways to get specific device data from a device object. This example assumes you have already retrieved one or more device objects using code such as the example shown in the"Retrieving DCR Device Objects" section.
Example 14-14 Retrieving Specific Device Data
Device device = <fetched device via DCR API ...>//Get a single Attribute or Credential valueAttribute attr = device.GetAttribute("snmp_v2_ro_comm_string");// Note that attribute object may be nullif(attr != null){String strValue = attr.getValue();...}// Alternate code: Get a single Attribute or Credential valueif(device. isAttributeAvailable("snmp_v2_ro_comm_string")){Attribute attr = device.GetAttribute("snmp_v2_ro_comm_string");String strValue = attr.getValue();...}//Alternate code: Get all attributes for each deviceIterator it = device.GetAttributes();//Then use the it iterator to cycle through all the attributes for the current deviceTwo methods you can use for retrieving specific device data will return special codes:
•
•
•
•
•
•
•
•
•
•
Note that this method assumes that complete device information (specifically, the parent DSBU and AUS ID attributes) have been fetched from DCR. If not, this method will always return 0.
Comparing Two Device Objects
The following code fragment shows how to compare two device objects. Note that two DCR devices are equal if their DCR Device ID values are the same and their attributes and attribute values are the same.
DeviceId id = device.GetID();device.equals(device2Object);Registering Third-Party Applications with DCR
Although CWCS-based applications use ESS to get events indicating updates to DCR devices, third-party applications must listen for events using HTTP. Example 14-15 shows how to register a third-party application so DCR will send events to it.
Example 14-15 Registering to Receive DCR Events Via HTTP
try{dcrProxy. registerForHTTPEvents (appID,"<application-URL-to-receive-events>"extraInfo);}catch (DCRException de){System.out.println("Error in registering app " +e.getMessage());// Do application specific things}catch (Exception e){System.out.println("Error in registering app " +e.getMessage());// Do application specific things}
Guidelines for DCR Application Development
Keep the following guidelines in mind when creating applications that use data from DCR:
•
•
•
•
•
•
•
•
•
•
•
–
–
–
DCR Error Codes and Interpretations
The DCR error codes and what they stand for are as follows:
Responding to DCR Events
Example 14-16 shows code for a sample application that can respond to DCR Device and DCR RESTORE Events.
Note
Example 14-16 Responding to DCR Device and RESTORE Events
public class DCREventReceiver {// Instantiate Tibco receiver and subscribe to "cisco.mgmt.cw.cmf.dcr" eventpublic DCREventReceiver() {try {_parser = SAXParserFactory.newInstance().newSAXParser();_handler = new SXP();log.info("INFO: Creating SAX Parser object");} catch (Exception ex) {log.fatal("Error creating: " + ex.getMessage());}try {TopicConnectionFactory factory;factory = new TopicConnectionFactoryImp();_con = factory.createTopicConnection();_session = _con.createTopicSession(false, Session.AUTO_ACKNOWLEDGE);} catch (JMSException e) {log.fatal("ERROR: cannot connect to Topic for receiving events.");log.fatal(MoMUtils.getStackTrace(e));return;}log.info("Listening on the topic: " + "cisco.mgmt.cw.cmf.dcr");try {Topic topic = _session.createTopic("cisco.mgmt.cw.cmf.dcr");_sub = _session.createSubscriber(topic);_sub.setMessageListener(this);} catch (JMSException e) {log.fatal("ERROR: Cannot create the Topic listener.");}}public void processEvents() {try {_con.start();log.info("INFO: Starting to receive message");} catch (JMSException e) {log.fatal("ERROR: cannot process events from topic");log.fatal(MoMUtils.getStackTrace(e));}}public void onMessage(Message jmsMsg) {log.info("Calling on mesage to create a thread.... ");try {TextMessage text = null;if (jmsMsg instanceof TextMessage) {text = (TextMessage) jmsMsg;} else {log.debug("Message is not TextMessage: " + jmsMsg);return ;}String xmlData = text.getText();log.info("Inserting event in queue: " + xmlData);processMessage(xmlData);} catch(Exception exception) {log.fatal("Problem in onMessage " + exception);}}// process the Event data//void processMessage(String txt) {dcrDeviceVec.clear();dcrEventType = "";byte[] txtBytes = txt.getBytes();ByteArrayInputStream bis = new ByteArrayInputStream(txtBytes);try {_parser.parse(bis, _handler);} catch (Exception ex) {log.fatal("Error parsing event data: " + txt+ ". Reason: " + ex.getMessage());return;}for (int i = 0; i < dcrDeviceVec.size(); i++) {// Device data}log.info("Event type is"+ dcrEventType);}class SXP extends DefaultHandler {public void startDocument() throws SAXException {log.info("SXP: StartDocument method is called");}public void endDocument() throws SAXException {log.info("SXP: EndDocument method is called");}public void startElement(String namespaceURI, String sName,String qName, Attributes attrs) {log.info("SXP: StartElement method is called " );log.info("SXP: NameSpaceURI is = " + namespaceURI);log.info("SXP: simple Name is = " + sName);log.info("SXP: Qualified Name is = " + qName);for (int i = 0; i < attrs.getLength(); ++i) {log.info("SXP: Local Name is = "+ attrs.getLocalName(i));log.info("SXP: QName is = "+ attrs.getQName(i));log.info("SXP: Attribute value is = "+ attrs.getValue(i));}if (qName.equalsIgnoreCase("Device")) {processDevice = true;}}public void endElement(String namespaceURI, String sName, String qName) {log.info("SXP: EndElement method is called " );log.info("SXP: NameSpaceURI is = " + namespaceURI);log.info("SXP: simple Name is = " + sName);log.info("SXP: Qualified Name is = " + qName);// for now, ignore bulk events, restore events etc.if (dcrEventType.equals("BULK_DEVICES_ADDED") ||dcrEventType.equals("BULK_DEVICES_DELETED") ||dcrEventType.equals("BULK_DEVICES_UPDATED") ||dcrEventType.equals("DCR_DATA_RESTORED_FROM_DIFFERENT_DOMAIN") ||dcrEventType.equals("DCR_DATA_RESTORED")) {processDevice = false;return;}if (!processDevice)return; // ignore devices we do not wantfor (int i = 0; i < dcrEventFieldNames.length; i++) {dcrDeviceFields[i] = "";if (qName.equalsIgnoreCase(dcrEventFieldNames[i])) {if (value != null && !value.equals(""))dcrDeviceFields[i] = value.toString();}if (qName.equalsIgnoreCase("SysObjectId")) {// Is the device is supported by the application//if (! applicationSupportedType(dcrDeviceFields[i])) {processDevice = false;return;}}// skip if the device id is not in our database// for a delete event.if (qName.equalsIgnoreCase("DeviceId")) {if (dcrEventType.equals(DCR_DEVICES_DELETED)) {synchronized(application.deviceIdsHash) {if (!application.deviceIdsHash.containsKey(dcrDeviceFields[i])) {processDevice = false;return;}}}}}if (qName.equalsIgnoreCase("Device") && processDevice) {// store all device attributes in an arraydcrEventType = dcrDeviceFields[0];String dcrDeviceId = dcrDeviceFields[1];String sysObjectId = "";String ipAddress = "";String hostName = "";String displayName = "";long dcrTransactionId = 0;if (!dcrEventType.equals("DEVICES_DELETED")) {// delete event has only dcrId.sysObjectId = dcrDeviceFields[2];ipAddress = dcrDeviceFields[3];hostName = dcrDeviceFields[4];displayName = dcrDeviceFields[5];dcrTransactionId = Long.parseLong(dcrDeviceFields[6]);}// Application-specific processing here...}}public void characters(char[] ch, int start, int length) {log.info("SXP: Characters method is called");String s = (new String(ch,start,length) ).trim();log.info("SXP: The value is " + s);if (value == null) {value = new StringBuffer(s);} else {value.append(s);}}} // End of Inner class - SXP//Vector to store the list of device InfoVector devDataVec=null;StringBuffer value=null;String dcrEventType = null;// parsing specifc variablesDefaultHandler _handler = null;SAXParser _parser = null;public static final Class _Class = DCREventReceiver.class;private TopicConnection _con = null;private TopicSession _session = null;private TopicSubscriber _sub = null;private SharedQueue _queue = null;Vector dcrDeviceVec = null;boolean processDevice = false;String[] dcrDeviceFields = null;Logger log;}**
Using DCR Domain and Transaction IDs
Example 14-17 shows code for a sample application that checks the Domain and Transaction at startup.
Note
Example 14-17 Using the DCR Domain and Transaction IDs During Startup
//initiate the process of listening for events from the DCRdcrEventListner = new DCREventReceiver();dcrEventListner.processEvents();// get the latest transaction ID from the application databasepublic long getMaxDcrTransactionId() {}// Filter device IDs; get only application-specific device IDs from DCRpublic Vector getFilteredDcrDevices(String action, DeviceId[] dcrDevices) {for (int i = 0; i < dcrDevices.length; i++) {DeviceId meDev = dcrDevices[i];if (action.equals("DEVICES_DELETED")) {// only device ID will be in the eventString dcrDeviceId = meDev.getValue();} else { // extract more event details from payloadfind out sysObjectId or mdf_type of the device...find out whether application supports this specific device}}return devicesVec;}/** this routine reads DCR data upon startup and syncs up data **//** in preparation for startup synching with DCR to catch any offline updates **/getDCRUpdatesOnStartup(long MaxDcrTransactionId){Device dcrDev = new com.cisco.nm.dcr.Device();DeviceId[] ids = null;Vector allIdsVec = new Vector();Vector newDevicesVec = null,updatedDevicesVec = null,deletedDevicesVec = null;String dcrDomainId = dcr.getDCRDomainID(extraInfo);String oldDcrDomainId = get dcrDomainId from application datatbaseif (oldDCRDomainId not availble in application database) // first timestore dcrDomainId in application database} else {if (!oldDCRDomainId.equals(dcrDomainId)) {clean application database and start resync DCR data orindicate application about the changeapplication specific action}}}if (appMaxDcrTransactionId == 0) { //first time startup -get devices from DCR throughDevices[] devices = getNewDevices(appMaxDcrTransactionId,extraInfo)filteredDevices = getFilteredDcrDevices("DEVICES_ADDED", updateInfo.getNewDevices());update application managed listreturn ;}// If not, check if DCR transaction ID is different// If DCR transaction ID is different, adds/deletes/updates took// place when application was offline. Get these changes now.// Load existing information from application database.//long maxDcrTransactionId = dcr.getMaxTransactionID(extraInfo);if (maxDcrTransactionId == appMaxDcrTransactionId)return null;} else (if appMaxDcrTransactionId < maxDcrTransactionId ) {// Otherwise, there were updates when application was offline.// Retrieve the current device IDs from application and then start sync.DCRUpdateData updateInfo = dcr.getDCRUpdates(appMaxDcrTransactionId,dcrDomainId, dcrDeviceIds, extraInfo);newDevicesVec = getFilteredDcrDevices("DEVICES_ADDED", updateInfo.getNewDevices());deletedDevicesVec = getFilteredDcrDevices("DEVICES_DELETED", updateInfo.getDeletedDevices());updatedDevicesVec = getFilteredDcrDevices("DEVICES_UPDATED", updateInfo.getUpdatedDevices());// Updated application managed list based on the new, deleted and updated data from DCR.}}/************************************************main method for the application.************************************************/public static void main(String[] args) throws Exception {// initialize first: Start new thread to listen to DCR events, and push to the queue.startDCREventListener();long MaxDcrTransactionId = application.getMaxDcrTransactionId();// Now start threads to handle all device processing.syncWithDCRAtStartup(MaxDcrTransactionId);}}
Using the DCR Command-Line Interface
The DCR command-line intepreter allows you to conduct via the command line most of the important tasks normally accessible only via the DCR API or the GUI. As with the GUI, all CLI commands must be executed on the same machine on which the target DCR server is running.
Table 14-17 shows the commands and their usage.
To start the DCR command line interpreter:
1.
2.
3.
Enhancing DCR Performance
A number of DCR APIs can cause performance problems under certain circumstances. To help you avoid these problems, the CWCS team makes the following recommendations:
1.
This paricular method returns the complete details of all attributes and credentials of all devices in DCR. This API should be used only very rarely, if at all, since there are very few cases when an application will want to retrieve that much information with a single call. If your DCR server contains a very large number of devices, use of this API can consume large amounts of memory, and increase the risk of CSTM errors, serialization/deserialization issues, and database-connection time out errors. This is compounded if several applications are using the same DCR, and all call this API at or near the same time.
Instead, use other DCR APIs that return only requested devices, such as getDevices and getIdentityAttributes (see recommendation 3, below). Most of these APIs require you to specify DCR Device IDs as arguments. Your application can retrieve the Device ID for DCR devices using the getDeviceIdentifiers() API call.
2.
All DCR APIs that return an "Array of Device objects" or take as arguments an "Array of DeviceId objects" (such as addDevices and updateDevices) are subject to the potential performance problems and risk described in recommendation 1, above.
To avoid this, do not use these APIs for more than 5,000 devices in a single call. If your application needs to call the API for more than 5, 000 devices, segment the list of devices and call the API multiple times. Since all applications have a wrapper around the DCR APIs, this logic should be fairly easy to implement.
This is especially important because performance and scaling for multiple applications making simultaneous DCR API calls can not be easily handled. Large add or update operations can block API calls from other applications. It is the responsibility of applications making such calls to yield control so other applications can effectively use the DCR APIs.
3.
Use this API in preference to getDevices() wherever possible. This API returns a device object that contains only the following attributes: display_name, management_ip_address, host_name, domain_name, device_identity (if it is an AUS device), SysObjectId and mdf_type. Most of the time, application needs for device information, especially for display purposes (such as in the Device Selector), are satisfied by this subset of attribute data. In addition, this API executes much more quickly. For example: To process 1,000 devices, getDevices takes approximately 10 seconds, while getIdentityAttributes takes about 500 milliseconds.
Note that recommendation 2, above, also applies to getIdentityAttributes (that is, do not use it to fetch more than 5,000 devices at a time).
4.
Before making some API calls, you will want to ensure you are not generating useless traffic by checking that the DCR Server is actually running. DCR provides two APIs to check the status of the DCR Server:
•
•
5.
Large numbers of device objects require large amounts of memory. If your Java application will process large numbers of device objects on a regular basis, you should adjust the JVM thread and heap parameters accordingly. Based on tests, large groups of DCR device objects typically require the following memory spaces:
6.
The DCRProxy class provides a close() method to clean up and free resources, including any open DB connections, when you are finished using it. Make sure that your code calls the close() method on each proxy object once you are done using the proxy object.
7.
You need to ensure that you use the proper DCRProxy object constructor: the default, or one that controls the loading of log4J categories for DCR and CSTM classes . For more information, see the "Creating the DCRProxy Object" section.