Table Of Contents
Administrators and Administrative Policy
Administrator Accounts
About Administrator Accounts
Privileges
Administration Control Privilege
The Influence of Policy
Group Access Privileges
Password Expirations and Account Lockouts
Support for Regulatory Compliance
Logging In
Adding, Editing, and Deleting Accounts
Adding or Editing Accounts
Deleting an Account
Configuring Policy Options
Configuring Access Policy
Configuring Session Policy
Configuring Password Policy
Administration Control Pages Reference
Administration Control Page
Add Administrator and Edit Administrator Pages
Administrator Password Policy Page
Access Policy Setup Page
Session Policy Setup Page
Administrators and Administrative Policy
This chapter addresses the features in the Administration Control section of the Cisco Secure Access Control Server Release 4.1, hereafter referred to as ACS.
This chapter contains the following topics:
•Administrator Accounts
•Logging In
•Adding, Editing, and Deleting Accounts
•Configuring Policy Options
•Administration Control Pages Reference
Administrator Accounts
Administrator accounts provide the only access to the ACS web interface.
This section contains the following topics:
•About Administrator Accounts
•Privileges
•Group Access Privileges
•Password Expirations and Account Lockouts
•Support for Regulatory Compliance
About Administrator Accounts
From the Administration Control page, you can link to pages that establish the names, passwords, and privileges for individual administrators or groups of administrators.
ACS administrator accounts are:
•Unique to ACS and not related to other accounts, such as Windows administrator accounts, ACS TACACS+ accounts, or any other ACS user accounts.
•Unrelated to external ACS users because ACS stores ACS administrator accounts in a separate internal database.
Privileges
The privileges that you grant to each administrator determine access to areas of the web interface. By default, new administrators do not have any privileges.
Administration Control Privilege
Administrators who have the Administration Control privilege can access the complete Administration Control page. For these administrators, this page provides management of administrators and access to pages that control administrative access policy. Restricted administrators can update their passwords. Figure 11-1 shows the access granted by the administration control privilege.
Figure 11-1 The Administration Control Privilege
Examples of privileges that you can grant to administrators or groups of administrators include:
•Shared profile components
•Network, system, and interface configuration
•Administration control
•External user databases, posture validation, and network access profiles (NAPs)
•Reports and activities
For example, you are an administrator with the Administration Control privilege who wants to configure access to the Network Configuration section of the web interface for administrators whose responsibilities include network management. Therefore, you check only the Network Configuration privilege for the applicable administrator accounts.
However, you might want to configure all privileges for an administrator or an administrative group. In this case, you click the Grant All (privileges) option.
The web interface also includes a filter that can control the type of access granted to administrators. For example, you can configure an administrator for read-only access to groups of users, or you can grant them add and edit access to the same groups.
Note See Chapter 10, "Logs and Reports," for information on generating reports of privileges granted to administrators.
The Influence of Policy
The Administration Control page also includes links to access, session, and password policy configuration pages. These policies influence all account logins and include the following configuration options:
•Access Policy—IP address limitations, HTTP port restrictions, and secure socket layer (SSL) setup.
•Session Policy—Timeouts, automatic local logins, and response to invalid IP address connections.
•Password Policy—Password validation, lifetime, inactivity, and incorrect attempts.
Group Access Privileges
ACS includes options that determine the type of administrator access to groups or users in groups. When enabled, these options grant an administrator the following privileges with respect to any available group:
•Add or edit user pages
•Edit group pages
•Read access to user pages
•Read access to the group pages
Table 11-1 describes the interaction of the options:
Table 11-1 Group Access Options
Add and Edit Access
|
Read Access
|
Result
|
No
|
No
|
Administrators cannot view the users in the Editable groups.
|
No
|
Yes
|
Administrators can view the users in the Editable groups, but Submit is not available.
|
Yes
|
No
|
Full access granted in either case. When enabled, Add/Edit Users in these groups overrides Read Access.
|
Yes
|
Yes
|
Password Expirations and Account Lockouts
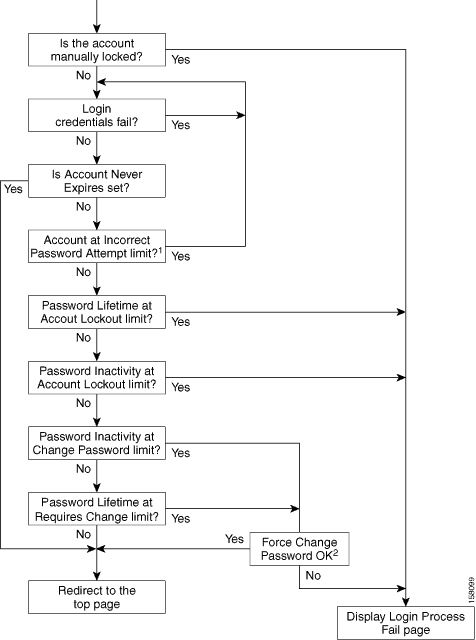
Successful logins take administrators to the main ACS web interface page. However, all logins are subject to the restrictions that have been configured in Administration Control, including expiration, account lockout, and password configuration options.
Limits set for password lifetime and password inactivity can force password change or account lockout. In addition, the limit set for failed attempts can force password change, and privileged administrators can manually lock accounts. In the case of an account lockout, a privileged administrator must unlock the account.
ACS includes the Account Never Expires option that can globally override automatic account lockouts and password configuration options. If the Account Never Expires option is enabled for a specific administrator, all administrator lockout options are ignored.
In the case of an account lockout, ACS displays the Login Process Fail page. Depending on the options, ACS displays the following pages for changing passwords:
•A password update page appears when you attempt to log in.
•The Change Password page appears when you click the Administration Control button in the navigation bar, if you do not have the Administration Control privilege. The Change Password page includes a list of the password criteria.
Figure 11-2 shows the process flow at login time.
Figure 11-2 Login Process Flow
1 When the administrator reaches the Incorrect Password Attempts limit, ACS locks the account. At this point, successful attempts will fail. However, if Account Never Expires is set, then the account cannot be locked out.
2 The administrator has successfully logged in. Therefore, if only the password has been incorrectly used, ACS allows retries even though the administrator has exceeded the Incorrect Password Attempt limit.
Support for Regulatory Compliance
ACS includes options that can support regulatory compliance. For example, an administrator with the Administration Control privilege can decide whether to grant the Administration Control privilege to other administrators. Administrators who do not have this privilege cannot access the administrator configuration details.
All administrator logins are subject to the policy that you configure for passwords and accounts, unless you check the Account Never Expires option. For example, ACS provides configurable limits on password lifetime, activity, and incorrect password attempts. These options can force password change and can result in automatic account lockout. Privileged administrators can also lock out an account. In addition, you can monitor the last password change and last account activity for each administrator.
In addition, you can restrict access to reports. For example, you can enable or disable an administrator's ability to change the Administration Audit report configuration.
You can also configure administrator access to user groups. You can selectively choose to allow administrators to setup groups and add or edit users. ACS also provides configuration of administrator read access to users and groups.
Logging In
The ACS login page is the access point for the web interface. If your valid password expires, or if a change in policy affects a password, ACS forces you to change your password when you log in. If you are locked out, contact an administrator who has the Administration Control privilege.
Note Administrators must have a Windows domain administrator account in order to log in and manage ACS services. However, Windows domain administrators cannot log in to ACS. Only administrators with valid ACS accounts can log in to ACS. For information, see the Installation Guide for Cisco Secure ACS for Windows Release 4.1 or the Installation Guide for Cisco Secure ACS Solution Engine Release 4.1.
ACS for Windows
To log in from a client, you must have an administrator account. However, the Session Policy includes an Allow automatic local login option. If this option is enabled, you can bypass the login page on the server that is running ACS. This option is available for unintentional lockouts. For more information about automatic local logins, see Configuring Session Policy.
ACS Solution Engine
To access the ACS web interface from a browser, log in to ACS by using an administrator account.
The first administrator to log in must create an administrator name and password by using the Add ACS Admin command in the Command Line Interface (CLI) to create the administrator name and password for the first account. For complete information on the CLI, see the "Administering Cisco Secure ACS Solution Engine" chapter of the Installation Guide for Cisco Secure ACS Solution Engine Release 4.1.
In cases where ACS has locked out all administrators, use the Unlock <administrator name> command from the CLI. Only an administrator with the Administration Control privilege can use this command. For complete information on the CLI, see the "Administering Cisco Secure ACS Solution Engine" chapter of the Installation Guide for Cisco Secure ACS Solution Engine Release 4.1.
To log in:
Step 1 To start ACS, click the ACS Admin button in the Cisco Secure ACS program group.
The Cisco Secure ACS login page appears.
Step 2 Type your Username and Password.
Step 3 Click the Login button.
The Cisco Secure ACS main page appears.
Adding, Editing, and Deleting Accounts
Administrators with the Administration Control privilege can add, edit, and delete administrator accounts.
This section contains the following topics:
•Adding or Editing Accounts
•Deleting an Account
Adding or Editing Accounts
To add or edit an administrator account:
Step 1 In the navigation bar, click Administration Control.
The Administration Control Page appears if the current account has the Administration Control privilege. Otherwise, a Change Password page appears.
Step 2 Click Add Administrator, and the Add Administrator page appears; or, click the name of the administrator account that you want to edit and the Edit Administrator administrator_name page appears.
Step 3 Type the Administrator Name, Password, and Password Confirmation for new accounts. If necessary, change the Password and Password Confirmation fields for an existing account. For information about these fields, see Add Administrator and Edit Administrator Pages.
Step 4 Check Account Never Expires to prevent the account for this administrator from expiring. For information, see Add Administrator and Edit Administrator Pages.
Step 5 Check the Account Locked check box to lock this account. If the Account Locked check box is checked, uncheck the box to unlock the account.
Step 6 Click Grant All or Revoke All to globally add or remove all privileges. For information on these commands, see Add Administrator and Edit Administrator Pages. Removing privileges from an existing account disables the account.
Step 7 Move the group names between the Available groups and Editable groups list boxes. Groups in the Editable groups list, and associated users, will be available to the current administrator according to the access options that you check.
Step 8 Check the appropriate options to grant access privileges to the Editable groups and associated users. For information on these options, see Add Administrator and Edit Administrator Pages.
Step 9 Check the appropriate options in the Shared Profile Components area to grant access to specific areas of the Shared Profile Components section of the web interface. For information on these options, see Add Administrator and Edit Administrator Pages. For information on shared profile components, see Chapter 4, "Shared Profile Components."
Step 10 Check Network Configuration to grant access to the Network Configuration section of the web interface. For information on network configuration, see Chapter 3, "Network Configuration."
Step 11 Check options in the System Configuration area to grant access to pages in the System Configuration section of the web interface. For information on these options, see Add Administrator and Edit Administrator Pages. For information on system configuration, see Chapter 7, "System Configuration: Basic," Chapter 8, "System Configuration: Advanced," and Chapter 10, "Logs and Reports."
Step 12 Check the Interface Configuration option to grant access to the Interface Configuration section of the web interface. For information on interface configuration, see Chapter 2, "Using the Web Interface."
Step 13 Check the Administration Control option to grant access to the Administration Control section of the web interface.
Step 14 Check the External User Databases option to grant access to the External User Databases section of the web interface. For information on external user databases, see Chapter 12, "User Databases."
Step 15 Check the Posture Validation option to grant access to the Posture Validation section of the web interface. For information on posture validation, see Chapter 13, "Posture Validation."
Step 16 Check the Network Access Profiles option to grant access to the Network Access Profiles section of the web interface. For information on network access profiles, see Chapter 14, "Network Access Profiles."
Step 17 Check options in the Reports and Activities area to grant access to pages in the Reports and Activities section of the web interface. For information on these options, see Add Administrator and Edit Administrator Pages. For information on reports, see Chapter 10, "Logs and Reports."
Step 18 Click Submit.
ACS saves the new administrator account. The new account appears in the list of administrator accounts on the Administration Control page.
Deleting an Account
You use this feature to delete administrator accounts. You can disable an account by clicking the Revoke All button. However, we recommend that you delete any unused administrator accounts.
To delete an account:
Step 1 In the navigation bar, click Administration Control.
ACS displays the Administration Control page.
Step 2 Click the name of the administrator account that you want to delete.
The Edit Administrator administrator_name page appears, where administrator_name is the name of the administrator account that you have selected.
Step 3 Click the Delete button.
ACS displays a confirmation dialog box.
Step 4 Click OK.
ACS deletes the administrator account. The Administrators list on the Administration Control page no longer contains the administrator account.
Configuring Policy Options
The options on these pages control access, session, and password policies.
This section contains the following options:
•Configuring Access Policy
•Configuring Session Policy
•Configuring Password Policy
Configuring Access Policy
If you have the Administration Control privilege, you can use the Access Policy feature to limit access by IP address and by the TCP port range used for administrative sessions. You can also enable the secure socket layer (SSL) for access to the web interface.
Before You Begin
If you want to enable the SSL for administrator access, you must have completed the steps in Installing an ACS Server Certificate, page 9-21, and Adding a Certificate Authority Certificate, page 9-24. After you have enabled SSL, ACS begins using the SSL at the next administrator login. This change does not affect current administrator sessions. In the absence of a certificate, ACS displays an error message when you attempt to configure SSL.
To set up an ACS Access Policy:
Step 1 In the navigation bar, click Administration Control.
ACS displays the Administration Control page.
Step 2 Click Access Policy.
The Access Policy Setup page appears.
Step 3 Click the appropriate IP Address Filtering option. For information on these options, see Access Policy Setup Page.
Step 4 Type the appropriate IP address ranges in accordance with the IP Address Filtering option.
Step 5 Click the appropriate HTTP Port Allocation option to allow all ports or restrict access to certain ports. If you restrict access, type the range of the restricted ports. For information on these options, see Access Policy Setup Page.
Step 6 Check this option if you want ACS to use the SSL. For information on this option, see Access Policy Setup Page.
Step 7 Click Submit.
ACS saves and begins enforcing the access policy settings.
Configuring Session Policy
If you have the Administration Control privilege, you can use the Session Policy controls that enable or disable:
•Local logins
•Responses to invalid IP address connections
To set up ACS session policy:
Step 1 In the navigation bar, click Administration Control.
ACS displays the Administration Control page.
Step 2 Click Session Policy.
The Session Policy Setup page appears.
Step 3 Click the appropriate policies and type the appropriate information to set up the policy. For information on these options and fields, see Session Policy Setup Page.
Step 4 Click Submit.
ACS saves and begins enforcing the session policy settings.
Configuring Password Policy
You can access the Administrator Password Policy page from the Password Policy button on the Add Administrator page. If you do not configure the password policy, any administrator can log in, create administrators, and assign privileges.
The Administrator Password Policy provides controls that:
•Constrain complexity
•Restrict lifetime
•Restrict inactive accounts
•Limit incorrect login attempts
To set up a password policy:
Step 1 In the navigation bar, click Administration Control.
ACS displays the Administration Control page.
Step 2 Click Password Policy.
The Administrator Password Policy page appears.
Step 3 Click the appropriate options and type the appropriate values. For information on these options and fields, see Administrator Password Policy Page.
Step 4 Click Submit.
ACS saves and begins enforcing the password policy settings at the next login.
Administration Control Pages Reference
The following topics describe the pages accessed from the Administration Control button on the navigation bar:
•Administration Control Page
•Add Administrator and Edit Administrator Pages
•Administrator Password Policy Page
•Access Policy Setup Page
•Session Policy Setup Page
Administration Control Page
The Administration Control page is the starting point for configuring administrator accounts and policies. Only administrators with the Administration Control privilege can access this page.
To open this page, click the Administration Control button in the navigation bar.
Table 11-2 Administration Control (Privileged Administrator)
Option
|
Description
|
Administrators
|
Lists all configured administrators.
|
<administrator_name>
|
|
Add Administrator
|
Opens the Add Administrator page. For information, see the Add Administrator and Edit Administrator Pages.
|
Access Policy
|
Opens the Access Policy Setup page, which controls network access for browsers. For information, see the Administrator Password Policy Page.
|
Session Policy
|
Opens the Session Policy Setup page, which provides configuration details for HTTP sessions. For information, see the Session Policy Setup Page.
|
Password Policy
|
Opens the Administrator Password Policy page. For information, see the Administrator Password Policy Page.
|
Related Topics
•Adding or Editing Accounts
•Deleting an Account
•Configuring Access Policy
•Configuring Session Policy
•Configuring Password Policy
Add Administrator and Edit Administrator Pages
Use the areas on the Add Administrator and Edit Administrator pages to:
•Add an administrator (Add Administrator page only)
•Add, edit, and monitor passwords
•Monitor and reenable locked out accounts
•Enable or disable privileges
To open these pages, click Administration Control, and then click Add Administrator or click <administrator_name> to edit an administrator.
Table 11-3 describes the following options:
•Administrator Details
•Administrator Privileges
•User & Group Setup
•Shared Profile Components
•Network Configuration
•System Configuration
•Interface Configuration
•Administration Control
•External User Databases
•Posture Validation
•Network Access Profiles
•Reports & Activity
Table 11-3 Add Administrator and Edit Administrator Pages
Option
|
Description
|
Administrator Details
|
Administrator Name (appears only on the Add Administrator page)
|
The login name for the ACS administrator account. Administrator names can contain 1 to 32 characters, excluding the left angle bracket (<), the right angle bracket (>), and the backslash (\). An ACS administrator name does not have to match a network user name.
The administrator name does not appear on the Edit Administrator page because ACS does not allow name changes for previously configured administrators. To change names, delete the account and configure an account with a new name. To disable an account, revoke all privileges.
|
Password
|
The password can match the password that the administrator uses for dial-in authentication, or it can be a different password. ACS enforces the options in the Password Validation Options section on the Administrator Password Policy page.
Passwords must be at least four characters long and contain at least one numeric character. The password cannot include the username or the reverse username, must not match any of the previous four passwords. and must be in ASCII characters. For errors in passwords, ACS displays the password criteria.
If the password policy changes and the password does not change, the administrator remains logged in. ACS enforces the new password policy at the next login.
|
Confirm Password
|
Verifies the password in the Password field. For errors in password typing, ACS displays an error message.
|
Last Password Change (Edit Administrator page only)
|
Displays the date of the change on which a password changes through administrative action on this page or through expiration of a password during login. (Read-only) Always displays the change date, not the expiration date. Does not appear until a new account has been submitted.
|
Last Activity (Edit Administrator page only)
|
Displays the date of the last successful login. (Read-only) Does not appear until a new account has been submitted.
|
Account Never Expires
|
Prevents account lockout by overriding the lockout options on the Administrator Password Policy page with the exception of manual lockout. Therefore, the account never expires but password change policy remains in effect. The default value is unchecked (disabled).
|
Account Locked
|
Prevents an administrator, who was locked out due to the lockout options on the Password Policy page, from logging in. When unchecked (disabled), this option unlocks an administrator who was locked out.
Administrators who have the Administration Control privilege can use this option to manually lock out an account or reset locked accounts. The system displays a message that explains the reason for a lockout.
When an administrator unlocks an account, ACS resets the Last Password Change and the Last Activity fields to the day on which the administrator unlocks the account.
The reset of a locked account does not affect the configuration of the lockout and unlock mechanisms for failed attempts.
|
Administrator Privileges
|
Contains the privilege options for the User Setup and Group Setup sections of the web interface.
By default, a remote administrator does not have privileges.
|
Grant All
|
Enables all privileges. ACS moves all user groups to the Editable Groups list. A privileged administrator can also grant privileges to each ACS administrator by assigning privileges on an individual basis. In either case, the administrator can individually override options enabled by Grant All.
By default, ACS restricts all privileges for new administrator accounts.
|
Revoke All
|
Clears (restricts) all privileges. ACS removes all user groups from the Editable Groups list. Revoking all privileges for an existing account effectively disables the account. The administrator can individually override options disabled by Revoke All.
You can also disable an account by revoking all privileges.
|
User & Group Setup
|
Add/Edit users in these groups
|
Enables an administrator to add or edit users, and to assign users to the groups in the Editable groups list.
When enabled, this setting overrides the settings in the Read access to users in these groups option.
|
Setup of these groups
|
Enables an administrator to edit the settings for the groups in the Editable groups list.
When enabled, this setting overrides the settings in the Read access of these groups option.
|
Read access to users in these groups
|
Enables read-only access to users in the Editable groups.
When the Add/Edit users in these groups option is enabled, it overrides the settings in the Read access to users in these groups option.
If the Add/Edit users in these groups option is checked (enabled), it does not matter if this setting is enabled or disabled. The Add/Edit users in these groups setting overrides this setting, and the administrator can edit all users in the Editable groups.
If the Add/Edit users in these groups option is unchecked (disabled):
•Check this check box to grant the administrator read access to the users in the Editable groups. In this case, the administrator cannot submit changes.
•When unchecked, administrators cannot view users.
|
Read access of these groups
|
Enables read-only access to users in the Editable groups.
When the Add/Edit users in these groups option is enabled, it overrides the settings in the Read access to users in these groups option.
If the Add/Edit users in these groups option is checked (enabled), it does not matter if this setting is enabled or disabled. The Add/Edit users in these groups setting overrides this setting, and the administrator can edit the Editable groups.
If the Add/Edit users in these groups option is unchecked (disabled):
•Check this check box to grant the administrator read access to the Editable groups list. In this case, the administrator cannot submit changes.
•When unchecked, administrators cannot view groups.
|
Available groups
|
Lists all user groups. Administrators do not have access to the groups in this list.
|
Editable groups
|
Lists the user groups to which administrators have access. Other options in the User & Group Setup area determine the limits on administrator access to these groups and associated users in this list.
Click >> to add all groups, or click << to remove all groups. Click > to add a single group, or click < to remove a single group.
Note The access settings in this section do not apply to group mappings for external authenticators.
|
Shared Profile Components
|
Network Access Restriction Sets
|
Enables full access to the Network Access Restriction Sets feature.
|
Network Access Filtering Sets
|
Enables full access to the Network Access Filtering Sets feature.
|
Downloadable ACLs
|
Enables full access to the Downloadable PIX ACLs feature.
|
RADIUS Authorization Components
|
Enables full access to RACs.
|
Create new Device Command Set Type
|
Allows the administrator account to be used as valid credentials by another Cisco application for adding new device command set types. New device command set types that are added to ACS by using this privilege appear in the Shared Profile Components section of the web interface.
|
Shell Command Authorization Sets
|
Enables full access to the Shell Command Authorization Sets feature.
|
PIX/ASA Command Authorization Sets
|
Enables full access to the PIX/ASA Command Authorization Sets feature.
Note Additional command authorization set privilege options can appear if other Cisco network management applications, such as CiscoWorks, have updated the configuration of ACS.
|
Network Configuration
|
Enables full access to the features in the Network Configuration section of the web interface.
|
System Configuration
|
Contains the privilege options for the features in the System Configuration section of the web interface. For each of the features, enabling the option grants full access to the feature.
|
Service Control
|
Enables access to configuration of the service log files, and stop and restart of ACS services.
|
Date/Time Format Control
|
Enables access to control of date formats.
|
Logging Control
|
Enables access to report options associated with the Logging Configuration page. To access the Logging Configuration page, click System Configuration, then click Logging.
|
Administration Audit Configuration
|
Enables this administrator to change the Administration Audit report configuration.
|
Password Change Configuration
|
Enables this administrator to change the Password Change report configuration.
|
Password Validation
|
Enables access to validation parameters for user passwords.
|
DB Replication
|
Enables access to ACS internal database replication.
|
RDBMS Synchronization
|
Enables access to RDBMS synchronization.
|
IP Pool Address Recovery
|
Enables access to IP pool address recovery.
|
IP Pool Server Configuration
|
Enables access to the configuration of IP pools.
|
ACS Backup
|
Enables access to ACS backup.
|
ACS Restore
|
Enables access to ACS restore.
|
ACS Service Management
|
Enables access to system monitoring and event logging.
|
VoIP Accounting Configuration
|
Enables access to the VoIP accounting configuration.
|
ACS Certificate Setup
|
Enables access to ACS certificate setup.
|
Global Authentication Setup
|
Grants privilege for global authentication setup. Any administrator who requires access to the EAP-FAST Files Generation configuration page must have the Global Authentication Setup privilege enabled.
|
NAC Attributes management (ACS Solution Engine)
|
Enables access to NAC attribute management.
|
Appliance Configuration (ACS Solution Engine)
|
Enables access to appliance configuration.
|
Support Operations (ACS Solution Engine)
|
Enables access to support operations.
|
View Diagnostic Logs (ACS Solution Engine)
|
Enables access to diagnostic logs.
|
Appliance Upgrade Status (ACS Solution Engine)
|
Enables access to appliance upgrade status reports.
|
Interface Configuration
|
Enables full access to the features in the Interface Configuration section of the web interface.
|
Administration Control
|
Enables full access to the features in the Administration Control section of the web interface.
|
External User Databases
|
Enables full access to the features in the External User Databases section of the web interface.
|
Posture Validation
|
Enables access to Network Admission Control (NAC) configuration.
|
Network Access Profiles
|
Enables access to service-based policy configuration by using NAPs.
|
Reports & Activity
|
Click the Reports and Activities button in the navigation bar to access these logs.
|
TACACS+ Accounting
|
Enables access to the TACACS+ Accounting log, which includes TACACS+ session information.
|
TACACS+ Administration
|
Enables access to the TACACS+ Administration log, which lists configuration commands.
|
RADIUS Accounting
|
Enables access to the RADIUS Accounting log, which includes RADIUS session information.
|
VoIP Accounting
|
Enables access to the VoIP Accounting log, which includes VoIP session information.
|
Passed Authentications
|
Enables access to the Passed Authentications log, which lists successful authentication requests.
|
Failed Attempts
|
Enables access to the Failed Attempts log, which lists authentication and authorization failures.
|
Logged-in Users
|
Enables access to the Logged-in Users log, which lists all users that receive services from AAA clients.
|
Purge of Logged-in Users
|
If users are listed as logged in but the connection to the AAA client has been lost and the users are no longer actually logged in, click Purge and that session's activity will be terminated. Purging the user from this list does not log the user off the AAA client, but terminates the session record in accounting. To print this list, right-click anywhere in the right window and print the window from the browser.
|
Disabled Accounts
|
Enables access to the Disabled Accounts log, which lists all disabled user accounts.
|
ACS Backup and Restore
|
Enables access to the ACS Backup and Restore log, which lists backup and restore activity.
|
DB Replication
|
Enables access to the Database Replication log, which lists database replication activity.
|
RDBMS Synchronization
|
Enables access to the RDBMS Synchronization log, which lists RDBMS synchronization activity.
|
Administration Audit
|
Enables access to the Administration Audit log, which lists system administrator actions.
|
ACS Service Monitor
|
Enables access to the ACS Service Monitoring log, which lists ACS service starts and stops.
|
User Change Password
|
Enables access to the User Password Changes log, which lists user-initiated password changes.
|
Entitlement Reports
|
Enables access to reports of user and administrator entitlements.
|
Appliance Status (ACS Solution Engine)
|
Enables access to the Appliance Status log, which logs resource utilization.
|
Appliance Administration Audit (ACS Solution Engine)
|
Enables access to the Appliance Administration Audit log. which lists activity on the serial console.
|
Related Topics
•Service Control, page 7-1
•Date Format Control, page 7-3
•Local Password Management, page 7-4
•ACS Backup, page 7-7
•ACS System Restore, page 7-13
•ACS Active Service Management, page 7-17
•VoIP Accounting Configuration, page 7-20
•Appliance Configuration (ACS Solution Engine Only), page 7-20
•Support Page (ACS Solution Engine Only), page 7-23
•Viewing or Downloading Diagnostic Logs (ACS Solution Engine Only), page 7-25
•Appliance Upgrade Status (ACS Solution Engine Only), page 7-26
•ACS Internal Database Replication, page 8-1
•RDBMS Synchronization, page 8-17
•IP Pools Server, page 8-32
•IP Pools Address Recovery, page 8-37
•Global Authentication Setup, page 9-19
•ACS Certificate Setup, page 9-20
•NAC Attribute Management (ACS Solution Engine Only), page 8-37
•Appliance Configuration (ACS Solution Engine Only), page 7-20
•About ACS Logs and Reports, page 10-1
•Password Expirations and Account Lockouts
•Adding, Editing, and Deleting Accounts
Administrator Password Policy Page
Use the Administrator Password Policy page to set password validation, lifetime, inactivity, and incorrect attempt options. If you do not configure the password policy, any administrator can log in, create administrators, and assign privileges.
To open this page, click Administration Control and then click Password Policy.
ACS returns an error when:
•The specification is out of range.
•Users do not meet the criteria on this page.
Table 11-4 describes the following options:
•Password Validation Options
•Password Lifetime Options
•Password Inactivity Options
•Incorrect Password Attempt Options
Table 11-4 Administrator Password Policy
Option
|
Description
|
Password Validation Options
|
Password may not contain the username
|
If enabled, the password cannot contain the username or the reverse username.
|
Minimum length n characters
|
n specifies the minimum length of the password (the default is 4, the range is 4 to 20).
|
Password must contain:
|
Use these options to determine password complexity constraints.
|
upper case alphabetic characters
|
If enabled, the password must contain uppercase alphabetic characters.
|
lower case alphabetic characters
|
If enabled, the password must contain lowercase alphabetic characters.
|
numeric characters
|
If enabled, the password must contain numeric characters.
|
non alphanumeric characters
|
If enabled, the password must contain nonalphanumeric characters (for example, @).
|
Password must be different from the previous n versions
|
If enabled, the password must be different from the previous n versions (the default is 1, the range is 1 to 99).
|
Password Lifetime Options
|
Following a change of password:
|
Use these options to set restrictions on the lifetime of administrator passwords. The value n represents the number of days that passed since the last time the password was changed.
|
The password will require change after n days
|
Following a change of password, if enabled, n specifies the number of days before ACS requires a change of password due to password age (the default is 30). The range is 1 to 365. When checked (enabled), The Administrator will be locked after n days option causes ACS to compare the two Password Lifetime Options and take the greater value.
|
The Administrator will be locked out after n days
|
Following a change of password, if enabled, n specifies the number of days before ACS locks out the associated administrator account due to password age (the default is 30, the range is 1 to 365).
|
Password Inactivity Options
|
Following last account activity:
|
Use these options to place restrictions on the use of inactive administrator accounts. The value n represents the number of days that passed since the activity (administrator login).
|
The password will require change after n days
|
Following the last account activity, if enabled, n specifies the number of days before ACS requires a change of password due to password inactivity (the default is 30). The range is 1 to 365. When checked (enabled), The Administrator will be locked after n days option causes ACS to compare the two Password Inactivity Options and take the greater value.
Note For additional security, ACS does not warn users who are approaching the limit for password inactivity.
|
The Administrator will be locked out after n days
|
Following the last account activity, if enabled, n specifies the number of days before ACS locks out the associated administrator account due to password inactivity (the default is 30, the range is 1 to 365).
Note For additional security, ACS does not warn users who are approaching the limit for account inactivity.
|
Incorrect Password Attempt Options
|
Lock out Administrator after n successive failed attempts
|
If enabled, n specifies the allowable number of incorrect password attempts. When checked, n cannot be set to zero. If disabled (not checked), ACS allows unlimited successive failed login attempts (the default is 3, the range is 1 to 98).
Note For additional security, ACS does not warn users who are approaching the limit for failed attempts. If the Account Never Expires option is enabled for a specific administrator, this option is ignored.
|
Access Policy Setup Page
Use the Access Policy Setup page to configure access for IP addresses and ranges, to configure HTTP access, and to set up the Secure Sockets Layer (SSL).
To open the Access Policy Setup page, click Administration Control, and then click Access Policy.
Table 11-5 describes the following options:
•IP Address Filtering
•IP Address Ranges
•HTTP Configuration
•Secure Socket Layer Setup
Table 11-5 Access Policy Options
Option
|
Description
|
IP Address Filtering
|
Allow all IP addresses to connect
|
Enables remote access to the web interface from any IP address.
|
Allow only listed IP addresses to connect
|
Restricts remote access to the web interface to IP addresses within the specified IP Address Ranges.
|
Reject connections from listed IP addresses
|
Restricts remote access to the web interface to IP addresses outside of the specified IP Address Ranges.
IP filtering operates on the IP address received in an HTTP request from a remote administrator's web browser. If the browser is configured to use an HTTP proxy server or the browser runs on a workstation behind a network device performing network address translation, IP filtering applies only to the IP address of the HTTP proxy server or the NAT device.
|
IP Address Ranges
|
The IP Address Ranges table contains ten rows for configuring IP address ranges. The ranges are always inclusive; that is, the range includes the Start and End IP addresses.
Use dotted-decimal format. The IP addresses that define a range must differ only in the last octet (Class C format).
|
Start IP Address
|
Defines the lowest included IP address in the specified range (up to 16 characters).
|
End IP Address
|
Defines the highest included IP address in the specified range (up to 16 characters).
|
HTTP Configuration
|
HTTP Port Allocation
|
|
Allow any TCP ports to be used for Administration HTTP Access
|
Enables ACS to use any valid TCP port for remote access to the web interface.
|
Restrict Administration Sessions to the following port range From Port n to Port n
|
Restricts the ports that ACS can use for remote access to the web interface. Use the boxes to specify the port range (up to five digits per box). The range is always inclusive; that is, the range includes the start and end port numbers. The size of the specified range determines the maximum number of concurrent administrative sessions.
ACS uses port 2002 to start all administrative sessions. Port 2002 does not need to be in the port range. Also, ACS does not allow definition of an HTTP port range that consists only of port 2002. The port range must consist of at least one port other than port 2002.
A firewall configured to permit HTTP traffic over the ACS administrative port range must also permit HTTP traffic through port 2002, because this is the port that a web browser must address to initiate an administrative session.
We do not recommend allowing administration of ACS from outside a firewall. If access to the web interface from outside a firewall is necessary, keep the HTTP port range as narrow as possible. A narrow range can help to prevent accidental discovery of an active administrative port by unauthorized users. An unauthorized user would have to impersonate, or "spoof," the IP address of a legitimate host to make use of the active administrative session HTTP port.
|
Secure Socket Layer Setup
|
Use HTTPS Transport for Administration Access
|
Enables ACS to use the secure socket layer (SSL) protocol to encrypt HTTP traffic between the CSAdmin service and the web browser that accesses the web interface. This option enables encryption of all HTTP traffic between the browser and ACS, as reflected by the URLs, that begin with HTTPS. Most browsers include an indicator for SSL-encrypted connections.
To enable SSL, first install an a server certificate and a certification authority certificate. Choose System Configuration > ACS Certificate Setup to access the installation process. With SSL enabled, ACS begins using HTTPS at the next administrator login. Current administrator sessions are unaffected. In the absence of a certificate, ACS displays an error.
|
Related Topics
•Installing an ACS Server Certificate, page 9-21
•Adding a Certificate Authority Certificate, page 9-24
Session Policy Setup Page
Use the Session Policy Setup page to configure session attributes that include timeout, automatic local logins (ACS for Windows only), and response to invalid IP address connections.
To open this page, click Administration Control, and then click Session Policy.
Table 11-6 describes the session configuration options.
Table 11-6 Session Policy
Option
|
Description
|
Session Configuration
|
Session idle timeout (minutes)
|
Specifies the time, in minutes, that an administrative session must remain idle before ACS terminates the connection (four-digit maximum, 5 to 1439).
When an administrative session terminates, ACS displays a dialog box asking whether the administrator wants to continue. If the administrator chooses to continue, ACS starts a new administrative session.
This parameter only applies to the ACS administrative session in the browser. It does not apply to an administrative dial-up session.
|
Allow Automatic Local Login (ACS for Windows)
|
Enables administrators to start an administrative session without logging in, if they are using a browser on the computer that runs ACS. ACS uses a default administrator account named local_login to conduct these sessions.
When unchecked (disabled), administrators must log in using administrator names and passwords.
Note To prevent accidental lockout when there are no defined administrator accounts, ACS does not require an administrator name and password for local access to ACS.
The local_login administrator account requires the Administration Control privilege. ACS records administrative sessions that use the local_login account in the Administrative Audit report under the local_login administrator name.
|
Respond to invalid IP address connections
|
Enables ACS to send an error message in response to attempts to start a remote administrative session by using an IP address that is invalid according to the IP address Range settings in the Access Policy. If this check box is clear, ACS does not display an error message when an invalid remote connection attempt is made. (the default is Enabled)
Disabling this option can help to prevent unauthorized users from discovering ACS.
|