-
Installation and Setup Guide for Cisco Secure ACS Solution Engine Version 3.3
-
Cisco 90-Day Limited Hardware Warranty Terms
-
Preface
-
Cisco Secure ACS Solution Engine Overview
-
Preparing for Installation
-
Installing and Configuring Cisco Secure ACS Solution Engine
-
Administering Cisco Secure ACS Solution Engine
-
Technical Specifications
-
Windows Service Advisement
-
Command Reference
-
Index
-
 Feedback
Table Of Contents
Administering Cisco Secure ACS Solution Engine
Basic Command Line Administration Tasks
Logging In to the Solution Engine via Serial Console
Shutting Down the Solution Engine via Serial Console
Logging Off the Solution Engine via Serial Console
Rebooting the Solution Engine via Serial Console
Determining the Status of Solution Engine System and Services via Serial Console
Stopping Solution Engine Services via Serial Console
Starting Solution Engine Services via Serial Console
Restarting Solution Engine Services via Serial Console
Getting Command Help via Serial Console
Obtaining Support Logs via the Serial Console
Backing Up ACS Data via the Serial Console
Restoring ACS Data via the Serial Console
Compacting the ACS Solution Engine Database
Reconfiguring Solution Engine System Parameters
Resetting the Solution Engine Administrator Password
Resetting the Solution Engine Administrator Name
Reconfiguring the Solution Engine IP Address
Setting the System Time and Date Manually
Setting the System Time and Date with NTP
Setting the Solution Engine System Domain
Setting the Solution Engine System Hostname
Transferring an Upgrade Package to the Solution Engine via Serial Console
Applying a Solution Engine System Upgrade
Understanding the CSAgent Patch
Recovering from Loss of Administrator Credentials
Re-Imaging the Solution Engine Hard Drive
Migrating to Cisco Secure ACS Solution Engine
Administering Cisco Secure ACS Solution Engine
This section describes the major Cisco Secure ACS Solution Engine Version 3.3 system administration tasks that you can perform via the serial console connection command line interface (CLI). For all other Cisco Secure ACS Solution Engine configuration and administration tasks, that is, those performed from the ACS HTML interface, see the User Guide for Cisco Secure ACS Solution Engine Version 3.3.
Serial console service starts automatically when the Cisco Secure ACS Solution Engine boots and prompts the user to log in. Successful login launches a command line application (shell) that operates the CLI.
This section contains the following topics:
•
Basic Command Line Administration Tasks
•
•
•
Basic Command Line Administration Tasks
This section details basic administrative tasks performed using a serial console connected the Cisco Secure ACS Solution Engine. This section contains the following procedures:
•
•
•
•
•
•
•
•
•
Logging In to the Solution Engine via Serial Console
To log in to the Cisco Secure ACS Solution Engine via a serial console, follow these steps:
Step 1
Step 2
Step 3
Result: The system prompt appears in the following form:
Cisco Secure ACS Solution Engine name
Note
Shutting Down the Solution Engine via Serial Console
Caution
To use the serial console to shut down the Cisco Secure ACS Solution Engine, follow these steps:
Step 1
Step 2
Step 3
Result: The Cisco Secure ACS Solution Engine displays the following message:
It is now safe to turn off the computerStep 4
The Cisco Secure ACS Solution Engine powers OFF.
Logging Off the Solution Engine via Serial Console
To log off the Cisco Secure ACS Solution Engine via the serial console, follow these steps:
Step 1
Step 2
Result: The serial console connection closes, and the login: prompt reappears.
Rebooting the Solution Engine via Serial Console
To reboot the Cisco Secure ACS Solution Engine via the serial console, follow these steps:
Step 1
Step 2
Result: The Cisco Secure ACS Solution Engine displays the following message:
Are you sure you want to reboot? (Y/N)Step 3
Result: The Cisco Secure ACS Solution Engine reboots. When the reboot is finished, the login: prompt reappears.
Determining the Status of Solution Engine System and Services via Serial Console
You can use the serial console connection to obtain system and service status information.
Note
To determine the status of the Cisco Secure ACS Solution Engine and the Cisco Secure ACS Services, follow these steps:
Step 1
Step 2
Result: The system displays the following status information:
Cisco Secure ACS Solution Engine NameCisco Secure ACS Solution Engine Version
Appliance Management Software VersionAppliance Base Image VersionCSA build XXXX: (Patch: x_x_x_xxx)Session Timeout (in minutes)Last Reboot TimeCurrent Date & TimeTime ZoneNTP Server(s)CPU Load (percentage)Free Disk (amount of hard drive space available)Free Physical MemoryAppliance IP ConfigurationDHCP Enabled (Yes/No)IP AddressSubnet MaskDefault GatewayDNS ServersACS Services (running/stopped)CSAdminCSAgentCSAuthCSDbSyncCSLogCSMonCSRadiusCSTacacs
Tracing Routes
If you are unfamiliar with the trace route command or want information on the command's optional arguments, see the Command Reference entry tracert, page C-16.
To trace the network route taken by the Cisco Secure ACS Solution Engine to a given destination, follow these steps:
Step 1
Step 2
Result: The system displays the route tracing information followed by the message:
Trace complete
Stopping Solution Engine Services via Serial Console
Note
You can stop any of the Cisco Secure ACS Solution Engine services from the serial console. The Cisco Secure ACS Solution Engine services include the following:
•
•
•
•
•
•
•
•
Tip
Note
To stop a service on the Cisco Secure ACS Solution Engine, follow these steps:
Step 1
Step 2
Tip
Step 3
Result: The system immediately shows the message:
[service name] is stopping. . .Followed by the message:
[service name] is not running
Starting Solution Engine Services via Serial Console
Note
You can start any of the ACS services from the serial console. The Cisco Secure ACS Solution Engine services include the following:
•
•
•
•
•
•
•
•
Tip
To start an ACS service, follow these steps:
Step 1
Step 2
Tip
Step 3
Result: The system immediately shows the message:
[service name] is starting. . .Followed by the message
[service name] is running
Restarting Solution Engine Services via Serial Console
Note
You can restart any Cisco Secure ACS Solution Engine service from the serial console. Cisco Secure ACS Solution Engine services include the following:
•
•
•
•
•
•
•
•
Tip
To restart an ACS service, follow these steps:
Step 1
Step 2
Tip
Step 3
Result: The system immediately shows the message:
service name is stopping. . .Followed by the messages
service name is not runningservice name is startingservice name is running
Getting Command Help via Serial Console
To obtain a list and description of commands on the Cisco Secure ACS Solution Engine via the serial console, follow these steps:
Step 1
Step 2
Tip
Result: The Cisco Secure ACS Solution Engine displays the following list of commands and their descriptions:
For more information on Cisco Secure ACS Solution Engine commands, see Appendix C, "Command Reference."
Working with System Data
This section details basic data manipulation tasks performed from a serial console connected to the Cisco Secure ACS Solution Engine. This section contains the following procedures:
•
•
•
•
Obtaining Support Logs via the Serial Console
This section details the procedure for running the support tool. The support tool first collects logs, system Registry information, and other ancillary data, and then compresses the collected information into a single file with the extension .cab. This file can then be sent to support personnel for analysis.
Caution
Note
This procedure uses the support command. For more information on this command, see support, page C-16, of Appendix C, "Command Reference." The arguments for the support command include the following:.
To generate a .cab file of log and system Registry information, follow these steps:
Step 1
Step 2
Step 3
Step 4
Step 5
Step 6
Step 7
Step 8
Caution
Step 9
Result: The Cisco Secure ACS Solution Engine displays a series of messages detailing the writing and dumping of the files and the stopping and starting of services. At file transfer conclusion the system displays the following messages:
Transferring `Package.cab' completedPress any key to finish.This indicates the Cisco Secure ACS Solution Engine has packaged and transferred the .cab file as specified and restarts services.
Step 10
Result: The system returns to the system prompt.
Exporting Logs
This section details the procedure for exporting Cisco Secure ACS Solution Engine log files to an FTP server for further examination and processing. Using the exportlogs command, you can either enter the name of the log or logs to exported or select log names from a list.
Before you begin
You must have the FTP server address and filepath, as well as the proper credentials for writing to the FTP server (username and password).
Caution
To export log files to an FTP server, follow these steps:
Step 1
Step 2
Tip
Caution
Step 3
Step 4
Step 5
Step 6
Step 7
Result: The Cisco Secure ACS Solution Engine exports the specified files to the specified location.
Exporting a List of Groups
This section details the procedure for exporting a list of Cisco Secure ACS Solution Engine user groups to an FTP server for further examination and processing.
Before you begin
You must have the FTP server address and filepath, as well as the proper credentials for writing to the FTP server (username and password).
Caution
To export a user group list to an FTP server, follow these steps:
Step 1
Step 2
Tip
Step 3
Result: The system displays the following message:
Command with restart CSAuth. Are you sure you want to continue?
Caution
Step 4
Step 5
Step 6
Step 7
Step 8
Result: The Cisco Secure ACS Solution Engine exports the group list file to the specified location. When done the system displays following message:
Transferring `groups.txt' completedThe system prompt returns.
Exporting a List of Users
This section details the procedure for exporting a list of Cisco Secure ACS Solution Engine users to an FTP server for further examination and processing.
Before you begin
You must have the FTP server address and filepath, as well as the proper credentials for writing to the FTP server (username and password).
Caution
To export a list of users to an FTP server, follow these steps:
Step 1
Step 2
Tip
Step 3
Result: The system displays the following message:
Command with restart CSAuth. Are you sure you want to continue?
Caution
Step 4
Step 5
Step 6
Step 7
Step 8
Result: The Cisco Secure ACS Solution Engine exports the list of users file to the specified location. When done the system displays following message:
Transferring `users.txt' completedThe system prompt returns.
Backing Up ACS Data via the Serial Console
This section details how to use the serial console to backup Cisco Secure ACS Solution Engine data to an FTP server.
Note
During backup, AAA services are interrupted and Cisco Secure ACS Solution Engine data is packaged and sent in a file to an FTP server. You may choose to encrypt this file package. For information on how to restore the backup data to the system, see Restoring ACS Data via the Serial Console.
Before you begin
You must have the FTP server address and filepath, as well as the proper credentials for writing to the FTP server (username and password).
Caution
To export Cisco Secure ACS Solution Engine data to an FTP server, follow these steps:
Step 1
Step 2
Tip
Step 3
Step 4
Step 5
Step 6
Step 7
Step 8
Step 9
Caution
Step 10
Result: The Cisco Secure ACS Solution Engine displays the following messages:
Backing up now . . .All running services will be stopped and restarted automatically.Are you sure you want to proceed? (y/Y = proceed)Step 11
Result: The Cisco Secure ACS Solution Engine exports the backup file to the specified location and displays messages regarding the progress of the backup. Before returning to the system prompt, the following message signifies the completion of the backup process:
Transferring xxx completed.
Restoring ACS Data via the Serial Console
This section details how use the serial console to restore Cisco Secure ACS Solution Engine data from an FTP server after having performed a backup. For more information on backing up Cisco Secure ACS Solution Engine data, see Backing Up ACS Data via the Serial Console.
Note
Before you begin
You must have the FTP server address and filepath, as well as the proper credentials for writing to the FTP server (username and password). You also need the name of the backup file and, if the backup was encrypted, the decryption password.
Caution
Caution
To restore Cisco Secure ACS Solution Engine data from an FTP server, follow these steps:
Step 1
Step 2
Tip
Step 3
Step 4
Step 5
Step 6
Step 7
Step 8
Step 9
Step 10
Step 11
Step 12
Note
Reloading a system backup will overwrite ALL current configuration information. All services will be stopped and started automaticallyStep 13
Result: The Cisco Secure ACS Solution Engine receives the backup file from the specified location and displays messages regarding the restoration. You may see warnings about components not included in the backup file. For example, if Cisco Secure ACS Solution Engine has no shared profile components configured, you see a message about DCS (device command sets) not on the backup. This is normal.
When completed the system displays the message:
Done
Compacting the ACS Solution Engine Database
This section details the procedure you perform to compact the Cisco Secure ACS Solution Engine user database. Like many relational databases, the Cisco Secure ACS Solution Engine user database handles the deletion of records by marking deleted records as deleted but not removing the record from the database. Over time, your Cisco Secure ACS Solution Engine user database may be substantially larger than is required by the number of users it contains. To reduce the CiscoSecure user database size, you can compact it periodically.
Database compaction includes three basic operations that take place automatically when you issue the dbcompact command:
•
•
•
Performing this procedure can reduce the amount of space that the database takes up and improve the database response time.
Caution
Note
To compact the Cisco Secure ACS Solution Engine use database, follow these steps:
Step 1
Step 2
Result: The system displays the following message:
Command will restart CSAuth. Are you sure you want to continue? (Y/N):
Caution
Step 3
Result: The system displays a series of messages similar to the following:
Stopping service: CSAuthDoneInitializing database . . .Loading database from dump.txt . . .DoneStarting service: CSAuthFinally, the system returns to displaying the system prompt.
Reconfiguring Solution Engine System Parameters
This section details basic reconfiguration tasks performed from a serial console connected the Cisco Secure ACS Solution Engine. This section contains the following procedures:
•
•
•
•
•
•
•
Resetting the Solution Engine Administrator Password
There is always a single set of Cisco Secure ACS Solution Engine administrator credentials consisting of administrator name and password. Unlike other ACS administrative accounts, this unique administrative account is granted all privileges, cannot be deleted, and is not listed in the Administrators table of the Administrative Control page in the Cisco Secure ACS HTML user interface.
You can reset the Cisco Secure ACS Solution Engine administrator name, the administrator password, or both. This procedure details how to reset the password after having logged on with the existing credentials. To reset the administrator name see Resetting the Solution Engine Administrator Name.
If you do not have the existing Cisco Secure ACS Solution Engine administrator login credentials to log in with, you must have the recovery CD ROM to reset these credentials. For information on resetting the administrator login and password without first logging in, see Recovering from Loss of Administrator Credentials.
To reset the Cisco Secure ACS Solution Engine administrator login credentials, follow these steps:
Step 1
Step 2
Result: The Cisco Secure ACS Solution Engine displays the following prompt:
Enter old password:Step 3
Result: The Cisco Secure ACS Solution Engine displays the following prompt:
Enter new account name:Step 4
Result: The Cisco Secure ACS Solution Engine displays the following prompt:
Enter new passwordStep 5
Note
Result: The Cisco Secure ACS Solution Engine displays the following prompt:
Reenter new passwordStep 6
Result: The Cisco Secure ACS Solution Engine displays the following prompt:
Password is set successfully.
Administrator account name is set to _____
Resetting the Solution Engine Administrator Name
There is always a single set of Cisco Secure ACS Solution Engine administrator credentials consisting of administrator name and password. Unlike other ACS administrative accounts, this unique administrative account is granted all privileges, cannot be deleted, and is not listed in the Administrators table of the Administrative Control page in the Cisco Secure ACS HTML user interface.
You can reset the Cisco Secure ACS Solution Engine administrator name, the administrator password, or both. This procedure details how to reset the administrator name after having logged on with the existing credentials. To reset the password, see Resetting the Solution Engine Administrator Password.
If you do not have the existing Cisco Secure ACS Solution Engine administrator login credentials with which to log in, you must have the recovery CD ROM to reset these credentials. For information on resetting the administrator login and password without first logging on, see Recovering from Loss of Administrator Credentials.
To reset the Cisco Secure ACS Solution Engine administrator name, follow these steps:
Step 1
Step 2
Result: The Cisco Secure ACS Solution Engine displays the Set administrator's name prompt.
Step 3
Step 4
Result: The system displays the following message on the console:
Administrator name is set successfully.
Reconfiguring the Solution Engine IP Address
Typically, you configure the IP address only once, during initial configuration. See Configuring the Cisco Secure ACS Solution Engine, page 3-16.
Caution
Caution
Note
To reconfigure the IP address, follow these steps:
Step 1
Step 2
Step 3
Step 4
If you responded Yes in the previous step to use a static IP address, do the following:
a.
b.
c.
d.
Result: The system displays the new configuration information and the following message:
IP Address is reconfigured.Step 5
Result: The Cisco Secure ACS Solution Engine restarts. The system displays the following message:
New ip address is set.Step 6
Tip
Step 7
Result: If successful, the system displays the ping statistics. Once again the system displays the prompt: Test network connectivity [Yes]:.
Step 8
Tip
Result: The Cisco Secure ACS Solution Engine restarts services, after which, it displays the system prompt.
Setting the System Time and Date Manually
You can set and maintain the system date and time using either of two methods:
•
•
To set the Cisco Secure ACS Solution Engine system time and date using an NTP, see Setting the System Time and Date with NTP.
To set the Cisco Secure ACS Solution Engine system time and date manually, follow these steps:
Step 1
Step 2
Result: The system displays the following message on the console:
Current Date Time Setting:Time Zone: (GMT -xx:xx) XXX TimeDate and Time: mm/dd/yyyy hh/mm/ssNTP Servers: ("Ntp Synchronization Disabled" - or -a list of NTP servers)Change Date & Time Setting? [N]Step 3
Result: The system displays a list of indexed time zones and the following message:
[xx] (GMT -xx:xx) XXX Time.Enter desired time zone index (0 for more choices) [x]:Step 4
Tip
Result: The system displays the new time zone.
Step 5
Step 6
Step 7
Result: The system time is reset.
Setting the System Time and Date with NTP
You can set and maintain the system date and time using either of two methods:
•
•
To set the Cisco Secure ACS Solution Engine system time and date manually, see Setting the System Time and Date Manually.
To set the Cisco Secure ACS Solution Engine system time and date with NTP, follow these steps:
Step 1
Step 2
Result: The system displays the following message on the console:
Current Date Time Setting:Time Zone: (GMT -xx:xx) XXX Time Date and Time: mm/dd/yyyy hh/mm/ss NTP Servers: ("Ntp Synchronization Disabled" - or - List of NTP servers)Change Date & Time Setting? [N]Step 3
Result: The system lists indexed time zones and the following message:
[xx] (GMT -xx:xx) XXX Time.Enter desired time zone index (0 for more choices) [x]:Step 4
Tip
Result: The system displays the time zone setting.
Step 5
Step 6
Tip
Result: The system displays the following message on the console:
Successfully synchronized with NTP serverCurrent Date/Time Setting:Time Zone: XXXDate & Time:NTP servers:
Setting the System Timeout
You can set a system timeout. This is the number of minutes with no activity on the serial console that can pass before the console login times out. To set the Cisco Secure ACS Solution Engine system timeout, follow these steps:
Step 1
Step 2
Step 3
Result: The system sets the new timeout period.
Setting the Solution Engine System Domain
You can set the system DNS domain from the serial console. To set the Cisco Secure ACS Solution Engine system domain, follow these steps:
Step 1
Step 2
Step 3
Result: The system displays the following confirmation message:
You should reboot appliance for the change to take effect.
Setting the Solution Engine System Hostname
Caution
You can set the system hostname. To set the Cisco Secure ACS Solution Engine system hostname, follow these steps:
Step 1
Step 2
Tip
Step 3
Result: The system restarts all services and the hostname is reset. The system then displays the following confirmation message:
You should reboot appliance for the change to take effect.(The hostname is then reset after system reboot.)
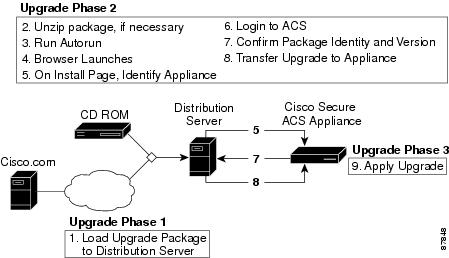
Upgrading the Solution Engine
This section describes how to load and install a Cisco Secure ACS Solution Engine upgrade image from the command line interface of the serial console.
Upgrading the Cisco Secure ACS Solution Engine typically involves the following three steps:
1.
2.
3.
This process is shown in Figure 4-1.
Figure 4-1 Solution Engine Upgrade Process
Transferring an Upgrade Package to the Solution Engine via Serial Console
Use this procedure to transfer an upgrade package from a distribution server to a Cisco Secure ACS Solution Engine.
Before you begin
You must have acquired the upgrade package and selected a distribution server. For more information, see Upgrading the Solution Engine.
Note
To transfer an upgrade to your Cisco Secure ACS Solution Engine, follow these steps:
Step 1
a.
Tip
b.
•
•
locate the autorun.bat file on the CD or in the directory that you extracted the compressed upgrade package in and run it.
Result: The HTTP server starts.
Step 2
a.
b.
c.
Result: The HTTP server starts. Messages from autorun.sh appear in a console window. Two web browser windows appear. The browser window titled Appliance Upgrade contains the Enter solution engine hostname or IP address box. The browser window titled New Desktop contains buttons labeled Install Next and Stop Distribution Server. You can use the New Desktop window to start transfers to other solution engines.
Step 3
Step 4
Step 5
Result: The system displays a number of messages including, finally, the following confirmation message:
Successfully downloaded the package. Run upgrade command to install the package.
Applying a Solution Engine System Upgrade
You use this procedure to install upgrades on the Cisco Secure ACS Solution Engine. Upgrades may include the installation of a full software revision or simply the installation of a software patch.
Before you begin
You must have an upgrade to install. For information on checking the availability of and obtaining an upgrade, see the User Guide for Cisco Secure ACS Solution Engine Version 3.3. For information on how to load the upgrade package onto the Cisco Secure ACS Solution Engine see, Transferring an Upgrade Package to the Solution Engine via Serial Console.
Also, if CSAgent is running, you must disable it before you issue the upgrade command. For information on stopping services see Stopping Solution Engine Services via Serial Console.
Finally, because the Cisco Secure ACS Solution Engine is non-operational during the upgrade process, you may want to schedule the upgrade for a time when its absence online will have the least impact.
To apply a Cisco Secure ACS Solution Engine system upgrade, follow these steps:
Step 1
Caution
Note
Step 2
Step 3
Result: The system displays the following confirmation message:
Installing the patch could adversely affect the system. Do you still want to
continue?---y(yes), n(no)
Step 4
Result: The system displays a series of messages that include:
---Extracting------Verifying . . .---
Tip
Step 5
Upgrade package was not verifiedApplying this upgrade package may corrupt the applianceContinue at your own risk!Continue ---y(yes), n(no)If you do see this prompt, type y to continue.
Result: The system displays a series of messages that may include:
Installing Cisco Secure ACS Version: x.x.xUpgrading . . .ACS Installation was successfulSuccessfully upgraded Cisco Secure ACS Version x.x.xCompleted upgrade and system will be rebooted.
Note
Reboot will occur in a few minutes.
Login:
Continue to wait until you see the final message:
Status: Appliance is functioning normally.
This message indicates that the upgrade is complete.
Tip
Patch Rollback
Removing Installed Patches
Use this procedure to uninstall one or more patches and to roll back the Cisco Secure ACS Solution Engine to the version that existed before the patch installation.
To roll back a Cisco Secure ACS Solution Engine system patch, follow these steps:
Step 1
Step 2
Tip
Result: The system displays the following confirmation message:
Are you sure you want to rollback [patch name]?)(Y/N):Step 3
Result: The system displays a series of messages that include:
Rolling patch backRollback process initiated successfullySuccessfully rolled back `[patch name]' to 0.
Tip
Understanding the CSAgent Patch
In Cisco Secure ACS Solution Engine Version 3.3 the CSAgent service is implemented as a pre-installed patch. You must stop CSAgent before you can install any patch or upgrade. Although, as a patch, the CSAgent can be rolled back, the preferred method for disabling this service is simply to stop it. Once stopped, the CSAgent service does not restart when the system is restarted; you must explicitly restart the service for it to operate. For more information, see User Guide for Cisco Secure ACS Solution Engine Version 3.3.
Recovery Management
Cisco Secure ACS Solution Engine functionality includes two procedures that the administrator can perform using the Cisco Secure ACS Solution Engine Recovery CD ROM. These procedures, detailed in this section, include the following:
•
•
Recovering from Loss of Administrator Credentials
If you cannot log in to the system because you have lost the account name or password for the Cisco Secure ACS Solution Engine administrator account, perform this procedure. In this procedure you use the Cisco Secure ACS Solution Engine Recovery CD ROM to access the system via the serial console and reset the administrator login credentials.
You should understand the following regarding the Cisco Secure ACS Solution Engine administrator login credentials:
•
•
•
•
To reset the administrator login credentials, follow these steps:
Step 1
Step 2
Step 3
Step 4
Result: The system displays the following message on the console:
ACS Appliance Recovery Options[1] Reset administrator account[2] Restore hard disk image from CD[3] Exit and rebootEnter menu item number: [ ]Step 5
Result: The system displays the following prompt:
Hit the Return key to log in.Step 6
Result: The system displays the following prompt:
Please remove this recovery CD from the drive,then hit RETURN to restart the system:Step 7
Result: The system reboots, and then displays the system version information followed by:
Status: The appliance is functioning properlyLogin:Step 8
Note
Step 9
Result: The system displays the system prompt.
Step 10
Step 11
Note
Step 12
Result: The system displays the following message on the console:
Password is set successfully.
Re-Imaging the Solution Engine Hard Drive
Use the Cisco Secure ACS Solution Engine Recovery CD ROM to re-image the Cisco Secure ACS Solution Engine if necessary. This will destroy all data and install a new image.
To re-image your Cisco Secure ACS Solution Engine, follow these steps:
Caution
Step 1
Step 2
Step 3
Result: The Cisco Secure ACS Solution Engine displays the following message on the console:
ACS Appliance Recovery Options[1] Reset administrator account[2] Restore hard disk image from CD[3] Exit and rebootEnter menu item number: [ ]Step 4
Result: The Cisco Secure ACS Solution Engine displays the following message on the console:
This operation will completely erase the hard drive. Press `Y' to confirm, any other key
to cancel: __
Caution
Step 5
Result: The Cisco Secure ACS Solution Engine processes the new image (this may take more than 2 minutes) while displaying odd characters and then displays the following message on the console:
The system has been reimaged successfully. Please remove this recovery CD from the drive,
then hit RETURN to restart the system:
Step 6
Step 7
Result: The Cisco Secure ACS Solution Engine reboots, performs some configurations, and reboots again. The configurations that occur after the first reboot take a significant amount of time, during which there is no feedback; this is normal system behavior.
Note
Migrating to Cisco Secure ACS Solution Engine
Migrating from Cisco Secure ACS for Windows Server to Cisco Secure ACS Solution Engine uses the backup and restore features of Cisco Secure ACS. Backup files produced by Cisco Secure ACS for Windows Server are compatible with Cisco Secure ACS Solution Engine, provided that both are using the same version of Cisco Secure ACS software.
Depending upon what version of Cisco Secure ACS for Windows Server is used and the operating system that it runs on, the migration process varies. For example, if Cisco Secure ACS runs on Windows NT 4.0, the procedure below will advise you when it is necessary to upgrade to Windows 2000 Server. Because the use of the backup and restore features is only supported between Cisco Secure ACSes of the same version, you must use Cisco Secure ACS for Windows Server, version 3.3, to transfer data from Cisco Secure ACS for Windows Server to Cisco Secure ACS Solution Engine. Cisco Secure ACS for Windows Server, version 3.3, supports Windows 2000 Server and Windows Server 2003, not Windows NT 4.0. See the following procedure for more details.
Before You Begin
Before upgrading or transferring data, back up your original Cisco Secure ACS and save the backup file in a location on a drive that is not local to the computer running Cisco Secure ACS.
To migrate from a Windows version of Cisco Secure ACS to Cisco Secure ACS Solution Engine, follow these steps:
Step 1
Step 2
If you run Cisco Secure ACS on Windows NT 4.0, upgrade to Cisco Secure ACS version 3.0, and then migrate to Windows 2000 Server before upgrading to Cisco Secure ACS version 3.3. Cisco Secure ACS version 3.3 does not support Windows NT 4.0 and Cisco Secure ACS version 3.0 is the most recent version of Cisco Secure ACS that supports Windows NT 4.0. For information about upgrading to Cisco Secure ACS version 3.0 or about migrating to Windows 2000 Server, see Installing Cisco Secure ACS 3.0 for Windows 2000/NT Servers. You can acquire the trial version of Cisco Secure ACS version 3.0 at http://www.cisco.com/pcgi-bin/tablebuild.pl/acs-win-3des.
Note
http://www.cisco.com/univercd/cc/td/doc/product/access/acs_soft/
csacs4nt/index.htmStep 3
Step 4
Step 5
The Cisco Secure ACS Solution Engine contains the original configuration of the Windows version Cisco Secure ACS that you migrated from.
Step 6
Step 7
Note
To change the IP address of the Cisco Secure ACS Solution Engine, follow these steps:
a.
b.
c.