Table Of Contents
Using the Multicast Routing Monitor
Finding Feature Information
Contents
Restrictions for Using the Multicast Routing Monitor
Information About the Multicast Routing Monitor
Multicast Routing Monitor Operation
Benefits of Multicast Routing Monitor
How to Use the Multicast Routing Monitor
Configuring a Test Receiver
Configuring a Test Sender
Monitoring Multiple Groups
Configuring a Manager
Conducting an MRM Test and Viewing Results
Configuration Examples for MRM
Configuring MRM: Example
Additional References
Related Documents
Standards
MIBs
RFCs
Technical Assistance
Feature Information for Using the Multicast Routing Monitor
Using the Multicast Routing Monitor
First Published: May 2, 2005
Last Updated: May 4, 2009
The Multicast Routing Monitor (MRM) is a management diagnostic tool that provides network fault detection and isolation in a large multicast routing infrastructure. It is designed to notify a network administrator of multicast routing problems in a test environment.
Finding Feature Information
Your software release may not support all the features documented in this module. For the latest feature information and caveats, see the release notes for your platform and software release. To find information about the features documented in this module, and to see a list of the releases in which each feature is supported, see the "Feature Information for Using the Multicast Routing Monitor" section.
Use Cisco Feature Navigator to find information about platform support and Cisco IOS and Catalyst OS software image support. To access Cisco Feature Navigator, go to http://www.cisco.com/go/cfn. An account on Cisco.com is not required.
Contents
• Restrictions for Using the Multicast Routing Monitor
•Information About the Multicast Routing Monitor
•How to Use the Multicast Routing Monitor
•Configuration Examples for MRM
•Additional References
•Feature Information for Using the Multicast Routing Monitor
Restrictions for Using the Multicast Routing Monitor
You must make sure the underlying multicast forwarding network being tested has no access lists or boundaries that deny the MRM data and control traffic. Specifically, consider the following factors:
•MRM test data are User Datagram Protocol (UDP) and Real-Time Transport Protocol (RTP) packets addressed to the configured multicast group address.
•MRM control traffic between the Test Sender, Test Receiver, and Manager is addressed to the 224.0.1.111 multicast group, which all three components join. The 224.0.1.111 group is an IANA-registered group.
•Take into account the unicast IP addresses of sources and receivers when considering what could prevent control traffic flowing.
Information About the Multicast Routing Monitor
Before using MRM, you should understand the following concepts:
•Multicast Routing Monitor Operation
•Benefits of Multicast Routing Monitor
Multicast Routing Monitor Operation
MRM has three components that play different roles: the Manager, the Test Sender, and the Test Receiver. To test a multicast environment using test packets, perhaps before an upcoming multicast event, you need all three components.
You create a test based on various test parameters, name the test, and start the test. The test runs in the background and the command prompt returns.
If the Test Receiver detects an error (such as packet loss or duplicate packets), it sends an error report to the router configured as the Manager. The Manager immediately displays the error report. (The show ip mrm status-report command also displays error reports, if any.) You then troubleshoot your multicast environment as normal, perhaps using the mtrace command from the source to the Test Receiver. If the show ip mrm status-report command displays no error reports, the Test Receiver is receiving test packets without loss or duplicates from the Test Sender.
The Cisco implementation of MRM supports Internet Draft of Multicast Routing Monitor (MRM), Internet Engineering Task Force (IETF), March 1999. The IETF originally conceived MRM to use both test packets and real data. The Cisco implementation does not use real data due to technical issues and the fact that the IETF draft did not progress.
Benefits of Multicast Routing Monitor
The benefits of the MRM are as follows:
•MRM allows network personnel to generate test flows without having to use host devices.
•MRM can verify a multicast environment prior to an event. You need not wait for real multicast traffic to fail in order to find out that a problem exists. You can test the multicast routing environment before a planned event.
•MRM provides easy diagnostics. The error information is easy for the user to understand.
•MRM is scalable. This diagnostic tool works well for many users.
How to Use the Multicast Routing Monitor
This section contains the following procedures:
•Configuring a Test Receiver (required)
•Configuring a Test Sender (required)
•Monitoring Multiple Groups (optional)
•Configuring a Manager (required)
•Conducting an MRM Test and Viewing Results (required)
Configuring a Test Receiver
Perform this task to configure a Test Receiver on a router or host.
SUMMARY STEPS
1. enable
2. configure terminal
3. interface type number
4. ip mrm test-receiver
5. ip mrm accept-manager access-list
DETAILED STEPS
| |
Command or Action
|
Purpose
|
Step 1
|
enable
Example:
Router> enable
|
Enables privileged EXEC mode.
•Enter your password if prompted.
|
Step 2
|
configure terminal
Example:
Router# configure terminal
|
Enters global configuration mode.
|
Step 3
|
interface type number
Example:
Router(config)# interface ethernet 0
|
Specifies an interface, and enters interface configuration mode.
|
Step 4
|
ip mrm test-receiver
Example:
Router(config-if)# ip mrm test-receiver
|
Configures the interface to operate as a Test Receiver.
|
Step 5
|
ip mrm accept-manager access-list
Example:
Router(config-if)# ip mrm accept-manager
supervisor
|
(Optional) Specifies that the Test Receiver can accept status report requests only from Managers specified by the access list.
•The access list is required and can be named or numbered.
•This example uses an access list named "supervisor." The access list is presumed to be already configured.
|
Configuring a Test Sender
Perform this task to configure a Test Sender on a different router or host from where you configured the Test Receiver.
SUMMARY STEPS
1. enable
2. configure terminal
3. interface type number
4. ip mrm test-sender
5. ip mrm accept-manager [access-list]
DETAILED STEPS
| |
Command or Action
|
Purpose
|
Step 1
|
enable
Example:
Router> enable
|
Enables privileged EXEC mode.
•Enter your password if prompted.
|
Step 2
|
configure terminal
Example:
Router# configure terminal
|
Enters global configuration mode.
|
Step 3
|
interface type number
Example:
Router(config)# interface ethernet 0
|
Specifies an interface, and enters interface configuration mode.
|
Step 4
|
ip mrm test-sender
Example:
Router(config-if)# ip mrm test-sender
|
Configures the interface to operate as a Test Sender.
|
Step 5
|
ip mrm accept-manager [access-list]
Example:
Router(config-if)# ip mrm accept-manager
supervisor
|
(Optional) Specifies that the Test Sender can accept status report requests only from Managers specified by the access list.
•This example uses an access list named "supervisor." The access list is presumed to be already configured.
|
Monitoring Multiple Groups
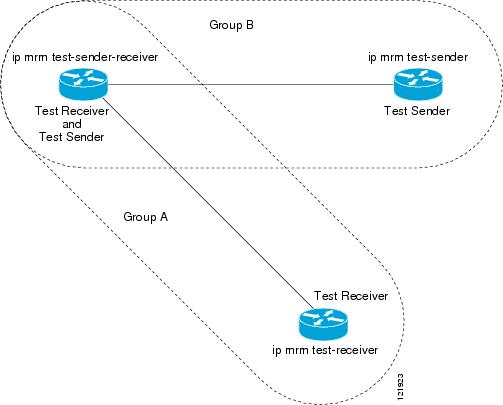
If you have more than one multicast group to monitor, you can configure an interface that is a Test Sender for one group and a Test Receiver for another group.
Figure 1 illustrates an environment where the router on the left is the Test Sender for Group A and the Test Receiver for Group B.
Figure 1 Test Sender and Test Receiver for Different Groups on One Router
SUMMARY STEPS
1. enable
2. configure terminal
3. interface type number
4. ip mrm test-sender-receiver
5. ip mrm accept-manager access-list [test-sender | test-receiver]
DETAILED STEPS
| |
Command or Action
|
Purpose
|
Step 1
|
enable
Example:
Router> enable
|
Enables privileged EXEC mode.
•Enter your password if prompted.
|
Step 2
|
configure terminal
Example:
Router# configure terminal
|
Enters global configuration mode.
|
Step 3
|
interface type number
Example:
Router(config)# interface ethernet 0
|
Specifies an interface, and enters interface configuration mode.
|
Step 4
|
ip mrm test-sender-receiver
Example:
Router(config-if)# ip mrm test-sender-receiver
|
Configures the interface to operate as a Test Sender for one group and Test Receiver for another group.
|
Step 5
|
ip mrm accept-manager access-list [test-sender
| test-receiver]
Example:
Router(config-if)# ip mrm accept-manager
supervisor test-sender
|
(Optional) Specifies that the Test Sender or Test Receiver can accept status report requests only from Managers specified by the access list.
•By default, the command applies to both the Test Sender and Test Receiver. Because this device is both, you might need to specify that the restriction applies to only the Test Sender or only the Test Receiver using the test-sender keyword or test-receiver keyword, respectively.
|
Configuring a Manager
Perform this task to configure a router as a Manager in order for MRM to function.
Note A host cannot be a Manager.
SUMMARY STEPS
1. enable
2. configure terminal
3. ip mrm manager test-name
4. manager type number group ip-address
5. beacon [interval seconds] [holdtime seconds] [ttl ttl-value]
6. udp-port [test-packet port-number] [status-report port-number]
7. senders access-list [packet-delay milliseconds] [rtp | udp] [target-only | all-multicasts | all-test-senders]
8. receivers access-list sender-list access-list [packet-delay]
9. receivers access-list [window seconds] [report-delay seconds] [loss percentage] [no-join] [monitor | poll]
DETAILED STEPS
| |
Command or Action
|
Purpose
|
Step 1
|
enable
Example:
Router> enable
|
Enables privileged EXEC mode.
•Enter your password if prompted.
|
Step 2
|
configure terminal
Example:
Router# configure terminal
|
Enters global configuration mode.
|
Step 3
|
ip mrm manager test-name
Example:
Router(config)# ip mrm manager test1
|
Specifies the name of an MRM test to be created or modified, and enters MRM manager configuration mode.
•The test name is used to start, stop, and monitor a test.
•From MRM manager configuration mode, you specify the parameters of the test.
|
Step 4
|
manager type number group ip-address
Example:
Router(config-mrm-manager)# manager ethernet 0
group 239.1.1.1
|
Specifies which interface on the router is the Manager, and specifies the multicast group address the Test Receiver will listen to.
|
Step 5
|
beacon [interval seconds] [holdtime seconds]
[ttl ttl-value]
Example:
Router(config-mrm-manager)# beacon interval 60
|
(Optional) Changes the frequency, duration, or scope of beacon messages that the Manager sends to the Test Sender and Test Receiver.
•By default, beacon messages are sent at an interval of 60 seconds.
•By default, the duration of a test period is 86400 seconds (1 day).
•By default, the TTL is 32 hops.
|
Step 6
|
udp-port [test-packet port-number]
[status-report port-number]
Example:
Router(config-mrm-manager)# udp-port
test-packet 20202
|
(Optional) Changes the UDP port numbers to which the Test Sender sends test packets or the Test Receiver sends status reports.
•Use the optional test-packet keyword and port-number argument to change the UDP port to which the Test Sender sends test packets. The port number must be even if the packets are Real-Time Transport Protocol (RTP)-encapsulated. The range is from 16384 to 65535.
•By default, the Test Sender uses UDP port number 16834 to send test packets.
•Use the optional status-report keyword and port-number argument to change the UDP port to which the Test Receiver sends status reports. The port number must be odd if the packets are RTP Control Protocol (RTCP)-encapsulated. The range is from 16834 to 65535.
•By default, the Test Receiver uses UDP port number 65535 to send status reports.
|
Step 7
|
senders access-list [packet-delay milliseconds]
[rtp | udp] [target-only | all-multicasts |
all-test-senders]
Example:
Router(config-mrm-manager)# senders 1
packet-delay 30 udp all-test-senders
|
Establishes Test Senders for MRM tests.
•Use the optional packet-delay keyword and milliseconds argument to specify the delay between test packets (in milliseconds). The range is from 50 to 10000. The default is 200 milliseconds, which results in 5 packets per second.
•Use the optional rtp keyword or udp keyword to specify the encapsulation of test packets, either Real-Time Transport Protocol (RTP) encapsulated or User Datagram Protocol (UDP) encapsulated. By default, test packets are RTP-encapsulated.
•Use the optional target-only keyword to specify that test packets are sent out on the targeted interface only (that is, the interface with the IP address that is specified in the Test Sender request target field). By default, test packets are sent out on all interfaces that are enabled with IP multicast.
•Use the optional all-multicasts keyword to specify that the test packets are sent out on all interfaces that are enabled with IP multicast. This is the default method for sending test packets.
•Use the optional all-test-senders keyword to specify that test packets are sent out on all interfaces that have test-sender mode enabled. By default, test packets are sent out on all interfaces that are enabled with IP multicast.
|
Step 8
|
receivers access-list sender-list access-list
[packet-delay]
Example:
Router(config-mrm-manager)# receivers 1
sender-list 3
|
Establishes Test Receivers for MRM.
Note Although the Cisco IOS CLI parser accepts the command entered without the sender-list access-list keyword-argument pair, this keyword-argument pair is not optional. For an MRM test to work, you must specify the sources that the Test Receiver should monitor using the sender-list keyword and access-list argument.
•Use the sender-list keyword and access-list to specify the sources that the Test Receiver should monitor. If the named or numbered access list matches any access list specified in the senders command, the associated packet-delay milliseconds keyword and argument of that senders command are used in the MRM test. Otherwise, the receivers command requires that a delay be specified for the packet-delay argument.
•Use the optional packet-delay argument to specify the delay between test packets (in milliseconds). The range is from 50 to 10000. If the sender-list access list matches any access list specified in a senders command, the associated packet-delay milliseconds keyword and argument of that senders command are used in this command. Otherwise, the receivers command requires that a delay be specified for the packet-delay argument.
|
Step 9
|
receivers access-list [window seconds]
[report-delay seconds] [loss percentage]
[no-join] [monitor | poll]
Example:
Router(config-mrm-manager)# receivers 1 window
7 report-delay 30
|
(Optional) Modifies the parameters of Test Receivers.
•Use the optional window keyword and seconds argument to specify the duration (in seconds) of a test period. This is a sliding window of time in which the packet count is collected, so that the loss percentage can be calculated. The range is from 1 to 10. The default is 5 seconds.
•Use the optional report-delay keyword and seconds argument to specify the delay (in seconds) between status reports. The delay prevents multiple Test Receivers from sending status reports to the Manager at the same time for the same failure. This value is relevant only if there are multiple Test Receivers. The range is from 1 to 60. The default is 1 second.
•Use the optional loss keyword and percentage argument to specify the threshold percentage of packet loss required before a status report is triggered. The range is from 0 to 100. The default is 0 percent, which means that a status report is sent for any packet loss.
•Use the optional no-join keyword to specify that the Test Receiver does not join the monitored group. The default is that the Test Receiver joins the monitored group.
•Use either the optional monitor or poll keyword to specify whether the Test Receiver monitors the test group or polls for receiver statistics. The monitor keyword means the Test Receiver reports only if the test criteria are met. The poll keyword means the Test Receiver sends status reports regularly, whether test criteria are met or not. The default is the behavior set with the monitor keyword.
|
Conducting an MRM Test and Viewing Results
From the router playing the Manager role you can start and stop the MRM test. To start and subsequently stop your MRM test, perform this task.
When the test begins, the Manager sends a unicast control packet to the Test Sender and Test Receiver, and then the Manager starts sending beacons. The Test Sender and Test Receiver send acknowledgments to the Manager and begin sending or receiving test packets. If an error occurs, the Test Receiver sends an error report to the Manager, which immediately displays the report.
SUMMARY STEPS
1. enable
2. clear ip mrm status-report [ip-address]
3. show ip mrm interface [type number]
4. show ip mrm manager [test-name]
5. mrm test-name start
6. mrm test-name stop
7. show ip mrm status-report [ip-address]
DETAILED STEPS
| |
Command or Action
|
Purpose
|
Step 1
|
enable
Example:
Router> enable
|
Enables privileged EXEC mode.
•Enter your password if prompted.
|
Step 2
|
clear ip mrm status-report [ip-address]
Example:
Router# clear ip mrm status-report 172.16.0.0
|
(Optional) Clears the MRM status report cache.
|
Step 3
|
show ip mrm interface [type number]
Example:
Router# show ip mrm interface Ethernet 1
|
(Optional) Displays MRM information related to interfaces.
•Use this command before starting an MRM test to verify the interfaces are participating in MRM, in which roles, and whether the interfaces are up or down.
|
Step 4
|
show ip mrm manager [test-name]
Example:
Router# show ip mrm manager test1
|
(Optional) Displays information about MRM tests.
•Use this command before starting an MRM test to verify MRM status information and the parameters configured for an MRM test.
|
Step 5
|
mrm test-name start
Example:
Router# mrm test1 start
|
Starts the MRM test.
|
Step 6
|
mrm test-name stop
Example:
Router# mrm test1 stop
|
Stops the MRM test.
|
Step 7
|
show ip mrm status-report [ip-address]
Example:
Router# show ip mrm status-report
|
(Optional) Displays the status reports in the MRM status report cache.
|
Configuration Examples for MRM
This section provides the following configuration example:
•Configuring MRM: Example
Configuring MRM: Example
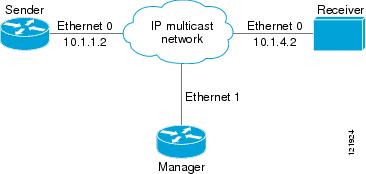
Figure 2 illustrates a Test Sender, a Test Receiver, and a Manager in an MRM environment. The partial configurations for the three devices follow the figure.
Figure 2 MRM Example Topology
Test Sender Configuration
Test Receiver Configuration
Manager Configuration
manager Ethernet 1 group 239.1.1.1
senders 1
receivers 2 sender-list 1
access-list 1 permit 10.1.1.2
access-list 2 permit 10.1.4.2
Additional References
The following sections provide references related to the using the MRM.
Related Documents
Standards
MIBs
MIB
|
MIBs Link
|
No new or modified MIBs are supported by this feature, and support for existing MIBs has not been modified by this feature.
|
To locate and download MIBs for selected platforms, Cisco IOS releases, and feature sets, use Cisco MIB Locator found at the following URL:
http://www.cisco.com/go/mibs
|
RFCs
RFC
|
Title
|
No new or modified RFCs are supported by this feature, and support for existing RFCs has not been modified by this feature.
|
—
|
Technical Assistance
Description
|
Link
|
The Cisco Support website provides extensive online resources, including documentation and tools for troubleshooting and resolving technical issues with Cisco products and technologies.
To receive security and technical information about your products, you can subscribe to various services, such as the Product Alert Tool (accessed from Field Notices), the Cisco Technical Services Newsletter, and Really Simple Syndication (RSS) Feeds.
Access to most tools on the Cisco Support website requires a Cisco.com user ID and password.
|
http://www.cisco.com/techsupport
|
Feature Information for Using the Multicast Routing Monitor
Table 1 lists the features in this module and provides links to specific configuration information. Only features that were introduced or modified in Cisco IOS Release 12.2(1) or a later release appear in the table.
For information on a feature in this technology that is not documented here, see the "IP Multicast Features Roadmap."
Not all commands may be available in your Cisco IOS software release. For release information about a specific command, see the command reference documentation.
Use Cisco Feature Navigator to find information about platform support and software image support. Cisco Feature Navigator enables you to determine which Cisco IOS and Catalyst OS software images support a specific software release, feature set, or platform. To access Cisco Feature Navigator, go to http://www.cisco.com/go/cfn. An account on Cisco.com is not required.
Note Table 1 lists only the Cisco IOS software release that introduced support for a given feature in a given Cisco IOS software release train. Unless noted otherwise, subsequent releases of that Cisco IOS software release train also support that feature.
Table 1 Feature Information for Using the Multicast Routing Monitor
Feature Name
|
Releases
|
Feature Information
|
This table is intentionally left blank because no features were introduced or modified in Cisco IOS Release 12.2(1) or later. This table will be updated when feature information is added to this module.
|
—
|
—
|
CCDE, CCSI, CCENT, Cisco Eos, Cisco HealthPresence, the Cisco logo, Cisco Lumin, Cisco Nexus, Cisco Nurse Connect, Cisco Stackpower, Cisco StadiumVision, Cisco TelePresence, Cisco WebEx, DCE, and Welcome to the Human Network are trademarks; Changing the Way We Work, Live, Play, and Learn and Cisco Store are service marks; and Access Registrar, Aironet, AsyncOS, Bringing the Meeting To You, Catalyst, CCDA, CCDP, CCIE, CCIP, CCNA, CCNP, CCSP, CCVP, Cisco, the Cisco Certified Internetwork Expert logo, Cisco IOS, Cisco Press, Cisco Systems, Cisco Systems Capital, the Cisco Systems logo, Cisco Unity, Collaboration Without Limitation, EtherFast, EtherSwitch, Event Center, Fast Step, Follow Me Browsing, FormShare, GigaDrive, HomeLink, Internet Quotient, IOS, iPhone, iQuick Study, IronPort, the IronPort logo, LightStream, Linksys, MediaTone, MeetingPlace, MeetingPlace Chime Sound, MGX, Networkers, Networking Academy, Network Registrar, PCNow, PIX, PowerPanels, ProConnect, ScriptShare, SenderBase, SMARTnet, Spectrum Expert, StackWise, The Fastest Way to Increase Your Internet Quotient, TransPath, WebEx, and the WebEx logo are registered trademarks of Cisco Systems, Inc. and/or its affiliates in the United States and certain other countries.
All other trademarks mentioned in this document or website are the property of their respective owners. The use of the word partner does not imply a partnership relationship between Cisco and any other company. (0903R)
Any Internet Protocol (IP) addresses and phone numbers used in this document are not intended to be actual addresses and phone numbers. Any examples, command display output, network topology diagrams, and other figures included in the document are shown for illustrative purposes only. Any use of actual IP addresses or phone numbers in illustrative content is unintentional and coincidental.
© 2005-2009 Cisco Systems, Inc. All rights reserved.
 Feedback