Downloads |
 Feedback Feedback
|
Table Of Contents
Prerequisites for PPPoE Client
Information About PPPoE Client
PPPoE Client Support on ATM PVCs and Ethernet Interfaces
PPPoE—Max-Payload Support on Client
PPPoE Client Session Initiation
How to Configure a PPPoE Client
Configuring a PPPoE Client in Releases Prior to Cisco IOS Release 12.2(13)T
Enabling PPPoE in a VPDN Group
Configuring a PPPoE Client on an ATM PVC
Configuring a PPPoE Client on an Ethernet Interface
Configuring the Dialer Interface
Clearing PPPoE Client Sessions
Troubleshooting PPPoE Client Sessions
Configuring a PPPoE Client in Cisco IOS Release 12.2(13)T, 12.4T, and Later Releases
Configuring a PPPoE Client on an ATM PVC
Configuring a PPPoE Client on an Ethernet Interface
Configuring a PPPoE Client on an Ethernet Subinterface
Configuring the Dialer Interface
Clearing PPPoE Client Sessions
Troubleshooting PPPoE Client Sessions
Configuration Examples for PPPoE Client
Examples: PPPoE Client in Releases Prior to Cisco IOS Release 12.2(13)T
Examples: PPPoE Client in Cisco IOS Release 12.2(13)T and Later Releases
Feature Information for PPP over Ethernet Client
PPP over Ethernet Client
First Published: May 25, 2001Last Updated: March 28, 2011The Point-to-Point Protocol (PPP) over Ethernet Client feature provides PPP over Ethernet (PPPoE) client support on routers.
PPPoE is a commonly used application in the deployment of digital subscriber lines (DSL). The PPP over Ethernet Client feature expands PPPoE functionality by providing support for PPPoE on the client as well as on the server.
Finding Feature Information
Your software release may not support all the features documented in this module. For the latest feature information and caveats, see the release notes for your platform and software release. To find information about the features documented in this module, and to see a list of the releases in which each feature is supported, see the "Feature Information for PPP over Ethernet Client" section.
Use Cisco Feature Navigator to find information about platform support and Cisco software image support. To access Cisco Feature Navigator, go to http://www.cisco.com/go/cfn. An account on Cisco.com is not required.
Contents
•
Prerequisites for PPPoE Client
•
•
•
•
•
Prerequisites for PPPoE Client
PPP connections must be established between two endpoints over a serial link or over an ATM virtual circuit (VC).
Restrictions for PPPoE Client
•
•
•
•
Information About PPPoE Client
•
•
•
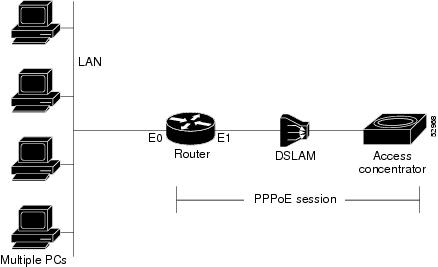
PPPoE Client Network Topology
The PPP over Ethernet Client feature provides PPPoE client support on routers on customer premises. Before the introduction of this feature, Cisco IOS software supported PPPoE on the access server side only. Figure 1 shows the typical network topology for configuring a PPPoE client on an Ethernet interface (E1 interface).
Figure 1 Typical Network Topology for PPPoE Deployment
PPPoE Client Support on ATM PVCs and Ethernet Interfaces
The PPPoE Client feature provides PPPoE client support on ATM PVCs and Ethernet interfaces. A dialer interface must be used for cloning virtual access.
Prior to Cisco IOS Release 12.4(15)T, one ATM PVC supported one PPPoE client. With the introduction of the Multiple PPPoE Client feature in Cisco IOS Release 12.4(15)T, one ATM PVC supports multiple PPPoE clients, allowing second line connection and redundancy. Multiple PPPoE clients can run concurrently on different PVCs, but each PPPoE client must use a separate dialer interface and a separate dialer pool.
Multiple PPPoE client sessions can be configured on an Ethernet interface, but each session must use a separate dialer interface and a separate dialer pool.
PPPoE—Max-Payload Support on Client
PPPoE, as described in RFC 2516, mandates a maximum negotiated Maximum Receive Unit (MRU) of 1492. This means that a PPPoE data packet cannot accommodate more than 1492 bytes of payload. To overcome this limitation, the client can use the PPP-Max-Payload tag (defined in RFC 4638) and negotiate a higher MRU with the Broadband Remote Access Server (BRAS). Use the pppoe-client ppp-max-payload command to send the PPP Max-Payload tag in PPPoE control packets to negotiate a higher MRU. A PPP Max-Payload tag allows a PPPoE client to override the MRU of 1492 by providing a maximum size for the PPP payload in both the sending and receiving directions.
The PPPoE client sends the PPPoE Max-Payload tag in a PPPoE Active Discovery Initiation (PADI) packet and if the PPPoE server can support a Maximum Transmission Unit (MTU)/Maximum Receive Unit (MRU) higher than 1492 octets, it responds with an echo of the clients tag in the PPPoE Active Discovery Offer (PADO) packet. The client sends the same tag in the PPPoE Active Discovery Request (PADR), and the server echoes the client tag in a PPPoE Active Discovery Session-confirmation (PADS) packet.
The pppoe-client ppp-max-payload command can only be configured when the PPPoE client dialer configuration is done. When the pppoe-client ppp-max-payload command is configured without the dialer configuration, an error message is displayed. If the dialer configuration is removed, the PPP max-payload configuration is also removed.
PPPoE Client Session Initiation
A PPPoE session is initiated by the PPPoE client. If the session has a timeout or is disconnected, the PPPoE client will immediately attempt to reestablish the session.
The following steps describe the exchange of packets that occurs when a PPPoE client initiates a PPPoE session:
1.
2.
3.
4.
If a client does not receive a PADO for a preceding PADI, the client sends out a PADI at predetermined intervals. That interval length is doubled for every successive PADI that does not evoke a response, until the interval reaches the configured maximum.
If PPP negotiation fails or the PPP line protocol is brought down for any reason, the PPPoE session and the virtual access will be brought down. When the PPPoE session is brought down, the client waits for a predetermined number of seconds before trying again to establish a PPPoE.
How to Configure a PPPoE Client
•
•
Configuring a PPPoE Client in Releases Prior to Cisco IOS Release 12.2(13)T
Perform the following tasks to configure a PPPoE client in releases prior to Cisco IOS release 12.2(13)T:
•
•
•
•
•
•
•
Enabling PPPoE in a VPDN Group
Perform this task to enable PPPoE in a virtual private dial-up network (VPDN) group.
Restrictions
This task applies only to releases prior to Cisco IOS Release 12.2(13)T.
SUMMARY STEPS
1.
2.
3.
4.
5.
6.
7.
DETAILED STEPS
Configuring a PPPoE Client on an ATM PVC
Perform this task to configure a PPPoE client on an ATM PVC.
SUMMARY STEPS
1.
2.
3.
4.
5.
6.
DETAILED STEPS
Note
Configuring a PPPoE Client on an Ethernet Interface
Perform this task to configure a PPPoE client on an Ethernet interface.
SUMMARY STEPS
1.
2.
3.
4.
5.
DETAILED STEPS
Configuring the Dialer Interface
Perform this task to configure the dialer interface to be used for cloning on the PVC.
SUMMARY STEPS
1.
2.
3.
4.
5.
6.
7.
8.
9.
DETAILED STEPS
Clearing PPPoE Client Sessions
Perform this task to clear PPPoE client sessions.
Restrictions
This task applies only to releases prior to Cisco IOS Release 12.2(13)T.
SUMMARY STEPS
1.
2.
DETAILED STEPS
Note
Verifying the PPPoE Client
Perform this task to verify PPPoE client configuration.
Prerequisites
This task assumes that the PPPoE client has been configured.
SUMMARY STEPS
1.
2.
3.
4.
5.
DETAILED STEPS
Troubleshooting PPPoE Client Sessions
Perform this task to troubleshoot the PPPoE client.
Restrictions
This task applies only to releases prior to Cisco IOS Release 12.2(13)T.
SUMMARY STEPS
1.
2.
3.
4.
5.
DETAILED STEPS
Configuring a PPPoE Client in Cisco IOS Release 12.2(13)T, 12.4T, and Later Releases
•
•
•
•
•
•
•
Configuring a PPPoE Client on an ATM PVC
Perform this task to configure a PPPoE client on an ATM PVC.
SUMMARY STEPS
1.
2.
3.
4.
5.
6.
7.
DETAILED STEPS
Note
Configuring a PPPoE Client on an Ethernet Interface
Perform this task to configure a PPPoE client on an Ethernet interface.
SUMMARY STEPS
1.
2.
3.
4.
5.
6.
DETAILED STEPS
Configuring a PPPoE Client on an Ethernet Subinterface
Perform this task to configure a PPPoE client on an Ethernet subinterface.
SUMMARY STEPS
1.
2.
3.
4.
5.
6.
7.
DETAILED STEPS
Configuring the Dialer Interface
Perform this task to configure the dialer interface to be used for cloning on the PVC.
SUMMARY STEPS
1.
2.
3.
4.
5.
6.
7.
8.
9.
DETAILED STEPS
Clearing PPPoE Client Sessions
Perform this task to clear PPPoE client sessions.
Restrictions
This task applies only to Cisco IOS Release 12.2(13)T and later releases.
SUMMARY STEPS
1.
2.
DETAILED STEPS
Note
Verifying the PPPoE Client
Perform this task to verify PPPoE client configuration.
Restrictions
This task applies only to Cisco IOS Release 12.2(13)T and later releases.
SUMMARY STEPS
1.
2.
DETAILED STEPS
Troubleshooting PPPoE Client Sessions
Perform this task to troubleshoot the PPPoE client.
Restrictions
This task applies only to Cisco IOS Release 12.2(13)T and later releases.
SUMMARY STEPS
1.
2.
DETAILED STEPS
Configuration Examples for PPPoE Client
•
•
Examples: PPPoE Client in Releases Prior to Cisco IOS Release 12.2(13)T
In the following example, a PPPoE client is configured on a PVC on the ATM interface 0. The PPPoE client uses the dialer interface 1 as its virtual access interface.
vpdn enablevpdn-group 1request-dialinprotocol pppoe!interface atm0pvc 1/100pppoe-client dial-pool-number 1!interface dialer 1ip address negotiateddialer pool 1dialer-group 1!In the following example, two PPPoE client sessions are configured on an Ethernet interface. Each PPPoE client uses a separate dialer interface and a separate dialer pool.
vpdn enablevpdn-group 1request-dialinprotocol pppoe!interface ethernet1/1pppoe-client dial-pool-number 1pppoe-client dial-pool-number 2!interface dialer 1ip address negotiateddialer pool 1dialer-group 1!interface dialer 2ip address negotiateddialer pool 2dialer-group 2Examples: PPPoE Client in Cisco IOS Release 12.2(13)T and Later Releases
The following example shows how to configure a PPPoE client on an Ethernet interface. Note that in Releases 12.2(13)T and later it is not necessary to configure a global VPDN group before configuring the PPPoE client.
interface Ethernet 0pppoe-client dial-pool-number 1pppoe-client ppp-max-payload 1500interface Dialer 1ip address negotiateddialer pool 1mtu 1492The following example shows how to configure multiple PPPoE clients on an ATM VC. Note that in Releases 12.4(15)T or a later release, more than one PPPoE session is supported on a single PVC.
interface ATM0no ip addressno ip mroute-cacheno atm ilmi-keepalivepvc 4/20pppoe-client dial-pool-number 1pppoe-client dial-pool-number 2pppoe-client ppp-max-payload 1500!endAdditional References
Related Documents
Cisco IOS commands
Broadband and DSL commands
VPDN features
VPDN and PPPoE commands
Cisco IOS Broadband Access Aggregation and DSL Command Reference
PPP over Frame Relay
Standards
MIBs
RFCs
Technical Assistance
Feature Information for PPP over Ethernet Client
Table 1 lists the features in this module and provides links to specific configuration information.
Use Cisco Feature Navigator to find information about platform support and software image support. Cisco Feature Navigator enables you to determine which software images support a specific software release, feature set, or platform. To access Cisco Feature Navigator, go to http://www.cisco.com/go/cfn. An account on Cisco.com is not required.
Note
Table 1 Feature Information for PPP over Ethernet Client
PPPoE—Max-Payload Support on Client
15.1(4)M
This feature supports the PPPoE client to send a PPP Max-Payload tag in PPPoE control packets. This feature is based on RFC 4638.
The following section provide information about this feature:
•
The following command was introduced or modified: pppoe-client ppp-max-payload.
PPP over Ethernet Client
12.2(2)T
12.2(13)T
12.4(15)T
15.0(1)MThis feature was introduced.
In Cisco IOS Release 12.2(13)T, PPPoE client functionality was separated from VPDN functionality, resulting in changes to PPPoE client configuration.
In the Cisco IOS Release 12.4(15)T, support was added for multiple PPPoE sessions per VC.
No new commands were introduced or modified.
PPP over Ethernet Subinterface
12.4(20)T
Support was added for PPPoE clients on Ethernet subinterfaces.
Cisco and the Cisco Logo are trademarks of Cisco Systems, Inc. and/or its affiliates in the U.S. and other countries. A listing of Cisco's trademarks can be found at www.cisco.com/go/trademarks. Third party trademarks mentioned are the property of their respective owners. The use of the word partner does not imply a partnership relationship between Cisco and any other company. (1005R)
Any Internet Protocol (IP) addresses and phone numbers used in this document are not intended to be actual addresses and phone numbers. Any examples, command display output, network topology diagrams, and other figures included in the document are shown for illustrative purposes only. Any use of actual IP addresses or phone numbers in illustrative content is unintentional and coincidental.
© 2001-2011 Cisco Systems, Inc. All rights reserved.