
 Feedback
Contents
- Configuring Security for VPNs with IPsec
- Finding Feature Information
- Prerequisites for Configuring Security for VPNs with IPsec
- Restrictions for Configuring Security for VPNs with IPsec
- Information About Configuring Security for VPNs with IPsec
- Supported Standards
- Supported Hardware Switching Paths and Encapsulation
- Supported Hardware
- VPN Accelerator Module Support
- AIMs and NM Support
- Supported Switching Paths
- Supported Encapsulation
- IPsec Functionality Overview
- IKEv1 Transform Sets
- IKEv2 Transform Sets
- IPsec Traffic Nested to Multiple Peers
- Crypto Access Lists
- Crypto Access List Overview
- When to Use the permit and deny Keywords in Crypto Access Lists
- Mirror Image Crypto Access Lists at Each IPsec Peer
- When to Use the any Keyword in Crypto Access Lists
- Transform Sets: A Combination of Security Protocols and Algorithms
- About Transform Sets
- Cisco IOS Suite-B Support for IKE and IPsec Cryptographic Algorithms
- Suite-B Requirements
- Where to Find Suite-B Configuration Information
- Crypto Map Sets
- About Crypto Maps
- Load Sharing Among Crypto Maps
- Crypto Map Guidelines
- Static Crypto Maps
- Dynamic Crypto Maps
- Dynamic Crypto Maps Overview
- Tunnel Endpoint Discovery
- Redundant Interfaces Sharing the Same Crypto Map
- Establish Manual SAs
- How to Configure IPsec VPNs
- Creating Crypto Access Lists
- What to Do Next
- Configuring Transform Sets for IKEv1 and IKEv2 Proposals
- Restrictions
- Configuring Transform Sets for IKEv1
- What to Do Next
- Configuring Transform Sets for IKEv2
- Transform Sets for IKEv2 Examples
- What to Do Next
- Creating Crypto Map Sets
- Creating Static Crypto Maps
- Troubleshooting Tips
- What to Do Next
- Creating Dynamic Crypto Maps
- Troubleshooting Tips
- What to Do Next
- Creating Crypto Map Entries to Establish Manual SAs
- Troubleshooting Tips
- What to Do Next
- Applying Crypto Map Sets to Interfaces
- Configuration Examples for IPsec VPN
- Example: Configuring AES-Based Static Crypto Map
- Additional References
- Feature Information for Security for VPNs with IPsec
Configuring Security for VPNs with IPsec
This module describes how to configure basic IPsec VPNs. IPsec is a framework of open standards developed by the IETF. It provides security for the transmission of sensitive information over unprotected networks such as the Internet. IPsec acts at the network layer, protecting and authenticating IP packets between participating IPsec devices ("peers"), such as Cisco routers.
- Finding Feature Information
- Prerequisites for Configuring Security for VPNs with IPsec
- Restrictions for Configuring Security for VPNs with IPsec
- Information About Configuring Security for VPNs with IPsec
- How to Configure IPsec VPNs
- Configuration Examples for IPsec VPN
- Additional References
- Feature Information for Security for VPNs with IPsec
Finding Feature Information
Your software release may not support all the features documented in this module. For the latest caveats and feature information, see Bug Toolkit and the release notes for your platform and software release. To find information about the features documented in this module, and to see a list of the releases in which each feature is supported, see the feature information table at the end of this module.
Use Cisco Feature Navigator to find information about platform support and Cisco software image support. To access Cisco Feature Navigator, go to www.cisco.com/go/cfn. An account on Cisco.com is not required.
Prerequisites for Configuring Security for VPNs with IPsec
IKE Configuration
You must configure Internet Key Exchange (IKE) as described in the module Configuring Internet Key Exchange for IPsec VPNs.
 Note | If you decide not to use IKE, you must still disable it as described in the module Configuring Internet Key Exchange for IPsec VPNs. |
Ensure Access Lists Are Compatible with IPsec
IKE uses UDP port 500. The IPsec encapsulating security payload (ESP) and authentication header (AH) protocols use protocol numbers 50 and 51, respectively. Ensure that your access lists are configured so that traffic from protocol 50, 51, and UDP port 500 are not blocked at interfaces used by IPsec. In some cases, you might need to add a statement to your access lists to explicitly permit this traffic.
Restrictions for Configuring Security for VPNs with IPsec
NAT Configuration
If you use Network Address Translation (NAT), you should configure static NAT so that IPsec works properly. In general, NAT should occur before the router performs IPsec encapsulation; in other words, IPsec should work with global addresses.
Nested IPsec Tunnels
IPsec supports nested tunnels that terminate on the same router. Double encryption of locally generated IKE packets and IPsec packets is supported only when a static virtual tunnel interface (sVTI) is configured. Double encryption is supported on releases up to and including Cisco IOS Release 12.4(15)T, but not on later releases.
With CSCts46591, the following nested IPsec tunnels are supported:
Information About Configuring Security for VPNs with IPsec
- Supported Standards
- Supported Hardware Switching Paths and Encapsulation
- IPsec Functionality Overview
- IPsec Traffic Nested to Multiple Peers
- Crypto Access Lists
- Transform Sets: A Combination of Security Protocols and Algorithms
- Cisco IOS Suite-B Support for IKE and IPsec Cryptographic Algorithms
- Crypto Map Sets
Supported Standards
Cisco implements the following standards with this feature:
- IPsec--IPsec is a framework of open standards that provides data confidentiality, data integrity, and data authentication between participating peers. IPsec provides these security services at the IP layer; IPsec uses IKE to handle negotiation of protocols and algorithms based on the local policy, and generate the encryption and authentication keys to be used by IPsec. IPsec can be used to protect one or more data flows between a pair of hosts, between a pair of security gateways, or between a security gateway and a host.
Note
The term IPsec is sometimes used to describe the entire protocol of IPsec data services and IKE security protocols, and is also sometimes used to describe only the data services. - IKE--A hybrid protocol that implements Oakley and SKEME key exchanges inside the Internet Security Association and Key Management Protocol (ISAKMP) framework. While IKE is used with other protocols, its initial implementation is with the IPsec protocol. IKE provides authentication of IPsec peers, negotiates IPsec security associations, and establishes IPsec keys.
The component technologies implemented for IPsec include:
- AES--Advanced Encryption Standard. A cryptographic algorithm that protects sensitive, unclassified information. AES is a privacy transform for IPsec and IKE and has been developed to replace DES. AES is designed to be more secure than DES. AES offers a larger key size, while ensuring that the only known approach to decrypt a message is for an intruder to try every possible key. AES has a variable key length--the algorithm can specify a 128-bit key (the default), a 192-bit key, or a 256-bit key.
- DES--Data Encryption Standard. An algorithm that is used to encrypt packet data. Cisco software implements the mandatory 56-bit DES-CBC with Explicit IV. Cipher Block Chaining (CBC) requires an initialization vector (IV) to start encryption. The IV is explicitly given in the IPsec packet. For backwards compatibility, Cisco IOS IPsec also implements the RFC 1829 version of ESP DES-CBC.
Cisco IOS also implements Triple DES (168-bit) encryption, depending on the software versions available for a specific platform. Triple DES (3DES) is a strong form of encryption that allows sensitive information to be transmitted over untrusted networks. It enables customers to utilize network layer encryption.
- SEAL--Software Encryption Algorithm. An alternative algorithm to software-based DES, 3DES, and AES. SEAL encryption uses a 160-bit encryption key and has a lower impact on the CPU when compared to other software-based algorithms.
- MD5 (Hash-based Message Authentication Code (HMAC) variant)--Message digest algorithm 5 (MD5) is a hash algorithm. HMAC is a keyed hash variant used to authenticate data.
- SHA (HMAC variant)--Secure Hash Algorithm. SHA is a hash algorithm. HMAC is a keyed hash variant used to authenticate data.
IPsec as implemented in Cisco software supports the following additional standards:
- AH--Authentication Header. A security protocol, which provides data authentication and optional anti-replay services. AH is embedded in the data to be protected (a full IP datagram).
- ESP--Encapsulating Security Payload. A security protocol, which provides data privacy services and optional data authentication, and anti-replay services. ESP encapsulates the data to be protected.
Supported Hardware Switching Paths and Encapsulation
Supported Hardware
VPN Accelerator Module Support
The VPN Accelerator Module (VAM) is a single-width acceleration module. It provides high-performance, hardware-assisted tunneling and encryption services suitable for VPN remote access, site-to-site intranet, and extranet applications. It also provides platform scalability and security while working with all services necessary for successful VPN deployments--security, quality of service (QoS), firewall and intrusion detection, service-level validation, and management. The VAM off-loads IPsec processing from the main processor, thus freeing resources on the processor engines for other tasks.
The VAM provides hardware-accelerated support for the following multiple encryption functions:
- 56-bit DES standard mode: CBC
- 3-Key Triple DES (168-bit)
- SHA-1 and MD5
- Rivest, Shamir, Adleman (RSA) public-key algorithm
- Diffie-Hellman key exchange RC4-40
For more information on VAMs, see the document VPN Acceleration Module (VAM).
AIMs and NM Support
The data encryption Advanced Integration Module (AIM) and Network Module (NM) provide hardware-based encryption.
The data encryption AIMs and NM are hardware Layer 3 (IPsec) encryption modules and provide DES and Triple DES IPsec encryption for multiple T1s or E1s of bandwidth. These products also have hardware support for Diffie-Hellman, RSA, and DSA key generation.
Before using either module, note that RSA manual keying is not supported.
See the table below to determine which VPN encryption module to use.
IPPCP Software for Use with AIMs and NMs in Cisco 2600 and Cisco 3600 Series Routers
The software Internet Protocol Payload Compression Protocol (IPPCP) with AIMs and NMs allows customers to use Lempel-Ziv-Stac (LZS) software compression with IPsec when a VPN module is in Cisco 2600 and Cisco 3600 series routers, allowing users to effectively increase the bandwidth on their interfaces.
Without IPPCP software, compression is not supported with the VPN encryption hardware AIM and NM; that is, a user has to remove the VPN module from the router and run the software encryption with software compression. IPPCP enables all VPN modules to support LZS compression in the software when the VPN module is in the router, thereby allowing users to configure data compression and increase their bandwidth, which is useful for a low data link.
Without IPPCP, compression occurs at Layer 2, and encryption occurs at Layer 3. After a data stream is encrypted, it is passed on for compression services. When the compression engine receives the encrypted data streams, the data expands and does not compress. This feature enables both compression and encryption of the data to occur at Layer 3 by selecting LZS with the IPsec transform set; that is, LZS compression occurs before encryption, and with better compression ratio.
| Table 1 | AIM/VPN Encryption Module Support by Cisco IOS Release |
|
Platform |
Encryption Module Support by Cisco IOS Release--12.2(13)T |
Encryption Module Support by Cisco IOS Release--12.3(4)T |
Encryption Module Support by Cisco IOS Release--12.3(5) |
Encryption Module Support by Cisco IOS Release--12.3(6) |
Encryption Module Support by Cisco IOS Release--12.3(7)T |
|---|---|---|---|---|---|
|
Cisco 831 |
Software-based AES |
Software-based AES |
Software-based AES |
Software-based AES |
Software-based AES |
|
Cisco 1710 Cisco 1711 Cisco 1721 Cisco 1751 Cisco 1760 |
Software-based AES |
Software-based AES |
Software-based AES |
Software-based AES |
Software-based AES |
|
Cisco 2600 XM |
-- |
-- |
-- |
AIM-VPN/BPII-Plus Hardware Encryption Module |
AIM-VPN/BPII-Plus Hardware Encryption Module |
|
Cisco 2611 XM Cisco 2621 XM Cisco 2651 XM |
-- |
AIM-VPN/BPII Hardware Encryption Module |
AIM-VPN/BPII Hardware Encryption Module |
AIM-VPN/BPII Hardware Encryption Module |
AIM-VPN/BPII-Plus Hardware Encryption Module |
|
Cisco 2691 XM |
AIM-VPN/EPII Hardware Encryption Module |
AIM-VPN/EPII Hardware Encryption Module |
AIM-VPN/EPII Hardware Encryption Module |
AIM-VPN/EPII Hardware Encryption Module |
AIM-VPN/EPII-Plus Hardware Encryption Module |
|
Cisco 3660 Cisco 3745 |
AIM-VPN/HPII Hardware Encryption Module |
AIM-VPN/HPII Hardware Encryption Module |
AIM-VPN/HPII-Plus Hardware Encryption Module |
AIM-VPN/HPII-Plus Hardware Encryption Module |
AIM-VPN/HPII-Plus Hardware Encryption Module |
|
Cisco 3735 |
AIM-VPN/EPII Hardware Encryption Module |
AIM-VPN/EPII Hardware Encryption Module |
AIM-VPN/EPII-Plus Hardware Encryption Module |
AIM-VPN/EPII-Plus Hardware Encryption Module |
AIM-VPN/EPII-Plus Hardware Encryption Module |
For more information on AIMs and NM, see the Installing Advanced Integration Modules in Cisco 2600 Series, Cisco 3600 Series, and Cisco 3700 Series Routers document.
Supported Switching Paths
The table below lists the supported switching paths that work with IPsec.
| Table 2 | Supported Switching Paths for IPsec |
|
Switching Paths |
Examples |
|---|---|
|
Cisco Express Forwarding |
ip cef interface ethernet0/0 ip route-cache ! Ensure that you will not hit flow switching. no ip route-cache flow |
|
Cisco Express Forwarding-flow switching |
! Enable global CEF. ip cef interface ethernet0/0 ip route-cache ip route-cache flow ! Enable CEF for the interface ip route-cache cef |
|
Fast switching |
interface ethernet0/0 ip route-cache ! Ensure that you will not hit flow switching. no ip route-cache flow ! Disable CEF for the interface, which supersedes global CEF. no ip route-cache cef |
|
Fast-flow switching |
interface ethernet0/0 ip route-cache ! Enable flow switching p route-cache flow ! Disable CEF for the interface. no ip route-cache cef |
|
Process switching |
interface ethernet0/0 no ip route-cache |
Supported Encapsulation
IPsec works with the following serial encapsulations: Frame Relay, High-Level Data-Links Control (HDLC), and PPP.
IPsec also works with Generic Routing Encapsulation (GRE) and IPinIP Layer 3, Layer 2 Forwarding (L2F), Layer 2 Tunneling Protocol (L2TP), Data Link Switching+ (DLSw+), and Source Route Bridging (SRB) tunneling protocols; however, multipoint tunnels are not supported. Other Layer 3 tunneling protocols may not be supported for use with IPsec.
Because the IPsec Working Group has not yet addressed the issue of group key distribution, IPsec currently cannot be used to protect group traffic (such as broadcast or multicast traffic).
IPsec Functionality Overview
IPsec provides the following network security services. (In general, the local security policy dictates the use of one or more of these services.)
- Data confidentiality--The IPsec sender can encrypt packets before transmitting them across a network.
- Data integrity--The IPsec receiver can authenticate packets sent by the IPsec sender to ensure that the data has not been altered during transmission.
- Data origin authentication--The IPsec receiver can authenticate the source of the sent IPsec packets. This service is dependent upon the data integrity service.
- Anti-replay--The IPsec receiver can detect and reject replayed packets.
IPsec provides secure tunnels between two peers, such as two routers. You define which packets are considered sensitive and should be sent through these secure tunnels, and you define the parameters that should be used to protect these sensitive packets by specifying the characteristics of these tunnels. When the IPsec peer recognizes a sensitive packet, the peer sets up the appropriate secure tunnel and sends the packet through the tunnel to the remote peer. (The use of the term tunnel in this chapter does not refer to using IPsec in tunnel mode.)
More accurately, these tunnels are sets of security associations (SAs) that are established between two IPsec peers. The SAs define the protocols and algorithms to be applied to sensitive packets and specify the keying material to be used by the two peers. SAs are unidirectional and are established per security protocol (AH or ESP).
With IPsec, you can define the traffic that needs to be protected between two IPsec peers by configuring access lists and applying these access lists to interfaces using crypto map sets. Therefore, traffic may be selected on the basis of the source and destination address, and optionally the Layer 4 protocol and port. (The access lists used for IPsec are only used to determine the traffic that needs to be protected by IPsec, not the traffic that should be blocked or permitted through the interface. Separate access lists define blocking and permitting at the interface.)
A crypto map set can contain multiple entries, each with a different access list. The crypto map entries are searched in a sequence--the router attempts to match the packet to the access list specified in that entry.
When a packet matches a permit entry in a particular access list, and the corresponding crypto map entry is tagged as cisco, connections are established, if necessary. If the crypto map entry is tagged as ipsec-isakmp, IPsec is triggered. If there is no SA that the IPsec can use to protect this traffic to the peer, IPsec uses IKE to negotiate with the remote peer to set up the necessary IPsec SAs on behalf of the data flow. The negotiation uses information specified in the crypto map entry as well as the data flow information from the specific access list entry. (The behavior is different for dynamic crypto map entries. See the Creating Dynamic Crypto Maps section later in this module.)
If the crypto map entry is tagged as ipsec-manual, IPsec is triggered. If there is no SA that IPsec can use to protect this traffic to the peer, the traffic is dropped. In this case, the SAs are installed via the configuration, without the intervention of IKE. If SAs do not exist, IPsec does not have all the necessary pieces configured.
Once established, the set of SAs (outbound to the peer) is then applied to the triggering packet and to subsequent applicable packets as those packets exit the router. "Applicable" packets are packets that match the same access list criteria that the original packet matched. For example, all applicable packets could be encrypted before being forwarded to the remote peer. The corresponding inbound SAs are used when processing the incoming traffic from that peer.
Multiple IPsec tunnels can exist between two peers to secure different data streams, with each tunnel using a separate set of SAs. For example, some data streams only need to be authenticated, while other data streams must both be encrypted and authenticated.
Access lists associated with IPsec crypto map entries also represent the traffic that the router needs protected by IPsec. Inbound traffic is processed against crypto map entries--if an unprotected packet matches a permit entry in a particular access list associated with an IPsec crypto map entry, that packet is dropped because it was not sent as an IPsec-protected packet.
Crypto map entries also include transform sets. A transform set is an acceptable combination of security protocols, algorithms, and other settings that can be applied to IPsec-protected traffic. During the IPsec SA negotiation, the peers agree to use a particular transform set when protecting a particular data flow.
IKEv1 Transform Sets
An Internet Key Exchange version 1 (IKEv1) transform set represents a certain combination of security protocols and algorithms. During the IPsec SA negotiation, the peers agree to use a particular transform set for protecting a particular data flow.
You can specify multiple transform sets and then specify one or more of these transform sets in a crypto map entry. The transform set defined in the crypto map entry is used in the IPsec SA negotiation to protect the data flows specified by that crypto map entry's access list.
During IPsec security association negotiations with IKE, peers search for a transform set that is the same at both peers. When such a transform set is found, it is selected and applied to the protected traffic as part of both peers' IPsec SAs. (With manually established SAs, there is no negotiation with the peer, so both sides must specify the same transform set.)
If you change a transform set definition, the change is applied only to crypto map entries that reference the transform set. The change is not applied to existing security associations, but is used in subsequent negotiations to establish new SAs. If you want the new settings to take effect sooner, you can clear all or part of the SA database by using the clear crypto sa command.
IKEv2 Transform Sets
An Internet Key Exchange version 2 (IKEv2) proposal is a set of transforms used in the negotiation of IKEv2 SA as part of the IKE_SA_INIT exchange. An IKEv2 proposal is regarded as complete only when it has at least an encryption algorithm, an integrity algorithm, and a Diffie-Hellman (DH) group configured. If no proposal is configured and attached to an IKEv2 policy, then the default proposal is used in the negotiation. The default proposal is a collection of commonly used algorithms which are as follows:
encryption aes-cbc-128 3des
integrity sha md5
group 5 2
The transforms shown above translate to the following combinations in the following order of priority:
aes-cbc-128, sha, 5
aes-cbc-128, sha, 2
aes-cbc-128, md5, 5
aes-cbc-128, md5, 2
3des, sha, 5
3des, sha, 2
3des, md5, 5
3des, md5, 2
Although the crypto ikev2 proposal command is similar to the crypto isakmp policy priority command, the IKEv2 proposal differs as follows:
- An IKEv2 proposal allows configuration of one or more transforms for each transform type.
- An IKEv2 proposal does not have any associated priority.
Note | To use IKEv2 proposals in negotiation, they must be attached to IKEv2 policies. If a proposal is not configured, then the default IKEv2 proposal is used with the default IKEv2 policy. |
When multiple transforms are configured for a transform type, the order of priority is from left to right.
A proposal with multiple transforms for each transform type translates to all possible combinations of transforms. If only a subset of these combinations is required, then they must be configured as individual proposals.
Device(config)# crypto ikev2 proposal proposal-1
Device(config-ikev2-proposal)# encryption 3des, aes-cbc-128
Device(config-ikev2-proposal)# integrity sha, md5
Device(config-ikev2-proposal)# group 2
For example, the commands shown above translate to the following transform combinations:
3des, sha, 2
aes-cbc-128, sha, 2
3des, md5, 2
aes-cbc-128, md5, 2
To configure the first and last transform combinations, use the following commands:
Device(config)# crypto ikev2 proposal proposal-1
Device(config-ikev2-proposal)# encryption 3des
Device(config-ikev2-proposal)# integrity sha
Device(config-ikev2-proposal)# group 2
Device(config-ikev2-proposal)# exit
Device(config)# crypto ikev2 proposal proposal-2
Device(config-ikev2-proposal)# encryption aes-cbc-128
Device(config-ikev2-proposal)# integrity md5
Device(config-ikev2-proposal)# group 2
IPsec Traffic Nested to Multiple Peers
You can nest IPsec traffic to a series of IPsec peers. For example, for traffic to traverse multiple firewalls (these firewalls have a policy of not letting through traffic that they have not authenticated), the router must establish IPsec tunnels with each firewall in turn. The "nearer" firewall becomes the "outer" IPsec peer.
In the example shown in the figure below, Router A encapsulates the traffic destined for Router C in IPsec (Router C is the inner IPsec peer). However, before Router A can send this traffic, it must first reencapsulate this traffic in IPsec to send it to Router B (Router B is the "outer" IPsec peer).
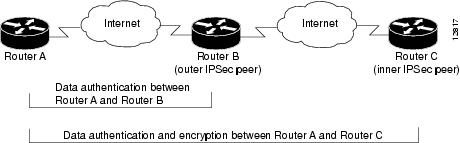
It is possible for the traffic between the "outer" peers to have one kind of protection (such as data authentication) and for traffic between the "inner" peers to have a different protection (such as both data authentication and encryption).
Crypto Access Lists
- Crypto Access List Overview
- When to Use the permit and deny Keywords in Crypto Access Lists
- Mirror Image Crypto Access Lists at Each IPsec Peer
- When to Use the any Keyword in Crypto Access Lists
Crypto Access List Overview
Crypto access lists are used to define which IP traffic is protected by crypto and which traffic is not protected by crypto. (These access lists are not the same as regular access lists, which determine what traffic to forward or block at an interface.) For example, access lists can be created to protect all IP traffic between Subnet A and Subnet Y or Telnet traffic between Host A and Host B.
The access lists themselves are not specific to IPsec. It is the crypto map entry referencing the specific access list that defines whether IPsec processing is applied to the traffic matching a permit in the access list.
Crypto access lists associated with IPsec crypto map entries have four primary functions:
- Select outbound traffic to be protected by IPsec (permit = protect).
- Indicate the data flow to be protected by the new SAs (specified by a single permit entry) when initiating negotiations for IPsec security associations.
- Process inbound traffic to filter out and discard traffic that should have been protected by IPsec.
- Determine whether or not to accept requests for IPsec security associations on behalf of the requested data flows when processing IKE negotiation from the IPsec peer.
- Perform negotiation only for ipsec-isakmp crypto map entries.
If you want certain traffic to receive one combination of IPsec protection (for example, authentication only) and other traffic to receive a different combination of IPsec protection (for example, both authentication and encryption), you need to create two different crypto access lists to define the two different types of traffic. These different access lists are then used in different crypto map entries, which specify different IPsec policies.
When to Use the permit and deny Keywords in Crypto Access Lists
Crypto protection can be permitted or denied for certain IP traffic in a crypto access list as follows:
- To protect IP traffic that matches the specified policy conditions in its corresponding crypto map entry, use the permit keyword in an access list.
- To refuse protection for IP traffic that matches the specified policy conditions in its corresponding crypto map entry, use the deny keyword in an access list.
Note | IP traffic is not protected by crypto if it is refused protection in all of the crypto map entries for an interface. |
After the corresponding crypto map entry is defined and the crypto map set is applied to the interface, the defined crypto access list is applied to the interface. Different access lists must be used in different entries of the same crypto map set. However, both inbound and outbound traffic is evaluated against the same "outbound" IPsec access list. Therefore, the access list criteria is applied in the forward direction to traffic exiting your router and in the reverse direction to traffic entering your router.
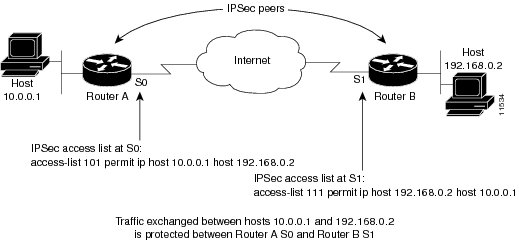
In the figure below, IPsec protection is applied to traffic between Host 10.0.0.1 and Host 192.168.0.2 as the data exits Router A's S0 interface en route to Host 192.168.0.2. For traffic from Host 10.0.0.1 to Host 192.168.0.2, the access list entry on Router A is evaluated as follows:
source = host 10.0.0.1
dest = host 192.168.0.2
For traffic from Host 192.168.0.2 to Host 10.0.0.1, the access list entry on Router A is evaluated as follows:
source = host 192.168.0.2
dest = host 10.0.0.1
If you configure multiple statements for a given crypto access list that is used for IPsec, in general the first permit statement that is matched is the statement used to determine the scope of the IPsec SA. That is, the IPsec SA is set up to protect traffic that meets the criteria of the matched statement only. Later, if traffic matches a different permit statement of the crypto access list, a new, separate IPsec SA is negotiated to protect traffic matching the newly matched access list statement.
Any unprotected inbound traffic that matches a permit entry in the crypto access list for a crypto map entry flagged as IPsec is dropped because this traffic was expected to be protected by IPsec.
The following example shows that if overlapping networks are used, then the most specific networks are defined in crypto sequence numbers before less specific networks are defined. In this example, the more specific network is covered by the crypto map sequence number 10, followed by the less specific network in the crypto map, which is sequence number 20.
crypto map mymap 10 ipsec-isakmp
 set peer 192.168.1.1
 set transform-set test
 match address 101
crypto map mymap 20 ipsec-isakmp
 set peer 192.168.1.2
 set transform-set test
 match address 102
access-list 101 permit ip 10.1.1.0 0.0.0.255 172.16.1.0 0.0.0.255
access-list 102 permit ip 10.0.0.0 0.255.255.255 172.16.0.0 0.15.255.255
The following example shows how having a deny keyword in one crypto map sequence number and having a permit keyword for the same subnet and IP range in another crypto map sequence number are not supported.
crypto map mymap 10 ipsec-isakmp
 set peer 192.168.1.1
 set transform-set test
 match address 101
crypto map mymap 20 ipsec-isakmp
 set peer 192.168.1.2
 set transform-set test
 match address 102
access-list 101 deny   ip 10.1.1.0 0.0.0.255 172.16.1.0 0.0.0.255
access-list 101 permit ip 10.0.0.0 0.255.255.255 172.16.0.0 0.15.255.255
access-list 102 permit ip 10.1.1.0 0.0.0.255 172.16.1.0 0.0.0.255
Mirror Image Crypto Access Lists at Each IPsec Peer
Cisco recommends that for every crypto access list specified for a static crypto map entry that you define at the local peer, you define a "mirror image" crypto access list at the remote peer. This ensures that traffic that has IPsec protection applied locally can be processed correctly at the remote peer. (The crypto map entries themselves must also support common transforms and must refer to the other system as a peer.)
The figure below shows some sample scenarios of mirror image and nonmirror image access lists.
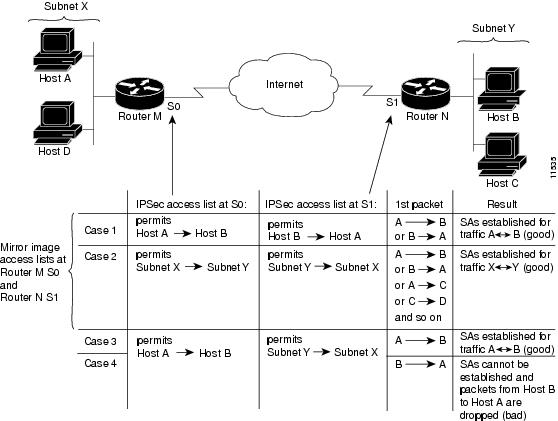
As the above figure indicates, IPsec SAs can be established as expected whenever the two peers' crypto access lists are mirror images of each other. However, an IPsec SA can be established only some of the time when access lists are not mirror images of each other. This can happen in the case where an entry in one peer's access list is a subset of an entry in the other peer's access list, such as shown in Cases 3 and 4 in the above figure. IPsec SA establishment is critical to IPsec--without SAs, IPsec does not work, thus causing packets matching the crypto access list criteria to be silently dropped instead of being forwarded with IPsec.
In the figure above, an SA cannot be established in Case 4. This is because SAs are always requested according to the crypto access lists at the initiating packet's end. In Case 4, Router N requests that all traffic between Subnet X and Subnet Y be protected, but this is a superset of the specific flows permitted by the crypto access list at Router M, so the request is not permitted. Case 3 works because Router M's request is a subset of the specific flows permitted by the crypto access list at Router N.
Because of the complexities introduced when crypto access lists are not configured as mirror images at peer IPsec devices, Cisco strongly encourages you to use mirror image crypto access lists.
When to Use the any Keyword in Crypto Access Lists
When you create crypto access lists, using the any keyword could cause problems. Cisco discourages the use of the any keyword to specify the source or destination addresses. By default, VTI solutions use the any keyword as a proxy identity. Use of VTI is encouraged when proxy identities of any are required.
The any keyword in a permit statement is not recommended when you have multicast traffic flowing through the IPsec interface; the any keyword can cause multicast traffic to fail.
Note | In Cisco IOS Release 12.4(9)T and later releases, multicast traffic from the router will be encapsulated into IPsec if proxy identities allow encapsulation. |
The permit any any statement is strongly discouraged because this causes all outbound traffic to be protected (and all protected traffic is sent to the peer specified in the corresponding crypto map entry) and requires protection for all inbound traffic. Then, all inbound packets that lack IPsec protection are silently dropped, including packets for routing protocols, the Network Time Protocol (NTP), echo, echo response, and so on.
You need to be sure that you define which packets to protect. If you must use the any keyword in a permit statement, you must preface that statement with a series of deny statements to filter out any traffic (that would otherwise fall within that permit statement) that you do not want to be protected.
The use of the any keyword in access control lists (ACLs) with reverse route injection (RRI) is not supported. (For more information on RRI, see the section "Creating Crypto Map Sets.")
Transform Sets: A Combination of Security Protocols and Algorithms
About Transform Sets
A transform set represents a certain combination of security protocols and algorithms. During the IPsec SA negotiation, the peers agree to use a particular transform set for protecting a particular data flow.
You can specify multiple transform sets, and then specify one or more of these transform sets in a crypto map entry. The transform set defined in the crypto map entry is used in the IPsec SA negotiation to protect the data flows specified by that crypto map entry's access list.
During IPsec security association negotiations with IKE, peers search for an identical transform set for both peers. When such a transform set is found, it is selected and applied to the protected traffic as part of both peers' IPsec SAs. (With manually established SAs, there is no negotiation with the peer, so both sides must specify the same transform set.)
If you change a transform set definition, the change is only applied to crypto map entries that reference the transform set. The change is not applied to existing security associations, but is used in subsequent negotiations to establish new SAs. If you want the new settings to take effect sooner, you can clear all or part of the SA database by using the clear crypto sa command.
The table below shows allowed transform combinations.
| Table 3 | Allowed Transform Combinations |
|
Transform Type |
Transform |
Description |
|---|---|---|
|
AH Transform (Pick only one.) |
ah-md5-hmac |
AH with the MD5 (Message Digest 5) (an HMAC variant) authentication algorithm. |
|
ah-sha-hmac |
AH with the SHA (Secure Hash Algorithm) (an HMAC variant) authentication algorithm. |
|
|
ESP Encryption Transform (Pick only one.) |
esp-aes |
ESP with the 128-bit Advanced Encryption Standard (AES) encryption algorithm. |
|
esp-gcm esp-gmac |
The esp-gcm and esp-gmac transforms are ESPs with either a 128-bit or a 256-bit encryption algorithm. The default for either of these transforms is 128 bits. Both esp-gcm and esp-gmac transforms cannot be configured together with any other ESP transform within the same crypto IPsec transform set using the crypto ipsec transform-set command. |
|
|
esp-aes 192 |
ESP with the 192-bit AES encryption algorithm. |
|
|
esp-aes 256 |
ESP with the 256-bit AES encryption algorithm. |
|
|
esp-des |
ESP with the 56-bit Data Encryption Standard (DES) encryption algorithm. |
|
|
esp-3des |
ESP with the 168-bit DES encryption algorithm (3DES or Triple DES). |
|
|
esp-null |
Null encryption algorithm. |
|
|
esp-seal |
ESP with the 160-bit SEAL encryption algorithm. |
|
|
ESP Authentication Transform (Pick only one.) |
esp-md5-hmac |
ESP with the MD5 (HMAC variant) authentication algorithm. |
|
esp-sha-hmac |
ESP with the SHA (HMAC variant) authentication algorithm. |
|
|
IP Compression Transform |
comp-lzs |
IP compression with the Lempel-Ziv-Stac (LZS) algorithm |
Cisco IOS Suite-B Support for IKE and IPsec Cryptographic Algorithms
Suite-B adds support for four user interface suites of cryptographic algorithms for use with IKE and IPSec that are described in RFC 4869. Each suite consists of an encryption algorithm, a digital signature algorithm, a key agreement algorithm, and a hash or message digest algorithm.
Suite-B has the following cryptographic algorithms:
- Suite-B-GCM-128-Provides ESP integrity protection, confidentiality, and IPsec encryption algorithms that use the 128-bit AES using Galois and Counter Mode (AES-GCM) described in RFC 4106. This suite should be used when ESP integrity protection and encryption are both needed.
- Suite-B-GCM-256-Provides ESP integrity protection and confidentiality using 256-bit AES-GCM described in RFC 4106. This suite should be used when ESP integrity protection and encryption are both needed.
- Suite-B-GMAC-128-Provides ESP integrity protection using 128-bit AES- Galois Message Authentication Code (GMAC) described in RFC 4543, but does not provide confidentiality. This suite should be used only when there is no need for ESP encryption.
- Suite-B-GMAC-256-Provides ESP integrity protection using 256-bit AES-GMAC described in RFC 4543, but does not provide confidentiality. This suite should be used only when there is no need for ESP encryption.
IPSec encryption algorithms use AES-GCM when encryption is required and AES-GMAC for message integrity without encryption.
IKE negotiation uses AES Cipher Block Chaining (CBC) mode to provide encryption and Secure Hash Algorithm (SHA)-2 family containing the SHA-256 and SHA-384 hash algorithms, as defined in RFC 4634, to provide the hash functionality. Diffie-Hellman using Elliptic Curves (ECP), as defined in RFC 4753, is used for key exchange and the Elliptic Curve Digital Signature Algorithm (ECDSA), as defined in RFC 4754, to provide authentication.
Suite-B Requirements
Suite-B imposes the following software crypto engine requirements for IKE and IPsec:
- HMAC-SHA256 and HMAC-SHA384 are used as pseudorandom functions; the integrity check within the IKE protocol is used. Optionally, HMAC-SHA512 can be used.
- Elliptic curve groups 19 (256-bit ECP curve) and 20 (384-bit ECP curve) are used as the Diffie-Hellman group in IKE. Optionally, group 21 (521-bit ECP curve) can be used.
- The Elliptic Curve Digital Signature Algorithm (ECDSA) algorithm (256-bit and 384-bit curves) is used for the signature operation within X.509 certificates.
- GCM (16 byte ICV) and GMAC is used for ESP (128-bit and 256-bit keys). Optionally, 192-bit keys can be used.
- Public Key Infrastructure (PKI) support for validation of X.509 certificates using ECDSA signatures must be used.
- PKI support for generating certificate requests using ECDSA signatures and for importing the issued certificates into IOS must be used.
- IKEV2 support for allowing the ECDSA signature (ECDSA-sig) as authentication method must be used.
Where to Find Suite-B Configuration Information
Suite-B configuration support is described in the following documents:
- For more information on the esp-gcm and esp-gmac transforms, see the "Configuring Transform Sets for IKEv1" section.
- For more information on SHA-2 family (HMAC variant) and Elliptic Curve (EC) key pair configuration, see the Configuring Internet Key Exchange for IPsec VPNs feature module.
- For more information on configuring a transform for an integrity algorithm type, see the "Configuring the IKEv2 Proposal" section in the Configuring Internet Key Exchange Version 2 (IKEv2) and FlexVPN Site-to-Site feature module.
- For more information on configuring the ECDSA-sig to be the authentication method for IKEv2, see the "Configuring IKEv2 Profile (Basic)" section in the Configuring Internet Key Exchange Version 2 (IKEv2) and FlexVPN Site-to-Site feature module.
- For more information on configuring elliptic curve Diffie-Hellman (ECDH) support for IPsec SA negotiation, see the Configuring Internet Key Exchange for IPsec VPNs and Configuring Internet Key Exchange Version 2 and FlexVPN feature modules.
For more information on the Suite-B support for certificate enrollment for a PKI, see the Configuring Certificate Enrollment for a PKI feature module.
Crypto Map Sets
Before you create crypto map entries, you should determine the type of crypto map--static, dynamic, or manual--best addresses the needs of your network.
- About Crypto Maps
- Load Sharing Among Crypto Maps
- Crypto Map Guidelines
- Static Crypto Maps
- Dynamic Crypto Maps
- Redundant Interfaces Sharing the Same Crypto Map
- Establish Manual SAs
About Crypto Maps
Crypto map entries created for IPsec pull together the various parts used to set up IPsec SAs, including:
- Which traffic should be protected by IPsec (per a crypto access list)
- The granularity of the flow to be protected by a set of SAs
- Where IPsec-protected traffic should be sent (who the remote IPsec peer is)
- The local address to be used for the IPsec traffic (See the "Applying Crypto Map Sets to Interfaces" section for more details)
- What IPsec SA should be applied to this traffic (selecting from a list of one or more transform sets)
- Whether SAs are manually established or are established via IKE
- Other parameters that might be necessary to define an IPsec SA
How Crypto Maps Work
Crypto map entries with the same crypto map name (but different map sequence numbers) are grouped into a crypto map set. Later, you apply these crypto map sets to interfaces; all IP traffic passing through the interface is evaluated against the applied crypto map set. If a crypto map entry sees outbound IP traffic that should be protected and the crypto map specifies the use of IKE, an SA is negotiated with the remote peer according to the parameters included in the crypto map entry; otherwise, if the crypto map entry specifies the use of manual SAs, an SA should have already been established via configuration. (If a dynamic crypto map entry sees outbound traffic that should be protected and no security association exists, the packet is dropped.)
The policy described in the crypto map entries is used during the negotiation of SAs. If the local router initiates the negotiation, it uses the policy specified in the static crypto map entries to create the offer to be sent to the specified IPsec peer. If the IPsec peer initiates the negotiation, the local router checks the policy from the static crypto map entries, as well as any referenced dynamic crypto map entries, to decide whether to accept or reject the peer's request (offer).
For IPsec to succeed between two IPsec peers, both peers' crypto map entries must contain compatible configuration statements.
Compatible Crypto Maps: Establishing an SA
When two peers try to establish an SA, they must each have at least one crypto map entry that is compatible with one of the other peer's crypto map entries. For two crypto map entries to be compatible, they must meet the following criteria:
- The crypto map entries must contain compatible crypto access lists (for example, mirror image access lists). In cases, where the responding peer is using dynamic crypto maps, the entries in the local crypto access list must be "permitted" by the peer's crypto access list.
- The crypto map entries must each identify the other peer (unless the responding peer is using dynamic crypto maps).
- The crypto map entries must have at least one transform set in common.
Load Sharing Among Crypto Maps
You can define multiple remote peers using crypto maps to allow load sharing. Load sharing is useful because if one peer fails, there is still a protected path. The peer to which packets are actually sent is determined by the last peer that the router heard from (that is, received either traffic or a negotiation request) for a given data flow. If the attempt fails with the first peer, IKE tries the next peer on the crypto map list.
If you are not sure how to configure each crypto map parameter to guarantee compatibility with other peers, you might consider configuring dynamic crypto maps as described in the section "Creating Dynamic Crypto Maps". Dynamic crypto maps are useful when the establishment of the IPsec tunnels is initiated by the remote peer (such as in the case of an IPsec router fronting a server). They are not useful if the establishment of the IPsec tunnels is locally initiated because the dynamic crypto maps are policy templates, not complete statements of policy.
Crypto Map Guidelines
You can apply only one crypto map set to a single interface. The crypto map set can include a combination of IPsec/IKE and IPsec/manual entries. Multiple interfaces can share the same crypto map set if you want to apply the same policy to multiple interfaces.
If you create more than one crypto map entry for a given interface, use the seq-num argument of each map entry to rank the map entries; the lower the seq-num argument the higher the priority. At the interface that has the crypto map set, traffic is first evaluated against the higher priority map entries.
You must create multiple crypto map entries for a given interface if any of the following conditions exist:
- If different data flows are to be handled by separate IPsec peers.
- If you want to apply different IPsec security to different types of traffic (for the same or separate IPsec peers); for example, if you want traffic between one set of subnets to be authenticated, and traffic between another set of subnets to be both authenticated and encrypted. In such cases, the different types of traffic should be defined in two separate access lists, and you must create a separate crypto map entry for each crypto access list.
- If you are not using IKE to establish a particular set of security associations, and you want to specify multiple access list entries, you must create separate access lists (one per permit entry) and specify a separate crypto map entry for each access list.
Static Crypto Maps
When IKE is used to establish SAs, IPsec peers can negotiate the settings they use for the new security associations. This means that you can specify lists (such as lists of acceptable transforms) within the crypto map entry.
Perform this task to create crypto map entries that use IKE to establish the SAs. To create IPv6 crypto map entries, you must use the ipv6 keyword with the crypto map command. For IPv4 crypto maps, use the crypto map command without the ipv6 keyword.
Dynamic Crypto Maps
Dynamic crypto maps can simplify IPsec configuration and are recommended for use with networks where the peers are not always predetermined. To create dynamic crypto maps, you should understand the following concepts:
Dynamic Crypto Maps Overview
Dynamic crypto maps are only available for use by IKE.
A dynamic crypto map entry is essentially a static crypto map entry without all the parameters configured. It acts as a policy template where the missing parameters are later dynamically configured (as the result of an IPsec negotiation) to match a remote peer's requirements. This allows remote peers to exchange IPsec traffic with the router even if the router does not have a crypto map entry specifically configured to meet all of the remote peer's requirements.
Dynamic crypto maps are not used by the router to initiate new IPsec security associations with remote peers. Dynamic crypto maps are used when a remote peer tries to initiate an IPsec security association with the router. Dynamic crypto maps are also used in evaluating traffic.
A dynamic crypto map set is included by reference as part of a crypto map set. Any crypto map entries that reference dynamic crypto map sets should be the lowest priority crypto map entries in the crypto map set (that is, have the highest sequence numbers) so that the other crypto map entries are evaluated first; that way, the dynamic crypto map set is examined only when the other (static) map entries are not successfully matched.
If the router accepts the peer's request, it installs the new IPsec security associations, it also installs a temporary crypto map entry. This entry contains the results of the negotiation. At this point, the router performs normal processing using this temporary crypto map entry as a normal entry, even requesting new security associations if the current ones are expiring (based upon the policy specified in the temporary crypto map entry). Once the flow expires (that is, all corresponding security associations expire), the temporary crypto map entry is removed.
For both static and dynamic crypto maps, if unprotected inbound traffic matches a permit statement in an access list, and the corresponding crypto map entry is tagged as "IPsec," the traffic is dropped because it is not IPsec-protected. (This is because the security policy as specified by the crypto map entry states that this traffic must be IPsec-protected.)
For static crypto map entries, if outbound traffic matches a permit statement in an access list and the corresponding SA is not yet established, the router initiates new SAs with the remote peer. In the case of dynamic crypto map entries, if no SA exists, the traffic would simply be dropped (because dynamic crypto maps are not used for initiating new SAs).
Tunnel Endpoint Discovery
Defining a dynamic crypto map allows only the receiving router to dynamically determine an IPsec peer. Tunnel Endpoint Discovery (TED) allows the initiating router to dynamically determine an IPsec peer for secure IPsec communications.
Dynamic TED helps to simplify the IPsec configuration on individual routers within a large network. Each node has a simple configuration that defines the local network that the router is protecting and the required IPsec transforms.
To have a large, fully-meshed network without TED, each peer needs to have static crypto maps to every other peer in the network. For example, if there are 100 peers in a large, fully-meshed network, each router needs 99 static crypto maps for each of its peers. With TED, only a single dynamic TED-enabled crypto map is needed because the peer is discovered dynamically. Thus, static crypto maps do not need to be configured for each peer.
The figure below and the corresponding steps explain a sample TED network topology.

DETAILED STEPS
What to Do Next
TED Versions
The following table lists the available TED versions:
|
Version |
First Available Release |
Description |
|---|---|---|
|
TEDv1 |
12.0(5)T |
Performs basic TED functionality on nonredundant networks. |
|
TEDv2 |
12.1M |
Enhanced to work with redundant networks with paths through multiple security gateways between the source and the destination. |
|
TEDv3 |
12.2M |
Enhanced to allow non-IP-related entries to be used in the access list. |
TED Restrictions
TED has the following restrictions:
- It is Cisco proprietary.
- It is available only on dynamic crypto maps. (The dynamic crypto map template is based on the dynamic crypto map performing peer discovery. Although there are no access-list restrictions on the dynamic crypto map template, the dynamic crypto map template should cover data sourced from the protected traffic and the receiving router using the any keyword. When using the any keyword, include explicit deny statements to exempt routing protocol traffic prior to entering the permit any command.
- TED works only in tunnel mode; that is, it does not work in transport mode.
- It is limited by the performance and scalability of the limitation of IPsec on each individual platform.
Note
Enabling TED slightly decreases the general scalability of IPsec because of the set-up overhead of peer discovery, which involves an additional "round-trip" of IKE messages (TED probe and reply). Although minimal, the additional memory used to store data structures during the peer discovery stage adversely affects the general scalability of IPsec. - IP addresses must be routed within the network.
- The access list used in the crypto map for TED can only contain IP-related entries--TCP, UDP, or other protocols cannot be used in the access list.
Note
This restriction is no longer applicable in TEDv3.
Redundant Interfaces Sharing the Same Crypto Map
For redundancy, you could apply the same crypto map set to more than one interface. The default behavior is as follows:
- Each interface has its own piece of the security association database.
- The IP address of the local interface is used as the local address for IPsec traffic originating from or destined to that interface.
If you apply the same crypto map set to multiple interfaces for redundancy purposes, you must specify an identifying interface. One suggestion is to use a loopback interface as the identifying interface. This has the following effects:
- The per-interface portion of the IPsec security association database is established one time and shared for traffic through all the interfaces that share the same crypto map.
- The IP address of the identifying interface is used as the local address for IPsec traffic originating from or destined to those interfaces sharing the same crypto map set.
Establish Manual SAs
The use of manual security associations is a result of a prior arrangement between the users of the local router and the IPsec peer. The two parties may begin with manual SAs and then move to using SAs established via IKE, or the remote party's system may not support IKE. If IKE is not used for establishing SAs, there is no negotiation of SAs, so the configuration information in both systems must be the same in order for traffic to be processed successfully by IPsec.
The local router can simultaneously support manual and IKE-established SAs, even within a single crypto map set.
There is very little reason to disable IKE on the local router (unless the router only supports manual SAs, which is unlikely).
Note | Access lists for crypto map entries tagged as ipsec-manual are restricted to a single permit entry and subsequent entries are ignored. In other words, the SAs established by that particular crypto map entry are only for a single data flow. To support multiple manually established SAs for different kinds of traffic, define multiple crypto access lists, and apply each one to a separate ipsec-manual crypto map entry. Each access list should include one permit statement defining what traffic to protect. |
How to Configure IPsec VPNs
- Creating Crypto Access Lists
- Configuring Transform Sets for IKEv1 and IKEv2 Proposals
- Creating Crypto Map Sets
- Applying Crypto Map Sets to Interfaces
Creating Crypto Access Lists
DETAILED STEPS
| Command or Action | Purpose | |||
|---|---|---|---|---|
Step 1 |
enable
Example: Device> enable |
Enables privileged EXEC mode. | ||
Step 2 |
configure terminal
Example: Device# configure terminal |
Enters global configuration mode. | ||
Step 3 | Do one of the following:
Example: Device(config)# access-list 100 permit ip 10.0.68.0 0.0.0.255 10.1.1.0 0.0.0.255 Example: Device(config)# ip access-list extended vpn-tunnel |
Specifies conditions to determine which IP packets are protected.
| ||
Step 4 | Repeat Step 3 for each crypto access list you want to create.
|
-- |
What to Do Next
After at least one crypto access list is created, a transform set needs to be defined as described in the "Configuring Transform Sets for IKEv1 and IKEv2 Proposals" section.
Next the crypto access lists need to be associated to particular interfaces when you configure and apply crypto map sets to the interfaces. (Follow the instructions in the "Creating Crypto Map Sets" and "Applying Crypto Map Sets to Interfaces" sections).
Configuring Transform Sets for IKEv1 and IKEv2 Proposals
Perform this task to define a transform set that is to be used by the IPsec peers during IPsec security association negotiations with IKEv1 and IKEv2 proposals.
Restrictions
If you are specifying SEAL encryption, note the following restrictions:
- Your router and the other peer must not have a hardware IPsec encryption.
- Your router and the other peer must support IPsec.
- Your router and the other peer must support the k9 subsystem.
- SEAL encryption is available only on Cisco equipment. Therefore, interoperability is not possible.
- Unlike IKEv1, the authentication method and SA lifetime are not negotiable in IKEv2, and because of this, these parameters cannot be configured under the IKEv2 proposal.
Configuring Transform Sets for IKEv1
DETAILED STEPS
| Command or Action | Purpose | |
|---|---|---|
Step 1 |
enable
Example: Device> enable |
Enables privileged EXEC mode. |
Step 2 |
configure terminal
Example: Device# configure terminal |
Enters global configuration mode. |
Step 3 |
crypto ipsec transform-set
transform-set-name
transform1 [transform2 [transform3]]
Example: Device(config)# crypto ipsec transform-set aesset esp-aes 256 esp-sha-hmac |
Defines a transform set and enters crypto transform configuration mode.
|
Step 4 |
mode [tunnel |
transport]
Example: Device(cfg-crypto-tran)# mode transport |
(Optional) Changes the mode associated with the transform set. |
Step 5 |
end
Example: Device(cfg-crypto-tran)# end |
Exits crypto transform configuration mode and enters privileged EXEC mode. |
Step 6 |
clear crypto sa [peer {ip-address |
peer-name} |
sa map
map-name |
sa entry
destination-address
protocol
spi]
Example: Device# clear crypto sa |
(Optional) Clears existing IPsec security associations so that any changes to a transform set takes effect on subsequently established security associations. Manually established SAs are reestablished immediately. |
Step 7 |
show crypto ipsec transform-set [tag
transform-set-name]
Example: Device# show crypto ipsec transform-set |
(Optional) Displays the configured transform sets. |
What to Do Next
After you have defined a transform set, you should create a crypto map as specified in the "Creating Crypto Map Sets" section.
Configuring Transform Sets for IKEv2
DETAILED STEPS
| Command or Action | Purpose | |
|---|---|---|
Step 1 |
enable
Example: Device> enable |
Enables privileged EXEC mode. |
Step 2 |
configure terminal
Example: Device# configure terminal |
Enters global configuration mode. |
Step 3 |
crypto ikev2 proposal
proposal-name
Example: Device(config)# crypto ikev2 proposal proposal-1 |
Specifies the name of the proposal and enters crypto IKEv2 proposal configuration mode. |
Step 4 |
encryption
transform1 [transform2] ...
Example: Device(config-ikev2-proposal)# encryption 3des aes-cbc-128 |
(Optional) Specifies one or more transforms of the following encryption type: |
Step 5 |
integrity
transform1 [transform2] ...
Example: Device(config-ikev2-proposal)# integrity sha md5 |
(Optional) Specifies one or more transforms of the following integrity type: |
Step 6 |
group
transform1 [transform2] ...
Example: Device(config-ikev2-proposal)# group 2 |
(Optional) Specifies one or more transforms of the possible DH group type: |
Step 7 |
end
Example: Device(config-ikev2-proposal)# end |
Exits crypto IKEv2 proposal configuration mode and returns to privileged EXEC mode. |
Step 8 |
show crypto ikev2 proposal
Example: Device# show crypto ikev2 proposal |
(Optional) Displays the parameters for each IKEv2 proposal. |
Transform Sets for IKEv2 Examples
IKEv2 Proposal with One Transform for Each Transform Type
Device(config)# crypto ikev2 proposal proposal-1
Device(config-ikev2-proposal)# encryption 3des
Device(config-ikev2-proposal)# integrity sha
Device(config-ikev2-proposal)# group 2
IKEv2 Proposal with Multiple Transforms for Each Transform Type
Device(config)# crypto ikev2 proposal proposal-2
Device(config-ikev2-proposal)# encryption 3des aes-cbc-128
Device(config-ikev2-proposal)# integrity sha md5
Device(config-ikev2-proposal)# group 2 5
The IKEv2 proposal proposal-2 translates to the following prioritized list of transform combinations:
IKEv2 Proposals on the Initiator and Responder
The proposal of the initiator is as follows:
Device(config)# crypto ikev2 proposal proposal-1
Device(config-ikev2-proposal)# encryption 3des aes-cbc-128
Device(config-ikev2-proposal)# integrity sha md5
Device(config-ikev2-proposal)# group 2 5
The proposal of the responder is as follows:
Device(config)# crypto ikev2 proposal proposal-2
Device(config-ikev2-proposal)# encryption aes-cbc-128 3des
Device(config-ikev2-proposal)# integrity md5 sha
Device(config-ikev2-proposal)# group 5 2
In the scenario, the initiator's choice of algorithms is preferred and the selected algorithms are as follows:
encryption 3des
integrity sha
group 2
What to Do Next
After you have defined a transform set, you should create a crypto map as specified in the "Creating Crypto Map Sets" section.
Creating Crypto Map Sets
- Creating Static Crypto Maps
- Creating Dynamic Crypto Maps
- Creating Crypto Map Entries to Establish Manual SAs
Creating Static Crypto Maps
When IKE is used to establish SAs, the IPsec peers can negotiate the settings they use for the new security associations. This means that you can specify lists (such as lists of acceptable transforms) within the crypto map entry.
Perform this task to create crypto map entries that use IKE to establish SAs. To create IPv6 crypto map entries, you must use the ipv6 keyword with the crypto map command. For IPv4 crypto maps, use the crypto map command without the ipv6 keyword.
DETAILED STEPS
| Command or Action | Purpose | |||
|---|---|---|---|---|
Step 1 |
enable
Example: Device> enable |
Enables privileged EXEC mode. | ||
Step 2 |
configure terminal
Example: Device# configure terminal |
Enters global configuration mode. | ||
Step 3 |
crypto map [ipv6]
map-name
seq-num [ipsec-isakmp]
Example: Device(config)# crypto map static-map 1 ipsec-isakmp |
Creates or modifies a crypto map entry, and enters crypto map configuration mode. | ||
Step 4 |
match address
access-list-id
Example: Device(config-crypto-m)# match address vpn-tunnel |
Names an extended access list. | ||
Step 5 |
set peer {hostname |
ip-address}
Example: Device(config-crypto-m)# set-peer 192.168.101.1 |
Specifies a remote IPsec peer--the peer to which IPsec protected traffic can be forwarded. | ||
Step 6 |
set transform-set
transform-set-name1 [transform-set-name2...transform-set-name6]
Example: Device(config-crypto-m)# set transform-set aesset |
Specifies the transform sets that are allowed for this crypto map entry. | ||
Step 7 |
set security-association lifetime {seconds
seconds |
kilobytes
kilobytes |
kilobytes
disable}
Example: Device (config-crypto-m)# set security-association lifetime seconds 2700 |
(Optional) Specifies a SA lifetime for the crypto map entry. | ||
Step 8 |
set security-association level per-host
Example: Device(config-crypto-m)# set security-association level per-host |
(Optional) Specifies that separate SAs should be established for each source and destination host pair.
| ||
Step 9 |
set pfs [group1 |
group2 |
group5]
Example: Device(config-crypto-m)# set pfs group2 |
(Optional) Specifies that IPsec either should ask for password forward secrecy (PFS) when requesting new SAs for this crypto map entry or should demand PFS in requests received from the IPsec peer. | ||
Step 10 |
end
Example: Device(config-crypto-m)# end |
Exits crypto map configuration mode and returns to privileged EXEC mode. | ||
Step 11 |
show crypto map [interface
interface |
tag
map-name]
Example: Device# show crypto map |
Displays your crypto map configuration. |
Troubleshooting Tips
Certain configuration changes take effect only when negotiating subsequent SAs. If you want the new settings to take immediate effect, you must clear the existing SAs so that they are reestablished with the changed configuration. If the router is actively processing IPsec traffic, clear only the portion of the SA database that would be affected by the configuration changes (that is, clear only the SAs established by a given crypto map set). Clearing the full SA database should be reserved for large-scale changes, or when the router is processing very little other IPsec traffic.
To clear IPsec SAs, use the clear crypto sa command with appropriate parameters. (Omitting all parameters clears out the full SA database, which clears active security sessions.)
What to Do Next
After you have successfully created a static crypto map, you must apply the crypto map set to each interface through which IPsec traffic flows. To complete this task, see the "Applying Crypto Map Sets to Interfaces" section.
Creating Dynamic Crypto Maps
Dynamic crypto map entries specify crypto access lists that limit traffic for which IPsec SAs can be established. A dynamic crypto map entry that does not specify an access list is ignored during traffic filtering. A dynamic crypto map entry with an empty access list causes traffic to be dropped. If there is only one dynamic crypto map entry in the crypto map set, it must specify the acceptable transform sets.
Perform this task to create dynamic crypto map entries that use IKE to establish the SAs.
Note | IPv6 addresses are not supported on dynamic crypto maps. |
DETAILED STEPS
| Command or Action | Purpose | |||
|---|---|---|---|---|
Step 1 |
enable
Example: Device> enable |
Enables privileged EXEC mode. | ||
Step 2 |
configure terminal
Example: Device# configure terminal |
Enters global configuration mode. | ||
Step 3 |
crypto dynamic-map
dynamic-map-name
dynamic-seq-num
Example: Device(config)# crypto dynamic-map test-map 1 |
Creates a dynamic crypto map entry and enters crypto map configuration mode. | ||
Step 4 |
set transform-set
transform-set-name1 [transform-set-name2...transform-set-name6]
Example: Device(config-crypto-m)# set transform-set aesset |
Specifies the transform sets allowed for the crypto map entry. | ||
Step 5 |
match address
access-list-id
Example: Device(config-crypto-m)# match address 101 |
(Optional) Specifies the list number or name of an extended access list.
| ||
Step 6 |
set peer {hostname |
ip-address}
Example: Device(config-crypto-m)# set peer 192.168.101.1 |
(Optional) Specifies a remote IPsec peer. Repeat this step for multiple remote peers.
| ||
Step 7 |
set security-association lifetime {seconds
seconds |
kilobytes
kilobytes |
kilobytes
disable}
Example: Device(config-crypto-m)# set security-association lifetime seconds 7200 |
(Optional) Overrides (for a particular crypto map entry) the global lifetime value, which is used when negotiating IP Security SAs.
| ||
Step 8 |
set pfs [group1 |
group2 |
group5]
Example: Device(config-crypto-m)# set pfs group2 |
(Optional) Specifies that IPsec should ask for PFS when requesting new security associations for this crypto map entry or should demand PFS in requests received from the IPsec peer. | ||
Step 9 |
exit
Example: Device(config-crypto-m)# exit |
Exits crypto map configuration mode and returns to global configuration mode. | ||
Step 10 |
exit
Example: Device(config)# exit |
Exits global configuration mode. | ||
Step 11 |
show crypto dynamic-map [tag
map-name]
Example: Device# show crypto dynamic-map |
(Optional) Displays information about dynamic crypto maps. | ||
Step 12 |
configure terminal
Example: Device# configure terminal |
Enters global configuration mode. | ||
Step 13 |
crypto map
map-name
seq-num
ipsec-isakmp
dynamic
dynamic-map-name [discover]
Example: Device(config)# crypto map static-map 1 ipsec-isakmp dynamic test-map discover |
(Optional) Adds a dynamic crypto map to a crypto map set.
| ||
Step 14 |
exit
Example: Device(config)# exit |
Exits global configuration mode. |
Troubleshooting Tips
Certain configuration changes take effect only when negotiating subsequent SAs. If you want the new settings to take immediate effect, you must clear the existing SAs so that they are reestablished with the changed configuration. If the router is actively processing IPsec traffic, clear only the portion of the SA database that would be affected by the configuration changes (that is, clear only the SAs established by a given crypto map set). Clearing the entire SA database must be reserved for large-scale changes, or when the router is processing minimal IPsec traffic.
To clear IPsec SAs, use the clear crypto sa command with appropriate parameters. (Omitting all parameters clears the full SA database, which clears active security sessions.)
What to Do Next
After you have successfully created a crypto map set, you must apply the crypto map set to each interface through which IPsec traffic flows. To complete this task, see the "Applying Crypto Map Sets to Interfaces" section.
Creating Crypto Map Entries to Establish Manual SAs
Perform this task to create crypto map entries to establish manual SAs (that is, when IKE is not used to establish the SAs). To create IPv6 crypto maps entries, you must use the ipv6 keyword with the crypto map command. For IPv4 crypto maps, use the crypto map command without the ipv6 keyword.
DETAILED STEPS
| Command or Action | Purpose | |||
|---|---|---|---|---|
Step 1 |
enable
Example: Device> enable |
Enables privileged EXEC mode. | ||
Step 2 |
configure terminal
Example: Device# configure terminal |
Enters global configuration mode. | ||
Step 3 |
crypto map [ipv6]
map-name
seq-num [ipsec-manual]
Example: Device(config)# crypto map mymap 10 ipsec-manual |
Specifies the crypto map entry to be created or modified and enters crypto map configuration mode. | ||
Step 4 |
match address
access-list-id
Example: Device(config-crypto-m)# match address 102 |
Names an IPsec access list that determines which traffic should be protected by IPsec and which traffic should not be protected by IPsec in the context of this crypto map entry. | ||
Step 5 |
set peer {hostname |
ip-address}
Example: Device(config-crypto-m)# set peer 10.0.0.5 |
Specifies the remote IPsec peer. This is the peer to which IPsec protected traffic should be forwarded. | ||
Step 6 |
set transform-set
transform-set-name
Example: Device(config-crypto-m)# set transform-set someset |
Specifies which transform set should be used.
| ||
Step 7 |
Sets the AH security parameter indexes (SPIs) and keys to apply to inbound and outbound protected traffic if the specified transform set includes the AH protocol. | |||
Step 8 | Do one of the following:
Example: Device(config-crypto-m)# set session-key inbound esp 256 cipher 0123456789012345 Example: Device(config-crypto-m)# set session-key outbound esp 256 cipher abcdefabcdefabcd |
Sets the Encapsulating Security Payload (ESP) Security Parameter Indexes (SPI) and keys to apply to inbound and outbound protected traffic if the specified transform set includes the ESP protocol. Or Specifies the cipher keys if the transform set includes an ESP cipher algorithm. Specifies the authenticator keys if the transform set includes an ESP authenticator algorithm. | ||
Step 9 |
exit
Example: Device(config-crypto-m)# exit |
Exits crypto map configuration mode and returns to global configuration mode. | ||
Step 10 |
exit
Example: Device(config)# exit |
Exits global configuration mode. | ||
Step 11 |
show crypto map [interface
interface |
tag
map-name]
Example: Device# show crypto map |
Displays your crypto map configuration. |
Troubleshooting Tips
For manually established SAs, you must clear and reinitialize the SAs for the changes to take effect. To clear IPsec SAs, use the clear crypto sa command with appropriate parameters. (Omitting all parameters clears the entire SA database, which clears active security sessions.)
What to Do Next
After you have successfully created a crypto map set, you must apply the crypto map set to each interface through which IPsec traffic flows. To complete this task, see the "Applying Crypto Map Sets to Interfaces" section.
Applying Crypto Map Sets to Interfaces
You must apply a crypto map set to each interface through which IPsec traffic flows. Applying the crypto map set to an interface instructs the device to evaluate the interface's traffic against the crypto map set and to use the specified policy during connection or security association negotiation on behalf of traffic to be protected by the crypto map.
Perform this task to apply a crypto map to an interface.
DETAILED STEPS
| Command or Action | Purpose | |
|---|---|---|
Step 1 |
enable
Example: Device> enable |
Enables privileged EXEC mode. |
Step 2 |
configure terminal
Example: Device# configure terminal |
Enters global configuration mode. |
Step 3 |
interface
type/number
Example: Device(config)# interface FastEthernet 0/0 |
Configures an interface and enters interface configuration mode. |
Step 4 |
crypto map
map-name
Example: Device(config-if)# crypto map mymap |
Applies a crypto map set to an interface. |
Step 5 |
exit
Example: Device(config-if)# exit |
Exits interface configuration mode and returns to global configuration mode. |
Step 6 |
crypto map
map-name
local-address
interface-id
Example: Device(config)# crypto map mymap local-address loopback0 |
(Optional) Permits redundant interfaces to share the same crypto map using the same local identity. |
Step 7 |
exit
Example: Device(config)# exit |
(Optional) Exits global configuration mode. |
Step 8 |
show crypto map [interface
interface]
Example: Device# show crypto map |
(Optional) Displays your crypto map configuration |
Configuration Examples for IPsec VPN
Example: Configuring AES-Based Static Crypto Map
This example shows how a static crypto map is configured and how an AES is defined as the encryption method:
crypto isakmp policy 10
 encryption aes 256
 authentication pre-share
 lifetime 180
crypto isakmp key cisco123 address 10.0.110.1
!
!
crypto ipsec transform-set aesset esp-aes 256 esp-sha-hmac
 mode transport
!
crypto map aesmap 10 ipsec-isakmp
 set peer 10.0.110.1
 set transform-set aesset
 match address 120
!
!
!
voice call carrier capacity active
!
!
mta receive maximum-recipients 0
!
!
interface FastEthernet0/0
 ip address 10.0.110.2 255.255.255.0
 ip nat outside
 no ip route-cache
 no ip mroute-cache
 duplex auto
 speed auto
 crypto map aesmap
!
interface Serial0/0
 no ip address
 shutdown
!
interface FastEthernet0/1
 ip address 10.0.110.1 255.255.255.0
 ip nat inside
 no ip route-cache
 no ip mroute-cache
 duplex auto
 speed auto
!
ip nat inside source list 110 interface FastEthernet0/0 overload
ip classless
ip route 0.0.0.0 0.0.0.0 10.5.1.1
ip route 10.0.110.0 255.255.255.0 FastEthernet0/0
ip route 172.18.124.0 255.255.255.0 10.5.1.1
ip route 172.18.125.3 255.255.255.255 10.5.1.1
ip http server
!
!
access-list 110 deny   ip 10.0.110.0 0.0.0.255 10.0.110.0 0.0.0.255
access-list 110 permit ip 10.0.110.0 0.0.0.255 any
access-list 120 permit ip 10.0.110.0 0.0.0.255 10.0.110.0 0.0.0.255
!
Additional References
Related Documents
|
Related Topic |
Document Title |
|---|---|
|
Cisco IOS commands |
|
|
IKE, IPsec, and PKI configuration commands: complete command syntax, command mode, defaults, usage guidelines, and examples |
|
|
IKE configuration |
Configuring Internet Key Exchange for IPsec VPNs |
|
Suite-B SHA-2 family (HMAC variant) and Elliptic Curve (EC) key pair configuration |
Configuring Internet Key Exchange for IPsec VPNs |
|
Suite-B Integrity algorithm type transform configuration |
Configuring Internet Key Exchange Version 2 (IKEv2) |
|
Suite-B Elliptic Curve Digital Signature Algorithm (ECDSA) signature (ECDSA-sig) authentication method configuration for IKEv2 |
Configuring Internet Key Exchange Version 2 (IKEv2) |
|
Suite-B Elliptic curve Diffie-Hellman (ECDH) support for IPsec SA negotiation |
|
|
Suite-B support for certificate enrollment for a PKI |
Configuring Certificate Enrollment for a PKI |
RFCs
|
RFCs |
Title |
|---|---|
|
RFC 2401 |
Security Architecture for the Internet Protocol |
|
RFC 2402 |
IP Authentication Header |
|
RFC 2403 |
The Use of HMAC-MD5-96 within ESP and AH |
|
RFC 2404 |
The Use of HMAC-SHA-1-96 within ESP and AH |
|
RFC 2405 |
The ESP DES-CBC Cipher Algorithm With Explicit IV |
|
RFC 2406 |
IP Encapsulating Security Payload (ESP) |
|
RFC 2407 |
The Internet IP Security Domain of Interpretation for ISAKMP |
|
RFC 2408 |
Internet Security Association and Key Management Protocol (ISAKMP) |
Technical Assistance
|
Description |
Link |
|---|---|
|
The Cisco Support and Documentation website provides online resources to download documentation, software, and tools. Use these resources to install and configure the software and to troubleshoot and resolve technical issues with Cisco products and technologies. Access to most tools on the Cisco Support and Documentation website requires a Cisco.com user ID and password. |
Feature Information for Security for VPNs with IPsec
The following table provides release information about the feature or features described in this module. This table lists only the software release that introduced support for a given feature in a given software release train. Unless noted otherwise, subsequent releases of that software release train also support that feature.
Use Cisco Feature Navigator to find information about platform support and Cisco software image support. To access Cisco Feature Navigator, go to www.cisco.com/go/cfn. An account on Cisco.com is not required.
| Table 4 | Feature Information for Configuring Security for IPsec VPNs |
|
Feature Name |
Software Releases |
Feature Information |
|---|---|---|
|
Advanced Encryption Standard |
12.2(8)T |
This feature adds support for the new encryption standard AES, which is a privacy transform for IPsec and IKE and has been developed to replace DES. The following commands were modified by this feature: crypto ipsec transform-set, encryption (IKE policy), show crypto ipsec transform-set, show crypto isakmp policy. |
|
DES/3DES/AES VPN Encryption Module (AIM-VPN/EPII, AIM-VPN/HPII, AIM-VPN/BPII Family) |
12.3(7)T |
This feature describes in which VPN encryption hardware AIM and NM are supported, in certain Cisco IOS software releases. |
|
IKEv2 Proposal Support |
15.1(1)T |
An IKEv2 proposal is a set of transforms used in the negotiation of IKEv2 SA as part of the IKE_SA_INIT exchange. An IKEv2 proposal is regarded as complete only when it has at least an encryption algorithm, an integrity algorithm, and a Diffie-Hellman (DH) group configured. If no proposal is configured and attached to an IKEv2 policy, then the default proposal is used in negotiation. The following commands were modified by this feature: crypto ikev2 proposal, encryption (ikev2 proposal), group (ikev2 proposal), integrity (ikev2 proposal), show crypto ikev2 proposal. |
|
IPv6 Support for IPSec and IKEv2 |
15.1(4)M |
This feature allows IPv6 addresses to be added to IPSec and IKEv2 protocols. In Cisco IOS Release 15.1(4)M, this feature was introduced. The following commands were introduced or modified: crypto map (global IPsec), crypto map (isakmp), crypto map (Xauth), ipv6 crypto map. |
|
Option to Disable Volume-based IPsec Lifetime Rekey |
15.0(1)M |
This feature allows customers to disable the IPsec security association rekey when processing large amounts of data. The following commands were modified by this feature: crypto ipsec security association lifetime, set security-association lifetime. |
|
SEAL Encryption |
12.3(7)T |
This feature adds support for SEAL encryption in IPsec. The following command was modified by this feature: crypto ipsec transform-set. |
|
Software IPPCP (LZS) with Hardware Encryption |
12.2(13)T |
This feature allows customers to use LZS software compression with IPsec when a VPN module is in Cisco 2600 and Cisco 3600 series routers. |
|
Suite-B Support in IOS SW Crypto |
15.1(2)T |
Suite-B adds support for four user interface suites of cryptographic algorithms for use with IKE and IPSec that are described in RFC 4869. Each suite consists of an encryption algorithm, a digital signature algorithm, a key agreement algorithm, and a hash or message digest algorithm. The following command was modified by this feature: crypto ipsec transform-set. |
Cisco and the Cisco logo are trademarks or registered trademarks of Cisco and/or its affiliates in the U.S. and other countries. To view a list of Cisco trademarks, go to this URL: www.cisco.com/go/trademarks. Third-party trademarks mentioned are the property of their respective owners. The use of the word partner does not imply a partnership relationship between Cisco and any other company. (1110R)
Any Internet Protocol (IP) addresses and phone numbers used in this document are not intended to be actual addresses and phone numbers. Any examples, command display output, network topology diagrams, and other figures included in the document are shown for illustrative purposes only. Any use of actual IP addresses or phone numbers in illustrative content is unintentional and coincidental.