
 Feedback
Contents
- Cisco Group Encrypted Transport VPN
- Finding Feature Information
- Prerequisites for Cisco Group Encrypted Transport VPN
- Restrictions for Cisco Group Encrypted Transport VPN
- Information About Cisco Group Encrypted Transport VPN
- Cisco Group Encrypted Transport VPN Overview
- Cisco Group Encrypted Transport VPN Architecture
- Key Distribution Group Domain of Interpretation
- GDOI
- Group Member
- Key Server
- How Protocol Messages Work with Cisco IOS Software
- IPsec
- Communication Flow Between Key Servers and Group Members to Update IPsec SAs
- IPsec and ISAKMP Timers
- Address Preservation
- Secure Data Plane Multicast
- Secure Data Plane Unicast
- Cisco Group Encrypted Transport VPN Features
- Rekeying
- Rekey Sequence-Number Check
- Multicast Rekeying
- Configuration Requirements for Multicast Rekeying
- Unicast Rekeying and SAs
- Rekey Behavior After Policy Changes
- IPsec SA Usage on the Group Members
- Configuration Changes Can Trigger a Rekey By a Key Server
- Commands That Trigger a Rekey
- Retransmitting a Rekey
- Group Member Access Control List
- Behavior of a Group Member When Security Policy Changes
- Fail-Close Mode
- Guidelines for Using the Fail-Close Feature
- Time-Based Antireplay
- Clock Synchronization
- Interval Duration
- Antireplay Configurations
- Control-Plane Time-Based Antireplay
- Cooperative Key Server
- Announcement Messages
- Change Key Server Role
- Receive Only SA
- Global Conversion
- Passive SA
- Enhanced Solutions Manageability
- Support with VRF-Lite Interfaces
- GET VPN VRF-Aware GDOI on GM
- Shared GDOI Groups Policies and Crypto Maps
- Different Groups Policies with Different Crypto Maps Sharing a Key Server
- Different Groups Policies with Different Crypto Maps on Different Key Servers
- Authentication Policy for GM Registration
- GET VPN GM Authorization
- Rekey Functionality in Protocol Independent Multicast-Sparse Mode
- GM Removal and Policy Trigger
- GET VPN Software Versioning
- GM Removal
- GM Removal Compatibility with Other GET VPN Software Versions
- GM Removal with Transient IPsec SAs
- GM Removal with Immediate IPsec SA Deletion
- Policy Replacement and Rekey Triggering
- Inconsistencies Regarding Which TEK and KEK Policy Changes Will Trigger Rekeys
- Policy Replacement and Rekey Triggering Compatibility with Other GET VPN Software Versions
- GDOI MIB Support for GET VPN
- GDOI MIB Compatibility with Other GET VPN Software Versions
- GDOI MIB Table Hierarchy
- GDOI MIB Table Objects
- GDOI MIB Notifications
- GDOI MIB Limitations
- GET VPN Support for IPv6 in the Data Plane
- Cisco Group Encrypted Transport VPN System Logging Messages
- How to Configure Cisco Group Encrypted Transport VPN
- Ensuring That GMs Are Running GET VPN Software Versions Compatible with IPv6 in the Data Plane
- Configuring a Key Server
- Prerequisites
- Configuring RSA Keys to Sign Rekey Messages
- What to Do Next
- Configuring the Group ID Server Type and SA Type
- What to Do Next
- Configuring the Rekey
- Prerequisites
- Configuring a Unicast Rekey
- Configuring a Multicast Rekey
- Configuring Group Member ACLs
- What to Do Next
- Configuring an IPsec Lifetime Timer
- What to Do Next
- Configuring an ISAKMP Lifetime Timer
- Configuring the IPsec SA
- What to Do Next
- Configuring Time-Based Antireplay for a GDOI Group
- Configuring Passive SA
- Resetting the Role of the Key Server
- Configuring a Group Member
- Configuring the Group Name ID Key Server IP Address and Group Member Registration
- What to Do Next
- Creating a Crypto Map Entry
- What to Do Next
- Applying the Crypto Map to an Interface to Which the Traffic Must Be Encrypted
- Activating Fail-Close Mode
- Configuring Acceptable Ciphers or Hash Algorithms for KEK
- Configuring Acceptable Transform Sets for TEK
- Configuring GET VPN GM Authorization
- Configuring GM Authorization Using Preshared Keys
- Configuring GM Authorization Using PKI
- Removing GMs and Triggering Rekeys
- Ensuring That GMs Are Running Software Versions That Support GM Removal
- Removing GMs with Transient IPsec SAs
- Removing GMs and Deleting IPsec SAs Immediately
- Ensuring that GMs Are Running Software Versions That Support Policy Replacement
- Triggering a Rekey
- Configuring GDOI MIB Support for GET VPN
- Ensuring that GMs Are Running Software Versions That Support the GDOI MIB
- Creating Access Control for an SNMP Community
- Enabling Communication with the SNMP Manager
- Enabling GDOI MIB Notifications
- Verifying and Troubleshooting Cisco Group Encrypted Transport VPN Configurations
- Verifying States and Statistics for All Features and All Debug Levels
- Verifying the Active Encryption ACLs on a Key Server
- Verifying the Active Encryption ACLs on a Group Member
- Verifying Active Group Members on a Key Server
- Verifying Rekey-Related Statistics
- Verifying IPsec SAs That Were Created by GDOI on a Group Member
- Verifying IPsec SAs That Were Created by GDOI on a Key Server
- Verifying Key Server States and Statistics
- Verifying Cooperative Key Server States and Statistics
- Verifying Antireplay Pseudotime-Related Statistics
- Verifying Group Member States and Statistics
- Verifying the Downloaded RSA Public Key on the Group Member
- Verifying the Fail-Close Mode Status of a Crypto Map
- Displaying GDOI Debug Conditional Filters
- Displaying Information About GDOI Event Traces
- Configuration Examples for Cisco Group Encrypted Transport VPN
- Example: Key Server and Group Member Case Study
- Example: Configuring Key Server 1
- Example: Configuring Key Server 2
- Example: Configuring Group Member 1
- Example: Configuring Group Member 2
- Example: Configuring Group Member 3
- Example: Configuring Group Member 4
- Example: Configuring Group Member 5
- Example: Verifying the Active Encryption ACLs on a Key Server
- Example: Verifying the Active Encryption ACLs on a Group Member
- Example: Passive SA
- Example: Configuring Fail-Close Mode
- Example: Removing GMs from the GET VPN Network
- Example: Triggering Rekeys on Group Members
- Example: Configuring GDOI MIB Support for GET VPN
- Example: Ensuring That GMs Are Running GET VPN Software Versions Compatible with IPv6 in the Data Plane
- Additional References
- Related Documents
- Standards
- MIBs
- RFCs
- Technical Assistance
- Feature Information for Cisco Group Encrypted Transport VPN
- Glossary
Cisco Group Encrypted Transport VPN
 Note | Security threats, as well as the cryptographic technologies to help protect against them, are constantly changing. For more information about the latest Cisco cryptographic recommendations, see the Next Generation Encryption (NGE) white paper. |
Cisco Group Encrypted Transport Virtual Private Network (GET VPN) is a set of features that are necessary to secure IP multicast group traffic or unicast traffic over a private WAN that originates on or flows through a Cisco IOS device. GET VPN combines the keying protocol Group Domain of Interpretation (GDOI) with IP security (IPsec) encryption to provide users with an efficient method to secure IP multicast traffic or unicast traffic. GET VPN enables the router to apply encryption to nontunneled (that is, "native") IP multicast and unicast packets and eliminates the requirement to configure tunnels to protect multicast and unicast traffic.
This document describes how to configure, verify, and troubleshoot Cisco GET VPN.
Cisco Group Encrypted Transport VPN provides the following benefits:
- Provides data security and transport authentication, helping to meet security compliance and internal regulation by encrypting all WAN traffic
- Enables high-scale network meshes and eliminates complex peer-to-peer key management with group encryption keys
- For Multiprotocol Label Switching (MPLS) networks, maintains network intelligence such as full-mesh connectivity, natural routing path, and quality of service (QoS)
- Grants easy membership control with a centralized key server
- Helps ensure low latency and jitter by enabling full-time, direct communications between sites, without requiring transport through a central hub
- Reduces traffic loads on customer premises equipment (CPE) and provider-edge (PE) encryption devices by using the core network for replication of multicast traffic, avoiding packet replication at each individual peer site
- Finding Feature Information
- Prerequisites for Cisco Group Encrypted Transport VPN
- Restrictions for Cisco Group Encrypted Transport VPN
- Information About Cisco Group Encrypted Transport VPN
- How to Configure Cisco Group Encrypted Transport VPN
- Configuration Examples for Cisco Group Encrypted Transport VPN
- Additional References
- Feature Information for Cisco Group Encrypted Transport VPN
- Glossary
Finding Feature Information
Your software release may not support all the features documented in this module. For the latest caveats and feature information, see Bug Search Tool and the release notes for your platform and software release. To find information about the features documented in this module, and to see a list of the releases in which each feature is supported, see the feature information table at the end of this module.
Use Cisco Feature Navigator to find information about platform support and Cisco software image support. To access Cisco Feature Navigator, go to www.cisco.com/go/cfn. An account on Cisco.com is not required.
Prerequisites for Cisco Group Encrypted Transport VPN
- The following Cisco VPN acceleration modules are supported:
- You should be knowledgeable about IPsec and Internet Key Exchange (IKE).
- You should know how to configure multicast and unicast routing on a Cisco IOS global router.
- When the IKE policy is configured, the IKE lifetime should be set to the minimum of 5 minutes so that unnecessary resources are not wasted on the maintenance of the IKE security association (SA). After the registration IKE SA is established, the registration SAs no longer have to be maintained because the rekey SA has been created and will be used to accept future rekeys.
Restrictions for Cisco Group Encrypted Transport VPN
- Cisco 870 series routers can be configured as group members only.
- If you are encrypting high packet rates for counter-based antireplay, ensure that you do not make the lifetime too long or it can take several hours for the sequence number to wrap. For example, if the packet rate is 100 kilopackets per second, the lifetime should be configured as fewer than 11.93 hours so that the SA is used before the sequence number wraps.
- For unicast traffic and counter-based antireplay, the sequence numbers may be out of sync between the group members if one of the group members goes down and comes back up. For example: There is traffic from group member 1 to group member 2, and the last sequence number is n . Group member 1 goes down and comes back up. The sequence number of the SA at group member 1 now starts with 1, but group member 2 is expecting continuation from the previous sequence number (n + 1). This situation causes subsequent traffic from group member 1 to be dropped until the sequence number on group member 1 reaches n or the next rekey.
- The Cisco VSA feature introduced in Cisco IOS Release 12.4(15)T5 does not support time-based antireplay.
Note
Support for time-based antireplay on the Cisco VSA encryption module was added in Cisco IOS Release 12.4(22)T. - If you are overriding the don't fragment bit (df-bit) setting in the IP header of encapsulated packets, you must configure the override commands in global configuration mode. GET VPN does not honor the interface configuration. This restriction is limited only to GET VPN. IPsec accepts both global configuration- and interface-specific override commands.
- Counter-based antireplay is not recommended and works only if there are two group members in a group.
- Because Path MTU Discovery (PMTUD) does not work for GET VPN, there is a possibility that encapsulated packets could be dropped when the df-bit is set and the MTU of an intermediate link is less than the size of the encapsulated packet. In such an event, the router that drops the packet sends a notification to the source IP address on the packet, indicating that the packet has been dropped because the router could not fragment the packet due to the df-bit setting. In GET VPN, this message goes past the encapsulating endpoint directly to the source of the data due to the header preservation feature of GET VPN. Thus, the encapsulating router never knows that it has to fragment the packet to a smaller size before setting the df-bit after encapsulation. It continues to set the df-bit on the packets and they continue to be dropped at the intermediate router. (This is known as black-holing the traffic.)
- A control plane replay protection mechanism was added to Cisco IOS releases 12.4(15)T10, 12.4(22)T3, 12.4(24)T2, 15.0(1)M, and 12.2(33)XNE. This mechanism is not backward-compatible, so if any GET VPN group member in the network is running any of these (or later) releases, you must also upgrade all key servers to one of these (or newer) releases. Otherwise, network disruption might occur because of a failed rekey, which causes one of the following system logging (syslog) messages to appear:
%GDOI-3-GDOI_REKEY_SEQ_FAILURE: Failed to process rekey seq # 2 in seq payload for group get-group, last seq # 6
or
%GDOI-3-PSEUDO_TIME_TOO_OLD: Rekey received in group get-group is too old and failed PST check: my_pst is 184 sec, peer_pst is 25 sec, allowable_skew is 10 sec
Information About Cisco Group Encrypted Transport VPN
- Cisco Group Encrypted Transport VPN Overview
- Cisco Group Encrypted Transport VPN Architecture
- Cisco Group Encrypted Transport VPN Features
- Cisco Group Encrypted Transport VPN System Logging Messages
Cisco Group Encrypted Transport VPN Overview
Networked applications such as voice and video increase the need for instantaneous, branch-interconnected, and QoS-enabled WANs. The distributed nature of these applications results in increased demands for scale. At the same time, enterprise WAN technologies force businesses to trade off between QoS-enabled branch interconnectivity and transport security. As network security risks increase and regulatory compliance becomes essential, GET VPN, a next-generation WAN encryption technology, eliminates the need to compromise between network intelligence and data privacy.
With GET, Cisco provides tunnelless VPN, which eliminates the need for tunnels. Meshed networks, by removing the need for point-to-point tunnels, can scale higher while maintaining network-intelligence features critical to voice and video quality. GET is a standards-based security model that is based on the concept of "trusted" group members. Trusted member routers use a common security methodology that is independent of any point-to-point IPsec tunnel relationship. Also, "any-any" networks, by using trusted groups instead of point-to-point tunnels, can scale higher while maintaining network-intelligence features (such as QoS, routing, and multicast), which are critical to voice and video quality.
GET-based networks can be used in a variety of WAN environments, including IP and MPLS. MPLS VPNs that use this encryption technology are highly scalable, manageable, and cost-effective, and they meet government-mandated encryption requirements. The flexible nature of GET allows security-conscious enterprises either to manage their own network security over a service provider WAN service or to offload encryption services to their providers. GET simplifies securing large Layer 2 or MPLS networks that require partial or full-mesh connectivity.
Cisco Group Encrypted Transport VPN Architecture
GET VPN encompasses Multicast Rekeying, a way to enable encryption for "native" multicast packets, and unicast rekeying over a private WAN. Multicast Rekeying and GET VPN is based on GDOI as defined in Internet Engineering Task Force (IETF) RFC 3547. In addition, there are similarities to IPsec in the area of header preservation and SA lookup. Dynamic distribution of IPsec SAs has been added, and tunnel overlay properties of IPsec have been removed. The diagram below further illustrates the GET VPN concepts and relationships.

This section has the following subsections:
- Key Distribution Group Domain of Interpretation
- Address Preservation
- Secure Data Plane Multicast
- Secure Data Plane Unicast
Key Distribution Group Domain of Interpretation
- GDOI
- Group Member
- Key Server
- How Protocol Messages Work with Cisco IOS Software
- IPsec
- Communication Flow Between Key Servers and Group Members to Update IPsec SAs
- IPsec and ISAKMP Timers
GDOI
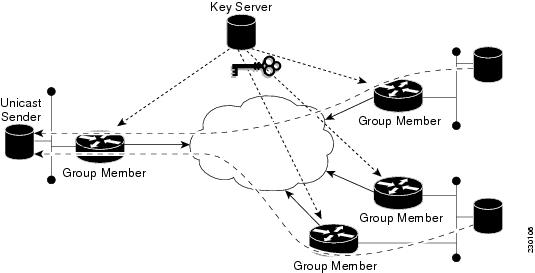
GDOI is defined as the Internet Security Association Key Management Protocol (ISAKMP) Domain of Interpretation (DOI) for group key management. In a group management model, the GDOI protocol operates between a group member and a group controller or key server (GCKS), which establishes SAs among authorized group members. The ISAKMP defines two phases of negotiation. GDOI is protected by a Phase 1 ISAKMP security association. The Phase 2 exchange is defined in IETF RFC 3547. The topology shown in the figure below and the corresponding explanation show how this protocol works.
Group Member
The group member registers with the key server to get the IPsec SA or SAs that are necessary to communicate with the group. The group member provides the group ID to the key server to get the respective policy and keys for this group. These keys are refreshed periodically, and before the current IPsec SAs expire, so that there is no loss of traffic.
The output of the show crypto isakmp sa detail command will show the security association (SA) Authentication as "rsig" because the RSA signature is used for key encryption key (KEK) rekey authentication in GET VPN.
Key Server
The responsibilities of the key server include maintaining the policy and creating and maintaining the keys for the group. When a group member registers, the key server downloads this policy and the keys to the group member. The key server also rekeys the group before existing keys expire.
The key server has two responsibilities: servicing registration requests and sending rekeys. A group member can register at any time and receive the most current policy and keys. When a group member registers with the key server, the key server verifies the group ID that the group member is attempting to join. If this ID is a valid group ID, the key server sends the SA policy to the group member. After the group member acknowledges that it can handle the downloaded policy, the key server downloads the respective keys.
There are two types of keys that the key server can download: the key encryption key (KEK) and the traffic encryption key (TEK). The TEK becomes the IPsec SA with which the group members within the same group communicate. The KEK encrypts the rekey message.
The GDOI server sends out rekey messages if an impending IPsec SA expiration occurs or if the policy has changed on the key server (using the command-line interface [CLI]). A rekey can also happen if the KEK timer has expired, and the key server sends out a KEK rekey. The rekey messages may also be retransmitted periodically to account for possible packet loss. Packet loss can occur because rekey messages are sent without the use of any reliable transport. If the rekey mechanism is multicast, there is no efficient feedback mechanism by which receivers can indicate that they did not receive a rekey message, so retransmission seeks to bring all receivers up to date. If the rekey mechanism is unicast, the receivers will send an acknowledgment message.
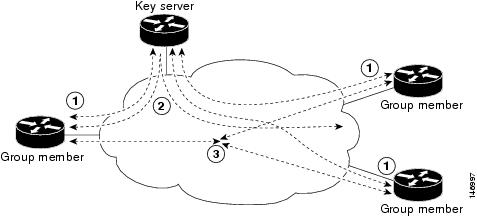
The topology shows the protocol flows that are necessary for group members to participate in a group, which are as follows:
- Group members register with the key server. The key server authenticates and authorizes the group members and downloads the IPsec policy and keys that are necessary for them to encrypt and decrypt IP multicast packets.
- As needed, the key server "pushes" a rekey message to the group members. The rekey message contains a new IPsec policy and keys to use when old IPsec SAs expire. Rekey messages are sent in advance of the SA expiration time to ensure that valid group keys are always available.
- The group members are authenticated by the key server and communicate with other authenticated group members that are in the same group using the IPsec SAs that the group members have received from the key server.
How Protocol Messages Work with Cisco IOS Software
Multicast Rekeying uses the GDOI protocol (IETF RFC 3547) to distribute the policy and keys for the group. The GDOI protocol is between a key server and a group member. The key server creates and maintains the policy and keys, and it downloads the policy and keys to the authenticated group members.
The GDOI protocol is protected by an ISAKMP Phase 1 exchange. The GDOI key server and the GDOI group member must have the same ISAKMP policy. This Phase 1 ISAKMP policy should be strong enough to protect the GDOI protocol that follows. The GDOI protocol is a four-message exchange that follows the Phase 1 ISAKMP policy. The Phase 1 ISAKMP exchange can occur in main mode or aggressive mode.
The figure below shows the ISAKMP Phase 1 exchange.
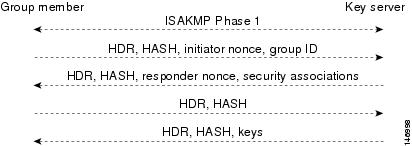
The ISAKMP Phase 1 messages and the four GDOI protocol messages are referred to as the GDOI registration, and the entire exchange that is shown is a unicast exchange between the group member and the key server.
During the registration, if the rekey mechanism is multicast, the group member receives the address of the multicast group and registers with the multicast group that is required to receive the multicast rekeys.
The GDOI protocol uses User Datagram Protocol (UDP) port 848 (with Network Address Translation-Traversal (NAT-T), it floats to 4500).
IPsec
IPsec is a well-known RFC that defines an architecture to provide various security services for traffic at the IP layer. The components and how they fit together with each other and into the IP environment are described in IETF RFC 2401.
Communication Flow Between Key Servers and Group Members to Update IPsec SAs
Key servers and group members are the two components of the GET VPN architecture. The key server holds and supplies group authentication keys and IPsec SAs to the group members.
Group members provide encryption service to the interesting traffic (traffic that is worthy of being encrypted and secured by IPsec).
Communication among the key server and group members is encrypted and secured. GDOI supports the use of two keys: the TEK and the KEK. The TEK is downloaded by the key server to all the group members. The downloaded TEK is used by all the group members to communicate securely among each other. This key is essentially the group key that is shared by all the group members. The group policies and IPsec SAs are refreshed by the key server using periodic rekey messages to the group members. The KEK is also downloaded by the key server and is used by the group members to decrypt the incoming rekey messages from the key server.
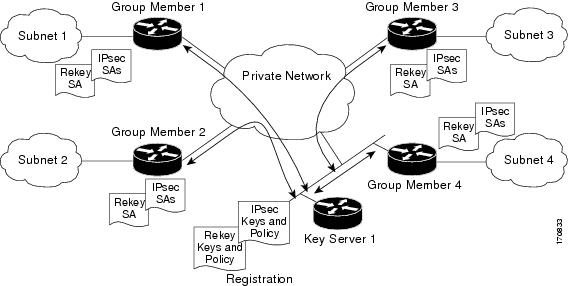
The key server generates the group policy and IPsec SAs for the GDOI group. The information generated by the key server includes multiple TEK attributes, traffic encryption policy, lifetime, source and destination, a Security Parameter Index (SPI) ID that is associated with each TEK, and the rekey policy (one KEK).
The figure below illustrates the communication flow between group members and the key server. The key server, after receiving registration messages from a group member, generates the information that contains the group policy and new IPsec SAs. The new IPsec SA is then downloaded to the group member. The key server maintains a table that contains the IP address of each group member per group. When a group member registers, the key server adds its IP address in its associated group table, thus allowing the key server to monitor an active group member. A key server can support multiple groups. A group member can be part of multiple groups.
IPsec and ISAKMP Timers
IPsec and ISAKMP SAs are maintained by the following timers:
- TEK lifetime-Determines the lifetime of the IPsec SA. Before the end of the TEK lifetime, the key server sends a rekey message, which includes a new TEK encryption key and transforms as well as the existing KEK encryption keys and transforms. The TEK lifetime is configured only on the key server, and the lifetime is "pushed down" to the group members using the GDOI protocol. The TEK lifetime value depends on the security policy of the network. If the set security-association lifetime command is not configured, the default value of 86,400 seconds takes effect. To configure a TEK lifetime, see the "Configuring an IPsec Lifetime Timer" section.
- KEK lifetime-Determines the lifetime of the GET VPN rekey SAs. Before the end of the lifetime, the key server sends a rekey message, which includes a new KEK encryption key and transforms and new TEK encryption keys and transforms. The KEK lifetime is configured only on the key server, and the lifetime is pushed down to group members dynamically using the GDOI protocol. The KEK lifetime value should be greater than the TEK lifetime value (it is recommended that the KEK lifetime value be at least three times greater than the TEK lifetime value). If the rekey lifetime command is not configured, the default value of 86,400 seconds takes effect. To configure a KEK lifetime, see the "Configuring a Multicast Rekey" section.
- ISAKMP SA lifetime-Defines how long each ISAKMP SA should exist before it expires. The ISAKMP SA lifetime is configured on a group member and on the key server. If the group members and key servers do not have a cooperative key server, the ISAKMP SA is not used after the group member registration. In this case (no cooperative key server), the ISAKMP SA can have a short lifetime (a minimum of 60 seconds). If there is a cooperative key server, all key servers must have long lifetimes to keep the ISAKMP SA "up" for cooperative key server communications. If the lifetime command is not configured, the default value of 86,400 seconds takes effect. To configure an ISAKMP SA lifetime, see the "Configuring an ISAKMP Lifetime Timer" section.
Address Preservation
The following section describes address preservation in GET VPN.
As shown in the figure below, IPsec-protected data packets carry the original source and destination in the outer IP header rather than replacing them with tunnel endpoint addresses. This technique is known as IPsec Tunnel Mode with Address Preservation.

Address preservation allows GET VPN to use the routing functionality present within the core network. Address preservation allows routing to deliver the packets to any customer-edge (CE) device in the network that advertises a route to the destination address. Any source and destination matching the policy for the group will be treated in a similar manner. In the situation where a link between IPsec peers is not available, address preservation also helps combat traffic "black-hole" situations.
Header preservation also maintains routing continuity throughout the enterprise address space and in the WAN. As a result, end host addresses of the campus are exposed in the WAN (for MPLS, this applies to the edge of the WAN). For this reason, GET VPN is applicable only when the WAN network acts as a "private" network (for example, in an MPLS network).
Secure Data Plane Multicast
The multicast sender uses the TEK that is obtained from the key server and encrypts the multicast data packet with header preservation before it switches out the packet. The replication of the multicast packet is carried out in the core on the basis of the (S, G) state that is retained in the multicast data packet. This process is illustrated in the figure below.
Cisco Group Encrypted Transport VPN Features
This section includes the following subsections:
- Rekeying
- Group Member Access Control List
- Fail-Close Mode
- Time-Based Antireplay
- Cooperative Key Server
- Change Key Server Role
- Receive Only SA
- Passive SA
- Enhanced Solutions Manageability
- Support with VRF-Lite Interfaces
- GET VPN VRF-Aware GDOI on GM
- Authentication Policy for GM Registration
- Rekey Functionality in Protocol Independent Multicast-Sparse Mode
- GM Removal and Policy Trigger
- GDOI MIB Support for GET VPN
- GET VPN Support for IPv6 in the Data Plane
Rekeying
Rekey messages are used to refresh IPsec SAs. When the IPsec SAs or the rekey SAs are about to expire, one single rekey message for a particular group is generated on the key server. No new IKE sessions are created for the rekey message distribution. The rekey messages are distributed by the key server over an existing IKE SA.
Rekeying can use multicast or unicast messages. GET VPN supports both unicast and multicast rekeying.
The following subsections give detailed rekeying information:
- Rekey Sequence-Number Check
- Multicast Rekeying
- Unicast Rekeying and SAs
- Rekey Behavior After Policy Changes
- IPsec SA Usage on the Group Members
- Configuration Changes Can Trigger a Rekey By a Key Server
- Commands That Trigger a Rekey
- Retransmitting a Rekey
Rekey Sequence-Number Check
The rekey sequence-number check between the key server and the group member is conducted as follows:
-
Antireplay in GROUPKEY-PUSH messages is restored as specified in RFC 3547.
- The group member drops any rekey message that has a sequence number lower than or equal to that of the last received rekey message.
- The group member accepts any rekey message that has a sequence number higher than that of the last received rekey message, no matter how large the difference.
- The sequence number is reset to 1 at the first rekey message after the KEK rekey, not at the KEK rekey message itself.
Multicast Rekeying
Multicast rekeys are sent out using an efficient multicast rekey. Following a successful registration, the group member registers with a particular multicast group. All the group members that are registered to the group receives this multicast rekey. Multicast rekeys are sent out periodically on the basis of the configured lifetime on the key server. Multicast rekeys are also sent out if the IPsec or rekey policy is changed on the key server. Triggered by the configuration change, the rekey sends out the new updated policy to all the group members with an efficient multicast rekey.
The key server pushes the rekey time back as follows:
1. If the TEK timeout is 300 seconds:
tek_rekey_offset = 90 (because 300 < 900)
If retransmissions are configured, the rekey timer is moved back more.
For three retransmissions every 10 seconds: 3 x 10
So the rekey will actually happen at (300 - 90 - 30) = 180 seconds
2. If the TEK timeout is 3600 seconds:
tek_rekey_offset = 3600 x 10 percent = 360 seconds
If retransmissions are configured, the rekey timer is moved back more.
For three retransmissions every 10 seconds: 3 x 10
So the rekey will actually happen at (3600 - 360 - 30) = 3210 seconds
When a KEK expires and when the transport mode is multicast, a multicast KEK rekey is sent. When a multicast KEK rekey is sent, the group member replaces the old KEK with the new KEK. Because it is a multicast rekey, and the retransmissions are sent, the old KEK continues to be used for encryption. This situation occurs because the group member does not receive the new KEK rekey. Hence the group member that received the multicast KEK rekey does not have the old KEK, and hence it drops these retransmissions.
The group member that did not initially receive the KEK key now receives the KEK retransmission and replaces the old KEK with the new KEK and will drop the retransmissions that will follow. For example, if five retransmissions are configured and a multicast KEK rekey with sequence number 1 is received at group member 1, all the other retransmissions with sequence numbers 2 3 4 5 6 will be dropped at the group member because the group member does not have the old KEK.
If group member 2 does not get the KEK rekey with sequence number 1 and it receives the retransmission with sequence number 2, it will drop the other retransmissions 3, 4, 5, 6.
Configuration Requirements for Multicast Rekeying
When a group member registers to a key server, it installs the KEK SA into its database. When the rekey transport is multicast the group member will use IGMP to join the multicast stream defined by the key server. The IGMP join is transmitted from the interface that contains the crypto map.
Note | The IGMP traffic should be excluded from encryption via either the ACL defined on the key server or a local deny ACL on the group member. |
When the key server is not reachable via the same interface as the one configured with the crypto map, it will have to manually join the stream.
Unicast Rekeying and SAs
In a large unicast group, to alleviate latency issues, the key server generates rekey messages for only a small number of group members at a time. The key server is ensured that all group members receive the same rekey messages for the new SA before the expiration of the old SA. Also, in a unicast group, after receiving the rekey message from the key server, a group member sends an encrypted acknowledge (ACK) message to the key server using the keys that were received as part of the rekey message. When the key server receives this ACK message, it notes this receipt in its associated group table, which accomplishes the following:
- The key server keeps a current list of active group members.
- The key server sends rekey messages only to active members.
In addition, in a unicast group, the key server removes the group member from its active list and stops sending the rekey messages to that particular group member if the key server does not receive an ACK message for three consecutive rekeys. If no ACK message is received for three consecutive rekeys, the group member has to fully re-register with the key server after its current SA expires if the group member is still interested in receiving the rekey messages. The ejection of a nonresponsive group member is accomplished only when the key server is operating in the unicast rekey mode. The key server does not eject group members in the multicast rekey mode because group members cannot send ACK messages in that mode.
As in multicast rekeying, if retransmission is configured, each rekey will be retransmitted the configured number of times.
Rekey transport modes and authentication can be configured under a GDOI group.
If unicast rekey transport mode is not defined, multicast is applied by default.
If the TEK rekey is not received, the group member re-registers with the key server 60 seconds before the current IPsec SA expires. The key server has to send out the rekey before the group member re-registration occurs. If no retransmission is configured, the key server sends the rekey tek_rekey_offset before the SA expires. The tek_rekey_offset is calculated based on the configured rekey lifetime. If the TEK rekey lifetime is less than 900 seconds, the tek_rekey_offset is set to 90 seconds. If the TEK rekey lifetime is configured as more than 900 seconds, the tek_rekey_offset = (configured TEK rekey lifetime)/10. If retransmission is configured, the rekey occurs earlier than the tek_rekey_offset to let the last retransmission be sent 90 seconds before the SA expires.
The key server uses the formula in the following example to calculate when to start sending the rekey to all unicast group members. The unicast rekey process on the key server sends rekeys to unicast group members in groups of 50 within a loop. The time spent within this loop is estimated to be 5 seconds.
A key server rekeys group members in groups of 50, which equals two loops. For example, for 100 group members:
Number of rekey loops = (100 group members)/50 = 2 loops:
- Time required to rekey one loop (estimation) = 5 seconds
- Time to rekey 100 group members in two loops of 50: 2 x 5 seconds = 10 seconds
So the key server pushes the rekey time back as follows:
But the start has to be earlier than the TEK expiry (as in the multicast case):
- Because 300 < 900, tek_rekey_offset = 90
- So 90 seconds is subtracted from the actual TEK time: 290 - tek_rekey_offset = 200 seconds
If retransmissions are configured, the rekey timer is moved back more:
- For three retransmissions every 10 seconds: 200 - (3 x 10) = 170
- If the TEK timeout is 3600 seconds: 3600 - 10 = 3590
But the start has to be earlier than the TEK expiry (as in the multicast case):
- Because 3600 > 900, tek_rekey_offset = 3600 x 10 percent = 360
- So 360 seconds is subtracted from the actual TEK time: 3590 - tek_rekey_offset = 3230 seconds
If retransmissions are configured, the rekey timer is moved back more:
The tek_rekey_offset formula applies to unicast and multicast rekeying.
Rekey Behavior After Policy Changes
The table below provides a list of rekey behavior based on the security policy changes.
| Table 1 | Rekey Behavior After Security Policy Changes |
|
Policy Changes |
Rekey Sent? |
Rekey Behavior After Policy Changes |
|---|---|---|
|
TEK: SA lifetime |
No |
The old SA remains active until its lifetime expires. The new lifetime will be effective after the next scheduled rekey. |
|
TEK: IPSEC transformset |
Yes |
The SAs of the old transform set remain active until its lifetime expires. |
|
TEK: IPSEC profile |
Yes |
The SAs of the old profile remain active until its lifetime expires. |
|
TEK:matching ACL |
Yes |
Outbound packet classification will use the new access control list (ACL) immediately. The old SAs are still kept in the SA database. |
|
TEK:enable replay counter |
Yes |
The old SA without counter replay remains active until its lifetime expires. |
|
TEK:change replay counter |
No |
The SA with a new replay counter will be sent out in the next scheduled rekey. |
|
TEK:disable replay counter |
Yes |
The old SA with counter replay enabled remains active until its lifetime expires. |
|
TEK:enable receive-only |
Yes |
Receive-only mode is activated immediately after rekey. |
|
TEK:disable receive-only |
Yes |
Receive-only mode is deactivated immediately after rekey. |
|
KEK:SA lifetimebehavior |
No |
Change is applied with the next rekey. |
|
KEK:change authentication key |
Yes |
Change is applied with the next rekey. |
|
KEK:changing crypto algorithm |
Yes |
Change is applied immediately. |
Enter the following commands for the policy changes to take effect immediately:
- Use the clear crypto gdoi [group] command on the key server.
- Use the clear crypto gdoi [group] command on all the group members.
Note | The key server sends rekeys for policy updates after the administrator exits configuration mode, ensuring that the rekeys are sent when appropriate. |
IPsec SA Usage on the Group Members
When a rekey is received and processed on a group member, the new IPsec SA (the SPI) is installed. There is a period of time when the old and the new IPsec SAs are used. After a certain specified interval, the old IPsec SA is deleted. This overlap ensures that all group members receive the current rekey and insert the new IPsec SAs. This behavior is independent of the transport method (multicast or unicast rekey transport) for the rekeys from the key server.
Approximately 30 seconds before the old SA expires, the group member starts to use the new SA in the outbound direction to encrypt the packet. Approximately 60 seconds before the old SA expires, if no new SA is received on the group member side via a rekey from the key server, the group member re-registers.
In the figure below, time T2 is when the old SA expires. T1 is 30 seconds before T2, which is when the group member (GM) starts to use the new SA in the outbound direction. T0 is another 30 seconds before T2. If no new SA is received at T0, the group member has to re-register. T is another 30 seconds from T0. The key server should send a rekey at T.

Configuration Changes Can Trigger a Rekey By a Key Server
Note | Security threats, as well as the cryptographic technologies to help protect against them, are constantly changing. For more information about the latest Cisco cryptographic recommendations, see the Next Generation Encryption (NGE) white paper. |
Configuration changes on a key server can trigger a rekey by the key server. Please refer to the following sample configuration as you read through the changes that will or will not cause a rekey that are described following the example.
crypto ipsec transform-set gdoi-p esp-aes esp-sha-hmac
!
crypto ipsec profile gdoi-p
 set security-association lifetime seconds 900
set transform-set gdoi-p
!
crypto gdoi group diffint
 identity number 3333
 server local
  rekey algorithm aes 128
  rekey address ipv4 121
  rekey lifetime seconds 3600
  no rekey retransmit
  rekey authentication mypubkey rsa mykeys
  sa ipsec 1
   profile gdoi-p
   match address ipv4 120
   replay counter window-size 3
The following configuration changes on the key server will trigger a rekey from the key server:
- Any change in the TEK configuration ("sa ipsec 1" in the example):
- If the ACL ("match address ipv4 120" in the above example) is changed. Any addition, deletion, or change in the ACL causes a rekey.
- If TEK replay is enabled or disabled on the key server, rekey is sent.
- Removal or addition of the IPsec profile in the TEK ("profile gdoi-p" in the example).
- Changing from multicast to unicast transport.
- Changing from unicast to multicast transport.
The following configuration changes on the key server will not trigger a rekey from the key server:
- Replay counter window size is changed under the TEK ("sa ipsec 1" in the example).
- Configuring or removing rekey retransmit.
- Removing or configuring the rekey ACL.
- Changing the TEK lifetime ("set security-association lifetime seconds 300" in the example) or changing the KEK lifetime ("rekey lifetime seconds 500" in the example).
- Adding, deleting, or changing the rekey algorithm ("rekey algorithm aes 128" in the example).
Commands That Trigger a Rekey
The table below is a comprehensive list of GET VPN command changes, and it shows which commands will or will not trigger a rekey. Commands are broken out based on the configuration mode in which they are entered. The table also shows when the commands take effect, regardless of whether they trigger a rekey.
| Table 2 | Commands That Trigger a Rekey |
|
Description |
Command |
Rekey Triggered |
When Triggered |
When Change Takes Effect |
|---|---|---|---|---|
|
Mode = (config) |
configure terminal |
-- |
-- |
-- |
|
Change/delete ACL used in GDOI group (example: rekey address ipv4 access-list-number[options]) |
[no] access-list access-list-number[options] |
No |
-- |
Immediately |
|
Change/delete ACL used in IPsec profile (example: match address ipv4 access-list-id | name[options]) |
[no] access-list access-list-number[options] |
Yes |
End configuration mode |
show running-config command output on key server indicates that the policy is incomplete, the packet is still encrypted/decrypted by the existing SA, downloaded ACLs are cleared but multidimensional-tree entries are still present (by displaying show crypto ruleset command output), and no new SAs are downloaded and old SAs are still active in encrypt/decrypt. |
|
Add/remove ISAKMP preshared key (arbitrary key) |
crypto isakmp key address peer-address |
No |
-- |
Immediately |
|
Add/remove ISAKMP preshared key (group member key) |
crypto isakmp key address peer-address |
No |
-- |
After key encryption key (KEK) SA expires (re-registration) |
|
Add IPsec profile |
crypto ipsec profile |
No |
-- |
Immediately |
|
Add/remove ISAKMP policy |
crypto isakmp policy priority |
No |
-- |
Immediately |
|
Mode = (ipsec-profile) |
crypto ipsec profile name |
-- |
-- |
-- |
|
Change SA lifetime (in IPsec profile) |
set security-association lifetime seconds |
No |
-- |
Next rekey |
|
Change transform-set |
set transform-set transform-set-name |
Yes |
End configuration mode |
The SAs of the old transform set remain active until the lifetime expires. |
|
Mode = (config-gdoi-group) |
crypto gdoi group [ipv6] group-name |
-- |
-- |
-- |
|
Change identity number |
identity number number |
No |
-- |
Must immediately configure on the group member. The other group members keep using the TEKs and KEKs of the old group ID. |
|
Mode = (gdoi-local-server) |
server local |
-- |
-- |
-- |
|
Change from unicast to multicast transport |
rekey transport unicast |
Yes |
Immediately |
After triggered rekey |
|
Change from multicast to unicast transport |
[no] rekey transport unicast |
Yes |
End configuration mode |
After triggered rekey |
|
Change rekey address |
rekey address ipv4 {access-list-number | access-list-name} |
Yes |
End configuration mode |
After triggered rekey (however, changing the ACL itself will not trigger a multicast rekey) |
|
Change rekey lifetime |
rekey lifetime seconds number-of-seconds |
No |
-- |
Next rekey, but lifetime starts decrementing when the command is issued (the current lifetime is sent out with the rekey). |
|
Enable/disable rekey retransmit |
rekey retransmit number-of-seconds [number number-of- retransmissions] |
No |
-- |
Next rekey |
|
Enable rekey authentication |
rekey authentication mypubkey rsa key-name |
Yes |
End configuration mode |
After triggered rekey |
|
Disable rekey authentication |
[no] rekey authentication |
No |
-- |
Immediately |
|
Change rekey authentication key |
rekey authentication mypubkey rsa key-name |
Yes |
End configuration mode |
After triggered rekey |
|
Change rekey encryption |
rekey algorithm type-of-encryption-algorithm |
Yes |
End configuration mode |
New algorithm takes effect immediately. |
|
Mode = (gdoi-sa-ipsec) |
sa ipsec sequence-number |
-- |
-- |
-- |
|
Change profile |
profile ipsec-profile-name |
Yes |
End configuration mode |
SAs of the old profile are still in effect until the lifetime expires. |
|
Change ACL match |
match address [options] |
Yes |
End configuration mode |
After triggered rekey |
|
Enable counter replay |
replay counter window-size seconds |
Yes |
End configuration mode |
Old SA without counter replay is still inactive until the lifetime expires. |
|
Change replay counter value |
replay counter window-size seconds |
No |
-- |
Next rekey |
|
Enable time-based antireplay |
replay time window-size seconds |
Yes |
End configuration mode |
New SA with time-based antireplay enabled is sent, but the old SA with time-based antireplay disabled is still active until the lifetime expires. |
|
Change time-based antireplay window |
replay time window-size seconds |
No |
-- |
New time-based antireplay window is effective only after entering the clear crypto gdoi command on both the key server and group member. |
|
Mode = (gdoi-coop-ks-config) |
redundancy |
-- |
-- |
-- |
|
Enable redundancy |
redundancy |
No |
-- |
Must immediately configure on other key servers |
|
Change local priority |
local priority number |
No |
-- |
Immediately but does not force key server election |
|
Add/remove peer address |
[no] peer address ipv4 ip-address |
No |
-- |
Next cooperative (COOP) message |
|
Disable redundancy |
[no] redundancy |
No |
-- |
Must immediately configure on other key servers |
When a timeout is caused by a pseudotime synchronization, the key server checks if either the KEK or the TEK timer is scheduled to expire in next 60 seconds, and if so, combines that timeout with the pseudotime synchronization timeout. That is, the rekey acts as both a TEK or KEK rekey and a pseudotime synchronization timeout rekey. See the "Time-Based Antireplay" section for more information on pseudotime synchronization.
Retransmitting a Rekey
Multicast rekeys are retransmitted by default. For unicast rekeys, if the key server does not receive the ACK, it retransmits the rekey. In either case, before retransmitting a rekey, the key server checks if there is a TEK or KEK rekey scheduled in the next 120 seconds. If so, it stops the current retransmission and waits for the scheduled rekey to happen.
Group Member Access Control List
For GET VPN, the traffic that has to be protected is defined statically on the key server using the ACL. The group member gets information about what has to be protected from the key server. This structure allows the key server to choose and change the policy dynamically as needed. In Secure Multicast, the key server ACL is defined inclusively. The ACL includes only the exact traffic that should be encrypted, with an implicit deny causing all other traffic to be allowed in the clear (that is, if there is no permit, all other traffic is allowed).
GET VPN employs a different philosophy: The definition of which packets should be encrypted is delivered independently. GET VPN supports only statically defined traffic selectors. Policy can be defined by using both deny and permit ACLs on the key server. Only the deny ACL is allowed to be manually configured on a group member. The policies that are downloaded from the key server and configured on the group member are merged. Any ACL that is configured on the group member has predominance over what is downloaded from the key server.
After the group member gets the ACL from the key server, the group member creates a temporary ACL and inserts it into the database. This ACL will be deleted if the group member is removed from the GDOI group for any reason. The packets that are going out of the interface are dropped by the group member if a packet matches the ACL but no IPsec SA exists for that packet.
The key server can send a set of traffic selectors, which may not exactly match the group member ACL on the group member. If such differences occur, the differences have to be merged and resolved. Because the group member is more aware of its topology than the key server, the downloaded ACLs are appended to the group member ACL. The group member ACL (except the implicit deny) is inserted into the database first, followed by the downloaded key server ACL. The database is prioritized, and the database search stops whenever a matched entry is found.
For information about configuring a group member ACL, see the "Configuring Group Member ACLs" section.
Behavior of a Group Member When Security Policy Changes
The behavior of a group member changes when ACL changes or any other policy changes are made in the key server. The effect of different policy changes on the behavior of the group members is explained in the following three scenarios.
Scenario 1
In the following example, the ACL has been initially configured to permit host A and host B.
ip access-list extended get-acl
permit ip host A host B
permit ip host B host A
Then the ACL is changed to permit host C and host D in the key server:
ip access-list extended get-acl
permit ip host C host D
permit ip host D host C
ACL changes affect the behavior of the group member in the following ways:
- Key server sends out a rekey to all group members immediately.
- Group member sends traffic between host A and host B in clear text immediately after rekey.
- Group member sends traffic between host C and host D in encrypted text immediately after rekey.
Scenario 2
The behavior of a group member changes when policy updates and transform set and time-based antireplay (TBAR) changes are made to the key server.
In this scenario, it is assumed that:
- The transform set has been changed from ESP-3DES to ESP-AES.
- The policy change occurs at 1000 seconds before the current TEK lifetime expires.
These policy changes affect the behavior of the group member in the following ways:
- The key server sends out a rekey of both old SAs (3DES) and new SAs (AES).
- Group member continues to use the old SA (3DES) for 1000 seconds until it expires.
- After the old SA expires, the group member automatically switches over to new SAs (AES).
Scenario 3
The behavior of a group member changes when other policy updates in the key server involve both ACL changes and other changes like the transform set or TBAR.
In this scenario it is assumed that:
- The ACL has been updated as specified in Scenario 1.
- The transform set was changed from ESP-3DES to ESP-AES.
- The policy change occurs 1000 seconds before the current TEK lifetime expires.
ACL changes and other policy updates affect the behavior of the group member in the following ways:
- The key server sends out a rekey that consists of both old SAs (3DES) and new SAs (AES).
- The group member sends traffic between host A and host B in clear text immediately after rekey.
- The group member sends encrypted traffic between host C and host D using old SAs (3DES) for 1000 seconds until its TEK lifetime expires.
- When old SAs (3DES) expire, the group member automatically switches to new SAs to encrypt traffic between host C and host D in AES.
Fail-Close Mode
Until a group member registers with a key server, traffic passing through the group member is not encrypted. This state is called "fail open." To prevent unencrypted traffic from passing through a group member before that member is registered, you can configure the Fail-Close feature. If the feature is configured, an implicit "permit ip any any" policy is installed, and all unencrypted traffic passing through the group member is dropped (this state is called fail-close mode).
The fail-close function can also be achieved by configuring an interface ACL. However, the Fail-Close feature is more manageable and is easier to implement than ACL lists.
If you configure the Fail-Close feature, you can still allow specific unencrypted traffic to pass through the group member by configuring the match address command (match address {ipv4 | ipv6}{access-list-number | access-list-name}). (You must use the ipv4 keyword for IPv4 groups and the ipv6 keyword for IPv6 groups. You must use a named (not numbered) access list for IPv6 configurations.) This explicit "deny" ACL is added before the implicit "permit ip any any" to allow denied (unencrypted) traffic to pass through the group member.
After the group member has successfully completed its registration, the fail-close policy, both explicit and implicit, is removed, and the group member behaves as it did before the Fail-Close feature was configured.
Guidelines for Using the Fail-Close Feature
When you are configuring a crypto map to work in fail-close mode, you must be careful. If the fail-close ACL is defined improperly, you may lock yourself out of the router. For example, if you use Secure Shell (SSH) to log in to the router through the interface with the crypto map applied, you have to include the deny tcp any eq port host address command line under the fail-close ACL. You may also need to include the routing protocol that the router is using (such as deny ospf any any) to find the path to the key server. It is suggested that you configure fail-close and its ACL first, and then verify the fail-close ACL using the show crypto map gdoi fail-close map-name command. After you have checked your fail-close ACL and are confident that it is correct, you can make the crypto map work in the fail-close mode by configuring the activate command. Fail-close is not activated until you have configured the activate command.
The fail-close ACL is configured from the group-member perspective. The fail-close ACL is configured on group member as follows:
access-list 125 deny ip host host1-ip-addr host2-ip-addr
In fail-close mode, all IP traffic from host1 to host2 will be sent out by group member 1 in clear text. In addition, the inbound mirrored traffic (that is, IP traffic from host2 to host1) is also accepted by GM1 in clear text.
Note | All IP traffic matching deny entries are sent out by the group member in clear text. |
The inbound traffic is matched to the mirrored access list.
The fail-close access list follows the same rules as the group member access list. For more information, see the "Group Member Access Control List" section.
You need not configure the deny udp any eq 848 any eq 848 command to make the GDOI registration go through. The code itself checks whether it is a GDOI packet for a particular group member from the key server to which it is configured. If it is a GDOI packet for this group member, the packet is processed. But for a scenario in which the key server is behind group member 1, if group member 1 cannot register successfully with the key server, other group members also will not be able to register unless an explicit deny udp any eq 848 any eq 848 command line is configured for group member 1. However, if the Fail-Close feature is properly configured, even if a group member fails to register with a key server, you will be able to ensure that no unwanted traffic can go out "in the clear." But you can allow specified traffic to go out in the clear, in which case registration packets from other group members will be able to reach the key server through group member 1 even if it fails to get registered.
For information on configuring fail-close mode, see the "Activating Fail-Close Mode" section.
To verify whether fail-close mode is activated, use the show crypto map gdoi fail-close command.
Time-Based Antireplay
Antireplay is an important feature in a data encryption protocol such as IPSec (RFC 2401). Antireplay prevents a third party from eavesdropping on an IPsec conversation, stealing packets, and injecting those packets into a session at a later time. The time-based antireplay mechanism helps ensure that invalid packets are discarded by detecting the replayed packets that have already arrived at an earlier time.
GET VPN uses the Synchronous Antireplay (SAR) mechanism to provide antireplay protection for multisender traffic. SAR is independent of real-world Network Time Protocol (NTP) clock or sequential-counter mechanisms (which guarantee packets are received and processed in order). A SAR clock advances regularly. The time tracked by this clock is called pseudotime. The pseudotime is maintained on the key server and is sent periodically to the group members within a rekey message as a time-stamp field called pseudoTimeStamp. GET VPN uses a Cisco proprietary protocol called Metadata to encapsulate the pseudoTimeStamp. Group members have to be resynchronized to the pseudotime of the key server periodically. The pseudotime of the key server starts ticking from when the first group member registers. Initially, the key server sends the current pseudotime value of the key server and window size to group members during the registration process. New attributes, such as time-based replay-enabled information, window size, and the pseudotime of the key server, is sent under the SA payload (TEK).
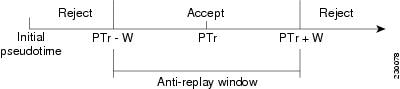
The group members use the pseudotime to prevent replay as follows: the pseudoTimeStamp contains the pseudotime value at which a sender created a packet. A receiver compares the pseudotime value of senders with its own pseudotime value to determine whether a packet is a replayed packet. The receiver uses a time-based antireplay "window" to accept packets that contain a time-stamp value within that window. The window size is configured on the key server and is sent to all group members.
Note | You should not configure time-based antireplay if you are using a Cisco VSA as a group member. |
the figure below illustrates an antireplay window in which the value PTr denotes the local pseudotime of the receiver, and W is the window size.
Clock Synchronization
Clocks of the group members can slip and lose synchronization with the key server. To keep the clocks synchronized, a rekey message (multicast or unicast, as appropriate), including the current pseudotime value of the key server, is sent periodically, either in a rekey message or at a minimum of every 30 minutes to the group member. If a packet fails this antireplay check, the pseudotime of both the sender and receiver is printed, an error message is generated, and a count is increased.
To display antireplay statistics, use the show crypto gdoi group group-name gm replay command on both the sender and receiver devices. If the configuration is changed by the administrator to affect the replay method of the size configuration, the key server initiates a rekey message.
Interval Duration
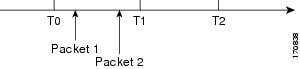
A tick is the interval duration of the SAR clock. Packets sent in this duration have the same pseudoTimeStamp. The tick is also downloaded to group members, along with the pseudotime from the key server. For example, as shown in the figure below, packets sent between T0 and T1 would have the same pseudoTimeStamp T0. SAR provides loose antireplay protection. The replayed packets are accepted if they are replayed during the window. The default window size is 100 seconds. It is recommended that you keep the window size small to minimize packet replay.
Antireplay Configurations
The Antireplay feature can be enabled under IPsec SA on a key server by using the following commands:
- replay time window-size--Enables the replay time option, which supports the nonsequential, or time-based, mode. The window size is in seconds. Use this mode only if you have more than two group members in a group.
- replay counter window-size--Enables sequential mode. This mode is useful if only two group members are in a group.
- no replay counter window-size--Disables antireplay.
Control-Plane Time-Based Antireplay
Rekey Pseudotime Check
The rekey pseudotime check between key servers and group members is conducted as follows:
-
The group member calculates the allowable pseudotime difference between the key server and its own as the lesser of the configured TBAR window size, that is, the value that was configured for it in the data plane, or 30 seconds.
- The group member accepts any rekey with a pseudotime larger than its own and updates its own pseudotime to the larger value. If the difference is larger than the calculated allowable pseudotime difference, it also generates the following syslog message:
*Jul 28 22:56:37.503: %GDOI-3-PSEUDO_TIME_LARGE: Pseudotime difference between key server (20008 sec) and GM (10057 sec) is larger than expected in group GET. Adjust to new pseudotime
-
- If the group member receives a rekey with a pseudotime smaller than its own but within the allowable difference, the group member accepts the rekey and updates its pseudotime value to the rekey pseudotime value.
- If the group member receives a rekey with a pseudotime smaller than its own but exceeding the allowable difference, the group member drops the rekey message and generates the following syslog message:
*Jul 28 23:37:59.699: %GDOI-3-PSEUDO_TIME_TOO_OLD: Rekey received in group GET is too old and fail PST check: my_pst is 22490 sec, peer_pst is 10026 sec, allowable_skew is 30 sec
ANN Message Pseudotime Handling in the Secondary Key Server
Cooperative key server announcement (ANN) messages are used to synchronize policy and group-member information between cooperative key servers.
The secondary key server handles ANN messages as follows:.
- The secondary key server calculates the allowable ANN message pseudotime as the lesser of the configured TBAR window size, that is, the value that was configured for it in the data plane, or 30 seconds.
- If the secondary key server receives an ANN message from the primary key server with a larger pseudotime, it does the following:
- It updates its pseudotime to the primary key server's value.
- If the pseudotime difference is larger than allowable, it generates the following syslog message:
*Jul 28 23:48:56.871: %GDOI-4-GDOI_ANN_TIMESTAMP_LARGE: COOP_KS ANN received from KS 10.0.8.1 in group GET has pseudotime bigger than myself. Adjust to new pseudotime:
my_old_pst is 23147 sec, peer_pst is 30005 sec
-
If the secondary key server receives an ANN message from the primary key server with a smaller pseudotime, it behaves as follows:
- If the difference is within the allowable range, the secondary key server accepts it and updates its pseudotime to the primary key server's value.
- If the difference exceeds the allowable range, it generates the following syslog message:
*Jul 28 23:42:12.603: %GDOI-4-GDOI_ANN_TIMESTAMP_TOO_OLD: COOP_KS ANN from KS 10.0.8.1 in group GET is too old and fail PST check:
my_pst is 22743 sec, peer_pst is 103 sec, allowable_skew is 10 sec
If, after three retransmit requests, the secondary key server has still not received any ANN message with a valid pseudotime, it starts blocking new group-member registrations, as follows:
*Jul 28 23:38:57.859: %GDOI-5-COOP_KS_VALID_ANN_TIMER_EXPIRED: This sec-KS has NOT received an ANN with valid pseudotime for an extended period in group GET. It will block new group members registration temporarily until a valid ANN is received
*Jul 29 00:08:47.775: %GDOI-5-COOP_KS_BLOCK_NEW_GM_REGISTER: This key server temporarily blocks group member with ip-addr 10.0.0.2 from registering in group GET as it has not received an ANN with valid pseudotime for prolonged period
The secondary key server resumes its group member registration functionality if any of the following happens:
- It receives an ANN with a valid pseudotime from the primary key server.
- It becomes a primary key server itself.
- The clear crypto gdoi group command is executed on the secondary key server.
ANN Message Pseudotime Handling in the Primary Key Server
The primary key server handles ANN messages as follows:
- It calculates the allowable ANN message pseudotime as the lesser of the configured TBAR window size, that is, the value that was configured for it in the data plane, or 30 seconds.
- It accepts from the secondary key server ANN messages that have a smaller pseudotime but are within the allowable difference.
- It rejects ANN messages that have a smaller pseudotime but exceed the allowable difference.
During a network merge, the following conditions apply:
- The new primary key server always picks the larger pseudotime between the two key servers.
- If the difference is larger than the calculated allowable pseudotime difference, the new primary key server sends out rekeys to all group members to update their pseudotime. It also generates the following syslog messages:
*Jul 28 23:42:41.311: %GDOI-5-COOP_KS_ELECTION: KS entering election mode in group GET (Previous Primary = NONE)
*Jul 28 23:42:41.311: %GDOI-4-GDOI_ANN_TIMESTAMP_LARGE: COOP_KS ANN received from KS 10.0.9.1 in group GET has PST bigger than myself. Adjust to new pseudotime:
my_old_pst is 0 sec, peer_pst is 22772 sec
*Jul 28 23:43:16.335: %GDOI-5-COOP_KS_TRANS_TO_PRI: KS 10.0.8.1 in group GET transitioned to Primary (Previous Primary = NONE)
*Jul 28 23:43:16.347: %GDOI-5-KS_SEND_UNICAST_REKEY: Sending Unicast Rekey for group GET from address 10.0.8.1 with seq # 1
Cooperative Key Server
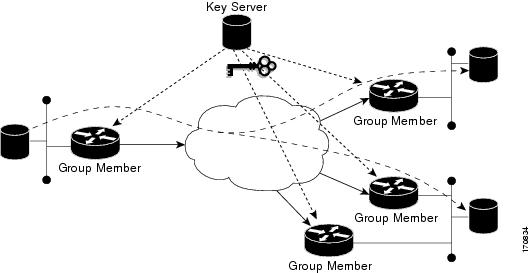
The figure below illustrates cooperative key server key distribution. The text following the illustration explains the Cooperative Key Server feature.

Cooperative key servers provide redundancy to GET VPN. Multiple key servers are supported by GET VPN to ensure redundancy, high availability, and fast recovery if the primary key server fails. Cooperating GDOI key servers jointly manage the GDOI registrations for the group. Each key server is an active key server, handling GDOI registration requests from group members. Because the key servers are cooperating, each key server distributes the same state to the group members that register with it. Load balancing is achieved because each of the GDOI key servers can service a portion of the GDOI registrations.
The primary key server is responsible for creating and distributing group policy. When cooperative key server key distribution occurs, one key server declares itself as primary, creates a policy, and sends the policy to the other secondary key server. The secondary key server declares the primary key server as primary key server when it gets the policy and ends the election mode. The secondary key server now also blocks GM registration while the cooperative key server key distribution is in progress. This change allows the cooperative key server distribution to become more efficient because it saves time. For example, the syslog warning message similar to the following is displayed during distribution:
00:00:16: %GDOI-5-COOP_KS_BLOCK_NEW_GM_REGISTER_ELECTION: This KS temporarily blocks GM with ip-addr 10.0.4.1 from registering in group diffint as the KS election is underway
The primary key server periodically sends out (or broadcasts) group information updates to all other key servers to keep those servers in synchronization. If the secondary key servers somehow miss the updates, they contact the primary key server to directly request information updates. The secondary key servers mark the primary key server as unreachable (that is, "dead") if the updates are not received for an extended period.
When a new policy is created on a primary key server, regardless of which key server a group member may be registered with, it is the responsibility of the primary key server to distribute rekey messages to GDOI group members.
In a cooperative-key-server setting, the rekey sequence number is synchronized between the primary and secondary key servers.
In a network merge, the key servers pick the larger of the rekey sequence numbers that they have between them.
If you are supporting more than 300 group members in your cooperative key server setup, you should increase the buffer size by using the buffers huge size command.
Announcement Messages
Announcement messages are secured by IKE Phase 1 and are sent as IKE notify messages. Authentication and confidentiality that are provided by IKE is used to secure the messaging between the key servers. Antireplay protection is provided by the sequence numbers in the announcement messages. Announcement messages are periodically sent from primary to secondary key servers.
Announcement messages include the components, described in the following sections that help maintain the current state.
Sender Priority of a Key Server
This value describes the priority of the sender, which is configurable using the CLI. The key server with the highest priority becomes the primary key server. If the priority values are the same, the key server with the highest IP address becomes the primary key server.
Maintaining the Role of the Sender
During the synchronization period, if the key servers are at geographically dispersed locations, they may suffer a network-partitioning event. If a network-partitioning event occurs, more than one key server can become the primary key server for a period of time. When the network is operating normally again and all the key servers find each other, they need to be told the current role of the sender so the key servers can attain their proper roles.
Request for a Return Packet Flag
All messages are defined as one-way messages. When needed, a key server can request the current state from a peer to find out its role or request the current state of the group.
Group Policies
The group policies are the policies that are maintained for a group, such as group member information and IPsec SAs and keys.
Antireplay functionalities and incorporated Cooperative announcement messages are supported. The primary key server updates the pseudotime value, sending it to all secondary key servers in the group. The secondary key servers should synchronize their SAR clocks to this updated value.
ANN Message Sequence Number Check Between Cooperative Key Servers
The following describes the sequence number check between cooperative key servers:
- Cooperative key servers drop any ANN message with a sequence number smaller than or equal to that of the last received ANN message.
- The ANN message is accepted if the sequence number is larger than that of the last received rekey message, no matter how large the difference.
- If a key server is reloaded, a new IKE session is created between the peers, and the reloaded key server's ANN sequence number will start with zero. In this case, the other side will accept the ANN message with any sequence number.
Change Key Server Role
In a network of cooperative key servers, the primary server is elected based on its highest priority at the time of election. The other key servers have secondary status. If the primary key server is detected as being dead or if its role changes, the clear crypto gdoi ks cooperative role command allows you to reset the cooperative role of the primary key server.
If the clear crypto gdoi ks cooperative role command is executed on a secondary key server, the election is triggered on that secondary key server although that server would most likely remain a secondary key server because there has been an elected primary key server. However, if the clear crypto gdoi ks cooperative role command is executed on the primary key server, the primary key server is reassigned to a secondary role, and as a result, a new election that involves all the key servers is triggered. If the previous primary server has the highest priority (of all the key servers), it again becomes the primary server. If the previous primary server does not have the highest priority, the server having the highest priority is elected as the new primary server.
Receive Only SA
For multicast traffic using the GDOI protocol, bidirectional SAs are installed. The Receive Only feature enables an incremental deployment so that only a few sites can be verified before bringing up an entire network. To test the sites, one of the group members should send encrypted traffic to all the other group members and have them decrypt the traffic and forward the traffic "in the clear." Receive Only SA mode allows encryption in only the inbound direction for a period of time. (See the steps for the Receive Only SA process.) If you configure the sa receive-only command on the key server, Steps 2 and 3 happen automatically.
This action allows the group members to install SAs in the inbound direction only. Receive-only SAs can be configured under a crypto group. (See the "Configuring the Group ID Server Type and SA Type" section.)
If the sa receive-only command is configured, all TEKs under this group are going to be marked "receive only" by the key server when they are sent to the group member.
Every time a GDOI group member receives an IPsec SA from the key server that is marked as "receive only," the group member installs this IPsec SA only in the inbound direction rather than in both incoming and outgoing directions.
- Test individual group members using the following local-conversion commands:
- crypto gdoi gm ipsec direction inbound optional
- crypto gdoi gm ipsec direction both
First, individually convert each of the group members to passive mode (this change tells the outbound check that there is a valid SA) and then to bidirectional mode.
The following method can be used when the testing phase is over and "receive only" SAs have to be converted to bidirectional SAs.
Global Conversion
Remove the sa receive-only command under the group. Removing the sa receive-only command creates new IPsec SAs for this group and causes a rekey. On receipt, group members reinstall the SA in both directions and begin to use it in passive mode. Because the SA cannot remain in passive mode forever, the group members change those SAs to receive or send mode if there is no rekey in 5 minutes. The conversion from passive mode to bidirectional encryption mode is automatic and does not require the administrator to do anything.
Passive SA
The Passive SA feature allows you to configure a group member so that it is in passive mode permanently. By using the Passive SA feature, you will avoid having to use the crypto gdoi gm ipsec direction inbound optional privileged EXEC command, which is not persistent after a router reload and can be overridden by key server configuration from a rekey. Having the group member in passive mode benefits network testing and debugging during migration to GET VPN, and it provides complete encryption protection during the migration. The group-member passive-mode configuration has higher priority over a key server configuration. The crypto gdoi gm ipsec direction inbound optional privileged EXEC command can override the configuration until the next rekey, which will bring back the group member and key server configuration.
To configure the Passive SA feature, see the "Configuring Passive SA" section.
Enhanced Solutions Manageability
Several show and debug commands are supported to help verify functionality. See the "Activating Fail-Close Mode" section for details.
Support with VRF-Lite Interfaces
The VRF-Lite application supports segmentation of traffic in the control and forwarding planes by keeping the routing tables separate for each user group (or VPN) and forwarding the traffic on the associated or dedicated interfaces of each user group.
There are some deployment scenarios in which remote sites that are connecting to an MPLS VPN network might be extending segmentation from a campus to the WAN. In such an extended segmentation case, a CE-PE interface on a CE (group member or key server) device "bounds" to its associated virtual routing and forwarding (VRF) instance. This VRF interface connects to an MPLS PE device where it is directly mapped to its associated Border Gateway Protocol (BGP) VRF process, in which case the crypto map is applied to a VRF interface. No other configuration changes are necessary.
GET VPN VRF-Aware GDOI on GM
The GET VPN VRF-Aware GDOI on GM feature adds to the GET VPN feature. The GET VPN VRF-Aware GDOI on GM feature allows control plane traffic (for example, GDOI registration) to be placed in a separate VRF (for example, a dedicated management VRF). Multiple entities placed in different MPLS VPNs (VRFs) can share the same key servers.
Use the client registration interface command to allow GDOI crypto maps to route registrations and receive rekeys through a different VRF.
The GET VPN GM requires VRF-lite in its data path. VRF-lite means that all the traffic traversing in a particular VRF should use the same VRF after route lookup. VRF-lite does not cover route leaking. If route leaking is configured on the GM, packets will be sent out in clear text from the crypto map applied interface.
The scenarios are described in the following sections.
- Shared GDOI Groups Policies and Crypto Maps
- Different Groups Policies with Different Crypto Maps Sharing a Key Server
- Different Groups Policies with Different Crypto Maps on Different Key Servers
Shared GDOI Groups Policies and Crypto Maps
The same crypto map is applied to multiple subinterfaces, and each subinterface is in a different VRF context or the same VRF context, and the key server is accessible through a different VRF or global VRF table. This is addressed by separating out the control traffic.
There is one group member registration for all the crypto maps applied to different subinterfaces. After successful registration, policies are downloaded to where the crypto maps are.
Different Groups Policies with Different Crypto Maps Sharing a Key Server
Different groups are applied to different interfaces, and each of these interfaces is in a different VRF context or the same VRF context. All these groups are accessing the same key server, and this key server is accessible through a different VRF or global VRF table. This is addressed by having individual group members registering for each group.
So for every group, there is one registration and also one unicast rekey received. All these group members would be using the same IKE SA, which is established between the CE and the key server.
Different Groups Policies with Different Crypto Maps on Different Key Servers
Different groups are applied to different interfaces, and each of these interfaces is in a different VRF context or the same VRF context. All these groups are accessing different key servers, and these key servers are accessible through a different VRF or the global VRF table. This is addressed by having a group member registering for each group. So for every group, there is one registration and also one unicase rekey received. Because every registration is with a different key server, a different IKE SA is established for every registration.
Authentication Policy for GM Registration
GMs can authenticate to the key server at registration time using preshared keys or Public Key Infrastructure (PKI). Preshared keys are easy to deploy but must be managed proactively. We recommend that you deploy a peer-based preshared key instead of defining a default key (the key defined with an address of 0.0.0.0) for all the devices in the network. Preshared keys should be updated regularly (every few months).
PKI uses its infrastructure to overcome the key management difficulties encountered when preshared keys are used. The PKI infrastructure acts as a certificate authority (CA) where router certificates are issued and maintained. However, using PKI during IKE authentication is computationally intensive. In PKI deployments, key server capacity, design, and placement become important.
For added security, GET VPN also supports GM authorization using either preshared keys or PKI. For more information, see the "GET VPN Authorization" section.
GET VPN GM Authorization
GET VPN GM authorization can be done using preshared keys or PKI. It is a best practice to turn on GET VPN authorization. When a key server serves multiple GDOI groups, key server authorization is required to prevent a GM in one group from requesting keys and policies from another group. The ISAKMP authorization confirms that the GM is allowed to request GDOI attributes from the key server while the GDOI authorization confirms that the GM is allowed to request GDOI attributes from a specific group configured in the key server.
GDOI authorization is based on the ISAKMP identity sent by a GM. If a GM sends an IP address as an identity, then only an authorization address is used for authorization. If a GM sends a distinguished name (DN) or hostname, then an authorization identity is used. Using an IP address as an identity will bypass authorization matching a DN or hostname and vice versa. To ensure that only GMs with a specific DN can connect (and no GMs using another identity can connect), you must specify deny any in the authorization address.
GM Authorization Using Preshared Keys
GET VPN supports GM authorization using the IP address when preshared keys are used. An ACL matching the WAN addresses (or subnets) of the GM can be defined and applied to the GET VPN group configuration. Any GM whose IP addresses match the ACL authorizes successfully and can register to the key server. If a GM IP address does not match the ACL, the key server rejects the GM registration request.
In cases of unsuccessful authorization, the following syslog message is generated:
%GDOI-1-UNAUTHORIZED_IPADDR: Group getvpn received registration from
unauthorized ip address: 10.1.1.9
GM Authorization Using PKI
GET VPN supports GM authorization using the commonly used DN or fully qualified domain name (FQDN) when PKI is used. The authorization identity command is used to activate GM authorization. A crypto identity matching certain fields in the GM certificate (typically--organizational unit [OU]) can be defined and applied to the GET VPN group configuration. Use the crypto identity command to define a crypto identity.
Any GM whose certificate credentials match the ISAKMP identity is authorized and can register to the key server. For example, if all GM certificates are issued with OU=GETVPN, a key server can be configured to check (authorize) that all GMs present a certificate having OU=GETVPN. If the OU in the certificate presented by a GM is set to something else, the GM will not be authorized to register to the key server.
If authorization is unsuccessful, the following syslog message is generated:
%GDOI-1-UNAUTHORIZED_IDENTITY: Group getvpn received registration from
unauthorized identity: Dist.name: hostname=GroupMember-1, ou=TEST
Rekey Functionality in Protocol Independent Multicast-Sparse Mode
Multicast rekeying can be used with all modes of multicast. The rekey retransmit command should be used whenever the Protocol Independent Multicast-sparse mode (PIM-SM) is configured because the PIM-SM shortest path tree (SPT) can be torn down if it does not receive continuing traffic. When traffic resumes, PIM-SM must reestablish the SPT. Retransmitting rekey packets increases the chance that group members receive the rekeys when PIM-SM is setting up the SPT.
GM Removal and Policy Trigger
This feature lets you easily remove unwanted GMs from the GET VPN network, provides a rekey triggering method to install new SAs and remove obsolete SAs, and lets you check whether devices are running versions of GET VPN software that support the above capabilities.
GET VPN Software Versioning
GET VPN software versions are of the form
major-version.minor-version.mini-version
where
- major-version defines compatibility for all GET VPN devices.
- minor-version defines compatibility for KS-to-KS (cooperative key server) associations and for GM-to-GM interoperability.
- mini-version tracks feature changes that have no compatibility impact.
For example, the base version (for all prior GET VPN features) is 1.0.1. Also, for example, the version that contains the GM removal feature and the policy replacement feature is 1.0.2, which means that these features are fully backward compatible with the base version (despite the introduction of behavior in these features for triggered rekeys).
GMs send the GET VPN software version to the KS in the vendor-ID payload during IKE phase 1 negotiation (which is defined in RFC 2408). KSs send the software version to other cooperative KSs in the version field of the ANN messages. Cooperative KSs also synchronize their lists of versions that each GM is using.
The GM removal feature and the policy replacement feature each provide a command that you run on the KS (or primary KS) to find devices in the group that do not support that feature.
GM Removal
Without the GM removal and policy replacement features, you would need to complete the following steps to remove unwanted GMs from a group:
- Revoke the phase 1 credential (for example, the preshared key or one or more PKI certificates).
- Clear the TEK and KEK database on the KS.
- Clear the TEK and KEK database on each GM individually and force each GM to re-register.
The third step is time-consuming when a GET VPN group serves thousands of GMs. Also, clearing the entire group in a production network might cause a network disruption. This feature automates this process by introducing a command that you enter on the KS (or primary KS) to create a new set of TEK and KEK keys and propagate them to the GMs.
- GM Removal Compatibility with Other GET VPN Software Versions
- GM Removal with Transient IPsec SAs
- GM Removal with Immediate IPsec SA Deletion
GM Removal Compatibility with Other GET VPN Software Versions
You should use this feature only after all devices in the GET VPN network are upgraded to GET VPN software versions that support this feature. Otherwise, secondary KSs or GMs running older software will ignore the GM removal message and continue to encrypt and decrypt traffic using the old SAs. This causes network traffic disruption.
This feature provides a command that you use on the KS (or primary KS) to check whether all devices in the network are running versions that support GM removal. When the primary KS tries to remove GMs in a network containing devices that do not support GM removal, a warning message appears. For more information, see the "Ensuring That GMs Are Running Software Versions That Support GM Removal" section.
GM Removal with Transient IPsec SAs
This feature provides a command that you use on the KS (or primary KS) to trigger GM removal with transient IPsec SAs. This shortens key lifetimes for all GMs and causes them to re-register before keys expire. During GM removal, no network disruption is expected, because traffic continues to be encrypted and decrypted using the transient IPsec SA until its lifetime expires. For more information, see the "Removing GMs with Transient IPsec SAs" section.
GM Removal with Immediate IPsec SA Deletion
This feature provides an optional keyword that you can use on the KS (or primary KS) to force GMs to delete old TEKs and KEKs immediately (without using transient SAs) and re-register. However, this can cause a disruption to the data plane, so you should use this method only for important security reasons. For more information, see the "Removing GMs and Deleting IPsec SAs Immediately" section.
Policy Replacement and Rekey Triggering
This feature provides a new rekey triggering method to remove obsolete SAs and install new SAs.
- Inconsistencies Regarding Which TEK and KEK Policy Changes Will Trigger Rekeys
- Policy Replacement and Rekey Triggering Compatibility with Other GET VPN Software Versions
Inconsistencies Regarding Which TEK and KEK Policy Changes Will Trigger Rekeys
Without this feature, there are inconsistencies regarding which TEK and KEK policy changes will trigger rekeys:
-
Multiple rekeys could be sent during the course of security policy updates.
-
Some policy changes (for example, transform set, profile, lifetime, and anti-replay) will install new SAs on GMs; however, the SAs from the existing policies remain active until their lifetimes expire.
-
Some policy changes (for example, a TEK's ACE/ACL changes) will install new SAs on GMs and take effect immediately. However, the obsolete SAs are kept in each GM's database (and can be displayed using the show crypto ipsec sa command until their lifetimes expire).
For example, if the KS changes the policy from DES to AES, when the GM receives this triggered rekey, it installs the new SAs (for example, for AES) and shortens the lifetimes of the old SAs (for example, for DES). The GM continues to encrypt and decrypt traffic using the old SAs until their shortened lifetimes expire.
Following is the formula to calculate the shortened lifetime:
TEK_SLT = MIN(TEK_RLT, MAX(90s, MIN(5%(TEK_CLT), 3600s)))
where
-
TEK_SLT is the TEK shortened lifetime
-
TEK_RLT is the TEK remaining lifetime
-
TEK_CLT is the TEK configured lifetime
The following table summarizes the inconsistencies regarding rekeys.
| Table 3 | Rekey Behavior After Security Policy Changes |
|
Policy Changes |
Rekey Sent? |
Rekey Behavior After Policy Changes |
|---|---|---|
|
TEK: SA lifetime |
No |
The old SA remains active until its lifetime expires. The new lifetime will be effective after the next scheduled rekey. Even if you enter the clear crypto sa command, it will re-register and download the old SA with the old lifetime again. |
|
TEK: IPSEC transform set |
Yes |
The SA of the old transform set remains active until its lifetime expires. |
|
TEK: IPSEC profile |
Yes |
The SA of the old profile remains active until its lifetime expires. |
|
TEK: Matching ACL |
Yes |
Outbound packet classification immediately uses the new access control list (ACL). But the old SAs remain in the SA database (you can view them by using the show crypto ipsec sa command). |
|
TEK: Enable replay counter |
Yes |
But the old SA without counter replay remains active until its lifetime expires. |
|
TEK: Change replay counter value |
No |
The SA with a new replay counter is sent out in the next scheduled rekey. |
|
TEK: Disable replay counter |
Yes |
But the old SA with counter replay enabled remains active until its lifetime expires. |
|
TEK: Enable TBAR |
Yes |
But the old SA with TBAR disabled remains active until its lifetime expires. |
|
TEK: Change TBAR window |
No |
The SA with a new TBAR window will be sent out in the next scheduled rekey. |
|
TEK: Disable TBAR |
Yes |
But the old SA with TBAR enabled remains active until its lifetime expires. |
|
TEK: Enable receive-only |
Yes |
Receive-only mode is activated right after the rekey. |
|
TEK: Disable receive-only |
Yes |
Receive-only mode is deactivated right after the rekey. |
|
KEK: SA lifetime behavior |
No |
The change is applied with the next rekey. |
|
KEK: Change authentication key |
Yes |
The change is applied immediately. |
|
KEK: Change crypto algorithm |
Yes |
The change is applied immediately. |
This feature solves these problems by ensuring consistency. With this feature, GET VPN policy changes alone will no longer trigger a rekey. When you change the policy (and exit from global configuration mode), a syslog message appears on the primary KS indicating that the policy has changed and a rekey is needed. This feature provides a new command that you then enter on the KS (or primary KS) to send a rekey (that is based on the latest security policy in the running configuration).
This feature also provides an extra keyword to the new command to force a GM receiving the rekey to remove the old TEKs and KEK immediately and install the new TEKs and KEK. Therefore, the new policy takes effect immediately without waiting for old policy SAs to expire. (However, using this keyword could cause a temporary traffic discontinuity, because all GMs might not receive the rekey message at the same time.)
Policy Replacement and Rekey Triggering Compatibility with Other GET VPN Software Versions
You should use rekey triggering only after all devices in the GET VPN network are upgraded to GET VPN software versions that support this feature. For GMs running older versions that do not yet support the crypto gdoi ks command, the primary KS uses the software versioning feature to detect those versions and only triggers a rekey without sending instruction for policy replacement. Therefore, when a GM receives the rekey, it installs the new SAs but does not shorten the lifetimes of the old SAs. (This behavior is the same as the prior rekey method and ensures backward compatibility for devices that cannot support policy replacement.)
This feature provides a command that you use on the KS (or primary KS) to check whether all the devices in the network are running versions that support policy replacement. For more information, see the "Ensuring That GMs Are Running Software Versions That Support Policy Replacement" section.
GDOI MIB Support for GET VPN
The existing MIBs in crypto are the IKE and IPSec MIBs, which are not sufficient for GDOI. The GDOI MIB Support for GET VPN feature adds MIB support for RFC 3547, The Group Domain of Interpretation; it supports only the objects related to the GDOI MIB IETF standard. You can import the GDOI MIB .my file into an SNMP management station and parse it to retrieve the table objects and hierarchy information.
The GDOI MIB consists of objects and notifications (formerly called traps) that include information about GDOI groups, GM and KS peers, and the policies that are created or downloaded. Only "get" operations are supported for GDOI.
To configure GDOI MIB support for GET VPN, see the "Configuring GDOI MIB Support for GET VPN" section.
- GDOI MIB Compatibility with Other GET VPN Software Versions
- GDOI MIB Table Hierarchy
- GDOI MIB Table Objects
- GDOI MIB Notifications
- GDOI MIB Limitations
GDOI MIB Compatibility with Other GET VPN Software Versions
The GDOI MIB Support for GET VPN feature provides a command that you use on the KS (or primary KS) to check whether all the devices in the network are running versions that support the GDOI MIB. For more information, see the "Ensuring that GMs Are Running Software Versions That Support the GDOI MIB" section.
GDOI MIB Table Hierarchy
The GDOI MIB objects are organized into the following GDOI MIB tables. Following is the relationship (hierarchy) among the tables:
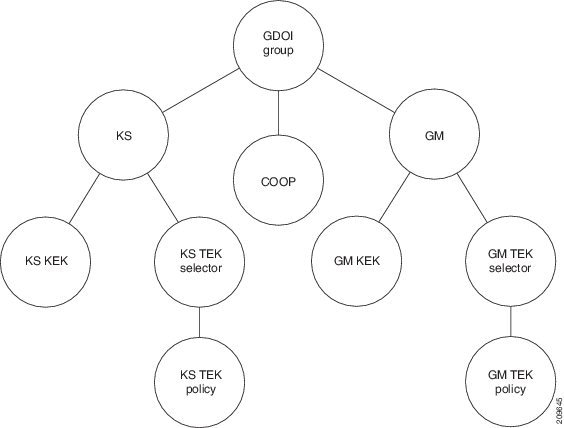
GDOI MIB Table Objects
Following is a list of the MIB table objects (listed per group).
Group table objects:
-
Group ID type--Specifies whether the group ID is an IP address, group number, hostname, and so on.
-
Group ID length--Number of octets in the group ID value.
-
Group ID value--Group number, IP address, or hostname.
-
Group name--String value.
KS table objects:
-
KS ID type
-
KS ID length
-
KS ID value
-
Active KEK--SPI of the KEK that is currently used by the KS to encrypt the rekey message.
-
Last rekey sequence number--Last rekey number that was sent by the KS to the group.
GM table:
-
GM ID type
-
GM ID length
-
GM ID value
-
Registered KS ID type--ID type of the KS to which the GM is registered.
-
Registered KS ID length
-
Registered KS ID value
-
Active KEK--SPI of the KEK currently used by the GM to decrypt rekey messages.
-
Last rekey seq number--Last rekey number received by the GM.
KS KEK table:
-
KEK index
-
KEK SPI
-
KEK source ID information--Source ID type, ID length, and ID value.
-
KEK source ID port--Port associated with the source ID.
-
KEK destination ID information--Destination ID type, ID length, and ID value.
-
KEK destination ID port--Port associated with the destination ID.
-
IP protocol ID--UDP or TCP.
-
Key management algorithm (unused).
-
Encryption algorithm and key length (bits)
-
SIG payload hash algorithm, SIG payload signature algorithm, and SIG payload key length (bits).
-
Hash algorithm (will be reused from the IPsec MIB)
-
Diffie-Hellman group
-
KEK original lifetime (seconds)--Maximum time for which a KEK is valid.
-
KEK remaining lifetime (seconds)
KS TEK selector table (corresponds to the ACLs that are configured as part of the IPsec SA in the GDOI group configuration on the KS):
-
Tek selector index--An integer index.
-
TEK source ID information--Source ID type, ID length, and ID value.
-
TEK source ID port--Port associated with the source ID.
-
TEK destination ID information--Destination ID type, ID length, and ID value.
-
TEK destination ID port--Port associated with the destination ID.
-
TEK Security protocol--GDOI_PROTO_IPSEC_ESP protocol ID value in the SA TEK payload (see RFC 3547).
KS TEK policy table:
-
TEK policy index--An integer index.
-
TEK SPI--Four octets
-
Encapsulation mode--Tunnel or transport.
-
Encryption algorithm and key length (bits)
-
Integrity and authentication algorithm and key length (bits)
-
TBAR window size (seconds)
-
TEK original lifetime (seconds)--Maximum time for which a TEK is valid.
-
TEK remaining lifetime (seconds)
-
TEK Status--Inbound, outbound, or not in use.
GM KEK table:
-
KEK index--An integer index.
-
KEK SPI
-
KEK source ID information--Source ID type, ID length , and ID value.
-
KEK source ID port--Port associated with the source ID.
-
KEK destination ID information--Destination ID type, ID length, and ID value.
-
KEK destination ID port--Port associated with the destination ID.
-
IP protocol ID--UDP or TCP.
-
Key management algorithm (unused)
-
Encryption algorithm and key length (bits)
-
SIG payload hash algorithm, SIG payload signature algorithm, and SIG payload key length (bits)
-
Hash algorithm
-
Diffie-Hellman group
-
KEK original lifetime (seconds)--Maximum time for which a KEK is valid.
-
KEK remaining lifetime (seconds)
GM TEK selector table (corresponds to the ACLs that are downloaded to the GM as part of the TEK policy from the KS):
-
TEK selector index--An integer index.
-
TEK source ID information--Source ID type, ID length, and ID value.
-
TEK source ID port--Port associated with the source ID.
-
TEK destination ID information--Destination ID type, ID length , and ID value.
-
TEK destination ID port--Port associated with the destination ID.
-
TEK Security protocol--GDOI_PROTO_IPSEC_ESP protocol ID value in the SA TEK payload (see RFC 3547).
GM TEK policy table:
-
TEK policy index--An integer index.
-
TEK SPI --Four octets.
-
Encapsulation mode--Tunnel or transport.
-
Encryption algorithm and key length (bits)
-
Integrity and authentication algorithm and key length (bits)
-
TBAR window size (seconds)
-
TEK original lifetime (seconds)--Maximum time for which a TEK is valid.
-
TEK remaining lifetime (seconds)
-
TEK Status--Inbound, outbound, or not in use.
GDOI MIB Notifications
The GDOI MIB supports the SNMP notifications in the following table. The GDOI MIB contains two kinds of notifications--those generated by the KS and those generated by each GM. You can enable any combination of notifications (or all notifications).
| Table 4 | SNMP Notifications Supported by the GDOI MIB |
|
Notification |
Description |
|---|---|
|
KS New Registration |
A KS first received a registration request from a GM. |
|
KS Registration Complete |
A GM completed registration to the KS. |
|
KS Rekey Pushed |
A rekey message was sent by the KS. |
|
KS No RSA Keys |
An error notification was received from the KS because of missing RSA keys. |
|
GM Register |
A GM first sent a registration request to a KS. |
|
GM Registration Complete |
A GM completed registration to a KS. |
|
GM Re-Register |
A GM began the re-registration process with a KS. |
|
GM Rekey Received |
A rekey message was received by a GM. |
|
GM Incomplete Config |
A GM sent an error notification because of a missing configuration. |
|
GM Rekey Failure |
A GM sent an error notification because it cannot process and install a rekey. |
For more information, see the "Enabling GDOI MIB Notifications" section.
GET VPN Support for IPv6 in the Data Plane
This feature secures IPv6 traffic in the data plane (while maintaining usage of IPv4 in the control plane) over private IP WANs such as MPLS. This means that a GM using this feature must be a dual-stack device.
The feature does not support "mixed mode," which means that a group cannot be configured with both IPv6 and IPv4 policies. Also, IPsec crypto maps do not support mixed mode. An IPv6 crypto map accepts only the assignment of an IPv6 group.
Because GET VPN is a technology that is based on groups, all devices in the same group (including the KS, cooperative KSs, and GMs) must support the GET VPN for IPv6 in the Data Plane feature before the group's KS can enable the feature. The feature provides a command that you use on the KS (or primary KS) to check whether all devices in the network are running versions that support it. For more information, see the "Ensuring That GMs Are Running GET VPN Software Versions Compatible with IPv6 in the Data Plane" section.
The feature uses the control plane to download IPv6 policies, registrations, and rekeys via IPv4 and then creates IPv6 IPsec SAs. KEKS continue to use IPv4, while downloaded TEKs are IPv6 policies using an IPv6 IPsec SA. When a GM downloads the policy from the KS, the GM checks if the policy is in IPv6. If not, the policy is rejected, and the GM attempts to re-register to another KS on its KS list.
The feature is supported only on those platforms that support IPv6 crypto maps. For other platforms, the applicable configuration commands are disabled.
Because control traffic is IPv4 and data traffic is IPv6, you must separate these two types of traffic. To do so, you can use the GET VPN VRF-Aware GDOI on GM feature (which will be needed for certain deployments to separate the control and data traffic). For other deployments, a dual-stack interface can be used to route the control and data traffic. (Control plane traffic for GDOI is for registration and rekeys.)
Cisco Group Encrypted Transport VPN System Logging Messages
The table below lists GET VPN system logging (also called syslog) messages and explanations.
| Table 5 | GET VPN System Logging Messages |
|
Message |
Explanation |
|---|---|
|
COOP_CONFIG_MISMATCH |
The configuration between the primary KS and secondary KS are mismatched. |
|
COOP_KS_ADD |
A KS has been added to the list of cooperative KSs in a group. |
|
COOP_KS_ELECTION |
The local KS has entered the election process in a group. |
|
COOP_KS_REACH |
The reachability between the configured cooperative KSs is restored. |
|
COOP_KS_REMOVE |
A KS has been removed from the list of cooperative KSs in a group. |
|
COOP_KS_TRANS_TO_PRI |
The local KS transitioned to a primary role from being a secondary server in a group. |
|
COOP_KS_UNAUTH |
An authorized remote server tried to contact the local KS in a group. Could be considered a hostile event. |
|
COOP_KS_UNREACH |
The reachability between the configured cooperative KSs is lost. Could be considered a hostile event. |
|
COOP_KS_VER_MISMATCH |
KSs are running different versions of the Cisco IOS code. |
|
COOP_PACKET_DROPPED |
A hard limit set on the driver buffer size prevents the sending of packets this size or larger. |
|
GDOI-3-GDOI_REKEY_SEQ_FAILURE |
The rekey message is rejected because the sequence number antireplay check failed. |
|
GDOI-3-GM_NO_CRYPTO_ENGINE |
No crypto engine is found due to a lack of resources or an unsupported feature requested. |
|
GDOI-3-PSEUDO_TIME_LARGE |
The rekey has a larger pseudotime that exceeds the calculated allowable pseudotime difference. |
|
GDOI-3-PSEUDO_TIME_TOO_OLD |
The rekey has a smaller pseudotime that exceeds the calculated allowable pseudotime difference. |
|
GDOI-4-GDOI_ANN_TIMESTAMP_ LARGE |
The secondary KS receives from the primary KS an ANN that has a larger pseudotime that exceeds the calculated allowable pseudotime difference. |
|
GDOI-4-GDOI_ANN_TIMESTAMP_ TOO_OLD |
The secondary KS receives from the primary KS an ANN that has a smaller pseudotime that exceeds the calculated allowable pseudotime difference. |
|
GDOI-5-COOP_KS_BLOCK_NEW_GM_REGISTER |
The secondary KS temporarily blocks a GM from registering in a group because it has not received a valid pseudotime from the primary KS. |
|
GDOI-5-COOP_KS_VALID_ANN_ TIMER_EXPIRED |
The secondary KS keeps receiving ANNs with invalid pseudotimes after three retransmits. The secondary KS temporarily blocks new group-member registration until a valid ANN is received. |
|
GDOI_ACL_NUM |
The ACL has too many entries. GDOI will honor only the first 100 ACL entries specified. |
|
GDOI_REKEY_FAILURE |
During GDOI rekey the payload parsing failed on this GM from the KS. |
|
GM_ACL_MERGE |
The ACL differences between a GM and KS are resolved and a merge took place. |
|
GM_ACL_PERMIT |
The GM can support only an ACL for "deny." Any traffic matching the "permit" entry will be dropped. |
|
GM_CLEAR_REGISTER |
The clear crypto gdoi command has been executed by the local GM. |
|
GM_CM_ATTACH |
A crypto map has been attached for the local GM. |
|
GM_CM_DETACH |
A crypto map has been detached for the local GM. |
|
GM_CONV_SA_DUPLEX |
IPsec SAs have been converted to bidirectional mode in a group on a GM. |
|
GM_CONV_SA_DUPLEX_LOCAL |
IPsec SAs have been converted to bidirectional mode in a group on a GM by a CLI command. |
|
GM_ENABLE_GDOI_CM |
A GM has enabled ACL on a GDOI crypto map in a group with a KS. |
|
GM_HASH_FAIL |
During GDOI registration protocol, a message sent by the KS has bad or no hash. |
|
GM_INCOMPLETE_CFG |
Registration cannot be completed because the GDOI group configuration may be missing the group ID, server ID, or both. |
|
GM_NO_IPSEC_FLOWS |
The hardware limitation for IPsec flow limit reached. Cannot create any more IPsec SAs. |
|
GM_RE_REGISTER |
The IPsec SA created for one group may have been expired or cleared. Need to re-register to the KS. |
|
GM_RECV_DELETE |
A message sent by the KS to delete the GM has been received. |
|
GM_RECV_REKEY |
Rekey received. |
|
GM_REGS_COMPL |
Registration complete. |
|
GM_REJECTING_SA_PAYLOAD |
During GDOI registration protocol, a proposal sent by the KS was refused by the local GM. |
|
GM_REKEY_IPV4_POLICY_CHECK_FAIL |
A GM that is configured to join an IPv4 group has mistakenly received an IPv6 policy during a rekey. This might be because of a configuration error on the KS in which the same group is configured with an IPv6 policy. |
|
GM_REKEY_IPV6_POLICY_CHECK_FAIL |
A GM that is configured to join an IPv6 group has mistakenly received an IPv4 policy during a rekey. This might be because of a configuration error on the KS in which the same group is configured with an IPv4 policy. |
|
GM_REKEY_NOT_RECD |
A GM has not received a rekey message from a KS in a group. Currently unimplemented. |
|
GM_REKEY_TRANS_2_MULTI |
A GM has transitioned from using a unicast rekey mechanism to using a multicast mechanism. |
|
GM_REKEY_TRANS_2_UNI |
A GM has transitioned from using a multicast rekey mechanism to using a unicast mechanism. |
|
GM_SA_INGRESS |
A received-only ACL has been received by a GM from a KS in a group. |
|
GM_UNREGISTER |
A GM has left the group. |
|
KS_BAD_ID |
A configuration mismatch exists between a local KS and a GM during GDOI registration protocol. |
|
KS_BLACKHOLE_ACK |
A KS has reached a condition of black-holing messages from a GM. Could be considered a hostile event. |
|
KS_CLEAR_REGISTER |
The clear crypto gdoi command has been executed by the local KS. |
|
KS_CONV_SAS_DUPLEX |
IPsec SAs have been converted to bidirectional mode in a group. |
|
KS_CONV_SAS_INGRESS |
IPsec SAs have been converted to receive-only mode in a group. |
|
KS_FIRST_GM, GDOI, LOG_INFO |
A local KS has received the first GM joining the group. |
|
KS_GM_REJECTS_SA_PAYLOAD |
During GDOI registration protocol, a proposal sent by the KS was refused by the GM. |
|
KS_GM_REVOKED |
During rekey protocol, an unauthorized member tried to join a group. Could be considered a hostile event. |
|
KS_GROUP_ADD |
A configuration command has been executed to add a KS in a group. |
|
KS_GROUP_DELETE |
A configuration command has been executed to remove a KS from a group. |
|
KS_HASH_FAIL |
During GDOI registration protocol, a message sent by the GM has a bad or no hash. |
|
KS_LAST_GM |
The last GM has left the group on the local KS. |
|
KS_NACK_GM_EJECT |
The KS has reached a condition of not receiving an ACK message from a GM and has been ejected. |
|
KS_NO_RSA_KEYS |
RSA keys were not created or they are missing. |
|
KS_REGS_COMPL |
The KS has successfully completed a registration in a group. |
|
KS_REKEY_TRANS_2_MULTI |
The group has transitioned from using a unicast rekey mechanism to a multicast mechanism. |
|
KS_REKEY_TRANS_2_UNI |
The group has transitioned from using a multicast rekey mechanism to using a unicast mechanism. |
|
KS_SEND_MCAST_REKEY |
Sending multicast rekey. |
|
KS_SEND_UNICAST_REKEY |
Sending unicast rekey. |
|
KS_UNAUTHORIZED |
During GDOI registration protocol, an unauthorized member tried to join a group. Could be considered a hostile event. |
|
KS_UNSOL_ACK |
The KS has received an unsolicited ACK message from a past GM or is under a DOS attack. Could be considered a hostile event. |
|
PSEUDO_TIME_LARGE |
A GM has received a pseudotime with a value that is largely different from its own pseudotime. |
|
REPLAY_FAILED |
A GM or KS has failed an antireplay check. |
|
UNAUTHORIZED_IDENTITY |
The registration request was dropped because the requesting device was not authorized to join the group. |
|
UNAUTHORIZED_IPADDR |
The registration request was dropped because the requesting device was not authorized to join the group. |
|
UNEXPECTED_SIGKEY |
An unexpected signature key was found that frees the signature key. |
|
UNREGISTERED_INTERFACE |
Receiving registration from unregistered interface. Stop processing it. |
|
UNSUPPORTED_TEK_PROTO |
Unexpected TEK protocol. |
How to Configure Cisco Group Encrypted Transport VPN
- Ensuring That GMs Are Running GET VPN Software Versions Compatible with IPv6 in the Data Plane
- Configuring a Key Server
- Configuring a Group Member
- Configuring GET VPN GM Authorization
- Removing GMs and Triggering Rekeys
- Configuring GDOI MIB Support for GET VPN
- Verifying and Troubleshooting Cisco Group Encrypted Transport VPN Configurations
Ensuring That GMs Are Running GET VPN Software Versions Compatible with IPv6 in the Data Plane
Because GET VPN is a technology that is based on groups, all devices in the same group (including the KS, cooperative KSs, and GMs) must support the GET VPN for IPv6 in the Data Plane feature before the group's KS can enable the feature. If you want to enable the feature for a group, you must ensure that all devices in the group are running compatible versions of the GET VPN software.
Note that a single KS can configure multiple IPv4 groups, multiple IPv6 groups, or a combination of multiple IPv4 and IPv6 groups (each group with a unique group ID). For the IPv4 groups, their KSs, cooperative KSs, and GMs are running IPv4 data plane encryption and decryption. For the IPv6 groups, their KSs, cooperative KSs, and GMs are running IPv6 data plane encryption and decryption.
You can check the versions and compatibility while on the KS (or primary KS) or on a GM (which displays the information for the GM but not for the KS or other GMs). To do so, perform the following steps.
DETAILED STEPS
Configuring a Key Server
- Prerequisites
- Configuring RSA Keys to Sign Rekey Messages
- Configuring the Group ID Server Type and SA Type
- Configuring the Rekey
- Configuring Group Member ACLs
- Configuring an IPsec Lifetime Timer
- Configuring an ISAKMP Lifetime Timer
- Configuring the IPsec SA
- Configuring Time-Based Antireplay for a GDOI Group
- Configuring Passive SA
- Resetting the Role of the Key Server
Prerequisites
Before creating the GDOI group, you must first configure IKE and the IPsec transform set, and you must create an IPsec profile. For information about how to configure IKE and the IPsec transform set and to create an IPsec profile, see the "Related Documents" subsection of the "Additional References" section.
Configuring RSA Keys to Sign Rekey Messages
Note | Security threats, as well as the cryptographic technologies to help protect against them, are constantly changing. For more information about the latest Cisco cryptographic recommendations, see the Next Generation Encryption (NGE) white paper. |
To configure RSA keys that will be used to sign rekey messages, perform the following steps. Omit this subtask if rekey is not in use.
DETAILED STEPS
Configuring the Group ID Server Type and SA Type
For a large number of sites, it is better to take precautions and add functionality incrementally, especially when migrating from any other encryption solutions like Dual Multipoint VPN (DMVPN). For example, instead of setting up all the CPE devices to encrypt the traffic bidirectionally, it is possible to configure one-way encryption so that only one or fewer members of a group are allowed to send encrypted traffic. Others are allowed to receive only encrypted traffic. After the one-way encryption is validated for one or a few members, bidirectional encryption can be turned on for all the members. This "inbound only" traffic can be controlled using the sa receive only command under a crypto group.
To configure the group ID, server type, and SA type, perform the following steps.
DETAILED STEPS
Configuring the Rekey
This section includes the following optional tasks:
Rekey is used in the control plane by the key server to periodically refresh the policy and IPsec SAs of the group. On the group-member side, instead of fully re-registering when timers expire for any other reasons, refreshing the registration with a rekey is more efficient. The initial registration is always a unicast registration.
The key server can be configured to send rekeys in unicast or multicast mode. The rekey transport mode is determined by whether the key server can use IP multicast to distribute the rekeys. If multicast capability is not present within the network of the customer, the key server will have to be configured to send rekeys using unicast messages.
Additional options for rekey use the rekey authentication, rekey retransmit, and rekey address ipv4 commands. If unicast transport mode is configured, the source address command will have to be included to specify the source address of this unicast rekey message.
Multicast is the default transport type for rekey messages. The following bulleted items explain when to use rekey transport type multicast or unicast:
- If all members in a group are multicast capable, do not configure the rekey transport unicast command. The no rekey transport unicast command is not needed if the rekey transport type "unicast" was not configured previously under this group because multicast rekeys are on by default.
- If all members in a group are unicast, use the rekey transport unicast command.
- If you have mixed members in a group (that is, the majority are multicast, but a few are unicast), do not configure the rekey transport unicast command. The rekeys will be distributed using multicast to the majority of group members. The remainder of the group members that do not receive the multicast messages (unicast group members) will have to re-register to the key server when their policies expire. Mixed mode (that is, unicast and multicast rekey mode) is not supported.
If the no rekey transport unicast command is used, members in the GDOI group that are unable to receive the multicast rekey messages need to re-register with the key server to get the latest group policies. The re-registration forces the default transport type to multicast. If no transport type was configured previously, the multicast transport type will apply by default.
Prerequisites
Before configuring the rekey authentication command, you must have configured the router to have an RSA key generated using the crypto key generate rsa command and general-keys and label keywords (for example, "crypto key generate rsa general-key label my keys").
Configuring a Unicast Rekey
In the configuration task table, the address "ipv4 10.0.5.2" specifies the interface on the key server by which the unicast or multicast rekey messages are sent. This address is required for unicast rekeys, but it is optional for multicast rekeys. For multicast rekeys, the source address of the key server can be retrieved from the rekey ACL.
To configure a unicast rekey, perform the following steps.
DETAILED STEPS
Configuring a Multicast Rekey
DETAILED STEPS
Configuring Group Member ACLs
All IP traffic matching deny entries are sent out by the group member in clear text. The inbound traffic is matched to the mirrored access list.
To configure group member ACLs, perform this task (note that a group member access list can contain only deny statements).
DETAILED STEPS
| Command or Action | Purpose | |
|---|---|---|
Step 1 |
enable
Example: Router> enable |
Enables privileged EXEC mode. |
Step 2 |
configure
terminal
Example: Router# configure terminal |
Enters global configuration mode. |
Step 3 |
access-list
access-list-number
deny
ip
host
source
host
source
Example: Router(config)# access-list 101 deny ip host 10.0.0.1 host 10.0.0.2 |
Defines a denied IP access list. |
Step 4 |
access-list
access-list-number
permit
ip
source
Example: Router(config)# access-list 103 permit ip 209.165.200.225 0.255.255.255 10.20.0.0 0.255.255.255 |
Defines an allowed IP access list. |
Configuring an IPsec Lifetime Timer
To configure an IPsec lifetime timer for a profile, perform the following steps. If this configuration task is not performed, the default is the maximum IPsec SA lifetime of 3600 seconds. The TEK lifetime value should be more than 900 seconds.
DETAILED STEPS
| Command or Action | Purpose | |
|---|---|---|
Step 1 |
enable
Example: Router> enable |
Enables privileged EXEC mode.
|
Step 2 |
configure
terminal
Example: Router# configure terminal |
Enters global configuration mode. |
Step 3 |
crypto
ipsec
profile
name
Example: Router(config)# crypto ipsec profile profile1 |
Defines the IPsec parameters that are to be used for IPsec encryption between two IPsec routers and enters crypto ipsec profile configuration mode. |
Step 4 |
set
security-association
lifetime
seconds
seconds
Example: Router(ipsec-profile)# set security-association lifetime seconds 2700 |
Overrides (for a particular crypto map entry) the global lifetime value, which is used when negotiating IPsec SAs. |
Configuring an ISAKMP Lifetime Timer
DETAILED STEPS
| Command or Action | Purpose | |
|---|---|---|
Step 1 |
enable
Example: Router> enable |
Enables privileged EXEC mode.
|
Step 2 |
configure
terminal
Example: Router# configure terminal |
Enters global configuration mode. |
Step 3 |
crypto
isakmp
policy
priority
Example: Router(config)# crypto isakmp policy 1 |
Defines an IKE policy and enters ISAKMP policy configuration mode. |
Step 4 |
lifetime
seconds
Example: Router(config-isakmp-policy)# lifetime 86400 |
Specifies the lifetime of an IKE SA. |
Configuring the IPsec SA
If time-based antireplay is configured on the key server but the group member is not capable of supporting it, the GDOI-3-GM_NO_CRYPTO_ENGINE syslog message is logged to the group member. See the "Cisco Group Encrypted Transport VPN System Logging Messages" section for a list of system error messages.
Mixed mode is not supported, which means that you cannot configure both IPv4 and IPv6 policies under the same group. If you configure an IPv6 GDOI group (by using the crypto gdoi group ipv6 command and keyword combination), the data plane must be using IPv6. Also, only matching of addresses using IPv6 ACLs (by using the match address ipv6 command and keyword combination) is allowed on the KS group configuration.
Note | Security threats, as well as the cryptographic technologies to help protect against them, are constantly changing. For more information about the latest Cisco cryptographic recommendations, see the Next Generation Encryption (NGE) white paper. |
To configure the IPsec SA, perform the following steps.
DETAILED STEPS
| Command or Action | Purpose | |||
|---|---|---|---|---|
Step 1 |
enable
Example: Router> enable |
Enables privileged EXEC mode. | ||
Step 2 |
configure
terminal
Example: Router# configure terminal |
Enters global configuration mode. | ||
Step 3 |
crypto
ipsec
transform-set
transform-set-name
transform
[transform2...transform4]
Example: Router(config)# crypto ipsec transform-set gdoi-trans esp-aes esp-sha-hmac |
Defines a transform set--an acceptable combination of security protocols and algorithms. | ||
Step 4 |
crypto
ipsec
profile
ipsec-profile-name
Example: Router(config)# crypto ipsec profile profile1 |
Defines an IPsec profile and enters crypto ipsec profile configuration mode. | ||
Step 5 |
set
transform-set
transform-set-name
Example: Router(ipsec-profile)# set transform-set transformset1 |
Specifies which transform sets can be used with the crypto map entry. | ||
Step 6 |
exit
Example: Device(ipsec-profile)# exit |
Exits IPsec profile configuration mode. | ||
Step 7 |
crypto
gdoi
group [ipv6]
group-name
Example: Router(config)# crypto gdoi group gdoigroupname |
Identifies a GDOI group and enters GDOI group configuration mode. If you are using GET VPN over IPv6 in the data plane, you must use the ipv6 keyword. | ||
Step 8 |
Identifies a GDOI group number or address. The identity number number command applies to IPv4 and IPv6 configurations. The identity address ipv4 address command applies only to IPv4 configurations. | |||
Step 9 |
server
local
Example: Router(config-gdoi-group)# server local |
Designates a device as a GDOI key server and enters GDOI local server configuration mode. | ||
Step 10 |
sa
ipsec
sequence-number
Example: Router(gdoi-local-server)# sa ipsec 1 |
Specifies the IPsec SA policy information to be used for a GDOI group and enters GDOI SA IPsec configuration mode. | ||
Step 11 |
profile
ipsec-profile-name
Example: Router(gdoi-sa-ipsec)# profile gdoi-p |
Defines the IPsec SA policy for a GDOI group. | ||
Step 12 |
match
address
{ipv4 |
ipv6} {access-list-number |
access-list-name}
Example: Router(gdoi-sa-ipsec)# match address ipv4 102 |
Specifies an IP extended access list for a GDOI registration. You must use the ipv4 keyword for IPv4 groups and the ipv6 keyword for IPv6 groups. You must use a named (not numbered) access list for IPv6 configurations.
| ||
Step 13 |
end
Example: Router(gdoi-sa-ipsec)# end |
Exits GDOI SA IPsec configuration mode and returns to privileged EXEC mode. |
Configuring Time-Based Antireplay for a GDOI Group
DETAILED STEPS
| Command or Action | Purpose | |||
|---|---|---|---|---|
Step 1 |
enable
Example: Router> enable |
Enables privileged EXEC mode. | ||
Step 2 |
configure
terminal
Example: Router# configure terminal |
Enters global configuration mode. | ||
Step 3 |
crypto
gdoi
group [ipv6]
group-name
Example: Router(config)# crypto gdoi group gdoigroup1 |
Identifies a GDOI group and enters GDOI group configuration mode. If you are using GET VPN over IPv6 in the data plane, you must use the ipv6 keyword. | ||
Step 4 |
identity
number
policy-name
Example: Router(config-gdoi-group)# identity number 1234 |
Identifies a GDOI group number. | ||
Step 5 |
server
local
Example: Router(config-gdoi-group)# server local |
Designates a device as a GDOI key server and enters GDOI local server configuration mode. | ||
Step 6 |
address
ipv4
ip-address
Example: Router(config-server-local)# address 209.165.200.225 |
Sets the source address, which is used as the source for packets originated by the local key server. | ||
Step 7 |
sa
ipsec
sequence-number
Example: Router(config-server-local)# sa ipsec 1 |
Specifies the IPsec SA and enters GDOI SA IPsec configuration mode. | ||
Step 8 |
profile
ipsec-profile-name
Example: Router(gdoi-sa-ipsec)# profile test1 |
Defines the IPsec SA policy for a GDOI group. | ||
Step 9 |
match
address
{ipv4 |
ipv6} {access-list-number |
access-list-name}
Example: Router(gdoi-sa-ipsec)# match address ipv4 101 |
Specifies an IP extended access list for a GDOI registration. You must use the ipv4 keyword for IPv4 groups and the ipv6 keyword for IPv6 groups. You must use a named (not numbered) access list for IPv6 configurations.
| ||
Step 10 |
replay
counter
window-size
seconds
Example: Router(gdoi-sa-ipsec)# replay counter window-size 512 |
Turns on counter-based antireplay protection for traffic defined inside an access list using GDOI if there are only two group members in a group.
| ||
Step 11 |
replay
time
window-size
seconds
Example: Router(gdoi-sa-ipsec)# replay time window-size 1 |
Sets the window size for antireplay protection using GDOI if there are more than two group members in a group.
|
Configuring Passive SA
DETAILED STEPS
| Command or Action | Purpose | |
|---|---|---|
Step 1 |
enable
Example: Router> enable |
Enables privileged EXEC mode. |
Step 2 |
configure
terminal
Example: Router# configure terminal |
Enters global configuration mode. |
Step 3 |
crypto
gdoi
group [ipv6]
group-name
Example: Router(config)# crypto gdoi group group1 |
Identifies a GDOI group and enters GDOI group configuration mode. If you are using GET VPN over IPv6 in the data plane, you must use the ipv6 keyword. |
Step 4 |
identity
name
Example: Router(config-gdoi-group)# identity 2345 |
Sets the identity to the crypto map. |
Step 5 |
passive
Example: Router(config-gdoi-group)# passive |
Puts the group member into passive mode. |
Step 6 |
server
address
ipv4
{address |
hostname}
Example: Router(config-gdoi-group)# server address ipv4 209.165.200.225 |
Specifies the address of the server that a GDOI group is trying to reach. |
Configuring a Group Member
To configure a group member, perform the following subtasks:
- Configuring the Group Name ID Key Server IP Address and Group Member Registration
- Creating a Crypto Map Entry
- Applying the Crypto Map to an Interface to Which the Traffic Must Be Encrypted
- Activating Fail-Close Mode
- Configuring Acceptable Ciphers or Hash Algorithms for KEK
- Configuring Acceptable Transform Sets for TEK
Configuring the Group Name ID Key Server IP Address and Group Member Registration
To configure the group name, ID, key server IP address, and group member registration, perform the following steps. You can configure up to eight key server addresses.
DETAILED STEPS
| Command or Action | Purpose | |
|---|---|---|
Step 1 |
enable
Example: Router> enable |
Enables privileged EXEC mode. |
Step 2 |
configure
terminal
Example: Router# configure terminal |
Enters global configuration mode. |
Step 3 |
crypto
gdoi
group [ipv6]
group-name
Example: Router(config)# crypto gdoi group gdoigroupone |
Identifies a GDOI group and enters GDOI group configuration mode. If you are using GET VPN over IPv6 in the data plane, you must use the ipv6 keyword. |
Step 4 |
Identifies a GDOI group number or address. | |
Step 5 |
Specifies the address or hostname of the server that a GDOI group is trying to reach. |
Creating a Crypto Map Entry
DETAILED STEPS
| Command or Action | Purpose | |
|---|---|---|
Step 1 |
enable
Example: Router> enable |
Enables privileged EXEC mode. |
Step 2 |
configure
terminal
Example: Router# configure terminal |
Enters global configuration mode. |
Step 3 |
crypto
map
[ipv6]
map-name
seq-num
gdoi
Example: Router(config)# crypto map mymap 10 gdoi |
Enters crypto map configuration mode and creates or modifies a crypto map entry. Use the ipv6 keyword to specify an IPv6 crypto map. |
Step 4 |
set
group
group-name
Example: Router(config-crypto-map)# set group group1 |
Applying the Crypto Map to an Interface to Which the Traffic Must Be Encrypted
Note | If you are configuring the GET VPN Support for IPv6 in the Data Plane feature and want to apply the crypto map to an IPv6-only interface (meaning one that does not support IPv4/IPv6 dual-stack), you must first define a client-registration interface to specify an IPv4 address that it will use for KS registration. The GET VPN Support for IPv6 in the Data Plane feature keeps control plane traffic in IPv4, which means that it cannot use the local address configured in the crypto map set. In order to share an IPv6 crypto map set with an IPv6 local address configured, the GM must use a client-registration interface (in IPv4) to take precedence over the IPv6 local address. For more information, see the GET VPN VRF-Aware GDOI on GM section and the Cisco IOS GETVPN VRF-Aware GDOI GM Solution Deployment Guide. |
To apply the crypto map to an interface to which the traffic must be encrypted, perform the following steps.
DETAILED STEPS
| Command or Action | Purpose | |
|---|---|---|
Step 1 |
enable
Example: Router> enable |
Enables privileged EXEC mode. |
Step 2 |
configure
terminal
Example: Router# configure terminal |
Enters global configuration mode. |
Step 3 |
interface
type
slot
/
port
Example: Router(config)# interface gigabitethernet 0/0 |
Configures an interface type and enters interface configuration mode. |
Step 4 | If you are configuring GET VPN over IPv6 in the data plane, you must use the
ipv6
crypto
map
map-name
command.
Applies the crypto map to the interface. |
Activating Fail-Close Mode
Fail-close mode prevents unencrypted traffic from passing through a group member before that member is registered with a key server.
To configure a crypto map to work in fail-close mode, perform the following steps:
DETAILED STEPS
| Command or Action | Purpose | |
|---|---|---|
Step 1 |
enable
Example: Router> enable |
Enables privileged EXEC mode. |
Step 2 |
configure
terminal
Example: Router# configure terminal |
Enters global configuration mode. |
Step 3 |
crypto
map
[ipv6]
map-name
gdoi
fail-close
Example: Router(config)# crypto map map1 gdoi fail-close |
Specifies that the crypto map is to work in fail-close mode and enters crypto map fail-close configuration mode. Use the ipv6 keyword to specify an IPv6 crypto map (required for using GET VPN over IPv6 in the data plane). |
Step 4 |
match
address
{access-list-number |
access-list-name}
Example: Router(crypto-map-fail-close)# match address 133 |
(Optional) Specifies an ACL for a GDOI registration. IPv6 configurations must use named (not numbered) ACLs. |
Step 5 |
activate
Example: Router(crypto-map-fail-close)# activate |
Activates fail-close mode. |
Configuring Acceptable Ciphers or Hash Algorithms for KEK
Note | Security threats, as well as the cryptographic technologies to help protect against them, are constantly changing. For more information about the latest Cisco cryptographic recommendations, see the Next Generation Encryption (NGE) white paper. |
To configure the ciphers and hash algorithms for KEK to be allowed by the GM, perform the following steps.
DETAILED STEPS
| Command or Action | Purpose | |
|---|---|---|
Step 1 |
enable
Example: Router> enable |
Enables privileged EXEC mode. |
Step 2 |
configure
terminal
Example: Router# configure terminal |
Enters global configuration mode. |
Step 3 |
crypto
gdoi
group [ipv6]
group-name
Example: Router(config)# crypto gdoi group gdoigroupone |
Identifies a GDOI group and enters GDOI group configuration mode. If you are using GET VPN over IPv6 in the data plane, you must use the ipv6 keyword. |
Step 4 |
Identifies a GDOI group number or address. | |
Step 5 |
server
address
ipv4
address
Example: Router(config-gdoi-group)# server address ipv4 10.0.5.2 |
Specifies the address of the server a GDOI group is trying to reach. |
Step 6 |
client
rekey
encryption
cipher
[... [cipher]]
Example: Router(config-gdoi-group)# client rekey encryption aes 128 aes 192 aes 256 |
Sets the client acceptable rekey ciphers for the KEK. |
Step 7 |
client
rekey
hash
hash
Example: Router(config-gdoi-group)# client rekey hash sha |
Sets the client acceptable hash algorithm for KEK. |
Step 8 |
end
Example: Router(config-gdoi-group)# end |
Exits GDOI group configuration mode and returns to privileged EXEC mode. |
Configuring Acceptable Transform Sets for TEK
To configure the acceptable transform sets used by TEK for data encryption or authentication, perform the following steps.
DETAILED STEPS
| Command or Action | Purpose | |
|---|---|---|
Step 1 |
enable
Example: Router> enable |
Enables privileged EXEC mode. |
Step 2 |
configure
terminal
Example: Router# configure terminal |
Enters global configuration mode. |
Step 3 |
crypto
ipsec
transform-set
transform-set-name
transform
[transform2...transform4]
Example: Router(config)# crypto ipsec transform-set g1 esp-aes 192 esp-sha-hmac |
Defines a transform set--an acceptable combination of security protocols and algorithms--and enters crypto transform configuration mode. |
Step 4 |
exit
Example: Router(cfg-crypto-trans)# exit |
Exits crypto transform configuration mode. |
Step 5 |
crypto
gdoi
group [ipv6]
group-name
Example: Router(config)# crypto gdoi group gdoigroupone |
Identifies a GDOI group and enters GDOI group configuration mode. If you are using GET VPN over IPv6 in the data plane, you must use the ipv6 keyword. |
Step 6 |
client
transform-sets
transform-set-name1
[... [transform-set-name6]]
Example: Router(config-gdoi-group)# client transform-sets g1 |
Specifies the acceptable transform-set tags used by TEK for data encryption and authentication. |
Step 7 |
end
Example: Router(config-gdoi-group)# end |
Exits GDOI group configuration mode and returns to privileged EXEC mode. |
Configuring GET VPN GM Authorization
GET VPN GM authorization can be done using preshared keys or PKI. It is a best practice to turn on GET VPN authorization. When a key server serves multiple GDOI groups, key server authorization is required to prevent a GM in one group from requesting keys and policies from another group. The ISAKMP authorization confirms that the GM is allowed to request GDOI attributes from the key server while the GDOI authorization confirms the GM is allowed to request GDOI attributes from a specific group configured in the key server.
To configure GET VPN GM authorization, perform either of the following tasks:
Configuring GM Authorization Using Preshared Keys
DETAILED STEPS
| Command or Action | Purpose | |
|---|---|---|
Step 1 |
enable
Example: Router> enable |
Enables privileged EXEC mode. |
Step 2 |
configure
terminal
Example: Router# configure terminal |
Enters global configuration mode. |
Step 3 |
crypto
gdoi
group [ipv6]
group-name
Example: Router(config)# crypto gdoi group getvpn |
Identifies a GDOI and enters GDOI group configuration mode. If you are using GET VPN over IPv6 in the data plane, you must use the ipv6 keyword. |
Step 4 |
server
local
Example: Router(config-gdoi-group)# server local |
Designates a device as a GDOI key server and enters GDOI local server configuration mode. |
Step 5 |
authorization
address
ipv4
{
access-list-name
|
access-list-number
}
Example: Router(gdoi-local-server)# authorization address ipv4 50 |
Specifies a list of addresses for a GDOI. |
Step 6 |
exit
Example: Router(gdoi-local-server)# exit |
Exits GDOI local configuration mode and returns to GDOI group configuration mode. |
Step 7 |
exit
Example: Router(config-gdoi-group)# exit |
Exits GDOI group configuration mode and returns to global configuration mode. |
Step 8 |
access-list
access-list-number
[dynamic
dynamic-name [timeout
minutes]] {deny |
permit}
protocol
source
source-wildcard
destination
destination-wildcard [precedence
precedence] [tos
tos] [time-range
time-range-name] [fragments] [log [word] |
log-input [word]]
Example: Router(config)# access-list 50 permit ip 209.165.200.225 0.0.0.0 209.165.200.254 0.0.0.0 |
Defines an allowed IP access list. |
Step 9 |
exit
Example: Router(config)# exit |
Exits global configuration mode and returns to privileged EXEC mode. |
Configuring GM Authorization Using PKI
DETAILED STEPS
| Command or Action | Purpose | |
|---|---|---|
Step 1 |
enable
Example: Router> enable |
Enables privileged EXEC mode. |
Step 2 |
configure
terminal
Example: Router# configure terminal |
Enters global configuration mode. |
Step 3 |
crypto
isakmp
identity {address |
dn |
hostname}
Example: Router(config)# crypto isakmp identity dn |
Defines the identity used by the router when the router is participating in the Internet Key Exchange (IKE) protocol. |
Step 4 |
crypto
pki
trustpoint
name
Example: Router(config)# crypto pki trustpoint GETVPN |
Declares the trustpoint that your router should use and enters ca-trustpoint configuration mode. |
Step 5 |
subject-name
[x.500-name]
Example: Router(ca-trustpoint)# subject-name OU=GETVPN |
Specifies the subject name in the certificate request. |
Step 6 |
exit
Example: Router(ca-trustpoint)# exit |
Exits ca-trustpoint configuration mode and returns to global configuration mode. |
Step 7 |
crypto
gdoi
group [ipv6]
group-name
Example: Router(config)# crypto gdoi group getvpn |
Identifies a GDOI group and enters GDOI group configuration mode. If you are using GET VPN over IPv6 in the data plane, you must use the ipv6 keyword. |
Step 8 |
server
local
Example: Router(config-gdoi-group)# server local |
Designates a device as a GDOI key server and enters GDOI local server configuration mode. |
Step 9 |
authorization
identity
name
Example: Router(gdoi-local-server)# authorization identity GETVPN_FILTER |
Specifies an identity for a GDOI group. |
Step 10 |
exit
Example: Router(gdoi-local-server)# exit |
Exits GDOI local server configuration mode and returns to GDOI group configuration mode. |
Step 11 |
exit
Example: Router(config-gdoi-group)# exit |
Exits GDOI group configuration mode and returns to global configuration mode. |
Step 12 |
crypto
identity
name
Example: Router(config)# crypto identity GETVPN_FILTER |
Configures the identity of the router with a given list of DNs in the certificate of the router and enters crypto identity configuration mode. |
Step 13 |
dn
name=string
[,
name=string]
Example: Router(config-crypto-identity)# dn ou=GETVPN |
Associates the identity of a router with the DN in the certificate of the router. |
Step 14 |
exit
Example: Router(config-crypto-identity)# exit |
Exits GDOI group configuration mode and returns to global configuration mode. |
Step 15 |
crypto
isakmp
identity
{address |
dn |
hostname
}
Example: Router(config)# crypto isakmp identity dn |
Defines the identity used by the router when the router is participating in the IKE protocol. |
Step 16 |
crypto
pki
trustpoint
name
Example: Router(config)# crypto pki trustpoint GETVPN |
Declares the trustpoint that your router should use and enters ca-trustpoint configuration mode. |
Step 17 |
subject-name
[x.500-name]
Example: Router(ca-trustpoint)# subject-name ou=getvpn |
Specifies the subject name in the certificate request. |
Step 18 |
end
Example: Router(ca-trustpoint)# exit |
Exits GDOI group configuration mode, saves the configuration, and returns to privileged EXEC mode. |
Removing GMs and Triggering Rekeys
This feature lets you create a new set of TEK and KEK keys and send out messages to all GMs to delete old groups (and thus clean up their old TEK and KEK databases).
- Ensuring That GMs Are Running Software Versions That Support GM Removal
- Removing GMs with Transient IPsec SAs
- Removing GMs and Deleting IPsec SAs Immediately
- Ensuring that GMs Are Running Software Versions That Support Policy Replacement
- Triggering a Rekey
Ensuring That GMs Are Running Software Versions That Support GM Removal
You should use this feature only after all devices in the GET VPN network are upgraded to GET VPN software versions that support this feature. Otherwise, secondary KSs or GMs that are running older software will ignore the GM removal message and continue to encrypt and decrypt traffic using the old SAs. This causes network traffic disruption.
To check whether all devices in the network support GM removal, perform the following steps on the KS (or primary KS).
DETAILED STEPS
| Command or Action | Purpose | |
|---|---|---|
Step 1 |
enable
Example: Router> enable |
Enables privileged EXEC mode. |
Step 2 |
show
crypto
gdoi
feature
gm-removal
Example: Router# show crypto gdoi feature gm-removal |
Displays the version of the GET VPN software running on each KS and GM in the GET VPN network and displays whether that device supports GM removal. |
Step 3 |
show
crypto
gdoi
feature
gm-removal
|
include
No
Example: Router# show crypto gdoi feature gm-removal | include No |
(Optional) Displays only those devices that do not support GM removal. |
Removing GMs with Transient IPsec SAs
To trigger removal of GMs with transient IPsec SAs, perform the following steps on the KS (or primary KS).
DETAILED STEPS
| Command or Action | Purpose | |
|---|---|---|
Step 1 |
enable
Example: Router> enable |
Enables privileged EXEC mode. |
Step 2 |
clear
crypto
gdoi [group
group-name]
ks
members
Example: Router# clear crypto gdoi ks members |
Creates a new set of TEK and KEK keys. This command also sends out GM removal messages to all GMs to clean up their old TEK and KEK databases. |
Examples
A message appears on the KS as follows:
Router# clear crypto gdoi ks members

% This GM-Removal message will shorten all GMs' key lifetimes and cause them to
re-register before keys expiry.
Are you sure you want to proceed? ? [yes/no]: yes
Sending GM-Removal message to group GET...
After each GM receives the GM removal message, the following syslog message appears on each GM:
*Jan 28 08:37:03.103: %GDOI-4-GM_RECV_DELETE: GM received delete-msg from KS in group GET.
TEKs lifetime are reduced and re-registration will start before SA expiry
Each GM removes the KEK immediately and shortens the lifetimes of the old TEKs as follows:
TEK_SLT = MIN(TEK_RLT, MAX(90s, MIN(5%(TEK_CLT), 3600s)))
TEK_SLT: TEK shortened lifetime
TEK_RLT: TEK Remaining LIfeTime
TEK_CLT: TEK Configured LIfeTime
Also, the GMs start re-registering to the KS to obtain the new TEKs and KEK according to the conventional re-registration timer and with jitter (random delay) applied. Jitter prevents all GMs from reregistering at the same time and overloading the key server CPU. Only GMs that pass the authentication based on the new credential installed on the KS will receive the new TEKs and KEK.
GM removal should not cause a network disruption, because traffic continues to be encrypted and decrypted using the transient IPsec SA until its lifetime expires.
If you try to use this command on the secondary KS, it is rejected as follows:
Router# clear crypto gdoi ks members

ERROR for group GET: can only execute this command on Primary KS
Removing GMs and Deleting IPsec SAs Immediately
To force GMs to delete old TEKs and KEKs immediately and re-register, perform the following steps on the KS (or primary KS).
DETAILED STEPS
| Command or Action | Purpose | |||
|---|---|---|---|---|
Step 1 |
enable
Example: Router> enable |
Enables privileged EXEC mode. | ||
Step 2 |
clear
crypto
gdoi [group
group-name]
ks
members
now
Example: Router# clear crypto gdoi ks members now |
Creates a new set of TEK and KEK keys. This command also sends out GM removal messages to all GMs to clean up their old TEK and KEK databases.
|
Examples
A message appears on the KS as follows:
Router# clear crypto gdoi ks members now

% This GM-Removal immediate message will cleanup all GMs downloaded policies
% This will cause all GMs to re-register.
Are you sure you want to proceed? ? [yes/no]: yes
Sending GM-Removal message to group GET...
After you enter the above command, the KS sends a "remove now" message to each GM to trigger the following actions on each GM:
- Cleans up its downloaded TEKs and KEK and its policy immediately and returns to fail-open mode (unless fail-close mode is explicitly configured).
- Sets up a timer with a randomly chosen period within 2 percent of the configured TEK lifetime.
- When the timer in the above step expires, the GM starts re-registering to the KS to download the new TEKs and KEK.
On each GM, the following syslog message is displayed to indicate that the GM will re-register in a random time period:
*Jan 28 08:27:05.627: %GDOI-4-GM_RECV_DELETE_IMMEDIATE: GM receive REMOVAL-NOW in group
GET to cleanup downloaded policy now. Re-registration will start in a randomly chosen
period of 34 sec
If you try to remove GMs in a network containing devices that do not support GM removal, a warning message appears:
Router# clear crypto gdoi ks members now

% This GM-Removal immediate message will cleanup all GMs downloaded policies
% This will cause all GMs to re-register.
Are you sure you want to proceed? ? [yes/no]: yes
WARNING for group GET: some devices cannot support GM-REMOVAL and can cause network
disruption. Please check 'show crypto gdoi feature'.
Are you sure you want to proceed ? [yes/no]: no
Ensuring that GMs Are Running Software Versions That Support Policy Replacement
To check whether all devices in the network support policy replacement, perform the following steps on the KS (or primary KS).
DETAILED STEPS
| Command or Action | Purpose | |
|---|---|---|
Step 1 |
enable
Example: Router> enable |
Enables privileged EXEC mode. |
Step 2 |
show
crypto
gdoi
feature
policy-replace
Example: Router# show crypto gdoi feature policy-replace |
Displays the version of the GET VPN software running on each KS and GM in the GET VPN network and displays whether that device supports policy replacement. |
Step 3 |
show
crypto
gdoi
feature
policy-replace
|
include
No
Example: Router# show crypto gdoi feature policy-replace | include No |
(Optional) Finds only those devices that do not support policy replacement. For these devices, the primary KS sends only the triggered rekey without instructions for policy replacement. Therefore, when a GM receives the rekey, it installs the new SAs but does not shorten the lifetimes of the old SAs. This behavior is the same as the existing rekey method and ensures backward compatibility. |
Triggering a Rekey
If you change the security policy (for example, from DES to AES) on the KS (or primary KS) and exit from global configuration mode, a syslog message appears on the KS indicating that the policy has changed and a rekey is needed. You enter the rekey triggering command as described below to send a rekey based on the latest policy in the running configuration.
To trigger a rekey, perform the following steps on the KS (or primary KS).
DETAILED STEPS
| Command or Action | Purpose | |||
|---|---|---|---|---|
Step 1 |
enable
Example: Router> enable |
Enables privileged EXEC mode. | ||
Step 2 |
crypto
gdoi
ks [group
group-name]
rekey [replace-now]
Example: Router# crypto gdoi ks group mygroup rekey |
Triggers a rekey on all GMs. The optional replace-now keyword immediately replaces the old TEKs and KEK on each GM to enable the new policy before the SAs expire.
|
Examples
A message appears on the KS as follows:
Router# crypto gdoi ks rekey
Router#
*Jan 28 09:17:44.363: %GDOI-5-KS_SEND_UNICAST_REKEY: Sending Unicast Rekey with
policy-replace for group GET from address 10.0.8.1 with seq # 2
After the policy change, when each GM receives this triggered rekey, it installs the new SAs (for example, for AES) and shortens the lifetimes of the old SAs (for example, for DES). Each GM continues to encrypt and decrypt traffic using the old SA until its shortened lifetime expires.
If you try to trigger a rekey on the secondary KS, it rejects the command as shown below:
Router# crypto gdoi ks rekey
ERROR for group GET: This command must be executed on Pri-KS
Configuring GDOI MIB Support for GET VPN
This feature provides a command that you use to determine which devices in the network are running versions that support the GDOI MIB. After you determine GDOI MIB support, you can configure those devices to use it.
- Ensuring that GMs Are Running Software Versions That Support the GDOI MIB
- Creating Access Control for an SNMP Community
- Enabling Communication with the SNMP Manager
- Enabling GDOI MIB Notifications
Ensuring that GMs Are Running Software Versions That Support the GDOI MIB
To determine whether all devices in the GET VPN network support the GDOI MIB, perform the following steps on the KS (or primary KS).
DETAILED STEPS
| Command or Action | Purpose | |
|---|---|---|
Step 1 |
enable
Example: Router> enable |
Enables privileged EXEC mode. |
Step 2 |
show
crypto
gdoi
feature
gdoi-mib
Example: Router# show crypto gdoi feature gdoi-mib |
Displays the version of the GET VPN software running on each KS and GM in the network and displays whether that device supports the GDOI MIB. |
Step 3 |
show
crypto
gdoi
feature
gdoi-mib
|
include
No
Example: Router# show crypto gdoi feature gdoi-mib | include No |
(Optional) Finds only those devices that do not support the GDOI MIB. |
Creating Access Control for an SNMP Community
You specify an SNMP community access string to define the relationship between the SNMP manager and the SNMP agent on the KS or GM in order to permit access to SNMP. Your community access string acts like a password to regulate access to the agent on the router.
To specify the community access string, perform the following steps.
DETAILED STEPS
| Command or Action | Purpose | |
|---|---|---|
Step 1 |
enable
Example: Router> enable |
Enables privileged EXEC mode. |
Step 2 |
configure
terminal
Example: Router# configure terminal |
Enters global configuration mode. |
Step 3 |
snmp-server
community
community-string [view
view-name] [ro |
rw] [ipv6
nacl] [access-list-number |
extended-access-list-number |
access-list-name]
Example: Router(config)# snmp-server community mycommunity |
Specifies the community access string. |
Step 4 |
end
Example: Router(config)# end |
Exits global configuration mode, saves the configuration, and returns to privileged EXEC mode. |
For more information about specifying a community access string, refer to the "Configuring SNMP Support" module in the SNMP Configuration Guide, Cisco IOS Release 15.2M&T. For more information about the snmp-server community command (including syntax and usage guidelines), refer to the Cisco IOS SNMP Support Command Reference.
Enabling Communication with the SNMP Manager
To enable communication between the SNMP agent on the KS or GM and the SNMP manager, perform the following steps.
DETAILED STEPS
| Command or Action | Purpose | |
|---|---|---|
Step 1 |
enable
Example: Router> enable |
Enables privileged EXEC mode. |
Step 2 |
configure
terminal
Example: Router# configure terminal |
Enters global configuration mode. |
Step 3 |
snmp-server
host {hostname |
ip-address}
version {1 |
2c |
3}
community-string
Example: Router(config)# snmp-server host 209.165.200.225 version 2c mycommunity |
Specifies the host to receive SNMP notifications. 2c is usually used as the SNMP version. |
Step 4 |
end
Example: Router(config)# end |
Exits global configuration mode, saves the configuration, and returns to privileged EXEC mode. |
For more information about enabling communication with the SNMP manager, refer to the "Configuring SNMP Support" module in the SNMP Configuration Guide, Cisco IOS Release 15.2M&T. For more information about the snmp-server host command (including syntax and usage guidelines), refer to the Cisco IOS SNMP Support Command Reference.
Enabling GDOI MIB Notifications
DETAILED STEPS
| Command or Action | Purpose | |
|---|---|---|
Step 1 |
enable
Example: Router> enable |
Enables privileged EXEC mode. |
Step 2 |
configure
terminal
Example: Router# configure terminal |
Enters global configuration mode. |
Step 3 |
snmp-server
enable
traps
gdoi [notification-type]
Example: Router(config)# snmp-server enable traps gdoi gm-registration-complete gm-rekey-rcvd ks-new-registration ks-reg-complete |
Specifies the particular SNMP notifications to be enabled. You can specify any combination of the following types in any order:
If you enter the command without any of the above keywords, all GDOI MIB notifications are enabled. |
Step 4 |
end
Example: Router(config)# end |
Exits global configuration mode, saves the configuration, and returns to privileged EXEC mode. |
Verifying and Troubleshooting Cisco Group Encrypted Transport VPN Configurations
The following tasks can be used to verify and troubleshoot your GET VPN configurations. These tasks are optional and are used to gather information during troubleshooting.
- Verifying States and Statistics for All Features and All Debug Levels
- Verifying the Active Encryption ACLs on a Key Server
- Verifying the Active Encryption ACLs on a Group Member
- Verifying Active Group Members on a Key Server
- Verifying Rekey-Related Statistics
- Verifying IPsec SAs That Were Created by GDOI on a Group Member
- Verifying IPsec SAs That Were Created by GDOI on a Key Server
- Verifying Key Server States and Statistics
- Verifying Cooperative Key Server States and Statistics
- Verifying Antireplay Pseudotime-Related Statistics
- Verifying Group Member States and Statistics
- Verifying the Downloaded RSA Public Key on the Group Member
- Verifying the Fail-Close Mode Status of a Crypto Map
- Displaying GDOI Debug Conditional Filters
- Displaying Information About GDOI Event Traces
Verifying States and Statistics for All Features and All Debug Levels
DETAILED STEPS
| Command or Action | Purpose | |
|---|---|---|
Step 1 |
enable
Example: Router> enable |
Enables privileged EXEC mode.
|
Step 2 |
debug
crypto
gdoi
all-features
[all-levels] [detail] Example: Router# debug crypto gdoi all-features detail |
Displays information for all features in GDOI. This consists of rekey, cooperative key server, replay, and registration information (for KSs ) and rekey, registration, and replay information (for GMs). The all-levels keyword displays all debug levels (detail, error, event, packet, and terse). |
Verifying the Active Encryption ACLs on a Key Server
DETAILED STEPS
| Command or Action | Purpose | |
|---|---|---|
Step 1 |
enable
Example: Router> enable |
Enables privileged EXEC mode. |
Step 2 |
show
crypto
gdoi
ks
acl
Example: Router# show crypto gdoi ks acl |
Displays the active encryption ACLs for groups using the KS. |
Verifying the Active Encryption ACLs on a Group Member
To verify the active encryption ACLs for the groups to which a GM belongs, perform the following steps on the GM.
DETAILED STEPS
| Command or Action | Purpose | |
|---|---|---|
Step 1 |
enable
Example: Router> enable |
Enables privileged EXEC mode. |
Step 2 |
show
crypto
gdoi
gm
acl
Example: Router# show crypto gdoi gm acl |
Displays the active encryption ACLs for the groups to which the GM belongs. |
Verifying Active Group Members on a Key Server
DETAILED STEPS
| Command or Action | Purpose | |
|---|---|---|
Step 1 |
enable
Example: Router> enable |
Enables privileged EXEC mode.
|
Step 2 |
show
crypto
gdoi
ks
members
Example: Router# show crypto gdoi ks members |
Displays information about key server members. |
Verifying Rekey-Related Statistics
DETAILED STEPS
| Command or Action | Purpose | |
|---|---|---|
Step 1 |
enable
Example: Router> enable |
Enables privileged EXEC mode.
|
Step 2 |
show
crypto
gdoi
ks
rekey
Example: Router# show crypto gdoi ks rekey |
On the key server, this command displays information about the rekeys that are being sent from the key server. |
Verifying IPsec SAs That Were Created by GDOI on a Group Member
DETAILED STEPS
| Command or Action | Purpose | |
|---|---|---|
Step 1 |
enable
Example: Router> enable |
Enables privileged EXEC mode. |
Step 2 |
show
crypto
gdoi
group
group-name
ipsec
sa
Example: Router# show crypto gdoi group diffint ipsec sa |
Displays information about IPsec SAs that were created by GDOI on a group member. |
Verifying IPsec SAs That Were Created by GDOI on a Key Server
DETAILED STEPS
| Command or Action | Purpose | |
|---|---|---|
Step 1 |
enable
Example: Router> enable |
Enables privileged EXEC mode.
|
Step 2 |
show
crypto
ipsec
sa
Example: Router# show crypto ipsec sa |
Displays the settings used by current SAs. |
Verifying Key Server States and Statistics
You can verify key server states and statistics for any (or all) features and any (or all) debug levels. To verify key server states and statistics, perform the following steps.
DETAILED STEPS
| Command or Action | Purpose | |
|---|---|---|
Step 1 |
enable
Example: Router> enable |
Enables privileged EXEC mode.
|
Step 2 |
debug
crypto
gdoi
ks
{all-features | coop| infrastructure | registration | rekey | replay} {all-levels | detail | error| event | fsm | packet| terse} Example: Router# debug crypto gdoi ks all-features event |
Displays debugging information about a cooperative key server. |
Verifying Cooperative Key Server States and Statistics
To verify cooperative key server states and statistics, perform the following steps, using one or both of the debug and show commands shown.
DETAILED STEPS
| Command or Action | Purpose | |
|---|---|---|
Step 1 |
enable
Example: Router> enable |
Enables privileged EXEC mode.
|
Step 2 |
debug
crypto
gdoi
ks
coop
{all-levels | detail | error | event | packet | terse} Example: Router# debug crypto gdoi ks coop detail |
Displays information about a cooperative key server. |
Step 3 |
show
crypto
gdoi
group
group-name
ks
coop
[version] Example: Router# show crypto gdoi group diffint ks coop version |
Displays information for the group "diffint" and version information about the cooperative key server. |
Verifying Antireplay Pseudotime-Related Statistics
To verify antireplay pseudotime-related statistics, perform the following steps using one or all of the clear, debug, and show commands.
DETAILED STEPS
| Command or Action | Purpose | |
|---|---|---|
Step 1 |
enable
Example: Router> enable |
Enables privileged EXEC mode.
|
Step 2 |
clear
crypto
gdoi
group
group-name
replay
Example: Router# clear crypto gdoi group diffint replay |
Clears the replay counters. |
Step 3 |
debug
crypto
gdoi
{gm | ks} replay {all-levels | detail | error | event | packet | terse} Example: Router# debug crypto gdoi gm replay detail |
Displays information about the pseudotime stamp that is contained in a packet. |
Step 4 |
show
crypto
gdoi
group
group-name
Example: Router# show crypto gdoi group diffint |
Displays information about the current pseudotime of the group member.
|
Step 5 |
show
crypto
gdoi
group
group-name
ks
replay
Example: Router# show crypto gdoi group diffint ks replay |
Displays information about the current pseudotime of the key server. |
Verifying Group Member States and Statistics
You can verify GM states and statistics for any (or all) features and any (or all) debug levels. To verify GM states and statistics, perform the following steps.
DETAILED STEPS
| Command or Action | Purpose | |
|---|---|---|
Step 1 |
enable
Example: Router> enable |
Enables privileged EXEC mode.
|
Step 2 |
debug
crypto
gdoi
gm
{all-features | infrastructure | registration | rekey | replay} {all-levels | detail | error| event | packet| terse} Example: Router# debug crypto gdoi gm all-features event |
Displays debugging information about a GM. |
Verifying the Downloaded RSA Public Key on the Group Member
The key server sends the group member the RSA public key when the group member registers. When the key server sends a rekey, it signs it using the RSA private key. When the group member receives this rekey, it verifies the signature using the public key that it downloaded from the key server (therefore, the group member knows that it received the rekey from the key server).
To verify the RSA public key that is downloaded from the key server, perform the following steps.
DETAILED STEPS
| Command or Action | Purpose | |
|---|---|---|
Step 1 |
enable
Example: Router> enable |
Enables privileged EXEC mode.
|
Step 2 |
show
crypto
gdoi
gm
pubkey
Example: Router# show crypto gdoi gm pubkey |
Verifies the RSA public key that is downloaded from the key server. |
Verifying the Fail-Close Mode Status of a Crypto Map
DETAILED STEPS
| Command or Action | Purpose | |
|---|---|---|
Step 1 |
enable
Example: Router> enable |
Enables privileged EXEC mode.
|
Step 2 |
show
crypto
map
gdoi
fail-close
Example: Router# show crypto map gdoi fail-close |
Displays information about the status of the fail-close mode. |
Displaying GDOI Debug Conditional Filters
DETAILED STEPS
| Command or Action | Purpose | |
|---|---|---|
Step 1 |
enable
Example: Router> enable |
Enables privileged EXEC mode.
|
Step 2 |
show
crypto
gdoi
debug-condition
Example: Router# show crypto gdoi debug-condition |
Displays conditional filters (based on groups and peers) that are enabled for GDOI debugging. |
Displaying Information About GDOI Event Traces
DETAILED STEPS
| Command or Action | Purpose | |
|---|---|---|
Step 1 |
enable
Example: Router> enable |
Enables privileged EXEC mode.
|
Step 2 |
show
monitor
event-trace
gdoi
[merged] {all | back trace-duration | clock time [day month] | from-boot [seconds] | latest} [detail] Example: Router# show monitor event-trace gdoi merged all detail |
Displays detailed information about GDOI event traces. |
Configuration Examples for Cisco Group Encrypted Transport VPN
- Example: Key Server and Group Member Case Study
- Example: Configuring Key Server 1
- Example: Configuring Key Server 2
- Example: Configuring Group Member 1
- Example: Configuring Group Member 2
- Example: Configuring Group Member 3
- Example: Configuring Group Member 4
- Example: Configuring Group Member 5
- Example: Verifying the Active Encryption ACLs on a Key Server
- Example: Verifying the Active Encryption ACLs on a Group Member
- Example: Passive SA
- Example: Configuring Fail-Close Mode
- Example: Removing GMs from the GET VPN Network
- Example: Triggering Rekeys on Group Members
- Example: Configuring GDOI MIB Support for GET VPN
- Example: Ensuring That GMs Are Running GET VPN Software Versions Compatible with IPv6 in the Data Plane
Example: Key Server and Group Member Case Study
The following case study includes encrypting traffic CE-CE in an MPLS VPN environment.
The MPLS VPN core interconnects VPN sites as is shown in the figure below. VPN site CPEs, Group Member 1 through Group Member 4, are grouped into a single GDOI group that correlates with a VPN with which these sites are a part. This scenario is an intranet VPN scenario. All the key servers and Group Members are part of the same VPN. Key Server 1 and Key Server 2 are the cooperative key servers that support VPN members Group Member 1 through Group Member 4. Key Server 1 is the primary key server and Key Server 2 is the secondary key server.

The following configuration examples are based on the case study in the figure above.
Example: Configuring Key Server 1
Key server 1 is the primary key server.
service timestamps debug datetime msec
service timestamps log datetime msec
no service password-encryption
service internal
!
hostname KS1
!
logging buffered 100000 debugging
no logging console
!
no aaa new-model
!
resource policy
!
clock timezone EST 0
ip subnet-zero
no ip domain lookup
ip domain name cisco.com
!
crypto isakmp policy 1
 encr aes
 authentication pre-share
 group 14
 lifetime 400
crypto isakmp key cisco address 10.1.1.13
crypto isakmp key cisco address 10.1.1.9
crypto isakmp key cisco address 10.1.1.1
crypto isakmp key cisco address 10.1.1.5
crypto isakmp key cisco address 10.1.1.21
crypto isakmp key cisco address 209.165.200.226
!
crypto ipsec transform-set gdoi-trans-group1 esp-aes esp-sha-hmac
!
crypto ipsec profile gdoi-profile-group1
 set security-association lifetime seconds 1800
 set transform-set gdoi-trans-group1
!
crypto gdoi group group1
 identity number 1
 server local
  rekey lifetime seconds 86400
  rekey retransmit 10 number 2
  rekey authentication mypubkey rsa group1-export-general
  rekey transport unicast
  sa ipsec 1
   profile gdoi-profile-group1
   match address ipv4 101
   replay counter window-size 64
  address ipv4 209.165.200.225
  redundancy
   local priority 10
   peer address ipv4 209.165.200.225
   !
interface Ethernet0/0
 ip address 209.165.200.225 255.255.255.252
!
ip classless
ip route 0.0.0.0 0.0.0.0 10.1.1.18
!
access-list 101 permit ip 10.1.0.0 0.0.255.255 10.1.0.0 0.0.255.255
!
end
Example: Configuring Key Server 2
Key Server 2 is the secondary key server.
service timestamps debug datetime msec
service timestamps log datetime msec
no service password-encryption
service internal
!
hostname KS2
!
logging buffered 100000 debugging
no logging console
!
no aaa new-model
!
resource policy
!
clock timezone EST 0
ip subnet-zero
no ip domain lookup
ip domain name cisco
!
crypto isakmp policy 1
 encr aes
 authentication pre-share
 group 14
 lifetime 400
crypto isakmp key cisco address 10.1.1.9
crypto isakmp key cisco address 10.1.1.1
crypto isakmp key cisco address 10.1.1.5
crypto isakmp key cisco address 10.1.1.17
crypto isakmp key cisco address 10.1.1.13
crypto isakmp key cisco address 209.165.200.225
!
crypto ipsec transform-set gdoi-trans-group1 esp-aes esp-sha-hmac
!
crypto ipsec profile gdoi-profile-group1
 set security-association lifetime seconds 1800
 set transform-set gdoi-trans-group1
!
crypto gdoi group group1
 identity number 1
 server local

  rekey lifetime seconds 86400
  rekey retransmit 10 number 2
  rekey authentication mypubkey rsa group1-export-general
  rekey transport unicast
  sa ipsec 1
   profile gdoi-profile-group1
   match address ipv4 101
   replay counter window-size 64
  address ipv4 10.1.1.21
  redundancy
   local priority 1
   peer address ipv4 10.1.1.17
   !
interface Ethernet0/0
 ip address 209.165.200.225 255.255.255.252
!
ip classless
ip route 0.0.0.0 0.0.0.0 10.1.1.22
!
access-list 101 permit ip 10.1.0.0 0.0.255.255 10.1.0.0 0.0.255.255
!
end
Example: Configuring Group Member 1
Group member 1 is part of a GDOI group that correlates with a VPN with which these sites are a part.
service timestamps debug datetime msec
service timestamps log datetime msec
no service password-encryption
!
hostname GM1
!
resource policy
!
clock timezone EST 0
ip subnet-zero
!
crypto isakmp policy 1
 encr aes
 authentication pre-share
 group 14
 lifetime 3600
crypto isakmp key cisco address 209.165.200.225
crypto isakmp key cisco address 209.165.201.1
!
crypto gdoi group group1
 identity number 1
 server address ipv4 209.165.200.225
 server address ipv4 209.165.201.1
!
crypto map map-group1 10 gdoi
 set group group1
!
interface Ethernet0/0
 ip address 209.165.200.225 255.255.255.252
 crypto map map-group1
!
router bgp 1000
 no synchronization
 bgp log-neighbor-changes
 network 10.1.1.0 mask 255.255.255.0
 neighbor 10.1.1.2 remote-as 5000
 no auto-summary
!
ip classless
!
End
The same GDOI group cannot be applied to multiple interfaces. The following examples show unsupported cases:
Example: Configuring Group Member 2
Group member 2 is part of a GDOI group that correlates with a VPN with which these sites are a part.
service timestamps debug datetime msec
service timestamps log datetime msec
!
hostname GM2
!
resource policy
!
clock timezone EST 0
ip subnet-zero
!
crypto isakmp policy 1
 encr aes
 authentication pre-share
 group 14
 lifetime 3600
crypto isakmp key cisco address 209.165.200.225
crypto isakmp key cisco address 209.165.201.1
!
crypto gdoi group group1
 identity number 1
 server address ipv4 209.165.201.1
 server address ipv4 209.165.200.225
!
crypto map map-group1 10 gdoi
 set group group1
!
interface Ethernet0/0
 ip address 209.165.200.225 255.255.255.252
 crypto map map-group1
!
router bgp 2000
 no synchronization
 bgp log-neighbor-changes
 network 10.1.2.0 mask 255.255.255.0
 neighbor 10.1.1.6 remote-as 5000
 no auto-summary
!
ip classless
!
end
Example: Configuring Group Member 3
Group member 3 is part of a GDOI group that correlates with a VPN with which these sites are a part.
service timestamps debug datetime msec
service timestamps log datetime msec
no service password-encryption
!
hostname GM3
!
resource policy
!
clock timezone EST 0
ip subnet-zero
!
crypto isakmp policy 1
 encr aes
 authentication pre-share
 group 14
 lifetime 3600
crypto isakmp key cisco address 209.165.200.225
crypto isakmp key cisco address 209.165.201.1
!
crypto ipsec transform-set gdoi-trans-group1 esp-aes esp-sha-hmac
crypto gdoi group group1
 identity number 1
 server address ipv4 209.165.200.225
 server address ipv4 209.165.201.1
!
crypto map map-group1 10 gdoi
 set group group1
!
interface Ethernet0/0
 ip address 209.165.201.1 255.255.255.252
 crypto map map-group1
!
router bgp 3000
 no synchronization
 bgp log-neighbor-changes
 network 10.1.3.0 mask 255.255.255.0
 neighbor 10.1.1.10 remote-as 5000
 no auto-summary
!
ip classless
!
end
Example: Configuring Group Member 4
Group member 4 is part of a GDOI group that correlates with a VPN with which these sites are a part.
service timestamps debug datetime msec
service timestamps log datetime msec
no service password-encryption
!
hostname GM4
!
clock timezone EST 0
ip subnet-zero
!
crypto isakmp policy 1
 encr aes
 authentication pre-share
 group 14
 lifetime 3600
crypto isakmp key cisco address 209.165.200.225
crypto isakmp key cisco address 209.165.201.1
!
crypto gdoi group group1
 identity number 1
 server address ipv4 209.165.200.225
 server address ipv4 209.165.201.1
!
crypto map map-group1 10 gdoi
 set group group1
!
interface Ethernet0/0
 ip address 209.165.201.1 255.255.255.252
 crypto map map-group1
!
router bgp 4000
 no synchronization
 bgp log-neighbor-changes
 network 10.1.4.0 mask 255.255.255.0
 neighbor 10.1.1.14 remote-as 5000
 no auto-summary
!
ip classless
!
end
Example: Configuring Group Member 5
If a group member has multiple interfaces that are part of the same GDOI group, you should use a loopback interface to source the crypto. If a loopback interface is not used, each interface that handles encrypted traffic must register individually with the key server.
The key server sees these as separate requests and must keep multiple records for the same group member, which also means sending multiple rekeys. If crypto is sourced from the loopback interface instead, the group member registers only once with the key server.
The following configuration shows how the group member registers once with the key server:
!
interface GigabitEthernet0/1
 description *** To AGG-1 ***
 crypto map dgvpn
!
interface GigabitEthernet0/2
 description *** To AGG-2 ***
 crypto map dgvpn
!
interface Loopback0
 ip address 209.165.201.1 255.255.255.255
!
 crypto map dgvpn local-address Loopback0
!
Example: Verifying the Active Encryption ACLs on a Key Server
The following example shows how to enter the command on a KS to display the encryption ACLs for groups. This example displays a numbered encryption ACL, which means that it is an IPv4 ACL (because IPv6 allows only named ACLs):
Router# show crypto gdoi ks acl

    Group Name               : diffint
    Configured ACL           : access-list 101 permit gre any any
The following example shows how to enter the command on a KS to display the encryption ACLs for groups. This example displays named encryption ACLs for two groups (an IPv4 group and an IPv6 group):
Router# show crypto gdoi ks acl

Group Name: GETV6
 Configured ACL:
   access-list ACL_GETV6_MIX  deny tcp host 2001:DB8:1::1 host 2001:DB8:0:ABCD::1 sequence 10
   access-list ACL_GETV6_MIX  permit ipv6 host 2001:DB8:1::1 host 2001:DB8:0:ABCD::1 sequence 20
   access-list ACL_GETV6_MIX  permit ipv6 host 2001:DB8:0:ABCD::1 host 2001:DB8:1::1 sequence 30
   access-list ACL_GETV6_MIX  deny udp 2001:DB8:0001::/48 2001:DB8:0002::/48 sequence 40
   access-list ACL_GETV6_MIX  deny udp 2001:DB8:0002::/48 2001:DB8:0001::/48 sequence 50
   access-list ACL_GETV6_MIX  permit icmp 2001:DB8:0001::/48 2001:DB8:0002::/48 sequence 60
   access-list ACL_GETV6_MIX  permit icmp 2001:DB8:0002::/48 2001:DB8:0001::/48 sequence 70

Group Name: GETV4
 Configured ACL:
   access-list ACL_GETV4_HOST  permit icmp host 192.0.2.2 host 192.0.2.3
   access-list ACL_GETV4_HOST  permit icmp host 192.0.2.3 host 192.0.2.2
Example: Verifying the Active Encryption ACLs on a Group Member
The following example shows how to enter the command on a GM to display the encryption ACLs for the groups to which it belongs. Even though a GM can be in any combination of IPv4 and IPv6 groups, this example shows that the GM is a member of only one group (in this case, an IPv6 group):
Router# show crypto gdoi gm acl

    Group Name: GETV6
    ACL Downloaded From KS 192.0.2.1:
     access-list  permit ipv6 2001:DB8:0001::/48 2001:DB8:0002::/48 sequence 1
     access-list  permit ipv6 2001:DB8:0002::/48 2001:DB8:0001::/48 sequence 2
The following example shows how to enter the command on a GM to display the encryption ACLs for the groups to which it belongs. In this case, the GM belongs to two groups (an IPv4 group and an IPv6 group):
Router# show crypto gdoi gm acl

Group Name: GETV6
 ACL Downloaded From KS 192.0.2.1:
   access-list   deny tcp host 2001:DB8:1::1 eq 0 host 2001:DB8:0:ABCD::1 eq 0 sequence 1
   access-list   permit ipv6 host 2001:DB8:1::1 host 2001:DB8:0:ABCD::1 sequence 2
   access-list   permit ipv6 host 2001:DB8:0:ABCD::1 host 2001:DB8:1::1 sequence 3
   access-list   deny udp 2001:DB8:0001::/48 eq 0 2001:DB8:0002::/48 eq 0 sequence 4
   access-list   deny udp 2001:DB8:0002::/48 eq 0 2001:DB8:0001::/48 eq 0 sequence 5
   access-list   permit icmp 2001:DB8:0001::/48 2001:DB8:0002::/48 sequence 6
   access-list   permit icmp 2001:DB8:0002::/48 2001:DB8:0001::/48 sequence 7
 ACL Configured Locally:

Group Name: GETV4
 ACL Downloaded From KS 192.0.2.1:
   access-list   permit icmp host 192.0.2.2 host 192.0.2.3
   access-list   permit icmp host 192.0.2.3 host 192.0.2.2
 ACL Configured Locally:
Example: Passive SA
The following examples show how to display information about crypto rules on outgoing packets.
Assuming that the KS has the following GET VPN IPv4 group ACL policy:
ip access-list extended get-acl
 deny   ospf any any
 deny   ip any host 192.0.2.5
 deny   ip host 192.0.2.5 any
 permit ip any any

crypto gdoi group GETVPN
 identity number 1111
 server local
 rekey authentication mypubkey rsa mykeys
 rekey transport unicast
 sa ipsec 1
 profile GET_PROFILE
 match address ipv4 get-acl
 replay time window-size 10
 address ipv4 192.0.2.5
The following example shows information about the crypto rules on outgoing packets for the above policy:
Router# show crypto ruleset

Mtree:
  11 192.0.2.1/500 ANY Forward, Forward
  11 192.0.2.1/4500 ANY Forward, Forward
  11 ANY/848 ANY Forward, Forward
  11 ANY ANY/848 Forward, Forward
  59 ANY ANY DENY
 IP ANY 192.0.2.5 DENY
 IP 192.0.2.5 ANY DENY
 IP ANY ANY Discard, Encrypt
The following example shows the directional mode of the IPsec SA for the above policy:
Router# show crypto ruleset detail

Mtree:
 199 VRF 0  11 192.0.2.1/500 ANY Forward, Forward
 299 VRF 0  11 192.0.2.1/4500 ANY Forward, Forward
 200000199 VRF 0  11 ANY/848 ANY Forward, Forward
 200000299 VRF 0  11 ANY ANY/848 Forward, Forward
 1000000000000201 VRF 0  59 ANY ANY DENY -> 1000000009999900
 1000000000000301 VRF 0 IP ANY 192.0.2.5 DENY -> 1000000009999900
 1000000000000401 VRF 0 IP 192.0.2.5 ANY DENY -> 1000000009999900
 1000000000000501 VRF 0 IP ANY ANY Discard, Encrypt
Assuming that the KS has the following GET VPN IPv6 group ACL policy:
ipv6 access-list ACL_GETV6_ANY
 permit ipv6 any any

crypto gdoi group ipv6 GETV6
 identity number 1111
 server local
 rekey authentication mypubkey rsa GETKEY
 rekey transport unicast
 sa ipsec 1
 profile IPSEC_PROF_GETV6
 match address ipv6 ACL_GETV6_ANY
 replay time window-size 10
 address ipv4 192.0.2.2
The following example shows information about the crypto rules on outgoing packets for the above policy:
Router# show crypto ruleset

Mtree:
IPv6:
0/0/1/1
 17 2001:DB8::A8BB:CCFF:FE01:2C02 500 ANY Forward, Forward
0/0/2/1
 17 2001:DB8::A8BB:CCFF:FE01:2C02 4500 ANY Forward, Forward
0/2/1/1
 17 ANY 848 ANY Forward, Forward
0/2/2/1
 17 ANY ANY 848 Forward, Forward
10/0/2/0
 IPV6 ANY ANY Discard, Encrypt
Mtree:
  11 192.0.2.3/500 ANY Forward, Forward
  11 192.0.2.3/4500 ANY Forward, Forward
  11 ANY/848 ANY Forward, Forward
  11 ANY ANY/848 Forward, Forward
  01 192.0.2.3 192.0.2.4 Discard, Encrypt
  01 192.0.2.4 192.0.2.3 Discard, Encrypt
The following example shows the directional mode of the IPsec SA for the above policy:
Router# show crypto ruleset detail

IPv6:
0/0/1/1
 17 2001:DB8::A8BB:CCFF:FE01:2C02 500 ANY Forward, Forward
0/0/2/1
 17 2001:DB8::A8BB:CCFF:FE01:2C02 4500 ANY Forward, Forward
0/2/1/1
 17 ANY 848 ANY Forward, Forward
0/2/2/1
 17 ANY ANY 848 Forward, Forward
10/0/2/0
 IPV6 ANY ANY Discard, Encrypt
Mtree:
 199 VRF 0  11 192.0.2.3/500 ANY Forward, Forward
 299 VRF 0  11 192.0.2.3/4500 ANY Forward, Forward
 200000199 VRF 0  11 ANY/848 ANY Forward, Forward
 200000299 VRF 0  11 ANY ANY/848 Forward, Forward
 1000000000000201 VRF 0  01 192.0.2.3 192.0.2.4 Discard, Encrypt
 1000000000000301 VRF 0  01 192.0.2.4 192.0.2.3 Discard, Encrypt
Example: Configuring Fail-Close Mode
The following example shows how to activate fail-close mode for an IPv4 crypto map named map1. This example also defines two extended IP access lists. Unencrypted traffic from access list 102 is allowed before the group member is registered:
Router> enable
Router# configure terminal
Router(config)# crypto map map1 gdoi fail-close
Router(config-crypto-map-fail-close)# match address 102
Router(config-crypto-map-fail-close)# activate
Router(config-crypto-map-fail-close)# exit
Router(config)# crypto map map1 10 gdoi
Router(config-crypto-map)# set group ks1_group
Router(config-crypto-map)# match address 101
Router(config-crypto-map)# exit
Router(config)# access-list 101 deny ip 10.0.1.0 0.0.0.255 10.0.1.0 0.0.0.255
Router(config)# access-list 102 deny tcp any eq telnet any
Router(config)# end
The following example shows how to activate fail-close mode for an IPv6 crypto map named map2. This example also defines two IPv6 access lists. Unencrypted traffic from access list ACL_GETV6_ANY6 is allowed before the group member is registered:
Router> enable
Router# configure terminal
Router(config)# crypto map ipv6 map2 gdoi fail-close
Router(config-crypto-map-fail-close)# match address ACL_GETV6_ANY6
Router(config-crypto-map-fail-close)# activate
Router(config-crypto-map-fail-close)# exit
Router(config)# crypto map ipv6 map2 20 gdoi
Router(config-crypto-map)# set group ks2_group
Router(config-crypto-map)# match address ACL_GETV6_ANY5
Router(config-crypto-map)# exit
Router(config)# ipv6 access-list ACL_GETV6_ANY5
Router(config-ipv6-acl)# deny tcp 2001:DB8:0000::/48 2001:DB8:0001::/48 eq telnet
Router(config-ipv6-acl)# exit
Router(config)# ipv6 access-list ACL_GETV6_ANY6
Router(config-ipv6-acl)# deny tcp any eq telnet any
Router(config-ipv6-acl)# end
The following show crypto map gdoi fail-close command output shows that fail-close has been activated:
Router# show crypto map gdoi fail-close

Crypto Map: "svn"
        Activate: yes
        Fail-Close Access-List: (Deny = Forward In Clear, Permit = Drop)
            access-list 105 deny tcp any port = 23 any
            access-list 105 deny ospf any any
Example: Removing GMs from the GET VPN Network
Ensuring That GMs Are Running Software Versions That Support GM Removal
The following example shows how to use the GET VPN software versioning command on the KS (or primary KS) to check whether all the devices in the network support the GM removal feature.
Router# show crypto gdoi feature gm-removal

Group Name: GET
	Key Server ID       Version   Feature Supported
	   10.0.8.1         1.0.2          Yes
	   10.0.9.1         1.0.2          Yes
	   10.0.10.1        1.0.2          Yes
	   10.0.11.1        1.0.2          Yes
	Group Member ID     Version   Feature Supported
	   10.0.0.2         1.0.2          Yes
	   10.0.0.3         1.0.1          No
The following example shows how to find only those devices that do not support GM removal.
Router# show crypto gdoi feature gm-removal | include No

	      10.0.0.3          1.0.1          No
The above example shows that the GM with IP address 10.0.0.3 is running older software version 1.0.1 (which does not support GM removal) and should be upgraded.
Removing GMs with Transient IPsec SAs
The following example shows how to trigger GM removal with transient IPsec SAs. You use this command on the KS (or primary KS).
Router# clear crypto gdoi ks members

% This GM-Removal message will shorten all GMs' key lifetimes and cause them to
re-register before keys expiry.
Are you sure you want to proceed? ? [yes/no]: yes
Sending GM-Removal message to group GET...
Removing GMs and Deleting IPsec SAs Immediately
The following example shows how to force GMs to delete old TEKs and KEKs immediately and re-register. You use this command on the KS (or primary KS).
Router# clear crypto gdoi ks members now

% This GM-Removal immediate message will cleanup all GMs downloaded policies
% This will cause all GMs to re-register.
Are you sure you want to proceed? ? [yes/no]: yes
Sending GM-Removal message to group GET...
Example: Triggering Rekeys on Group Members
Ensuring That GMs Are Running Software Versions That Support Rekey Triggering
The following example shows how to use the GET VPN software versioning command on the KS (or primary KS) to display the version of software on devices in the GET VPN network and display whether they support rekey triggering after a policy change.
Router# show crypto gdoi feature policy-replace

Key Server ID       Version  Feature Supported
		10.0.8.1         1.0.2          Yes
		10.0.9.1         1.0.2          Yes
		10.0.10.1        1.0.2          Yes
		10.0.11.1        1.0.2          Yes
	Group Member ID     Version  Feature Supported
		5.0.0.2          1.0.2          Yes
		9.0.0.2          1.0.1          No
The following example shows how to find only those devices that do not support rekey triggering after policy replacement.
Router# show crypto gdoi feature policy-replace  | include No

	      9.0.0.2          1.0.1          No
For these devices, the primary KS sends only the triggered rekey without instructions for policy replacement. Therefore, when a GM receives the rekey, it installs the new SAs but does not shorten the lifetimes of the old SAs.
Triggering a Rekey
The following example shows how to trigger a rekey after you have performed a policy change. In this example, an IPsec policy change (for example, DES to AES) occurs with the profile gdoi-p2 command.
Router# configure terminal
Router(config)# crypto gdoi group GET
Router(config-gdoi-group)# server local
Router(gdoi-local-server)# sa ipsec 1
Router(gdoi-sa-ipsec)# no profile gdoi-p
Router(gdoi-sa-ipsec)# profile gdoi-p2
Router(gdoi-sa-ipsec)# end
Router#

*Jan 28 09:15:15.527: %SYS-5-CONFIG_I: Configured from console by console
*Jan 28 09:15:15.527: %GDOI-5-POLICY_CHANGE: GDOI group GET policy has changed. Use
'crypto gdoi ks rekey' to send a rekey, or the changes will be send in the next scheduled
rekey
Router# crypto gdoi ks rekey
Router#
*Jan 28 09:17:44.363: %GDOI-5-KS_SEND_UNICAST_REKEY: Sending Unicast Rekey with
policy-replace for group GET from address 10.0.8.1 with seq # 2
The following example shows the error message that appears if you try to trigger a rekey on the secondary KS.
Router# crypto gdoi ks rekey

ERROR for group GET: This command must be executed on Pri-KS
Example: Configuring GDOI MIB Support for GET VPN
Ensuring That GMs Are Running Software Versions That Support the GDOI MIB
The following example shows how to use the GET VPN software versioning command on the KS (or primary KS) to check whether all the devices in the network support the GDOI MIB.
Router# show crypto gdoi feature gdoi-mib

Group Name: GET
	Key Server ID       Version   Feature Supported
	   10.0.8.1         1.0.2          Yes
	   10.0.9.1         1.0.2          Yes
	   10.0.10.1        1.0.2          Yes
	   10.0.11.1        1.0.2          Yes
	Group Member ID     Version   Feature Supported
	   5.0.0.2          1.0.2          Yes
	   9.0.0.2          1.0.1          No
The following example shows how to find only those devices that do not support the GDOI MIB.
Router# show crypto gdoi feature gdoi-mib | include No

	      9.0.0.2          1.0.1          No
Creating Access Control for an SNMP Community
The following example shows how to specify an SNMP community string named mycommunity to define the relationship between the SNMP manager and the SNMP agent on the KS or GM in order to permit access to SNMP.
Router> enable
Router# configure terminal
Router(config)# snmp-server community mycommunity
Router(config)# end
Enabling Communication with the SNMP Manager
The following example shows how to enable communication with the SNMP manager. This example using a community string named mycommunity that has already been created.
Router> enable
Router# configure terminal
Router(config)# snmp-server host 209.165.200.225 version 2c mycommunity
Router(config)# end
Example: Ensuring That GMs Are Running GET VPN Software Versions Compatible with IPv6 in the Data Plane
The following example shows how to use the GET VPN software versioning command on the KS (or primary KS) to check whether all the devices in the GET VPN network support IPv6 encryption and decryption (and thus can be added to an IPv6 group):
Router# show crypto gdoi feature ipv6-crypto-path

Group Name: GET
	Key Server ID       Version   Feature Supported
	   10.0.8.1         1.0.3          Yes
	   10.0.9.1         1.0.3          Yes
	   10.0.10.1        1.0.3          Yes
	   10.0.11.1        1.0.3          Yes
	Group Member ID     Version   Feature Supported
	   5.0.0.2          1.0.3          Yes
	   10.0.0.3         1.0.1          No
You can also enter the above command on a GM (which will display the information for the GM but not for the KS or other GMs).
The following example shows how to enter the command on the KS (or primary KS) find only those devices in the GET VPN network that do not support IPv6:
Router# show crypto gdoi feature ipv6-crypto-path | include No

	   10.0.0.3          1.0.1          No
Additional References
Related Documents
|
Related Topic |
Document Title |
|---|---|
|
Cisco IOS commands |
|
|
Cisco IOS security commands |
Cisco IOS Security Command References |
|
Configuring IKE and IKE policy Configuring an IPsec transform |
"Configuring Internet Key Exchange for IPsec VPNs" module in the Internet Key Exchange for IPsec VPNs Configuration Guide, Cisco IOS Release 15.2M&T |
|
Basic deployment guidelines for enabling GET VPN in an enterprise network |
|
|
Configuring SNMP |
|
|
Routing control plane traffic (GDOI registrations and rekeys) through a separate VRF (for example, a dedicated management VRF) |
Cisco IOS GETVPN VRF-Aware GDOI GM Solution Deployment Guide |
|
Recommended cryptographic algorithms |
MIBs
Technical Assistance
|
Description |
Link |
|---|---|
|
The Cisco Support and Documentation website provides online resources to download documentation, software, and tools. Use these resources to install and configure the software and to troubleshoot and resolve technical issues with Cisco products and technologies. Access to most tools on the Cisco Support and Documentation website requires a Cisco.com user ID and password. |
Feature Information for Cisco Group Encrypted Transport VPN
The following table provides release information about the feature or features described in this module. This table lists only the software release that introduced support for a given feature in a given software release train. Unless noted otherwise, subsequent releases of that software release train also support that feature.
Use Cisco Feature Navigator to find information about platform support and Cisco software image support. To access Cisco Feature Navigator, go to www.cisco.com/go/cfn. An account on Cisco.com is not required.
| Table 6 | Feature Information for Cisco Group Encrypted Transport VPN |
|
Feature Name |
Releases |
Feature Information |
||
|---|---|---|---|---|
|
Cisco Group Encrypted Transport VPN |
12.4(11)T |
Cisco Group Encrypted Transport VPN is an optimal encryption solution for large-scale IP or MPLS sites that require any-to-any connectivity with minimum convergence time, low processing, provisioning, managing, and troubleshooting overhead. The following commands were introduced or modified: address ipv4 (GDOI), clear crypto gdoi, crypto gdoi gm, debug crypto gdoi, local priority, peer address ipv4, redundancy, rekey address ipv4, rekey transport unicast, replay counter window-size, replay time window-size, sa receive-only, and show crypto gdoi. |
||
|
GDOI MIB Support for GET VPN |
15.2(1)T |
This feature adds MIB support for RFC 3547, The Group Domain of Interpretation. This feature supports only the objects related to the GDOI MIB IETF standard. This feature also provides a command that displays whether devices on the network are running versions of GET VPN software that support the GDOI MIB. The GDOI MIB consists of objects and notifications that include information about GDOI groups, GM and KS peers, as well as the policies that are created or downloaded. The following sections provide information about this feature:
The following command was introduced: snmp-server enable traps gdoi. |
||
|
GET VPN Enhancements |
12.4(22)T |
These enhancements include the following features:
|
||
|
GET VPN GM Removal and Policy Trigger |
15.2(1)T |
This feature provides a command that lets you efficiently eliminate unwanted GMs from the GET VPN network, provides a rekey triggering command to install new SAs and remove obsolete SAs, and provides commands that display whether devices on the network are running versions of GET VPN software that support these features. The following sections provide information about this feature:
The following commands were introduced or modified: clear crypto gdoi, crypto gdoi ks, and show crypto gdoi. |
||
|
GET VPN Phase 1.2 |
12.4(22)T |
Support for time-based antireplay on the Cisco VSA was added. |
||
| GET VPN Support for IPv6 in the Data Plane |
15.2(3)T |
This feature secures IPv6 traffic in the data plane (while maintaining usage of IPv4 in the control plane) over private IP WANs such as MPLS. The following commands were introduced or modified: crypto gdoi group, crypto map gdoi fail-close, match address (GDOI local server), show crypto gdoi, and show crypto ruleset. |
||
|
GET VPN Troubleshooting |
15.1(3)T |
This feature provides improved debugging levels (so debug messages can be enabled per feature), event logging, exit trace capabilities to save a log of error conditions and their tracebacks, and conditional debugging (which provides the ability to debug individual group members from the key server). The conditional debugging feature provides the ability to perform conditional debugging on the key server so that it can filter based on GM or other cooperative key servers. The event logging feature provides the ability to log the last set of events. The following commands were introduced or modified: clear crypto gdoi, debug crypto condition unmatched, debug crypto gdoi, debug crypto gdoi condition, monitor event-trace gdoi, show crypto gdoi, and show monitor event-trace gdoi. |
||
|
GET VPN VRF-Aware GDOI on GM |
15.0(1)M |
This feature enhances GET VPN. It allows separation between data and control planes on group members. The following command was introduced: client registration interface. |
||
|
Secure Multicast |
12.4(6)T |
The secure multicast part of this feature was introduced in Cisco IOS Release 12.4(6)T in the Secure Multicast feature document. However, all pertinent information from that document has been integrated into this document and updated. |
||
|
VSA Support for GET VPN |
12.4(15)T5 |
Cisco VSA (high-performance crypto engine) support was added for GDOI and GET VPN.
|
Glossary
DOI--Domain of Interpretation. For Internet Security Association Key Management Protocol (ISAKMP), a value in the security association (SA) payload that describes in which context the key management message is being sent (IPsec or Group Domain of Interpretation).
GDOI--Group Domain of Interpretation. For ISAKMP, a means of distributing and managing keys for groups of mutually trusted systems.
group member--Device (Cisco IOS router) that registers with a group that is controlled by the key server for purposes of communicating with other group members.
group security association--SA that is shared by all group members in a group.
IPsec--IP security. Data encryption protocol for IP packets that are defined in a set of RFCs (see IETF RFC 2401).
ISAKMP--Internet Security Association and Key Management Protocol. Protocol that provides a framework for cryptographic key management protocols.
KEK--key encryption key. Key used to protect the rekey between the key server and group members.
key server--Device (Cisco IOS router) that distributes keys and policies to group members.
MTU--Maximum transmission unit. Size (in bytes) of the largest packet or frame that a given layer of a communications protocol can pass onward.
SA--Security association. SA that is shared by all group members in a group.
TEK--Traffic encryption key. Key that is used to protect the rekey between group members.
Simple Network Management Protocol (SNMP)--An interoperable standards-based protocol that allows for external monitoring of a managed device through an SNMP agent.
Cisco and the Cisco logo are trademarks or registered trademarks of Cisco and/or its affiliates in the U.S. and other countries. To view a list of Cisco trademarks, go to this URL: www.cisco.com/go/trademarks. Third-party trademarks mentioned are the property of their respective owners. The use of the word partner does not imply a partnership relationship between Cisco and any other company. (1110R)
Any Internet Protocol (IP) addresses and phone numbers used in this document are not intended to be actual addresses and phone numbers. Any examples, command display output, network topology diagrams, and other figures included in the document are shown for illustrative purposes only. Any use of actual IP addresses or phone numbers in illustrative content is unintentional and coincidental.