Installing and Upgrading the PMC Application

Table Of Contents

Installing and Upgrading the PMC Application

PMC-Server Interactions

Installing the PMC Application

Installation Caveats

Downloading and Installing the PMC Application

Optimizing Your Audio on the PMC

Configuring the Audio Settings

Using a USB DSP Headset with the PMC

Using the Microphone with the PMC

Important Information about Using the Microphone

Checking the Microphone

Voice Quality Tips

Launching the PMC Application

Performing Additional PMC Tasks

Upgrading the PMC Application

Managing PMC Version Numbers

Checking for PMC Updates

Performing a Noncritical Upgrade

Downloading the PMC Update

Upgrading the PMC Application

Performing a Critical Upgrade

Reverting to a Previous Version of the PMC Application

Uninstalling the PMC Application


Installing and Upgrading the PMC Application


This chapter describes how to install, upgrade, and uninstall the PMC application. It also explains how to revert to an earlier compatible version of the PMC application after you perform an upgrade.

This chapter includes the following topics:

PMC-Server Interactions

Installing the PMC Application

Optimizing Your Audio on the PMC

Launching the PMC Application

Performing Additional PMC Tasks

Upgrading the PMC Application

Reverting to a Previous Version of the PMC Application

Uninstalling the PMC Application

PMC-Server Interactions

The Cisco IPICS server manages the PMC application. When you install, update, or upgrade the PMC application, the PMC interacts with the server in the following ways:

The server manages the PMC software, user data and privileges, and configuration information.

The server manages the PMC installation-related tasks, such as installation, upgrade, and PMC update activities.

The PMC downloads the installation file and other necessary user files from the server. These files provide the Cisco IPICS server information along with skin and user configuration data. (The skin information specifies the "look and feel" of the PMC end-user interface.) For more information about the PMC skin, see the "Customizing the PMC End-User Interface" section.

Upon login to the PMC, the Cisco IPICS server provides information to the PMC about available versions; the PMC then performs a check for version compatibility and determines whether the PMC must be upgraded. See the "Managing PMC Version Numbers" section for more information about version management. PMC upgrades can be in the form of noncritical or critical upgrades. See the "Performing a Noncritical Upgrade" section and the "Performing a Critical Upgrade" section for more information.

Related Topics

System Interactions

Configuring the PMC Skins

Installing the PMC Application

You install the PMC application on a client machine on which the required Windows operating system is already installed. See the "System Requirements for the PMC Application" section for information about hardware and software requirements.

This section includes the following topics:

Installation Caveats

Downloading and Installing the PMC Application

Installation Caveats

The following information pertains to the PMC application installation on your client machine:

The PMC installation involves downloading the self-extracting PMC installation program, which includes the PMC installation and configuration files along with the default skins, from the Cisco IPICS server.

The PMC installation program automatically runs the PMC installation file to install the PMC software on your client machine.

The PMC performs preinstallation version checks to ensure compatibility.

During the installation process, the PMC may be offline.

The installation automatically adds an entry to the Windows Start menu for "Cisco IPICS PMC" along with a desktop shortcut.

The system retains a copy of previous versions of the PMC software so that you can easily revert to an earlier compatible version, if necessary. (See the "Managing PMC Version Numbers" section for information about the number of versions that may be retained.)

The PMC retrieves your configuration data from the Cisco IPICS server, which maintains the most current information.

Downloading and Installing the PMC Application

The PMC application uses Hypertext Transfer Protocol over Secure Sockets Layer (HTTPS) to ensure secure communications between the browser on the PMC client machine and the Cisco IPICS server. HTTPS ensures that the user login password transports securely via the web.

Cisco IPICS uses HTTPS with supported versions of Internet Explorer. (See the "About the PMC Application" section for more information about supported browsers.)

To install the PMC application on your client machine, perform the following procedure.


Note Before you perform this procedure, check with your system administrator to make sure that the Cisco IPICS server application has been installed and configured on the server.


Procedure


Step 1 On your client machine, open a supported version of the Internet Explorer browser.

Step 2 In the Location or Address field, enter the following URL, replacing IP address with the IP address of the Cisco IPICS server:

http://<IP address>


Note Contact your system administrator if you do not know the IP address of the Cisco IPICS server to which you must connect.


Step 3 Log in to the Cisco IPICS server by using your user name and password.


Tip Be aware that user names are case-insensitive; that is, you can enter either upper case or lower case characters for your PMC user name. However, passwords are case-sensitive.


Figure 2-1 shows an illustration of the Cisco IPICS server login window.

Figure 2-1 Cisco IPICS Server Login Window

The User menu on the Cisco IPICS server displays.

Step 4 Click the PMC Download link that displays near the top of the User menu window.

Figure 2-2 shows an illustration of the Cisco IPICS User window that displays the PMC Download link.

Figure 2-2 PMC Download on the Cisco IPICS User Window

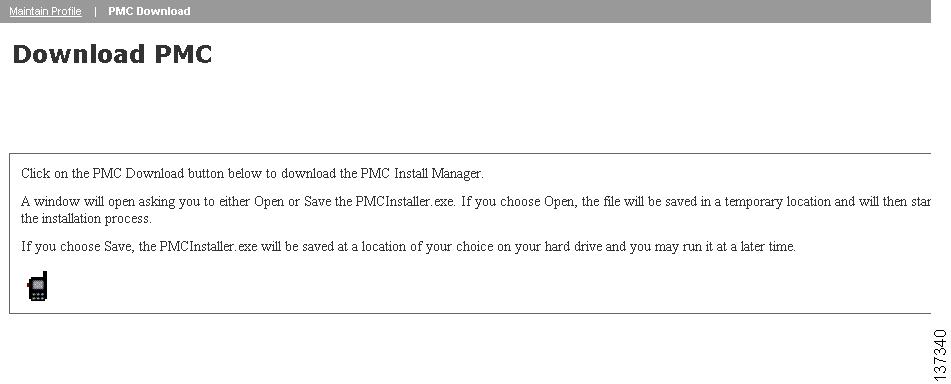
The Download PMC dialog box displays.

Step 5 Click the PMC icon to download the latest version of the PMC installation program (pmcsetup.exe).

Figure 2-3 shows an illustration of the download PMC dialog box.

Figure 2-3 Download PMC Dialog Box

The file download dialog box displays.

Step 6 Click Save to save the PMC installation program to a temporary directory on your hard drive.


Note Be sure to save the PMC installation file to a clean, temporary directory and make a note of the directory where you saved the file.


Step 7 After you see the Download Complete dialog box, which indicates that the download has completed, click Close.

Step 8 Navigate to the directory where you saved the PMC installation program and double-click pmcsetup.exe to extract the PMC installation file and the PMC configuration file, and to automatically run the installation executable to install the PMC on your client machine.

If you encounter a problem running the pmcsetup.exe file, you can generate an installation log file to help you identify and resolve the problem. For more information, see the "Generating a PMC Installation Log File" section.

The Cisco IPICS PMC InstallShield Wizard displays.

Figure 2-4 shows an illustration of the Cisco IPICS PMC InstallShield Wizard.

Figure 2-4 PMC InstallShield Wizard

Step 9 Click Next to continue.

The End User License Agreement displays.

Step 10 Read and accept the terms of the license agreement by clicking the "I accept the terms in the license agreement" radio button; then, click Next.

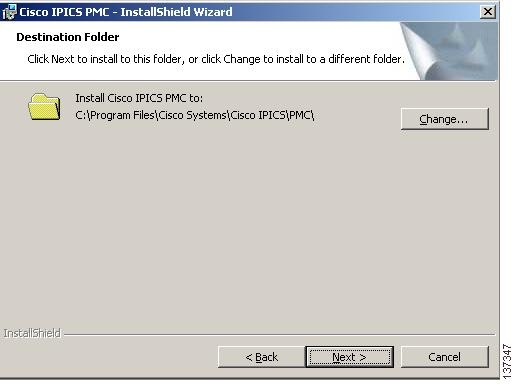
The destination folder window displays.

Step 11 Click Next to install the PMC application to the default folder.

Alternatively, you can click Change to install the PMC application to a different folder.

Figure 2-5 shows an illustration of the PMC destination folder window.

Figure 2-5 PMC Installation Destination Folder


Note If you already have the same version of the PMC software installed on your client machine as that which you downloaded from the Cisco IPICS server, a Program Maintenance window displays. You can choose among the options that display in this window to modify, repair, or remove the PMC software from your client machine.

Figure 2-6 is provided as a reference to show an illustration of the PMC program maintenance window. This window only displays if you have the same version of the PMC already installed on your client machine.


Figure 2-6 PMC Program Maintenance Window

The ready to install window displays.

Step 12 Click Install to begin the installation.


Note If you have Cisco Security Agent (CSA) installed on your PMC client machine and you are prompted with an access permission dialog box, make sure that you click Yes to grant permission to the PMC installation. If the "Don't ask me again" check box displays as an option, you may check it to instruct CSA not to prompt you again in the future. For information about using CSA, refer to the Cisco Security Agent documentation at the following URL: http://www.cisco.com/univercd/cc/td/doc/product/vpn/ciscosec/csa/index.htm


Step 13 Click Finish to exit the Cisco IPICS PMC InstallShield Wizard.

To immediately launch the PMC application, check the Launch Cisco IPICS PMC check box.


Note By default, Cisco IPICS installs the PMC software in the following directory on your PMC client machine hard drive: C:\Program Files\Cisco Systems\IPICS PMC\PMC.


Figure 2-7 shows an illustration of the PMC installation completion window.

Figure 2-7 PMC Installation Complete


Tip The installation process places a shortcut on the Start menu, along with a desktop shortcut. You can access the Start menu shortcut by navigating to Start > Programs > Cisco IPICS > PMC.


Optimizing Your Audio on the PMC

After you have installed the PMC application, check the current settings for the playback and recording audio devices on your client machine to ensure that you are using the preferred or default sound devices with the PMC. This section guides you through the audio configuration and it includes information about properly using a USB DSP headset and microphone for record and playback capability in the following topics:

Configuring the Audio Settings

Using a USB DSP Headset with the PMC

Using the Microphone with the PMC

Voice Quality Tips

Configuring the Audio Settings


Note It is very important that you choose the preferred or default sound device option in the Windows audio settings in order to limit echo that can be caused by multiple microphones picking up traffic on the same machine.


To configure your audio settings for use with the PMC, perform the following procedure:

Procedure


Step 1 On Windows 2000 client machines, navigate to Start > Settings > Control Panel > Sounds and Multimedia.

The Sounds and Multimedia Properties window displays.

a. Click the Audio tab.

b. Check the Use only preferred devices check box.

c. Click OK.

Step 2 On Windows XP client machines, navigate to Start > Settings >Control Panel > Sounds and Audio Devices.

The Sounds and Audio Devices Properties window displays.

a. Click the Audio tab.

b. Check the Use only default devices check box.

c. Click OK.


Note The capability for the PMC application to coexist with other Cisco voice applications depends on the operating system that you use. For example, Windows XP allows multiple applications to run concurrently and open and use the microphone at the same time. Windows 2000, however, does not provide support for this same capability; that is, only one voice application, such as the PMC or another voice application, may be active at the same time on a Windows 2000 client machine. See the "PMC Coexistence with Other Voice Applications" section for more information.


Note Be aware that if the microphone on the PMC client machine is busy or if it cannot be opened by the PMC for other reasons, you will be able to listen to active conversations but you will not be able to talk.


Using a USB DSP Headset with the PMC

When you use a USB DSP headset (that is, a headset that includes its own sound card) with the Windows operating system, Windows may configure the USB DSP headset as the default speaker and microphone. Therefore, make sure that you connect the USB DSP headset to the PMC client machine before you launch the PMC. If you launch the PMC after you plug the headset into your PMC client machine, the PMC may not automatically remember the audio setting for the USB DSP headset; instead, the PMC reverts to the default Windows operating system audio settings.

To resolve this situation and use the USB DSP headset with the PMC, follow this procedure:


Step 1 Close the PMC by clicking Exit from the PMC menu or by clicking the "X" that is located at the top right corner of the PMC application window.

Step 2 Navigate to Start > Settings > Control Panel > Sounds and Multimedia; then click the Audio tab to check the Windows audio settings.

a. Configure the Windows audio settings to set the USB DSP headset as the default device by choosing the device from the drop-down list box.

b. Click OK to save your changes.

Step 3 Double-click the PMC icon on your desktop to start the PMC.


Figure 2-8 shows an illustration of the Sounds and Audio Devices Properties window with the default device specified and the "Use only default devices" option chosen.

Figure 2-8 Sounds and Audio Devices Properties Window


Note If you use the microphone on a USB headset for an extended period of time, your voice may become unintelligible. If this problem occurs, close the PMC and unplug the USB headset from the PMC client machine. Then, plug the USB headset back into the PMC client machine and restart the PMC.


Using the Microphone with the PMC

This section includes the following topics about operating the microphone and checking the settings to ensure proper use with the PMC:

Important Information about Using the Microphone

Checking the Microphone


Tip If you encounter a situation where you can hear other users but they cannot hear you, check to make sure that your microphone is not set to mute.


Important Information about Using the Microphone

Cisco IPICS uses voice activity detection to squelch (silence) transmissions that contain undetectable speech. To avoid issues that may arise from these incomplete transmissions, be sure to use a high-quality microphone and check the placement and settings of your microphone before you begin using the PMC.

Be aware of the following tips when you use the microphone:

Make sure that you use a high-quality microphone with the PMC; otherwise, the Cisco IPICS system may not be able to accurately detect your voice and properly register transmit and/or receive traffic.

If the Cisco IPICS system cannot detect your voice when you transmit, the system may squelch the transmission; in this situation, another Cisco IPICS user may start speaking over your transmission because your voice cannot be heard and the PMC receive indicator may not display any indication of the transmission.

Checking the Microphone

To check the audio recording and playback capability of the microphone on your PMC client machine, access the Windows Sound Recorder to record your voice and then listen to the recording. (Make sure that you have an audio input device connected to your machine.)

To access the Sound Recorder on the PMC client machine, follow this procedure:

Procedure


Step 1 Navigate to Start > Programs > Accessories > Entertainment > Sound Recorder.

The Sound Recorder dialog box displays.

Step 2 Click File > New.

Step 3 To begin recording, click the Record button; this button displays in the lower right corner on the Sound Recorder dialog box.

Step 4 Speak into the microphone to record your voice.

Step 5 To stop recording, click the Stop button; this button displays to the left of the Record button.

Step 6 To listen to your recording, click the Play button; this button displays to the left of the Stop button.

You should hear your voice as it was recorded.

Alternatively, you can choose File > Save as and then enter a file name to save your recording file. Recorded sounds are saved as waveform (.wav) files. To play the file, choose File > Open, locate the sound file that you want to play; then, double-click the file.

Step 7 To stop playing the recording, click the Stop button.


Voice Quality Tips

Be aware of the following tips, which can help to ensure enhanced voice quality, when you use the PMC:

Make sure that you use a high-quality headset and microphone, and check the placement and settings of both components, when you use the PMC. A high-quality and properly-configured headset can greatly enhance voice quality for both receive and transmit activity.

For enhanced voice quality, make sure that you plug your USB headset or audio device into a dedicated USB port instead of a USB hub. The use of USB hubs, which multiplex data from USB devices into one data stream, can result in timing issues and impact voice quality.

Check your audio settings to make sure that the volume is not set too low. If the volume is set low, increase the input gain on your microphone by sliding the bar up on the volume controls to increase the volume.

For optimum connectivity, use the most appropriate location for your connection type when you log in to the PMC. For example, if you are using a wireless connection, choose the location that correlates to wireless connectivity for your organization. You can ensure higher quality audio by choosing the appropriate connection type.

Make sure that you always use the most recent version of the PMC. Newer versions of software often contain voice quality updates that enhance functionality.

Be aware that a slow-speed connection, such as a digital subscriber line (DSL) connection or any slow wired link, may affect voice quality. If possible, try to use a high-speed connection when you use the PMC.

Try to limit the use of high-bandwidth applications on the PMC client machine at the same time that you use the PMC. If your CPU is overburdened by other programs that are running at the same time, there may insufficient CPU cycles for the PMC to run properly. Check the CPU activity on your PMC client machine and close any programs that do not need to be open.

For more information about voice quality issues and tips, see "Troubleshooting Tips for the PMC Application."

Launching the PMC Application

To launch the PMC application, perform the following procedure:

Procedure


Step 1 To launch the PMC application, choose one of the following options:

Double-click the PMC icon that appears on your desktop.

Navigate to Start > Programs > Cisco IPICS > PMC; then, click the PMC icon.


Tip If you have CSA installed on your PMC client machine and you are prompted with an access permission dialog box, be sure to click Yes to grant permission to allow the PMC to monitor the media device (microphone). If the "Don't ask me again" check box displays as an option, you may check it to instruct CSA not to prompt you again in the future.


Note Be aware that if you allow CSA to time-out based on its default value of No, the PMC will be able to receive traffic but it will not be able to send traffic; that is, you will still be able to listen to any active conversations but you will not be able to transmit.


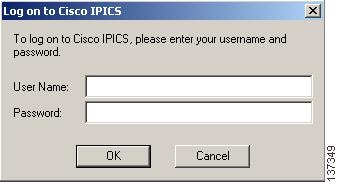
The Cisco IPICS login dialog box displays.

Figure 2-9 shows an illustration of the Cisco IPICS login dialog box.

Figure 2-9 Cisco IPICS Login Dialog Box

Step 2 Enter your user name and password; then, click OK.


Tip Be aware that user names and passwords are case-sensitive.


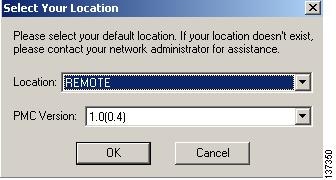
The location selection dialog box displays.

Step 3 Choose your default location and your PMC version from the drop-down list boxes; then, click OK.


Note The PMC version drop-down list box includes the PMC versions that are installed on your client machine and compatible with the server.


Note The location information that displays in the drop-down list box is configured in the Cisco IPICS server. Contact your system administrator if your location information does not display as an option or if you are not sure which location you should choose.


Figure 2-10 shows an illustration of the location selection dialog box.

Figure 2-10 Location Selection Dialog Box

The PMC application opens on your desktop. For information about using the PMC application, see "Using the PMC Application."


Related Topics

About the PMC Application

System Requirements for the PMC Application

Location Support

Using the PMC Application

Performing Additional PMC Tasks

After you install the PMC application, you can perform the tasks that are described in Table 2-1.

Table 2-1 Additional PMC Tasks 

Task
Description
Reference

Download the PMC application

This task lets you download the PMC update files when you choose to download a noncritical update at a later time.

Downloading the PMC Update

Upgrade the PMC application

This task upgrades the PMC application when you choose to perform a noncritical upgrade at a later time.

Upgrading the PMC Application

Revert to a previous compatible version of the PMC application

This task allows you to revert to a previous compatible version of the PMC application.

Reverting to a Previous Version of the PMC Application


Related Topics

Downloading the PMC Update

Upgrading the PMC Application

Reverting to a Previous Version of the PMC Application

Upgrading the PMC Application

This section describes the upgrade process for the PMC application and includes the following topics:

Managing PMC Version Numbers

Checking for PMC Updates

Performing a Noncritical Upgrade

Performing a Critical Upgrade


Tip Make sure that you close the PMC application before you install a new version of the PMC software. If you run the PMC at the same time that you install a new version, the system will prompt you to restart your machine after the installation has completed.


Managing PMC Version Numbers

Because the Cisco IPICS server maintains information about version compatibility, the system supports the ability to perform version upgrades to the next release of software, along with the ability to revert to an earlier compatible version.

To ensure version compatibility, the Cisco IPICS server regularly provides information to the PMC about version availability. The system then performs a version check of major and minor version upgrades.

The PMC client system can maintain multiple versions, current and previous, of the PMC application. (The system retains the previous versions in the event that you need to revert to an earlier installed version.)

Upon login, the server communicates the following version information to the PMC, as described in Table 2-2:

Table 2-2 Cisco IPICS Server -PMC Version Information 

Version Information
Description

Minimum version

This version represents the minimum software version that is required to run on the PMC.

Maximum version

This version represents the maximum software version that is available to run on the PMC.

Recommended version

This version represents the recommended software version that should be run on the PMC.

Current version

This version represents the most current software version on the PMC, which is the most recent software version that the PMC downloaded from the server.

Number of versions

This number signifies the number of PMC versions that the PMC should maintain.

Polling rate

This number signifies the polling rate (time interval) at which the PMC checks the server for changes that need to be downloaded.


When the PMC starts up, it applies this version information to the existing versions that are installed on the PMC client machine hard drive. The PMC automatically deletes all versions prior to the minimum version. The PMC then deletes additional previous versions until the number of versions to maintain matches the information that is configured in the server. For example, if the server configures the number of versions to maintain as two, then the last two most recent versions of the PMC are retained.

If the PMC has deleted all versions from the PMC client machine, a pop-up dialog box displays to inform you that you do not have a valid version of the PMC and asks if you would like to download and run the latest version of the PMC software.

If your PMC client machine does not have a version of the PMC software that is greater than or equal to the recommended version, a pop-up dialog box displays to inform you that your version is not the recommended version and asks if you would like to download the recommended version.

When you click Yes to this prompt, the PMC.DLL file for the recommended version downloads to the following directory on the PMC client machine:

C:\Program Files\Cisco Systems\Cisco IPICS\PMC\Bin

After the PMC.DLL file downloads, the system updates the location selection dialog box to provide you with the option of choosing this latest version.


Note The PMC automatic update process installs the PMC.DLL file only; with this update, the PMC skins and the online help are not updated. To get the latest, fully executable version, you need to uninstall and reinstall the PMC application.


When new upgrades become available, and based on version compatibility, the PMC may be forced to download and upgrade a new version immediately (critical upgrade) if the system detects version incompatibility. Alternatively, an option may be provided to download and upgrade a new version at a later time (noncritical upgrade).


Note The current version of the PMC application continues to operate when a new version becomes available as long as the upgrade is not critical.


To locate the PMC application version information on your system, perform the following procedure:

Procedure


Step 1 If the PMC application is not already open, double-click the PMC icon on your desktop or navigate to Start > Programs > Cisco IPICS > PMC to launch the application.

Step 2 Position your cursor so that it is located inside the PMC window; then right-click inside this window.

A list of options displays.

Step 3 Click About.

The version information for your PMC application displays.

Step 4 Click OK to exit the window.


Note Cisco IPICS does not support automatic downgrades of the PMC application when you have downloaded noncumulative versions from the server. (You can identify noncumulative versions by the release numbers, which appear out of sequence.) If you need to downgrade to a PMC version that is earlier than the currently installed version, and if you have been running noncumulative versions, you must uninstall the current PMC before you can install a downgraded version. For information about how to uninstall the PMC application, see the "Uninstalling the PMC Application" section.


Checking for PMC Updates

At regular intervals, the PMC receives update information from the server. When updates become available, the Cisco IPICS server automatically notifies the PMC and a pop-up message displays to alert you.

For information about PMC automatic updates, see the "Managing PMC Version Numbers" section.

Cisco IPICS supports the following types of upgrades:

Noncritical upgrades

Critical upgrades


Note When a critical upgrade must be installed, the system automatically downloads the PMC application update immediately and upgrades the software in the background; you do not need to take any action. Be aware that network performance might be impacted during this time.


Table 2-3 describes the types of upgrades that Cisco IPICS supports.

Table 2-3 Types of Cisco IPICS Upgrades 

Type of Upgrade
Description
Reference

Noncritical Upgrades

If the upgrade is considered noncritical, you can choose not to download the update. After a preconfigured period of time, the PMC will prompt you to download the update and perform the upgrade; you can choose to download now or at a later time.

For more information, see the "Performing a Noncritical Upgrade" section.

Critical Upgrades

There may be situations where the system detects a version incompatibility or another emergency situation. In these cases, the PMC application must be upgraded immediately; a warning message displays to alert you of the necessity to download the critical update. The download and upgrade procedures then run automatically.

For more information, see the "Performing a Critical Upgrade" section.


Tip The PMC logs all update and upgrade activities to a log file. Be aware that the system may reset your debug log settings after you perform installation activities (such as install, upgrade, or repair) on the PMC. Check your debug log settings to make sure that the options you need are enabled. For more information about how to identify, access, and use these logs, see "Using the PMC Application Logs."


Performing a Noncritical Upgrade

This section describes the process that you need to follow to perform a noncritical upgrade of the PMC and includes the following topics:

Downloading the PMC Update

Upgrading the PMC Application

When you log in to the PMC, the Cisco IPICS server sends information about the minimum, maximum, recommended, and current PMC versions, as described in the "Managing PMC Version Numbers" section. If the currently-installed PMC version is newer than the minimum version but older than the latest version, the system prompts you to download and install the upgrade. When you choose to download and install the upgrade, the system performs this activity automatically. After the installation has completed, you will have the option to choose the new version.

Upgrade tasks for the PMC involve the following steps:

1. Downloading the PMC update files from the Cisco IPICS server to the PMC client machine—For more information, see the "Downloading the PMC Update" section.

2. Upgrading the PMC software on the PMC client machine—For more information, see the "Upgrading the PMC Application" section.

Downloading the PMC Update

When a noncritical update becomes available for the PMC, you have the option to perform the upgrade now or at a later time. In this situation, a message displays the next time that the PMC connects to the Cisco IPICS server to alert you that an update is available for download.

When you see this message, choose one of the following options to continue:

Yes—Choose this option to instruct the PMC application to download the new version of the PMC application from the Cisco IPICS server.


Note The PMC manages the download and upgrade tasks in the background, so you do not need to take any action.


No—Choose this option to instruct the PMC application to not download the new version now and to prompt you later.


Note In addition, the PMC will prompt you to download the update each time that you log in to the system.


Upgrading the PMC Application

When a PMC upgrade is outstanding, a message displays to inform you and asks if you want to upgrade the PMC now; this message displays the next time that you log in to the PMC application.

When you see this message, choose one of the following options to continue:

Yes—Choose this option to instruct the PMC application to upgrade.

No—Choose this option to instruct the PMC application to not upgrade now and to prompt you at a later time.


Note In addition, the PMC will prompt you to perform the upgrade every time that you log in.


If you choose Yes, the PMC is upgraded to the latest version.

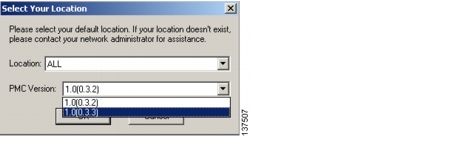
After the upgrade has completed, choose your default location and the upgraded PMC version from the location selection dialog box drop-down list box; then, click OK.

Figure 2-11 PMC Version Dialog Box


Tip The PMC version drop-down list box includes the PMC versions that are installed on the PMC client machine and compatible with the server. The location information that displays in the drop-down list box is configured in the Cisco IPICS server. Contact your system administrator if your location information does not display as an option.


Note Network performance may be impacted during the upgrade process.


Tip If you have CSA installed on your PMC client machine and you are prompted with an access permission dialog box, make sure that you click Yes to grant permission to the PMC upgrade. If the "Don't ask me again" check box displays as an option, you may check it to instruct CSA not to prompt you again in the future.


Performing a Critical Upgrade

The system typically requires an immediate upgrade of the PMC application when the Cisco IPICS application has been upgraded to a version that is not compatible with the PMC application or in other emergency situations.

If an immediate upgrade of the PMC is required, a message alerts you. The critical update downloads and the system performs the upgrade in the background, so you do not need to take any action. After the entire process completes, the previous PMC version exits and you can choose your default location and the upgraded PMC version from the location selection dialog box. (The system ensures that the new version maintains the same state as the previous version.)

Related Topics

Identifying the PMC Logs

Using the PMC Logs

Reverting to a Previous Version of the PMC Application

When you upgrade the PMC application, the PMC maintains a copy of the previous versions of the application. If necessary, and if an earlier version is compatible with the current version of the Cisco IPICS application, you can revert to any previous compatible version of the PMC application.


Note The system does not allow you to revert to a PMC version that is not compatible with the current Cisco IPICS application.


To revert to any previous compatible version of the PMC application, perform the following procedure:

Procedure


Step 1 Launch the PMC application, as described in the "Launching the PMC Application" section.

Step 2 From the drop-down list box in the location selection dialog box, choose the PMC version that you want to revert to.

The drop-down list box contains a list of the PMC versions that are compatible with the server.

Step 3 Click OK.

The PMC version that you choose becomes available for your use.


Related Topics

Launching the PMC Application

Uninstalling the PMC Application

To uninstall the PMC application from your client machine, perform the following procedure:

Procedure


Step 1 Navigate to Start > Programs > Cisco IPICS > PMC > Uninstall PMC.


Tip If you have CSA installed on your PMC client machine and you are prompted with an access permission dialog box, be sure to click Yes to grant permission to the PMC uninstallation process.


A dialog box displays to ask if you are sure that you want to uninstall this product.

Step 2 Click Yes.

The PMC application is uninstalled from your client machine.


Where to Find More Information

Cisco IPICS Server Administration Guide