Downloads |
 Feedback Feedback
|
Table Of Contents
Troubleshooting CiscoWorks 2000
Troubleshooting Information for CiscoWorks 2000 Installation and Setup
Required Server Software Installation Troubleshooting
Essentials Troubleshooting Tools
Checking Files and Directories After Installation
Understanding Installation Error Messages
Accessing the Essentials Server
Adding and Importing Device Information
Essentials Daemon Manager and CWSI Campus
Testing Connection to the Database
Methods for Evaluating and Troubleshooting RME Problems
Troubleshooting a Process Problem
Information for Troubleshooting CWSI (CiscoWorks for Switched Internetworking) Campus
Understanding CWSI Campus Background Processes
Stopping and Starting CWSI Campus Processes
Losing the Connection to EventChannel
Identifying a Corrupt Database
Using the Same Database on Multiple Workstations
Using Multiple Copies of CWSI Campus
Improving CWSI Campus Performance
Entering Valid Community Strings
Which Community Strings Are Valid?
What Happens If I Enter an Invalid Write Community String?
Why Do Links Appear as Dashed Lines?
Why Do Devices Appear with a Red X?
Why Do Devices Appear as an Empty Box with a Red X?
Why Does Discovery Take a Long Time?
How Can Discovery Be Disabled?
Why Does the ATM Network Appear as a Cloud?
Why Do Some Ethernet Links Not Include Speed?
Why Do the Wrong Devices or Connections Appear?
Why Do Some Unknown Devices Appear with an OID As the Device Name?
Why Are Frame Relay CDP Links Not Discovered?
Displaying Discrepancy Reports
Interpreting the Discrepancy Report
Customizing the Discrepancy Report
Troubleshooting Information for Applications Included in CWSI Campus
Can VLANs in Different VTP Domains Have the Same Name?
Can You Drag Ports from One VLAN to Another on VTP Transparent Switches?
Will VlanDirector Display VLAN Information for a Switch That Is in Transparent Mode?
Why Is the Switch Highlighted When Any VLAN Is Selected?
Why Is There a Lighting Bolt on the Port?
Checking the Status of Devices and Links
Collecting Data for Troubleshooting
Troubleshooting TrafficDirector
Ensuring Access to SwitchProbe Devices
NetFlow and Resource Monitor Options—SwitchProbe Devices
NetFlow Option—Network Analysis Module
SwitchProbe and Network Analysis Module Security
Network Access to SwitchProbe Devices
Testing Agents, Switches, and Frame Relay Agents
Interpreting Test Agent Messages
Interpreting Switch Agent Test Messages
The Cvinstall.cshrc and the Cvinstall.sh Files and System Performance Issue
Identifying Device Problems (Dashboard Monitor)
Before Calling Cisco Systems' TAC Team
Troubleshooting CiscoWorks 2000
Objectives
The main objective of this chapter is to present troubleshooting information for problems commonly encountered when installing and using CiscoWorks 2000 (RME 2.2 and CWSI 2.4). It contains the following sections:
•
Introduction to the Network Management Products Family CiscoWorks 2000
•
•
•
•
Introduction
CiscoWorks 2000 is a family of management products that combines the best of enterprise router and switch management functionality with easy-to-access deployment of web-based technologies. CiscoWorks 2000 offers a new model of network-management solutions for large, fast-changing enterprise networks. Resource Manager Essentials and CWSI Campus make up the foundation of the CiscoWorks 2000 family, This new generation of management tools leverages the power of the Internet to bring network-accessible knowledge to the management process, and to give users standard web-browser access to management functionality. The CiscoWorks 2000 products integrate switch and router management, provide management application integration via the browser-based Cisco Management Connection, and share common services between functional modules.
Cisco delivered its first Internet-based product when it shipped Resource Manager in 1997, and it integrated several separate applications into a single suite called CiscoWorks for switched Internetworks (CWSI). CiscoWorks 2000 takes these products a step further. Cisco has added management functionality that crosses switches and routers, has dramatically increased web-accessible features, and has integrated existing products onto a common management foundation to leverage a single set of background services.
CWSI Campus offers sophisticated traffic management, ATM management, VLAN management, and device configuration to CiscoWorks 2000. It complements the Resource Manager Essentials automated software upgrade, inventory, and configuration management features. The two applications share some back-end processes, which allows Resource Manager Essentials to run on a standalone basis but requires that CWSI Campus be installed with Resource Manager Essentials as a base to build upon.
The network-management product CiscoWorks Classic was replaced by CiscoWorks 2000 Resource Manager Essentials. For those who want to know the details of migrating from CiscoWorks Classic to Essentials, please refer to the CCO link, at www.cisco.com/univercd/cc/td/doc/product/rtrmgmt/cw2000/cw2000e/rme_ltu/ug_appb.htm. CiscoWorks 2000 has four different versions that correspond to four different operating system flavors: CW2000 on NT, CW 2000 on Solaris, CW 2000 on HPUX, and CW 2000 on AIX. In this chapter, if not specifically pointed out, the troubleshooting information should apply to all flavors of CW 2000.
Troubleshooting Information for CiscoWorks 2000 Installation and Setup
The following subsections are presented in this section:
•
•
•
•
•
•
•
•
•
•
•
•
Required Server Software Installation Troubleshooting
CiscoWorks 2000 for Windows NT version's installation requires Windows NT 4.0 Option Pack components be installed. If you did not install one of the following required components of the Windows NT 4.0 Option Pack during initial installation, you can install them later:
•
•
•
To install one or more of these components after initial installation, follow these steps:
Step 1
Step 2
Step 3
Step 4
Step 5
Step 6
Essentials Troubleshooting Tools
Essentials provides several troubleshooting options that are accessible from the navigation tree. To access these tools, select Admin; Troubleshooting.
1.
Step 1
Step 2
Step 3
Step 4
Step 5
Step 6
2.
3.
4.
To view process failures, follow these steps:
Step 1
Step 2
Step 3
Step 4
5.
Step 1
Step 2
Step 3
Step 4
Step 5
Step 6
Logging in After Upgrading
After upgrading from Cisco Resource Manager 1.1 to Essentials 2.1, or from Essentials 2.0 to Essentials 2.1, or from Essential 2.1 to Essential 2.2, you might need to clear your browser cache to log into Essentials.
If the Login Manager dialog box on the Essentials desktop does not appear correctly when you attempt to log in for the first time after upgrading, clear your browser cache as follows, and then re-enter the Essentials server URL in your browser.
For Microsoft Internet Explorer, follow these steps:
Step 1
Step 2
Step 3
For Netscape Navigator, follow these steps:
Step 1
Step 2
Step 3
Step 4
Checking Files and Directories After Installation
If you encountered problems while installing Essentials, make sure that the following directories are installed in the right directories.
For CW 2000 installation on NT, the following directories should be installed in the C:\Program Files\CSCOpx directory (or the directory that you specified for the installation):
•
•
•
•
•
•
•
•
•
•
•
•
•
•
•
•
•
•
•
•
•
The Essentials installation tool installed the following directories in the C:\Program Files\CSCOpx\objects directory (or the directory that you specified for the installation):
•
•
•
•
•
•
•
•
•
•
•
•
•
For CW 2000 installation on Solaris, HPUX and AIX, make sure that the following directories have been installed in the /opt/CSCOpx/, /opt/CSCOpx/, and /usr/CSCOpx/ directories, respectively:
•
•
•
•
•
•
•
•
•
•
•
•
Also, the Essentials installation tool installed the following directories in the /opt/CSCOpx/objects, /opt/CSCOpx/objects, and /usr/CSCOpx/objects directories, respectively on Solaris, HPUX, and AIX:
•
•
•
•
•
•
•
•
•
•
•
•
•
•
Note
In addition, the following files should have been added to the /etc directory on Solaris:
•
•
•
•
On HPUX, the following files should be added:
•
•
•
•
On AIX, the file rc.dmgtd should be added in the /etc directory.
Understanding Installation Error Messages
After verifying that the correct files are installed, check the c:\rme_in001.log file (or the log file with the highest number, such as rme_in003.log) for installation errors on NT, or check the /var/tmp/ciscoinstall.log file for installation errors on Solaris, HPUX, and AIX. You might find the following types of messages:
•
•
•
Table 24-2 shows error messages that might occur during installation on NT and describes the reasons for the errors.
Table 24-3 shows error messages that might occur during installation on UNIX and describes the reasons for the errors.
Accessing the Essentials Server
The Essentials server uses the port 1741. Make sure that you enter the correct URL when accessing the server:
http://server_name:1741
Here, server_name is the name of the Essentials server.
If you still cannot access the server, enter the following command at a DOS prompt to make sure that your server is running:
ping server_name
If you get a message that the server is "alive" and get a proxy error when you try to connect to the server, make sure that the proxy is set up correctly. If your server is configured to use a proxy server outside the firewall (specified in Netscape Navigator under Options; Network Preferences; Proxies), you will get proxy errors if you have incorrectly configured the proxy to ignore requests to a certain machine, set of machines, or domain.
Your proxy is set up incorrectly if you encounter any of the following:
•
•
•
•
•
Setting Up the Browser
If the Essentials buttons do not work, you have not enabled Java and JavaScript. Enable Java and JavaScript as described in the Installing Essentials manual on CCO, in the "Configuring Client Systems" section. Ensure that your cache is not set to zero. If you experience browser problems, increase your cache settings, as explained in the same section in the Installing Essentials manual on CCO.
Do not resize the browser window while the desktop or main page is still loading. This can cause a Java error.
Adding and Importing Device Information
This subsection describes some problems that might occur when you attempt to add or import device information.
1.
Step 1
Step 2
Even if the DIServer process shows the state "Running Normally," it might be in an error state. You need to stop and restart it by following these steps:
To stop the DIServer process, select Admin; System Admin; Stop Process. The Stop Process dialog box appears. Click the Process radio button.
In the Process Name field, select DIServer and then click Finish.
To restart the DIServer process, follow these steps:
From the System Admin folder, click Start Processes. The Start Process dialog box appears.
Click the Process radio button.
In the Process Name field, select DIServer, and then click Finish.Step 3
2.
–
–
Gathering Server Information
Essentials contains a utility that can help you troubleshoot server problems. You can obtain information about the Essentials server in one of two ways:
Select Admin; Troubleshooting; Collect Server Info. The Collect Server Information dialog box appears. Click Display to collect information about the server. After the information has been collected, the dialog box tells you how to view the server information in your web browser.
From the server, enter the following command from the command window:
collect.info filename.html
Here, filename is a filename of your choice.
If collect.info is not recognized as a command, add the following path name to your PATH system variable:
On NT: C:\Program Files\CSCOpx\cgi-bin\admin\perl
On Solaris and HPUX: /opt/CSCOpx/bin
On AIX: /usr/CSCOpx/bin
On UNIX machines, the server information will be collected into the /var/tmp/px_status.info file. Send this file to Cisco via e-mail if directed to do so by your technical support representative.
Essentials Daemon Manager and CWSI Campus
CWSI Campus relies on the Essentials Daemon Manager. Therefore, the Essentials Daemon Manager must be running for CWSI Campus to run. If the Essentials Daemon Manager has stalled, you must stop and restart the Essentials Daemon Manager.
On Windows NT, to stop the Essentials Daemon Manager from the GUI, follow these steps:
Step 1
Step 2
Step 3
Step 4
To restart the Essentials Daemon Manager from the GUI, follow these steps:
Step 1
Step 2
Step 3
Step 4
To stop and start the Essentials Daemon Manager from the command-line interface, follow these steps:
Step 1
Step 2
Step 3
net stop crmdmgtdStart the server by entering the following command at the prompt:Step 4
On a Solaris system, to stop and restart the Essentials Daemon Manager, follow these steps:
Step 1
Step 2
Step 3
# /etc/init.d/dmgtd stopStep 4
# /etc/init.d/dmgtd startCannot Log in to AniServer
If you have just restarted your computer and cannot log in to <Hostname>AniServer, the ANI server might not be ready to receive messages. Wait a few minutes, and then try to log in again.
If you still cannot log in, follow these steps:
Step 1
Step 2
pdshow RmeOrb AniServerThis will show whether OSAgent and AniServer are running, and whether AniServer is connected to the database.
Step 3
Set the OSAGENT_PORT environment variable to 42342. This is the port used by OSAgent in Essentials.
Set OSAGENT_PORT=42342 (on Windows NT)
# setenv OSAGENT_PORT 42342 (on Solaris)Run osfind. This verifies whether AniServer has registered with the OSAgent. This tool is located in C:\Program Files\CSCOpx\lib\visigenics\bin (on Windows NT), or /opt/CSCOpx/lib/visigenics/bin (on Solaris).
If <Hostname>AniServer is registered with the OSAgent, verify that the name of <Hostname>AniServer in the login box is the same name as the name registered with OsAgent.
If <Hostname>AniServer is registered, retry to log in to CWSI Campus.
If <Hostname>AniServer is not registered, you must stop and restart CWSI Campus.
Step 4
StopcwsiserverWhen the prompt returns, all daemons have been stopped.
Step 5
StartcwsiserverWait until the prompt returns.
Step 6
If <Hostname>AniServer is registered, retry to log in to CWSI Campus.
If <Hostname>AniServer is not registered, continue to next step.
Step 7
pdreg -1 AniServerThis verifies whether AniServer is registered with Essentials Daemon Manager.
If AniServer is registered with Essentials Daemon Manager but is not running, check the ani.log to see how far the initialization has proceeded.
If AniServer is not registered, the following error message appears:
ERROR AniServer is not a registered server name.If AniServer is not registered with Essentials Daemon Manager, it will not be capable of initializing itself. Contact your Cisco TAC representative for additional assistance.
Testing Connection to the Database
You can run a utility to determine if you can connect to the CWSI Campus database. To run the utility, follow these steps:
Step 1
Step 2
If the program finishes and the prompt returns, the database connection is fine.
Methods for Evaluating and Troubleshooting RME Problems
Essentials provides you with methods for evaluating and troubleshooting problems.
The following sections are presented in this section:
•
•
•
Error Message Format
Essentials displays two types of error messages:
•
•
Interface error messages are displayed in dialog boxes with descriptions of the probable causes and recommended corrective actions, if any.
Three types of interface error messages are available:
•
•
•
Some interface error messages include a Details button. Click Details for additional information and recommended corrective action. An informational dialog box appears.
Back-end error messages result from problems that occur in processes running on the Essentials server. Back-end error messages are stored in the syslog.
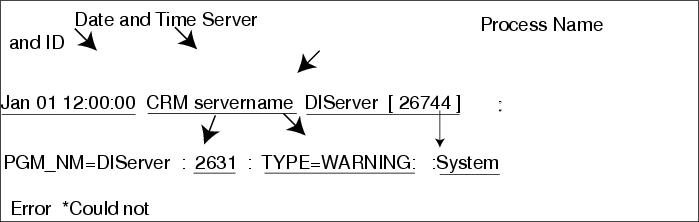
Refer to the appropriate Essentials installation guide for the location of the error message logs. Figure 24-1 shows the syslog error message format.
Figure 24-1 Syslog Error Message Format
Process Status Features
Two interfaces are available for viewing and troubleshooting process problems:
•
•
Use the Process Status, Start Process, and Stop Process System Admin options to view process status and troubleshoot process problems. Use the CLI for processes that cannot be monitored through the desktop interface (for example, syslogd).
Table 24-4 shows the process features available in the desktop interface and their command-line equivalents.
Table 24-4 Process Features
Process Status
pdshow
Start Process
pdexec
Stop Process
pdterm
For a complete description of the desktop interface processes, refer to the RME online help.
Several events can cause a process to fail. For example, the database engine might fail for one of the following reasons:
•
•
•
Troubleshooting a Process Problem
The Process Failures table gives you information about potential process failures. It tells you that the process has failed or that an administrator has shut down the process.
If a process behaves in an unexpected way and you want to know the possible cause, to troubleshoot a process, perform the following steps:
Step 1
Step 2
Step 3
Step 4
Step 5
Step 6
Starting a Process
Scenario: You check process status and notice that the DbServer process in the Process Status table shows a state of "Failed to run." You attempt to restart the process.
For the desktop interface, to attempt a process restart using the navigation tree, perform the following steps:
Step 1
The Start Process dialog box appears.
Step 2
The Process Status table appears. If the status now reads "Running normally," you have solved the problem.
If the process is still not running normally, you may need collect more server and process information to further troubleshooting.
For the command-line interface, to restart a process using the CLI, perform the following steps:
Step 1
Step 2
If the process is operating properly, the following message appears:
Process= DbServerState = Running normallyPid = 21473RC = 0Signo = 0Start = 19:16:15 06/02/1999Stop = Not applicableCore = Not applicableInfo = Data server (dbeng50) invokedIf the process is still not running normally, check the error log for further troubleshooting.
Stopping a Process
Scenario: You want to back up all data that you have stored on your hard drive, so you shut down the DbServer process.
On the desktop interface, to stop the DbServer process using the navigation tree, perform the following steps:
Step 1
Step 2
Step 3
Step 4
The process stops, and the Process Status table displays the message "Administrator has shut down this server."
On the command-line interface, to stop the DbServer process using the CLI, perform the following steps:
Step 1
Step 2
The following status message appears, showing that the process has been stopped.
Process= DbServerState = Administrator has shut down this serverPid = 0RC = 0Signo = 0Start = 19:16:15 06/02/97Stop = 11:27:05 06/03/97Core = Not applicableInfo = Not applicableTroubleshooting Suggestions
Table 24-5 lists troubleshooting suggestions. If the action items suggested do not resolve the error, check the release notes supporting your platform for possible workarounds.
Information for Troubleshooting CWSI (CiscoWorks for Switched Internetworking) Campus
The following subsections provide information to troubleshoot CWSI Campus:
•
•
•
•
•
•
Understanding CWSI Campus Background Processes
To use many of the troubleshooting techniques, you must first understand the background processes of CWSI Campus. Refer to the "Enabling trace or debug" and "Stopping and Starting CWSI Campus Processes" sections for information about understanding and working with the CWSI Campus background processes:
CWSI Campus includes the following major technology components that enhance the overall performance:
•
•
•
These background processes are described in Table 24-6. The server processes represent the processes controlled by the CWSI Campus software; these are the background processes for the client processes. The client processes require user input.
To verify that these processes are running, you can use the pdshow command from any command prompt. You also can use the Task Manager (on Windows NT) or ps- (on UNIX systems).
Figure 24-2 illustrates the interactions of the CWSI Campus processes.
Figure 24-2 CWSI Campus Architecture
Enabling trace or debug
Some of the troubleshooting steps may require that you enable trace or debug in ANI to gather additional information. You also might be asked to enable trace or debug for particular subsystems of CWSI Campus when you contact your Cisco TAC representative for additional assistance.
To enable trace and debug, follow these steps:
Step 1
Step 2
Step 3
ani -trace <subsystem> -debug <subsystem> -logfile <logfile name>The troubleshooting instructions or the TAC representative will provide you with the appropriate subsystem name. You can enter any name for the log file, and the log file will appear in the <CWSIROOT> directory, where <CWSIROOT> is the directory in which you installed CWSI Campus.
Step 4
Step 5
Stopping and Starting CWSI Campus Processes
The following command-line scripts control the CWSI Campus processes:
stopcwsiserver stops the CWSI daemons.
startcwsiserver starts the CWSI daemons.
To use these scripts, you must be signed in as the administrator on Windows NT or as root on UNIX operating systems. Open a command prompt or shell window. Enter stopcwsiserver to stop the CWSI Campus server processes. When the prompt returns, all the daemons have been stopped. To restart the processes, enter startcwsiserver and wait until the prompt returns.
Losing the Connection to EventChannel
If an error occurs stating that you have lost connection to EventChannel, follow these steps:
Step 1
Step 2
Step 3
Step 4
Step 5
•
•
•
Starting CWSI Campus
If you have difficulty starting the CWSI Campus applications, follow the tips in these subsections.
If you have just restarted your computer and cannot log in to <Hostname>AniServer, the ANI server might not be ready to receive messages. Wait a few minutes, and then try to log in again.
If you still cannot log in, refer to the previous section of "Troubleshooting Information for CiscoWorks 2000 Installation and Setup." That section includes detailed steps for resolving this error on Windows NT and UNIX systems.
Identifying a Corrupt Database
A corrupt database cannot be easily identified. In past versions of CWSI Campus, symptoms included a connection that hangs or intermittent hanging. However, these problems have been resolved. Currently, the only way to know definitively whether the database is corrupt is to look at the ani.log file. If many SQL exceptions and errors are present in the ani.log, the database may be corrupt.
Replacing a Corrupt Database
ANI cannot perform effectively with a corrupt database. If you determine that you have a corrupt database, you need to reinitialize a new database.
Note
You can replace a corrupt database using two different methods:
•
•
These will be discussed next.
Running the Script
If you run the script to replace a corrupt database, the script automatically stops all CWSI Campus servers. After the database engine stops, the script then erases the old database, sets the correct permissions, and replaces the old database with an empty, reinitialized database. The script automatically restarts the CWSI Campus servers.
To use this script, follow these steps:
Step 1
On Windows NT, select Run from the Start menu and enter reinitdb.
On UNIX systems, log in as root and run the reinitdb script located in the <CWSIROOT>/bin directory.
Step 2
Step 3
Step 4
Replacing the Corrupt Database Manually
You should not need to manually replace a corrupt database because the script automatically performs all necessary steps for you. However, you can use this method if you want to retain a copy of your old database.
Note
To create a new database, follow these steps:
Step 1
Step 2
Step 3
Step 4
Note
Step 5
Step 6
Step 7
Using the Same Database on Multiple Workstations
You cannot install CWSI Campus on multiple workstations and allow them to share the database. Also, if you plan to install multiple copies of CWSI Campus on your network, you should change the name of the AniServer that each copy is accessing.
Using Multiple Copies of CWSI Campus
If you plan to install multiple copies of CWSI Campus on your network, you should be aware of how the CWSI Campus discovery process works in this environment. The discovery process uses ANI, which runs as a server process and exchanges information with other CWSI Campus applications running as clients. Each AniServer is intended to manage a single domain. Therefore, if you install another copy of CWSI Campus configured with the same AniServer name (AniServer, by default) in your network, unpredictable behavior might result, depending on which AniServer the client chooses as its default AniServer.
Depending on the available system resources on your initial CWSI Campus system, using the wrong AniServer might result in poor system performance of all CWSI Campus systems that are accessing and using the resources of the default AniServer.
If you want to install another copy of CWSI Campus to manage another domain, you must manually configure your systems to run separate AniServer processes.
To configure your systems, follow these steps:
Step 1
Step 2
Step 3
The ani.properties file is located in the <CWSIROOT>/etc/cwsi/ directory.
Step 4
AniName = AniServer_NameFor example, if you just installed a Solaris version of CWSI Campus, you could rename the AniServer to SOLAniServer.
Step 5
Step 6
Improving CWSI Campus Performance
You can improve the performance of CWSI Campus by reducing the overhead on the CWSI Campus workstation. To reduce the CPU cycles required by CWSI Campus, follow these steps:
Step 1
Note
•
•
•
Discovery.threads=12.•
Discovery.threads=5.•
Step 2
Step 3
Step 4
Step 5
Install enough physical memory to handle CWSI Campus and any other programs that you run simultaneously. You should avoid using swapping.
Ensure a fast network connection; the connection should be better than a 10-MB shared media connection.
If you are using Windows NT, use ultra-fast wide SCSI drives. Also, place the swap file on its own partition, if possible, or ensure that it remains unfragmented.
Entering Valid Community Strings
To allow CWSI Campus to configure the devices in your network, you must ensure that the proper community strings are set. These sections will help you troubleshoot problems that you may experience.
Which Community Strings Are Valid?
When entering valid community strings, what determines whether these examples are invalid or valid?
Example 1: Invalid Community Strings Entry
172.26.1.*:sub1::::::sub1:
172.26.1.*:sub2::::::sub2:
Example 2: Valid Community Strings Entry
*.*.*.*:sub1::::::sub1:
172.26.1.*:sub2::::::sub2:
The first example is invalid because you have assigned different community strings to the same nested address. CWSI Campus probably will overwrite the first entry with the second. However, unpredictable results are also possible.
The second example is valid because 172.26.1.* is an address nested in the *.*.*.* address.
What Happens If I Enter an Invalid Write Community String?
If you accidentally enter an invalid write community string, you will still be able to discover the network (provided that you entered a valid read-only community string). You will not be able to perform any write actions until you enter a valid read-write string.
Working with Discovery
If you have experienced difficulty interpreting your discovered network, follow the suggestions in this section for assistance with common problems.
Why Do Links Appear as Dashed Lines?
When a link between devices appears as a dashed line, it means that during the last discovery cycle, CWSI Campus was incapable of doing a complete discovery of one of the devices at either end of the link. This situation could happen if the link is inoperable for any reason, such as if the link was removed from the network.
The most likely explanation for these dashed lines is an SNMP timeout. SNMP typically has the lowest priority of the background processes for the Cisco device system. For example, SNMP can be affected if you create a new VLAN because a spanning-tree recalculation occurs, which takes precedence over SNMP.
You can lengthen the SNMP timeout for an individual device. To lengthen the timeout, follow these steps:
Step 1
Step 2
target:read:UNUSED:timeout:retries:UNUSED:UNUSED:write:The default timeout is 3 seconds.
Step 3
Any changes made to the community strings take effect immediately.
Why Do Devices Appear with a Red X?
Devices with a red X on them are not being discovered properly. For any device to be discovered by CWSI Campus, the following criteria must be met:
•
•
•
•
•
•
•
Why Do Devices Appear as an Empty Box with a Red X?
Devices appearing as a box with a red X signify that the device is reachable but is unknown to CWSI Campus. This icon is typically displayed for non-Cisco devices. It may also display if a new Cisco device has been released since the last release of CWSI Campus.
Why Does Discovery Take a Long Time?
Several factors determine how long a discovery will take, including the following:
•
•
•
If you experience a slow discovery, follow these steps:
Step 1
Step 2
Step 3
Step 4
Note
•
•
•
Discovery.threads=12•
Discovery.threads=60.•
How Can Discovery Be Disabled?
You cannot completely shut off discovery. CWSI Campus was built on a real-time data model that relies upon discovery data.
You can set the discovery interval to an extremely large number so that discovery occurs only when the ANI server starts or when you manually discover the network.
How Can Devices Be Deleted?
If CWSI Campus has discovered a device that you do not want displayed on the map, you cannot delete this device. The following solutions are available:
•
This solution works well if the device is in your network, but you do not want to display it on the CWSI Campus map.
•
This solution works best for erroneously discovered devices that are not really in your network, or if you have removed a device since the initial discovery.
Why Does the ATM Network Appear as a Cloud?
If CWSI Campus cannot correlate the ATM link information, the ATM network appears as a ATM cloud on the CWSI Campus map. Possible causes and their solutions include these:
•
–
•
•
•
–
•
–
•
–
Why Do Some Ethernet Links Not Include Speed?
On some devices (typically unknown devices), CWSI Campus can retrieve only the media table from the IF table RFC 1213 MIB ifType. In these cases, the link is displayed as Ethernet. For most devices, CWSI Campus reads the enterprise-specific MIBs, which contain more detailed port-type information. Therefore, 10 M and 100 M are displayed on the map.
Why Do the Wrong Devices or Connections Appear?
Make sure that your routers do not have the same sysName. Routers advertise sysName as their CDP cache identification, and CWSI Campus depends on CDP information for discovery. Therefore, if you have two or more devices with the same sysName, CWSI Campus displays unpredictable results.
You can also check the log file to see if a large number of duplicate devices has been discovered and rejected as duplicates.
Why Do Some Unknown Devices Appear with an OID As the Device Name?
Devices that are unsupported by CWSI Campus will not appear with a device name, but will appear with an Object Identifier (OID) instead. CWSI Campus attempts to map the OID to a Cisco product tree MIB. If the OID is under the CiscoProducts or workgroup tree, the OID appears as the device name.
Why Are Frame Relay CDP Links Not Discovered?
Some Frame Relay CDP links may not be discovered by CWSI Campus, even though their neighbors appear by using the show cdp command on the CLI. This is caused by an IOS bug in which point-to-multipoint Frame Relay WAN links do not appear in the SNMP list of CDP neighbors, even though they appear on the CLI.
Displaying Discrepancy Reports
Discrepancy reports enable you to discover inconsistencies in your network.
These subsections provide information about working with discrepancy reports.
You can display and print reports about inconsistencies in your network map:
Step 1
The Discrepancy window opens.
Step 2
The report is saved as a file. You can print the report from the program in which it has been saved.
Interpreting the Discrepancy Report
The discrepancy report displays information on inconsistencies or irregularities in your network.
Table 24-7 describes these irregularities that may appear in your report.
When interpreting the discrepancy report, keep in mind that configurations that you set up intentionally may appear as discrepancies. If you are aware that this is how you wanted to configure your network, then do not be overly concerned with the discrepancies.
Customizing the Discrepancy Report
You can customize the Discrepancy Report to display only those discrepancies about which you want to be notified.
Step 1
Step 2
Step 3
Troubleshooting Information for Applications Included in CWSI Campus
The following subsections are presented in this section:
•
•
•
•
Troubleshooting VlanDirector
Use the information provided here to help you troubleshoot problems with the VlanDirector application.
Does VTP Need To Be Enabled?
The VlanDirector application requires VTP to be enabled. For most predictable results, Cisco recommends having at least one switch configured as a VTP server, and the remaining switches configured as VTP clients.
If There Are Multiple VTP Servers in a VTP Domain, Which VTP Server Does VlanDirector Make the Changes To?
If the two VTP servers are in the same domain and are connected by VTP trunks, it does not matter which switch the VlanDirector application changes. VTP ensures that the information on all VTP servers and clients in a single VTP domain is coordinated and shares the same configuration.
If the servers are in different VTP domains, then they do not share VLAN states, and they are both known to the VlanDirector application. You must select the VTP domain in which you want to make the VLAN changes, and the corresponding VTP servers will reflect those changes.
If there are two servers with the same VTP domain that are not connected by trunks, the configurations managed by the two servers may diverge. This configuration is not supported by the VlanDirector application, and it creates a discrepancy.
Can VLANs in Different VTP Domains Have the Same Name?
You can have VLANs with the same name, provided that other characteristics, such as VLAN Index and SAID value, are also identical. Discrepancies occur when there are identically named VLANs with other attributes that are different (such as index and so on). If the two VLANs share identical definitions, no discrepancy is detected.
Can You Drag Ports from One VLAN to Another on VTP Transparent Switches?
Attempting to drag a port to a VLAN may or may not work, depending upon the definition of that particular VLAN on both the VTP server and the transparent switch. If the definitions are identical (including name, VLAN index, and so on), the dragging process will probably work fine. However, if the definitions are not identical, then the results are undefined: The process may or may not work. Therefore, to add VTP transparent switches to the same VLANs that are running on the VTP server, you must ensure that the VLAN definitions are consistent.
Will VlanDirector Display VLAN Information for a Switch That Is in Transparent Mode?
The VlanDirector application does not discover any VLANs configured on a switch in transparent mode. Thus, if the VLAN state of a transparent switch differs from the state reported by a server in the same domain, the VlanDirector application will not properly handle VLAN changes to the transparent switch.
Why Is the Switch Highlighted When Any VLAN Is Selected?
In the VlanDirector application, you can select a VLAN, and the switches associated with that VLAN are highlighted on the CWSI Campus map. You can also highlight a switch in the CWSI Campus map to indicate which VLANs are active on that switch. However, if the switch has trunks that carry all VLANs, then the switch will be highlighted, regardless which VLAN you select.
Why Is There a Lighting Bolt on the Port?
The lightning bolt on a port means that the port is part of a link (either a device-to-device link or a connection into a shared media).
The lightning bolt is used to differentiate between a port that is connected to another switch (linking) and a port that is configured as a user port. Cisco Discovery Protocol (CDP) has discovered a CDP peer out of this port.
The bolt indicates that you cannot manipulate the port for VLAN configuration by itself; you must configure it as part of its corresponding link. You do this by selecting the link from the CWSI Campus map and dragging the link to the appropriate VLAN.
Configuring LANE Services
The VlanDirector application enables you to configure LANE services. Tables 24-8 through 24-11 provide you with detailed troubleshooting information for resolving LANE configuration problems.
Troubleshooting AtmDirector
This subsection describes how you can use the tools within the AtmDirector application to troubleshoot and enhance your network.
Logging Messages
The AtmDirector application logs error and debug messages that are useful when you need to troubleshoot your network or to resolve any problems. The error and debug messages are automatically recorded (by default) in the $CWSIROOT/log/atmd.log file.
To set the logging option on or off, follow these steps:
Step 1
Step 2
Step 3
Note
Step 4
You can start or stop logging the error and debug messages while the AtmDirector application is running. The option that you select (On or Off) will not change when the application is terminated.
Note
Analyzing the Log
You can begin to troubleshoot your network and resolve any problems by analyzing the error and debug messages that have been recorded in the logfile of the AtmDirector application. The logfile with the error and debug messages is kept in the $CWSIROOT/log/atmd.log file.
Note
The error and debug messages in the $CWSIROOT/log/atmd.log file are in the following format:
<timestamp> AtmDirector:<severity>:<component>:<message>
Example error and debug messages include the following:
1998/07/29 17:09:15.55 AtmDirector:Info:GUI:Started AtmDirector Initialization...
1998/07/29 17:09:15.56 AtmDirector:Debug:Topology:Running in Debug All mode.
1998/07/29 17:09:17.08 AtmDirector:Debug:ORB:EVENTCHANNEL CONNECTED...
1998/07/29 17:09:30.37 AtmDirector:Info:GUI:Finished AtmDirector Initialization.
Checking the Status of Devices and Links
The AtmDirector application monitors devices and links at defined intervals and shows their status on the topology map by changing the colors of the affected device icons and indicating the status of the links.
You can redefine the intervals by changing the SNMP polling. The polling parameters (Timeout, Retries, Data Collection Polling Interval, and Utilization Polling Interval) are displayed in the Global Preferences window.
The Timeout parameter default is 5 seconds. If the polling process does not receive a response from a device in the time specified, the device is considered unreachable.
The Retries parameter default is three attempts. If the discovery process cannot reach a device in the specified number of attempts, the device is considered unreachable.
The Data Collection Polling Interval parameter default is 30 minutes. This polling interval is used by RMON.
The Utilization Polling Interval parameter default is 10 seconds. This polling interval is used for the utilization calculations in the VC list.
Checking ATM Networks
You can troubleshoot your ATM network or monitor the traffic and usage of its virtual channels (VCs) by using specific reports and graphical displays provided by the AtmDirector application. Refer to the following sections of online AtmDirector manual, located at http://cio.cisco.com/univercd/cc/td/doc/product/rtrmgmt/cw2000/camp_mgr/cwsi_2x/c2si_2_2/atmd_c/vcs.htm#xtocid2851315 for the information that you need:
•
•
•
•
•
•
•
•
•
•
•
•
•
•
•
Checking ATM-VLAN Networks
You can troubleshoot your ATM-VLAN network by monitoring its LANE components and virtual channels, and by using specific reports and graphical displays provided by the AtmDirector application. Refer to the following sections of online AtmDirector manual, located at http://cio.cisco.com/unviercd/cc/td/doc/product/rtrmgmt/cw2000/camp_mgr/cwsi_2x/cwsi_2_2/atmd_c/lanetopo.htm for the information that you need:
•
•
•
•
•
•
•
•
•
•
•
•
•
•
•
Checking PNNI Networks
You can use the AtmDirector application to troubleshoot your PNNI network by checking the node configurations (including the PNNI timers), monitoring the link status of neighboring peers and PNNI addresses, and tuning the PNNI parameters. Refer to the following sections of online AtmDirector manual, located at the following web addresses, for the information you need:
http://cio.cisco.com/unviercd/cc/td/doc/product/rtrmgmt/cw2000/camp_mgr/cwsi_2x/cwsi_2_2/atmd_c/pnnicfg.htm
http://cio.cisco.com/unviercd/cc/td/doc/product/rtrmgmt/cw2000/camp_mgr/cwsi_2x/cwsi_2_2/atmd_c/pnniaddr.htm
http://cio.cisco.com/unviercd/cc/td/doc/product/rtrmgmt/cw2000/camp_mgr/cwsi_2x/cwsi_2_2/atmd_c/pnnimgmt.htm
•
•
•
•
•
•
•
•
•
•
•
•
•
•
•
•
•
•
Collecting Data for Troubleshooting
The AtmDirector application has some features that require you to enable data collection for troubleshooting purposes. The collected data is used to help you perform the following tasks:
•
•
•
Refer to the following sections of online AtmDirector manual, located at http://cio/cisco/com/univercd/cc/td/doc/product/rtrmgmt/cw2000/camp_mgr/cwsi_2x/cwsi_2_2/atmd_c/enable2.htm#xtocid56365 for the information that you need to collect data:
•
•
•
•
•
•
•
•
Problem Solving
Table 24-12 displays problems that you might encounter while using the AtmDirector application and provides probable causes and possible solutions.
Troubleshooting TrafficDirector
In some cases, the TrafficDirector environment does not work as you would expect. This subsection includes tips for troubleshooting your TrafficDirector environment. It explains the following:
•
•
•
Ensuring Access to SwitchProbe Devices
Because the operations personnel who set up and configured your SwitchProbe devices may be different than the TrafficDirector administrator, a quick review of the implications of configuration settings at the SwitchProbe device can help you isolate possible problems.
Before the TrafficDirector application can access SwitchProbe data, the parameters must be properly set using the SwitchProbe agent configuration utility, including those special parameters required for tracking Frame Relay, ATM, and WAN statistics.
For more information, see the following sections:
•
•
•
•
Note
Before the TrafficDirector application can access the proper data required in the VLAN Monitor or ART Monitor applications, you must verify that the VLAN option is enabled at the SwitchProbe device or Network Analysis Module to support VLAN Monitor, and that the ARTMIB option is enabled at the device to support ART Monitor.
NetFlow and Resource Monitor Options—SwitchProbe Devices
Before the TrafficDirector application can reflect NetFlow and Resource Monitor activity, verify that the NetFlow option is enabled at the SwitchProbe device to support viewing of proxy SNMP and round-trip delay data (with Resource Manager only) and NetFlow statistics.
NetFlow Option—Network Analysis Module
Before the TrafficDirector application can support viewing of NetFlow statistics on the Network Analysis Module, you must verify that the NetFlow option is enabled on the device.
SwitchProbe and Network Analysis Module Security
To ensure that the TrafficDirector administrator has access privileges to the local console on the SwitchProbe device using the TrafficDirector Remote Login application, you must grant the optional administrative privileges (read and write access) to the TrafficDirector administrator.
User access privileges, if set at the SwitchProbe device, allow you to view the console settings but not to edit them. This user-level security setting is useful if you have multiple sites where operations personnel may be asked to track down but not necessarily fix a SwitchProbe agent problem.
If you do not know the administrative password at the SwitchProbe device and one is set, you cannot use the Remote Login application. These SwitchProbe security features are independent of the security options that you can enable for access to TrafficDirector administrator applications.
The following section contains more information.
Properties File Installation
To ensure that properties files can be reinstalled automatically when SwitchProbe devices are rebooted, follow these steps:
Step 1
Step 2
Step 3
If these conditions are met, you do not need to manually reinstall the properties files through the Configuration Manager.
Network Access to SwitchProbe Devices
To test for network connectivity to the SwitchProbe device, use the Test Agents application. The test agent tool indicates whether an agent is operational and what options are supported, and it indicates the general health of the device's UDP/IP connection.
For more information about agent configuration issues, see the Cisco SwitchProbe Installation and Configuration Guide.
Testing Agents, Switches, and Frame Relay Agents
Note
Step 1
Step 2
•
•
If the agent is operational, the Agent Test window opens (see Figure 24-3).
Figure 24-3 Agent Test Window
Interpreting Test Agent Messages
When a test is successful, the information in Table 24-13 is displayed. When you have finished viewing the information, click OK to close the Agent Test window.
Interpreting Switch Agent Test Messages
The test information that is generated when communicating with a switch is slightly different from the information generated when you test an agent.
When you test a switch, the TrafficDirector software queries the switch and informs you if the query passed or failed. Figure 24-4 shows the Switch Test window.
Figure 24-4 Switch Test Window
When a test is successful, the information in Table 24-14 is displayed.
You receive the same message as an agent or Frame Relay agent, if the test failed.
Troubleshooting CiscoView
This subsection provides the following information on how to troubleshoot any problems that you might encounter when using CiscoView application and how to identify device problems using CiscoView.
The Cvinstall.cshrc and the Cvinstall.sh Files and System Performance Issue
The CVinstall.cshrc and the CVinstall.sh files automatically set all environmental variables required for CiscoView. If there are errors starting CiscoView, source one of these files.
CiscoView opens each device in a separate window, by default. On large networks, this can consume too much RAM and slow performance. To decrease RAM use, you can open devices in the same window by changing operating characteristics. Select Options; Properties. Choose Same Window in the Launch CiscoView In option.
Also, multiple sessions of CiscoView might degrade system performance because of the use of X resources. Reduce the number of sessions running on an X server by selecting the option Same Window in Options; Properties. This causes successive invocations of CiscoView on an X server to reuse a single session.
Fixing Display Problems
If CiscoView fails to display a device, the following message appears:
"<hostname>: unmanageable"
This message suggests one of the following conditions:
•
–
•
–
•
–
•
–
•
–
•
•
•
•
For the previous conditions, check whether the device package supports the IOS version of the device under consideration. Upgrade the IOS/switch version.
•
–
There are two possible reasons why the device package may roll back:
A package was installed without the requisite installation of a dependent device package. For example, the 3600 package needs to be installed before installation of the AS5800, and the CPW1420.pkg requires installation of the Cat2820.
Note
The device package's installation did not pass the static check utility. Contact the Cisco TAC with the following file: $NMSROOT/CVinstall.log.
–
Identifying Device Problems (Dashboard Monitor)
Perform any of the following tasks in CiscoView to isolate the cause of a problem:
•
•
•
•
•
Interpreting SNMP Error Messages
CiscoView displays the following SNMP error messages, shown in Table 24-15, resulting from failed command requests in the status bar message area:
Before Calling Cisco Systems' TAC Team
Before calling Cisco Systems's Technical Assistance Center (TAC), make sure that you have read through this chapter and completed the actions suggested for your system or application's problem.
Additionally, do the following and document the results so that we can better assist you. Please be prepared to provide the following information:
•
•
•
•
•
What the exact error message is, and a description of the problem behavior or the error message text
•
•
•
Additional Sources
The following books have information in both hard-copy and online copy on CCO:
•
•
•
•
•
•
•
•
•
•
•
•
•
•
•