소개
이 문서에서는 ISE(Identity Services Engine)에서 리포지토리를 구성하는 방법에 대해 설명합니다.
사전 요구 사항
요구 사항
다음 주제에 대한 지식을 보유하고 있으면 유용합니다.
- ISE(Identity Services Engine)에 대한 기본 지식
- FTP(File Transfer Protocol) 서버 및 SFTP(SSH File Transfer Protocol) 서버에 대한 기본 지식
사용되는 구성 요소
이 문서의 정보는 다음 소프트웨어 및 하드웨어 버전을 기반으로 합니다.
- Cisco Identity Service Engine 버전 2.x
- 작동하는 FTP 서버 및 SFTP 서버
이 문서의 정보는 특정 랩 환경의 디바이스를 토대로 작성되었습니다. 이 문서에 사용된 모든 디바이스는 초기화된(기본) 컨피그레이션으로 시작되었습니다. 현재 네트워크가 작동 중인 경우 모든 명령의 잠재적인 영향을 미리 숙지하시기 바랍니다.
배경 정보
Cisco에서는 관리 포털을 통해 리포지토리를 생성하고 삭제할 수 있습니다. 다음과 같은 유형의 저장소를 생성할 수 있습니다.
- 디스크
- FTP
- SFTP
- NFS
- CD-롬
- HTTP
- HTTPS
참고: 소규모 구축의 경우 10GB(엔드포인트 100개 이하), 중간 규모 구축의 경우 100GB, 대규모 구축의 경우 200GB의 저장소 크기를 사용하는 것이 좋습니다.
ISE 리포지토리는 ISE의 GUI 및 CLI에서 구성할 수 있으며 다음 용도로 사용할 수 있습니다.
- ISE 컨피그레이션 및 운영 데이터의 백업 및 복원
- ISE 노드 업그레이드
- 패치 설치
- ISE에서 데이터(보고서) 내보내기
- ISE 노드에서 지원 번들 내보내기
참고: ISE 노드의 CLI에서 구성된 리포지토리는 각 노드에 로컬이며 노드를 다시 로드할 때 제거됩니다. ISE의 GUI에서 구성된 리포지토리는 구축의 모든 노드에 복제되며 노드를 다시 로드할 때 제거되지 않습니다.
설정
FTP 저장소 구성
GUI에서 FTP 저장소 구성
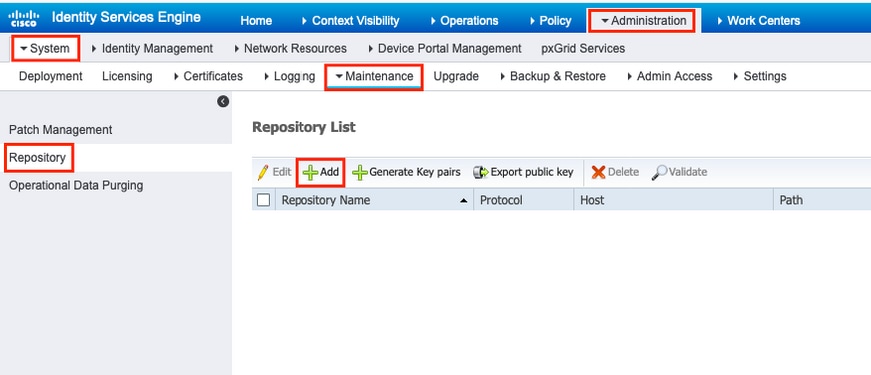
1단계. ISE에서 저장소를 구성하려면 ISE GUI에 로그인하여 Administration > System > Maintenance > Repository. 그런 다음 Add에 나와 있는 것처럼.
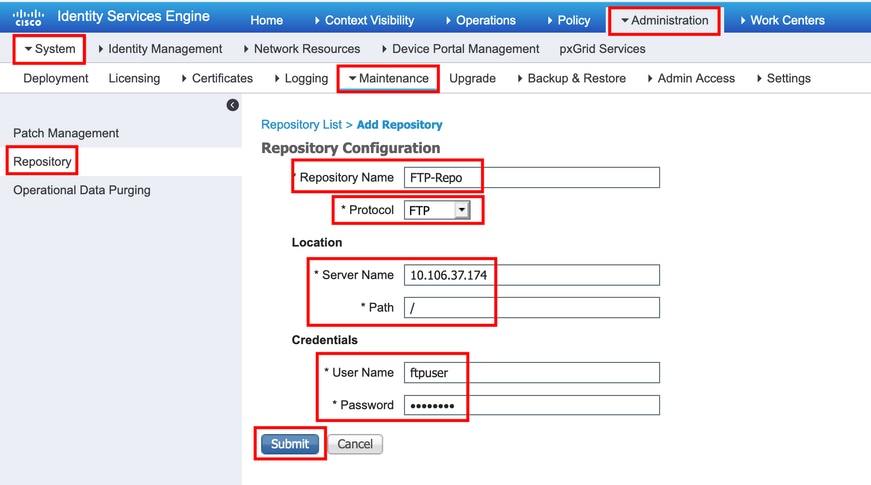
2단계. 제공 Repository Name 선택 FTP 프로토콜로 지정합니다. 그런 다음 Server Name, Path, User Name및 Password을 클릭하고 Submit에 나와 있는 것처럼.
CLI에서 FTP 저장소 구성
SSH를 통해 ISE 노드의 CLI에 로그인하고 다음 명령을 실행합니다.
ise/admin#
ise/admin# configure terminal
Enter configuration commands, one per line. End with CNTL/Z.
ise/admin(config)# repository FTP-Repo
ise/admin(config-Repository)# url ftp://10.106.37.174/

ise/adminconfig-Repository)# user <Username> password plain <Password>
ise/admin(config-Repository)# exit
ise/admin(config)# exit
ise/admin#
SFTP 저장소 구성
GUI에서 SFTP 저장소 구성
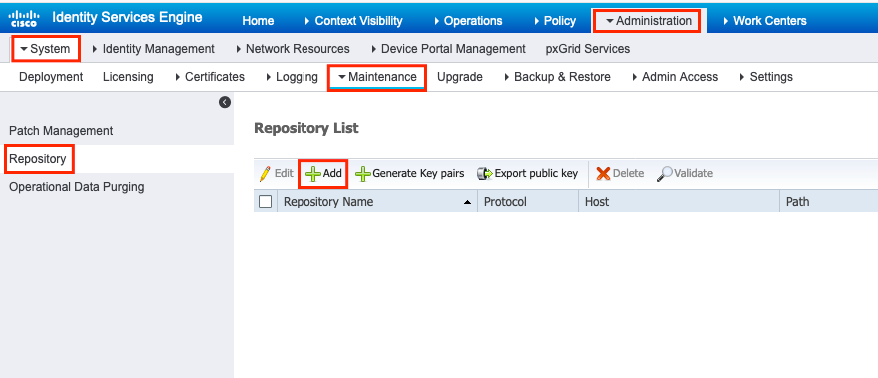
1단계. ISE에서 저장소를 구성하려면 ISE GUI에 로그인하여 Administration > System > Maintenance > Repository. 그런 다음 Add에 나와 있는 것처럼.
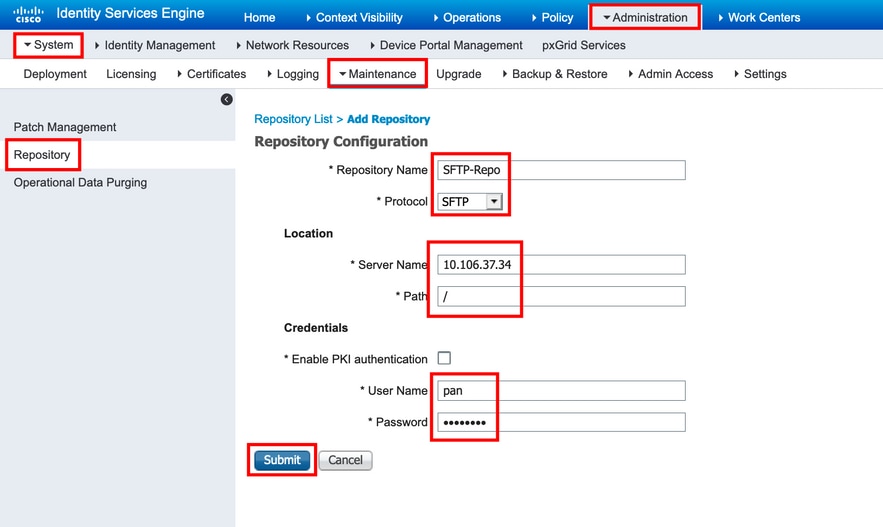
2단계. 제공 Repository Name 선택 SFTP 프로토콜로 지정합니다. 그런 다음 Server Name, Path, User Name및 Password을 클릭하고 Submit에 나와 있는 것처럼.
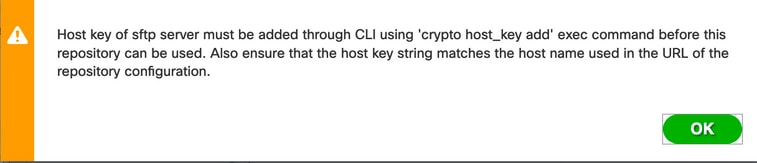
3단계. After you c핥기 Submit,a 팝업 메시지가 나타납니다. 이미지에 표시된 대로 CLI를 사용하여 SFTP 서버의 호스트 키를 추가하라는 메시지가 표시됩니다.
4단계. SSH를 통해 ISE 노드의 CLI에 로그인하고 명령을 사용합니다 crypto host_key add host <ip address of the server> 호스트 키를 추가합니다.
ise/admin# crypto host_key add host 10.106.37.34
host key fingerprint added
Operating in CiscoSSL FIPS mode

# Host 10.106.37.34 found: line 1
10.106.37.34 RSA SHA256:exFnNITDhafaNPFr35x6kC1pR0iTP6xS+LBmtIXPfnk
ise/admin#
CLI에서 SFTP 리포지토리 구성
SSH를 통해 ISE 노드의 CLI에 로그인하고 다음 명령을 실행합니다.
ise/admin#

ise/admin# configure terminal
Enter configuration commands, one per line. End with CNTL/Z.
ise/admin(config)# repository SFTP-Repo
ise/admin(config-Repository)# url sftp://10.106.37.34/

ise/adminconfig-Repository)# user <Username> password plain <Password>
ise/admin(config-Repository)# exit
ise/admin(config)# exit
ise/admin#
NFS 저장소 구성
GUI에서 NFS 저장소 구성
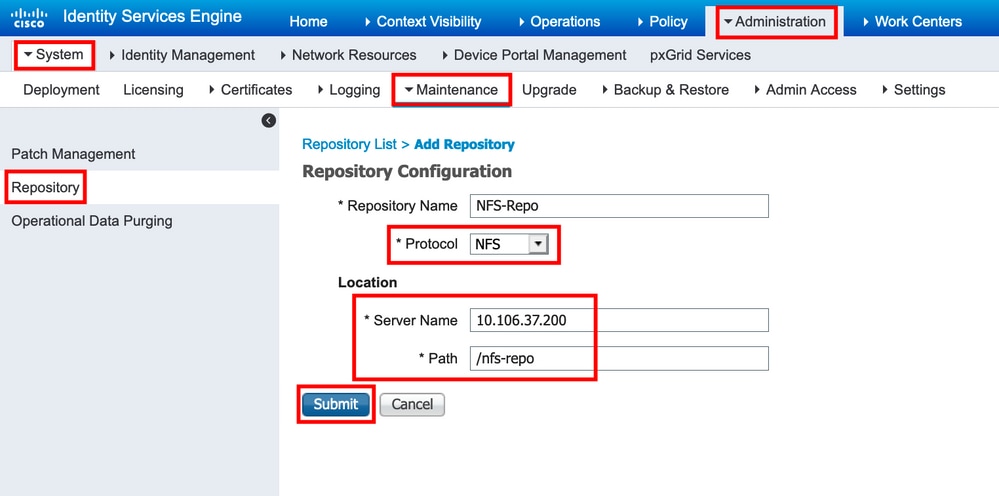
1단계. ISE에서 저장소를 구성하려면 ISE GUI에 로그인하여 Administration > System > Maintenance > Repository. 그런 다음 이미지에 표시된 대로 Add(추가)를 클릭합니다.

2단계. 제공 Repository Name 선택 NFS 프로토콜로 지정합니다. 그런 다음 Server Name 및 Path을 클릭하고 Submit에 나와 있는 것처럼.
CLI에서 NFS 저장소 구성
SSH를 통해 ISE 노드의 CLI에 로그인하고 다음 명령을 실행합니다.
ise/admin#

ise/admin# configure terminal
Enter configuration commands, one per line. End with CNTL/Z.
ise/admin(config)# repository NFS-Repo
ise/admin(config-Repository)#  url nfs://10.106.37.200:/nfs-repo
ise/admin(config-Repository)# exit
ise/admin(config)# exit
ise/admin#
ISE 로컬 저장소 구성
GUI에서 로컬 저장소 구성
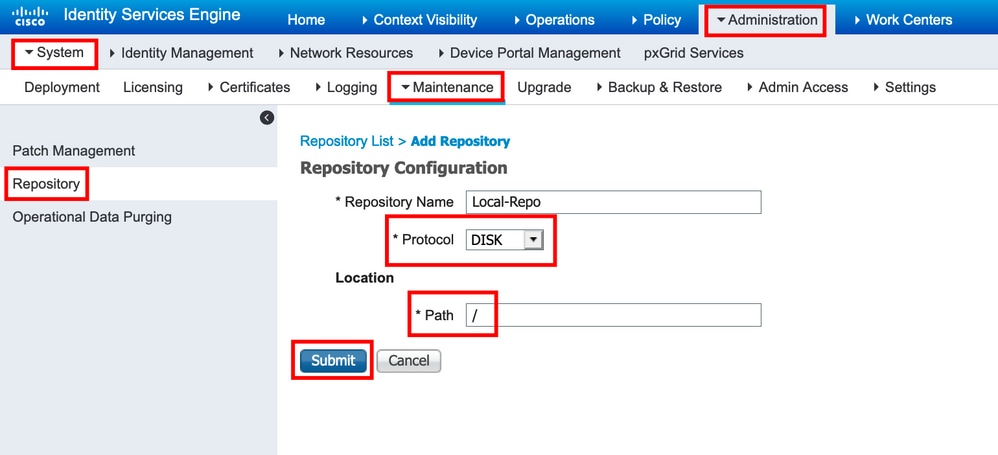
1단계. ISE에서 저장소를 구성하려면 ISE GUI에 로그인하여 Administration > System > Maintenance > Repository. 그런 다음 Add에 나와 있는 것처럼.

2단계. 제공 Repository Name 선택 DISK 프로토콜로 지정합니다. 그런 다음 Path 을 클릭하고 Submit에 나와 있는 것처럼.
CLI에서 로컬 저장소 구성
SSH를 통해 ISE 노드의 CLI에 로그인하고 다음 명령을 실행합니다.
ise/admin#

ise/admin# configure terminal
Enter configuration commands, one per line. End with CNTL/Z.
ise/admin(config)# repository Local-Repo
ise/admin(config-Repository)# url disk:/
ise/admin(config-Repository)# exit
ise/admin(config)# exit
ise/admin#
참고: 로컬 저장소는 ISE 디스크에 데이터를 로컬로 저장합니다.
다음을 확인합니다.
ISE 서버의 GUI 및 CLI에서 리포지토리를 확인할 수 있습니다.
GUI로 확인
GUI를 사용하여 리포지토리를 검증하려면 Administration > System > Maintenance > Repository, 리포지토리를 선택하고 Validate에 나와 있는 것처럼.
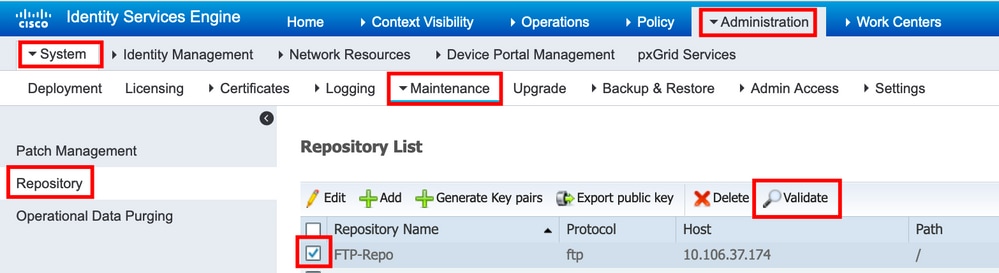
다음을 클릭한 후 Validate을(를) 통해 Repository validated successfully 그림과 같이 GUI에서 응답합니다.

CLI로 확인
CLI에서 리포지토리를 검증하려면 SSH를 통해 ISE 노드에 로그인하고 명령을 실행합니다 show repository <name of the repository>. 명령의 출력에는 저장소에 있는 파일이 나열됩니다.
ise/admin#
ise/admin# show repository FTP-Repo
Config-Backup-CFG10-200307-1043.tar.gpg
ise/admin#
문제 해결
ISE의 리포지토리를 디버깅하려면 다음 디버그를 사용합니다.
ise-1/pan# debug copy 7
ise-1/pan# debug transfer 7
ise-1/pan#
ise-1/pan# 6 [25683]:[info] transfer: cars_xfer.c[220] [system]: ftp dir of repository FTP-Repo requested
7 [25683]:[debug] transfer: cars_xfer_util.c[2017] [system]: ftp get dir for repos FTP-Repo
7 [25683]:[debug] transfer: cars_xfer_util.c[2029] [system]: initializing curl
7 [25683]:[debug] transfer: cars_xfer_util.c[2040] [system]: full url is ftp://10.106.37.174/ISE/
7 [25683]:[debug] transfer: cars_xfer_util.c[1928] [system]: initializing curl
7 [25683]:[debug] transfer: cars_xfer_util.c[1941] [system]: full url is ftp://10.106.37.174/ISE/Config-Backup-CFG10-200307-1043.tar.gpg
7 [25683]:[debug] transfer: cars_xfer_util.c[1962] [system]: res: 0
7 [25683]:[debug] transfer: cars_xfer_util.c[1966] [system]: res: 0-----filetime Config-Backup-CFG10-200307-1043.tar.gpg: Sat Mar  7 10:55:39 2020
7 [25683]:[debug] transfer: cars_xfer_util.c[1972] [system]: filetime Config-Backup-CFG10-200307-1043.tar.gpg: Sat Mar  7 10:55:39 2020
7 [25683]:[debug] transfer: cars_xfer_util.c[1976] [system]: filesize Config-Backup-CFG10-200307-1043.tar.gpg: 181943580 bytes
6 [25683]:[info] transfer: cars_xfer.c[130] [system]: ftp copy out of /opt/backup/backup-Config-Backup-1587433372/Config-Backup-CFG10-200421-0712.tar.gpg requested
6 [25683]:[info] transfer: cars_xfer_util.c[787] [system]: curl version: libcurl/7.29.0 OpenSSL/1.0.2s zlib/1.2.7 libidn/1.28 libssh2/1.4.2
7 [25683]:[debug] transfer: cars_xfer_util.c[799] [system]: full url is ftp://10.106.37.174/ISE/Config-Backup-CFG10-200421-0712.tar.gpg
디버깅은 다음 그림과 같이 비활성화됩니다.
ise-1/pan#
ise-1/pan# no debug copy 7
ise-1/pan# no debug transfer 7
ise-1/pan#
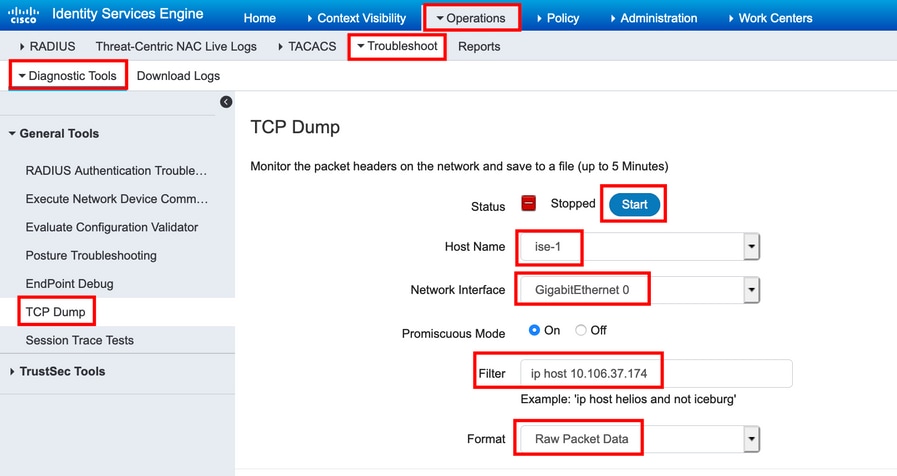
ISE와 구성된 리포지토리 서버 간에 적절한 통신이 이루어지도록 하려면 ISE GUI에서 패킷 캡처를 설정합니다.
- Operations(운영) > Troubleshoot(문제 해결) > Diagnostic tools(진단 도구) > TCP Dump(TCP 덤프)로 이동합니다.
- Filter(필터)에 적절한 값을 입력하고 Format(형식)을 선택합니다.
- Start(시작)를 클릭합니다.
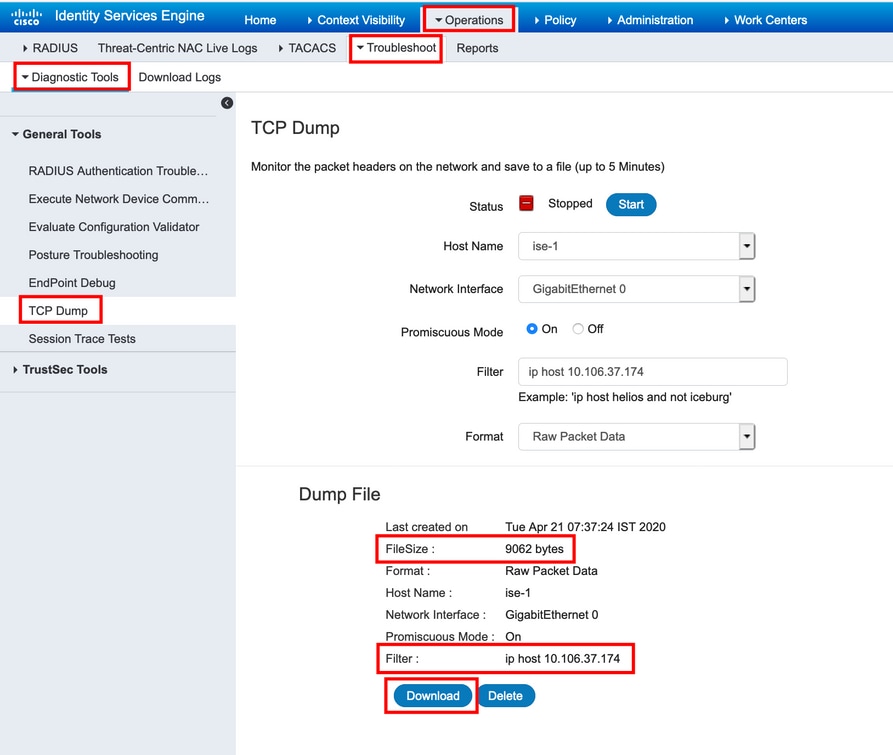
테스트해야 하는 저장소에 대한 일부 트래픽을 트리거하려면 Administration > System > Maintenance > Repository, 리포지토리를 선택하고 Validate. 다음으로 이동 Operations > Troubleshoot > Diagnostic tools > TCP Dump, 클릭 Stop에 나와 있는 대로 패킷 캡처를 다운로드합니다.
 피드백
피드백