Cisco Aironet 802.11a/b/g Wireless LAN Client Adapters (CB21AG and PI21AG) Administration Utility Administrator Guide (ACAU), Release 2.0
Bias-Free Language
The documentation set for this product strives to use bias-free language. For the purposes of this documentation set, bias-free is defined as language that does not imply discrimination based on age, disability, gender, racial identity, ethnic identity, sexual orientation, socioeconomic status, and intersectionality. Exceptions may be present in the documentation due to language that is hardcoded in the user interfaces of the product software, language used based on RFP documentation, or language that is used by a referenced third-party product. Learn more about how Cisco is using Inclusive Language.
- Updated:
- June 29, 2007
Chapter: Chapter 2 - Using the ACAU
Using the ACAU
This chapter describes how to use the ACAU. The following topics are discussed in the chapter.
•![]() Creating a New Configuration File
Creating a New Configuration File
•![]() Modifying an Existing Configuration or Profile
Modifying an Existing Configuration or Profile
•![]() Importing and Exporting Profiles
Importing and Exporting Profiles
•![]() Including a Profile in Auto Profile Selection
Including a Profile in Auto Profile Selection
•![]() Retrieving a File From the Registry
Retrieving a File From the Registry
Creating a New Configuration File
The configuration file is the file you create that provides installation and profile information the install wizard uses to control the installation of the utilities, driver, firmware, and profiles for the CB21AG PC-Cardbus and PI21AG PCI adapters. You create a new configuration by opening ACAU and selecting New from the File drop-down menu. The file contains two parts: global settings and profiles. Global settings are administrative parameters that determine how the ADU is installed on a user's computer. You can override the default parameters using the Global Settings tab. You create and configure the user's profiles using the Profile Management tab. The Profile Management tab enables you to name the profile and determine its general, security, and advanced characteristics. Both parts are saved in the configuration file, ciscoadminconfig.dat.
Follow these steps to create a new ciscoadminconfig.dat file:
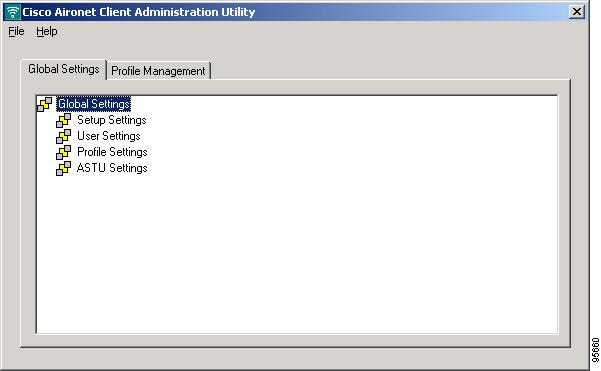
Step 1 ![]() Open ACAU. The Cisco Aironet Client Administration Utility window appears (Figure 2-1).
Open ACAU. The Cisco Aironet Client Administration Utility window appears (Figure 2-1).
Figure 2-1 Cisco Aironet Client Administration Window
Step 2 ![]() From the File drop-down menu, click New. ACAU names the file New and displays it in the window title bar inside brackets.
From the File drop-down menu, click New. ACAU names the file New and displays it in the window title bar inside brackets.
Step 3 ![]() Expand the Global Settings components and make any changes to the parameters within them.
Expand the Global Settings components and make any changes to the parameters within them.
•![]() For detailed information about setup settings, go to the "Configuring Setup Settings" section.
For detailed information about setup settings, go to the "Configuring Setup Settings" section.
•![]() For detailed information about user settings, go to the "Configuring User Privileges" section.
For detailed information about user settings, go to the "Configuring User Privileges" section.
•![]() For detailed information about profile settings, go to the "Configuring Profile Settings" section.
For detailed information about profile settings, go to the "Configuring Profile Settings" section.
•![]() For detailed information about ASTU settings, go to the "Configuring ASTU Settings" section.
For detailed information about ASTU settings, go to the "Configuring ASTU Settings" section.
Step 4 ![]() Click the Profile Management tab to access the profile components and parameters. The Profile Manager window appears (Figure 2-2).
Click the Profile Management tab to access the profile components and parameters. The Profile Manager window appears (Figure 2-2).
Figure 2-2 Profile Management Window

Step 5 ![]() Click New. The Profile Editor General window appears (Figure 2-3).
Click New. The Profile Editor General window appears (Figure 2-3).
Figure 2-3 Profile Editor General Window
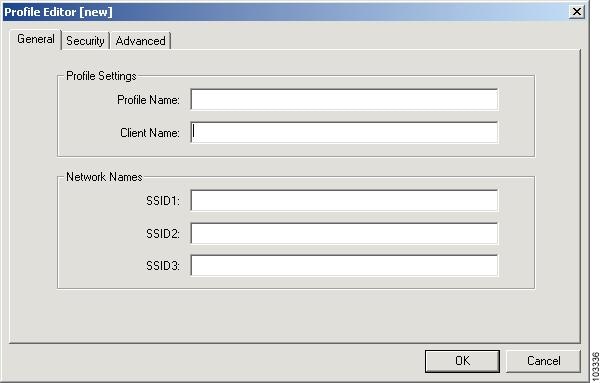
Step 6 ![]() Enter a profile name and SSID(s).
Enter a profile name and SSID(s).
•![]() For detailed information about the General settings page, go to the "Setting General Parameters" section.
For detailed information about the General settings page, go to the "Setting General Parameters" section.
Step 7 ![]() Click the Advanced tab to open the Advanced Settings page.
Click the Advanced tab to open the Advanced Settings page.
•![]() For detailed information about advanced settings, go to the "Setting Advanced Parameters" section.
For detailed information about advanced settings, go to the "Setting Advanced Parameters" section.
Step 8 ![]() Click the Security tab to access the security settings.
Click the Security tab to access the security settings.
•![]() For detailed information about security settings, go to the "Setting Security Parameters" section.
For detailed information about security settings, go to the "Setting Security Parameters" section.

Note ![]() Repeat steps 5 through 8 to create additional profiles. You can create up to 16 profiles.
Repeat steps 5 through 8 to create additional profiles. You can create up to 16 profiles.
Step 9 ![]() Save the configuration file.
Save the configuration file.
Note ![]() When you use ACAU for the first time and save the file using the Save option in the File drop-down menu, ACAU automatically names the file ciscoadminconfig.dat and prompts you to save it in the Cisco Aironet folder.
When you use ACAU for the first time and save the file using the Save option in the File drop-down menu, ACAU automatically names the file ciscoadminconfig.dat and prompts you to save it in the Cisco Aironet folder.
Note ![]() The configuration file you created must reside in the location on the user's computer in which the client's install wizard (setup.exe) resides. If the file is saved to any other location it is not processed by the install wizard.
The configuration file you created must reside in the location on the user's computer in which the client's install wizard (setup.exe) resides. If the file is saved to any other location it is not processed by the install wizard.
Note ![]() After you have saved the file the first time, subsequent saves automatically overwrite the existing file to the path and directory you specified when you saved it the first time. To change either the filename or the path, you must use the Save As command.
After you have saved the file the first time, subsequent saves automatically overwrite the existing file to the path and directory you specified when you saved it the first time. To change either the filename or the path, you must use the Save As command.
Modifying an Existing Configuration or Profile
You can modify an existing configuration file or profile. Follow these steps:
Step 1 ![]() Open ACAU.
Open ACAU.
Step 2 ![]() From the File drop-down menu, click Open.
From the File drop-down menu, click Open.
Step 3 ![]() Open the ciscoadminconfig.dat file.
Open the ciscoadminconfig.dat file.
Step 4 ![]() Modify the global or profile settings.
Modify the global or profile settings.
Step 5 ![]() Save the file.
Save the file.
Note ![]() You can use the Save or Save As command to save the configuration file. If the file already exists and you use the Save As command, ACAU prompts whether or not you want to replace it.
You can use the Save or Save As command to save the configuration file. If the file already exists and you use the Save As command, ACAU prompts whether or not you want to replace it.
Note ![]() If you close ACAU without saving any changes you made, ACAU informs you that the file has changed and asks you whether or not you want to save the changes. You must select either Yes or No before ACAU can close.
If you close ACAU without saving any changes you made, ACAU informs you that the file has changed and asks you whether or not you want to save the changes. You must select either Yes or No before ACAU can close.
Removing a Profile
Follow these steps to remove a profile from your configuration file.
Step 1 ![]() Open ACAU.
Open ACAU.
Step 2 ![]() Retrieve the ciscoadminconfig.dat file.
Retrieve the ciscoadminconfig.dat file.
Step 3 ![]() Click the Profile Management tab. The Profile Management window appears.
Click the Profile Management tab. The Profile Management window appears.
Step 4 ![]() In the profiles list, highlight the profile that you want to remove.
In the profiles list, highlight the profile that you want to remove.
Step 5 ![]() Click Remove. The profile is removed.
Click Remove. The profile is removed.
Step 6 ![]() In the File drop-down menu, click Save or Save As to save the modified configuration file.
In the File drop-down menu, click Save or Save As to save the modified configuration file.
Importing and Exporting Profiles
You may want to use the import/export feature for the following reasons:
•![]() To export one or more profiles and use them to set up additional configuration files
To export one or more profiles and use them to set up additional configuration files
•![]() To export profiles and import them directly into the ADU
To export profiles and import them directly into the ADU
•![]() To import a profile created and exported from the ADU and use it in a configuration file
To import a profile created and exported from the ADU and use it in a configuration file
Follow the steps in the corresponding section below to import or export profiles.
Importing a Profile
Step 1 ![]() If the profile that you want to import is on a floppy disk, insert the disk into your computer's floppy drive.
If the profile that you want to import is on a floppy disk, insert the disk into your computer's floppy drive.
Step 2 ![]() Open ACAU and click the Profile Management tab. The Profile Management window appears.
Open ACAU and click the Profile Management tab. The Profile Management window appears.
Step 3 ![]() Click Import. The Import Profile window appears (see Figure 2-4).
Click Import. The Import Profile window appears (see Figure 2-4).
Figure 2-4 Import Profile Window
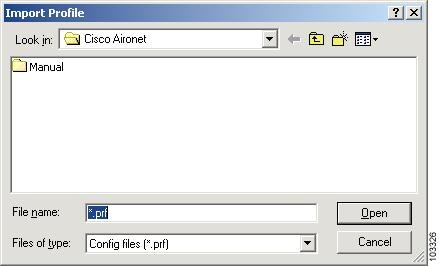
Step 4 ![]() In the Look in drop-down box, find the directory where the profile is located.
In the Look in drop-down box, find the directory where the profile is located.
Step 5 ![]() Click the profile so it appears in the File name box at the bottom of the window.
Click the profile so it appears in the File name box at the bottom of the window.
Step 6 ![]() Click Open. The imported profile appears in the profiles list on the ACAU Profile Management window.
Click Open. The imported profile appears in the profiles list on the ACAU Profile Management window.
Step 7 ![]() Edit the file as necessary.
Edit the file as necessary.
Exporting a Profile
Step 1 ![]() Insert a blank floppy disk into your computer's floppy drive, if you wish to export a profile to a floppy disk. You can also save the profile to any location, either local or network based.
Insert a blank floppy disk into your computer's floppy drive, if you wish to export a profile to a floppy disk. You can also save the profile to any location, either local or network based.
Step 2 ![]() Open ACAU and click the Profile Management tab. The Profile Management window appears.
Open ACAU and click the Profile Management tab. The Profile Management window appears.
Step 3 ![]() In the profiles list, highlight the profile that you want to export.
In the profiles list, highlight the profile that you want to export.
Step 4 ![]() Click Export. The Export Profile window appears (see Figure 2-5).
Click Export. The Export Profile window appears (see Figure 2-5).
Figure 2-5 Export Profile Window

Step 5 ![]() Enter a name for the profile in the File name box.
Enter a name for the profile in the File name box.
Step 6 ![]() Select a different directory (such as your computer's floppy disk drive or a location on the network) from the Save in drop-down box.
Select a different directory (such as your computer's floppy disk drive or a location on the network) from the Save in drop-down box.
Step 7 ![]() Click Save. The profile is exported to the specified location.
Click Save. The profile is exported to the specified location.
Note ![]() If the file already exists and you did not change the name or path of the profile you are exporting, ACAU prompts you whether or not to replace it.
If the file already exists and you did not change the name or path of the profile you are exporting, ACAU prompts you whether or not to replace it.
Including a Profile in Auto Profile Selection
After you have created profiles, you can choose to include them in the profile manager's auto profile selection feature. Then when auto profile selection is enabled, the client adapter automatically selects a profile from the list of profiles that were included in auto profile selection and uses it to establish a connection to the network.
Follow these steps to include profiles in auto profile selection and establish the order in which the profiles will be selected for use.
Step 1 ![]() Open ACAU and click the Profile Management tab. The Profile Management window appears.
Open ACAU and click the Profile Management tab. The Profile Management window appears.
Step 2 ![]() Click Order Profiles. The Auto Profile Selection Management window appears (see Figure 2-6).
Click Order Profiles. The Auto Profile Selection Management window appears (see Figure 2-6).
Figure 2-6 Auto Profile Selection Management Window
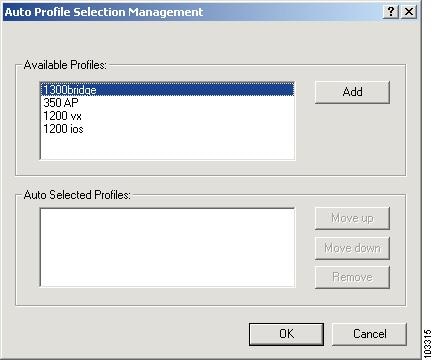
Step 3 ![]() All the profiles you created are listed in the Available Profiles box. Select each one you want to include in auto profile selection and click the Add button. The profiles appear in the Auto Selected Profiles box.
All the profiles you created are listed in the Available Profiles box. Select each one you want to include in auto profile selection and click the Add button. The profiles appear in the Auto Selected Profiles box.
The following rules apply to auto profile selection:
•![]() You must include at least two profiles in the Auto Selected Profiles box.
You must include at least two profiles in the Auto Selected Profiles box.
•![]() The profiles must specify an SSID; otherwise, they do not appear in the Available Profiles box.
The profiles must specify an SSID; otherwise, they do not appear in the Available Profiles box.
•![]() Profiles cannot specify multiple SSIDs; otherwise, they do not appear in the Available Profiles box.
Profiles cannot specify multiple SSIDs; otherwise, they do not appear in the Available Profiles box.
•![]() Each profile that is included in the auto profile selection must have a unique SSID. For Example, if Profile 1 and Profile 2 both have "ABCD" as their SSID, then only Profile 1 or Profile 2 (whichever one was created first) appears in the Available Profiles box and can be included in auto profile selection.
Each profile that is included in the auto profile selection must have a unique SSID. For Example, if Profile 1 and Profile 2 both have "ABCD" as their SSID, then only Profile 1 or Profile 2 (whichever one was created first) appears in the Available Profiles box and can be included in auto profile selection.
Note ![]() If you want to remove a profile from auto profile selection, select the profile in the Auto Selected Profile box and click Remove. The profile is removed from the Auto Selected Profiles box.
If you want to remove a profile from auto profile selection, select the profile in the Auto Selected Profile box and click Remove. The profile is removed from the Auto Selected Profiles box.
Step 4 ![]() Continue to highlight and add profiles as necessary. The Auto Selected Profiles Pane looks similar to Figure 2-7.
Continue to highlight and add profiles as necessary. The Auto Selected Profiles Pane looks similar to Figure 2-7.
Figure 2-7 Profiles Selected

Step 5 ![]() Prioritize the auto selected profiles by highlighting a profile and then selecting Move up or Move down as appropriate.
Prioritize the auto selected profiles by highlighting a profile and then selecting Move up or Move down as appropriate.
Note ![]() You can remove a profile from the list by highlighting it and clicking Remove. The profile is returned to the Available Profiles pane.
You can remove a profile from the list by highlighting it and clicking Remove. The profile is returned to the Available Profiles pane.
Step 6 ![]() The first profile in the Auto Selected Profiles box has the highest priority while the last profile has the lowest priority. To change the order (and priority) of your auto-selected profiles, select the profile that you want to move and click Move up or Move down to move the profile up or down, respectively.
The first profile in the Auto Selected Profiles box has the highest priority while the last profile has the lowest priority. To change the order (and priority) of your auto-selected profiles, select the profile that you want to move and click Move up or Move down to move the profile up or down, respectively.
Step 7 ![]() Click OK to save your selections and return to the Profile Management window.
Click OK to save your selections and return to the Profile Management window.
Step 8 ![]() Select Auto Select Profiles.
Select Auto Select Profiles.
Step 9 ![]() Save the modified configuration file.
Save the modified configuration file.
When Auto Select Profiles is enabled, the client adapter scans for an available network. The profile with the highest priority and the same SSID as the one of the found networks is the one that is used to connect to the network. If the connection fails, the client adapter tries the next highest priority that matches the SSID and so on.
Retrieving a File From the Registry
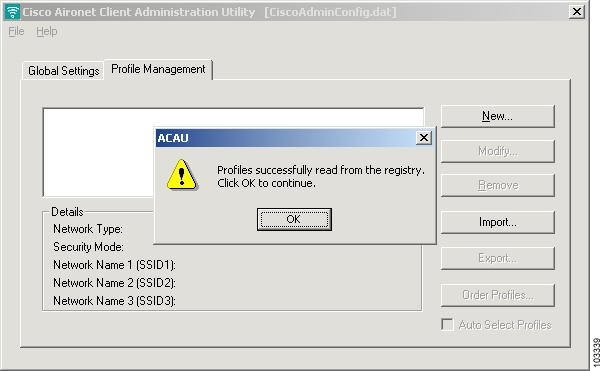
If you created profiles on your PC using a previous version of ACAU or ADU, they are saved in the registry. You can retrieve those profiles using ACAU or ADU by selecting Read from registry from the File drop-down menu. When you select this option, ACAU queries the Windows registry for profiles, reads them into memory, and displays the pop-up message shown in Figure 2-8.
Note ![]() The Read from Registry feature reads profiles that exist in the current installation of the Cisco Aironet Desktop Utility, which may not have been created by this or any other ACAU.
The Read from Registry feature reads profiles that exist in the current installation of the Cisco Aironet Desktop Utility, which may not have been created by this or any other ACAU.
Figure 2-8 ACAU Read from Registry Message
After you click OK, the profiles appear in the Profile Manager field, similar to those shown in Figure 2-9.
Figure 2-9 Profiles Read from the Registry
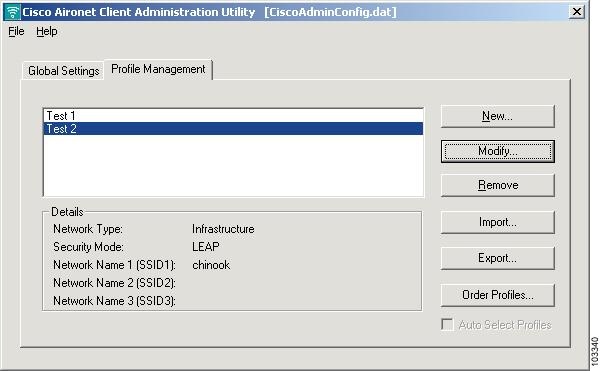
All profiles read from the registry can be edited in ACAU. You can perform any of the following operations:
•![]() Modify
Modify
•![]() Remove
Remove
•![]() Import
Import
•![]() Export
Export
•![]() Order
Order
Profiles read from the registry can be saved to the ciscocdminconfig.dat file by selecting Save or Save As from the File drop-down menu. In either case, you can save the existing configuration file or not. If you choose to save it, ACAU overwrites the file.
 Feedback