- Preface
- Chapter 1 - Product Overview
- Chapter 2 - Preparing for Installation
- Chapter 3 - Installing the Client Adapter
- Chapter 4 - Using the Profile Manager
- Chapter 5 - Configuring the Client Adapter
- Chapter 6 - Using EAP Authentication
- Chapter 7 - Performing Diagnostics
- Chapter 8 - Using the Aironet Client Monitor (ACM)
- Chapter 9 - Routine Procedures
- Chapter 10 - Troubleshooting
- Appendix A - Technical Specifications
- Appendix B - Translated Safety Warnings
- Appendix C - Declarations of Conformity and Regulatory Information
- Appendix D - Channels, Power Levels, and Antenna Gains
- Appendix E - Configuring the Client Adapter through the Windows XP Operating System
- Appendix F - Performing a Site Survey
- Glossary
- Index
Cisco Aironet 340, 350, and CB20A Wireless LAN Client Adapters Installation and Configuration Guide for Windows, OL-1394-07
Bias-Free Language
The documentation set for this product strives to use bias-free language. For the purposes of this documentation set, bias-free is defined as language that does not imply discrimination based on age, disability, gender, racial identity, ethnic identity, sexual orientation, socioeconomic status, and intersectionality. Exceptions may be present in the documentation due to language that is hardcoded in the user interfaces of the product software, language used based on RFP documentation, or language that is used by a referenced third-party product. Learn more about how Cisco is using Inclusive Language.
- Updated:
- May 4, 2007
Chapter: Chapter 9 - Routine Procedures
Routine Procedures
This chapter provides procedures for common tasks related to the client adapter.
The following topics are covered in this chapter:
•![]() Inserting and Removing a Client Adapter
Inserting and Removing a Client Adapter
•![]() Client Adapter Software Procedures
Client Adapter Software Procedures
•![]() Restarting the Client Adapter
Restarting the Client Adapter
•![]() Turning Your Client Adapter's Radio On or Off
Turning Your Client Adapter's Radio On or Off
•![]() Uninstalling the Microsoft Hot Fix
Uninstalling the Microsoft Hot Fix
Inserting and Removing a Client Adapter
This section provides instructions for inserting and removing PC cards, PC-Cardbus cards, and PCI cards. Instructions are not provided for LM cards and mini PCI cards because they are pre-installed inside computing devices and are not meant to be installed or removed by the user.

Inserting a Client Adapter
Follow the instructions in one of the sections below to insert a PC card, PC-Cardbus card, or PCI card into a computing device.
Inserting a PC Card or PC-Cardbus Card
Step 1 ![]() Before you begin, examine the card. One end has a dual-row, 68-pin connector. The card is keyed so it can be inserted only one way into the PC card slot or Cardbus slot.
Before you begin, examine the card. One end has a dual-row, 68-pin connector. The card is keyed so it can be inserted only one way into the PC card slot or Cardbus slot.

Note ![]() The PC card slot or Cardbus slot is on the left or right side of the computer, depending on the model.
The PC card slot or Cardbus slot is on the left or right side of the computer, depending on the model.
Step 2 ![]() Perform one of the following:
Perform one of the following:
•![]() Turn on your computer, let the operating system boot up completely, and follow the remaining steps in this section to insert the card.
Turn on your computer, let the operating system boot up completely, and follow the remaining steps in this section to insert the card.
•![]() Turn off your computer, follow the remaining steps in this section to insert the card, and reboot your computer.
Turn off your computer, follow the remaining steps in this section to insert the card, and reboot your computer.
Step 3 ![]() Hold the card with the Cisco logo facing up and insert it into the PC card slot or Cardbus slot, applying just enough pressure to make sure it is fully seated (see Figure 9-1).
Hold the card with the Cisco logo facing up and insert it into the PC card slot or Cardbus slot, applying just enough pressure to make sure it is fully seated (see Figure 9-1).
Figure 9-1
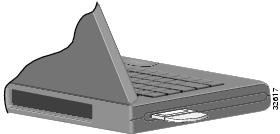
Inserting a PC Card or PC-Cardbus Card into a Computing Device
Note ![]() The profiles for PC-Cardbus cards are tied to the slot in which the card is inserted. Therefore, you must always insert your PC-Cardbus card into the same slot or create profiles for both slots.
The profiles for PC-Cardbus cards are tied to the slot in which the card is inserted. Therefore, you must always insert your PC-Cardbus card into the same slot or create profiles for both slots.
Inserting a PCI Card
Step 1 ![]() Turn off the PC and all its components.
Turn off the PC and all its components.
Step 2 ![]() Remove the computer cover.
Remove the computer cover.
Note ![]() On most Pentium PCs, PCI expansion slots are white. Refer to your PC documentation for slot identification.
On most Pentium PCs, PCI expansion slots are white. Refer to your PC documentation for slot identification.
Step 3 ![]() Remove the screw from the top of the CPU back panel above an empty PCI expansion slot. This screw holds the metal bracket on the back panel.
Remove the screw from the top of the CPU back panel above an empty PCI expansion slot. This screw holds the metal bracket on the back panel.
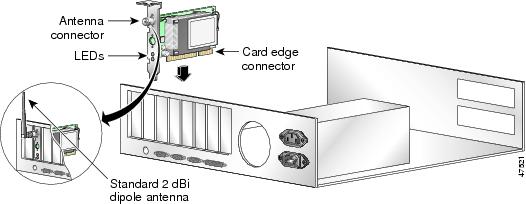
Step 4 ![]() Examine the PCI card. The antenna connector and the LEDs face out of your computer and are visible when you put the cover back on. The bottom edge of the card is the connector you will insert into an empty expansion slot in your computer. See Figure 9-2.
Examine the PCI card. The antenna connector and the LEDs face out of your computer and are visible when you put the cover back on. The bottom edge of the card is the connector you will insert into an empty expansion slot in your computer. See Figure 9-2.
Figure 9-2 Inserting a PCI Card into a PC
Step 5 ![]() Tilt the card to allow the antenna connector and LEDs to slip through the opening in the CPU back panel.
Tilt the card to allow the antenna connector and LEDs to slip through the opening in the CPU back panel.
Step 6 ![]() Press the card into the empty slot until the connector is firmly seated.
Press the card into the empty slot until the connector is firmly seated.
Step 7 ![]() Reinstall the screw on the CPU back panel and replace the computer cover.
Reinstall the screw on the CPU back panel and replace the computer cover.
Step 8 ![]() Attach the 2-dBi antenna to the card's antenna connector until it is finger-tight. Do not overtighten.
Attach the 2-dBi antenna to the card's antenna connector until it is finger-tight. Do not overtighten.
Step 9 ![]() For optimal reception, position the antenna so it is straight up.
For optimal reception, position the antenna so it is straight up.
Step 10 ![]() Boot up your PC.
Boot up your PC.
Removing a Client Adapter
Follow the instructions in one of the sections below to remove a PC card, PC-Cardbus card, or PCI card from a computing device, when necessary.
Removing a PC Card or PC-Cardbus Card
To remove a PC card or PC-Cardbus card after it is successfully installed and configured (such as when your laptop is to be transported), completely shut down your computer and pull the card directly out of the PC card slot or Cardbus slot. When the card is reinserted and the computer is rebooted, your connection to the network should be re-established.
Note ![]() If you need to remove your PC card or PC-Cardbus card but do not want to shut down your computer, double-click the Unplug or Eject Hardware icon in the Windows system tray, select the Cisco Aironet client adapter you want to remove under Hardware devices, click Stop, and click OK twice. Then pull the card directly out of the card slot.
If you need to remove your PC card or PC-Cardbus card but do not want to shut down your computer, double-click the Unplug or Eject Hardware icon in the Windows system tray, select the Cisco Aironet client adapter you want to remove under Hardware devices, click Stop, and click OK twice. Then pull the card directly out of the card slot.
Removing a PCI Card
Because PCI client adapters are installed inside desktop computers, which are not designed for portable use, you should have little reason to remove the adapter. However, instructions are provided below in case you ever need to remove your PCI card.
Step 1 ![]() Completely shut down your computer.
Completely shut down your computer.
Step 2 ![]() Disconnect the client adapter's antenna.
Disconnect the client adapter's antenna.
Step 3 ![]() Remove the computer cover.
Remove the computer cover.
Step 4 ![]() Remove the screw from the top of the CPU back panel above the PCI expansion slot that holds your client adapter.
Remove the screw from the top of the CPU back panel above the PCI expansion slot that holds your client adapter.
Step 5 ![]() Pull up firmly on the client adapter to release it from the slot and carefully tilt the adapter to allow it to clear the opening in the CPU back panel.
Pull up firmly on the client adapter to release it from the slot and carefully tilt the adapter to allow it to clear the opening in the CPU back panel.
Step 6 ![]() Reinstall the screw on the CPU back panel and replace the computer cover.
Reinstall the screw on the CPU back panel and replace the computer cover.
Client Adapter Software Procedures
This section provides instructions for the following procedures:
•![]() Finding the Install Wizard version, see below
Finding the Install Wizard version, see below
•![]() Upgrading the client adapter software, page 6
Upgrading the client adapter software, page 6
•![]() Uninstalling the client adapter software, page 6
Uninstalling the client adapter software, page 6
•![]() Finding the driver version, page 7
Finding the driver version, page 7
•![]() Firmware procedures, page 8
Firmware procedures, page 8
•![]() ACU procedures, page 12
ACU procedures, page 12
•![]() ACM procedures, page 15
ACM procedures, page 15
Finding the Install Wizard Version
Follow the instructions in this section to find the version of the Install Wizard that is currently installed for your client adapter.
Step 1 ![]() Open Windows Explorer.
Open Windows Explorer.
Step 2 ![]() Find the Install Wizard files.
Find the Install Wizard files.
Step 3 ![]() Right-click the IWSetup.exe file.
Right-click the IWSetup.exe file.
Step 4 ![]() Click Properties.
Click Properties.
Step 5 ![]() Click the Version tab. The version of the currently installed Install Wizard file is shown in the File version field.
Click the Version tab. The version of the currently installed Install Wizard file is shown in the File version field.
Upgrading the Client Adapter Software
The same procedure that is used to initially install client adapter software can also be used to upgrade to a more recent version. Refer to Chapter 3 for instructions on upgrading your client adapter's software.
Note ![]() The client adapter's firmware can also be upgraded through ACU. Refer to the "Upgrading the Firmware" section for details.
The client adapter's firmware can also be upgraded through ACU. Refer to the "Upgrading the Firmware" section for details.
Uninstalling the Client Adapter Software
This section provides instructions for uninstalling any Cisco Aironet client adapter drivers, utilities, and security modules that are installed on your computer. Only the client adapter's firmware remains installed. This procedure is necessary if you want to remove any installed client adapter software components from your computer or downgrade to previous versions.
Note ![]() If you want to downgrade to earlier versions of client adapter software, follow the steps below to uninstall the current software components. Then install the older software.
If you want to downgrade to earlier versions of client adapter software, follow the steps below to uninstall the current software components. Then install the older software.
Note ![]() When you uninstall the client adapter software, any existing profiles are removed. If you want to save your profiles for later use, follow the instructions in Chapter 4, to export your profiles before uninstalling the software components.
When you uninstall the client adapter software, any existing profiles are removed. If you want to save your profiles for later use, follow the instructions in Chapter 4, to export your profiles before uninstalling the software components.
Note ![]() This procedure does not uninstall the PC, LM, or PCI card driver that was bundled with Windows Me and XP. It uninstalls only drivers to which you have upgraded. When you follow the steps below to uninstall an upgraded driver and then eject and reinsert the card, Windows finds the original driver and reinstalls it automatically.
This procedure does not uninstall the PC, LM, or PCI card driver that was bundled with Windows Me and XP. It uninstalls only drivers to which you have upgraded. When you follow the steps below to uninstall an upgraded driver and then eject and reinsert the card, Windows finds the original driver and reinstalls it automatically.
Step 1 ![]() Perform one of the following:
Perform one of the following:
•![]() If you want to remove the client adapter from your computer, shut down your computer, remove the client adapter, and reboot your computer.
If you want to remove the client adapter from your computer, shut down your computer, remove the client adapter, and reboot your computer.
•![]() If you want to leave your client adapter inserted in your computer or if your client adapter is an LM or mini PCI card and cannot be removed, go to Step 2.
If you want to leave your client adapter inserted in your computer or if your client adapter is an LM or mini PCI card and cannot be removed, go to Step 2.
Step 2 ![]() Select Start > Run.
Select Start > Run.
Step 3 ![]() Browse to the location of the Install Wizard software, select the IWSetup.exe file, and click Open and OK.
Browse to the location of the Install Wizard software, select the IWSetup.exe file, and click Open and OK.
The Cisco Aironet Wireless LAN Client Adapter Installation Wizard screen appears (see Figure 9-3).
Figure 9-3 Cisco Aironet Wireless LAN Client Adapter Installation Wizard screen
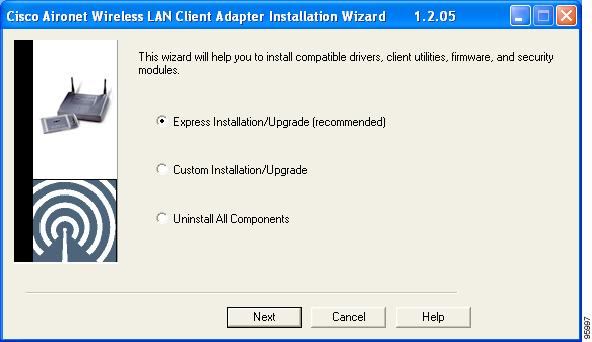
Step 4 ![]() Select Uninstall All Components and click Next.
Select Uninstall All Components and click Next.
Step 5 ![]() When prompted to confirm your decision, click Yes. The process to uninstall the files begins. You ares notified throughout the process as each component is uninstalled.
When prompted to confirm your decision, click Yes. The process to uninstall the files begins. You ares notified throughout the process as each component is uninstalled.
Step 6 ![]() When the process completes, you are notified that the system is about to reboot. Close any open applications and click OK.
When the process completes, you are notified that the system is about to reboot. Close any open applications and click OK.
Step 7 ![]() If you did not remove the client adapter from your computer, the Found New Hardware Wizard screen appears after your computer reboots. Click Cancel.
If you did not remove the client adapter from your computer, the Found New Hardware Wizard screen appears after your computer reboots. Click Cancel.
Note ![]() The Found New Hardware Wizard screen does not appear on computers running Windows NT.
The Found New Hardware Wizard screen does not appear on computers running Windows NT.
Step 8 ![]() This procedure does not remove the Install Wizard file or its uncompressed files. If you want to remove them from your computer, find the files using Windows Explorer and delete them.
This procedure does not remove the Install Wizard file or its uncompressed files. If you want to remove them from your computer, find the files using Windows Explorer and delete them.
Finding the Driver Version
Follow the instructions in this section to find the version of the driver that is currently installed for your client adapter.
Step 1 ![]() Open ACU.
Open ACU.
Step 2 ![]() Click the Status icon or select Status from the Commands drop-down menu. The Status screen displays the current version of your client adapter's driver in the NDIS Driver Version field.
Click the Status icon or select Status from the Commands drop-down menu. The Status screen displays the current version of your client adapter's driver in the NDIS Driver Version field.
Firmware Procedures
This section provides instructions for the following procedures:
•![]() Finding the Firmware Version, see below
Finding the Firmware Version, see below
•![]() Upgrading the Firmware, see below
Upgrading the Firmware, see below
•![]() Preventing the Driver from Upgrading the Firmware, page 10
Preventing the Driver from Upgrading the Firmware, page 10
Finding the Firmware Version
Follow the instructions in this section to find the version of firmware that is currently installed for your client adapter.
Step 1 ![]() Open ACU.
Open ACU.
Step 2 ![]() Click the Status icon or select Status from the Commands drop-down menu. The Status screen displays the current version of your client adapter's firmware in the Firmware Version field.
Click the Status icon or select Status from the Commands drop-down menu. The Status screen displays the current version of your client adapter's firmware in the Firmware Version field.
Upgrading the Firmware
You can upgrade your client adapter's firmware using either the Install Wizard or ACU. If you use the wizard, the firmware loads from the Install Wizard file and is installed along with other software components. If you use ACU, the firmware installs from an image (*.img) file that contains only firmware.
Note ![]() To ensure compatibility between software components, Cisco recommends that you use the Install Wizard to upgrade the firmware along with the other software components.
To ensure compatibility between software components, Cisco recommends that you use the Install Wizard to upgrade the firmware along with the other software components.
Using the Install Wizard
To upgrade the firmware using the Install Wizard, follow the instructions in the "Installing or Upgrading the Client Adapter Software" section.
Using ACU
Note ![]() When you upgrade your client adapter's firmware using ACU, the Automatically Load New Firmware When NDIS Driver Is Updated parameter on the Aironet Client Utility Preferences screen becomes disabled (or unchecked) automatically to prevent the newly loaded firmware from being overwritten by the driver. If you ever want to enable this parameter, you must recheck the check box.
When you upgrade your client adapter's firmware using ACU, the Automatically Load New Firmware When NDIS Driver Is Updated parameter on the Aironet Client Utility Preferences screen becomes disabled (or unchecked) automatically to prevent the newly loaded firmware from being overwritten by the driver. If you ever want to enable this parameter, you must recheck the check box.
To upgrade the firmware using ACU, follow the steps below.
Step 1 ![]() Use the computer's web browser to access the following URL:
Use the computer's web browser to access the following URL:
http://www.cisco.com/public/sw-center/sw-wireless.shtml
Step 2 ![]() Select Option #2: Aironet Wireless Software Display Tables.
Select Option #2: Aironet Wireless Software Display Tables.
Note ![]() You can download software from the Software Selector tool instead of the display tables. To do so, select Option #1: Aironet Wireless Software Selector, follow the instructions on the screen, and go to Step 7.
You can download software from the Software Selector tool instead of the display tables. To do so, select Option #1: Aironet Wireless Software Selector, follow the instructions on the screen, and go to Step 7.
Step 3 ![]() Select Cisco Aironet Wireless LAN Client Adapters.
Select Cisco Aironet Wireless LAN Client Adapters.
Step 4 ![]() Under Individual Files, find the client adapter firmware.
Under Individual Files, find the client adapter firmware.
Step 5 ![]() Click the link that corresponds to your client adapter's model number (such as 340 or 350 series).
Click the link that corresponds to your client adapter's model number (such as 340 or 350 series).
Step 6 ![]() Select the latest firmware file for your specific client adapter type (such as CB or MPI).
Select the latest firmware file for your specific client adapter type (such as CB or MPI).
Note ![]() The firmware for PC, LM, and PCI cards is labeled PCMCIA-LMC-PCI, the firmware for mini PCI cards is labeled mini PCI or MPI, and the firmware for PC-Cardbus cards is labeled CB.
The firmware for PC, LM, and PCI cards is labeled PCMCIA-LMC-PCI, the firmware for mini PCI cards is labeled mini PCI or MPI, and the firmware for PC-Cardbus cards is labeled CB.
Note ![]() If your wireless network uses EAP authentication, access points to which your client adapter will attempt to authenticate must use the following firmware versions or greater: 11.23T (340 and 350 series access points), Cisco IOS Release 12.2(4)JA (1100 series access points), or 11.54T (1200 series access points).
If your wireless network uses EAP authentication, access points to which your client adapter will attempt to authenticate must use the following firmware versions or greater: 11.23T (340 and 350 series access points), Cisco IOS Release 12.2(4)JA (1100 series access points), or 11.54T (1200 series access points).
Step 7 ![]() Read and accept the terms and conditions of the Software License Agreement.
Read and accept the terms and conditions of the Software License Agreement.
Step 8 ![]() Select the firmware file again to download it.
Select the firmware file again to download it.
Step 9 ![]() Save the file to a floppy disk or to your computer's hard drive.
Save the file to a floppy disk or to your computer's hard drive.
Step 10 ![]() Find the file using Windows Explorer, double-click it, and extract the image file to a folder.
Find the file using Windows Explorer, double-click it, and extract the image file to a folder.
Note ![]() To extract the file, click Browse on the WinZip Self-Extractor screen, select the folder in which you want the file to be placed, and click OK and Unzip. After the file is extracted, click OK to close the screen.
To extract the file, click Browse on the WinZip Self-Extractor screen, select the folder in which you want the file to be placed, and click OK and Unzip. After the file is extracted, click OK to close the screen.
Step 11 ![]() Make sure the client adapter is installed in your computer and is operational.
Make sure the client adapter is installed in your computer and is operational.
Step 12 ![]() Open ACU; click the Load Firmware icon or select Load New Firmware from the Commands drop-down menu. The Load New Firmware screen appears (see Figure 9-4).
Open ACU; click the Load Firmware icon or select Load New Firmware from the Commands drop-down menu. The Load New Firmware screen appears (see Figure 9-4).
Figure 9-4 Load New Firmware Screen
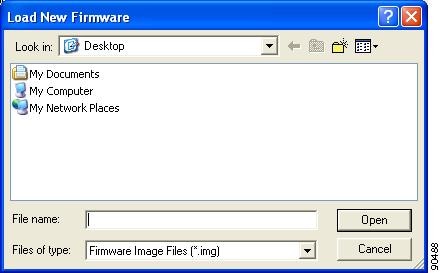
Step 13 ![]() Find the location of the new firmware in the Look in box.
Find the location of the new firmware in the Look in box.
Step 14 ![]() Click the firmware image file (*.img) so that it appears in the File name box at the bottom of the screen.
Click the firmware image file (*.img) so that it appears in the File name box at the bottom of the screen.
Step 15 ![]() Click the Open button. A progress bar appears while the selected image is loaded into the client adapter's Flash memory.
Click the Open button. A progress bar appears while the selected image is loaded into the client adapter's Flash memory.
Step 16 ![]() Click OK when the "Firmware Upgrade Complete!" message appears. The OK button cannot be selected until the process is complete or an error occurs. If an error occurs, refer to the "Error Messages" section in Chapter 10.
Click OK when the "Firmware Upgrade Complete!" message appears. The OK button cannot be selected until the process is complete or an error occurs. If an error occurs, refer to the "Error Messages" section in Chapter 10.
Preventing the Driver from Upgrading the Firmware
The Automatically Load New Firmware When NDIS Driver Is Updated parameter on the Aironet Client Utility Preferences screen affects the firmware that is bundled with the driver, not the firmware that is included in the Install Wizard. This parameter controls whether the driver (whenever it loads) installs the firmware with which it is bundled. (The driver loads each time you insert a client adapter or reboot your computer.)
Note ![]() To complete this procedure, you must have used the Install Wizard to install ACU.
To complete this procedure, you must have used the Install Wizard to install ACU.
Note ![]() The Automatically Load New Firmware When NDIS Driver Is Updated parameter is functionally equivalent to the Disable Firmware Checking parameter in the Install Wizard. The parameter that is set last is the one that governs how the driver behaves. Refer to Chapter 3 for additional information.
The Automatically Load New Firmware When NDIS Driver Is Updated parameter is functionally equivalent to the Disable Firmware Checking parameter in the Install Wizard. The parameter that is set last is the one that governs how the driver behaves. Refer to Chapter 3 for additional information.
Step 1 ![]() Open ACU.
Open ACU.
Step 2 ![]() Click the Preferences icon or select Preferences from the Options drop-down menu. The Aironet Client Utility Preferences screen appears (see Figure 9-5).
Click the Preferences icon or select Preferences from the Options drop-down menu. The Aironet Client Utility Preferences screen appears (see Figure 9-5).
Figure 9-5 Aironet Client Utility Preferences Screen
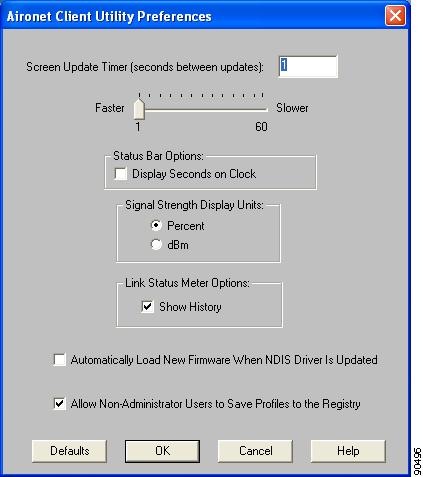
Step 3 ![]() If you want to prevent the driver (when it loads) from installing the firmware with which it is bundled, thereby allowing the client adapter to retain its current firmware version, make sure the Automatically Load New Firmware When NDIS Driver Is Updated check box is not checked.
If you want to prevent the driver (when it loads) from installing the firmware with which it is bundled, thereby allowing the client adapter to retain its current firmware version, make sure the Automatically Load New Firmware When NDIS Driver Is Updated check box is not checked.
Note ![]() If you want the driver (when it loads) to install the firmware with which it is bundled if it is newer than the firmware that is currently installed in the client adapter, make sure the Automatically Load New Firmware When NDIS Driver Is Updated check box is checked.
If you want the driver (when it loads) to install the firmware with which it is bundled if it is newer than the firmware that is currently installed in the client adapter, make sure the Automatically Load New Firmware When NDIS Driver Is Updated check box is checked.
Note ![]() When you upgrade your client adapter's firmware using ACU, the Automatically Load New Firmware When NDIS Driver Is Updated parameter becomes unchecked automatically to prevent the newly loaded firmware from being overwritten by the driver. If you want to enable this parameter, you must recheck the check box.
When you upgrade your client adapter's firmware using ACU, the Automatically Load New Firmware When NDIS Driver Is Updated parameter becomes unchecked automatically to prevent the newly loaded firmware from being overwritten by the driver. If you want to enable this parameter, you must recheck the check box.
Note ![]() The Automatically Load New Firmware When NDIS Driver Is Updated parameter is dependent on the radio type (and the Cardbus slot for PC-Cardbus cards). Therefore, if you insert a client adapter of a different card type (such as a 340 instead of a 350) or insert the same PC-Cardbus card into a different slot, whether or not the driver installs the firmware with which it is bundled depends on how this parameter (or the Disable Firmware Checking parameter) was last set for that card type or card slot.
The Automatically Load New Firmware When NDIS Driver Is Updated parameter is dependent on the radio type (and the Cardbus slot for PC-Cardbus cards). Therefore, if you insert a client adapter of a different card type (such as a 340 instead of a 350) or insert the same PC-Cardbus card into a different slot, whether or not the driver installs the firmware with which it is bundled depends on how this parameter (or the Disable Firmware Checking parameter) was last set for that card type or card slot.
Step 4 ![]() Click OK.
Click OK.
ACU Procedures
This section provides instructions for the following procedures:
•![]() Opening ACU, below
Opening ACU, below
•![]() Exiting ACU, page 13
Exiting ACU, page 13
•![]() Modifying ACU installation settings, page 13
Modifying ACU installation settings, page 13
•![]() Finding the version of ACU, page 13
Finding the version of ACU, page 13
•![]() Adding the ACU icon to or removing it from the desktop, page 14
Adding the ACU icon to or removing it from the desktop, page 14
•![]() Accessing online help, page 14
Accessing online help, page 14
Opening ACU
To open ACU, perform one of the following:
•![]() Double-click the Aironet Client Utility (ACU) icon on your desktop.
Double-click the Aironet Client Utility (ACU) icon on your desktop.
•![]() Select Aironet Client Utility (ACU) from the folder in the Windows Start Menu that you chose during installation [the default location is Start > Program Files > Cisco Systems > Aironet Client Utility (ACU)].
Select Aironet Client Utility (ACU) from the folder in the Windows Start Menu that you chose during installation [the default location is Start > Program Files > Cisco Systems > Aironet Client Utility (ACU)].
•![]() Double-click My Computer > Control Panel > Aironet Client Utility.
Double-click My Computer > Control Panel > Aironet Client Utility.
Exiting ACU
To exit ACU, select Exit from the Commands drop-down menu (see Figure 9-6).
Figure 9-6 Commands Drop-Down Menu

Modifying ACU Installation Settings
If you need to change any of the settings that you selected during installation (for example, placing the ACU icon on the desktop or allowing a saved LEAP username and password), you must run the Install Wizard again and modify the parameter values. Refer to Chapter 3 for instructions.
Finding the Version of ACU
Follow the instructions in this section to find the version of ACU that is currently installed.
Step 1 ![]() Open ACU.
Open ACU.
Step 2 ![]() Click the About icon or select the About Aironet Client Utility option from the Help drop-down menu. The About Aironet Client Utility screen appears (see Figure 9-7).
Click the About icon or select the About Aironet Client Utility option from the Help drop-down menu. The About Aironet Client Utility screen appears (see Figure 9-7).
Figure 9-7 About Aironet Client Utility Screen
Adding the ACU Icon to or Removing it from the Desktop
By default, an ACU icon is added to your computer's desktop when you install the Install Wizard.
•![]() If you wish to remove the ACU icon from the desktop, run the Install Wizard again and set the Place Icon on Desktop parameter to No or right-click the icon, click Delete, and click Yes to confirm your decision.
If you wish to remove the ACU icon from the desktop, run the Install Wizard again and set the Place Icon on Desktop parameter to No or right-click the icon, click Delete, and click Yes to confirm your decision.
•![]() If you want to add the ACU icon to the desktop, set the Place Icon on Desktop parameter to Yes in the Install Wizard.
If you want to add the ACU icon to the desktop, set the Place Icon on Desktop parameter to Yes in the Install Wizard.
Accessing Online Help
To access ACU's online help, open ACU. Then click the Help icon or select Contents from the Help drop-down menu. An overview of ACU appears.
From the Overview of the Aironet Client Utility screen, you can access additional information.
•![]() To access information on specific menu options, click Contents. Double-click Aironet Client Utility Commands, the desired menu (such as Options Menu), and the desired topic (such as Preferences).
To access information on specific menu options, click Contents. Double-click Aironet Client Utility Commands, the desired menu (such as Options Menu), and the desired topic (such as Preferences).
•![]() To access information on specific parameters, click Contents. Double-click Configurable Parameters, the client adapter, a parameter category (such as System Parameters), and the desired parameter (such as SSID).
To access information on specific parameters, click Contents. Double-click Configurable Parameters, the client adapter, a parameter category (such as System Parameters), and the desired parameter (such as SSID).
•![]() To access information on specific diagnostic topics, click Contents. Double-click Run Time Diagnostic Information, a diagnostic category (such as Running a Linktest), and the desired topic (such as Packet Size).
To access information on specific diagnostic topics, click Contents. Double-click Run Time Diagnostic Information, a diagnostic category (such as Running a Linktest), and the desired topic (such as Packet Size).
•![]() To search for a specific topic, click Index, select an index entry, and click Display.
To search for a specific topic, click Index, select an index entry, and click Display.
•![]() To search for a specific word or phrase, click Contents or Index, click the Find tab, and follow the instructions in the Find Setup Wizard window.
To search for a specific word or phrase, click Contents or Index, click the Find tab, and follow the instructions in the Find Setup Wizard window.
ACM Procedures
Refer to Chapter 8 for instructions on using ACM.
Restarting the Client Adapter
ACU enables you to reinitialize (or restart) the client adapter without having to reboot your computer or eject and reinsert the adapter. For instance, if your client adapter is experiencing poor throughput, you might want to restart the client adapter to try to force it to disassociate from the access point to which it is currently associated in the hope that it reassociates to an access point with a stronger signal.
Note ![]() Restarting the client adapter may cause you to lose your wireless network connection.
Restarting the client adapter may cause you to lose your wireless network connection.
Follow the steps below to restart the client adapter.
Step 1 ![]() Open ACU.
Open ACU.
Step 2 ![]() Select the Restart Card option from the Commands drop-down menu (see Figure 9-6).
Select the Restart Card option from the Commands drop-down menu (see Figure 9-6).
Step 3 ![]() When prompted to confirm your decision, click Yes. The driver stops the client adapter's radio, writes the configuration (although no parameter settings have been changed), and restarts the radio. The status bar at the bottom of the ACU screen shows the client adapter losing association and then reassociating.
When prompted to confirm your decision, click Yes. The driver stops the client adapter's radio, writes the configuration (although no parameter settings have been changed), and restarts the radio. The status bar at the bottom of the ACU screen shows the client adapter losing association and then reassociating.
Turning Your Client Adapter's Radio On or Off
Your client adapter's radio can be turned on or off. Turning the radio off prevents the adapter from transmitting RF energy. You might want to turn off the client adapter's radio in the following situations:
•![]() You are not transmitting data and want to conserve battery power.
You are not transmitting data and want to conserve battery power.
•![]() You have EAP-SIM authentication set up to occur transparently (the SIM card is left in the reader and the PIN is stored in the computer), and you do not want to be billed for air time upon entering an area that enables the client to authenticate.
You have EAP-SIM authentication set up to occur transparently (the SIM card is left in the reader and the PIN is stored in the computer), and you do not want to be billed for air time upon entering an area that enables the client to authenticate.
•![]() You are using a laptop on an airplane and want to prevent the adapter's transmissions from potentially interfering with the operation of certain devices.
You are using a laptop on an airplane and want to prevent the adapter's transmissions from potentially interfering with the operation of certain devices.
When the radio is on, it periodically sends out probes even if it is not associated to an access point, as required by the 802.11 specification. Therefore, it is important to turn it off around devices that are susceptible to RF interference.
Note ![]() Your client adapter is not associated while its radio is off.
Your client adapter is not associated while its radio is off.
Note ![]() If your client adapter's radio is turned off before your computer enters standby or hibernate mode or before you reboot the computer, the radio remains off when the computer resumes. You must turn the radio back on to resume operation.
If your client adapter's radio is turned off before your computer enters standby or hibernate mode or before you reboot the computer, the radio remains off when the computer resumes. You must turn the radio back on to resume operation.
You can use ACU or ACM to turn the client adapter's radio on or off. Follow the instructions below to use ACU or refer to the "Turn Radio On/Off" section to use ACM.
If your client adapter's radio is on, open ACU and select Turn Radio Off from the Commands drop-down menu (see Figure 9-6) to turn off the radio. The status bar at the bottom of the ACU screen indicates that the radio is turned off.
If your client adapter's radio is off, open ACU and select Turn Radio On from the Commands drop-down menu (see Figure 9-6) to turn on the radio.
Uninstalling the Microsoft Hot Fix
When LEAP is selected during installation on a Windows 98 or 98 SE device, a Microsoft hot fix is also installed to fix two problems related to the use of LEAP. If you ever need to uninstall the hot fix, select Start > Run, enter C:\Windows\Inf\Qfe\W98.se\241052un.inf, and click OK.
 Feedback