- Preface
- Chapter 1 - Product Overview
- Chapter 2 - Preparing for Installation
- Chapter 3 - Installing the Client Adapter
- Chapter 4 - Using the Profile Manager
- Chapter 5 - Configuring the Client Adapter
- Chapter 6 - Using EAP Authentication
- Chapter 7 - Performing Diagnostics
- Chapter 8 - Routine Procedures
- Chapter 9 - Troubleshooting
- Appendix A - Technical Specifications
- Appendix B - Translated Safety Warnings
- Appendix C - Declarations of Conformity and Regulatory Information
- Appendix D - Channels, Power Levels, and Antenna Gains
- Appendix E - Configuring the Client Adapter through Windows CE .NET
- Glossary
- Index
Cisco Aironet Wireless LAN Client Adapters Installation and Configuration Guide for Windows CE, OL-1375-03
Bias-Free Language
The documentation set for this product strives to use bias-free language. For the purposes of this documentation set, bias-free is defined as language that does not imply discrimination based on age, disability, gender, racial identity, ethnic identity, sexual orientation, socioeconomic status, and intersectionality. Exceptions may be present in the documentation due to language that is hardcoded in the user interfaces of the product software, language used based on RFP documentation, or language that is used by a referenced third-party product. Learn more about how Cisco is using Inclusive Language.
- Updated:
- May 4, 2007
Chapter: Appendix E - Configuring the Client Adapter through Windows CE .NET
Configuring the Client Adapter through
Windows CE .NET
This appendix explains how to configure and use the client adapter with Windows CE .NET.
The following topics are covered in this appendix:
•![]() Configuring the Client Adapter
Configuring the Client Adapter
•![]() Associating to an Access Point Using Windows CE .NET
Associating to an Access Point Using Windows CE .NET
•![]() Viewing the Status of Your Client Adapter
Viewing the Status of Your Client Adapter
Overview
This chapter provides instructions for configuring the client adapter through Windows CE .NET (instead of through ACU). It also provides basic information on using Windows CE .NET to specify the networks to which the client adapter associates and to view the status of your client adapter.

Note ![]() If you require more information about configuring or using your client adapter with Windows CE .NET, refer to Microsoft's documentation for Windows CE .NET.
If you require more information about configuring or using your client adapter with Windows CE .NET, refer to Microsoft's documentation for Windows CE .NET.
Configuring the Client Adapter
Follow the steps below to configure your client adapter using Windows CE .NET.
Step 1 ![]() Make sure the client adapter is inserted in the Windows CE .NET device.
Make sure the client adapter is inserted in the Windows CE .NET device.
Step 2 ![]() Double-tap the ACU icon on your desktop or select Start > Programs > Cisco > ACU.
Double-tap the ACU icon on your desktop or select Start > Programs > Cisco > ACU.
Step 3 ![]() On the Profiles screen, select <External Settings> from the Select Active Profile drop-down menu.
On the Profiles screen, select <External Settings> from the Select Active Profile drop-down menu.
Step 4 ![]() Tap OK to save your settings.
Tap OK to save your settings.
Step 5 ![]() When prompted, reset your Windows CE device or eject and reinsert the client adapter.
When prompted, reset your Windows CE device or eject and reinsert the client adapter.
Step 6 ![]() Select Start > Settings > Network and Dial-up Connections > the Cisco Wireless LAN Client Adapter icon > the Wireless Networks tab. The Cisco Wireless LAN Adapter Settings (Wireless Networks tab) screen appears (see Figure E-1).
Select Start > Settings > Network and Dial-up Connections > the Cisco Wireless LAN Client Adapter icon > the Wireless Networks tab. The Cisco Wireless LAN Adapter Settings (Wireless Networks tab) screen appears (see Figure E-1).
Figure E-1 Cisco Wireless LAN Adapter Settings Screen (Wireless Networks Tab)
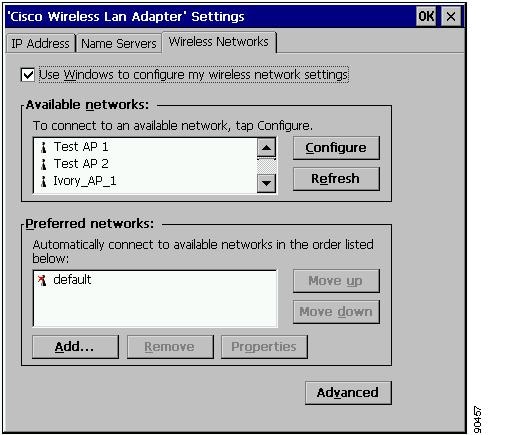
Step 7 ![]() Make sure that the Use Windows to configure my wireless network settings check box is checked.
Make sure that the Use Windows to configure my wireless network settings check box is checked.
Step 8 ![]() Select the SSID of the access point to which you want the client adapter to associate from the list of available networks and tap the Configure button. If the SSID of the access point you want to use is not listed or you are planning to operate the client adapter in an ad hoc network (a computer-to-computer network without access points), tap the Add button at the bottom of the screen.
Select the SSID of the access point to which you want the client adapter to associate from the list of available networks and tap the Configure button. If the SSID of the access point you want to use is not listed or you are planning to operate the client adapter in an ad hoc network (a computer-to-computer network without access points), tap the Add button at the bottom of the screen.
Note ![]() The Allow Broadcast SSID to Associate option on the access point must be enabled for the SSID to appear in the list of available networks.
The Allow Broadcast SSID to Associate option on the access point must be enabled for the SSID to appear in the list of available networks.
The Wireless Network Properties screen appears (see Figure E-2).
Figure E-2 Wireless Network Properties Screen
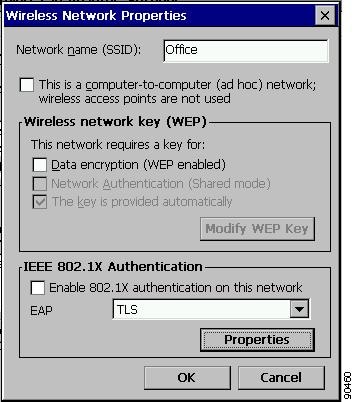
Note ![]() The IEEE 802.1X Authentication portion of the screen is currently not operational. Support for EAP-TLS and PEAP authentication will be available for Windows CE .NET devices in a future release.
The IEEE 802.1X Authentication portion of the screen is currently not operational. Support for EAP-TLS and PEAP authentication will be available for Windows CE .NET devices in a future release.
Step 9 ![]() Perform one of the following:
Perform one of the following:
•![]() If you selected an SSID from the list of available networks, make sure the SSID appears in the Network name (SSID) field.
If you selected an SSID from the list of available networks, make sure the SSID appears in the Network name (SSID) field.
•![]() If you tapped the Add button, enter the case-sensitive SSID of the access point to which you want the client adapter to associate or the name of the ad hoc network in the Network name (SSID) field.
If you tapped the Add button, enter the case-sensitive SSID of the access point to which you want the client adapter to associate or the name of the ad hoc network in the Network name (SSID) field.
Step 10 ![]() Check the This is a computer-to-computer (ad hoc mode) network; wireless access points are not used check box if you are planning to operate the client adapter in an ad hoc network.
Check the This is a computer-to-computer (ad hoc mode) network; wireless access points are not used check box if you are planning to operate the client adapter in an ad hoc network.
Step 11 ![]() Check the Data encryption (WEP enabled) check box if you are planning to use static WEP.
Check the Data encryption (WEP enabled) check box if you are planning to use static WEP.
Note ![]() Refer to the "Static WEP Keys" section for information on static WEP keys.
Refer to the "Static WEP Keys" section for information on static WEP keys.
Step 12 ![]() Check the Network Authentication (Shared mode) check box if you want to use shared key (rather than open) authentication with the access point.
Check the Network Authentication (Shared mode) check box if you want to use shared key (rather than open) authentication with the access point.
Open authentication enables your client adapter, regardless of its WEP settings, to authenticate and attempt to communicate with an access point.
Shared key authentication enables your client adapter to communicate only with access points that have the same WEP key. Cisco recommends that shared key authentication not be used because it presents a security risk.
Step 13 ![]() Follow the steps below to enter up to four WEP keys, if you are planning to use static WEP.
Follow the steps below to enter up to four WEP keys, if you are planning to use static WEP.
a. ![]() Obtain the WEP key for the access point (in an infrastructure network) or other clients (in an ad hoc network) from your system administrator.
Obtain the WEP key for the access point (in an infrastructure network) or other clients (in an ad hoc network) from your system administrator.
b. ![]() Tap the Modify WEP Key button. The Wireless (WEP) Key Settings screen appears (see Figure E-3).
Tap the Modify WEP Key button. The Wireless (WEP) Key Settings screen appears (see Figure E-3).
Figure E-3 Wireless (WEP) Key Settings Screen
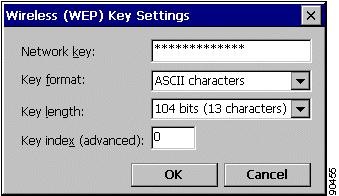
c. ![]() Enter the WEP key in the Network key field. In order to communicate, the client adapter must use the same WEP key as the access point or other clients.
Enter the WEP key in the Network key field. In order to communicate, the client adapter must use the same WEP key as the access point or other clients.
d. ![]() Select one of the following WEP key formats:
Select one of the following WEP key formats:
–![]() ASCII characters—Specifies that the WEP key will be entered in ASCII text, which includes alpha characters, numbers, and punctuation marks.
ASCII characters—Specifies that the WEP key will be entered in ASCII text, which includes alpha characters, numbers, and punctuation marks.
–![]() Hexadecimal digits—Specifies that the WEP key will be entered in hexadecimal characters, which include 0-9, A-F, and a-f.
Hexadecimal digits—Specifies that the WEP key will be entered in hexadecimal characters, which include 0-9, A-F, and a-f.
Note ![]() ASCII text WEP keys are not supported on the Cisco Aironet 1200 Series Access Points, so you must select the Hexadecimal digits option if you are planning to use your client adapter with these access points.
ASCII text WEP keys are not supported on the Cisco Aironet 1200 Series Access Points, so you must select the Hexadecimal digits option if you are planning to use your client adapter with these access points.
e. ![]() Select one of the following WEP key lengths:
Select one of the following WEP key lengths:
–![]() 104 bits (13 characters)—You can select this option (or the 40 bits option) if your client adapter supports 128-bit WEP.
104 bits (13 characters)—You can select this option (or the 40 bits option) if your client adapter supports 128-bit WEP.
–![]() 40 bits (5 characters)—You must select this option if your client adapter supports only 40-bit WEP.
40 bits (5 characters)—You must select this option if your client adapter supports only 40-bit WEP.
f. ![]() In the Key index (advanced) field, enter the number of the WEP key you are creating (0, 1, 2, or 3).
In the Key index (advanced) field, enter the number of the WEP key you are creating (0, 1, 2, or 3).
Note ![]() The WEP key must be assigned to the same number on both the client adapter and the access point (in an infrastructure network) or other clients (in an ad hoc network).
The WEP key must be assigned to the same number on both the client adapter and the access point (in an infrastructure network) or other clients (in an ad hoc network).
g. ![]() Tap OK to save your settings.
Tap OK to save your settings.
h. ![]() Repeat the previous steps if you want to enter another WEP key.
Repeat the previous steps if you want to enter another WEP key.
Step 14 ![]() Tap OK to save your settings and to add this SSID to the list of preferred networks (see Figure E-1). The client adapter automatically attempts to associate to the network(s) in the order in which they are listed.
Tap OK to save your settings and to add this SSID to the list of preferred networks (see Figure E-1). The client adapter automatically attempts to associate to the network(s) in the order in which they are listed.
To verify association, double-tap the icon of the two connected computers in the Windows CE .NET system tray and tap the Wireless Information tab. The status appears at the bottom of the screen. If the client adapter is associated, the status reads Associated.
Associating to an Access Point Using Windows CE .NET
Windows CE .NET causes the client adapter's driver to automatically attempt to associate to the first network in the list of preferred networks (see Figure E-1). If the adapter fails to associate or loses association, it automatically switches to the next network in the list of preferred networks. The adapter does not switch networks as long as it remains associated to the access point. To force the client adapter to associate to a different access point, you must select a different network from the list of available networks (and tap Configure and OK).
You can also attempt to force the client adapter to switch associations from the Wireless Information screen. To do so, follow the steps below:
Step 1 ![]() Double-tap the icon of the two connected computers in the Windows CE .NET system tray.
Double-tap the icon of the two connected computers in the Windows CE .NET system tray.
Step 2 ![]() Tap the Wireless Information tab. The Wireless Information screen appears, showing a list of all available networks (or access points in the vicinity that are broadcasting their SSIDs).
Tap the Wireless Information tab. The Wireless Information screen appears, showing a list of all available networks (or access points in the vicinity that are broadcasting their SSIDs).
Step 3 ![]() Select the network to which you want your client adapter to associate and tap the Connect button.
Select the network to which you want your client adapter to associate and tap the Connect button.
Step 4 ![]() If the Wireless Network Properties screen appears, tap OK.
If the Wireless Network Properties screen appears, tap OK.
The client adapter scans for the SSID of the specified network, and the status of the connection appears in the Status field at the bottom of the Wireless Information screen.
Viewing the Status of Your Client Adapter
This section enables you to view IP and wireless information for your client adapter.
Viewing IP Information
To view IP information for your client adapter, double-tap the icon of the two connected computers in the Windows CE .NET system tray. The IP Information screen appears (see Figure E-4).
Figure E-4 IP Information Screen
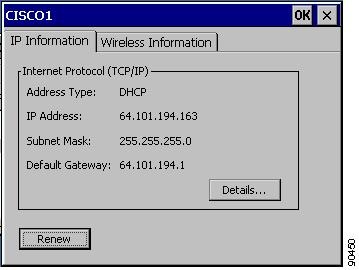
This screen shows the client adapter's address type (DHCP or static), IP address, subnet mask, and default gateway address. To renew the adapter's IP address and refresh the displayed information, tap the Renew button.
If you want to view more information about the adapter's network connections, tap the Details button. The Network Connection Details screen appears (see Figure E-5).
Figure E-5 Network Connection Details Screen
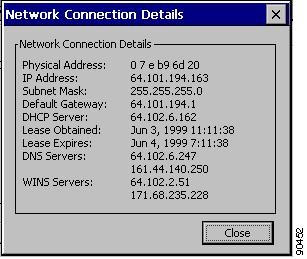
In addition to the information shown on the IP Information screen, this screen also shows the physical (MAC) address, the DHCP server, the date the lease was obtained and the date it expires, the DNS servers, and the WINS servers.
Viewing Wireless Information
To view wireless information for your client adapter, follow the steps below.
Step 1 ![]() Tap the Wireless Information tab. The Wireless Information screen appears (see Figure E-6).
Tap the Wireless Information tab. The Wireless Information screen appears (see Figure E-6).
Figure E-6 Wireless Information Screen
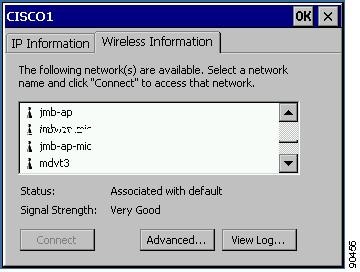
The Status field at the bottom of the screen shows the status of your client adapter's connection to an access point. In Figure E-6, the status "Associated with default" indicates that the client adapter is associated to an access point whose SSID is default.
The Signal Strength field shows the strength of that connection.
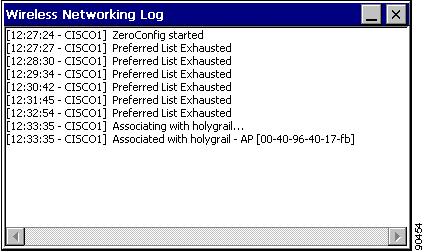
Step 2 ![]() If you want to view a log of Windows CE .NET messages that pertain to the client adapter's connections, tap the View Log button. The Wireless Networking Log screen appears (see Figure E-7).
If you want to view a log of Windows CE .NET messages that pertain to the client adapter's connections, tap the View Log button. The Wireless Networking Log screen appears (see Figure E-7).
Figure E-7 Wireless Networking Log Screen
 Feedback