CPS CCI Guide for Full Privilege Administrators, Release 18.1.0 (Restricted Release)
Bias-Free Language
The documentation set for this product strives to use bias-free language. For the purposes of this documentation set, bias-free is defined as language that does not imply discrimination based on age, disability, gender, racial identity, ethnic identity, sexual orientation, socioeconomic status, and intersectionality. Exceptions may be present in the documentation due to language that is hardcoded in the user interfaces of the product software, language used based on RFP documentation, or language that is used by a referenced third-party product. Learn more about how Cisco is using Inclusive Language.
- Updated:
- March 16, 2018
Chapter: Subscriber Screens
Subscriber
Screens
- Subscriber Screens Overview
- Find a Subscriber
- Create a Subscriber
- Edit a Subscriber
- Change the Credential ID of a Subscriber
- Deactivating or Activating a Subscriber
- Delete a Subscriber
- Subscriber Screens Definitions
- Overview Screen
- Details Screens
- Sessions Screen
- Balance Screen
Subscriber Screens Overview
This chapter provides discussion and examples for an administrator with full read and write privileges. As a full privilege admin, you are able to change, delete, and deactivate subscriber information.
After you log in, the default page of the Control Center interface displays the screen.
The Subscribers tab lets you look at details for a subscriber, any subaccounts under a subscriber, and any sessions a subscriber may have.
From the menu tree on the left, you have access to session information screens at the subscriber level and the network level. Read about these screens in Sessions Screen.
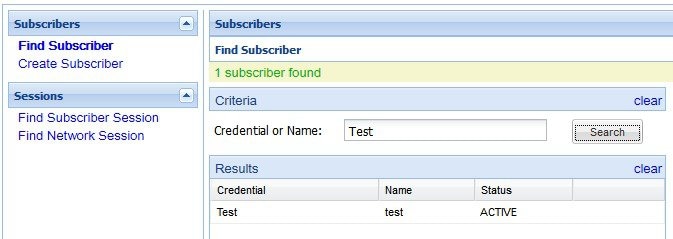
Find a Subscriber
 Note | To list all subscribers, leave the Credential Name field blank. The maximum number of records returned is 1000. |
Enter search criteria into either the Credential or Name field. You can use any portion of a subscriber’s name, but when searching on a credential ID, you must use the full credential. No wild cards are permitted.
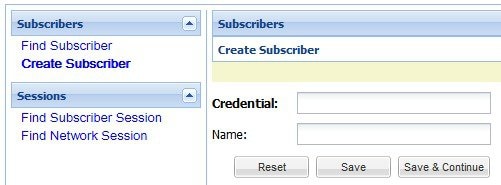
Create a Subscriber
To import a large number of subscribers, use your own subscriber profile repository (SPR) software.
Use these steps to create subscribers one at a time.
| Step 1 | Click
item in the menu tree.
 |
| Step 2 | Select a Domain
from the drop-down menu.
Domains are created in the Policy Builder interface and are displayed here. Domains are a point of intersection between Control Center and Policy Builder. |
| Step 3 | Type in a
credential that specifically identifies the new subscriber.
A credential is a unique identifier that subscribers and subaccount customers use to log in. Typically, a credential is defined when you create the subscriber or subaccount. However, you can manage credentials separately from the create process. The credential can be any letter or number with a length of one or more alphanumeric characters. Best practice is to not use special characters, although apostrophe and hyphen may be part of a name. |
| Step 4 | Enter the subscriber’s name, first and last, in the same field. |
| Step 5 | Click
Save to create the subscriber with just a domain,
name, and credential defined. You can return later and fill in more details
later.
Click Save and Continue to provide more details of the new subscriber at this time. The other two areas, Sessions and Balance, show you more information about the user, but there is nothing editable. If you want to check your work, use the Find Subscriber task in the menu tree and make sure you can find the subscriber you just created. |
Edit a Subscriber
| Step 1 | Find the subscriber as described at Find a Subscriber. |
| Step 2 | Hover over the
name displayed in the Results table and click
Open.
 The Subscriber Overview screen appears. 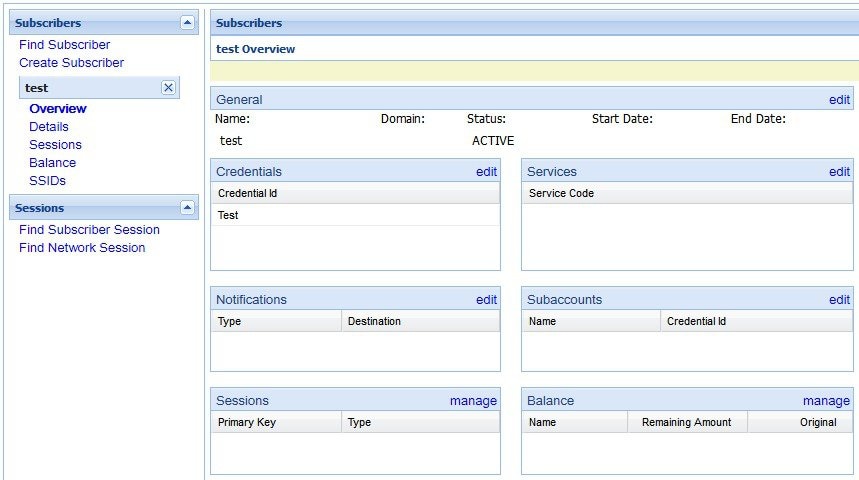 |
| Step 3 | From this
screen, click any of the edit or manage links to change subscriber information
about that topic.
You can also use the menu items in the menu tree on the left to display individual screens. |
Change the Credential ID of a Subscriber
| Step 1 | Click item in the tree. |
| Step 2 | Enter search criteria for the subscriber in the Find Subscriber screen. |
| Step 3 | Hover over the subscriber in the Results list and click the open link. |
| Step 4 | In the Credentials area, click the edit link. |
| Step 5 | Either add a new
credential or edit one already present.
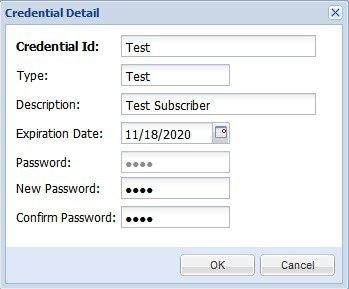
In the Credential Detail screen that appears, set the expiration date for the credential, or add or change an optional password to the credential. See also the Credentials Screen. That screen contains the fields for a secondary password for the subscriber. |
Deactivating or Activating a Subscriber
Deactivate a subscriber if you don’t want to completely delete them from your subscriber base. This way you can reactivate them later.
| Step 1 | Click
item in the menu tree.
Find the subscriber as described on Find a Subscriber. |
| Step 2 | On the Overview screen, click the edit link in the General area. |
| Step 3 | In the Status drop-down menu, change the subscriber’s status to Suspended or Active. |
Delete a Subscriber
If deleting a subscriber is too drastic, you can deactivate them with the procedure on Deactivating or Activating a Subscriber.
| Step 1 | Click
item in the menu tree.
Find the subscriber as described on Find a Subscriber. |
| Step 2 | Hover over the subscriber in the Results table and click Delete. |
| Step 3 | Be sure you are
deleting the correct subscriber. Check the credential in the Confirm screen and
make sure.
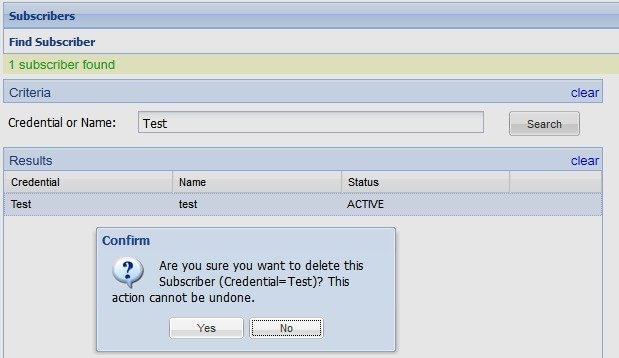 The Results table displays your matches, but without the deleted subscriber. |
Subscriber Screens Definitions
This section describes the screens used to support subscribers. After you find a subscriber you can access these screens.
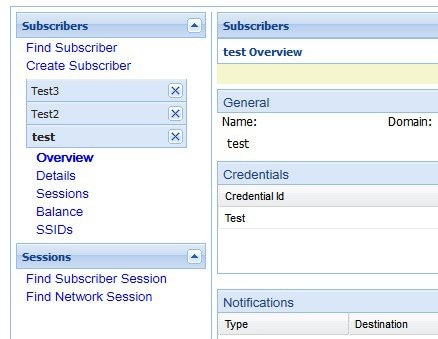
Overview Screen
When you find a subscriber and open their record, the Overview screen opens.
The menu tree on the left displays the subscriber name and four submenus (Overview, Details, Sessions, Balance).
The Overview screen, with its six subsections, appears on the right.
Click the edit or manage links at the right of the sections to add, edit, or remove information for that specific aspect of the subscriber. Refer to Edit a Subscriber for more information.
Details Screens
The Details item in the menu lets you view and edit five other screens that contain even more specific information about a subscriber or a subaccount:
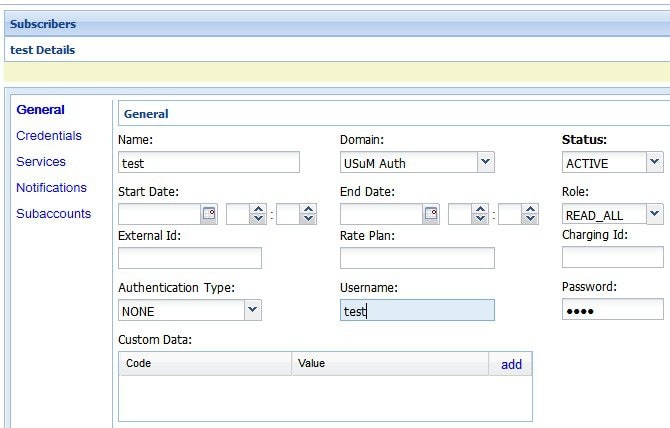
General Screen
-
Click item in the menu tree.
-
Find the subscriber as described in Find a Subscriber.
-
Click .
|
Field |
Description |
|---|---|
|
Name |
This single field is for both the first and last name of the subscriber. |
|
Domain |
This drop-down list displays the domain to which the subscriber is assigned. Domains themselves are created in the Policy Builder interface. |
|
Status |
By default, status for a new subscriber is always ACTIVE, but you can change this. |
|
Start Date End Date |
Use the calendar widget to specify the start and stop date and time of service to the subscriber. |
|
Role |
When the subscriber logs in to your subscriber portal, this field determines how much read-write privilege is granted to them. The primary subscriber is always granted the Write All role, permitting editing of all subaccounts under it. You can change this role if you wish. For example, the primary subscriber might be a team leader responsible for team member accounts. See Subaccount Screen. If a user is not a primary subscriber, they are created as a subaccount user under a primary subscriber. Assign roles for subaccount users in the Details > Subaccounts screen. Be sure to assign the access privileges of a subaccount user. When first created, they have Write all privileges. |
|
External ID |
Occasionally, a subscriber may need to connect with or relate to an external third-party system. This field identifies the subscriber to that external service. |
|
Rate Plan |
Enter predefined rate plan codes, such as prepaid or postpaid. Rate plans are created in Policy Builder and are obtained from that administrator. |
|
Charging ID |
A subscriber might have a unique charging ID. Using this, usage by members of a subaccount, or ’children’ of the subscriber can be billed to their ’parent’. |
|
Authentication Type |
Not used. |
|
Username |
This field is used to provision the EAP username in the subscriber profile. This field is provided to support the EAP-TTLS/MSCHAPv2 call flow introduced in the CPS 7.5 release. |
|
Password |
This field is used to provision the EAP password in the subscriber profile. This field is used together with the Username field. |
|
Custom Data Area |
This area lets you use a look up list, or key-value pairs to keep track of other variables that concern your subscriber. |
|
Code |
This is the key portion of a key-value pair. |
|
Value |
This is the definition or value of the key-value pair. |
Credentials Screen
The Credentials screen lets you specify more than one credential or password for a subscriber. More than one credential may be necessary for the subscriber to log in from different devices or locations.
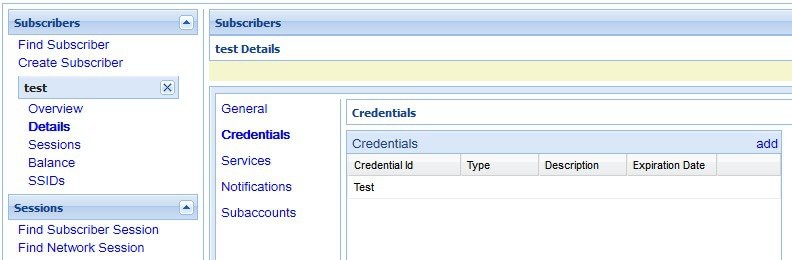
The rows in this screen are populated by the Credential Detail screen shown below.
Click the add or edit link to display the Credential Detail screen.
|
Field |
Description |
|---|---|
|
Credential ID |
A credential is a unique identifier that subscribers and subaccount customers use to log in. Typically, a credential is defined when you create the subscriber or subaccount. However, you can manage credentials separately from the create process. The credential can be any letter or number with a length of one or more alphanumeric characters. Best practice is to not use special characters, although apostrophe and hyphen may be part of a name. |
|
Type |
Use this field for sorting and reporting. In this field, you can indicate if the credential is for a subscriber or a subaccount, or for permanent or guest use. |
|
Description |
This field lets you provide more information about this particular credential. |
|
Expiration Date |
Uses the calendar widget to set an end date to the credential and so restrict logins. |
|
Password |
In addition to a credential ID, a subscriber can log in with a password. A password is optional because MAC addresses, for example, do not have a password. |
|
New Password |
Change the password already defined. |
|
Confirm Password |
This entry must match the new password. |
Services Screen
The Services link lets you administer what services or service plans a subscriber may access.
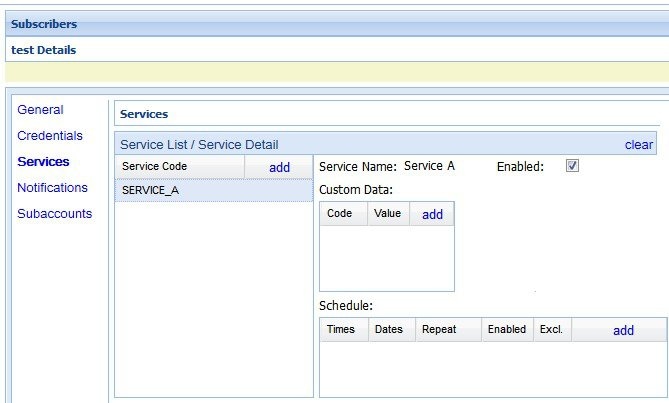
The Services screen shows this information about the service provided to the subscriber. Recall that a subscriber can have one or more services.
Services and service plans are developed in Policy Builder and are reflected here for you to choose from.
Services are a point of intersection between Control Center and Policy Builder.
|
Field |
Description |
|---|---|
|
Service Name |
Enter the name or code of the service. |
|
Enabled |
If checked, this box allows the subscriber to use the service. Unchecked, the subscriber cannot access the service. |
|
Custom Data |
This area lets you use a look up list, or key-value pairs to keep track of other variables that concern your service. |
|
Code |
This is the key portion of a key-value pair. |
|
Value |
This is the definition or value of the key. |
|
Schedule |
This area lets you define specific times and recurrence for when the service is available to the subscriber. Click the add link to fill in the Schedule Detail window.  |
|
Start Time End Time |
These two fields let you limit the hours of the day your subscriber may access your system. The example shows access times from 8:00 in the morning to 5:00 in the afternoon. Conversely, if you check the Turn off service during these times check box, you prevent access during the times specified here. |
|
Dates |
Set dates to limit subscriber access on a wider basis. |
|
Start Date End Date |
Use the calendar widget to set a specific start and end date to service. Conversely, check the Turn off service during these times check box and prevent access during the dates specified here. |
|
Day of month |
Select a day of the month to permit the subscriber to access this service. If you want, you can allow access on the 5th, 10th, and 30th of the month by creating three schedules. Conversely, check the Turn off service during these time check box to deny access to a service on a particular day of the month. |
|
Day of Week |
Select the day of the week to permit the subscriber to access this service. You can allow access on only Tuesday, Wednesday, and Thursday by creating three schedules specifying those days of the week. For another example, you might create two schedules, one for Saturday and one for Sunday. If you check the Turn off service during these times check box for both schedules, you prevent access on weekends specifically. |
|
Month |
Select a month that you would like to allow service, perhaps for an introductory offer. Services is granted for that calendar month only. To affect more than one month, create multiple schedules, that is, one for June, one for July, one for August and so on. Conversely, check the Turn off service during these times check box to deny access to a service for a particular month, perhaps during vacation period. |
|
Year |
Grant service for an entire calendar year. To affect more than one year, create multiple schedules, that is, one for 2014, 2015, and so on. Conversely, check the Turn off service during these times check box to deny access to a service for a particular year. |
|
Repeat |
This field interprets the Schedule detail, showing if the schedule has a recurring aspect. |
|
Enabled |
Select this check box to put the schedule into effect. If you are developing a schedule and don’t want to invoke it yet, deselect this box. This selection is reflected on the Service Detail screen as a Yes or No in the Enabled column. |
|
Turn off service during these times |
Select this check box to make the scheduled time unavailable for login, that is, to create and excluded time. For example, you may want to block a subscriber from logging in during school time hours. This selection is reflected on the Service Detail screen as a Yes or No in the Excl column. |
Add a Service to a Subscriber
| Step 1 | To add a service to a subscriber, click . |
| Step 2 | Choose a service
from the
Select
Service window.
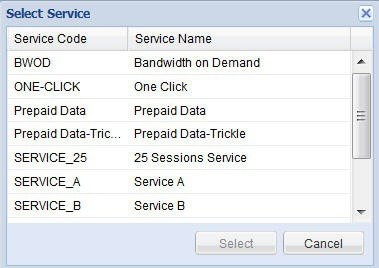 |
| Step 3 | Click the
Select button.
Services already provisioned to a subscriber are grayed out and you cannot select them again. |
| Step 4 | Check that the new service is listed under the Service List area on the Subscriber screen. |
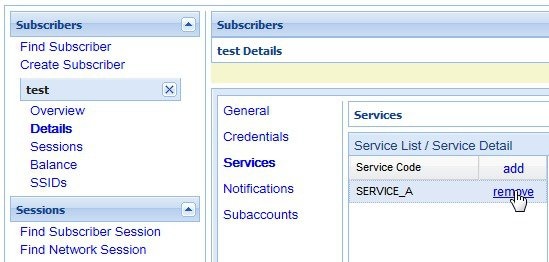
Remove a Service from a Subscriber
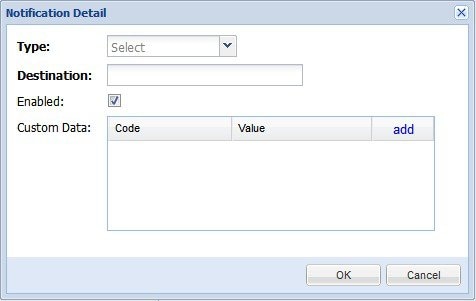
Notifications Screen
Note | Notifications must be set up in Policy Builder prior to using this screen. |
|
Field |
Description |
|---|---|
|
Type |
Contact your subscriber with one of these methods in the drop-down menu: |
|
Destination |
Specify the address for the notification. For an XML message, provide URLs. For an SMS message, provide the destination number, perhaps 555544444. For an email notification, provide an email address. For an Apple iPhone push, provide the server gateway, server port, and certificate and certificate password. |
|
Enabled |
Click this check box to allow notifications to go through, or uncheck it if you are still developing the message. |
|
Custom Data Area |
This area lets you use a look up list, or key-value pairs and so keep track of other variables that concern your subscriber. |
|
Code |
This is the key portion of a key-value pair. |
|
Value |
This is the definition or value of the key. |
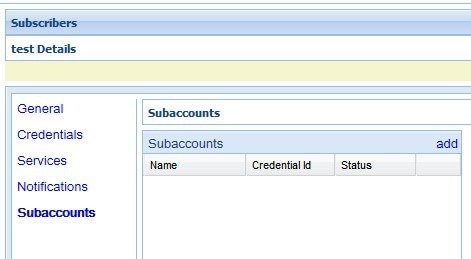
Subaccount Screen
You may be asked to create a subaccount under a primary subscriber so that the primary subscriber has authority over others, perhaps team members or family members. This construct forces a subaccount’s login to count against the bill of the main subscriber.
For example, if the primary subscriber has a Charging ID of 123456, assign the subaccount users the same charging ID.
Note | Currently, there is no method to move a primary subscriber to become a subaccount of a different subscriber. You must delete and then recreate such a subscriber. |
Note | You cannot make another subaccount under the current subaccount. You can only provision subaccounts under a primary subscriber. |
Sessions Screen
The Sessions item in the menu tree under a subscriber lets you see the sessions the subscriber has running. That is, find the subscriber first, and then check their sessions. A subscriber may have several sessions up, perhaps from different devices.
You can display a Sessions screen two ways:
-
Find the subscriber and then view all their sessions:
See Viewing a Subscriber Session.
-
Find all sessions on the network and then look for a subscriber:
See Finding Network Sessions.
Note | If you would like a utility to start artificial sessions, contact your Cisco technical representative. |
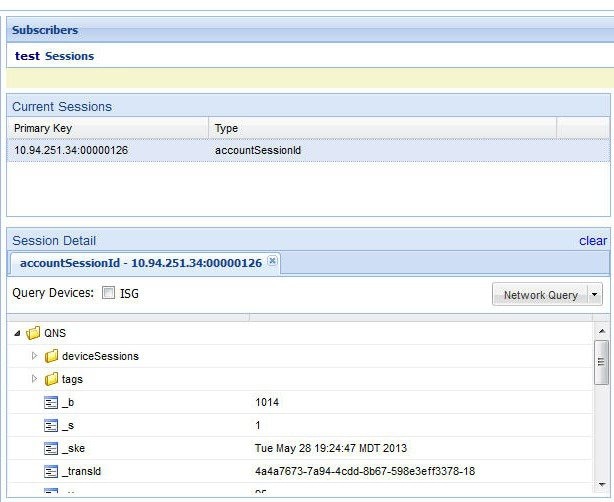
Session Details Table
The Session Detail table contains information about the session, including a Remove Session link.
An example of a Session Detail is shown below.
|
Field |
Description |
|---|---|
|
Session Tabs |
At the top, a tab exists for each session the subscriber has running. The example has one tab, the subscriber has one session up. |
|
Query Devices |
This check box lets you filter the session information below to one or more devices. |
|
Network Query |
This drop-down list lets you show details for only the devices you can provide IP addresses and secrets for, and so limits the data returned by the detail table. |
The Policy Server folder has several subfolders to organize the session data.
Remove a Session
There are several ways to find a session and then remove it.
-
Subscribers tab > Subscriber node > Find a subscriber > subscriber Sessions item > Remove Session link
-
Subscribers tab > Subscriber node > Find a subscriber > Overview screen Sessions area > manage link > Remove Session link
-
Subscribers tab > Sessions node > Find Subscriber session > open link > Remove Session link
Removing a session affects Cisco Policy Suite only, but other PEPs may be notified. Removing a session drops a subscriber and force them to log in again. If a subscriber reports that they cannot log in, check to see if there is a stuck session and remove it. If the system is experiencing performance troubles, dropping stuck sessions may help.
Balance Screen
The Balance item in the tree under a subscriber name provides a way to set balance amounts and quota amounts for the subscriber.
A subscriber can have several balance codes in place, and under each one, the subscriber can have several quota codes.
Balance codes and quota codes are developed and maintained in the Policy Builder interface. Control Center reflects that configuration.
- Balances
- Quotas
- Managing Quotas and Balances
- Add a Balance Type
- Credit or Debit an Existing Balance
- Delete a Balance
- Delete a Quota
- Check the History of Balances
Balances
Balances are of these types:
-
Recurring—recurring balances automatically replenish on a configured cycle, for example daily, weekly, monthly, or per billing cycle. Any remaining balance is not carried over when the balance is reset. -
One-time—one-time balances do not automatically replenish. One-time balances may be configured with an expiration date. -
Top Up—a type of One-time balance. Top ups add to a subscriber’s balance and may be applied to any of the above balance types. Top ups are differentiated from the balance to which they are applied, enabling the service provider to define the order in which top ups, and the underlying balance, is consumed. Top ups may be assigned an expiration date.
-
Balances can be configured to be automatically allocated for a subscriber during a balance reserve activity if a balance does not already exist. The fair use balances for new subscribers is an example. Auto-provisioned balances are created based on rules configured by the service provider, which may refer to parameters such as subscriber class, rate plan, and so on, when provisioning the balance.
Quotas
Quota may be either of two types, one-time or recurring.
One-time quotas are amounts of time use or data use that occur only one time and are not renewed. For example:
-
If an ISP provider gives free introductory minutes
-
If data bandwidth is provided on a tiered system, with the first 100 KB free, and then payment begins
-
For a prepaid card use case
Recurring quota are those services the account subscriber signs up for and gets refreshed at some recurring period.
Managing Quotas and Balances
Balance codes and quota codes are developed and maintained in the Policy Builder interface for these drop-down lists.
In the data hierarchy, Balances contain Quota. If you delete information at the balance level, all the quotas underneath it are removed.
| Step 1 | In the menu, click Subscribers tab > Subscribers node > Find Subscriber. |
| Step 2 | Open a subscriber record. |
| Step 3 | Select the Balance item in the menu tree under the subscriber. |
| Step 4 | Click the plus sign by the balance code name, to open the full view to the balances. |
| Step 5 | Click a Credit link to apply more quotas or balance amounts for the subscriber. |
| Step 6 | Use the date picker and time picker fields to change the start and expiration of a credit. Originally a credit amount is provided for you, but you can increase or decrease the amount you want to credit the balance using the date and time picker fields. |
| Step 7 | When the credit data are correct, click apply credit. |
| Step 8 | Wait for a screen refresh, and then review the new Balance chart. Be sure that your changes are in effect. |
Add a Balance Type
| Step 1 | To add another type of quota for the subscriber’s use, click the add link located just below the Last refresh message. | ||
| Step 2 | Fill in the fields in the Add Balance window using the drop-down lists and calendar widgets. | ||
| Step 3 | Select a balance
and quota code and enter the amount you want to give the subscriber.
|
Credit or Debit an Existing Balance
Sometimes a subscriber’s balance may need to be adjusted up or down.
| Step 1 | To adjust a balance, open the balance information with the plus sign. |
| Step 2 | Then click
either credit or debit links on the right. The credit link lets you specify an
amount of credit and also a start and expiration date for when it may be used.
If you select to debit a balance, you are only prompted for the amount. |
| Step 3 | Fill in the field for debit or credit amount. The remaining quota is calculated. |
Delete a Balance
If you need to completely remove a specific balance type and all of its quota types from a subscriber, click the red circle/white dash icon.
This may be done during testing scenarios, but with real subscribers, another solution might be to simply debit balance until the balance approaches zero.
Delete a Quota
A quota is a part of an overall balance. You can delete any quota that contributes to a balance, and so affect the entire subscriber balance.
Note | Take care about which you delete with the red circle/white dash. If you delete the Balance item on the screen, all of the quotas within it are deleted as well. |
Click the red circle/white dash associated with a quota type, for example Quota1, to delete a single quota type within a balance type.
Check the History of Balances
On the Balance screen, you can review the credit transactions against a quota type, but not the debit history.
| Step 1 | Click the
history link associated with the quota.
The History screen shows you the Start and Expiration dates, original amount, transacted amount and any reserved quota. |
| Step 2 | Click on a column heading to sort that column. |
| Step 3 | Click on the down arrow in a column to change the sort or add or remove columns from the display. |
 Feedback