Cisco UCS Director APIC Management Guide, Release 6.0
Bias-Free Language
The documentation set for this product strives to use bias-free language. For the purposes of this documentation set, bias-free is defined as language that does not imply discrimination based on age, disability, gender, racial identity, ethnic identity, sexual orientation, socioeconomic status, and intersectionality. Exceptions may be present in the documentation due to language that is hardcoded in the user interfaces of the product software, language used based on RFP documentation, or language that is used by a referenced third-party product. Learn more about how Cisco is using Inclusive Language.
- Updated:
- September 19, 2016
Chapter: Managing Tenants
Managing
Tenants
This chapter contains the following sections:
Onboarding a Cisco UCS Director Tenant
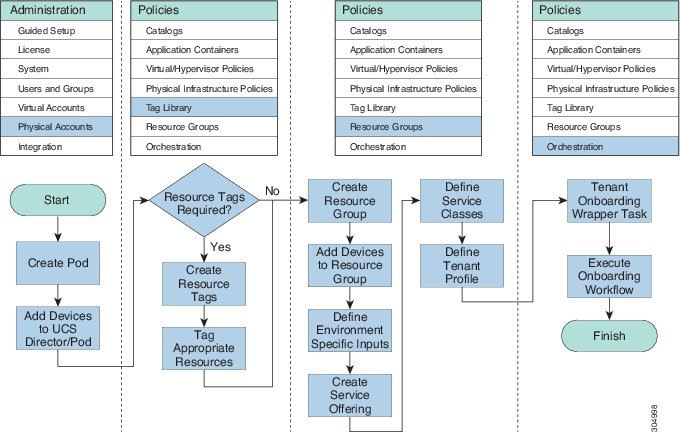
Cisco UCS Director tenants are essentially customers who share the compute, network, and storage resources that are configured for ACI in Cisco UCS Director. The following image explains the end-to-end process flow of the Cisco UCS Director tenant onboarding process.
-
APIC Usecases > Tenant Usecases > VNX Storage Tenant Usecases
-
APIC Usecases > Tenant Usecases > NetApp Storage Tenant Usecases
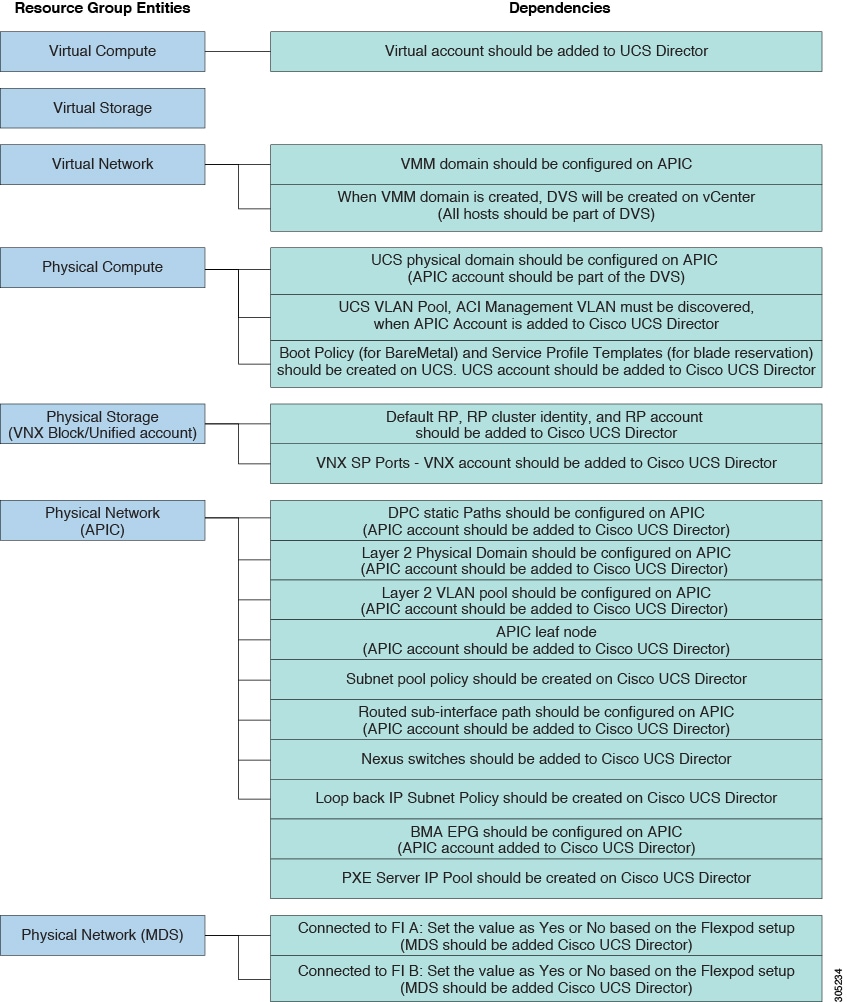
Ensure that the environment variables are defined for the physical and virtual infrastructure resources in a resource group that is used for onboarding a tenant. The following image explains the dependencies of the physical and virtual infrastructure resources.
Workflows for Onboarding a Tenant
Cisco UCS Director provides the following preconfigured orchestration workflows for secure tenant onboarding:
-
NetApp workflows:
-
FlexPod ACI - Tenant Infrastructure Configuration—Use this workflow to create an APIC tenant, configure the tenant-dedicated NetApp storage, configure the ACI fabric for NFS data store connectivity, and provide a tenant-dedicated NFS data store to an ESXi cluster. For more information on how to deploy Cisco UCS Director on FlexPod with Cisco Application Centric Infrastructure using the FlexPod ACI - Tenant Infrastructure Configuration workflow, see the Deployment Guide for FlexPod with VMware vSphere 5.5 Update 1, Cisco UCS Director and Cisco Nexus 9000 Cisco Application Centric Infrastructure (ACI). 
Note
If the NetApp device uses ONTAP 8.3 operating system, ensure that the following tasks are added before the Create Failover Group tasks: This workflow includes the following child workflows:
-
Tenant Onboarding - L2 Out—Use this workflow to configure the Layer 2 out configuration for the APIC tenant.
-
Tenant Onboarding - L3 Out—Use this workflow to configure the Layer 3 out configuration for the APIC tenant. When executing this workflow, set the Ethernet interfaces, BGP ID, and subnet IP addresses. In the Workflow Designer dialog box, double-click the SSH Command task and navigate to Task Inputs screen by clicking Next. The administrator has to define the sub interface for the configuration by editing the values of the following task inputs:
-
-
FlexPod ACI - Enable Tenant Infrastructure Support For Guest Attached ISCSI—Use this workflow to configure iSCSI support on the NetApp storage, and configure iSCSI-A and iSCSI-B paths from the storage virtual machine to the ESXi cluster through the ACI fabric.
Note
If the NetApp device uses ONTAP 8.3 operating system, ensure that the following tasks are added before the Create Failover Group tasks: -
FlexPod ACI - Enable Connectivity for VM Application Consistent Snapshots—Use this workflow to configure an ACI contract between the tenant-dedicated VMNET EPG and the tenant storage virtual machine management EPG to meet the connectivity requirements defined by the NetApp SnapDrive software.
-
-
VNX Workflows:
-
Tenant Onboarding with MSP - VNX—Use this workflow to onboard a tenant for Managed Service Provider (MSP) organization on the VNX storage device.
Note
If you have not enabled the service provider feature in Cisco UCS Director, the Tenant Onboarding with MSP - VNX workflow will be in the validation failed state. To enable a service provider, choose Administration > System > Service Provider Feature, and check the Enable Service Provider Feature (Requires System Restart) check box. Restart the service and validate the Tenant Onboarding with MSP workflow.
This workflow includes the following child workflows:
-
Tenant Onboarding - L2 Out—Use this workflow to configure the Layer 2 out configuration for the APIC tenant.
-
Tenant Onboarding - L3 Out—Use this workflow to configure the Layer 3 out configuration for the APIC tenant.
-
DR Cluster with RP support—Use this workflow to create replica of data cluster with the RP support in a tenant. Provide the following RP-related information in addition to the cluster information: RP account identity, RP cluster identity, and tenant CG identity.
When updating a tenant, provide the primary and secondary CG copy identities. To handle a failover scenario for a tenant with the disaster recovery (DR) support, same LUN ID and host LUN (HLU) ID are needed in the primary and secondary sites. During tenant onboarding, the same LUN ID and HLU ID are reserved on the primary and secondary sites, based on the availability of the selected VNX account and VMware host.
-
DR Tenant Onboarding with MSP - VNX—Use this workflow to onboard a tenant with the DR support for MSP organization on the VNX storage device.
-
Tenant Onboarding - Datastore Cluster Creation - VNX—Use this workflow to create data store cluster for a tenant.
-
Reserve Blade on UCSM—Use this workflow to reserve half- or full-width blades on Cisco UCS Manager for the tenant.
-
-
Tenant Onboarding - VNX—Use this workflow to onboard a tenant for a user group on the VNX storage device.
This workflow includes the following child workflows:
-
Tenant Onboarding - L2 Out—Use this workflow to configure the Layer 2 out configuration for the APIC tenant.
-
Tenant Onboarding - L3 Out—Use this workflow to configure the Layer 3 out configuration for the APIC tenant.
-
DR Cluster with RP support—Use this workflow to create a replica of a data cluster with RP support in a tenant.
Provide the following RP-related information in addition to the cluster information: RP account identity, RP cluster identity, and tenant CG identity. When updating a tenant, provide the primary and secondary consistency group (CG) copy identities.
To handle a failover scenario for a tenant with the disaster recovery (DR) support, the same LUN ID and host LUN (HLU) ID are needed in the primary and secondary sites. During tenant onboarding, the same LUN ID and HLU ID are reserved on the primary and secondary sites, based on the availability of the selected VNX account and VMware host.
-
DR Tenant Onboarding with MSP - VNX—Use this workflow to onboard a tenant with the DR support for MSP organization on the VNX storage device.
-
Reserve Blade on UCSM—Use this workflow to reserve half- or full-width blades on Cisco UCS Manager for the tenant.
-
-
-
Update Tenant:
-
Update Tenant - Datastore Cluster Creation - VNX—Use this workflow to add VNX data store to the tenant data store cluster.
-
Update Tenant - VNX—Use this workflow to update the physical and virtual resources of the tenant, such as memory, number of CPUs, number of VDCs, and number of full-width and half-width blades.
-
DR Update Tenant - VNX—Use this workflow to update the physical and virtual resources of the tenant, such as memory, number of CPUs, number of VDCs, number of full-width and half-width blades, and reserved space of the physical server.
-
-
Tenant Onboarding with Private Network(s)—Use this workflow to onboard a tenant with one or more private networks.
-
Update Tenant vPOD with Existing Resources—Use this workflow to update the vPOD information with multiple data stores and multiple data store clusters, for a tenant. Choose the tenant that you want to update, and the service offering with which the tenant is onboarded. The data stores and data store clusters must be part of VMware generic cluster that has been selected during tenant onboarding.
- Example: VNX Tenant Onboarding
- Example: Flexpod ACI – Tenant Infrastructure Configuration
- Example: Tenant Onboarding with Private Network(s)
Example: VNX Tenant Onboarding
This section describes the step-by-step process involved in onboarding a tenant on the VNX storage device for Managed Service Provider (MSP) organization through the user interface.
| Step 1 | Add a pod. For more information, see the Cisco UCS Director Administration Guide. | ||||||||||||||||||||||||||||||||||||||||||||||||||||||||||
| Step 2 | Add the
following types of accounts to the pod:
For more information on how to create physical and virtual accounts, see the Cisco UCS Director Administration Guide. | ||||||||||||||||||||||||||||||||||||||||||||||||||||||||||
| Step 3 | Add the pod to a resource group using the Add Pod to Resource Group option, to associate the accounts in the pod to the resource group. For more information, see Adding a Pod to a Resource Group. | ||||||||||||||||||||||||||||||||||||||||||||||||||||||||||
| Step 4 | Choose the
resource group and click
Edit to define the environment variable for each
account. For more information, see
Editing a Resource Group.
| ||||||||||||||||||||||||||||||||||||||||||||||||||||||||||
| Step 5 | Add a service offering and define the service class for each resource type (physical compute, physical storage, physical network, virtual compute, virtual storage, and virtual network). The service offering defines the resource requirements of the tenant. For more information on how to add a service offering, see Adding a Service Offering. | ||||||||||||||||||||||||||||||||||||||||||||||||||||||||||
| Step 6 | Add a tenant profile. In the Add Tenant Profile dialog box, choose the service offering that you added in Step 5 and add the resource group to the service offering. For more information on how to add a tenant profile, see Adding a Tenant Profile. | ||||||||||||||||||||||||||||||||||||||||||||||||||||||||||
| Step 7 | Enable the service provider feature in Cisco UCS Director as follows: | ||||||||||||||||||||||||||||||||||||||||||||||||||||||||||
| Step 8 | Restart the service to enable the service provider. | ||||||||||||||||||||||||||||||||||||||||||||||||||||||||||
| Step 9 | Validate the Tenant Onboarding with MSP workflow to move the workflow from the validation failed state to valid state. | ||||||||||||||||||||||||||||||||||||||||||||||||||||||||||
| Step 10 | Edit the VNX
Tenant Onboarding workflow to enter the mandatory input values as follows:
| ||||||||||||||||||||||||||||||||||||||||||||||||||||||||||
| Step 11 | Choose the VNX Tenant Onboarding workflow and click Validate Workflow to validate the workflow. | ||||||||||||||||||||||||||||||||||||||||||||||||||||||||||
| Step 12 | Double-click the VNX Tenant Onboarding workflow. | ||||||||||||||||||||||||||||||||||||||||||||||||||||||||||
| Step 13 | In the Workflow Designer dialog box, click Edit Workflow Properties to view the tasks and to edit user inputs that are used for task input mapping for this workflow, if necessary. | ||||||||||||||||||||||||||||||||||||||||||||||||||||||||||
| Step 14 | (Optional)Add an advanced type catalog for onboarding a tenant and publish the catalog as follows: | ||||||||||||||||||||||||||||||||||||||||||||||||||||||||||
| Step 15 | Onboard a
tenant in one of the following ways:
| ||||||||||||||||||||||||||||||||||||||||||||||||||||||||||
Example: Flexpod ACI – Tenant Infrastructure Configuration
This section describes the step-by-step process involved in onboarding a tenant on the NetApp storage device using the Flexpod ACI – Tenant Infrastructure Configuration workflow.
| Step 1 | Add a pod. For more information, see the Cisco UCS Director Administration Guide. | ||
| Step 2 | Add the
following types of accounts to the pod:
For more information on how to create physical and virtual accounts, see the Cisco UCS Director Administration Guide. | ||
| Step 3 | Add the pod to a resource group using the Add Pod to Resource Group option, to associate the accounts in the pod with the resource group. For more information, see Adding a Pod to a Resource Group. | ||
| Step 4 | Choose the
resource group and click
Edit to define the environment variable for each
account. For more information, see
Editing a Resource Group.
| ||
| Step 5 | Add a service offering and define the service class for each resource type (physical compute, physical storage, physical network, virtual compute, virtual storage, and virtual network). The service offering defines the resource requirements of tenant. For more information on how to add a service offering, see Adding a Service Offering. | ||
| Step 6 | Add a tenant profile. In the Add Tenant Profile dialog box, choose the service offering that you have added in Step 5 and add the resource group to the service offering. For more information on how to add a tenant profile, see Adding a Tenant Profile. | ||
| Step 7 | Edit the
Flexpod ACI – Tenant Infrastructure Configuration workflow to enter the
mandatory input values as follows:
| ||
| Step 8 | Choose the Flexpod ACI – Tenant Infrastructure Configuration workflow and click Validate Workflow to validate the workflow. | ||
| Step 9 | Double-click the Flexpod ACI – Tenant Infrastructure Configuration workflow. | ||
| Step 10 | In the Workflow Designer dialog box, click Edit Workflow Properties to view the tasks and edit user inputs that are used for task-input mapping for this workflow, if necessary. | ||
| Step 11 | Add an
advanced type catalog for onboarding a tenant and publish the catalog as
follows:
| ||
| Step 12 | After
publishing a catalog, you can onboard a tenant in one of the following ways:
|
Example: Tenant Onboarding with Private Network(s)
Note | This example is validated using SDX with VPX instances in one-arm mode. |
-
Ensure that appropriate tags are created for VMware cluster, data store cluster, and data stores. Also ensure that these tags are used to tag the VMware cluster, data stores cluster, and data stores in virtual compute and virtual storage, manually.
-
Ensure that the ESXi clusters and hosts are defined.
-
Ensure that the data store and data store clusters are defined.
| Step 1 | Add a pod. For more information, see the Cisco UCS Director Administration Guide. |
| Step 2 | Add the
following types of accounts to the pod:
For more information on how to create physical and virtual accounts, see the Cisco UCS Director Administration Guide. |
| Step 3 | Add the pod to a resource group using the Add Pod to Resource Group option, to associate the accounts in the pod with the resource group. For more information, see Adding a Pod to a Resource Group. |
| Step 4 | Choose the
resource group and click
Edit to define the environment variable for each
account. For more information, see
Editing a Resource Group.
|
| Step 5 | Add a service offering. During addition of the service offering, ensure that you check the Override Mandatory Service Class Requirement check box and define the service class for each resource type (physical network, virtual compute, virtual storage, and virtual network). The service offering defines the resource requirements for the tenant. For more information on how to add a service offering, see Adding a Service Offering. |
| Step 6 | Add a tenant profile. In the Add Tenant Profile dialog box, choose the service offering that you added in Step 5 and add the resource group to the service offering. For more information on how to add a tenant profile, see Adding a Tenant Profile. |
| Step 7 | To onboard a
tenant with multiple private networks, execute the tenant onboarding workflow
as follows:
|
 Feedback