Configuring the Cisco TelePresence Content Server Release 5.x to Use an External Windows Media Streaming Server
Available Languages
Table of Contents
How to Configure the Content Server to Use an External Windows Media Streaming Server
Configuring an External Windows Media Streaming Server
Configure Windows Media Services
Configuring the Content Server to Use the External Windows Media Streaming Server
Create a template using that media server
Create a recording alias that uses the template.
Obtaining Documentation and Submitting a Service Request
Configuring the Cisco TelePresence Content Server Release 5.x to Use an External Windows Media Streaming Server
This guide describes how to configure the Cisco TelePresence Content Server (Content Server) Release 5.x to use an external Windows Media streaming server for live unicast and on-demand streaming.Introduction
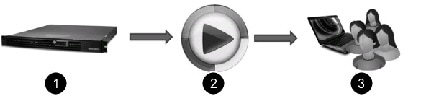
The Content Server default installation has an embedded Windows Media streaming server that supports live and on-demand streaming of Windows Media content. You can also configure an external Windows Media streaming server to stream content from the Content Server (Figure 1). Streaming off an external server will increase the streaming capacity and the maximum concurrent number of users who are able to view content without affecting other services running on the Content Server.

Note
The Content Server creating the recording will The Content Server creating the recording will not be live streaming in this scenario. Live multicast streaming of Windows Media content is supported only from the local Windows Media server. For more information, see the Cisco TelePresence Content Server Administrator and User Guide for your release.
How to Configure the Content Server to Use an External Windows Media Streaming Server
To configure the Content Server to use an external Windows Media streaming server for streaming, complete the following tasks in the order shown:
1. Configuring an External Windows Media Streaming Server
2. Configuring the Content Server to Use the External Windows Media Streaming Server
Configuring an External Windows Media Streaming Server
You must configure the external Windows Media streaming server as described in this section; otherwise, publishing point creation will fail.
Create a local user account
You must configure the external Windows Media streaming server to authenticate streams off the Content Server by using a local user account.
Step 1 Log on to an external Windows Media streaming server by using Remote Desktop Connection.
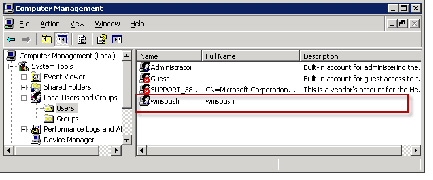
Step 2 Go to Computer Management > Local Users and Groups > Users .
Step 3 Create a new local user account. The example in Figure 2 shows a user called wmspush .
Figure 2 Computer Management: Local Users
Step 4 In Properties for the user, specify Password never expires to prevent the password from expiring automatically.
Note If you change the password on the external Windows Media server, you need to enter the new password for this user on the Content Server (see Configuring the Content Server to Use the External Windows Media Streaming Server).
Configure Windows Media Services
Step 1 Choose Windows Media Services from the Start menu.
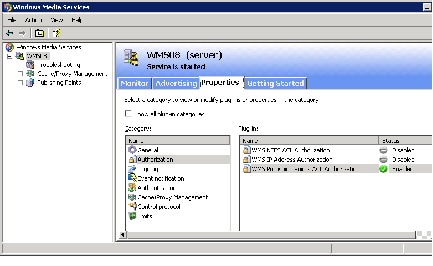
Step 2 Choose Manage the Streaming Media Server , select the server name from the panel on the left, and from the Properties tab select Authorization > WMS Publishing Points ACL Authorization as shown in Figure 3.
Figure 3 Windows Media Services: Server Properties
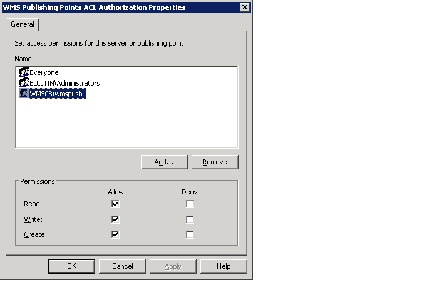
Step 3 Double click WMS Publishing Points ACL Authorization to bring up the Properties window and click Add… .
Step 4 In the resulting dialog, add the local user that you created.
Step 5 After adding the user, select the user and enable permissions to Allow Read , Write and Create , as shown in Figure 4; then, click OK .
Figure 4 WMS Publishing Points ACL Authorization Properties
Step 6 From the Properties tab, select Authentication , and verify that the status for WMS Negotiate Authentication is Enabled , as shown in Figure 5.
Figure 5 WMS Negotiate Authentication Enabled

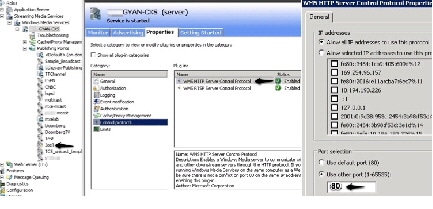
Step 7 Windows Server 2008 only : From the Properties tab, select Control protocol and double click WMS HTTP Server Control Protocol to bring up the Properties window, shown in Figure 6.
Figure 6 WMS HTTP Server Control Protocol Properties
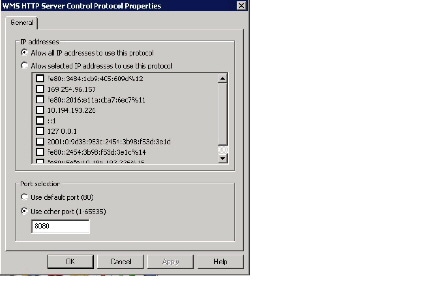
Step 8 Specify the IP addresses and port to use.
Note Beware of port conflicts that might be running on the remote Windows Media Server. Also, ensure that the port you use for control is available; otherwise, publishing will fail.
Configuring the Content Server to Use the External Windows Media Streaming Server
Now that you have set up authentication on the Windows Media streaming server, you need to configure the Content Server to start streaming content from the external server by completing the following tasks:
Create a media server
The following steps will create a new media server on the Content Server with support for live unicast and on-demand streaming from an external Windows Media streaming server. If you require support for one type of streaming, complete the steps as needed to create only a live streaming or an on-demand media server.
Step 1 Log in to the Content Server as administrator.
Step 2 Choose Management > Recording setup > Media server configurations .
Step 3 Click the Add Windows Media streaming server configuration to create a new Windows Media streaming server.
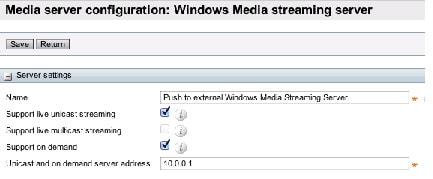
Step 4 Enter a name for your media server and then select Support live unicast streaming , Support on demand , or both, as shown in Figure 7. In the Unicast and on demand server address field , enter the IP address of the external Windows Media server that you configured.
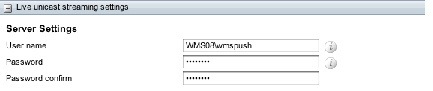
Step 5 In Live unicast streaming settings, enter the user name and password for the local account that you created on the external Windows Media server.
Note You must enter the user name as follows:
External_WM_server_Machine_name\username. The example in Figure 8 shows the user name WMS08\wmspush.
Figure 8 Live Unicast Streaming Settings
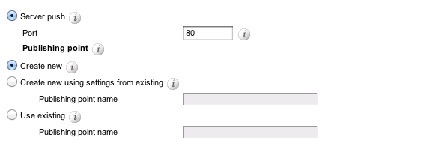
Step 6 In Server Push, enter either 80 or a port that the external Windows Media server listens to for incoming push media.
Step 7 Select Create new in the Publishing Points section, as shown in Figure 9.
Note You can create a new or use an existing publishing point. The key source formatting requirement syntax is Push:*. This syntax means that the publishing point is triggered externally—by the Content Server in this case.
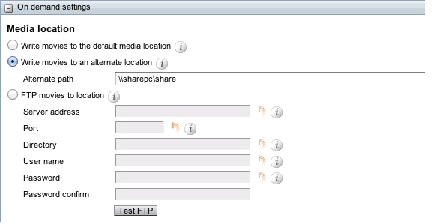
Step 8 In On Demand Settings, specify how the Content Server should move the media files to a location that the external Windows Media server can access either by writing to an alternate media location via UNC or using FTP to move the media.
a. Select Write movies to an alternate media location and enter a valid path that the Content Server has access to write files to, as shown in Figure 10.
Note The Content Server must have WRITE access to the share that this path points to. This means that either the share is fully open or the Content Server’s Windows machine account has the appropriate access. The implication of this is that both the Content Server and the machine hosting the share must be added to the same domain.
b. Select FTP movies to location to upload the finished media file to the final location.
- Specify the IP address or the DNS name for the server.
- Enter the port the FTP server uses to listen for requests on. The default port is 21.
- Enter the directory on the FTP server that files will be written to.
- Enter a user name and password for an account that has permissions for read and write access to the FTP directory on the FTP server.
- Test the FTP connection by clicking the Test FTP button.
Step 9 Specify the on-demand URLs to use.
- Use default on demand URLs —In most cases, you can use default on-demand URLs to view streaming content.
- Use alternate on demand URLs —Alternate Uniform Resource Locator (URLs) are used to provide a location for the Content Servers’ content viewer. This option is useful when specifying a different IP address or DNS name for viewing clients that are connecting from a different network. For this option, enter the path that you want the content viewer to specify when viewing recordings from this media server.
Note Depending on the streaming protocol options implemented on the external server, MMS, RTSP and HTTP are available.
Step 10 Save the media server configuration.
Create a template using that media server
After you have created a media server that supports streaming off an external Windows Media server, you need to use this media server in a Content Server template. Multiple templates can use the same media server.
Step 1 Choose Recording setup > Templates .
Step 2 Click Add Template to create a new template.
Step 3 Enter a name for the template.
Step 4 Choose Viewable in the Content Server web interface in the Template section.
Step 5 Select one of the available viewing layouts.
Step 6 In the On demand media server configuration settings for Windows Media, choose a Content Server media server that supports on-demand streaming off an external Windows Media server.
Step 7 Select Live Stream if you want the call to be available for live streaming.
Step 8 In the Live media server configuration settings, choose a Content Server media server that supports live streaming off an external Windows Media server.
Create a recording alias that uses the template.
Now that you have set up a template for streaming off an external Windows Media server, you need to create a recording alias on the Content Server that uses the template. Multiple recording aliases can use the same template.
Step 1 Select Recording setup > Recording aliases .
Step 2 Click Add recording alias .
Step 3 Enter a name for your recording alias.
Step 4 Enter the dialing properties.
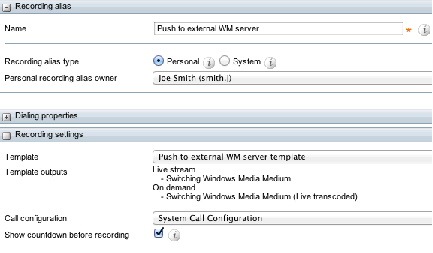
Step 5 Select a Content Server template that supports streaming off an external Windows Media server, as shown in Figure 11.
Figure 11 Recording Alias Settings
Step 6 Save the alias. You have now configured the Content Server to use an external Windows Media streaming server.
Step 7 Make a test call on your configured recording alias to verify setup.
Example Configuration
Use this example to obtain and verify the following information in your configuration:
Content Server: Windows Media Server Configuration

Publishing Point on External Windows Media Server

Troubleshooting
Problem Publishing point verification
Recommended Action Verify that the broadcast publishing point shows ‘started’ on the remote windows media, which indicates a successful publish.
Recommended Action Verify proper live streaming functionality by pointing a compatible media player at the publishing point with the following syntax: mms:// Content_Server_IP_Address/Publishing_Point_Name
Problem Windows authentication
Possible Cause If the Content Server is in Domain A and the external media server is in Domain B, you might have a problem.
Check the Content Server logs for the following warning to verify that you are experiencing this problem: Warning: Reporting Windows Media writer status, Error occurred in WMT_ERROR [call_id = 1, address = http:// Content_Server_IP_Address/Publishing_Point_Name , error = error code = (0xc00d2f0b)]
Recommended Action Check your AD configuration, trust, and so on. The simplest case is where both the Content Server and the external media server are in the same Domain or are both in a Workgroup.
Related Documentation
For more information about the Cisco TelePresence Content Server, see these documents:
- Cisco TelePresence Content Server Release Administration and User Guide
- Configuring the Cisco TelePresence Content Server for Streaming from a QuickTime Media Server
- Configuring the Cisco TelePresence Content Server for Streaming Flash from a Wowza Media Server
- Cisco TCS Integration to Cisco Show and Share for Live WMV Streaming
- Cisco TelePresence Content Server API Guide
- Video on Demand Integration for Cisco TCS to Cisco Show and Share
All documents are located here:
http://www.cisco.com/en/US/products/ps11347/tsd_products_support_series_home.html
Obtaining Documentation and Submitting a Service Request
For information on obtaining documentation, submitting a service request, and gathering additional information, see the monthly What’s New in Cisco Product Documentation , which also lists all new and revised Cisco technical documentation, at:
http://www.cisco.com/en/US/docs/general/whatsnew/whatsnew.html
Subscribe to the What’s New in Cisco Product Documentation as an RSS feed and set content to be delivered directly to your desktop using a reader application. The RSS feeds are a free service. Cisco currently supports RSS Version 2.0.
Cisco and the Cisco logo are trademarks or registered trademarks of Cisco and/or its affiliates in the U.S. and other countries. To view a list of Cisco trademarks, go to this URL: www.cisco.com/go/trademarks . Third-party trademarks mentioned are the property of their respective owners. The use of the word partner does not imply a partnership relationship between Cisco and any other company. (1110R)
Any Internet Protocol (IP) addresses and phone numbers used in this document are not intended to be actual addresses and phone numbers. Any examples, command display output, network topology diagrams, and other figures included in the document are shown for illustrative purposes only. Any use of actual IP addresses or phone numbers in illustrative content is unintentional and coincidental.
 Feedback
Contact Cisco
- Open a Support Case

- (Requires a Cisco Service Contract)