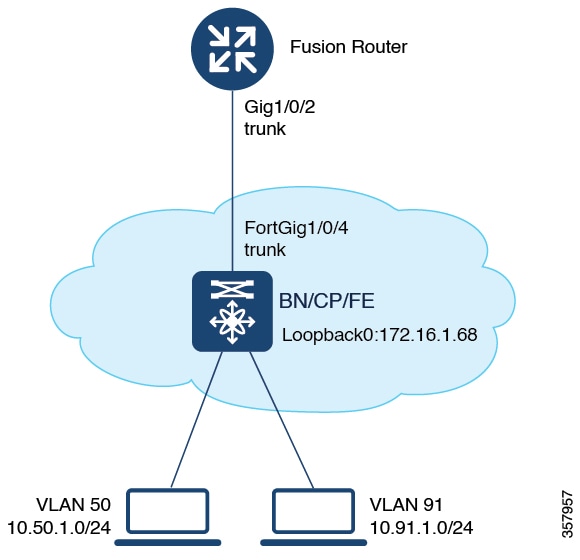
How to Configure Fabric in a Box
Use the Fabric in a box construct for smaller sites or remote branch deployments.
 Note |
Before you begin, ensure that the underlay network links are configured for routed access connectivity. |
|
Step |
Task |
Purpose |
|---|---|---|
|
Step 1 |
Configure a VRF to support IPv4 and IPv6 routing tables. VRF maintains the routing and forwarding information for devices within a virtual network. A VRF instance has its own IP routing table, a forwarding table, and one or more interfaces assigned to it. The VRF tables help the routing device reach the locator address space. |
|
|
Step 2 |
Configure the interface on the device for external connectivity and Layer 3 handoff. |
|
|
Step 3 |
Configure Switch Integrated Security Features based (SISF-based) device tracking to track the presence, location, and movement of endpoints in the fabric. SISF snoops traffic received by the device, extracts device identity (MAC and IP address), and stores them in a binding table. |
|
|
Step 4 |
Configure VLANs to segment your network and achieve traffic isolation between the segments. |
|
|
Step 5 |
Configure an SVI interface for each VLAN. A Switched Virtual Interface (SVI) interface is a VLAN interface that allows traffic to be routed between the VLANs. DHCP Snooping on a VLAN enables DT-PROGRAMMATIC policy that supports onboarding of DHCPv4 hosts. |
|
|
Step 6 |
Configure the fabric in a box device as a DHCP relay agent to relay the DHCP traffic between fabric endpoints and DHCP server. |
|
|
Step 7 |
|
|
|
Step 8 |
In a LISP VXLAN fabric, the VXLAN-GPO header has a VNI field that serves as an identifier of a specific virtual network. VXLAN VNI helps carry the macro segmentation information within the fabric site. A Layer 3 VNI identifies a Layer 3 overlay segment.
|
|
|
A Layer 2 VNI identifies a Layer 2 overlay segment. Configure Layer 2 VNI for the Default Instance. Configure Layer 2 VNI for the User-Defined VRF. Configuring Layer 2 VNI programmatically enables these first-hop-security policies on the VLANs: LISP-DT-GUARD-VLAN and LISP-AR-RELAY-VLAN. LISP-DT-GUARD-VLAN policy mitigates IP theft, MAC theft and DOS attacks. LISP-AR-RELAY policy helps in converting ARP broadcast and Neighbor Solicitation (NS) multicast packets to unicast. |
||
|
Step 9 |
Configure Border Gateway Protocol (BGP) for route exchange with the external network. |
|
|
Step 10 |
Configure a prefix list and route map for redistribution and route leaking between the global routing table (GRT) and the VRF. |
|
|
Step 11 |
Verify the configurations on the fabric in a box device using these show commands: |
|
|
show lisp session |
Displays the details of the LISP sessions that are established on the device. |
|
|
show lisp locator-set |
Displays the locator set information. |
|
|
show ip interface brief |
Displays the usability status of all the interfaces that are configured on the device. Filter the output to view the dynamically created LISP interfaces, using the show ip interface brief | i LISP command. |
|
|
show lisp instance-id instance-id ipv4 show lisp instance-id instance-id ipv6 |
Displays the details of each of the LISP IPv4 or IPv6 instances that are configured on the device. Use this command to view the operational status of the IPv4 or the IPv6 address family under each instance-id. This includes the status of the database, map-cache, publication entries, site registration entries, and so on. |
|
|
show lisp instance-id instance-id ethernet server |
Displays the LISP site registration information such as the site name, the node that registered last, status of the site, and the EID prefixes that are associated with the site. | |
|
show lisp instance-id instance-id ethernet database |
Displays the database mappings on the device Use this command to check EID table for a given VLAN |
|
|
show ip route vrf vrf |
Displays the route table that is created on the node for a given VRF. |
|
|
show lisp platform |
Displays the limits of the given platform or the device. This command shows the LISP instance limits, Layer 3 limits, Layer 2 limits, and the supported configuration style on the device. Use this command to understand the limits of the device and plan its usage and role in the fabric. |
Configure VRFs
To configure VRFs on the fabric in a box device, perform this task:
Procedure
| Command or Action | Purpose | |
|---|---|---|
|
Step 1 |
enable Example: |
Enables privileged EXEC mode. Enter your password, if prompted. |
|
Step 2 |
configure terminal Example: |
Enters global configuration mode. |
|
Step 3 |
vrf definition vrf-name Example: |
Configures a VRF table, and enters VRF configuration mode. |
|
Step 4 |
rd route-distinguisher Example: |
Creates routing and forwarding tables for a VRF instance. |
|
Step 5 |
address-family {ipv4 | ipv6} Example: |
Specifies the address family, and enters address family configuration mode.
|
|
Step 6 |
route-target export route-target-ext-community Example: |
Creates a list of export route target communities for the specified VRF. Enter either an AS system number and an arbitrary number (xxx:y) or an IP address and an arbitrary number (A.B.C.D:y). The route-target-ext-community value should be the same as the route-distinguisher value entered in the earlier step. |
|
Step 7 |
route-target import route-target-ext-community Example: |
Creates a list of import route target communities for the specified VRF. |
|
Step 8 |
exit-address-family Example: |
Exits address family configuration mode, and enters VRF configuration mode. |
|
Step 9 |
end Example: |
Returns to privileged EXEC mode. |
Configure Layer 3 Handoff
To configure Layer 3 handoff on a fabric in a box device, perform this task:
Procedure
| Command or Action | Purpose | |
|---|---|---|
|
Step 1 |
enable Example: |
Enables privileged EXEC mode. Enter your password, if prompted. |
|
Step 2 |
configure terminal Example: |
Enters global configuration mode. |
|
Step 3 |
vlan vlan-id Example: |
Places you into the VLAN configuration submode. If the VLAN does not exist, the system creates the specified VLAN and then enters the VLAN configuration submode. |
|
Step 4 |
name vlan-name Example: |
Names the VLAN. |
|
Step 5 |
exit Example: |
Returns to global configuration mode. |
|
Step 6 |
interface interface-name Example: |
Specifies the VLAN interface and enters the interface configuration mode. |
|
Step 7 |
description interface-description Example: |
Adds a description for the interface |
|
Step 8 |
vrf forwarding vrf-name Example: |
Associates the VRF instance with the interface. |
|
Step 9 |
ip address ip_address subnet_mask Example: |
Configures the IP address and IP subnet. |
|
Step 10 |
no ip redirects Example: |
Disables sending of Internet Control Message Protocol (ICMP) redirect messages. |
|
Step 11 |
ipv6 address address Example: |
Configures an IPv6 address on the interface. |
|
Step 12 |
ipv6 enable Example: |
Enables IPv6 on the interface. |
|
Step 13 |
exit Example: |
Returns to global configuration mode. |
|
Step 14 |
interface interface-number Example: |
Specifies the interface and enters the interface configuration mode. |
|
Step 15 |
switchport mode trunk Example: |
Configures the interface as a VLAN trunk port. Configures the physical interface toward Fusion router. |
|
Step 16 |
end Example: |
Returns to privileged EXEC mode. |
Configure Device Tracking
To configure device-tracking on a fabric in a box device, perform this task:
Procedure
| Command or Action | Purpose | |
|---|---|---|
|
Step 1 |
enable Example: |
Enables privileged EXEC mode. Enter your password, if prompted. |
|
Step 2 |
configure terminal Example: |
Enters global configuration mode. |
|
Step 3 |
device-tracking policy policy-name Example: |
Creates a device-tracking policy with the specified name, and enters the device-tracking configuration mode. |
|
Step 4 |
tracking enable Example: |
Enables polling for the specified policy. |
|
Step 5 |
exit Example: |
Exits device-tracking configuration mode, and enters global configuration mode. |
|
Step 6 |
interface interface-id Example: |
Specifies an interface and enters interface configuration mode. |
|
Step 7 |
device-tracking attach-policy policy-name Example: |
Attaches the device tracking policy to the interface. |
|
Step 8 |
end Example: |
Returns to privileged EXEC mode. |
Configure VLAN
To configure VLAN on a FiaB, perform this task:
Procedure
| Command or Action | Purpose | |
|---|---|---|
|
Step 1 |
enable Example: |
Enables privileged EXEC mode. Enter your password, if prompted. |
|
Step 2 |
configure terminal Example: |
Enters global configuration mode. |
|
Step 3 |
ipv6 nd raguard Example: |
Configures the default Router Advertisement (RA) Guard policy on the VLAN. The RA Guard feature analyzes the RAs and filters out bogus RAs sent by unauthorized devices. In host mode, all router advertisement and router redirect messages are disallowed on the port. |
|
Step 4 |
ipv6 dhcp guard Example: |
Configures the default DHCP Guard policy on the VLAN. The IPv6 DHCP Guard feature blocks reply and advertisement messages that come from unauthorized DHCPv6 servers and relay agents. |
|
Step 5 |
vlan vlan-id Example: |
Specifies a VLAN ID, and enters VLAN configuration mode. |
|
Step 6 |
name vlan-name Example: |
Specifies a name for the VLAN. |
|
Step 7 |
exit Example: |
Exits VLAN configuration mode, and enters global configuration mode. |
|
Step 8 |
vlan vlan-id Example: |
Specifies a VLAN ID, and enters VLAN configuration mode. |
|
Step 9 |
name vlan-name Example: |
Specifies a name for the VLAN. |
|
Step 10 |
exit Example: |
Exits VLAN configuration mode, and enters global configuration mode. |
|
Step 11 |
end Example: |
Returns to privileged EXEC mode. |
Configure SVI Interface
To configure SVI interface for a VLAN, perform this task.
Procedure
| Command or Action | Purpose | |
|---|---|---|
|
Step 1 |
enable Example: |
Enables privileged EXEC mode. Enter your password, if prompted. |
|
Step 2 |
configure terminal Example: |
Enters global configuration mode. |
|
Step 3 |
interface vlan-id Example: |
Specifies the interface for which you are adding a description, and enters interface configuration mode. |
|
Step 4 |
description string Example: |
Adds a description for an interface. |
|
Step 5 |
mac-address address Example: |
Specifies the MAC address for the VLAN interface (SVI). We recommend that you use a MAC address starting from the base range value of 0000.0C9F.F05F. |
|
Step 6 |
vrf forwarding name Example: |
Associates the VRF instance with the interface. |
|
Step 7 |
ip address ip_address subnet_mask Example: |
Configures the IP address and IP subnet. |
|
Step 8 |
ip helper-address ip_address Example: |
Configures the IP helper address. |
|
Step 9 |
no ip redirects Example: |
Disables sending of Internet Control Message Protocol (ICMP) redirect messages. |
|
Step 10 |
ipv6 address address Example: |
Configures an IPv6 address on the interface. |
|
Step 11 |
ipv6 enable Example: |
Enables IPv6 on the interface. |
|
Step 12 |
ipv6 nd {dad attempts | prefix | managed-config-flag | other-config-flag | router-preference | } Example: |
Configures IPv6 neighbor discovery on the interface.
|
|
Step 13 |
ipv6 dhcp relay {destination | source-interface | trust} Example: |
Configures Dynamic Host Configuration Protocol (DHCP) for IPv6 relay service on the interface.
|
|
Step 14 |
no lisp mobility liveness test Example: |
Removes mobility liveness settings discovered on this interface. |
|
Step 15 |
lisp mobility dynamic-eid-name Example: |
Specifies the name of the LISP dynamic-EID policy to apply to this interface. |
|
Step 16 |
no autostate Example: |
Brings up the VLAN even if there is no trunk or physical link that is up on that device. |
|
Step 17 |
end Example: |
Returns to privileged EXEC mode. |
Configure DHCP Relay and Snooping
To configure DHCP relay and snooping on a fabric in a box device, perform this task:
Procedure
| Command or Action | Purpose | |
|---|---|---|
|
Step 1 |
enable Example: |
Enables privileged EXEC mode. Enter your password, if prompted. |
|
Step 2 |
configure terminal Example: |
Enters global configuration mode. |
|
Step 3 |
ip dhcp relay information option Example: |
Enables the system to insert the DHCP relay agent information option (option-82 field) in forwarded BOOTREQUEST messages to a DHCP server. |
|
Step 4 |
ip dhcp snooping vlan {vlan id | vlan range} Example: |
Enables DHCP snooping on a VLAN or VLAN range. |
|
Step 5 |
ip dhcp snooping Example: |
Enables DHCP snooping globally. |
|
Step 6 |
end Example: |
Returns to privileged EXEC mode. |
Configure LISP
To configure LISP on a fabric in a box device, perform this task:
Procedure
| Command or Action | Purpose | |
|---|---|---|
|
Step 1 |
enable Example: |
Enables privileged EXEC mode. Enter your password, if prompted. |
|
Step 2 |
configure terminal Example: |
Enters global configuration mode. |
|
Step 3 |
router lisp Example: |
Enters LISP configuration mode. |
|
Step 4 |
locator-table default Example: |
Selects the default (global) routing table for association with the routing locator address space. |
|
Step 5 |
locator-set loc-set-name Example: |
Specifies a locator-set, and enters the locator-set configuration mode. |
|
Step 6 |
ipv4-interface Loopback loopback-interface-id priority locator-priority weight locator-weight Example: |
Configures the loopback IP address to ensure the device is reachable. |
|
Step 7 |
exit-locator-set Example: |
Exits locator-set configuration mode, and enters LISP configuration mode. |
|
Step 8 |
locator-set loc-set-name Example: |
Specifies a locator-set, and enters the locator-set configuration mode. Ensure that this locator set is different from the default locator. |
|
Step 9 |
ipv4-interface Loopback loopback-interface-id priority locator-priority weight locator-weight Example: |
Specifies that the IPv4 address of the loopback interface should be used to reach the locator. |
|
Step 10 |
auto-discover-rlocs Example: |
Auto discover the locators registered by other ingress or egress tunnel routers (xTRs). |
|
Step 11 |
exit-locator-set Example: |
Exits locator-set configuration mode, and enters LISP configuration mode. |
|
Step 12 |
locator default-set loc-set-name Example: |
Specifies a default locator-set. |
|
Step 13 |
service { ipv4| ipv6} Example: |
Enables network services for the default instance. service ipv4 : Enables Layer 3 network services for the IPv4 address family. service ipv6 : Enables Layer 3 network services for the IPv6 address family. |
|
Step 14 |
encapsulation vxlan Example: |
Specifies VXLAN-based encapsulation. |
|
Step 15 |
map-cache publications Example: |
Exports the publication entries to the map cache. These entries are used for forwarding the traffic. |
|
Step 16 |
import publication publisher publisher-address Example: |
Imports the publications from the publisher that is specified by the publisher-address . publisher-address is the IP address of the Loopback 0 interface of the control plane node. |
|
Step 17 |
itr map-resolver map-resolver-address Example: |
Configures a locator address for the LISP map resolver. To resolve the EID-to-RLOC mappings, this router sends map request messages to the map resolver. A control plane node is the LISP map resolver. Specify the IP address of the Loopback 0 interface on control plane node as the map-resolver-address . |
|
Step 18 |
etr map-server map-server-address key authentication-key Example: |
Configures a map server to be used by the Egress Tunnel Router (ETR), and specifies the key type. A control plane node is the LISP map server. Specify the IP address of the Loopback 0 interface on control plane node as the map-server-address . |
|
Step 19 |
etr map-server map-server-address proxy-reply Example: |
Configures a locator address for the LISP map server and an authentication key. This device acting as a LISP ETR, uses the authetication key to register with the LISP mapping system. |
|
Step 20 |
etr Example: |
Configures the device as an Egress Tunnel Router (ETR). |
|
Step 21 |
sgt Example: |
Enables the Security Group Tag (SGT) function for SGT tag propagation. |
|
Step 22 |
route-export publications Example: |
Exports the LISP publications into the routing information base (RIB). |
|
Step 23 |
distance publications 250 Example: |
Specifies the administrative distance to RIB when the LISP publications are exported to the RIB. |
|
Step 24 |
proxy-etr Example: |
Enables Proxy Egress Tunnel Router (PETR) functionality for the EIDs. |
|
Step 25 |
proxy-itr address Example: |
Enables Proxy Ingress Tunnel Router (PITR) functionality for the EIDs. For address , specify the Loopback 0 IP address of this device. |
|
Step 26 |
map-server Example: |
Configures the locator address of the LISP map server. |
|
Step 27 |
map-resolver Example: |
Configures the locator address of the LISP map resolver. |
|
Step 28 |
Do one of the following:
Example: |
Exits service configuration mode, and enters LISP configuration mode. Use the appropriate command, depending on which service mode you are exiting from (IPv4 or IPv6 service mode). |
|
Step 29 |
service ethernet Example: |
Enables Layer 2 network services for the default instance. |
|
Step 30 |
itr map-resolver map-resolver-address Example: |
Configures a locator address for the LISP map resolver to which this router will send map request messages for IPv4 EID-to-RLOC mapping resolutions. |
|
Step 31 |
itr Example: |
Configures the device as an Ingress Tunnel Router (ETR). |
|
Step 32 |
etr map-server map-server-address key authentication-key Example: |
Configures a map server to be used by the Egress Tunnel Router (ETR), and specifies the key type. map-server-address is the IP address of the Loopback 0 interface on the control plane node. In this step, specify the Loopback 0 IP address of the device because the control plane node, border node, and edge node are all configured on a single device. |
|
Step 33 |
etr map-server map-server-address proxy-reply Example: |
Configures a locator address for the LISP map server and an authentication key for which this router, acting as an IPv4 LISP ETR, will use to register with the LISP mapping system. map-server-address is the IP address of the Loopback 0 interface on the control plane node. In this step, specify the Loopback 0 IP address of the device because the control plane node, border node, and edge node are all configured on a single device. |
|
Step 34 |
etr Example: |
Configures the device as an Egress Tunnel Router (ETR). |
|
Step 35 |
map-server Example: |
Configures the device as a Map Server. |
|
Step 36 |
map-resolver Example: |
Configures the device as a Map Resolver. |
|
Step 37 |
exit Example: |
Exits service Ethernet configuration mode and enters LISP configuration mode. |
|
Step 38 |
site site-name Example: |
Specifies a LISP site named site-name and enters LISP site configuration mode. A LISP site name is locally significant to the map server on which it is configured. It has no relevance anywhere else. This name is used solely as an administrative means of associating one or more EID prefixes with an authentication key and other site-related mechanisms |
|
Step 39 |
description description Example: |
Provides a description for the LISP site. |
|
Step 40 |
authentication-key { key-type} authentication-key Example: |
Configures the authentication key associated with this site. |
|
Step 41 |
eid-record instance-id instance-id [eid-prefix] [ accept-more-specifics] Example: |
Configures an IPv4 or IPv6 EID prefix associated with this LISP instance. eid-prefix can be IPv4 or IPv6 or MAC EID prefixes. accept-more-specifics allows the site to accept registrations for more specific EID prefixes
|
|
Step 42 |
allow-locator-default-etr instance-id instance-id { ipv4 | ipv6 } Example: |
Configures the LISP site to accept default egress tunnel router (ETR) registrations for a particular instance-id and a given service level (IPv4 or IPv6) within that instance-id. A default ETR handles the unknown EID prefixes, which are the EID prefixes that are not present in the control plane database. A border node that registers with the control plane node as a default ETR tracks the unknown EID prefixes in each of their VRF tables (a given service level within an instance ID). |
|
Step 43 |
exit Example: |
Exits the LISP Site configuration mode, and enters LISP configuration mode. |
|
Step 44 |
ipv4 locator reachability minimum-mask-length length Example: |
|
|
Step 45 |
ipv4 source-locator Loopback loopback-interface-number Example: |
|
|
Step 46 |
exit-router-lisp Example: |
Exits LISP configuration mode, and enters global configuration mode. |
|
Step 47 |
end Example: |
Returns to privileged EXEC mode. |
Configure Layer 3 VNI and Segment for Default Instance
To configure Layer 3 VNI on fabric in a box device, perform this task:
Procedure
| Command or Action | Purpose | |
|---|---|---|
|
Step 1 |
enable Example: |
Enables privileged EXEC mode. Enter your password, if prompted. |
|
Step 2 |
configure terminal Example: |
Enters global configuration mode. |
|
Step 3 |
instance-id id Example: |
Specifies the instance ID. |
|
Step 4 |
remote-rloc-probe on-route-change Example: |
Configures parameters for probing of remote local routing locators (RLOCs). |
|
Step 5 |
dynamic-eid eid-name Example: |
Creates a dynamic End Point Identifier (EID) policy, and enters the dynamic-eid configuration mode on an xTR. |
|
Step 6 |
database-mapping eid-prefix/prefix-length locator-set RLOC_name Example: |
Configures an IPv4 endpoint identifier-to-routing locator (EID-to-RLOC) mapping relationship and an associated traffic policy for LISP. |
|
Step 7 |
exit-dynamic-eid Example: |
Exits dynamic-eid configuration mode, and enters instance configuration mode. |
|
Step 8 |
dynamic-eid eid-name Example: |
Creates a dynamic End Point Identifier (EID) policy, and enters the dynamic-eid configuration mode on an xTR. |
|
Step 9 |
service {ipv4 | ipv6} Example: |
Enables Layer 3 network services for the IPv4 or IPv6 address family. |
|
Step 10 |
eid-table default Example: |
Configures the default (global) routing table for association with the configured instance-service. |
|
Step 11 |
map-cache address map-request Example: |
Sends map-request for LISP destination EID. |
|
Step 12 |
Do one of the following:
Example: |
Exits service configuration mode, and enters instance configuration mode. |
|
Step 13 |
exit-instance-id Example: |
Exits instance configuration mode, and enters global configuration mode. |
|
Step 14 |
end Example: |
Returns to privileged EXEC mode. |
Configure Layer 3 VNI for User-Defined VRF
To configure a Layer 3 VNI for user-defined VRF, perform this task.
Procedure
| Command or Action | Purpose | |
|---|---|---|
|
Step 1 |
enable Example: |
Enables privileged EXEC mode. Enter your password, if prompted. |
|
Step 2 |
configure terminal Example: |
Enters global configuration mode. |
|
Step 3 |
router lisp Example: |
Enters LISP configuration mode. |
|
Step 4 |
instance-id id Example: |
Specifies the instance ID. |
|
Step 5 |
remote-rloc-probe on-route-change Example: |
Configures parameters for probing of remote local routing locators (RLOCs). |
|
Step 6 |
dynamic-eid eid-name Example: |
Creates a dynamic End Point Identifier (EID) policy, and enters the dynamic-eid configuration mode on an xTR. |
|
Step 7 |
database-mapping eid-prefix/prefix-length locator-set RLOC_name Example: |
Configures an IPv4 endpoint identifier-to-routing locator (EID-to-RLOC) mapping relationship and an associated traffic policy for LISP. |
|
Step 8 |
exit-dynamic-eid Example: |
Exits dynamic-eid configuration mode, and enters LISP instance configuration mode. |
|
Step 9 |
dynamic-eid eid-name Example: |
Creates a dynamic End Point Identifier (EID) policy, and enters the dynamic-eid configuration mode on an xTR. |
|
Step 10 |
database-mapping eid-prefix/prefix-length locator-set RLOC_name Example: |
Configures an IPv4 endpoint identifier-to-routing locator (EID-to-RLOC) mapping relationship and an associated traffic policy for LISP. |
|
Step 11 |
exit-dynamic-eid Example: |
Exits dynamic-eid configuration mode, and enters LISP instance configuration mode. |
|
Step 12 |
service ipv4 Example: |
Enables Layer 3 network services for the IPv4 address family. |
|
Step 13 |
eid-table vrf vrf-name Example: |
Configures the VRF table for association with the configured instance-service. |
|
Step 14 |
database-mapping eid-prefix/prefix-length locator-set RLOC_name default-etr local Example: |
Configures an IPv4 endpoint identifier-to-routing locator (EID-to-RLOC) mapping relationship and an associated traffic policy for LISP. |
|
Step 15 |
exit-service-ipv4 Example: |
Exits service IPv4 configuration mode, and enters LISP instance configuration mode. |
|
Step 16 |
service ipv6 Example: |
Enables Layer 3 network services for the IPv6 address family. |
|
Step 17 |
eid-table vrf vrf-name Example: |
Configures the VRF table for association with the configured instance-service. |
|
Step 18 |
database-mapping eid-prefix/prefix-length locator-set RLOC_name default-etr local Example: |
Configures an IPv6 endpoint identifier-to-routing locator (EID-to-RLOC) mapping relationship and an associated traffic policy for LISP. |
|
Step 19 |
exit-service-ipv6 Example: |
Exits service IPv6 configuration mode, and enters LISP instance configuration mode. |
|
Step 20 |
exit-instance-id Example: |
Exits instance configuration mode, and enters LISP configuration mode. |
|
Step 21 |
end Example: |
Returns to privileged EXEC mode. |
Configure Layer 2 VNI for Default Instance
To configure a Layer 2 VNI for a default instance on fabric in a box device, perform this task:
Procedure
| Command or Action | Purpose | |
|---|---|---|
|
Step 1 |
enable Example: |
Enables privileged EXEC mode. Enter your password, if prompted. |
|
Step 2 |
configure terminal Example: |
Enters global configuration mode. |
|
Step 3 |
router lisp Example: |
Enters LISP configuration mode. |
|
Step 4 |
instance-id id Example: |
Specifies the instance ID. |
|
Step 5 |
remote-rloc-probe on-route-change Example: |
Specifies that the probing of remote routing locators (RLOCs) should be done when there is a route change for the remote RLOCs. |
|
Step 6 |
service ethernet Example: |
Enables Layer 2 network services. |
|
Step 7 |
eid-table vlan vlan-id Example: |
Configures the specified VLAN table for association with the configured instance. |
|
Step 8 |
database-mapping eid-prefix/prefix-length locator-set RLOC_name Example: |
Configures an IPv4 endpoint identifier-to-routing locator (EID-to-RLOC) mapping relationship and an associated traffic policy for LISP. |
|
Step 9 |
exit Example: |
Exits EID table configuration mode. |
|
Step 10 |
exit-service-ethernet Example: |
Exits service Ethernet configuration mode, and enters instance configuration mode. |
|
Step 11 |
exit-instance-id Example: |
Exits instance configuration mode, and enters global configuration mode. |
|
Step 12 |
exit-router-lisp Example: |
Exits LISP configuration mode, and enters global configuration mode. |
|
Step 13 |
end Example: |
Returns to privileged EXEC mode. |
Configure Layer 2 VNI for User-Defined VRF
To configure Layer 2 VNI for user-defined VRF on a fabric in a box device, perform this task:
Procedure
| Command or Action | Purpose | |
|---|---|---|
|
Step 1 |
enable Example: |
Enables privileged EXEC mode. Enter your password, if prompted. |
|
Step 2 |
configure terminal Example: |
Enters global configuration mode. |
|
Step 3 |
router lisp Example: |
Enters LISP configuration mode. |
|
Step 4 |
instance-id id Example: |
Specifies the instance ID of the user-defined instance. |
|
Step 5 |
remote-rloc-probe on-route-change Example: |
Specifies that the probing of remote local routing locators (RLOCs) should be done when there are routing changes for remote RLOCs. |
|
Step 6 |
service ethernet Example: |
Enables Layer 2 network services. |
|
Step 7 |
eid-table vlan vlan-id Example: |
Configures the specified VLAN table for association with the configured instance. |
|
Step 8 |
database-mapping eid-prefix/prefix-length locator-set RLOC_name Example: |
Configures an IPv4 endpoint identifier-to-routing locator (EID-to-RLOC) mapping relationship and an associated traffic policy for LISP. |
|
Step 9 |
exit Example: |
Exits EID table configuration mode. |
|
Step 10 |
exit-service-ethernet Example: |
Exits service Ethernet configuration mode, and enters instance configuration mode. |
|
Step 11 |
exit-instance-id Example: |
Exits instance configuration mode, and enters global configuration mode. |
|
Step 12 |
exit-router-lisp Example: |
Exits LISP configuration mode, and enters global configuration mode. |
|
Step 13 |
end Example: |
Returns to privileged EXEC mode. |
Configure BGP
To configure BGP on a fabric in a box device, perform this task:
Procedure
| Command or Action | Purpose | |||
|---|---|---|---|---|
|
Step 1 |
enable Example: |
Enables privileged EXEC mode. Enter your password, if prompted. |
||
|
Step 2 |
configure terminal Example: |
Enters global configuration mode. |
||
|
Step 3 |
router bgp autonomous-system-number Example: |
Configures a BGP routing process, and enters router configuration mode for the specified routing process. Use the autonomous-system-number argument to specify an integer, from 0 and 65534, that identifies the device to other BGP speakers. |
||
|
Step 4 |
bgp router-id ip-address Example: |
(Optional) Configures a fixed 32-bit router ID as the identifier of the local device running BGP. Use the ip-address argument to specify a unique router ID within the network.
|
||
|
Step 5 |
bgp log-neighbor-changes Example: |
(Optional) Enables logging of BGP neighbor status changes (up or down) and neighbor resets. Use this command for troubleshooting network connectivity problems and measuring network stability. Unexpected neighbor resets might indicate high error rates or high packet loss in the network and should be investigated. |
||
|
Step 6 |
bgp graceful-restart Example: |
Enables the BGP graceful restart capability globally for all BGP neighbors. |
||
|
Step 7 |
address-family {ipv4 | ipv6} Example: |
Specifies the address family, and enters address family configuration mode.
|
||
|
Step 8 |
bgp aggregate-timer seconds Example: |
Sets the interval at which BGP routes will be aggregated or to disable timer-based route aggregation. |
||
|
Step 9 |
network network-number mask network-mask Example: |
Specifies a network as local to this autonomous system and adds it to the BGP routing table. |
||
|
Step 10 |
aggregate-address address mask summary-only Example: |
Creates an aggregate entry in a BGP database.
|
||
|
Step 11 |
exit-address-family Example: |
Exits address family configuration mode, and enters router configuration mode. |
||
|
Step 12 |
address-family { ipv4| ipv6} [ vrf vrf-name] Example: |
Enters address family configuration mode to configure routing sessions that use address family-specific command configurations. Use the vrf option to specify the VRF instance with which the subsequent address family configuration commands are associated. |
||
|
Step 13 |
bgp aggregate-timer seconds Example: |
Configures the interval at which the BGP routes are aggregated. A value of 0 (zero) disables timer-based aggregation and starts aggregation immediately. |
||
|
Step 14 |
network network-number [mask network-mask ] [route-map route-map-name ] Example: |
Specifies the network to be advertised by BGP and adds it to the BGP routing table.
|
||
|
Step 15 |
aggregate-address address mask summary-only Example: |
Creates an aggregate entry in a BGP database.
|
||
|
Step 16 |
exit-address-family Example: |
Exits address family configuration mode, and enters router configuration mode. |
||
|
Step 17 |
end Example: |
Returns to privileged EXEC mode. |
Configure Route-Map
To configure a route-map for a fabric in a box device, perform this task:
Procedure
| Command or Action | Purpose | |
|---|---|---|
|
Step 1 |
enable Example: |
Enables privileged EXEC mode. Enter your password, if prompted. |
|
Step 2 |
configure terminal Example: |
Enters global configuration mode. |
|
Step 3 |
route-map map-name [permit | deny ] [sequence-number] Example: |
Configures a route map for the BGP and enters route map configuration mode. Route map entries are read in order. You can identify the order using the sequence_number argument. |
|
Step 4 |
description description Example: |
Adds a description for the route map. |
|
Step 5 |
set as-path tag Example: |
Modifies an autonomous system path for BGP routes. |
|
Step 6 |
end Example: |
Returns to privileged EXEC mode. |
 Feedback