- Preface
- Overview
- Installing the Cisco VSG and the Cisco VNMC-Quick Start
- Installing Cisco VNMC
- Installing the Cisco VSG
- Registering Devices With the Cisco VNMC
- Installing the Cisco VSG on a Cisco Cloud Services Platform Virtual Services Appliance
- Upgrading the Cisco VSG and the Cisco VNMC
- Examples of Cisco VNMC OVA Template Deployment and Cisco VNMC ISO Installations
- Index
Cisco VSG for VMware vSphere, Release 4.2(1)VSG2(1.1) and Cisco VNMC, Release 2.1 Installation and Upgrade Guide
Bias-Free Language
The documentation set for this product strives to use bias-free language. For the purposes of this documentation set, bias-free is defined as language that does not imply discrimination based on age, disability, gender, racial identity, ethnic identity, sexual orientation, socioeconomic status, and intersectionality. Exceptions may be present in the documentation due to language that is hardcoded in the user interfaces of the product software, language used based on RFP documentation, or language that is used by a referenced third-party product. Learn more about how Cisco is using Inclusive Language.
- Updated:
- June 24, 2013
Chapter: Upgrading the Cisco VSG and the Cisco VNMC
- Complete Upgrade Procedure
- Upgrade Guidelines and Limitations
- Upgrade Procedure for Cisco VSG Release 4.2(1)VSG1(4.1) to Release 4.2(1)VSG2(1.1), Cisco VNMC Release 2.0 to Release 2.1 and Cisco Nexus 1000V Release 4.2(1)SV1(5.2) to Release 4.2(1)SV2(2.1)
- Cisco VSG Release 4.2(1)VSG1(4.1) to 4.2(1)VSG2(1.1) and Cisco VNMC 2.0 to 2.1 Staged Upgrade
- Upgrading VNMC from Release 2.0 to Release 2.1
- Upgrading Cisco VSG from Release 4.2(1)VSG1(4.1) to 4.2(1)VSG2(1.1)
- Upgrading VSMs
- Upgrading VEMs
- VEM Upgrade Procedures
- VEM Upgrade Methods from Release 4.2(1)SV1(4x), Release 4.2(1)SV1(5x), or Release 4.2(1)SV2(1.1x) to the Current Release
- Upgrading the VEMs Using VMware Update Manager from Release 4.2(1)SV1(4x), Release 4.2(1)SV1(5x), or Release 4.2(1)SV2(1.1x) to the Current Release
- Upgrading the VEMs Manually from from Release 4.2(1)SV1(4x), Release 4.2(1)SV1(5x), or Release 4.2(1)SV2(1.1x) to the Current Release
- Accepting the VEM Upgrade
- Upgrading the VEM Software Using the vCLI
- Cisco VSG Release 4.2(1)VSG1(3.1) to 4.2(1)VSG2(1.1) and Cisco VNMC 1.3 to 2.1 Staged Upgrade
- Upgrading VNMC from Release 1.3 to Release 2.1
- Upgrading Cisco VSG from Release 4.2(1)VSG1(3.1) to 4.2(1)VSG2(1.1)
- Upgrading VSMs
- Upgrading VEMs
- VEM Upgrade Procedures
- VEM Upgrade Methods from Release 4.2(1)SV1(4x), Release 4.2(1)SV1(5x), or Release 4.2(1)SV2(1.1x) to the Current Release
- Upgrading the VEMs Using VMware Update Manager from Release 4.2(1)SV1(4x), Release 4.2(1)SV1(5x), or Release 4.2(1)SV2(1.1x) to the Current Release
- Upgrading the VEMs Manually from from Release 4.2(1)SV1(4x), Release 4.2(1)SV1(5x), or Release 4.2(1)SV2(1.1x) to the Current Release
- Accepting the VEM Upgrade
- Upgrading the VEM Software Using the vCLI
Upgrading the Cisco VSG and the Cisco VNMC
This chapter contains the following sections:
- Complete Upgrade Procedure
- Upgrade Guidelines and Limitations
- Upgrade Procedure for Cisco VSG Release 4.2(1)VSG1(4.1) to Release 4.2(1)VSG2(1.1), Cisco VNMC Release 2.0 to Release 2.1 and Cisco Nexus 1000V Release 4.2(1)SV1(5.2) to Release 4.2(1)SV2(2.1)
- Upgrade Procedure for Cisco VSG Release 4.2(1)VSG1(3.1) to Release 4.2(1)VSG2(1.1), Cisco VNMC Release 1.3 to Release 2.1 and Cisco Nexus 1000V Release 4.2(1)SV1(4.1) to Release 4.2(1)SV2(2.1)
Complete Upgrade Procedure
| You are Upgrading From | Follow The Sequential Steps in the Following Section: |
|---|---|
Cisco VSG Release 4.2(1)VSG1(4.1) to Release 4.2(1)VSG2(1.1) and Cisco VNMC Release 2.0 to Release 2.1 |
Upgrade Procedures for Cisco VSG Release 4.2(1)VSG1(4.1) to Release 4.2(1)VSG2(1.1) and Cisco VNMC Release 2.0 to Release 2.1. This includes upgrade procedures for Cisco Nexus 1000V Release 4.2(1)SV1(5.2) to Release 4.2(1)SV2(2.1). |
Cisco VSG Release 4.2(1)VSG1(3.1) to Release 4.2(1)VSG2(1.1) and Cisco VNMC Release 1.3 to Release 2.1 |
Upgrade Procedures for Cisco VSG Release 4.2(1)VSG1(3.1) to Release 4.2(1)VSG2(1.1) and Cisco VNMC Release 1.3 to Release 2.1. This includes upgrade procedures for Cisco Nexus 1000V Release 4.2(1)SV1(5.2) to Release 4.2(1)SV2(2.1). |
 Note |
We highly recommend that you upgrade the Cisco VSG and the Cisco VNMC in the sequence listed. Any deviation from the ordered steps could cause disruption of your connectivity and data communication. The Cisco VNMC must be upgraded with the corresponding policy agent (PA). |
Information About Cisco VNMC Upgrades
When you upgrade the Cisco VNMC software, all current (command-line interface) CLI and (graphical user interface) GUI sessions are interrupted, which means that you must restart any CLI or GUI sessions.
Information About Cisco VSG Upgrades
The upgrade procedure for a standalone Cisco VSG is hitful, which means that you must manually reload the Cisco VSG for the new image to become effective. In HA mode, the upgrade is hitless, which means that the standby Cisco VSG is upgraded first and then after a switchover, the previously active Cisco VSG is upgraded.
Because license information is not stored with the Cisco VSG but is maintained between the Virtual Supervisor Module (VSM) and Virtual Ethernet Module (VEM), if packets are received at the Cisco VSG, that means that the license is valid and the packets are processed.
An upgrade affects two bin files: the kickstart file and the system file.
An upgrade does not erase any of the existing information, when the Cisco VSG comes online. Because the Cisco VSG is stateless, it gets all this information from the Cisco VNMC at bootup.
Upgrade Guidelines and Limitations
- We highly recommend that you upgrade the Cisco VSG and the Cisco VNMC in the order provided. Any deviation from the ordered steps could cause disruption of your connectivity and data communication. The Cisco VNMC must be upgraded with the corresponding policy agent (PA).
- We recommend that you take a snapshot or backup (clone) of the original Cisco VNMC and VSM prior to the upgrade process and then perform an ISSU upgrade process on both the VSM and the Cisco VSG. We do not recommend that you perform a manual upgrade.
-
For a full In-service Software Upgrade (ISSU) upgrade on both the Cisco VSG and VSM, follow these rules: - The vn-service command is changed to the vservice command on the VSM port-profile in VSM Release 4.2(1)SV1(5.2).
-
Upgrade instructions include the following information:
Upgrade Procedure for Cisco VSG Release 4.2(1)VSG1(4.1) to Release 4.2(1)VSG2(1.1), Cisco VNMC Release 2.0 to Release 2.1 and Cisco Nexus 1000V Release 4.2(1)SV1(5.2) to Release 4.2(1)SV2(2.1)
Cisco VSG Release 4.2(1)VSG1(4.1) to 4.2(1)VSG2(1.1) and Cisco VNMC 2.0 to 2.1 Staged Upgrade
Note |
The vn-service command is changed to the vservice command on the VSM port-profile in VSM Release 4.2(1)SV1(5.2). |
Note |
Because we support full ISSU upgrade on both VSG and VSM that involves installing a new PA, you should install the VNMC first. The new PA may not support the old VNMC. |
Upgrading VNMC from Release 2.0 to Release 2.1
1. vnmc# connect local-mgmt
2. (Optional) vnmc (local-mgmt)# show version
3. (Optional) vnmc (local-mgmt)# copy scp://user@example-server-ip/example-dir/filename bootflash:/
4. vnmc (local-mgmt)# dir bootflash:/
5. vnmc (local-mgmt)# update bootflash:/filename
6. vnmc (local-mgmt)# service restart
7. (Optional) vnmc (local-mgmt)# service status
8. (Optional) vnmc (local-mgmt)# show version
DETAILED STEPS
Configuration Example
The following example shows how to connect to the local-mgmt mode:
vnmc# connect local-mgmt
Cisco Virtual Network Management Center
TAC support: http://www.cisco.com/tac
Copyright (c) 2002-2013, Cisco Systems, Inc. All rights reserved.
The copyrights to certain works contained in this software are
owned by other third parties and used and distributed under
license. Certain components of this software are licensed under
the GNU General Public License (GPL) version 2.0 or the GNU
Lesser General Public License (LGPL) Version 2.1. A copy of each
such license is available at
http://www.opensource.org/licenses/gpl-2.0.php and
http://www.opensource.org/licenses/lgpl-2.1.php
The following example shows how to display version information for the Cisco VNMC:
vnmc(local-mgmt)# show version

Name                Package             Version        GUI
----                -------             -------        ----
core                Base System         2.0(1)         2.0(1)
service-reg         Service Registry    2.0(1)         2.0(1)
policy-mgr          Policy Manager      2.0(1)         2.0(1)
resource-mgr        Resource Manager    2.0(1)         2.0(1)
vm-mgr              VM manager          2.0(1)         none
The following example shows how to copy the Cisco VNMC software to the VM:
vnmc(local-mgmt)# copy scp://<user@example-server-ip>/example1-dir/vnmc.2.1.bin bootflash:/
Enter password:
100%  143MB  11.9MB/s   00:12
The following example shows how to see the directory information for Cisco VNMC:
vnmc(local-mgmt)# dir bootflash:/
14M Jul 28 2011  gui-automation.tgz

            887 May 28 2013  vnmc-dplug.2.0.1.bin
            20M May 28 2013  vnmc-vsgpa.2.0.1.bin
            20M May 28 2013  vnmc-vsmpa.2.0.1.bin
           403M Jan 31 01:58 vnmc.2.0.bin


Usage for bootflash://

			18187836 bytes used
             3842128 bytes free
            22029964 bytes total
The following example shows how to start the update for the Cisco VNMC:
vnmc(local-mgmt)# update bootflash:/vnmc.2.1.1a.bin
It is recommended that you perform a full-state backup before updating any VNMC component.  Press enter to continue or Ctrl-c to exit.
The following example shows how to display the updated version for the Cisco VNMC:
vnmc(local-mgmt)# show version

Name                Package             Version        GUI
----                -------             -------        ----
core                Base System         2.1            2.1
service-reg         Service Registry    2.1            2.1
policy-mgr          Policy Manager      2.1            2.1
resource-mgr        Resource Manager    2.1            2.1
vm-mgr              VM manager          2.1            none
Upgrading Cisco VSG from Release 4.2(1)VSG1(4.1) to 4.2(1)VSG2(1.1)
Enter the commands on all Cisco VSG nodes on your network.
- You are logged in to the CLI in EXEC mode.
-
You have copied the new system image, kickstart image and the Cisco VSG policy agent image into the bootflash file system using the following commands: switch# copy scp://user@scpserver.cisco.com/downloads/nexus-1000v-kickstart-mz.VSG2.1.bin bootflash:nexus-1000v-kickstart-mz.VSG2.1.bin switch# copy scp://user@scpserver.cisco.com/downloads/nexus-1000v-mz.VSG2.1.bin bootflash:nexus-1000v-mz.VSG2.1.bin switch# copy scp://user@scpserver.cisco.com/downloads/vnmc-vsgpa.2.1(1b).bin bootflash:vnmc-vsgpa.2.1(1b).bin
- You have confirmed that the system is in high availability (HA) mode for an HA upgrade using the show system redundancy status command.
1. configure terminal
2. install all kickstart bootflash:nexus-1000v-kickstart-mz.VSG2.1.bin system bootflash:nexus-1000v-mz.VSG2.1.bin vnmpa bootflash:vnmc-vsgpa.2.1(1b).bin
3. show vnm-pa status
4. copy running-config startup-config
DETAILED STEPS
| Command or Action | Purpose | |||
|---|---|---|---|---|
| Step 1 | configure terminal |
Enters global configuration mode. |
||
| Step 2 | install all kickstart bootflash:nexus-1000v-kickstart-mz.VSG2.1.bin system bootflash:nexus-1000v-mz.VSG2.1.bin vnmpa bootflash:vnmc-vsgpa.2.1(1b).bin |
Installs the kickstart image, system image, and policy agent (PA) image.
|
||
| Step 3 | show vnm-pa status |
Verifies that the new PA is installed and the upgrade was successful.
|
||
| Step 4 | copy running-config startup-config |
Saves the change persistently through reboots and restarts by copying the running configuration to the startup configuration. |
Configuration Example
The following example shows how to upgrade Cisco VSG Release 4.2(1)VSG1(4.1) to Release 4.2(1)VSG2(1.1):
vsg # configure terminal
vsg (config)# install all kickstart bootflash:nexus-1000v-kickstart-mz.VSG2.1.bin system bootflash:nexus-1000v-mz.VSG2.1.bin vnmpa bootflash:vnmc-vsgpa.2.1(1b).bin
vsg (config)# show vnm-pa status
VNM Policy-Agent status is - Installed Successfully. Version 2.1(1b)-vsg
vsg(config)# copy running-config startup-config
Upgrading VSMs
Upgrade Procedures
The following table lists the upgrade steps.
If you are running this configuration |
Follow these steps |
|---|---|
Release 4.0(4)SV1(1) or 4.0(4)SV1(2) |
Upgrades from these releases are not supported. |
Releases 4.0(4)SV1(3x) Series |
|
Release 4.2(1)SV1(4x) Series with a vSphere release 4.0 Update 1 or later |
|
Release 4.2(1)SV1(4x) Series with a vSphere release 4.1 GA, patches, or updates |
|
Release 4.2(1)SV1(4a) or 4.2(1)SV1(4b) with a vSphere release 5.0 GA, patches, or updates |
|
The following table lists the upgrade steps when upgrading from Release 4.2(1)SV1(5x) and later releases to the current release.
If you are running this configuration |
Follow these steps |
|---|---|
With vSphere 4.1 GA, patches, or updates. |
|
With vSphere 5.0 GA, patches, or updates. |
|
With ESX version upgrade. |
Installing and Upgrading VMware |
Software Images
The software image install procedure is dependent on the following factors:
- Software images—The kickstart and system image files reside in directories or folders that you can access from the Cisco Nexus 1000V software prompt.
- Image version—Each image file has a version.
- Disk—The bootflash: resides on the VSM.
- ISO file—If a local ISO file is passed to the install all command, the kickstart and system images are extracted from the ISO file.
In-Service Software Upgrades on Systems with Dual VSMs
Note |
Performing an In-Service Software Upgrade (ISSU) from Cisco Nexus 1000V Release 4.2(1)SV1(4) or Release 4.2(1)SV1(4a) to the current release of Cisco Nexus 1000V using ISO files is not supported. You must use kickstart and system files to perform an ISSU upgrade to the current release of Cisco Nexus 1000V. |
The Cisco Nexus 1000V software supports in-service software upgrades (ISSUs) for systems with dual VSMs. An ISSU can update the software images on your switch without disrupting data traffic. Only control traffic is disrupted. If an ISSU causes a disruption of data traffic, the Cisco Nexus 1000V software warns you before proceeding so that you can stop the upgrade and reschedule it to a time that minimizes the impact on your network.
Note |
On systems with dual VSMs, you should have access to the console of both VSMs to maintain connectivity when the switchover occurs during upgrades. If you are performing the upgrade over Secure Shell (SSH) or Telnet, the connection will drop when the system switchover occurs, and you must reestablish the connection. |
An ISSU updates the following images:
All of the following processes are initiated automatically by the upgrade process after the network administrator enters the install all command.
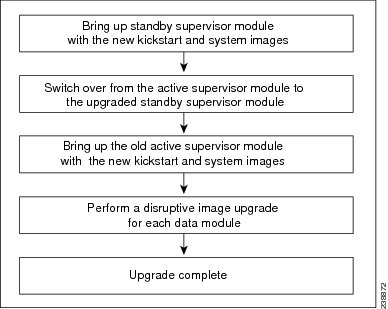
ISSU Process for the Cisco Nexus 1000V
The following figure shows the ISSU process.
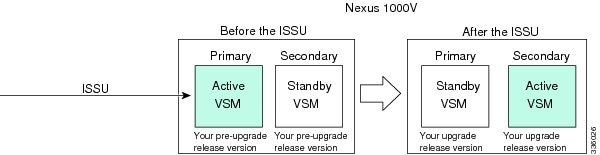
ISSU VSM Switchover
The following figure provides an example of the VSM status before and after an ISSU switchover.
ISSU Command Attributes
Support
The install all command supports an in-service software upgrade (ISSU) on dual VSMs in an HA environment and performs the following actions:
- Determines whether the upgrade is disruptive and asks if you want to continue.
- Copies the kickstart and system images to the standby VSM. Alternatively, if a local ISO file is passed to the install all command instead, the kickstart and system images are extracted from the file.
- Sets the kickstart and system boot variables.
- Reloads the standby VSM with the new Cisco Nexus 1000V software.
- Causes the active VSM to reload when the switchover occurs.
Benefits
The install all command provides the following benefits:
- You can upgrade the VSM by using the install all command.
- You can receive descriptive information on the intended changes to your system before you continue with the installation.
- You have the option to cancel the command. Once the effects of the command are presented, you can continue or cancel when you see this question (the default is no): Do you want to continue (y/n) [n]: y
- You can upgrade the VSM using the least disruptive procedure.
- You can see the progress of this command on the console, Telnet, and SSH screens:
- The install all command automatically checks the image integrity, which includes the running kickstart and system images.
- The install all command performs a platform validity check to verify that a wrong image is not used.
- The Ctrl-C escape sequence gracefully ends the install all command. The command sequence completes the update step in progress and returns to the switch prompt. (Other upgrade steps cannot be ended by using Ctrl-C.)
- After running the install all command, if any step in the sequence fails, the command completes the step in progress and ends.
Upgrading VSMs from Releases 4.2(1)SV1(4x), 4.2(1)SV1(5x), 4.2(1)SV2(1.1x) to Release 4.2(1)SV2(2.1x)
1. Log in to the active VSM.
2. Log in to Cisco.com to access the links provided in this document. To log in to Cisco.com, go to the URL http://www.cisco.com/ and click Log In at the top of the page. Enter your Cisco username and password.
3. Access the Software Download Center by using this URL:
4. Navigate to the download site for your system.
5. Choose and download the Cisco Nexus 1000V zip file and extract the kickstart and system software files to a server.
6. Ensure that the required space is available for the image file(s) to be copied.
7. Verify that there is space available on the standby VSM.
8. Delete any unnecessary files to make space available if you need more space on the standby VSM.
9. If you plan to install the images from the bootflash:, copy the Cisco Nexus 1000V kickstart and system images or the ISO image to the active VSM by using a transfer protocol. You can use ftp:, tftp:, scp:, or sftp:. The examples in this procedure use scp:.
10. Check on the impact of the ISSU upgrade for the kickstart and system images or the ISO image.
11. Read the release notes for the related image file. See the Cisco Nexus 1000V Release Notes.
12. Determine if the Virtual Security Gateway (VSG) is configured in the deployment:
13. Save the running configuration to the startup configuration.
14. Save the running configuration on the bootflash and externally.
15. Perform the upgrade on the active VSM using the ISO or kickstart and system images.
16. Continue with the installation by pressing Y.
17. After the installation operation completes, log in and verify that the switch is running the required software version.
18. Copy the running configuration to the startup configuration to adjust the startup-cgf size.
19. Display the log of the last installation.
DETAILED STEPS
| Step 1 | Log in to the active VSM. | ||||
| Step 2 |
Log in to Cisco.com to access the links provided in this document. To log in to Cisco.com, go to the URL http://www.cisco.com/ and click Log In at the top of the page. Enter your Cisco username and password.
|
||||
| Step 3 | Access the Software Download Center by using this URL: | ||||
| Step 4 |
Navigate to the download site for your system. You see links to the download images for your switch. |
||||
| Step 5 | Choose and download the Cisco Nexus 1000V zip file and extract the kickstart and system software files to a server. | ||||
| Step 6 |
Ensure that the required space is available for the image file(s) to be copied.
switch# dir bootflash:
.
.
.
Usage for bootflash://
  485830656 bytes used
 1109045248 bytes free
 1594875904 bytes total
|
||||
| Step 7 |
Verify that there is space available on the standby VSM.
switch# dir bootflash://sup-standby/
.
.
.
Usage for bootflash://
  485830656 bytes used
 1109045248 bytes free
 1594875904 bytes total
|
||||
| Step 8 | Delete any unnecessary files to make space available if you need more space on the standby VSM. | ||||
| Step 9 |
If you plan to install the images from the bootflash:, copy the Cisco Nexus 1000V kickstart and system images or the ISO image to the active VSM by using a transfer protocol. You can use ftp:, tftp:, scp:, or sftp:. The examples in this procedure use scp:.
|
||||
| Step 10 |
Check on the impact of the ISSU upgrade for the kickstart and system images or the ISO image.
|
||||
| Step 11 | Read the release notes for the related image file. See the Cisco Nexus 1000V Release Notes. | ||||
| Step 12 |
Determine if the Virtual Security Gateway (VSG) is configured in the deployment:
|
||||
| Step 13 |
Save the running configuration to the startup configuration.
switch# copy running-config startup-config
|
||||
| Step 14 |
Save the running configuration on the bootflash and externally.
switch# copy running-config bootflash:run-cfg-backup
switch# copy running-config scp://user@tftpserver.cisco.com/n1kv-run-cfg-backup
|
||||
| Step 15 |
Perform the upgrade on the active VSM using the ISO or kickstart and system images.
|
||||
| Step 16 |
Continue with the installation by pressing Y.
Install is in progress, please wait.

Syncing image bootflash:/nexus-1000v-kickstart-4.2.1.SV2.1.1a.bin to standby.
[####################] 100% -- SUCCESS

Syncing image bootflash:/nexus-1000v-4.2.1.SV2.1.1a.bin to standby.
[####################] 100% -- SUCCESS

Setting boot variables.
[####################] 100% -- SUCCESS

Performing configuration copy.
[####################] 100%2011 Mar 31 03:49:42 BL1-VSM %SYSMGR-STANDBY-5-CFGWRITE_STARTED: Configuration copy started (PID 3660).
[####################] 100% -- SUCCESS
Continuing with installation, please wait Module 2: Waiting for module online -- SUCCESS Install has been successful |
||||
| Step 17 |
After the installation operation completes, log in and verify that the switch is running the required software version. switch# show version
Nexus1000v# show version
Cisco Nexus Operating System (NX-OS) Software
TAC support: http://www.cisco.com/tac
Copyright (c) 2002-2012, Cisco Systems, Inc. All rights reserved.
The copyrights to certain works contained herein are owned by
other third parties and are used and distributed under license.
Some parts of this software are covered under the GNU Public
License. A copy of the license is available at
http://www.gnu.org/licenses/gpl.html.
Software
loader: version unavailable [last: loader version not available]
kickstart: version 4.2(1)SV2(1.1a) [build 4.2(1)SV2(1.1a)]
system: version 4.2(1)SV2(1.1a) [build 4.2(1)SV2(1.1a)]
kickstart image file is: bootflash:/nexus-1000v-kickstart-4.2.1.SV2.1.1a.bin
kickstart compile time: 1/11/2012 3:00:00 [01/11/2012 12:49:49]
system image file is: bootflash:/nexus-1000v-4.2.1.SV2.1.1a.bin
system compile time: 1/11/2012 3:00:00 [01/11/2012 13:42:57]
Hardware
cisco Nexus 1000V Chassis ("Virtual Supervisor Module")
Intel(R) Xeon(R) CPU with 2075740 kB of memory.
Processor Board ID T5056B1802D
Device name: Nexus1000v
bootflash: 1557496 kB
Kernel uptime is 4 day(s), 8 hour(s), 31 minute(s), 3 second(s)
plugin
Core Plugin, Ethernet Plugin, Virtualization Plugin
... |
||||
| Step 18 |
Copy the running configuration to the startup configuration to adjust the startup-cgf size. switch# copy running-config startup-config [########################################] 100% switch# |
||||
| Step 19 |
Display the log of the last installation. switch# show install all status
This is the log of last installation.
Verifying image bootflash:/nexus-1000v-kickstart-4.2.1.SV2.1.1a.bin for boot variable "kickstart".
-- SUCCESS
Verifying image bootflash:/nexus-1000v-4.2.1.SV2.1.1a.bin for boot variable "system".
-- SUCCESS
Verifying image type.
-- SUCCESS
Extracting "system" version from image bootflash:/nexus-1000v-4.2.1.SV2.1.1a.bin.
-- SUCCESS
Extracting "kickstart" version from image bootflash:/nexus-1000v-kickstart-4.2.1.SV2.1.1a.bin.
-- SUCCESS
Notifying services about system upgrade.
-- SUCCESS
Compatibility check is done:
Module bootable Impact Install-type Reason
------ -------- -------------- ------------ ------
1 yes non-disruptive reset
2 yes non-disruptive reset
Images will be upgraded according to following table:
Module Image Running-Version New-Version Upg-Required
------ ---------- ---------------------- ---------------------- ------------
1 system 4.2(1)SV1(5.2) 4.2(1)SV2(1.1a) yes
1 kickstart 4.2(1)SV1(5.2) 4.2(1)SV2(1.1a) yes
2 system 4.2(1)SV1(5.2) 4.2(1)SV2(1.1a) yes
2 kickstart 4.2(1)SV1(5.2) 4.2(1)SV2(1.1a) yes
Images will be upgraded according to following table:
Module Running-Version ESX Version VSM Compatibility ESX Compatibility
------ ---------------------- ---------------------------------------------------- ---------------------- ----------------------
3 4.2(1)SV1(5.2) VMware ESXi 5.0.0 Releasebuild-469512 (3.0) COMPATIBLE COMPATIBLE
4 4.2(1)SV1(5.2) VMware ESXi 5.0.0 Releasebuild-469512 (3.0) COMPATIBLE COMPATIBLE
Install is in progress, please wait.
Syncing image bootflash:/nexus-1000v-kickstart-4.2.1.SV2.1.1a.bin to standby.
-- SUCCESS
Syncing image bootflash:/nexus-1000v-4.2.1.SV2.1.1a.bin to standby.
-- SUCCESS
Setting boot variables.
-- SUCCESS
Performing configuration copy.
-- SUCCESS
Module 2: Waiting for module online.
-- SUCCESS
Notifying services about the switchover.
-- SUCCESS
"Switching over onto standby".
switch#
switch#
switch#
switch# attach module 2
Attaching to module 2 ...
To exit type 'exit', to abort type '$.'
Cisco Nexus Operating System (NX-OS) Software
TAC support: http://www.cisco.com/tac
Copyright (c) 2002-2011, Cisco Systems, Inc. All rights reserved.
The copyrights to certain works contained in this software are
owned by other third parties and used and distributed under
license. Certain components of this software are licensed under
the GNU General Public License (GPL) version 2.0 or the GNU
Lesser General Public License (LGPL) Version 2.1. A copy of each
such license is available at
http://www.opensource.org/licenses/gpl-2.0.php and
http://www.opensource.org/licenses/lgpl-2.1.php
switch(standby)#
switch(standby)# show install all status
This is the log of last installation.
Continuing with installation, please wait
Trying to start the installer...
Module 2: Waiting for module online.
-- SUCCESS
Install has been successful.
switch(standby)# |
Upgrading VEMs
VEM Upgrade Procedures
-
VUM Upgrade Procedures
- Generate an upgrade ISO. See Creating an Upgrade ISO with a VMware ESX Image and a Cisco Nexus 1000V VEM Image.
- Set up VUM baselines. See Upgrading the ESXi Hosts to Release 5.1.
- Initiate an upgrade from VUM. See Upgrading the VEMs Using VMware Update Manager from Release 4.2(1)SV1(4x), Release 4.2(1)SV1(5x), or Release 4.2(1)SV2(1.1x) to the Current Release.
- Upgrade VEM from VSM. See Upgrading the VEMs Using VMware Update Manager from Release 4.2(1)SV1(4x), Release 4.2(1)SV1(5x), or Release 4.2(1)SV2(1.1x) to the Current Release.
-
Manual upgrade procedures
- Upgrading VIB Manually from the CLI. See Upgrading the VEMs Manually from from Release 4.2(1)SV1(4x), Release 4.2(1)SV1(5x), or Release 4.2(1)SV2(1.1x) to the Current Release
- Installing or upgrading stateless ESXi. See Installing the VEM Software on a Stateless ESXi Host.
VEM upgrades fall into three types:
- An upgrade of an ESX or stateful ESXi host, without a migration from ESX (with a console OS) to ESXi. This upgrade type is described further in this section.
- An upgrade of a stateless ESXi host. This involves installing a new image on the host by updating the image profile and rebooting the host. The upgrade is described in Installing the VEM Software on a Stateless ESXi Host.
- An upgrade that involve a migration from ESX to ESXi (of the same or different vSphere version).
An upgrade of an ESX or stateful ESXi host without a migration from ESX (which has a console OS) to ESXi falls into two separate workflows.
- Upgrade the VEM alone, while keeping the ESX/ESXi version intact. The first figure shows this flow.
- Upgrade the ESX/ESXi without a change of the Cisco Nexus 1000V version. This process is addressed in the Workflow 2 figure.
The following figure shows Workflow 1 where Cisco Nexus 1000V Release 4.2(1)SV1(4.x) or 4.2(1)SV1(5.x) is upgraded to the current release, without a change of ESX versions.
If you are using VUM, set up a host patch baseline with the VEM’s offline bundle. Then follow Upgrading the VEMs Using VMware Update Manager from Release 4.2(1)SV1(4x), Release 4.2(1)SV1(5x), or Release 4.2(1)SV2(1.1x) to the Current Release.
If you are upgrading from the command line, see Upgrading the VEMs Manually from from Release 4.2(1)SV1(4x), Release 4.2(1)SV1(5x), or Release 4.2(1)SV2(1.1x) to the Current Release.
The following figure shows Workflow 2 where Cisco Nexus 1000VRelease 4.2(1)SV2(1.1) is installed and VMware 4.1 is upgraded to 5.0.
-
If you are using VUM version 5.0 or later, use the following method (independent of whether the VEM version is being changed as well):
- If you are upgrading the ESX host to a new update within a release, use a host upgrade baseline. For example, vSphere 5.0 GA to 5.0 U1.
- If you are upgrading the ESX host to a major release (for example, vSphere 4.1 U2 to 5.0 U1), generate an upgrade ISO and set up a host upgrade baseline. The upgrade ISO must have the desired final images for both ESX and VEM. The procedure to generate an upgrade ISO is in Creating an Upgrade ISO with a VMware ESX Image and a Cisco Nexus 1000V VEM Image.
- You can upgrade the ESX version and VEM version simultaneously if you are using VUM 5.0 Update 1 or later. VUM 5.0 GA does not support a combined upgrade.
Note |
If you plan to perform Workflow 2 and manually update to vSphere 5.0 or later, you must boot the host from an upgrade ISO with both ESX and VEM images. |
VEM Upgrade Methods from Release 4.2(1)SV1(4x), Release 4.2(1)SV1(5x), or Release 4.2(1)SV2(1.1x) to the Current Release
There are two methods for upgrading the VEMs.
- Upgrading the VEMs Using VMware Update Manager from Release 4.2(1)SV1(4x), Release 4.2(1)SV1(5x), or Release 4.2(1)SV2(1.1x) to the Current Release
- Upgrading the VEMs Manually from from Release 4.2(1)SV1(4x), Release 4.2(1)SV1(5x), or Release 4.2(1)SV2(1.1x) to the Current Release
- Accepting the VEM Upgrade
- Upgrading the VEM Software Using the vCLI
Upgrading the VEMs Using VMware Update Manager from Release 4.2(1)SV1(4x), Release 4.2(1)SV1(5x), or Release 4.2(1)SV2(1.1x) to the Current Release
 Caution |
If removable media is still connected (for example, if you have installed the VSM using ISO and forgot to remove the media), host movement to maintenance mode fails and the VUM upgrade fails. |
1. switch# show vmware vem upgrade status
2. switch# vmware vem upgrade notify
3. switch# show vmware vem upgrade status
4. switch# show vmware vem upgrade status
5. Initiate the VUM upgrade process with the following commands.
6. switch# show vmware vem upgrade status
7. Clear the VEM upgrade status after the upgrade process is complete with the following commands.
8. switch# show module
DETAILED STEPS
| Step 1 |
switch# show vmware vem upgrade status Display the current configuration.
|
||||
| Step 2 |
switch# vmware vem upgrade notify Coordinate with and notify the server administrator of the VEM upgrade process. |
||||
| Step 3 |
switch# show vmware vem upgrade status Verify that the upgrade notification was sent.
|
||||
| Step 4 |
switch# show vmware vem upgrade status Verify that the server administrator has accepted the upgrade in the vCenter. For more information about how the server administrator accepts the VEM upgrade, see Accepting the VEM Upgrade. Coordinate the notification acceptance with the server administrator. After the server administrator accepts the upgrade, proceed with the VEM upgrade.
|
||||
| Step 5 |
Initiate the VUM upgrade process with the following commands.
|
||||
| Step 6 |
switch# show vmware vem upgrade status Check for the upgrade complete status. |
||||
| Step 7 | Clear the VEM upgrade status after the upgrade process is complete with the following commands. | ||||
| Step 8 |
switch# show module Verify that the upgrade process is complete. The upgrade is complete. |
The following example shows how to upgrade VEMs using VUM.
switch# show vmware vem upgrade status

Upgrade VIBs: System VEM Image
Upgrade Status:
Upgrade Notification Sent Time:
Upgrade Status Time(vCenter):
Upgrade Start Time:
Upgrade End Time(vCenter):
Upgrade Error:
Upgrade Bundle ID:
    VSM: VEM500-201306160100-BG
    DVS: VEM410-201301152101-BG
switch#
switch# vmware vem upgrade notify
Warning:
Please ensure the hosts are running compatible ESX versions for the upgrade. Refer to corresponding
"Cisco Nexus 1000V and VMware Compatibility Information" guide.
switch# show vmware vem upgrade status

Upgrade VIBs: System VEM Image
Upgrade Status: Upgrade Availability Notified in vCenter
Upgrade Notification Sent Time: Tue Apr 23 10:03:24 2013
Upgrade Status Time(vCenter):
Upgrade Start Time:
Upgrade End Time(vCenter):
Upgrade Error:
Upgrade Bundle ID:
    VSM:  VEM500-201306160100-BG
    DVS:  VEM410-201301152101-BG
switch#
switch# show vmware vem upgrade status

Upgrade VIBs: System VEM Image
Upgrade Status: Upgrade Accepted by vCenter Admin
Upgrade Notification Sent Time: Tue Apr 23 10:03:24 2013
Upgrade Status Time(vCenter): Tue Apr 23 02:06:53 2013
Upgrade Start Time:
Upgrade End Time(vCenter):
Upgrade Error:
Upgrade Bundle ID:
    VSM: VEM500-201306160100-BG
    DVS: VEM410-201301152101-BG
switch#
switch# vmware vem upgrade proceed
switch# show vmware vem upgrade status

Upgrade VIBs: System VEM Image
Upgrade Status: Upgrade In Progress in vCenter
Upgrade Notification Sent Time: Tue Apr 23 10:03:24 2013
Upgrade Status Time(vCenter) : Tue Apr 23 02:06:53 2013
Upgrade Start Time: : Tue Apr 23 10:09:08 2013
Upgrade End Time(vCenter):
Upgrade Error:
Upgrade Bundle ID:
    VSM: VEM500-201306160100-BG
    DVS: VEM500-201306160100-BG
switch#
switch# show vmware vem upgrade status

Upgrade VIBs: System VEM Image
Upgrade Status: Upgrade Complete in vCenter
Upgrade Notification Sent Time: : Tue Apr 23 10:03:24 2013
Upgrade Status Time(vCenter): : Tue Apr 23 02:06:53 2013
Upgrade Start Time: : Tue Apr 23 10:09:08 2013
Upgrade End Time(vCenter): : Tue Apr 23 10:09:08 2013
Upgrade Error:
Upgrade Bundle ID:
    VSM: VEM410-201304160104-BG
    DVS: VEM410-201304160104-BG
switch#
switch# vmware vem upgrade complete
switch# show vmware vem upgrade status


Upgrade VIBs: System VEM Image
Upgrade Status:
Upgrade Notification Sent Time:
Upgrade Status Time(vCenter):
Upgrade Start Time:
Upgrade End Time(vCenter):
Upgrade Error:
Upgrade Bundle ID:
    VSM: VEM500-201306160100-BG
    DVS: VEM500-201306160100-BG
switch#
switch# show module
Mod  Ports  Module-Type                       Model               Status
---  -----  --------------------------------  ------------------  ------------
1    0      Virtual Supervisor Module         Nexus1000V          ha-standby
2    0      Virtual Supervisor Module         Nexus1000V          active *
3    248    Virtual Ethernet Module           NA                  ok
4    248    Virtual Ethernet Module           NA                  ok

Mod  Sw                  Hw
---  ------------------  ------------------------------------------------
1    4.2(1)SV2(2.1)      0.0
2    4.2(1)SV2(2.1)      0.0
3    4.2(1)SV2(2.1)      VMware ESXi 5.0.0 Releasebuild-469512 (3.0)
4    4.2(1)SV2(2.1)      VMware ESXi 5.0.0 Releasebuild-623860 (3.0)

Mod  MAC-Address(es)                         Serial-Num
---  --------------------------------------  ----------
1    00-19-07-6c-5a-a8 to 00-19-07-6c-62-a8  NA
2    00-19-07-6c-5a-a8 to 00-19-07-6c-62-a8  NA
3    02-00-0c-00-03-00 to 02-00-0c-00-03-80  NA
4    02-00-0c-00-04-00 to 02-00-0c-00-04-80  NA

Mod  Server-IP        Server-UUID                           Server-Name
---  ---------------  ------------------------------------  --------------------
1    10.104.249.171   NA                                    NA
2    10.104.249.171   NA                                    NA
3    10.104.249.172   7d41e666-b58a-11e0-bd1d-30e4dbc299c0  10.104.249.172
4    10.104.249.173   17d79824-b593-11e0-bd1d-30e4dbc29a0e  10.104.249.173

* this terminal session
switch#
Note |
The lines with the bold characters in the preceding example display that all VEMs are upgraded to the current release. |
Upgrading the VEMs Manually from from Release 4.2(1)SV1(4x), Release 4.2(1)SV1(5x), or Release 4.2(1)SV2(1.1x) to the Current Release
Note |
If VUM is installed, it should be disabled. |
To manually install or upgrade the Cisco Nexus 1000V VEM on an ESX/ESXi host, follow the steps in Upgrading the VEM Software Using the vCLI.
To upgrade the VEMs manually, perform the following steps as network administrator:
Note |
This procedure is performed by the network administrator. Before proceeding with the upgrade, make sure that the VMs are powered off if you are not running the required patch level. |
Caution |
If removable media is still connected, (for example, if you have installed the VSM using ISO and forgot to remove the media), host movement to maintenance mode fails and the VEM upgrade fails. |
1. switch# vmware vem upgrade notify
2. switch# show vmware vem upgrade status
3. switch# show vmware vem upgrade status
4. Perform one of the following tasks:
5. switch# vmware vem upgrade proceed
6. switch# show vmware vem upgrade status
7. Coordinate with and wait until the server administrator upgrades all ESX host VEMs with the new VEM software release and informs you that the upgrade process is complete.
8. switch# vmware vem upgrade complete
9. switch# show vmware vem upgrade status
10. switch# show module
DETAILED STEPS
| Step 1 |
switch# vmware vem upgrade notify Coordinate with and notify the server administrator of the VEM upgrade process. |
||||
| Step 2 |
switch# show vmware vem upgrade status Verify that the upgrade notification was sent. |
||||
| Step 3 |
switch# show vmware vem upgrade status Verify that the server administrator has accepted the upgrade in vCenter Server. For details about the server administrator accepting the VEM upgrade, see Accepting the VEM Upgrade. After the server administrator accepts the upgrade, proceed with the VEM upgrade. |
||||
| Step 4 | Perform one of the following tasks: | ||||
| Step 5 |
switch# vmware vem upgrade proceed Initiate the Cisco Nexus 1000V Bundle ID upgrade process.
Enter the vmware vem upgrade proceed command so that the Cisco Nexus 1000V Bundle ID on the vCenter Server gets updated. If VUM is enabled and you do not update the Bundle ID, an incorrect VIB version is pushed to the VEM when you next add the ESX to the VSM.
|
||||
| Step 6 |
switch# show vmware vem upgrade status Check for the upgrade complete status. |
||||
| Step 7 |
Coordinate with and wait until the server administrator upgrades all ESX host VEMs with the new VEM software release and informs you that the upgrade process is complete. The server administrator performs the manual upgrade by using the vihostupdate command or the esxcli command. For more information, see Upgrading the VEM Software Using the vCLI. |
||||
| Step 8 |
switch# vmware vem upgrade complete Clear the VEM upgrade status after the upgrade process is complete. |
||||
| Step 9 |
switch# show vmware vem upgrade status Check the upgrade status once again. |
||||
| Step 10 |
switch# show module
The upgrade is complete. |
switch# show vmware vem upgrade status

Upgrade VIBs: System VEM Image
Upgrade Status:
Upgrade Notification Sent Time:
Upgrade Status Time(vCenter):
Upgrade Start Time:
Upgrade End Time(vCenter):
Upgrade Error:
Upgrade Bundle ID:
    VSM: VEM500-201306160100-BG
    DVS: VEM410-201301152101-BG
switch#
switch# vmware vem upgrade notify
Warning:
Please ensure the hosts are running compatible ESX versions for the upgrade. Refer to corresponding
"Cisco Nexus 1000V and VMware Compatibility Information" guide.

switch# show vmware vem upgrade status

Upgrade VIBs: System VEM Image
Upgrade Status: Upgrade Accepted by vCenter Admin
Upgrade Notification Sent Time: Tue Apr 23 10:03:24 2013
Upgrade Status Time(vCenter): Tue Apr 23 02:06:53 2013
Upgrade Start Time:
Upgrade End Time(vCenter):
Upgrade Error:
Upgrade Bundle ID:
    VSM: VEM500-201306160100-BG
    DVS: VEM410-201301152101-BG

switch#
switch# vmware vem upgrade proceed
switch# show vmware vem upgrade status

Upgrade VIBs: System VEM Image
Upgrade Status: Upgrade In Progress in vCenter
Upgrade Notification Sent Time: Tue Apr 23 10:03:24 2013
Upgrade Status Time(vCenter): Tue Apr 23 02:06:53 2013
Upgrade Start Time: Tue Apr 23 10:09:08 2013
Upgrade End Time(vCenter):
Upgrade Error:
Upgrade Bundle ID:
    VSM: VEM500-201306160100-BG
    DVS: VEM500-201306160100-BG

switch# show vmware vem upgrade status
Upgrade VIBs: System VEM Image
Upgrade Status: Upgrade Complete in vCenter
Upgrade Notification Sent Time: Tue Apr 23 10:03:24 2013
Upgrade Status Time(vCenter): Tue Apr 23 02:06:53 2013
Upgrade Start Time: Tue Apr 23 10:09:08 2013
Upgrade End Time(vCenter):
Upgrade Error
Upgrade Bundle ID:
    VSM: VEM500-201306160100-BG
    DVS: VEM500-201306160100-BG

switch#
switch# vmware vem upgrade complete
switch# show vmware vem upgrade status

Upgrade VIBs: System VEM Image
Upgrade Status:
Upgrade Notification Sent Time:
Upgrade Status Time(vCenter):
Upgrade Start Time:
Upgrade End Time(vCenter):
Upgrade Error
Upgrade Bundle ID:
    VSM: VEM500-201306160100-BG
    DVS: VEM500-201306160100-BG

switch#
switch# show module
Mod  Ports  Module-Type                       Model               Status
---  -----  --------------------------------  ------------------  ------------
1    0      Virtual Supervisor Module         Nexus1000V          active *
2    0      Virtual Supervisor Module         Nexus1000V          ha-standby
3    332    Virtual Ethernet Module           NA                  ok
6    248    Virtual Ethernet Module           NA                  ok


Mod  Sw                  Hw
---  ------------------  ------------------------------------------------
1    4.2(1)SV2(2.1)  0.0
2    4.2(1)SV2(2.1)  0.0
3    4.2(1)SV2(2.1)      VMware ESXi 5.0.0 Releasebuild-843203 (3.0)
6    4.2(1)SV2(2.1)      VMware ESXi 5.1.0 Releasebuild-843203 (3.0)


Mod  Server-IP        Server-UUID                           Server-Name
---  ---------------  ------------------------------------  --------------------
1    10.105.232.25    NA                                    NA
2    10.105.232.25    NA                                    NA
3    10.105.232.72    e6c1a563-bc9e-11e0-bd1d-30e4dbc2baba  10.105.232.72
6    10.105.232.70    ecebdf42-bc0e-11e0-bd1d-30e4dbc2b892  10.105.232.70

* this terminal session
switch#
Accepting the VEM Upgrade
1. In the vCenter Server, choose Inventory > Networking.
2. Click the vSphere Client DVS Summary tab to check for the availability of a software upgrade.
3. Click Apply upgrade.
DETAILED STEPS
| Step 1 | In the vCenter Server, choose Inventory > Networking. |
| Step 2 |
Click the vSphere Client DVS Summary tab to check for the availability of a software upgrade.
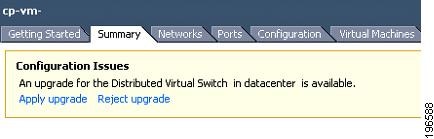
|
| Step 3 |
Click Apply upgrade. The network administrator is notified that you are ready to apply the upgrade to the VEMs. |
Upgrading the VEM Software Using the vCLI
You can upgrade the VEM software by using the vCLI.
-
If you are using vCLI, do the following:
- You have downloaded and installed the VMware vCLI. For information about installing the vCLI, see the VMware vCLI documentation.
-
You are logged in to the remote host where the vCLI is installed.
Note
The vSphere command-line interface (vCLI) command set allows you to enter common system administration commands against ESX/ESXi systems from any machine with network access to those systems. You can also enter most vCLI commands against a vCenter Server system and target any ESX/ESXi system that the vCenter Server system manages. vCLI commands are especially useful for ESXi hosts because ESXi does not include a service console.
- If you are using the esxupdate command, you are logged in to the ESX host.
- Check Cisco Nexus 1000V and VMware Compatibility Information for compatible versions.
- You have already copied the VEM software installation file to the /tmp directory. Do not copy the files to the root (/) folder.
- You know the name of the VEM software file to be installed.
-
vihostupdate
Installs the ESX/ ESXi and VEM software simultaneously if you are using the vCLI.
-
esxupdate
Installs the VEM software from the ESX host /tmp directory. Note You must log in to each host and enter this command. This command loads the software manually on the host, loads the kernel modules, and starts the VEM agent on the running system.
1. [root@serialport -]# cd tmp
2. Determine the upgrade method that you want to use and enter the appropriate command.
3. Enter the appropriate commands as they apply to you.
4. Display values with which to compare to Cisco Nexus 1000V and VMware Compatibility Information by typing the following commands.
5. switch# show module
DETAILED STEPS
| Step 1 |
[root@serialport -]# cd tmp Go to the directory where the new VEM software was copied. |
||
| Step 2 |
Determine the upgrade method that you want to use and enter the appropriate command.
|
||
| Step 3 | Enter the appropriate commands as they apply to you. | ||
| Step 4 | Display values with which to compare to Cisco Nexus 1000V and VMware Compatibility Information by typing the following commands. | ||
| Step 5 |
switch# show module Display that the VEMs were upgraded by entering the command on the VSM. |
If the upgrade was successful, the installation procedure is complete.
[root@serialport -]# cd tmp
[root@serialport tmp]#
esxupdate -b [VMware offline update bundle] update
~ # esxcli software vib install -d /var/log/vmware/VEM500-201306160100-BG-zip
Installation Result
   Message: Operation finished successfully.
   Reboot Required: false
   VIBs Installed: Cisco_bootbank_cisco-vem-v160-esx_4.2.1.2.2.1.0-3.0.1
   VIBs Removed:
   VIBs Skipped:
~ #

~ # esxcli software vib install -v /var/log/vmware/cross_cisco-vem-v160-4.2.1.2.2.1.0-3.0.1.vib
Installation Result
   Message: Operation finished successfully.
   Reboot Required: false
   VIBs Installed: Cisco_bootbank_cisco-vem-v160-esx_4.2.1.2.2.1.0-3.0.1
   VIBs Removed:
   VIBs Skipped:
~ #
[root@serialport tmp]# vmware -v
VMware ESXi 5.0.0 build-843203
root@serialport tmp]# # esxupdate query
------Bulletin ID------- -----Installed----- --------------Summary---------------
VEM500-201306160100 2013-04-21T08:18:22 Cisco Nexus 1000V 4.2(1)SV2(2.1)


[root@host212 ~]# . ~ # vem status -v
Package vssnet-esxmn-release
Version 4.2.1.2.2.1.0-3.0.1
Build 1
Date Sun Apr 21 04:56:14 PDT 2013

VEM modules are loaded
Switch Name      Num Ports   Used Ports  Configured Ports  MTU     Uplinks
vSwitch0         128         4           128               1500    vmnic4
DVS Name         Num Ports   Used Ports  Configured Ports  MTU     Uplinks
p-1              256         19          256               1500    vmnic7,vmnic6,vmnic3,vmnic2,vmnic1,vmnic0
VEM Agent (vemdpa) is running
~ #


[root@host212 ~]# vemcmd show version
vemcmd show version
VEM Version: 4.2.1.2.2.1.0-3.0.1
VSM Version: 4.2(1)SV2(2.1) [build 4.2(1)SV2(2.1)]
System Version: VMware ESXi 5.0.0 Releasebuild-843203

~ #
switch# show module
Mod  Ports  Module-Type                       Model               Status
---  -----  --------------------------------  ------------------  ------------
1    0      Virtual Supervisor Module         Nexus1000V          active *
2    0      Virtual Supervisor Module         Nexus1000V          ha-standby
3    332    Virtual Ethernet Module           NA                  ok
6    248    Virtual Ethernet Module           NA                  ok

Mod  Sw                  Hw
---  ------------------  ------------------------------------------------
1    4.2(1)SV2(2.1)  0.0
2    4.2(1)SV2(2.1)  0.0
3    4.2(1)SV2(2.1)      VMware ESXi 5.0.0 Releasebuild-843203 (3.0)
6    4.2(1)SV2(2.1)      VMware ESXi 5.1.0 Releasebuild-843203 (3.0)


Mod  Server-IP        Server-UUID                           Server-Name
---  ---------------  ------------------------------------  --------------------
1    10.105.232.25    NA                                    NA
2    10.105.232.25    NA                                    NA
3    10.105.232.72    e6c1a563-bc9e-11e0-bd1d-30e4dbc2baba  10.105.232.72
6    10.105.232.70    ecebdf42-bc0e-11e0-bd1d-30e4dbc2b892  10.105.232.70

switch#
Note |
The highlighted text in the previous command output confirms that the upgrade was successful. |
Upgrade Procedure for Cisco VSG Release 4.2(1)VSG1(3.1) to Release 4.2(1)VSG2(1.1), Cisco VNMC Release 1.3 to Release 2.1 and Cisco Nexus 1000V Release 4.2(1)SV1(4.1) to Release 4.2(1)SV2(2.1)
Cisco VSG Release 4.2(1)VSG1(3.1) to 4.2(1)VSG2(1.1) and Cisco VNMC 1.3 to 2.1 Staged Upgrade
Note |
The vn-service command is changed to the vservice command on the VSM port-profile in VSM Release 4.2(1)SV1(5.2). |
Virtual Appliance |
Original State |
Stage 1: Cisco VNMC Upgrade only (no PAs upgraded) |
Stage 2: Cisco VSG Upgrade (ISSU: PA upgrade) |
Stage 3: VSM/VEM Upgrade (ISSU: PA upgrade) |
|---|---|---|---|---|
| Cisco VNMC | Old 1.3 |
New 2.1 |
New 2.1 |
New 2.1 |
| Cisco VSG | Old 4.2(1)VSG1(3.1a) |
Old 4.2(1)VSG1(3.1a) |
New 4.2(1)VSG2(2.1) |
New 4.2(1)VSG1(4.1) |
VSG PA |
Old 1.3.1 |
Old 1.3.1 |
New 2.1 |
New 2.1 |
VSM |
Old 4.2(1)SV1(4b) |
Old 4.2(1)SV1(4b) |
Old 4.2(1)SV1(4b) |
New 4.2(1)SV2(2.1) |
VEM |
Old 4.2(1)SV1(4b) |
Old 4.2(1)SV1(4b) |
Old 4.2(1)SV1(4b) |
New 4.2(1)SV2(2.1) |
VSM PA |
1.2.1 |
Old 1.2.1 |
Old 1.2.1 |
New 2.0 |
Supported operations after upgrading to each stage |
All operations supported |
|
|
|
Restricted operations after upgrading to each stage |
None |
|
|
|
Note |
Because we support full ISSU upgrade on both VSG and VSM that includes installing a new PA, you must install the VNMC first. The new PA may not be compatible with the old VNMC. |
Upgrading VNMC from Release 1.3 to Release 2.1
1. vnmc# connect local-mgmt
2. (Optional) vnmc (local-mgmt)# show version
3. (Optional) vnmc (local-mgmt)# copy scp://user@example-server-ip/example-dir/filename bootflash:/
4. vnmc (local-mgmt)# dir bootflash:/
5. vnmc (local-mgmt)# update bootflash:/filename
6. vnmc (local-mgmt)# service restart
7. (Optional) vnmc (local-mgmt)# service status
8. (Optional) vnmc (local-mgmt)# show version
DETAILED STEPS
| Command or Action | Purpose | |||
|---|---|---|---|---|
| Step 1 | vnmc# connect local-mgmt | Places you in local management mode. |
||
| Step 2 | vnmc (local-mgmt)# show version | (Optional) Displays the version information for the Cisco VNMC software. |
||
| Step 3 | vnmc (local-mgmt)# copy scp://user@example-server-ip/example-dir/filename bootflash:/ | (Optional) Copies the Cisco VNMC software file to the VM. |
||
| Step 4 | vnmc (local-mgmt)# dir bootflash:/ | Verifies that the desired file is copied in the directory. |
||
| Step 5 | vnmc (local-mgmt)# update bootflash:/filename | Begins the update of the Cisco VNMC software. |
||
| Step 6 | vnmc (local-mgmt)# service restart | Restarts the server. |
||
| Step 7 | vnmc (local-mgmt)# service status | (Optional) Allows you to verify that the server is operating as desired. |
||
| Step 8 | vnmc (local-mgmt)# show version | (Optional) Allows you to verify that the Cisco VNMC software version is updated.
|
Configuration Example
The following example shows how to connect to the local-mgmt mode:
vnmc# connect local-mgmt
Cisco Virtual Network Management Center
TAC support: http://www.cisco.com/tac
Copyright (c) 2002-2013, Cisco Systems, Inc. All rights reserved.
The copyrights to certain works contained in this software are
owned by other third parties and used and distributed under
license. Certain components of this software are licensed under
the GNU General Public License (GPL) version 2.0 or the GNU
Lesser General Public License (LGPL) Version 2.1. A copy of each
such license is available at
http://www.opensource.org/licenses/gpl-2.0.php and
http://www.opensource.org/licenses/lgpl-2.1.php
The following example shows how to display version information for the Cisco VNMC:
vnmc(local-mgmt)# show version

Name                Package             Version        GUI
----                -------             -------        ----
core                Base System         1.3(1)         1.3(1)
service-reg         Service Registry    1.3(1)         1.3(1)
policy-mgr          Policy Manager      1.3(1)         1.3(1)
resource-mgr        Resource Manager    1.3(1)         1.3(1)
vm-mgr              VM manager          1.3(1)         none
The following example shows how to copy the Cisco VNMC software to the VM:
vnmc(local-mgmt)# copy scp://<user@example-server-ip>/example1-dir/vnmc.2.1.bin bootflash:/
Enter password:
100%  143MB  11.9MB/s   00:12
The following example shows how to see the directory information for Cisco VNMC:
vnmc(local-mgmt)# dir bootflash:/
14M May 28 2013  gui-automation.tgz

            887 May 28 2013  vnmc-dplug.1.3.1.bin
            20M May 28 2013  vnmc-vsgpa.1.3.1.bin
            20M May 28 2013  vnmc-vsmpa.1.3.1.bin
           403M Jan 31 01:58 vnmc.2.0.bin


Usage for bootflash://

			18187836 bytes used
             3842128 bytes free
            22029964 bytes total
The following example shows how to start the update for the Cisco VNMC:
vnmc(local-mgmt)# update bootflash:/vnmc.2.1.bin
It is recommended that you perform a full-state backup before updating any VNMC component.  Press enter to continue or Ctrl-c to exit.
The following example shows how to display the updated version for the Cisco VNMC:
vnmc(local-mgmt)# show version

Name                Package             Version        GUI
----                -------             -------        ----
core                Base System         2.1            2.1
service-reg         Service Registry    2.1            2.1
policy-mgr          Policy Manager      2.1            2.1
resource-mgr        Resource Manager    2.1            2.1
vm-mgr              VM manager          2.1            none
Upgrading Cisco VSG from Release 4.2(1)VSG1(3.1) to 4.2(1)VSG2(1.1)
Enter the commands on all Cisco VSG nodes on your network.
- You are logged in to the CLI in EXEC mode.
-
You have copied the new system image, kickstart image and the Cisco VSG policy agent image into the bootflash file system using the following commands: switch# copy scp://user@scpserver.cisco.com/downloads/nexus-1000v-kickstart-mz.VSG2.1.bin bootflash:nexus-1000v-kickstart-mz.VSG2.1.bin switch# copy scp://user@scpserver.cisco.com/downloads/nexus-1000v-mz.VSG2.1.bin bootflash:nexus-1000v-mz.VSG2.1.bin switch# copy scp://user@scpserver.cisco.com/downloads/vnmc-vsgpa.2.1(1b).bin bootflash:vnmc-vsgpa.2.1(1b).bin
- You have confirmed that the system is in high availability (HA) mode for an HA upgrade using the show system redundancy status command.
1. configure terminal
2. install all kickstart bootflash:nexus-1000v-kickstart-mz.VSG2.1.bin system bootflash:nexus-1000v-mz.VSG2.1.bin vnmpa bootflash:vnmc-vsgpa.2.1(1b).bin
3. show vnm-pa status
4. copy running-config startup-config
DETAILED STEPS
| Command or Action | Purpose | |||
|---|---|---|---|---|
| Step 1 | configure terminal |
Enters global configuration mode. |
||
| Step 2 | install all kickstart bootflash:nexus-1000v-kickstart-mz.VSG2.1.bin system bootflash:nexus-1000v-mz.VSG2.1.bin vnmpa bootflash:vnmc-vsgpa.2.1(1b).bin |
Installs the kickstart image, system image, and policy agent (PA) image.
|
||
| Step 3 | show vnm-pa status |
Verifies that the new PA is installed and the upgrade was successful.
|
||
| Step 4 | copy running-config startup-config |
Saves the change persistently through reboots and restarts by copying the running configuration to the startup configuration. |
Configuration Example
The following example shows how to upgrade Cisco VSG Release 4.2(1)VSG1(3.1) to Release 4.2(1)VSG2(1.1):
vsg # configure terminal
vsg (config)# install all kickstart bootflash:nexus-1000v-kickstart-mz.VSG2.1.bin system bootflash:nexus-1000v-mz.VSG2.1.bin vnmpa bootflash:vnmc-vsgpa.2.1(1b).bin
vsg (config)# show vnm-pa status
VNM Policy-Agent status is - Installed Successfully. Version 2.1(1b)-vsg
vsg(config)# copy running-config startup-config
Upgrading VSMs
Upgrade Procedures
The following table lists the upgrade steps.
If you are running this configuration |
Follow these steps |
|---|---|
Release 4.0(4)SV1(1) or 4.0(4)SV1(2) |
Upgrades from these releases are not supported. |
Releases 4.0(4)SV1(3x) Series |
|
Release 4.2(1)SV1(4x) Series with a vSphere release 4.0 Update 1 or later |
|
Release 4.2(1)SV1(4x) Series with a vSphere release 4.1 GA, patches, or updates |
|
Release 4.2(1)SV1(4a) or 4.2(1)SV1(4b) with a vSphere release 5.0 GA, patches, or updates |
|
The following table lists the upgrade steps when upgrading from Release 4.2(1)SV1(5x) and later releases to the current release.
If you are running this configuration |
Follow these steps |
|---|---|
With vSphere 4.1 GA, patches, or updates. |
|
With vSphere 5.0 GA, patches, or updates. |
|
With ESX version upgrade. |
Installing and Upgrading VMware |
Software Images
The software image install procedure is dependent on the following factors:
- Software images—The kickstart and system image files reside in directories or folders that you can access from the Cisco Nexus 1000V software prompt.
- Image version—Each image file has a version.
- Disk—The bootflash: resides on the VSM.
- ISO file—If a local ISO file is passed to the install all command, the kickstart and system images are extracted from the ISO file.
In-Service Software Upgrades on Systems with Dual VSMs
Note |
Performing an In-Service Software Upgrade (ISSU) from Cisco Nexus 1000V Release 4.2(1)SV1(4) or Release 4.2(1)SV1(4a) to the current release of Cisco Nexus 1000V using ISO files is not supported. You must use kickstart and system files to perform an ISSU upgrade to the current release of Cisco Nexus 1000V. |
The Cisco Nexus 1000V software supports in-service software upgrades (ISSUs) for systems with dual VSMs. An ISSU can update the software images on your switch without disrupting data traffic. Only control traffic is disrupted. If an ISSU causes a disruption of data traffic, the Cisco Nexus 1000V software warns you before proceeding so that you can stop the upgrade and reschedule it to a time that minimizes the impact on your network.
Note |
On systems with dual VSMs, you should have access to the console of both VSMs to maintain connectivity when the switchover occurs during upgrades. If you are performing the upgrade over Secure Shell (SSH) or Telnet, the connection will drop when the system switchover occurs, and you must reestablish the connection. |
An ISSU updates the following images:
All of the following processes are initiated automatically by the upgrade process after the network administrator enters the install all command.
ISSU Process for the Cisco Nexus 1000V
The following figure shows the ISSU process.
ISSU VSM Switchover
The following figure provides an example of the VSM status before and after an ISSU switchover.
ISSU Command Attributes
Support
The install all command supports an in-service software upgrade (ISSU) on dual VSMs in an HA environment and performs the following actions:
- Determines whether the upgrade is disruptive and asks if you want to continue.
- Copies the kickstart and system images to the standby VSM. Alternatively, if a local ISO file is passed to the install all command instead, the kickstart and system images are extracted from the file.
- Sets the kickstart and system boot variables.
- Reloads the standby VSM with the new Cisco Nexus 1000V software.
- Causes the active VSM to reload when the switchover occurs.
Benefits
The install all command provides the following benefits:
- You can upgrade the VSM by using the install all command.
- You can receive descriptive information on the intended changes to your system before you continue with the installation.
- You have the option to cancel the command. Once the effects of the command are presented, you can continue or cancel when you see this question (the default is no): Do you want to continue (y/n) [n]: y
- You can upgrade the VSM using the least disruptive procedure.
- You can see the progress of this command on the console, Telnet, and SSH screens:
- The install all command automatically checks the image integrity, which includes the running kickstart and system images.
- The install all command performs a platform validity check to verify that a wrong image is not used.
- The Ctrl-C escape sequence gracefully ends the install all command. The command sequence completes the update step in progress and returns to the switch prompt. (Other upgrade steps cannot be ended by using Ctrl-C.)
- After running the install all command, if any step in the sequence fails, the command completes the step in progress and ends.
Upgrading VSMs from Releases 4.2(1)SV1(4x), 4.2(1)SV1(5x), 4.2(1)SV2(1.1x) to Release 4.2(1)SV2(2.1x)
1. Log in to the active VSM.
2. Log in to Cisco.com to access the links provided in this document. To log in to Cisco.com, go to the URL http://www.cisco.com/ and click Log In at the top of the page. Enter your Cisco username and password.
3. Access the Software Download Center by using this URL:
4. Navigate to the download site for your system.
5. Choose and download the Cisco Nexus 1000V zip file and extract the kickstart and system software files to a server.
6. Ensure that the required space is available for the image file(s) to be copied.
7. Verify that there is space available on the standby VSM.
8. Delete any unnecessary files to make space available if you need more space on the standby VSM.
9. If you plan to install the images from the bootflash:, copy the Cisco Nexus 1000V kickstart and system images or the ISO image to the active VSM by using a transfer protocol. You can use ftp:, tftp:, scp:, or sftp:. The examples in this procedure use scp:.
10. Check on the impact of the ISSU upgrade for the kickstart and system images or the ISO image.
11. Read the release notes for the related image file. See the Cisco Nexus 1000V Release Notes.
12. Determine if the Virtual Security Gateway (VSG) is configured in the deployment:
13. Save the running configuration to the startup configuration.
14. Save the running configuration on the bootflash and externally.
15. Perform the upgrade on the active VSM using the ISO or kickstart and system images.
16. Continue with the installation by pressing Y.
17. After the installation operation completes, log in and verify that the switch is running the required software version.
18. Copy the running configuration to the startup configuration to adjust the startup-cgf size.
19. Display the log of the last installation.
DETAILED STEPS
| Step 1 | Log in to the active VSM. | ||||
| Step 2 |
Log in to Cisco.com to access the links provided in this document. To log in to Cisco.com, go to the URL http://www.cisco.com/ and click Log In at the top of the page. Enter your Cisco username and password.
|
||||
| Step 3 | Access the Software Download Center by using this URL: | ||||
| Step 4 |
Navigate to the download site for your system. You see links to the download images for your switch. |
||||
| Step 5 | Choose and download the Cisco Nexus 1000V zip file and extract the kickstart and system software files to a server. | ||||
| Step 6 |
Ensure that the required space is available for the image file(s) to be copied.
switch# dir bootflash:
.
.
.
Usage for bootflash://
  485830656 bytes used
 1109045248 bytes free
 1594875904 bytes total
|
||||
| Step 7 |
Verify that there is space available on the standby VSM.
switch# dir bootflash://sup-standby/
.
.
.
Usage for bootflash://
  485830656 bytes used
 1109045248 bytes free
 1594875904 bytes total
|
||||
| Step 8 | Delete any unnecessary files to make space available if you need more space on the standby VSM. | ||||
| Step 9 |
If you plan to install the images from the bootflash:, copy the Cisco Nexus 1000V kickstart and system images or the ISO image to the active VSM by using a transfer protocol. You can use ftp:, tftp:, scp:, or sftp:. The examples in this procedure use scp:.
|
||||
| Step 10 |
Check on the impact of the ISSU upgrade for the kickstart and system images or the ISO image.
|
||||
| Step 11 | Read the release notes for the related image file. See the Cisco Nexus 1000V Release Notes. | ||||
| Step 12 |
Determine if the Virtual Security Gateway (VSG) is configured in the deployment:
|
||||
| Step 13 |
Save the running configuration to the startup configuration.
switch# copy running-config startup-config
|
||||
| Step 14 |
Save the running configuration on the bootflash and externally.
switch# copy running-config bootflash:run-cfg-backup
switch# copy running-config scp://user@tftpserver.cisco.com/n1kv-run-cfg-backup
|
||||
| Step 15 |
Perform the upgrade on the active VSM using the ISO or kickstart and system images.
|
||||
| Step 16 |
Continue with the installation by pressing Y.
Install is in progress, please wait.

Syncing image bootflash:/nexus-1000v-kickstart-4.2.1.SV2.1.1a.bin to standby.
[####################] 100% -- SUCCESS

Syncing image bootflash:/nexus-1000v-4.2.1.SV2.1.1a.bin to standby.
[####################] 100% -- SUCCESS

Setting boot variables.
[####################] 100% -- SUCCESS

Performing configuration copy.
[####################] 100%2011 Mar 31 03:49:42 BL1-VSM %SYSMGR-STANDBY-5-CFGWRITE_STARTED: Configuration copy started (PID 3660).
[####################] 100% -- SUCCESS
Continuing with installation, please wait Module 2: Waiting for module online -- SUCCESS Install has been successful |
||||
| Step 17 |
After the installation operation completes, log in and verify that the switch is running the required software version. switch# show version
Nexus1000v# show version
Cisco Nexus Operating System (NX-OS) Software
TAC support: http://www.cisco.com/tac
Copyright (c) 2002-2012, Cisco Systems, Inc. All rights reserved.
The copyrights to certain works contained herein are owned by
other third parties and are used and distributed under license.
Some parts of this software are covered under the GNU Public
License. A copy of the license is available at
http://www.gnu.org/licenses/gpl.html.
Software
loader: version unavailable [last: loader version not available]
kickstart: version 4.2(1)SV2(1.1a) [build 4.2(1)SV2(1.1a)]
system: version 4.2(1)SV2(1.1a) [build 4.2(1)SV2(1.1a)]
kickstart image file is: bootflash:/nexus-1000v-kickstart-4.2.1.SV2.1.1a.bin
kickstart compile time: 1/11/2012 3:00:00 [01/11/2012 12:49:49]
system image file is: bootflash:/nexus-1000v-4.2.1.SV2.1.1a.bin
system compile time: 1/11/2012 3:00:00 [01/11/2012 13:42:57]
Hardware
cisco Nexus 1000V Chassis ("Virtual Supervisor Module")
Intel(R) Xeon(R) CPU with 2075740 kB of memory.
Processor Board ID T5056B1802D
Device name: Nexus1000v
bootflash: 1557496 kB
Kernel uptime is 4 day(s), 8 hour(s), 31 minute(s), 3 second(s)
plugin
Core Plugin, Ethernet Plugin, Virtualization Plugin
... |
||||
| Step 18 |
Copy the running configuration to the startup configuration to adjust the startup-cgf size. switch# copy running-config startup-config [########################################] 100% switch# |
||||
| Step 19 |
Display the log of the last installation. switch# show install all status
This is the log of last installation.
Verifying image bootflash:/nexus-1000v-kickstart-4.2.1.SV2.1.1a.bin for boot variable "kickstart".
-- SUCCESS
Verifying image bootflash:/nexus-1000v-4.2.1.SV2.1.1a.bin for boot variable "system".
-- SUCCESS
Verifying image type.
-- SUCCESS
Extracting "system" version from image bootflash:/nexus-1000v-4.2.1.SV2.1.1a.bin.
-- SUCCESS
Extracting "kickstart" version from image bootflash:/nexus-1000v-kickstart-4.2.1.SV2.1.1a.bin.
-- SUCCESS
Notifying services about system upgrade.
-- SUCCESS
Compatibility check is done:
Module bootable Impact Install-type Reason
------ -------- -------------- ------------ ------
1 yes non-disruptive reset
2 yes non-disruptive reset
Images will be upgraded according to following table:
Module Image Running-Version New-Version Upg-Required
------ ---------- ---------------------- ---------------------- ------------
1 system 4.2(1)SV1(5.2) 4.2(1)SV2(1.1a) yes
1 kickstart 4.2(1)SV1(5.2) 4.2(1)SV2(1.1a) yes
2 system 4.2(1)SV1(5.2) 4.2(1)SV2(1.1a) yes
2 kickstart 4.2(1)SV1(5.2) 4.2(1)SV2(1.1a) yes
Images will be upgraded according to following table:
Module Running-Version ESX Version VSM Compatibility ESX Compatibility
------ ---------------------- ---------------------------------------------------- ---------------------- ----------------------
3 4.2(1)SV1(5.2) VMware ESXi 5.0.0 Releasebuild-469512 (3.0) COMPATIBLE COMPATIBLE
4 4.2(1)SV1(5.2) VMware ESXi 5.0.0 Releasebuild-469512 (3.0) COMPATIBLE COMPATIBLE
Install is in progress, please wait.
Syncing image bootflash:/nexus-1000v-kickstart-4.2.1.SV2.1.1a.bin to standby.
-- SUCCESS
Syncing image bootflash:/nexus-1000v-4.2.1.SV2.1.1a.bin to standby.
-- SUCCESS
Setting boot variables.
-- SUCCESS
Performing configuration copy.
-- SUCCESS
Module 2: Waiting for module online.
-- SUCCESS
Notifying services about the switchover.
-- SUCCESS
"Switching over onto standby".
switch#
switch#
switch#
switch# attach module 2
Attaching to module 2 ...
To exit type 'exit', to abort type '$.'
Cisco Nexus Operating System (NX-OS) Software
TAC support: http://www.cisco.com/tac
Copyright (c) 2002-2011, Cisco Systems, Inc. All rights reserved.
The copyrights to certain works contained in this software are
owned by other third parties and used and distributed under
license. Certain components of this software are licensed under
the GNU General Public License (GPL) version 2.0 or the GNU
Lesser General Public License (LGPL) Version 2.1. A copy of each
such license is available at
http://www.opensource.org/licenses/gpl-2.0.php and
http://www.opensource.org/licenses/lgpl-2.1.php
switch(standby)#
switch(standby)# show install all status
This is the log of last installation.
Continuing with installation, please wait
Trying to start the installer...
Module 2: Waiting for module online.
-- SUCCESS
Install has been successful.
switch(standby)# |
Upgrading VEMs
VEM Upgrade Procedures
-
VUM Upgrade Procedures
- Generate an upgrade ISO. See Creating an Upgrade ISO with a VMware ESX Image and a Cisco Nexus 1000V VEM Image.
- Set up VUM baselines. See Upgrading the ESXi Hosts to Release 5.1.
- Initiate an upgrade from VUM. See Upgrading the VEMs Using VMware Update Manager from Release 4.2(1)SV1(4x), Release 4.2(1)SV1(5x), or Release 4.2(1)SV2(1.1x) to the Current Release.
- Upgrade VEM from VSM. See Upgrading the VEMs Using VMware Update Manager from Release 4.2(1)SV1(4x), Release 4.2(1)SV1(5x), or Release 4.2(1)SV2(1.1x) to the Current Release.
-
Manual upgrade procedures
- Upgrading VIB Manually from the CLI. See Upgrading the VEMs Manually from from Release 4.2(1)SV1(4x), Release 4.2(1)SV1(5x), or Release 4.2(1)SV2(1.1x) to the Current Release
- Installing or upgrading stateless ESXi. See Installing the VEM Software on a Stateless ESXi Host.
VEM upgrades fall into three types:
- An upgrade of an ESX or stateful ESXi host, without a migration from ESX (with a console OS) to ESXi. This upgrade type is described further in this section.
- An upgrade of a stateless ESXi host. This involves installing a new image on the host by updating the image profile and rebooting the host. The upgrade is described in Installing the VEM Software on a Stateless ESXi Host.
- An upgrade that involve a migration from ESX to ESXi (of the same or different vSphere version).
An upgrade of an ESX or stateful ESXi host without a migration from ESX (which has a console OS) to ESXi falls into two separate workflows.
- Upgrade the VEM alone, while keeping the ESX/ESXi version intact. The first figure shows this flow.
- Upgrade the ESX/ESXi without a change of the Cisco Nexus 1000V version. This process is addressed in the Workflow 2 figure.
The following figure shows Workflow 1 where Cisco Nexus 1000V Release 4.2(1)SV1(4.x) or 4.2(1)SV1(5.x) is upgraded to the current release, without a change of ESX versions.
If you are using VUM, set up a host patch baseline with the VEM’s offline bundle. Then follow Upgrading the VEMs Using VMware Update Manager from Release 4.2(1)SV1(4x), Release 4.2(1)SV1(5x), or Release 4.2(1)SV2(1.1x) to the Current Release.
If you are upgrading from the command line, see Upgrading the VEMs Manually from from Release 4.2(1)SV1(4x), Release 4.2(1)SV1(5x), or Release 4.2(1)SV2(1.1x) to the Current Release.
The following figure shows Workflow 2 where Cisco Nexus 1000VRelease 4.2(1)SV2(1.1) is installed and VMware 4.1 is upgraded to 5.0.
-
If you are using VUM version 5.0 or later, use the following method (independent of whether the VEM version is being changed as well):
- If you are upgrading the ESX host to a new update within a release, use a host upgrade baseline. For example, vSphere 5.0 GA to 5.0 U1.
- If you are upgrading the ESX host to a major release (for example, vSphere 4.1 U2 to 5.0 U1), generate an upgrade ISO and set up a host upgrade baseline. The upgrade ISO must have the desired final images for both ESX and VEM. The procedure to generate an upgrade ISO is in Creating an Upgrade ISO with a VMware ESX Image and a Cisco Nexus 1000V VEM Image.
- You can upgrade the ESX version and VEM version simultaneously if you are using VUM 5.0 Update 1 or later. VUM 5.0 GA does not support a combined upgrade.
Note |
If you plan to perform Workflow 2 and manually update to vSphere 5.0 or later, you must boot the host from an upgrade ISO with both ESX and VEM images. |
VEM Upgrade Methods from Release 4.2(1)SV1(4x), Release 4.2(1)SV1(5x), or Release 4.2(1)SV2(1.1x) to the Current Release
There are two methods for upgrading the VEMs.
- Upgrading the VEMs Using VMware Update Manager from Release 4.2(1)SV1(4x), Release 4.2(1)SV1(5x), or Release 4.2(1)SV2(1.1x) to the Current Release
- Upgrading the VEMs Manually from from Release 4.2(1)SV1(4x), Release 4.2(1)SV1(5x), or Release 4.2(1)SV2(1.1x) to the Current Release
- Accepting the VEM Upgrade
- Upgrading the VEM Software Using the vCLI
Upgrading the VEMs Using VMware Update Manager from Release 4.2(1)SV1(4x), Release 4.2(1)SV1(5x), or Release 4.2(1)SV2(1.1x) to the Current Release
Caution |
If removable media is still connected (for example, if you have installed the VSM using ISO and forgot to remove the media), host movement to maintenance mode fails and the VUM upgrade fails. |
1. switch# show vmware vem upgrade status
2. switch# vmware vem upgrade notify
3. switch# show vmware vem upgrade status
4. switch# show vmware vem upgrade status
5. Initiate the VUM upgrade process with the following commands.
6. switch# show vmware vem upgrade status
7. Clear the VEM upgrade status after the upgrade process is complete with the following commands.
8. switch# show module
DETAILED STEPS
| Step 1 |
switch# show vmware vem upgrade status Display the current configuration.
|
||||
| Step 2 |
switch# vmware vem upgrade notify Coordinate with and notify the server administrator of the VEM upgrade process. |
||||
| Step 3 |
switch# show vmware vem upgrade status Verify that the upgrade notification was sent.
|
||||
| Step 4 |
switch# show vmware vem upgrade status Verify that the server administrator has accepted the upgrade in the vCenter. For more information about how the server administrator accepts the VEM upgrade, see Accepting the VEM Upgrade. Coordinate the notification acceptance with the server administrator. After the server administrator accepts the upgrade, proceed with the VEM upgrade.
|
||||
| Step 5 |
Initiate the VUM upgrade process with the following commands.
|
||||
| Step 6 |
switch# show vmware vem upgrade status Check for the upgrade complete status. |
||||
| Step 7 | Clear the VEM upgrade status after the upgrade process is complete with the following commands. | ||||
| Step 8 |
switch# show module Verify that the upgrade process is complete. The upgrade is complete. |
The following example shows how to upgrade VEMs using VUM.
switch# show vmware vem upgrade status

Upgrade VIBs: System VEM Image
Upgrade Status:
Upgrade Notification Sent Time:
Upgrade Status Time(vCenter):
Upgrade Start Time:
Upgrade End Time(vCenter):
Upgrade Error:
Upgrade Bundle ID:
    VSM: VEM500-201306160100-BG
    DVS: VEM410-201301152101-BG
switch#
switch# vmware vem upgrade notify
Warning:
Please ensure the hosts are running compatible ESX versions for the upgrade. Refer to corresponding
"Cisco Nexus 1000V and VMware Compatibility Information" guide.
switch# show vmware vem upgrade status

Upgrade VIBs: System VEM Image
Upgrade Status: Upgrade Availability Notified in vCenter
Upgrade Notification Sent Time: Tue Apr 23 10:03:24 2013
Upgrade Status Time(vCenter):
Upgrade Start Time:
Upgrade End Time(vCenter):
Upgrade Error:
Upgrade Bundle ID:
    VSM:  VEM500-201306160100-BG
    DVS:  VEM410-201301152101-BG
switch#
switch# show vmware vem upgrade status

Upgrade VIBs: System VEM Image
Upgrade Status: Upgrade Accepted by vCenter Admin
Upgrade Notification Sent Time: Tue Apr 23 10:03:24 2013
Upgrade Status Time(vCenter): Tue Apr 23 02:06:53 2013
Upgrade Start Time:
Upgrade End Time(vCenter):
Upgrade Error:
Upgrade Bundle ID:
    VSM: VEM500-201306160100-BG
    DVS: VEM410-201301152101-BG
switch#
switch# vmware vem upgrade proceed
switch# show vmware vem upgrade status

Upgrade VIBs: System VEM Image
Upgrade Status: Upgrade In Progress in vCenter
Upgrade Notification Sent Time: Tue Apr 23 10:03:24 2013
Upgrade Status Time(vCenter) : Tue Apr 23 02:06:53 2013
Upgrade Start Time: : Tue Apr 23 10:09:08 2013
Upgrade End Time(vCenter):
Upgrade Error:
Upgrade Bundle ID:
    VSM: VEM500-201306160100-BG
    DVS: VEM500-201306160100-BG
switch#
switch# show vmware vem upgrade status

Upgrade VIBs: System VEM Image
Upgrade Status: Upgrade Complete in vCenter
Upgrade Notification Sent Time: : Tue Apr 23 10:03:24 2013
Upgrade Status Time(vCenter): : Tue Apr 23 02:06:53 2013
Upgrade Start Time: : Tue Apr 23 10:09:08 2013
Upgrade End Time(vCenter): : Tue Apr 23 10:09:08 2013
Upgrade Error:
Upgrade Bundle ID:
    VSM: VEM410-201304160104-BG
    DVS: VEM410-201304160104-BG
switch#
switch# vmware vem upgrade complete
switch# show vmware vem upgrade status


Upgrade VIBs: System VEM Image
Upgrade Status:
Upgrade Notification Sent Time:
Upgrade Status Time(vCenter):
Upgrade Start Time:
Upgrade End Time(vCenter):
Upgrade Error:
Upgrade Bundle ID:
    VSM: VEM500-201306160100-BG
    DVS: VEM500-201306160100-BG
switch#
switch# show module
Mod  Ports  Module-Type                       Model               Status
---  -----  --------------------------------  ------------------  ------------
1    0      Virtual Supervisor Module         Nexus1000V          ha-standby
2    0      Virtual Supervisor Module         Nexus1000V          active *
3    248    Virtual Ethernet Module           NA                  ok
4    248    Virtual Ethernet Module           NA                  ok

Mod  Sw                  Hw
---  ------------------  ------------------------------------------------
1    4.2(1)SV2(2.1)      0.0
2    4.2(1)SV2(2.1)      0.0
3    4.2(1)SV2(2.1)      VMware ESXi 5.0.0 Releasebuild-469512 (3.0)
4    4.2(1)SV2(2.1)      VMware ESXi 5.0.0 Releasebuild-623860 (3.0)

Mod  MAC-Address(es)                         Serial-Num
---  --------------------------------------  ----------
1    00-19-07-6c-5a-a8 to 00-19-07-6c-62-a8  NA
2    00-19-07-6c-5a-a8 to 00-19-07-6c-62-a8  NA
3    02-00-0c-00-03-00 to 02-00-0c-00-03-80  NA
4    02-00-0c-00-04-00 to 02-00-0c-00-04-80  NA

Mod  Server-IP        Server-UUID                           Server-Name
---  ---------------  ------------------------------------  --------------------
1    10.104.249.171   NA                                    NA
2    10.104.249.171   NA                                    NA
3    10.104.249.172   7d41e666-b58a-11e0-bd1d-30e4dbc299c0  10.104.249.172
4    10.104.249.173   17d79824-b593-11e0-bd1d-30e4dbc29a0e  10.104.249.173

* this terminal session
switch#
Note |
The lines with the bold characters in the preceding example display that all VEMs are upgraded to the current release. |
Upgrading the VEMs Manually from from Release 4.2(1)SV1(4x), Release 4.2(1)SV1(5x), or Release 4.2(1)SV2(1.1x) to the Current Release
Note |
If VUM is installed, it should be disabled. |
To manually install or upgrade the Cisco Nexus 1000V VEM on an ESX/ESXi host, follow the steps in Upgrading the VEM Software Using the vCLI.
To upgrade the VEMs manually, perform the following steps as network administrator:
Note |
This procedure is performed by the network administrator. Before proceeding with the upgrade, make sure that the VMs are powered off if you are not running the required patch level. |
Caution |
If removable media is still connected, (for example, if you have installed the VSM using ISO and forgot to remove the media), host movement to maintenance mode fails and the VEM upgrade fails. |
1. switch# vmware vem upgrade notify
2. switch# show vmware vem upgrade status
3. switch# show vmware vem upgrade status
4. Perform one of the following tasks:
5. switch# vmware vem upgrade proceed
6. switch# show vmware vem upgrade status
7. Coordinate with and wait until the server administrator upgrades all ESX host VEMs with the new VEM software release and informs you that the upgrade process is complete.
8. switch# vmware vem upgrade complete
9. switch# show vmware vem upgrade status
10. switch# show module
DETAILED STEPS
| Step 1 |
switch# vmware vem upgrade notify Coordinate with and notify the server administrator of the VEM upgrade process. |
||||
| Step 2 |
switch# show vmware vem upgrade status Verify that the upgrade notification was sent. |
||||
| Step 3 |
switch# show vmware vem upgrade status Verify that the server administrator has accepted the upgrade in vCenter Server. For details about the server administrator accepting the VEM upgrade, see Accepting the VEM Upgrade. After the server administrator accepts the upgrade, proceed with the VEM upgrade. |
||||
| Step 4 | Perform one of the following tasks: | ||||
| Step 5 |
switch# vmware vem upgrade proceed Initiate the Cisco Nexus 1000V Bundle ID upgrade process.
Enter the vmware vem upgrade proceed command so that the Cisco Nexus 1000V Bundle ID on the vCenter Server gets updated. If VUM is enabled and you do not update the Bundle ID, an incorrect VIB version is pushed to the VEM when you next add the ESX to the VSM.
|
||||
| Step 6 |
switch# show vmware vem upgrade status Check for the upgrade complete status. |
||||
| Step 7 |
Coordinate with and wait until the server administrator upgrades all ESX host VEMs with the new VEM software release and informs you that the upgrade process is complete. The server administrator performs the manual upgrade by using the vihostupdate command or the esxcli command. For more information, see Upgrading the VEM Software Using the vCLI. |
||||
| Step 8 |
switch# vmware vem upgrade complete Clear the VEM upgrade status after the upgrade process is complete. |
||||
| Step 9 |
switch# show vmware vem upgrade status Check the upgrade status once again. |
||||
| Step 10 |
switch# show module
The upgrade is complete. |
switch# show vmware vem upgrade status

Upgrade VIBs: System VEM Image
Upgrade Status:
Upgrade Notification Sent Time:
Upgrade Status Time(vCenter):
Upgrade Start Time:
Upgrade End Time(vCenter):
Upgrade Error:
Upgrade Bundle ID:
    VSM: VEM500-201306160100-BG
    DVS: VEM410-201301152101-BG
switch#
switch# vmware vem upgrade notify
Warning:
Please ensure the hosts are running compatible ESX versions for the upgrade. Refer to corresponding
"Cisco Nexus 1000V and VMware Compatibility Information" guide.

switch# show vmware vem upgrade status

Upgrade VIBs: System VEM Image
Upgrade Status: Upgrade Accepted by vCenter Admin
Upgrade Notification Sent Time: Tue Apr 23 10:03:24 2013
Upgrade Status Time(vCenter): Tue Apr 23 02:06:53 2013
Upgrade Start Time:
Upgrade End Time(vCenter):
Upgrade Error:
Upgrade Bundle ID:
    VSM: VEM500-201306160100-BG
    DVS: VEM410-201301152101-BG

switch#
switch# vmware vem upgrade proceed
switch# show vmware vem upgrade status

Upgrade VIBs: System VEM Image
Upgrade Status: Upgrade In Progress in vCenter
Upgrade Notification Sent Time: Tue Apr 23 10:03:24 2013
Upgrade Status Time(vCenter): Tue Apr 23 02:06:53 2013
Upgrade Start Time: Tue Apr 23 10:09:08 2013
Upgrade End Time(vCenter):
Upgrade Error:
Upgrade Bundle ID:
    VSM: VEM500-201306160100-BG
    DVS: VEM500-201306160100-BG

switch# show vmware vem upgrade status
Upgrade VIBs: System VEM Image
Upgrade Status: Upgrade Complete in vCenter
Upgrade Notification Sent Time: Tue Apr 23 10:03:24 2013
Upgrade Status Time(vCenter): Tue Apr 23 02:06:53 2013
Upgrade Start Time: Tue Apr 23 10:09:08 2013
Upgrade End Time(vCenter):
Upgrade Error
Upgrade Bundle ID:
    VSM: VEM500-201306160100-BG
    DVS: VEM500-201306160100-BG

switch#
switch# vmware vem upgrade complete
switch# show vmware vem upgrade status

Upgrade VIBs: System VEM Image
Upgrade Status:
Upgrade Notification Sent Time:
Upgrade Status Time(vCenter):
Upgrade Start Time:
Upgrade End Time(vCenter):
Upgrade Error
Upgrade Bundle ID:
    VSM: VEM500-201306160100-BG
    DVS: VEM500-201306160100-BG

switch#
switch# show module
Mod  Ports  Module-Type                       Model               Status
---  -----  --------------------------------  ------------------  ------------
1    0      Virtual Supervisor Module         Nexus1000V          active *
2    0      Virtual Supervisor Module         Nexus1000V          ha-standby
3    332    Virtual Ethernet Module           NA                  ok
6    248    Virtual Ethernet Module           NA                  ok


Mod  Sw                  Hw
---  ------------------  ------------------------------------------------
1    4.2(1)SV2(2.1)  0.0
2    4.2(1)SV2(2.1)  0.0
3    4.2(1)SV2(2.1)      VMware ESXi 5.0.0 Releasebuild-843203 (3.0)
6    4.2(1)SV2(2.1)      VMware ESXi 5.1.0 Releasebuild-843203 (3.0)


Mod  Server-IP        Server-UUID                           Server-Name
---  ---------------  ------------------------------------  --------------------
1    10.105.232.25    NA                                    NA
2    10.105.232.25    NA                                    NA
3    10.105.232.72    e6c1a563-bc9e-11e0-bd1d-30e4dbc2baba  10.105.232.72
6    10.105.232.70    ecebdf42-bc0e-11e0-bd1d-30e4dbc2b892  10.105.232.70

* this terminal session
switch#
Accepting the VEM Upgrade
1. In the vCenter Server, choose Inventory > Networking.
2. Click the vSphere Client DVS Summary tab to check for the availability of a software upgrade.
3. Click Apply upgrade.
DETAILED STEPS
| Step 1 | In the vCenter Server, choose Inventory > Networking. |
| Step 2 |
Click the vSphere Client DVS Summary tab to check for the availability of a software upgrade.
|
| Step 3 |
Click Apply upgrade. The network administrator is notified that you are ready to apply the upgrade to the VEMs. |
Upgrading the VEM Software Using the vCLI
You can upgrade the VEM software by using the vCLI.
-
If you are using vCLI, do the following:
- You have downloaded and installed the VMware vCLI. For information about installing the vCLI, see the VMware vCLI documentation.
-
You are logged in to the remote host where the vCLI is installed.
Note
The vSphere command-line interface (vCLI) command set allows you to enter common system administration commands against ESX/ESXi systems from any machine with network access to those systems. You can also enter most vCLI commands against a vCenter Server system and target any ESX/ESXi system that the vCenter Server system manages. vCLI commands are especially useful for ESXi hosts because ESXi does not include a service console.
- If you are using the esxupdate command, you are logged in to the ESX host.
- Check Cisco Nexus 1000V and VMware Compatibility Information for compatible versions.
- You have already copied the VEM software installation file to the /tmp directory. Do not copy the files to the root (/) folder.
- You know the name of the VEM software file to be installed.
-
vihostupdate
Installs the ESX/ ESXi and VEM software simultaneously if you are using the vCLI.
-
esxupdate
Installs the VEM software from the ESX host /tmp directory. Note You must log in to each host and enter this command. This command loads the software manually on the host, loads the kernel modules, and starts the VEM agent on the running system.
1. [root@serialport -]# cd tmp
2. Determine the upgrade method that you want to use and enter the appropriate command.
3. Enter the appropriate commands as they apply to you.
4. Display values with which to compare to Cisco Nexus 1000V and VMware Compatibility Information by typing the following commands.
5. switch# show module
DETAILED STEPS
| Step 1 |
[root@serialport -]# cd tmp Go to the directory where the new VEM software was copied. |
||
| Step 2 |
Determine the upgrade method that you want to use and enter the appropriate command.
|
||
| Step 3 | Enter the appropriate commands as they apply to you. | ||
| Step 4 | Display values with which to compare to Cisco Nexus 1000V and VMware Compatibility Information by typing the following commands. | ||
| Step 5 |
switch# show module Display that the VEMs were upgraded by entering the command on the VSM. |
If the upgrade was successful, the installation procedure is complete.
[root@serialport -]# cd tmp
[root@serialport tmp]#
esxupdate -b [VMware offline update bundle] update
~ # esxcli software vib install -d /var/log/vmware/VEM500-201306160100-BG-zip
Installation Result
   Message: Operation finished successfully.
   Reboot Required: false
   VIBs Installed: Cisco_bootbank_cisco-vem-v160-esx_4.2.1.2.2.1.0-3.0.1
   VIBs Removed:
   VIBs Skipped:
~ #

~ # esxcli software vib install -v /var/log/vmware/cross_cisco-vem-v160-4.2.1.2.2.1.0-3.0.1.vib
Installation Result
   Message: Operation finished successfully.
   Reboot Required: false
   VIBs Installed: Cisco_bootbank_cisco-vem-v160-esx_4.2.1.2.2.1.0-3.0.1
   VIBs Removed:
   VIBs Skipped:
~ #
[root@serialport tmp]# vmware -v
VMware ESXi 5.0.0 build-843203
root@serialport tmp]# # esxupdate query
------Bulletin ID------- -----Installed----- --------------Summary---------------
VEM500-201306160100 2013-04-21T08:18:22 Cisco Nexus 1000V 4.2(1)SV2(2.1)


[root@host212 ~]# . ~ # vem status -v
Package vssnet-esxmn-release
Version 4.2.1.2.2.1.0-3.0.1
Build 1
Date Sun Apr 21 04:56:14 PDT 2013

VEM modules are loaded
Switch Name      Num Ports   Used Ports  Configured Ports  MTU     Uplinks
vSwitch0         128         4           128               1500    vmnic4
DVS Name         Num Ports   Used Ports  Configured Ports  MTU     Uplinks
p-1              256         19          256               1500    vmnic7,vmnic6,vmnic3,vmnic2,vmnic1,vmnic0
VEM Agent (vemdpa) is running
~ #


[root@host212 ~]# vemcmd show version
vemcmd show version
VEM Version: 4.2.1.2.2.1.0-3.0.1
VSM Version: 4.2(1)SV2(2.1) [build 4.2(1)SV2(2.1)]
System Version: VMware ESXi 5.0.0 Releasebuild-843203

~ #
switch# show module
Mod  Ports  Module-Type                       Model               Status
---  -----  --------------------------------  ------------------  ------------
1    0      Virtual Supervisor Module         Nexus1000V          active *
2    0      Virtual Supervisor Module         Nexus1000V          ha-standby
3    332    Virtual Ethernet Module           NA                  ok
6    248    Virtual Ethernet Module           NA                  ok

Mod  Sw                  Hw
---  ------------------  ------------------------------------------------
1    4.2(1)SV2(2.1)  0.0
2    4.2(1)SV2(2.1)  0.0
3    4.2(1)SV2(2.1)      VMware ESXi 5.0.0 Releasebuild-843203 (3.0)
6    4.2(1)SV2(2.1)      VMware ESXi 5.1.0 Releasebuild-843203 (3.0)


Mod  Server-IP        Server-UUID                           Server-Name
---  ---------------  ------------------------------------  --------------------
1    10.105.232.25    NA                                    NA
2    10.105.232.25    NA                                    NA
3    10.105.232.72    e6c1a563-bc9e-11e0-bd1d-30e4dbc2baba  10.105.232.72
6    10.105.232.70    ecebdf42-bc0e-11e0-bd1d-30e4dbc2b892  10.105.232.70

switch#
Note |
The highlighted text in the previous command output confirms that the upgrade was successful. |
 Feedback